
Knowledgebase (2345)
Children categories
How to split text into two columns and add line between them
2015-05-28 08:51:50 Written by AdministratorColumns are widely used to set page layout, for which could split text into two or more columns so that the text could flow from one column to the next on the same page. Using Spire.Doc, we could achieve this feature and add a line between columns at the same time. This article is going to introduce how to split text into two columns and add line between them.
Note: please download the latest version of Spire.Doc and add Spire.Doc .dll as reference of Visual Studio.
Step 1: Create a new document and load from file
Document document = new Document();
document.LoadFromFile("S.docx");
Step 2: Add a column to section one, set the width of columns and the spacing between columns. Here we set width as 100f and spacing as 20f.
document.Sections[0].AddColumn(100f, 20f);
Step 3: Add a line between the two columns
document.Sections[0].PageSetup.ColumnsLineBetween = true;
Step 4: Save the document and launch to see effects
document.SaveToFile("result.docx",FileFormat.Docx2013);
System.Diagnostics.Process.Start("result.docx");
Before adding the columns:
Effects:

Full Code:
using System;
using System.Collections.Generic;
using System.Linq;
using System.Text;
using Spire.Doc;

namespace Column
{
    class Program
    {
        static void Main(string[] args)
        {
            Document document = new Document();

            document.LoadFromFile("S.docx");

            document.Sections[0].AddColumn(100f, 20f);

            document.Sections[0].PageSetup.ColumnsLineBetween = true;

            document.SaveToFile("result.docx",FileFormat.Docx2013);
            System.Diagnostics.Process.Start("result.docx");

        }
    }
}
Text Box has been widely used in word documents to present additional information to readers. As a powerful and easy to use .NET word component, Spire.Doc has powerful function to work with text box. We have already showed you how to insert text box to word document and extract Text from Text Boxes in Word document. In this article let's see how to remove text box from word document in C#.
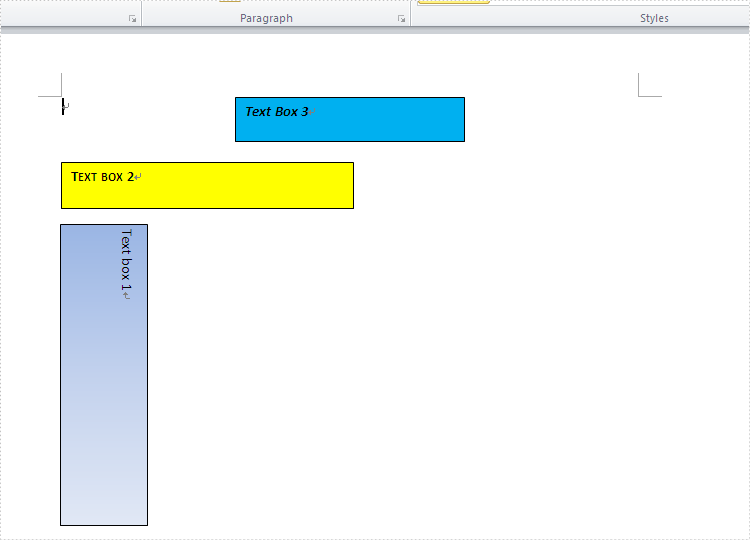
Spire.Doc supports to remove the particular text box or clear all the text boxes from the word documents. We will show you the details as below. Firstly, check the original word document contains three text boxes on it.
Here comes to the steps of how to remove the text box from word document by using the class of TextBoxes.
Step 1: Create a new document and load from file.
Document Doc = new Document();
Doc.LoadFromFile("Sample.docx");
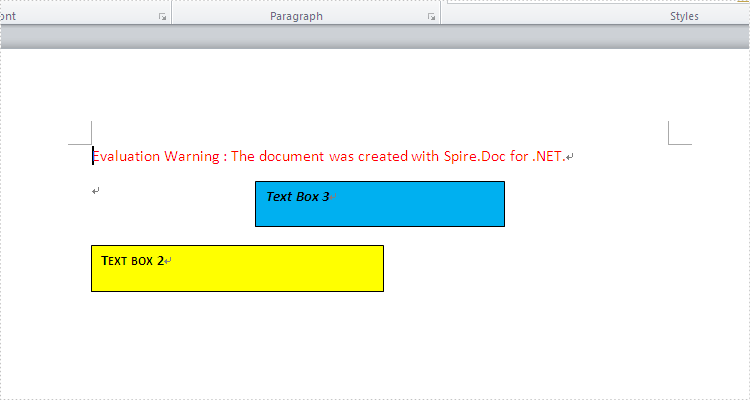
Step 2: Remove the first text box by using the class of TextBoxes.
Doc.TextBoxes.RemoveAt(0);
Step 3: Save and launch the file.
Doc.SaveToFile("result.docx", FileFormat.Docx);
System.Diagnostics.Process.Start("result.docx");
Effective screenshot:
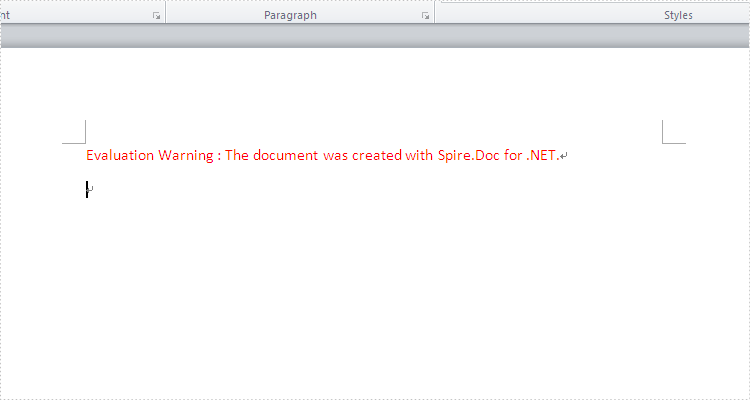
If you want to clear all the text boxes at one time, the following code snippet will fulfill it.
Screenshot after clear all the text boxes:
Doc.TextBoxes.Clear();
Full codes:
namespace Removetextbox
{
    class Program
    {
        static void Main(string[] args)
        {
            Document Doc = new Document();
            Doc.LoadFromFile("Sample.docx");

            Doc.TextBoxes.RemoveAt(0);
            //Doc.TextBoxes.Clear();

            Doc.SaveToFile("result.docx", FileFormat.Docx);
            System.Diagnostics.Process.Start("result.docx");

        }
    }
}
Grid also offers more flexible resizing behavior than Table and lighter weight then a Table. It derives from the Panel element which is best used inside of forms. This article is mainly talk about how to merge cells in grid via Spire.PDF.
Prerequisite:
- Download Spire.PDF for .NET (or Spire.Office for .NET) and install it on your system.
- Add Spire.PDF.dll as reference in the downloaded Bin folder thought the below path: "..\Spire.PDF\Bin\NET4.0\ Spire.PDF.dll".
- Check the codes as below in C#:
Here are the detail steps:
Step 1: Create a new PDF document and add a new page.
PdfDocument doc = new PdfDocument();
PdfPageBase page = doc.Pages.Add();
Step 2: Add a new grid with 5 columns and 2 rows, and set height and width.
PdfGrid grid = new PdfGrid();
grid.Columns.Add(5);
float width = page.Canvas.ClientSize.Width - (grid.Columns.Count + 1);
for (int j = 0; j < grid.Columns.Count;j++)
{
  grid.Columns[j].Width = width * 0.20f;
}

 PdfGridRow row0 = grid.Rows.Add();
 PdfGridRow row1 = grid.Rows.Add();
 float height = 20.0f;
 for (int i = 0; i < grid.Rows.Count; i++)
 {
      grid.Rows[i].Height = height;
 }
Step 3: Draw the current grid.
grid.Draw(page, new PointF(0, 50));
Step 4: Set the font of the grid and fill some content in the cells. Use RowSpan and ColumnSpan to merge certain cells vertically and horizontally.
row0.Style.Font = new PdfTrueTypeFont(new Font("Arial", 16f, FontStyle.Bold), true);
row1.Style.Font = new PdfTrueTypeFont(new Font("Arial", 16f, FontStyle.Italic), true);

row0.Cells[0].Value = "Corporation";
row0.Cells[0].RowSpan = 2;

row0.Cells[1].Value = "B&K Undersea Photo";
row0.Cells[1].StringFormat = new PdfStringFormat(PdfTextAlignment.Center, PdfVerticalAlignment.Middle);
row0.Cells[1].ColumnSpan = 3;

row0.Cells[4].Value = "World";
row0.Cells[4].Style.Font = new PdfTrueTypeFont(new Font("Arial", 10f, FontStyle.Bold | FontStyle.Italic), true);
row0.Cells[4].StringFormat = new PdfStringFormat(PdfTextAlignment.Center, PdfVerticalAlignment.Middle);
row0.Cells[4].Style.BackgroundBrush = PdfBrushes.LightGreen;

row1.Cells[1].Value = "Diving International Unlimited";
row1.Cells[1].StringFormat = new PdfStringFormat(PdfTextAlignment.Center, PdfVerticalAlignment.Middle);
row1.Cells[1].ColumnSpan = 4;
Step 5: Draw the new grid and save the file, the review it.
grid.Draw(page, new PointF(0, 100));

doc.SaveToFile("result.pdf");
System.Diagnostics.Process.Start("result.pdf");
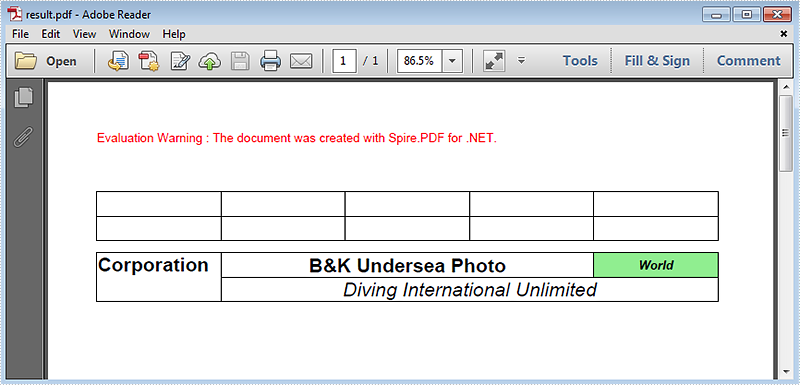
Following is the result screenshot:
Full Code:
using Spire.Pdf;
using Spire.Pdf.Graphics;
using Spire.Pdf.Grid;
using System.Drawing;


namespace MergeCells
{
    class Program
    {
        static void Main(string[] args)
        {
            PdfDocument doc = new PdfDocument();
            PdfPageBase page = doc.Pages.Add();

            PdfGrid grid = new PdfGrid();
            grid.Columns.Add(5);
            float width = page.Canvas.ClientSize.Width - (grid.Columns.Count + 1);
            for (int j = 0; j < grid.Columns.Count; j++)
            {
                grid.Columns[j].Width = width * 0.20f;
            }

            PdfGridRow row0 = grid.Rows.Add();
            PdfGridRow row1 = grid.Rows.Add();
            float height = 20.0f;
            for (int i = 0; i < grid.Rows.Count; i++)
            {
                grid.Rows[i].Height = height;
            }

            grid.Draw(page, new PointF(0, 50));

            row0.Style.Font = new PdfTrueTypeFont(new Font("Arial", 16f, FontStyle.Bold), true);
            row1.Style.Font = new PdfTrueTypeFont(new Font("Arial", 16f, FontStyle.Italic), true);

            row0.Cells[0].Value = "Corporation";
            row0.Cells[0].RowSpan = 2;

            row0.Cells[1].Value = "B&K Undersea Photo";
            row0.Cells[1].StringFormat = new PdfStringFormat(PdfTextAlignment.Center, PdfVerticalAlignment.Middle);
            row0.Cells[1].ColumnSpan = 3;

            row0.Cells[4].Value = "World";
            row0.Cells[4].Style.Font = new PdfTrueTypeFont(new Font("Arial", 10f, FontStyle.Bold | FontStyle.Italic), true);
            row0.Cells[4].StringFormat = new PdfStringFormat(PdfTextAlignment.Center, PdfVerticalAlignment.Middle);
            row0.Cells[4].Style.BackgroundBrush = PdfBrushes.LightGreen;

            row1.Cells[1].Value = "Diving International Unlimited";
            row1.Cells[1].StringFormat = new PdfStringFormat(PdfTextAlignment.Center, PdfVerticalAlignment.Middle);
            row1.Cells[1].ColumnSpan = 4;

            grid.Draw(page, new PointF(0, 100));

            doc.SaveToFile("result.pdf");
            System.Diagnostics.Process.Start("result.pdf");
        }
    }
}
