
Knowledgebase (2417)
Children categories
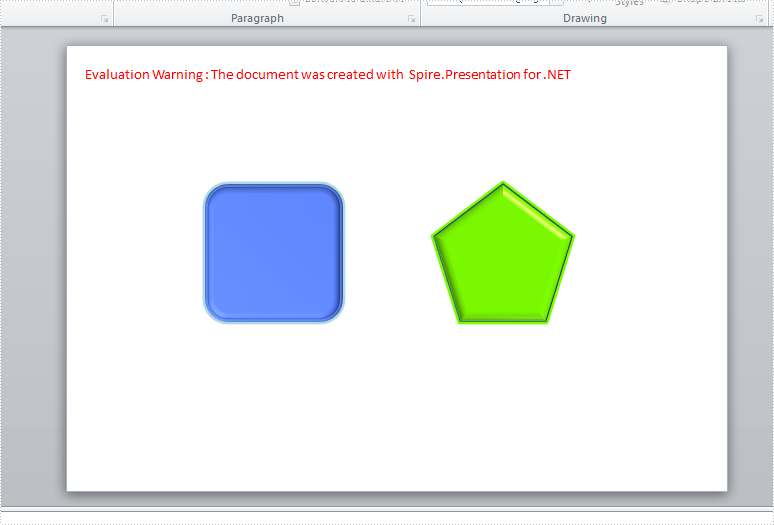
3-D is the abbreviation for three-dimensional. After adding a shape into the slide, we could set its format as 3-D, which looks more fresh and attractive. We could use options like Bevel, Contours, and Surface Material to customize 3-D shapes. This article is going to introduce the method to set 3-D shapes in C# using Spire.Presentation.
Note: before start, please download the latest version of Spire.Presentation and add the .dll in the bin folder as the reference of Visual Studio.
Step 1: Create a new presentation document.
Presentation presentation = new Presentation();
Step 2: Add shape1 and fill it with color.
IAutoShape shape1 = presentation.Slides[0].Shapes.AppendShape(ShapeType.RoundCornerRectangle, new RectangleF(150, 150, 150, 150));
shape1.Fill.FillType = FillFormatType.Solid;
shape1.Fill.SolidColor.KnownColor = KnownColors.RoyalBlue;
Step 3: Initialize a new instance of the 3-D class for shape1 and set its properties.
            ShapeThreeD Demo1 = shape1.ThreeD.ShapeThreeD;
            Demo1.PresetMaterial = PresetMaterialType.Powder;
            Demo1.TopBevel.PresetType = BevelPresetType.ArtDeco;
            Demo1.TopBevel.Height = 4;
            Demo1.TopBevel.Width = 12;
            Demo1.BevelColorMode = BevelColorType.Contour;
            Demo1.ContourColor.KnownColor = KnownColors.LightBlue;
            Demo1.ContourWidth = 3.5;
Step 4: Set 3-D format for shape2 as comparison.
IAutoShape shape2 = presentation.Slides[0].Shapes.AppendShape(ShapeType.Pentagon, new RectangleF(400, 150, 150, 150));
           shape2.Fill.FillType = FillFormatType.Solid;
           shape2.Fill.SolidColor.KnownColor = KnownColors.LawnGreen;
           ShapeThreeD Demo2 = shape2.ThreeD.ShapeThreeD;
           Demo2.PresetMaterial = PresetMaterialType.SoftEdge;
           Demo2.TopBevel.PresetType = BevelPresetType.SoftRound;
           Demo2.TopBevel.Height = 12;
           Demo2.TopBevel.Width = 12;
           Demo2.BevelColorMode = BevelColorType.Contour;
           Demo2.ContourColor.KnownColor = KnownColors.LawnGreen;
           Demo2.ContourWidth = 5;
Step 5: Save the document and launch to see effects.
           presentation.SaveToFile("result.pptx", FileFormat.Pptx2010);
           System.Diagnostics.Process.Start("result.pptx");
Effects:
Full Codes:
using System;
using System.Collections.Generic;
using System.Linq;
using System.Text;
using Spire.Presentation;
using Spire.Presentation.Drawing;
using System.Drawing;

namespace test
{
    class Program
    {
        static void Main(string[] args)
        {

            Presentation presentation = new Presentation();

            IAutoShape shape1 = presentation.Slides[0].Shapes.AppendShape(ShapeType.RoundCornerRectangle, new RectangleF(150, 150, 150, 150));
            shape1.Fill.FillType = FillFormatType.Solid;
            shape1.Fill.SolidColor.KnownColor = KnownColors.RoyalBlue;
            ShapeThreeD Demo1 = shape1.ThreeD.ShapeThreeD;
            Demo1.PresetMaterial = PresetMaterialType.Powder;
            Demo1.TopBevel.PresetType = BevelPresetType.ArtDeco;
            Demo1.TopBevel.Height = 4;
            Demo1.TopBevel.Width = 12;
            Demo1.BevelColorMode = BevelColorType.Contour;
            Demo1.ContourColor.KnownColor = KnownColors.LightBlue;
            Demo1.ContourWidth = 3.5;

            IAutoShape shape2 = presentation.Slides[0].Shapes.AppendShape(ShapeType.Pentagon, new RectangleF(400, 150, 150, 150));
            shape2.Fill.FillType = FillFormatType.Solid;
            shape2.Fill.SolidColor.KnownColor = KnownColors.LawnGreen;
            ShapeThreeD Demo2 = shape2.ThreeD.ShapeThreeD;
            Demo2.PresetMaterial = PresetMaterialType.SoftEdge;
            Demo2.TopBevel.PresetType = BevelPresetType.SoftRound;
            Demo2.TopBevel.Height = 12;
            Demo2.TopBevel.Width = 12;
            Demo2.BevelColorMode = BevelColorType.Contour;
            Demo2.ContourColor.KnownColor = KnownColors.LawnGreen;
            Demo2.ContourWidth = 5;

            presentation.SaveToFile("result.pptx", FileFormat.Pptx2010);
            System.Diagnostics.Process.Start("result.pptx");
        }
    }
}
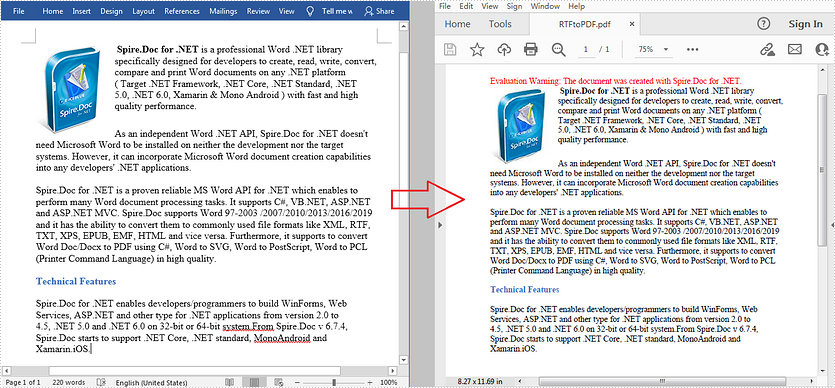
RTF (Rich Text Format) is a cross-platform document developed by Microsoft in the 1980s. RTF can be opened by most word processors, and it is also convenient for editing. But when it comes to sharing and printing documents in daily work, it’s more recommended to convert the RTF to PDF for further processing. In this article, you will learn how to convert RTF to PDF programmatically using Spire.Doc for .NET.
Install Spire.Doc for .NET
To begin with, you need to add the DLL files included in the Spire.Doc for .NET package as references in your .NET project. The DLL files can be either downloaded from this link or installed via NuGet.
PM> Install-Package Spire.Doc
Convert RTF to PDF in C# and VB.NET
Spire.Doc for .NET enables you to directly load a file with .rtf extension and then convert it to PDF with only three lines of code. The detailed steps are as follows.
- Create a Document instance.
- Load a sample RTF document using Document.LoadFromFile() method.
- Save the document as a PDF file using Document.SaveToFile() method.
- C#
- VB.NET
using Spire.Doc;

namespace RTFtoPDF
{
    class Program
    {
        static void Main(string[] args)
        {
            //Create a Document instance
            Document doc = new Document();

            //Load a sample RTF document
            doc.LoadFromFile("sample.rtf", FileFormat.Rtf);

            //Save it to PDF
            doc.SaveToFile("RTFtoPDF.pdf", FileFormat.PDF);
        }
    }
}
Apply for a Temporary License
If you'd like to remove the evaluation message from the generated documents, or to get rid of the function limitations, please request a 30-day trial license for yourself.
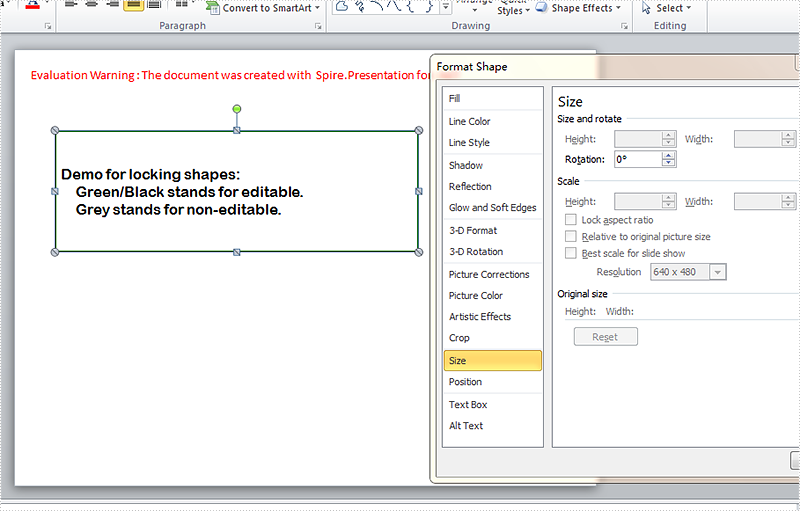
After finishing designs of shapes in slides, accidental changes might happen if we haven't made necessary protecting settings. Locking shapes from being selected firstly or preventing changes to shape attributes (like size, position, rotation etc.) can be used to prevent changes to shapes. It's necessary to mention that Spire.Presentation supports the features to prevent changes to shapes. This article is going to introduce how to prevent or allow changes to shapes in C# using Spire.Presentation.
Note: before start, please download the latest version of Spire.Presentation and add the .dll in the bin folder as the reference of Visual Studio.
Step 1: create a presentation file and add a sample shape.
Presentation presentation = new Presentation();
            IAutoShape shape = presentation.Slides[0].Shapes.AppendShape(ShapeType.Rectangle, new RectangleF(50, 100, 450, 150));
Step 2: format the sample shape.
            shape.Fill.FillType = FillFormatType.None;
            shape.ShapeStyle.LineColor.Color = Color.DarkGreen;
            shape.TextFrame.Paragraphs[0].Alignment = TextAlignmentType.Justify;
            shape.TextFrame.Text = "Demo for locking shapes:\n    Green/Black stands for editable.\n    Grey points stands for non-editable.";
            shape.TextFrame.Paragraphs[0].TextRanges[0].LatinFont = new TextFont("Arial Rounded MT Bold");
            shape.TextFrame.Paragraphs[0].TextRanges[0].Fill.FillType = FillFormatType.Solid;
            shape.TextFrame.Paragraphs[0].TextRanges[0].Fill.SolidColor.Color = Color.Black;
Step 3: set which operations are disabled on the shape to prevent changes. Here the selection and rotation changing of the shape are allowed while the changes of size, position, shape type, text, rotation, handles, and aspect ratio are not allowed.
            shape.Locking.RotationProtection = false;
            shape.Locking.SelectionProtection = false;
            shape.Locking.ResizeProtection = true;
            shape.Locking.PositionProtection = true;
            shape.Locking.ShapeTypeProtection = true;
            shape.Locking.AspectRatioProtection = true;
            shape.Locking.TextEditingProtection = true;
            shape.Locking.AdjustHandlesProtection = true;
Step 4: save the document and launch to see effects.
            presentation.SaveToFile("result.pptx", FileFormat.Pptx2010);
            System.Diagnostics.Process.Start("result.pptx");
Effects:
Full codes:
using System;
using System.Collections.Generic;
using System.Linq;
using System.Text;
using Spire.Presentation;
using Spire.Presentation.Drawing;
using System.Drawing;

namespace test
{
    class Program
    {
        static void Main(string[] args)
        {

            Presentation presentation = new Presentation();
            IAutoShape shape = presentation.Slides[0].Shapes.AppendShape(ShapeType.Rectangle, new RectangleF(50, 100, 450, 150));

            shape.Fill.FillType = FillFormatType.None;
            shape.ShapeStyle.LineColor.Color = Color.DarkGreen;
            shape.TextFrame.Paragraphs[0].Alignment = TextAlignmentType.Justify;
            shape.TextFrame.Text = "Demo for locking shapes:\n    Green/Black stands for editable.\n    Grey stands for non-editable.";
            shape.TextFrame.Paragraphs[0].TextRanges[0].LatinFont = new TextFont("Arial Rounded MT Bold");
            shape.TextFrame.Paragraphs[0].TextRanges[0].Fill.FillType = FillFormatType.Solid;
            shape.TextFrame.Paragraphs[0].TextRanges[0].Fill.SolidColor.Color = Color.Black;

            shape.Locking.RotationProtection = false;
            shape.Locking.SelectionProtection = false;
            shape.Locking.ResizeProtection = true;
            shape.Locking.PositionProtection = true;
            shape.Locking.ShapeTypeProtection = true;
            shape.Locking.AspectRatioProtection = true;
            shape.Locking.TextEditingProtection = true;
            shape.Locking.AdjustHandlesProtection = true;

            presentation.SaveToFile("result.pptx", FileFormat.Pptx2010);
            System.Diagnostics.Process.Start("result.pptx");
        }
    }
}
