
Knowledgebase (2417)
Children categories
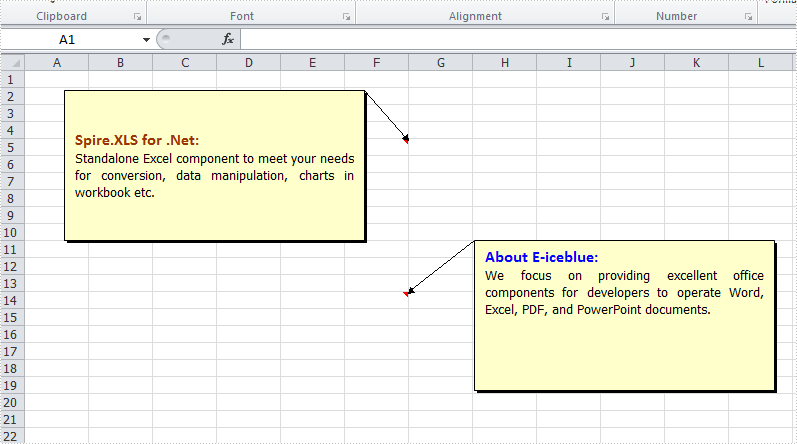
Excel comments are used to add notes to individual cells and it works well to give the reader extra information for the data in the cells. There are articles to show how to add, change comments in Excel using Spire.XLS. This article is going to introduce the method to set the position and text alignment of Excel comments in C# using Spire.XLS.
Note: before start, please download the latest version of Spire.XLS and add the reference in the bin folder as the reference of Visual Studio.
Step 1: Create a new workbook and add a sheet.
            Workbook workbook = new Workbook();
            Worksheet sheet = workbook.Worksheets[0];
Step 2: Set two font styles which will be used in comments.
            ExcelFont font1 = workbook.CreateFont();
            font1.FontName = "Calibri";
            font1.Color = Color.Firebrick;
            font1.IsBold = true;
            font1.Size = 12;
            ExcelFont font2 = workbook.CreateFont();
            font2.FontName = "Calibri";
            font2.Color = Color.Blue;
            font2.Size = 12;
            font2.IsBold = true;
Step 3: Add comment 1 and set its size, text, position and alignment.
            ExcelComment Comment1 = sheet.Range["F5"].Comment;
            Comment1.IsVisible = true;
            Comment1.Height = 150;
            Comment1.Width = 300;
            Comment1.RichText.Text = "Spire.XLS for .Net:\nStandalone Excel component to meet your needs for conversion, data manipulation, charts in workbook etc. ";
            Comment1.RichText.SetFont(0, 19, font1);
            Comment1.TextRotation = TextRotationType.LeftToRight;
            //set the position of Comment
            Comment1.Top = 20;
            Comment1.Left = 40;
            //set the alignment of text in Comment
            Comment1.VAlignment = CommentVAlignType.Center;
            Comment1.HAlignment = CommentHAlignType.Justified;
Step 4: Add comment2 and set its size, text, position and alignment for comparison.
            ExcelComment Comment2= sheet.Range["F14"].Comment;
            Comment2.IsVisible = true;
            Comment2.Height = 150;
            Comment2.Width = 300;
            Comment2.RichText.Text = "About E-iceblue: \nWe focus on providing excellent office components for developers to operate Word, Excel, PDF, and PowerPoint documents.";
            Comment2.TextRotation = TextRotationType.LeftToRight;
            Comment2.RichText.SetFont(0, 16, font2);
            Comment2.Top = 170;
            Comment2.Left = 450;
            Comment2.VAlignment = CommentVAlignType.Top;
            Comment2.HAlignment = CommentHAlignType.Justified;
Step 5: Save the document and launch to see effect.
            workbook.SaveToFile("S3.xlsx", ExcelVersion.Version2010);
            System.Diagnostics.Process.Start("S3.xlsx");
Effects:
Full Codes:
using System;
using System.Collections.Generic;
using System.Linq;
using System.Text;
using Spire.Xls;
using System.Drawing;

namespace How_to_set_Excel_margin_to_print
{
    class Program
    {
        static void Main(string[] args)
        {
            Workbook workbook = new Workbook();
            Worksheet sheet = workbook.Worksheets[0];

            ExcelFont font1 = workbook.CreateFont();
            font1.FontName = "Calibri";
            font1.Color = Color.Firebrick;
            font1.IsBold = true;
            font1.Size = 12;
            ExcelFont font2 = workbook.CreateFont();
            font2.FontName = "Calibri";
            font2.Color = Color.Blue;
            font2.Size = 12;
            font2.IsBold = true;

            ExcelComment Comment1 = sheet.Range["F5"].Comment;
            Comment1.IsVisible = true;
            Comment1.Height = 150;
            Comment1.Width = 300;
            Comment1.RichText.Text = "Spire.XLS for .Net:\nStandalone Excel component to meet your needs for conversion, data manipulation, charts in workbook etc. ";
            Comment1.RichText.SetFont(0, 19, font1);
            Comment1.TextRotation = TextRotationType.LeftToRight;
            Comment1.Top = 20;
            Comment1.Left = 40;
            Comment1.VAlignment = CommentVAlignType.Center;
            Comment1.HAlignment = CommentHAlignType.Justified;

            ExcelComment Comment2= sheet.Range["F14"].Comment;
            Comment2.IsVisible = true;
            Comment2.Height = 150;
            Comment2.Width = 300;
            Comment2.RichText.Text = "About E-iceblue: \nWe focus on providing excellent office components for developers to operate Word, Excel, PDF, and PowerPoint documents.";
            Comment2.TextRotation = TextRotationType.LeftToRight;
            Comment2.RichText.SetFont(0, 16, font2);
            Comment2.Top = 170;
            Comment2.Left = 450;
            Comment2.VAlignment = CommentVAlignType.Top;
            Comment2.HAlignment = CommentHAlignType.Justified;

            workbook.SaveToFile("S3.xlsx", ExcelVersion.Version2010);
            System.Diagnostics.Process.Start("S3.xlsx");
        }
    }
}
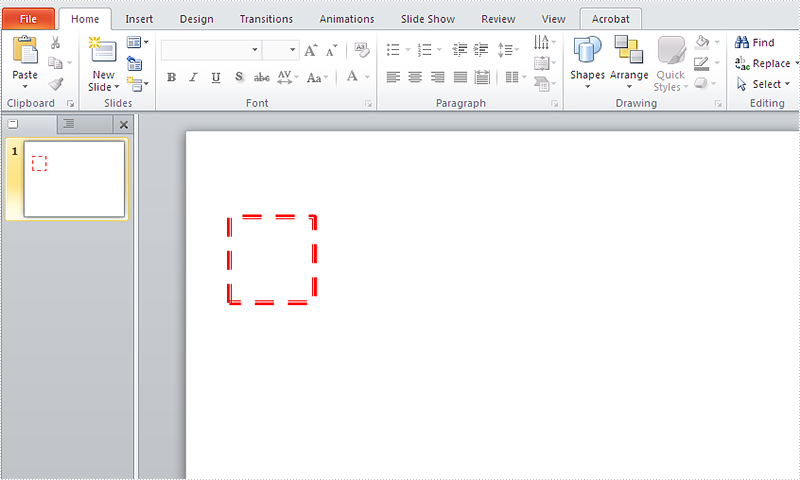
With Spire.Presentation for .NET, developers can add different shapes to slides in C#. We can also use Spire.Presentation to formatting the lines of shape, such as the style, width, dash style and color of the line, etc. This article will show you how to set the format for the shape lines in C#. We will use rectangle for example. Here comes to the code snippet:
Step 1: Create a PPT document.
Presentation presentation = new Presentation();
Step 2: Add a rectangle shape to the slide.
IAutoShape shape = presentation.Slides[0].Shapes.AppendShape(ShapeType.Rectangle, new RectangleF(50, 100, 100, 100));
Step 3: Set the fill color of the rectangle shape.
shape.Fill.FillType = FillFormatType.Solid;
shape.Fill.SolidColor.Color = Color.White;
Step 4: Apply some formatting on the line of the rectangle.
shape.Line.Style = TextLineStyle.ThickThin;
shape.Line.Width = 5;
shape.Line.DashStyle = LineDashStyleType.Dash;
Step 5: Set the color of the line of the rectangle.
shape.ShapeStyle.LineColor.Color = Color.Red;
Step 6: Save the document to file.
presentation.SaveToFile("shape.pptx", FileFormat.Pptx2010);
Effective screenshot:
Full codes:
using Spire.Presentation;
using Spire.Presentation.Drawing;
using System.Drawing;

namespace SetFormat
{

    class Program
    {

        static void Main(string[] args)
        {
            Presentation presentation = new Presentation();

            IAutoShape shape = presentation.Slides[0].Shapes.AppendShape(ShapeType.Rectangle, new RectangleF(50, 100, 100, 100));

            shape.Fill.FillType = FillFormatType.Solid;
            shape.Fill.SolidColor.Color = Color.White;

            shape.Line.Style = TextLineStyle.ThickThin;
            shape.Line.Width = 5;
            shape.Line.DashStyle = LineDashStyleType.Dash;

            shape.ShapeStyle.LineColor.Color = Color.Red;

            presentation.SaveToFile("shape.pptx", FileFormat.Pptx2010);

        }
    }
}
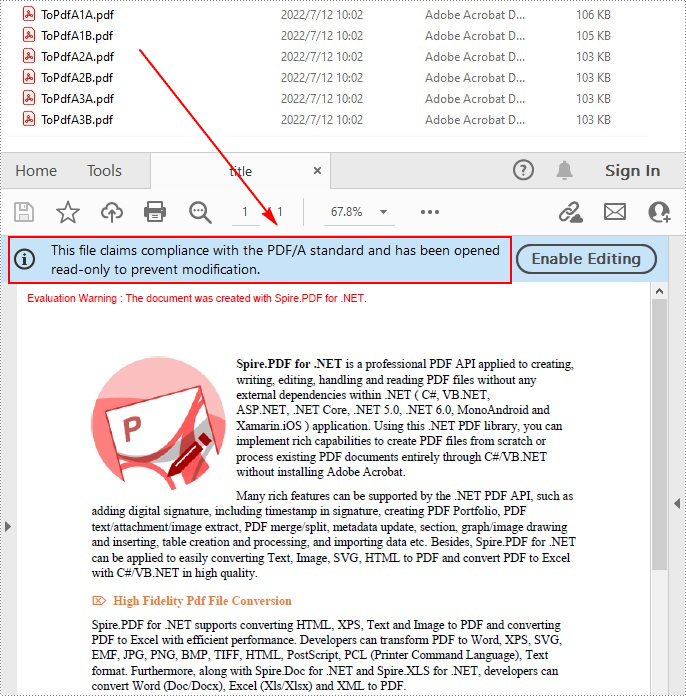
PDF/A is an ISO-standardized version of PDF that supports archiving of files for future use. Documents in PDF/A format can be reproduced in exactly the same way regardless of the software used. Due to its advantages in long-term preservation of digital documents, it may sometimes be necessary to convert PDF to PDF/A. In this article, you will learn how to programmatically convert PDF to PDF/A-1A, 2A, 3A, 1B, 2B and 3B compliant PDF using Spire.PDF for .NET.
Install Spire.PDF for .NET
To begin with, you need to add the DLL files included in the Spire.PDF for.NET package as references in your .NET project. The DLLs files can be either downloaded from this link or installed via NuGet.
PM> Install-Package Spire.PDF
Convert PDF to PDF/A
The detailed steps are as follows.
- Specify the input file path and output folder
- Create a PdfStandardsConverter instance and pass in the input file as a parameter.
- Convert the input file to PdfA1A conformance level using PdfStandardsConverter.ToPdfA1A() method.
- Convert the input file to PdfA1B conformance level using PdfStandardsConverter.ToPdfA1B() method.
- Convert the input file to PdfA2A conformance level using PdfStandardsConverter.ToPdfA2A() method.
- Convert the input file to PdfA2B conformance level using PdfStandardsConverter.ToPdfA2B() method.
- Convert the input file to PdfA3A conformance level using PdfStandardsConverter.ToPdfA3A() method.
- Convert the input file to PdfA3B conformance level using PdfStandardsConverter.ToPdfA3B() method.
- C#
- VB.NET
using System;
using Spire.Pdf.Conversion;

namespace ConvertPdf2Pdfa
{
    class Program
    {
        static void Main(string[] args)
        {
            //Specify input file path
            String inputFile = @"C:\Users\Administrator\Desktop\sample.pdf";

            //Specify output folder
            String outputFolder = @"C:\Users\Administrator\Desktop\Output\";

            //Create a PdfStandardsConverter instance, passing in the input file as a parameter
            PdfStandardsConverter converter = new PdfStandardsConverter(inputFile);

            //Convert to PdfA1A
            converter.ToPdfA1A(outputFolder + "ToPdfA1A.pdf");

            //Convert to PdfA1B
            converter.ToPdfA1B(outputFolder + "ToPdfA1B.pdf");

            //Convert to PdfA2A
            converter.ToPdfA2A(outputFolder + "ToPdfA2A.pdf");

            //Convert to PdfA2B
            converter.ToPdfA2B(outputFolder + "ToPdfA2B.pdf");

            //Convert to PdfA3A
            converter.ToPdfA3A(outputFolder + "ToPdfA3A.pdf");

            //Convert to PdfA3B
            converter.ToPdfA3B(outputFolder + "ToPdfA3B.pdf");
        }
    }
}
Apply for a Temporary License
If you'd like to remove the evaluation message from the generated documents, or to get rid of the function limitations, please request a 30-day trial license for yourself.
