
Knowledgebase (2345)
Children categories
Why we convert PDF to image?
- PDF requires an external application like Adobe Acrobat Reader while image does not.
- Browsers have the built-in capability to display images while handling PDF documents requires an external application or plug-in.
So, in some specific cases converting your PDF documents to an image format like PNG or JPEG could be the solution we are looking for.
How to convert PDF to image in WPF?
For developers, we can easily render PDF pages to images with high quality by using Spire.PDF for WPF, which is a professional PDF component providing tons of useful methods to manipulate PDF document in your WPF applications. Now, follow the below steps to achieve this purpose.
Detailed steps:
Step 1: Create a new project by choosing WPF Application in Visual Studio, add a button in MainWindow, double click the button to write code.
    public partial class MainWindow : Window
    {
        public MainWindow()
        {
            InitializeComponent();
        }

        private void button1_Click(object sender, RoutedEventArgs e)
        {

        }
}
Step 2: Create a new instance of Spire.Pdf.Document and load the sample PDF file.
PdfDocument pdf = new PdfDocument();
pdf.LoadFromFile("sample.pdf");
Step 3: To convert PDF to image, we need firstly save PDF pages as BitmapSource by calling the method pdf.SaveAsImage, then convert BitmapSource to Bitmap, then save the Bitmap as image with a specified format using Image.Save().
               BitmapSource source;
            Bitmap bmp;

            for(int i=0;i<pdf.Pages.Count;i++)
            {
                source = pdf.SaveAsImage(i);
                bmp = SourceToBitmap(source);
                bmp.Save(string.Format("result-{0}.png", i), ImageFormat.Png);
            }
        }

        private Bitmap SourceToBitmap(BitmapSource source)
        {
            Bitmap bmp;
            using (MemoryStream ms = new MemoryStream())
            {
                PngBitmapEncoder encoder = new PngBitmapEncoder();
                encoder.Frames.Add(BitmapFrame.Create(source));
                encoder.Save(ms);
                bmp = new Bitmap(ms);
            }
            return bmp;
        }
Output of the first page:

Full code:
using Spire.Pdf;

namespace ConvertPdfToImage
{
    ///
    /// Interaction logic for MainWindow.xaml
    ///
    public partial class MainWindow : Window
    {
        public MainWindow()
        {
            InitializeComponent();
        }

        private void button1_Click(object sender, RoutedEventArgs e)
        {
            PdfDocument pdf = new PdfDocument();
            pdf.LoadFromFile("1.pdf");

            BitmapSource source;
            Bitmap bmp;

            for(int i=0;i<pdf.Pages.Count;i++)
            {
                source = pdf.SaveAsImage(i);
                bmp = SourceToBitmap(source);
                bmp.Save(string.Format("result-{0}.png", i), ImageFormat.Png);
            }
        }

        private Bitmap SourceToBitmap(BitmapSource source)
        {
            Bitmap bmp;
            using (MemoryStream ms = new MemoryStream())
            {
                PngBitmapEncoder encoder = new PngBitmapEncoder();
                encoder.Frames.Add(BitmapFrame.Create(source));
                encoder.Save(ms);
                bmp = new Bitmap(ms);
            }
            return bmp;
        }

    }
}
How to fill the table cell with color in PowerPoint document in C#
2014-10-13 08:24:52 Written by KoohjiA table provides a visual grouping of information and gives more convenience for writer to modify and query data in table. In particular when you have a table with colorful cells, your document would be more attractive. With the help of Spire.Presentation, developers can easily add tables and set table styles in PowerPoint document. This tutorial shows you how to fill the table cells with color in C#.
Step 1: Create a presentation document and load the file from disk.
Presentation presentation = new Presentation();
presentation.LoadFromFile("sample.pptx");
Step 2: Fill the table cell with color. You can fill all the cells or only fill one single row of cell in table with color.
foreach (TableRow row in table.TableRows)
  {
     foreach (Cell cell in row)
    {
      cell.FillFormat.FillType = FillFormatType.Solid;
      cell.FillFormat.SolidColor.Color = Color.Green;
     }
  }
Step 3: Save the presentation documents to file.
presentation.SaveToFile("result.pptx", FileFormat.Pptx2010);
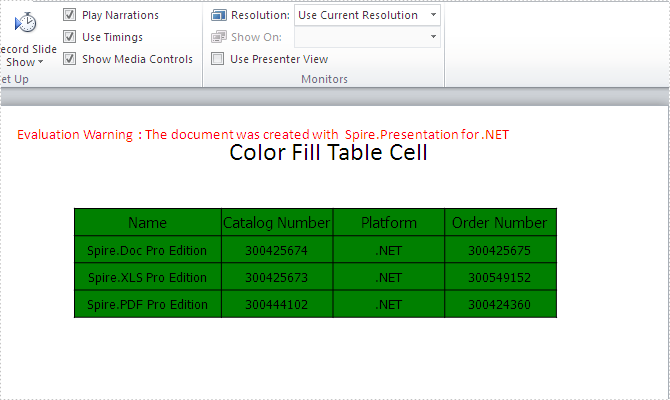
Effective screenshot for fill the color in all the table cells:
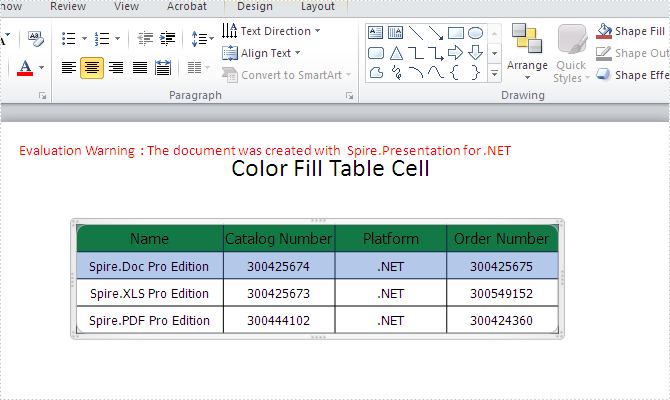
Effective screenshot for fill the color for the first row of table cell:
Full codes:
using System;
using System.Collections.Generic;
using System.Linq;
using System.Text;
using Spire.Presentation;
using Spire.Presentation.Drawing;
using System.Drawing;

namespace colorfilltablecell
{
    class Program
    {
        static void Main(string[] args)
        {
            Presentation presentation = new Presentation();
            presentation.LoadFromFile("sample.pptx");
            ITable table = null;
            foreach (IShape shape in presentation.Slides[0].Shapes)
            {
                if (shape is ITable)
                {
                    table = (ITable)shape;

                    foreach (TableRow row in table.TableRows)

                    {
                        //TableRow row = table.TableRows[0];
                        foreach (Cell cell in row)
                        {
                            cell.FillFormat.FillType = FillFormatType.Solid;
                            cell.FillFormat.SolidColor.Color = Color.Green;
                        }
                    }
                }
            }
            presentation.SaveToFile("result.pptx", FileFormat.Pptx2010);
        }
    }
}
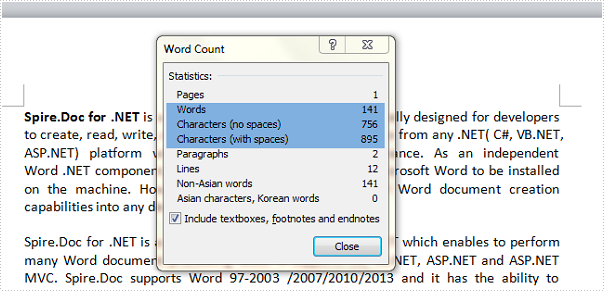
When you type in a document, Word automatically counts the number of pages and words in your document and displays them on the status bar – Word Count, at the bottom of the workspace. But how can we get the number of words, characters in an existing Word document through programming? This article aims to give you a simple solution offered by Spire.Doc.
Test file:
Detailed Steps for Getting the Number of Words and Characters
Step 1: Create a new instance of Spire.Doc.Document class and load the test file.
Document doc = new Document();
doc.LoadFromFile("test.docx", FileFormat.Docx2010);
Step 2: Display the number of words, characters including or excluding spaces on console.
Console.WriteLine("CharCount: " + doc.BuiltinDocumentProperties.CharCount);
Console.WriteLine("CharCountWithSpace: " + doc.BuiltinDocumentProperties.CharCountWithSpace);
Console.WriteLine("WordCount: " + doc.BuiltinDocumentProperties.WordCount);
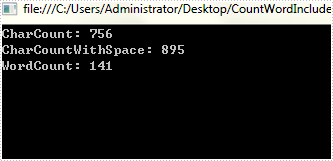
Output:
Full Code:
using Spire.Doc;
using System;
namespace CountNumber
{
    class Program
    {
        static void Main(string[] args)
        {
            Document doc = new Document();
            doc.LoadFromFile("test.docx", FileFormat.Docx2010);
            Console.WriteLine("CharCount: " + doc.BuiltinDocumentProperties.CharCount);
            Console.WriteLine("CharCountWithSpace: " + doc.BuiltinDocumentProperties.CharCountWithSpace);
            Console.WriteLine("WordCount: " + doc.BuiltinDocumentProperties.WordCount);
            Console.ReadKey();
        }
    }
}
Imports Spire.Doc
Namespace CountNumber
	Class Program
		Private Shared Sub Main(args As String())
			Dim doc As New Document()
			doc.LoadFromFile("test.docx", FileFormat.Docx2010)
			Console.WriteLine("CharCount: " + doc.BuiltinDocumentProperties.CharCount)
			Console.WriteLine("CharCountWithSpace: " + doc.BuiltinDocumentProperties.CharCountWithSpace)
			Console.WriteLine("WordCount: " + doc.BuiltinDocumentProperties.WordCount)
			Console.ReadKey()
		End Sub
	End Class
End Namespace
