
Knowledgebase (2345)
Children categories
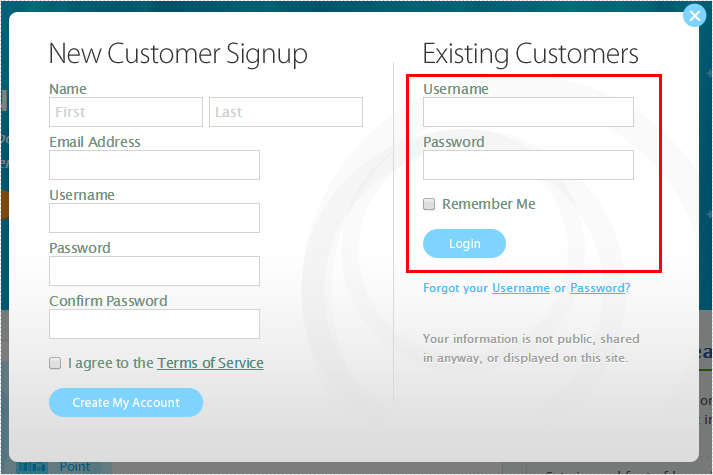
If you want to get invoice of your order, please follow the below steps:
Step 1: Login to E-iceblue website with your purchased account information.
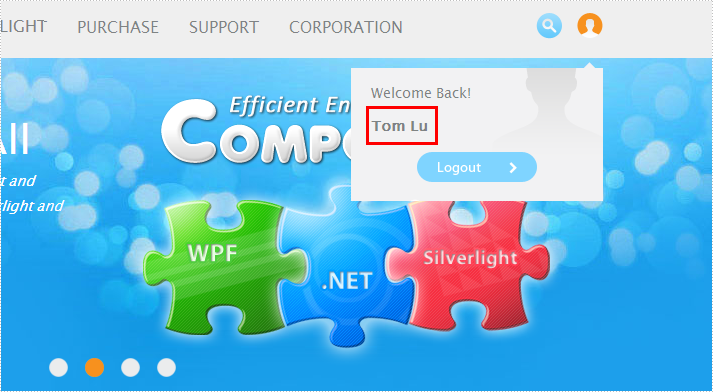
Step 2: Go to "User Information" page by clicking your username.
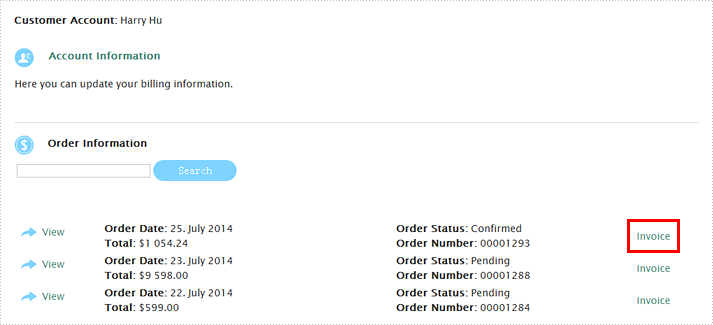
Step 3: At the Order information area, click "Invoice" and then you will get your invoice in PDF format.
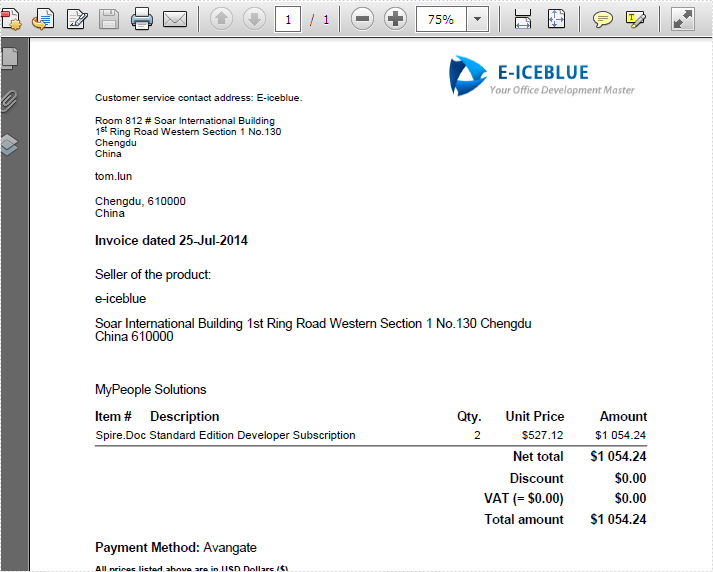
Step 4: Invoice Sample.
If you need any changes on the invoice, please get back to sales@e-iceblue.com for updates. We will help you update it manually.
When creating a spreadsheet, you can adjust the layout and appearance of it by setting the row height and column width. Microsoft Excel provides users with various methods to modify column width and row height, such as dragging the boundaries of columns or rows to the desired size, or entering specific values in the column width box or row height box. However, it is crucial for developers to understand how to achieve this functionality through programming. In this article, we will show you how to set row height and column width in Excel by using Spire.XLS for .NET.
Install Spire.XLS for .NET
To begin with, you need to add the DLL files included in the Spire.XLS for.NET package as references in your .NET project. The DLLs files can be either downloaded from this link or installed via NuGet.
PM> Install-Package Spire.XLS
Set the Row Height in Excel
Spire.XLS for .NET supports users to set the row height programmatically by calling Worksheet.SetRowHeight() method. The following are detailed steps.
- Create an object of Workbook class.
- Load a sample file using Workbook.LoadFromFile() method.
- Get the first sheet from this file by using Workbook.Worksheets[] property.
- Set the height of the first row by calling Worksheet.SetRowHeight() method.
- Save the result file using Workbook.SaveToFile() method.
- C#
- VB.NET
using Spire.Xls;
namespace SetExcelRow
{
    class Program
    {

        static void Main(string[] args)
        {
            //Create an object of  Workbook class
            Workbook workbook = new Workbook();

            //Load a sample file from disk
            workbook.LoadFromFile(@"sample.xlsx");

            //Get the first worksheet from the sample file
            Worksheet sheet = workbook.Worksheets[0];

            //Set the row height of the first row
            sheet.SetRowHeight(1, 25);

            //Save the result file
            workbook.SaveToFile("SetRow.xlsx", ExcelVersion.Version2013);
            workbook.Dispose();
        }
    }
}
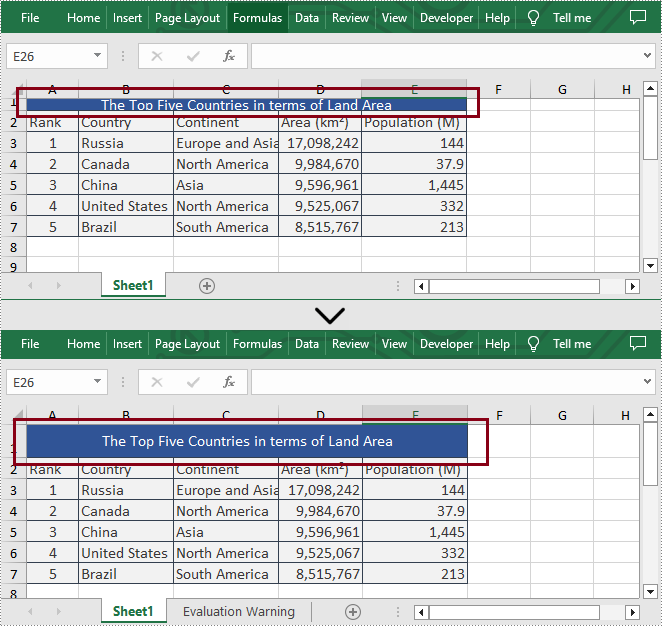
Set the Column Width in Excel
What's more, Spire.XLS for .NET also enable users to set the column width in Excel programmatically by calling Worksheet.SetColumnWidth() method. The following are detailed steps.
- Create an object of Workbook class.
- Load a sample file using Workbook.LoadFromFile() method.
- Get the first sheet from this file by using Workbook.Worksheets[] property.
- Set the width of the fourth column by calling Worksheet.SetColumnWidth() method.
- Save the result file using Workbook.SaveToFile() method.
- C#
- VB.NET
using Spire.Xls;
namespace SetExcelColumn
{
    class Program
    {

        static void Main(string[] args)
        {
            //Create an object of  Workbook class
            Workbook workbook = new Workbook();

            //Load a sample file from disk
            workbook.LoadFromFile(@"sample.xlsx");

            //Get the first worksheet from the sample file
            Worksheet sheet = workbook.Worksheets[0];

            //Set the column width of the fourth column
            sheet.SetColumnWidth(4, 15);

            //Save the result file
            workbook.SaveToFile("SetColumn.xlsx", ExcelVersion.Version2013);
            workbook.Dispose();
        }
    }
}

Apply for a Temporary License
If you'd like to remove the evaluation message from the generated documents, or to get rid of the function limitations, please request a 30-day trial license for yourself.
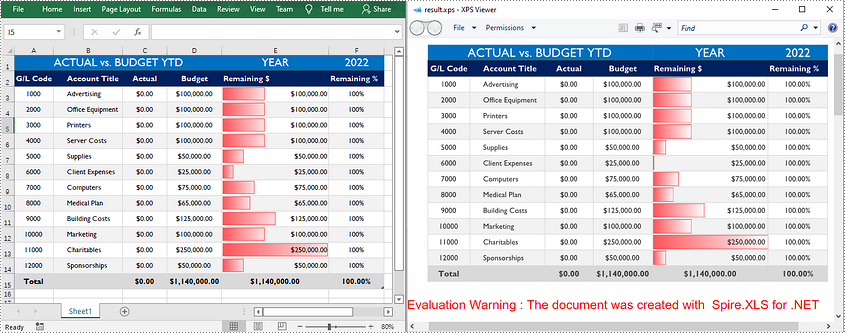
XPS (XML Paper Specification) is a specification for a page description language and a fixed-document format developed by Microsoft. It defines the layout of a document and the visual appearance of each page. Sometimes you may need to convert an Excel document to XPS for distribution, archiving or printing purposes, and this article will demonstrate how to accomplish this task programmatically using Spire.XLS for .NET.
Install Spire.XLS for .NET
To begin with, you need to add the DLL files included in the Spire.XLS for .NET package as references in your .NET project. The DLL files can be either downloaded from this link or installed via NuGet.
PM> Install-Package Spire.XLS
Convert Excel to XPS
Spire.XLS for .NET allows you to convert Excel (.xls/ .xlsx) to XPS with only three lines of code. The detailed steps are as follows.
- Create a Workbook object.
- Load a sample Excel document using Workbook.LoadFromFile() method.
- Convert the Excel document to XPS using Workbook.SaveToFile(String, FileFormat) method.
- C#
- VB.NET
using Spire.Xls;

namespace ExceltoXPS
{
    class Program
    {
        static void Main(string[] args)
        {

            //Create a Workbook object.
            Workbook workbook = new Workbook();

            //Load a sample Excel document
            workbook.LoadFromFile(@"E:\Files\\sample0.xlsx", ExcelVersion.Version2010);

            //Convert the document to XPS
            workbook.SaveToFile("result.xps", FileFormat.XPS);
        }
    }
}
Apply for a Temporary License
If you'd like to remove the evaluation message from the generated documents, or to get rid of the function limitations, please request a 30-day trial license for yourself.
