
Knowledgebase (2345)
Children categories
Since Excel spreadsheets or diagrams are difficult to distribute, it is reasonable that we frequently convert our Excel files to a web-friendly format, such as image. Plus, if we convert Excel to image, the data cannot be formatted and modified directly. In this article, I’ll introduce how to save each worksheet in an Excel file as an image to local folder in WPF using Spire.XLS for WPF.
The sample file for test contains three worksheets, sheet 1 and sheet 2 have some contents in them. What we need is to convert each worksheet that contains contents to image respectively.

Detailed Steps:
Step 1: Create a new project by choosing WPF Application in Visual Studio, add a button in MainWindow, double click the button to write code.
Step 2: Create a new instance of Spire.Xls.Workbook class and load the sample Excel file.
Workbook workbook = new Workbook();
workbook.LoadFromFile("sample.xlsx", ExcelVersion.Version2010);
Step 3: Use for sentence to traverse each worksheet in the Excel. Call Worksheet.SaveToImage() to save worksheet as image, set image format as png.
for (int i = 0; i < workbook.Worksheets.Count; i++)
{
    workbook.Worksheets[i].SaveToImage(string.Format("result-{0}.png", i));
}
Result:
Image 1
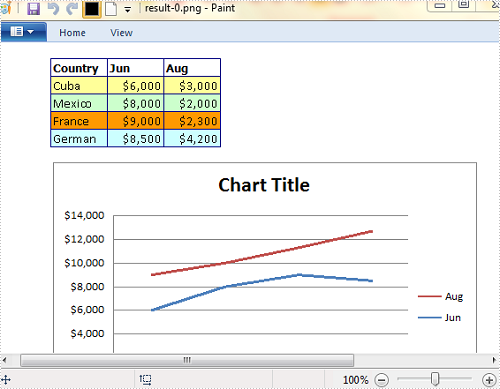
Image 2
Full Code:
using Spire.Xls;

namespace WpfApplication
{
    ///
    /// Interaction logic for MainWindow.xaml
    ///
    public partial class MainWindow : Window
    {
        public MainWindow()
        {
            InitializeComponent();
        }

        private void button1_Click(object sender, RoutedEventArgs e)
        {
            Workbook workbook = new Workbook();
            workbook.LoadFromFile("sample.xlsx", ExcelVersion.Version2010);
            for (int i = 0; i < workbook.Worksheets.Count; i++)
            {
                workbook.Worksheets[i].SaveToImage(string.Format("result-{0}.png", i));
            }
        }
    }
}
Form field has been widely used by developers to display, catch and edit data. Developers may create a form to let others to fill the data and then save the form as a non-fillable file and set it to read only. Spire.PDF supports to create and fill form field; this article will focus on show you how to change the field's value and set all the fields on a form to read only.
By using the PdfFormWidget class, we can get the PDF field collection on the form and then update the values on it. Here comes to the code snippet of how to change the form field's value and set it to read only:
Step 1: Create PDFDocument and load from file.
PdfDocument doc = new PdfDocument();
doc.LoadFromFile("FormField.pdf");
Step 2: Get the PDF field collection on the Form.
PdfFormWidget widget = doc.Form as PdfFormWidget;
Step 3: Traverse each PDF field in pdf field collection.
for (int i = 0; i < widget.FieldsWidget.List.Count; i++)
  {
    PdfField f = widget.FieldsWidget.List[i] as PdfField;
Step 4: Find a PDF field named username and set the value for it.
if (f.Name == "username")
{
  //Convert the pdf field to PdfTextBoxFieldWidget
PdfTextBoxFieldWidget textboxField = f as PdfTextBoxFieldWidget;
  //Change its text
textboxField.Text = "Sky.Luo";
                }
Step 5: Set the field to read-only.
f.Flatten = true;
f.ReadOnly = true;
Step 6: Save the document to file and launch to view it.
doc.SaveToFile("FormFieldEdit.pdf");
System.Diagnostics.Process.Start("FormFieldEdit.pdf");
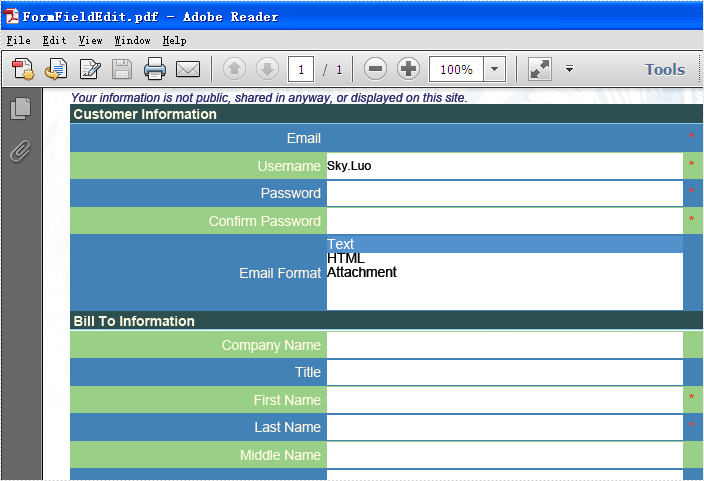
Effective screenshot of the read only form field:
Full codes:
using Spire.Pdf;
using Spire.Pdf.Fields;
using Spire.Pdf.Widget;

namespace ReadOnlyField
{
    class Program
    {
        static void Main(string []args)
        {
            PdfDocument doc = new PdfDocument();
            doc.LoadFromFile("FormField.pdf");

            PdfFormWidget widget = doc.Form as PdfFormWidget;

            for (int i = 0; i < widget.FieldsWidget.List.Count; i++)
            {
                PdfField f = widget.FieldsWidget.List[i] as PdfField;
                if (f.Name == "username")
                {
                    PdfTextBoxFieldWidget textboxField = f as PdfTextBoxFieldWidget;
                    textboxField.Text = "Sky.Luo";
                }
                f.Flatten = true;
                f.ReadOnly = true;
            }
            doc.SaveToFile("FormFieldEdit.pdf");
            System.Diagnostics.Process.Start("FormFieldEdit.pdf");

        }
    }
}
Some time back, one of registered members on our Forum had a requirement to display the value of HTML code in Excel cell. This article is aimed to provide a fine way to manage this issue using Spire.Doc and Spire.XLS.
Main Method:
At present, we have to use Document.LoadHTML() method which is available in Spire.Doc.Document class to load HTML string to a Word document, this way, HTML formatted text will be save in specific paragraphs. Then, get the paragraph with rich text style and return a RichTextString object, save RichText to a specified CellRange. Besides, the paragraph text style must be applied to this CellRange.
Detailed Steps:
Step 1: Create a new Workbook and Word document.
Workbook workbook = new Workbook();
Document doc = new Document();
Step 2: Save the HTML code to StringReader and load the HTML string to Word document.
StringReader sr = new StringReader("<span style=\"border-width:thin;border-color:#FFFFFF;\"><font color=#000000 size=8><b>U = Unchanged rate</b></font></span>");
doc.LoadHTML(sr, XHTMLValidationType.None);
Step 3: Get the formatted text from Word document and save to cell 'A4' in the first worksheet.
foreach (Section section in doc.Sections)
{
    foreach (Paragraph paragraph in section.Paragraphs)
    {
        if (paragraph.Items.Count > 0)
        {
           workbook.Worksheets[0].Range["A4"].RichText.Text += paragraph.Text;
        }
     }
}
Step 4: Apply text style including font color and font size to cell 'A4'.
int index = 0;

foreach (var item in paragraph.Items)
{
    if (item is Spire.Doc.Fields.TextRange)
    {
        for (int i = index; i < (item as Spire.Doc.Fields.TextRange).Text.Length + index; i++)
        {
            ExcelFont excelFont = workbook.CreateFont();
            excelFont.FontName = (item as Spire.Doc.Fields.TextRange).CharacterFormat.FontName;
            excelFont.Size = (item as Spire.Doc.Fields.TextRange).CharacterFormat.FontSize;
            excelFont.IsBold = (item as Spire.Doc.Fields.TextRange).CharacterFormat.Bold;
            excelFont.IsItalic = (item as Spire.Doc.Fields.TextRange).CharacterFormat.Italic;
            excelFont.Underline = (FontUnderlineType)(item as Spire.Doc.Fields.TextRange).CharacterFormat.UnderlineStyle; excelFont.Color = (item as Spire.Doc.Fields.TextRange).CharacterFormat.TextColor;
            workbook.Worksheets[0].Range["A4"].RichText.SetFont(i, i, excelFont);
        }
    }
    index += (item as Spire.Doc.Fields.TextRange).Text.Length;

}
Step 5: Change the width and height of the row to achieve the best fit.
workbook.Worksheets[0].Range["A4"].AutoFitRows();
Step 6: Save changes to the workbook in a new file.
workbook.SaveToFile("result.xlsx", ExcelVersion.Version2010);
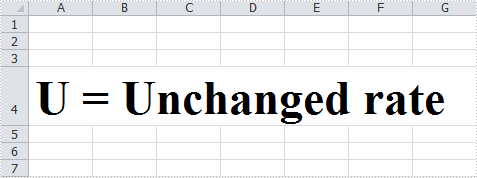
HTML-Formatted Text in Excel would be shown as:
Full Code:
Workbook workbook = new Workbook();
Document doc = new Document();

StringReader sr = new StringReader("<span style=\"border-width:thin;border-color:#FFFFFF;\"><font color=#000000 size=8><b>U = Unchanged rate</b></font></span>");
doc.LoadHTML(sr, XHTMLValidationType.None);

int index = 0;

foreach (Section section in doc.Sections)
{
    foreach (Paragraph paragraph in section.Paragraphs)
    {
        if (paragraph.Items.Count > 0)
        {
            workbook.Worksheets[0].Range["A4"].RichText.Text += paragraph.Text;
            foreach (var item in paragraph.Items)
            {
                if (item is Spire.Doc.Fields.TextRange)
                {
for (int i = index; i < (item as Spire.Doc.Fields.TextRange).Text.Length + index; i++)
{
    ExcelFont excelFont = workbook.CreateFont();
    excelFont.FontName = (item as Spire.Doc.Fields.TextRange).CharacterFormat.FontName;
    excelFont.Size = (item as Spire.Doc.Fields.TextRange).CharacterFormat.FontSize;
    excelFont.IsBold = (item as Spire.Doc.Fields.TextRange).CharacterFormat.Bold;
    excelFont.IsItalic = (item as Spire.Doc.Fields.TextRange).CharacterFormat.Italic;
    excelFont.Underline = (FontUnderlineType)(item as Spire.Doc.Fields.TextRange).CharacterFormat.UnderlineStyle;
    excelFont.Color = (item as Spire.Doc.Fields.TextRange).CharacterFormat.TextColor;
    workbook.Worksheets[0].Range["A4"].RichText.SetFont(i, i, excelFont);
}
                }
                index += (item as Spire.Doc.Fields.TextRange).Text.Length;
            }
        }
    }
}
workbook.Worksheets[0].Range["A4"].AutoFitRows();
workbook.SaveToFile("result.xlsx", ExcelVersion.Version2010);
