
Knowledgebase (2345)
Children categories
How to create vertical table at one side of the word document
2015-01-13 08:46:41 Written by AdministratorSpire.Doc can help developers to create word table with data and format cells easily and it also supports to add text watermark into the word documents. This article will show you how to create a vertical table at one side of the word document, which looks like the vertical watermark in the word document.
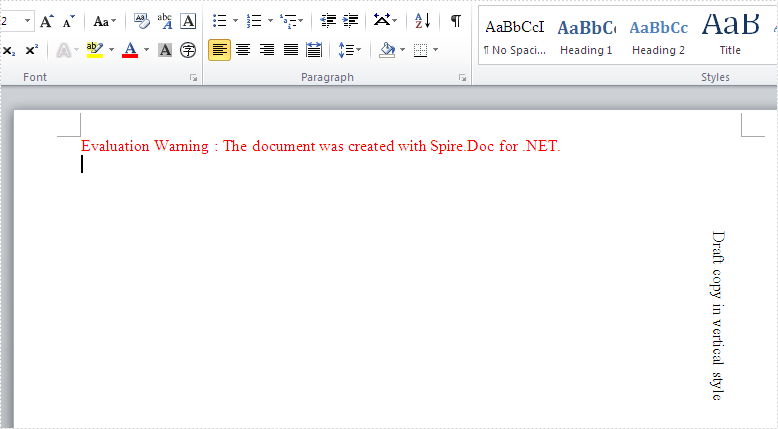
Firstly, please check the effective screenshot of the vertical table at the right of the word document added by Spire.Doc:
Here comes to the steps of how to create vertical table in C#.
Step 1: Create a new document and add a section to the document.
Document document = new Document();
Section section=document.AddSection();
Step 2: Add a table with rows and columns and set the text for the table.
Table table = section.AddTable();
table.ResetCells(1, 1);
TableCell cell = table.Rows[0].Cells[0];
table.Rows[0].Height = 150;
cell.AddParagraph().AppendText("Draft copy in vertical style");
Step 3: Set the TextDirection for the table to RightToLeftRotated.
cell.CellFormat.TextDirection = TextDirection.RightToLeftRotated;
Step 4: Set the table format.
table.TableFormat.WrapTextAround = true;
table.TableFormat.Positioning.VertRelationTo = VerticalRelation.Page;
table.TableFormat.Positioning.HorizRelationTo = HorizontalRelation.Page;
table.TableFormat.Positioning.HorizPosition = section.PageSetup.PageSize.Width- table.Width;
table.TableFormat.Positioning.VertPosition = 200;
Step 5: Save the document to file.
document.SaveToFile("result.docx",FileFormat.docx2013);
Full codes in C#:
using Spire.Doc;
using Spire.Doc.Documents;

namespace CreateVerticalTable
{
    class Program
    {
        static void Main(string[] args)
        {

            Document document = new Document();
            Section section=document.AddSection();
            Table table = section.AddTable();
            table.ResetCells(1, 1);
            TableCell cell = table.Rows[0].Cells[0];
            table.Rows[0].Height = 150;
            cell.AddParagraph().AppendText("Draft copy in vertical style");
            cell.CellFormat.TextDirection = TextDirection.RightToLeftRotated;
            table.Format.WrapTextAround = true;
            table.Format.Positioning.VertRelationTo = VerticalRelation.Page;
            table.Format.Positioning.HorizRelationTo = HorizontalRelation.Page;
            table.Format.Positioning.HorizPosition = section.PageSetup.PageSize.Width - table.Width;
            table.Format.Positioning.VertPosition = 200;

            document.SaveToFile(""result.docx"", FileFormat.Docx2013);

        }
    }
}
MS Excel contains a set of Windows Forms controls that can be used to Worksheet to host item. Spire.XLS also provides programmers similar features to add controls on Worksheet at runtime without installing any other control program. In this article, I'll introduce you how to insert TextBox, CheckBox and RadioButton into Worksheet via Spire.XLS in C#, VB.NET.
Detailed Steps:
Step 1: Download Spire.XLS and reference dll file to your VS project.
Step 2: Use Spire.Xls.Core as namespace, which contains all the interfaces like ITextBoxShap, ICheckBox, IRadioButton and etc.
Step 3: Initialize a new instance of Workbook and create a Worksheet in it.
Workbook wb = new Workbook();
Worksheet ws = wb.Worksheets[0];
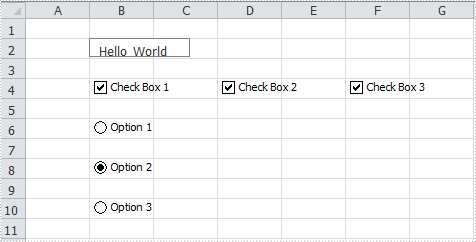
Step 4: Insert a TextBox at specified location and input the display text.
ITextBoxShape textbox = ws.TextBoxes.AddTextBox(2, 2, 15, 100);
textbox.Text = "Hello World";
Step 5: Insert three CheckBox into Worksheet at different locations. Set the CheckState and display text.
ICheckBox cb = ws.CheckBoxes.AddCheckBox(4, 2, 15, 100);
cb.CheckState = CheckState.Checked;
cb.Text = "Check Box 1";

cb = ws.CheckBoxes.AddCheckBox(4, 4, 15, 100);
cb.CheckState = CheckState.Checked;
cb.Text = "Check Box 2";

cb = ws.CheckBoxes.AddCheckBox(4, 6, 15, 100);
cb.CheckState = CheckState.Checked;
cb.Text = "Check Box 3";
Step 6: Insert three RadioButton and set the related properties.
IRadioButton rb = ws.RadioButtons.Add(6, 2, 15, 100);
rb.Text = "Option 1";

rb = ws.RadioButtons.Add(8, 2, 15, 100);
rb.CheckState = CheckState.Checked;
rb.Text = "Option 2";

rb = ws.RadioButtons.Add(10, 2, 15, 100);
rb.Text = "Option 3";
Step 7: Save the file.
ws.DefaultRowHeight = 15;
wb.SaveToFile("Result.xlsx", ExcelVersion.Version2010);
Output:
Full Code:
using Spire.Xls;
using Spire.Xls.Core;
namespace InsertControl
{
    class Program
    {
        static void Main(string[] args)
        {
            Workbook wb = new Workbook();
            Worksheet ws = wb.Worksheets[0];

            ITextBoxShape textbox = ws.TextBoxes.AddTextBox(2, 2, 15, 100);
            textbox.Text = "Hello World";

            ICheckBox cb = ws.CheckBoxes.AddCheckBox(4, 2, 15, 100);
            cb.CheckState = CheckState.Checked;
            cb.Text = "Check Box 1";

            cb = ws.CheckBoxes.AddCheckBox(4, 4, 15, 100);
            cb.CheckState = CheckState.Checked;
            cb.Text = "Check Box 2";

            cb = ws.CheckBoxes.AddCheckBox(4, 6, 15, 100);
            cb.CheckState = CheckState.Checked;
            cb.Text = "Check Box 3";

            IRadioButton rb = ws.RadioButtons.Add(6, 2, 15, 100);
            rb.Text = "Option 1";

            rb = ws.RadioButtons.Add(8, 2, 15, 100);
            rb.CheckState = CheckState.Checked;
            rb.Text = "Option 2";

            rb = ws.RadioButtons.Add(10, 2, 15, 100);
            rb.Text = "Option 3";

            ws.DefaultRowHeight = 15;
            wb.SaveToFile("Result.xlsx", ExcelVersion.Version2010);
        }
    }
}
Imports Spire.Xls
Imports Spire.Xls.Core
Namespace InsertControl
	Class Program
		Private Shared Sub Main(args As String())
			Dim wb As New Workbook()
			Dim ws As Worksheet = wb.Worksheets(0)

			Dim textbox As ITextBoxShape = ws.TextBoxes.AddTextBox(2, 2, 15, 100)
			textbox.Text = "Hello World"

			Dim cb As ICheckBox = ws.CheckBoxes.AddCheckBox(4, 2, 15, 100)
			cb.CheckState = CheckState.Checked
			cb.Text = "Check Box 1"

			cb = ws.CheckBoxes.AddCheckBox(4, 4, 15, 100)
			cb.CheckState = CheckState.Checked
			cb.Text = "Check Box 2"

			cb = ws.CheckBoxes.AddCheckBox(4, 6, 15, 100)
			cb.CheckState = CheckState.Checked
			cb.Text = "Check Box 3"

			Dim rb As IRadioButton = ws.RadioButtons.Add(6, 2, 15, 100)
			rb.Text = "Option 1"

			rb = ws.RadioButtons.Add(8, 2, 15, 100)
			rb.CheckState = CheckState.Checked
			rb.Text = "Option 2"

			rb = ws.RadioButtons.Add(10, 2, 15, 100)
			rb.Text = "Option 3"

			ws.DefaultRowHeight = 15
			wb.SaveToFile("Result.xlsx", ExcelVersion.Version2010)
		End Sub
	End Class
End Namespace
Sparkline is a tiny chart that can be inserted in cells to represent the trends in a series of values. Spire.XLS enables programmers to select a data cell range and display sparkline in another cell, usually next to data range. This article gives an example in C# and VB.NET to show how this purpose is achieved with a few lines of code.
Code Snippet:
Step 1: Create a new Workbook and load the sample file.
Workbook wb = new Workbook();
wb.LoadFromFile("sample.xlsx");
Step 2: Get the Worksheet from Workbook.
Worksheet ws = wb.Worksheets[0];
Step 3: Set SparklineType as line and apply line sparkline to SparklineCollection.
SparklineGroup sparklineGroup = ws.SparklineGroups.AddGroup(SparklineType.Line);
SparklineCollection sparklines = sparklineGroup.Add();
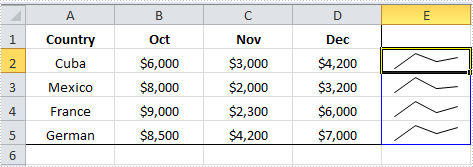
Step 4: Call SparklineCollection.Add(DateRange, ReferenceRange) mothed get data from a range of cells and display sparkline chart inside another cell, e.g., a sparkline in E2 shows the trend of values from A2 to D2.
sparklines.Add(ws["A2:D2"], ws["E2"]);
sparklines.Add(ws["A3:D3"], ws["E3"]);
sparklines.Add(ws["A4:D4"], ws["E4"]);
sparklines.Add(ws["A5:D5"], ws["E5"]);
Step 5: Save the file.
wb.SaveToFile("output.xlsx",ExcelVersion.Version2010);
Output:
Full Code:
using Spire.Xls;
namespace InsertSparkline
{
    class Program
    {

        static void Main(string[] args)
        {

            Workbook wb = new Workbook();
            wb.LoadFromFile("sample.xlsx");
            Worksheet ws = wb.Worksheets[0];

            SparklineGroup sparklineGroup = ws.SparklineGroups.AddGroup(SparklineType.Line);
            SparklineCollection sparklines = sparklineGroup.Add();
            sparklines.Add(ws["A2:D2"], ws["E2"]);
            sparklines.Add(ws["A3:D3"], ws["E3"]);
            sparklines.Add(ws["A4:D4"], ws["E4"]);
            sparklines.Add(ws["A5:D5"], ws["E5"]);

            wb.SaveToFile("output.xlsx", ExcelVersion.Version2010);

        }
    }
}
Imports Spire.Xls
Namespace InsertSparkline
	Class Program

		Private Shared Sub Main(args As String())

			Dim wb As New Workbook()
			wb.LoadFromFile("sample.xlsx")
			Dim ws As Worksheet = wb.Worksheets(0)

			Dim sparklineGroup As SparklineGroup = ws.SparklineGroups.AddGroup(SparklineType.Line)
			Dim sparklines As SparklineCollection = sparklineGroup.Add()
			sparklines.Add(ws("A2:D2"), ws("E2"))
			sparklines.Add(ws("A3:D3"), ws("E3"))
			sparklines.Add(ws("A4:D4"), ws("E4"))
			sparklines.Add(ws("A5:D5"), ws("E5"))

			wb.SaveToFile("output.xlsx", ExcelVersion.Version2010)

		End Sub
	End Class
End Namespace
