Knowledgebase (2417)
Children categories
In the previous topic, we discussed about how to insert hyperlink into PowerPoint presentation. In this topic, we will show you how to remove the hyperlink on a slide in the presentation by using the Spire.Presentation in C#.
Firstly, view the hyperlinks on a slide that we need to remove later.

Here comes to the steps of how to remove the hyperlinks in the PowerPoint presentation in C#.
Step 1: Create Presentation instance and load file.
Presentation ppt = new Presentation();
ppt.LoadFromFile("Sample.pptx", FileFormat.Pptx2010);
Step 2: Get the shape and its text with hyperlink.
IAutoShape shape = ppt.Slides[0].Shapes[1] as IAutoShape;
Step 3: Set the ClickAction property into null to remove the hyperlink.
shape.TextFrame.TextRange.ClickAction = null;
Step 4: Save the document to file.
ppt.SaveToFile("Result.pptx", FileFormat.Pptx2010);
Effective screenshot after removing the first hyperlink:

Full codes:
using Spire.Presentation;
namespace RemoveHyperlink
{

    class Program
    {

        static void Main(string[] args)
        {
            Presentation ppt = new Presentation();
            ppt.LoadFromFile("Sample.pptx", FileFormat.Pptx2010);

            IAutoShape shape = ppt.Slides[0].Shapes[1] as IAutoShape;
            shape.TextFrame.TextRange.ClickAction = null;

            ppt.SaveToFile("Result.pptx", FileFormat.Pptx2010);

        }
    }
}
Adding an image in table cell can make your PPT files more different. Spire.Presentation allows developers add images to table cells. Here we introduce an example to add an image to a table cell in PPT.
Step 1: Create a new PPT document instance.
Presentation presentation = new Presentation();
Step 2: Call AppendTable() method to create a table and set the table style.
ISlide slide = presentation.Slides[0];
Double[] widths = new double[] { 100, 100};
Double[] heights = new double[] { 100, 100};
ITable table = presentation.Slides[0].Shapes.AppendTable(100, 80, widths, heights);
table.StylePreset = TableStylePreset.LightStyle1Accent2;
Step 3: Use table[0, 0].FillFormat.PictureFill.Picture.EmbedImage to embed the image to the cell. The FillType can be changed.
IImageData imgData = presentation.Images.Append(Image.FromFile("1.jpg"));
table[0, 0].FillFormat.FillType = FillFormatType.Picture;
table[0, 0].FillFormat.PictureFill.Picture.EmbedImage = imgData;
table[0, 0].FillFormat.PictureFill.FillType = PictureFillType.Stretch;
Step 4: Save and review.
presentation.SaveToFile("table.pptx", FileFormat.Pptx2010);
System.Diagnostics.Process.Start("table.pptx");
Here is the screenshot:

Layout of PPT concerns visual effect directly. PPT Viewer may have different feelings and thoughts such as tense, confused or anxious about different layouts. We can make our PPT files show main information and weaken minor information. This article will show how to set the layout for your slide via Spire.Presentation. Here are the steps:
Step 1: Create a PPT document.
Presentation ppt = new Presentation();
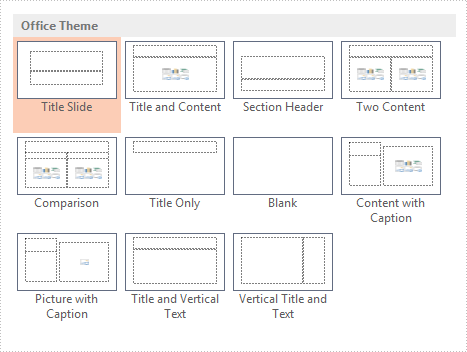
Step2: Set the layout for slide. Spire.Presentation offers 11 kinds of layout just as Microsoft PowerPoint supports.
ISlide slide = ppt.Slides.Append(SlideLayoutType.Title);
Step 3: Add content for Title and Text.
IAutoShape shape = slide.Shapes[0] as IAutoShape;
shape.TextFrame.Text = "Hello Wolrd! –> This is title";

shape = slide.Shapes[1] as IAutoShape;
shape.TextFrame.Text = "E-iceblue Support Team -> This is content";
Step 4: Save and review.
ppt.SaveToFile("Result.PPTx", FileFormat.PPTx2010);
System.Diagnostics.Process.Start("Result.PPTx");
Here is the result:

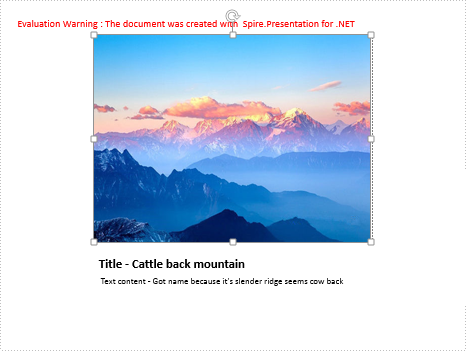
Then change another layout (Picture With Caption) to show: PictureAndCaption
Use function AppendEmbedImage to add image, and notice the order of the shape in PictureAndCaption is Shapes[1], Shapes[0] and Shapes[2].
Full code:
using Spire.Presentation;
namespace SetLayout
{
    class Program
    {
        static void Main(string[] args)
        {
            Presentation ppt = new Presentation();
            ISlide slide = ppt.Slides.Append(SlideLayoutType.PictureAndCaption);

            string ImageFile2 = "1.jpg";
            IAutoShape shape0 = slide.Shapes[1] as IAutoShape;

            slide.Shapes.AppendEmbedImage(ShapeType.Rectangle, ImageFile2, shape0.Frame.Rectangle);


            IAutoShape shape = slide.Shapes[0] as IAutoShape;
            shape.TextFrame.Text = "Title - Cattle back mountain";

            IAutoShape shape2 = slide.Shapes[2] as IAutoShape;
            shape2.TextFrame.Text = " Text content - Got name because it's slender ridge seems cow back";


            ppt.SaveToFile("Sample.pptx", FileFormat.Pptx2010);
            System.Diagnostics.Process.Start("Sample.PPTx");


        }
    }
}
Result: