
Knowledgebase (2345)
Children categories
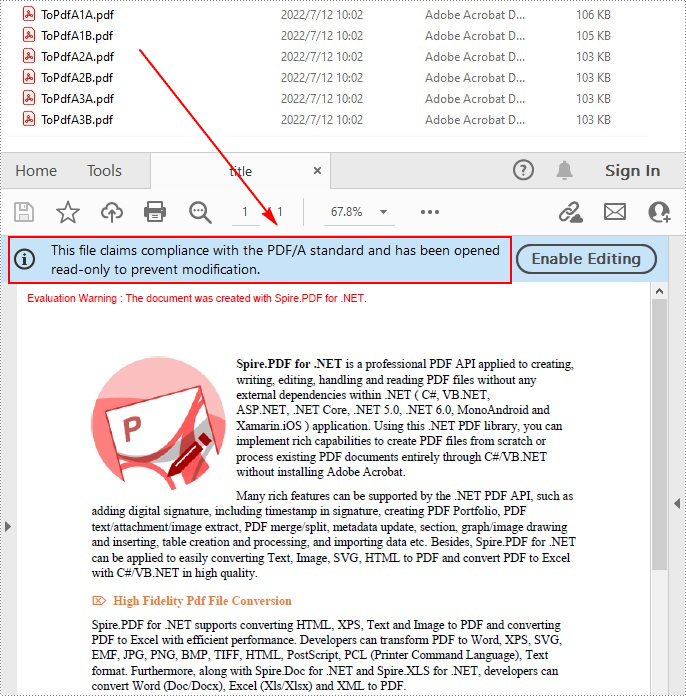
PDF/A is an ISO-standardized version of PDF that supports archiving of files for future use. Documents in PDF/A format can be reproduced in exactly the same way regardless of the software used. Due to its advantages in long-term preservation of digital documents, it may sometimes be necessary to convert PDF to PDF/A. In this article, you will learn how to programmatically convert PDF to PDF/A-1A, 2A, 3A, 1B, 2B and 3B compliant PDF using Spire.PDF for .NET.
Install Spire.PDF for .NET
To begin with, you need to add the DLL files included in the Spire.PDF for.NET package as references in your .NET project. The DLLs files can be either downloaded from this link or installed via NuGet.
PM> Install-Package Spire.PDF
Convert PDF to PDF/A
The detailed steps are as follows.
- Specify the input file path and output folder
- Create a PdfStandardsConverter instance and pass in the input file as a parameter.
- Convert the input file to PdfA1A conformance level using PdfStandardsConverter.ToPdfA1A() method.
- Convert the input file to PdfA1B conformance level using PdfStandardsConverter.ToPdfA1B() method.
- Convert the input file to PdfA2A conformance level using PdfStandardsConverter.ToPdfA2A() method.
- Convert the input file to PdfA2B conformance level using PdfStandardsConverter.ToPdfA2B() method.
- Convert the input file to PdfA3A conformance level using PdfStandardsConverter.ToPdfA3A() method.
- Convert the input file to PdfA3B conformance level using PdfStandardsConverter.ToPdfA3B() method.
- C#
- VB.NET
using System;
using Spire.Pdf.Conversion;

namespace ConvertPdf2Pdfa
{
    class Program
    {
        static void Main(string[] args)
        {
            //Specify input file path
            String inputFile = @"C:\Users\Administrator\Desktop\sample.pdf";

            //Specify output folder
            String outputFolder = @"C:\Users\Administrator\Desktop\Output\";

            //Create a PdfStandardsConverter instance, passing in the input file as a parameter
            PdfStandardsConverter converter = new PdfStandardsConverter(inputFile);

            //Convert to PdfA1A
            converter.ToPdfA1A(outputFolder + "ToPdfA1A.pdf");

            //Convert to PdfA1B
            converter.ToPdfA1B(outputFolder + "ToPdfA1B.pdf");

            //Convert to PdfA2A
            converter.ToPdfA2A(outputFolder + "ToPdfA2A.pdf");

            //Convert to PdfA2B
            converter.ToPdfA2B(outputFolder + "ToPdfA2B.pdf");

            //Convert to PdfA3A
            converter.ToPdfA3A(outputFolder + "ToPdfA3A.pdf");

            //Convert to PdfA3B
            converter.ToPdfA3B(outputFolder + "ToPdfA3B.pdf");
        }
    }
}
Apply for a Temporary License
If you'd like to remove the evaluation message from the generated documents, or to get rid of the function limitations, please request a 30-day trial license for yourself.
In MS Word page border options, there are checkboxes to choose whether page border surrounds header/footer or not. This feature is very important for which can be used to manage the positional relation between page border and header/footer. Spire.Doc supports to set the two frequently-used features: page border and header/footer, and it supports to manage their spatial relations, too. This article is going to introduce the method to set whether page border surrounds header/footer or not.
Note: before start, please download the latest version of Spire.Doc and add the .dll in the bin folder as the reference of Visual Studio.
Step 1: Create a Word document and add a section.
            Document document = new Document();
            Section section = document.AddSection();
Step 2: Add a sample page border to the document using Spire.Doc library.
            section.PageSetup.Borders.BorderType = BorderStyle.Wave;
            section.PageSetup.Borders.Color = Color.Green;
            section.PageSetup.Borders.Left.Space = 20;
            section.PageSetup.Borders.Right.Space = 20;
Step 3: Add sample header and footer to the document using Spire.Doc library.
//add a header and set its format
Paragraph paragraph1 = section.HeadersFooters.Header.AddParagraph();
paragraph1.Format.HorizontalAlignment = HorizontalAlignment.Right;
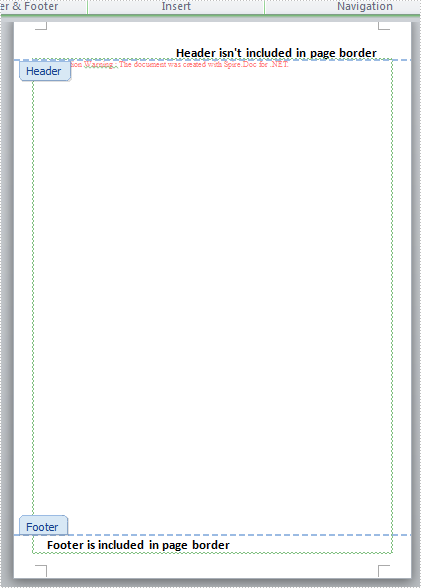
TextRange headerText = paragraph1.AppendText("Header isn't included in page border");
headerText.CharacterFormat.FontName = "Calibri";
headerText.CharacterFormat.FontSize = 20;
headerText.CharacterFormat.Bold = true;
//add a footer and set its format
Paragraph paragraph2 = section.HeadersFooters.Footer.AddParagraph();
paragraph2.Format.HorizontalAlignment = HorizontalAlignment.Left;
TextRange footerText = paragraph2.AppendText("Footer is included in page border");
footerText.CharacterFormat.FontName = "Calibri";
footerText.CharacterFormat.FontSize = 20;
footerText.CharacterFormat.Bold = true;
Step 4: Set the header not included in the page border while the footer included.
            section.PageSetup.PageBorderIncludeHeader = false;
            section.PageSetup.HeaderDistance = 40;
            section.PageSetup.PageBorderIncludeFooter = true;
            section.PageSetup.FooterDistance = 40;
Step 5: Save the document and launch to see effect.
            document.SaveToFile("result.docx", FileFormat.Docx2013);
            System.Diagnostics.Process.Start("result.docx");
Effects:
Full Codes:
using System;
using System.Collections.Generic;
using System.Linq;
using System.Text;
using Spire.Doc;
using Spire.Doc.Documents;
using Spire.Doc.Fields;
using System.Drawing;

namespace Mirror_Margin
{
    class Program
    {
        static void Main(string[] args)
        {
            Document document = new Document();
            Section section = document.AddSection();

            section.PageSetup.Borders.BorderType = BorderStyle.Wave;
            section.PageSetup.Borders.Color = Color.Green;
            section.PageSetup.Borders.Left.Space = 20;
            section.PageSetup.Borders.Right.Space = 20;

            Paragraph paragraph1 = section.HeadersFooters.Header.AddParagraph();
            paragraph1.Format.HorizontalAlignment = HorizontalAlignment.Right;
            TextRange headerText = paragraph1.AppendText("Header isn't included in page border");
            headerText.CharacterFormat.FontName = "Calibri";
            headerText.CharacterFormat.FontSize = 20;
            headerText.CharacterFormat.Bold = true;

            Paragraph paragraph2 = section.HeadersFooters.Footer.AddParagraph();
            paragraph2.Format.HorizontalAlignment = HorizontalAlignment.Left;
            TextRange footerText = paragraph2.AppendText("Footer is included in page border");
            footerText.CharacterFormat.FontName = "Calibri";
            footerText.CharacterFormat.FontSize = 20;
            footerText.CharacterFormat.Bold = true;

            section.PageSetup.PageBorderIncludeHeader = false;
            section.PageSetup.HeaderDistance = 40;
            section.PageSetup.PageBorderIncludeFooter = true;
            section.PageSetup.FooterDistance = 40;

            document.SaveToFile("result.docx", FileFormat.Docx2013);
            System.Diagnostics.Process.Start("result.docx");
        }
    }
}
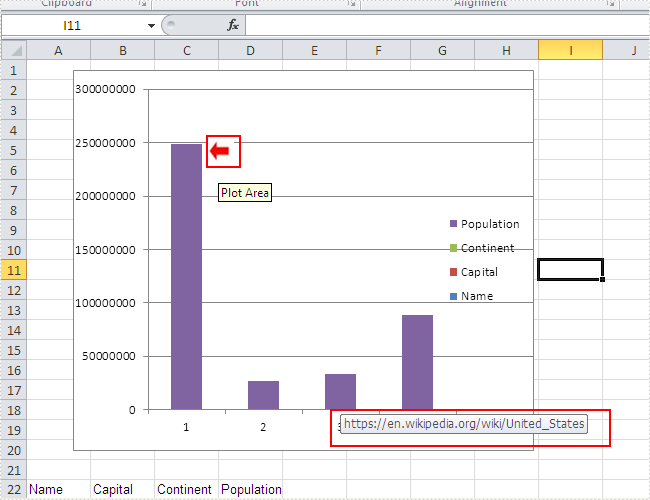
How to add a picture to the chart and then assign a hyperlink to the picture
2015-07-21 01:22:54 Written by KoohjiOne of our users requests a demo of Spire.XLS for how to add a picture to the chart at a specified location and then assign a hyperlink to the picture in C#. To fulfil it, we need to prepare the two things. Firstly, we need to know how to create Excel Charts in C# with the help of Spire.XLS. Secondly, we should have an image that we use to insert to the chart. We will use Excel Column chart for example.
Here comes to the steps. Firstly, please review the sample excel chart that we will add image later.

Step 1: Create a new document and load from file.
Workbook workbook = new Workbook();
workbook.LoadFromFile("sample.xlsx");
Step 2: Get the first worksheet and the first chart in it.
Worksheet workSheet = workbook.Worksheets[0];
Chart chart = workSheet.Charts[0];
Step 3: Add the desired image into the chart and set the image's position and size.
IPictureShape ps = chart.Shapes.AddPicture("1.png");
ps.Top = 180;
ps.Left = 280;
ps.Width = 60;
ps.Height = 80;
Step 4: Assign a hyperlink to the image.
(ps as XlsBitmapShape).SetHyperLink("https://en.wikipedia.org/wiki/United_States", true);
Step 5: Save the document to file.
workbook.SaveToFile("result.xlsx", ExcelVersion.Version2010);
Effective screenshot of adding an image to the chart and assign a hyperlink to the image:
Full codes:
using Spire.Xls;
using Spire.Xls.Core;
using Spire.Xls.Core.Spreadsheet.Shapes;
namespace AddPicturetoChart
{
    class Program
    {

        static void Main(string[] args)
        {
            Workbook workbook = new Workbook();
            workbook.LoadFromFile("sample.xlsx");

            Worksheet workSheet = workbook.Worksheets[0];
            Chart chart = workSheet.Charts[0];

            IPictureShape ps = chart.Shapes.AddPicture("1.png");
            ps.Top = 180;
            ps.Left = 280;
            ps.Width = 60;
            ps.Height = 80;
            (ps as XlsBitmapShape).SetHyperLink("https://en.wikipedia.org/wiki/United_States", true);

            workbook.SaveToFile("result.xlsx", ExcelVersion.Version2010);
        }
    }
}
