
Knowledgebase (2344)
Children categories
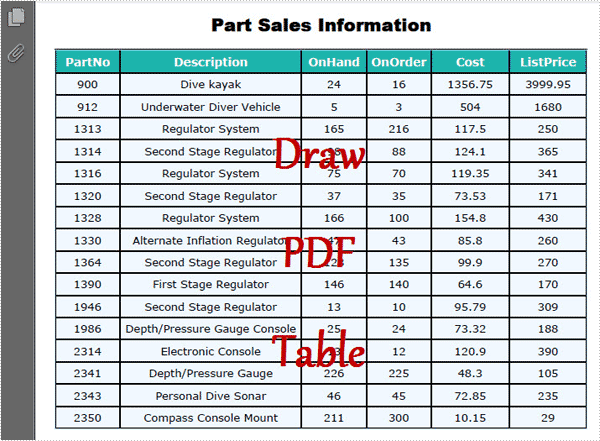
PDF table is one of the best ways to display data information. Using it, all the data can be quickly and clearly read. This section will introduce a solution to draw PDF table via a .NET PDF component in C#, VB.NET.
Using Spire.PDF for .NET (a .NET PDF library for manipulating PDF files), you can draw PDF table through two simple steps. One is to draw all the data by a string array. Another step is to split these string array by string[] Split(params char[] separator); Thus, a PDF table has been drawn. From below picture, you can see the effect of the task:
Here, you can download Spire.PDF for .NET and install it on your system. After adding the Spire.Pdf dll from your Bin folder, you can follow below key code to draw your PDF table in C#, VB.NET.
using Spire.Pdf;
using Spire.Pdf.Graphics;
using Spire.Pdf.Tables;
using System;
using System.Drawing;


namespace DrawPDFTable
{
    class Program
    {
        static void Main(string[] args)
        {
            //Create a pdf document.
            PdfDocument doc = new PdfDocument();
            PdfSection sec = doc.Sections.Add();
            sec.PageSettings.Width = PdfPageSize.A4.Width;
            PdfPageBase page = sec.Pages.Add();
            float y = 10;
            //title
            PdfBrush brush1 = PdfBrushes.Black;
            PdfTrueTypeFont font1 = new PdfTrueTypeFont(new Font("Arial", 16f, FontStyle.Bold));
            PdfStringFormat format1 = new PdfStringFormat(PdfTextAlignment.Center);
            page.Canvas.DrawString("Part Sales Information", font1, brush1, page.Canvas.ClientSize.Width / 2, y, format1);
            y = y + font1.MeasureString("Country List", format1).Height;
            y = y + 5;

            String[] data
         = {
   "PartNo;Description;OnHand;OnOrder;Cost;ListPrice",
   "900;Dive kayak;24;16;1356.75;3999.95",
   "912;Underwater Diver Vehicle;5;3;504;1680",
   "1313;Regulator System;165;216;117.5;250",
   "1314;Second Stage Regulator;98;88;124.1;365",
   "1316;Regulator System;75;70;119.35;341",
   "1320;Second Stage Regulator;37;35;73.53;171",
   "1328;Regulator System;166;100;154.8;430",
   "1330;Alternate Inflation Regulator;47;43;85.8;260",
   "1364;Second Stage Regulator;128;135;99.9;270",
   "1390;First Stage Regulator;146;140;64.6;170",
   "1946;Second Stage Regulator;13;10;95.79;309",
   "1986;Depth/Pressure Gauge Console;25;24;73.32;188",
   "2314;Electronic Console;13;12;120.9;390",
   "2341;Depth/Pressure Gauge;226;225;48.3;105",
   "2343;Personal Dive Sonar;46;45;72.85;235",
   "2350;Compass Console Mount;211;300;10.15;29"
       };
            String[][] dataSource
                = new String[data.Length][];
            for (int i = 0; i < data.Length; i++)
            {
                dataSource[i] = data[i].Split(';');
            }

            PdfTable table = new PdfTable();
            table.Style.CellPadding = 2;
            table.Style.BorderPen = new PdfPen(brush1, 0.75f);
            table.Style.HeaderStyle.StringFormat = new PdfStringFormat(PdfTextAlignment.Center);
            table.Style.HeaderSource = PdfHeaderSource.Rows;
            table.Style.HeaderRowCount = 1;
            table.Style.ShowHeader = true;
            table.Style.HeaderStyle.BackgroundBrush = PdfBrushes.CadetBlue;
            table.DataSource = dataSource;
            foreach (PdfColumn column in table.Columns)
            {
                column.StringFormat = new PdfStringFormat(PdfTextAlignment.Center, PdfVerticalAlignment.Middle);
            }
            table.Draw(page, new PointF(0, y));

            doc.SaveToFile("SimpleTable.pdf");
        }
    }
}
Imports Spire.Pdf
Imports Spire.Pdf.Graphics
Imports Spire.Pdf.Tables
Imports System.Drawing


Namespace DrawPDFTable
	Class Program
		Private Shared Sub Main(args As String())
			'Create a pdf document.
			Dim doc As New PdfDocument()
			Dim sec As PdfSection = doc.Sections.Add()
			sec.PageSettings.Width = PdfPageSize.A4.Width
			Dim page As PdfPageBase = sec.Pages.Add()
			Dim y As Single = 10
			'title
			Dim brush1 As PdfBrush = PdfBrushes.Black
			Dim font1 As New PdfTrueTypeFont(New Font("Arial", 16F, FontStyle.Bold))
			Dim format1 As New PdfStringFormat(PdfTextAlignment.Center)
			page.Canvas.DrawString("Part Sales Information", font1, brush1, page.Canvas.ClientSize.Width / 2, y, format1)
			y = y + font1.MeasureString("Country List", format1).Height
			y = y + 5

			Dim data As [String]() = {"PartNo;Description;OnHand;OnOrder;Cost;ListPrice", "900;Dive kayak;24;16;1356.75;3999.95", "912;Underwater Diver Vehicle;5;3;504;1680", "1313;Regulator System;165;216;117.5;250", "1314;Second Stage Regulator;98;88;124.1;365", "1316;Regulator System;75;70;119.35;341", _
				"1320;Second Stage Regulator;37;35;73.53;171", "1328;Regulator System;166;100;154.8;430", "1330;Alternate Inflation Regulator;47;43;85.8;260", "1364;Second Stage Regulator;128;135;99.9;270", "1390;First Stage Regulator;146;140;64.6;170", "1946;Second Stage Regulator;13;10;95.79;309", _
				"1986;Depth/Pressure Gauge Console;25;24;73.32;188", "2314;Electronic Console;13;12;120.9;390", "2341;Depth/Pressure Gauge;226;225;48.3;105", "2343;Personal Dive Sonar;46;45;72.85;235", "2350;Compass Console Mount;211;300;10.15;29"}
			Dim dataSource As [String]()() = New [String](data.Length - 1)() {}
			For i As Integer = 0 To data.Length - 1
				dataSource(i) = data(i).Split(";"C)
			Next

			Dim table As New PdfTable()
			table.Style.CellPadding = 2
			table.Style.BorderPen = New PdfPen(brush1, 0.75F)
			table.Style.HeaderStyle.StringFormat = New PdfStringFormat(PdfTextAlignment.Center)
			table.Style.HeaderSource = PdfHeaderSource.Rows
			table.Style.HeaderRowCount = 1
			table.Style.ShowHeader = True
			table.Style.HeaderStyle.BackgroundBrush = PdfBrushes.CadetBlue
			table.DataSource = dataSource
			For Each column As PdfColumn In table.Columns
				column.StringFormat = New PdfStringFormat(PdfTextAlignment.Center, PdfVerticalAlignment.Middle)
			Next
			table.Draw(page, New PointF(0, y))

			doc.SaveToFile("SimpleTable.pdf")
		End Sub
	End Class
End Namespace
Spire.PDF for .NET is a professional .NET PDF component which enables you to create, edit and handle PDF files in C#, VB.NET.
Export PDF Document to Images without PDFConverter via PDFViewer
2012-06-08 05:47:24 Written by KoohjiPDF format, beyond all doubt, provides great convenience for people in daily work. But sometimes, the character of requiring an external application like Acrobat Reader makes things more complex. For example, images can be easily and quickly presented on browsers as long as you have image addresses or load them from your system. While for PDF document, it has to be presented by an external application. Besides, loading images can save much time compared with loading a PDF file since images can be loaded one by one, while PDF file is only available after the complete PDF document is downloaded. Furthermore, images are more likely to handle by Office applications. That is why people need to export PDF document pages to images.
When it comes to the conversion or transformation from this document format to another, people subconsciously think about conversion software. But for Spire.PDF Viewer, you do not need any PDF converter and can realize the PDF to image task in two ways. Moreover, you can export the PDF pages to any image format such as png, jpg, bmp and so on. Finally, except exporting PDF pages to images, Spire.PDFViewer is a totally independent .NET library and has other functions such as open and read encrypted PDF files, view embedded PDF file with hyperlinks and so on.
Two solutions will be displayed to finish this task. The first solution is more complicated than the second one but it has more functions. So both methods have their own advantages. You can choose any one according to your own need.
Export PDF to Images Solution 1
This method requires two forms. One is to load PDF document and the other is to display images which are exported from PDF file. You can export any page or pages to save as images. Details can be shown in the below procedure.
Step 1: Create a new project
- Create a new project in Windows Forms Application.
- Set the Target Framework to be .NET Framework 2 or above in Properties.
- Set the target Framework in this project Properties to be .NET Framework 2.0 or above.
Step 2: Design two Forms
- Add a toolScript and PdfDocumentViewer in Form1.
- Add three Buttons, two Labels and two ComboBoxes in Form1 from the toolScript dropdown list.
- Set the Properties of the Buttons, Labels, ComboBoxes and PdfDocumentViewer as below table.

- Add another Form in Windows Form from Add item by right clicking the project. I name this Form to be FormImages.
- In FormImages, I add a FlowLayoutPanel to it and set its Name to be panelImages1, the Dock property to be Fill.
Step 3: Export PDF file pages to images
Click Form1, add Spire.PDFViewer Forms dll as reference from your downloaded Spire.PDFViewer. Then, add namespaces to the top of the method.
using System.IO;
using Spire.PdfViewer.Forms;
Imports System.IO
Imports Spire.PdfViewer.Forms
Load a PDF file from system and open it. This step also enables you to open another PDF from your system by clicking the "Open" button in Form1.
private void Form1_Load(object sender, EventArgs e)
        {
            string pdfDoc = @"D:\michelle\e-iceblue\Spire.PDFViewer\Demos\Data\PDFViewer.pdf";
            if (File.Exists(pdfDoc))
            {
                this.pdfDocumentViewer1.LoadFromFile(pdfDoc);
            }
        }
private void btnOpen_Click(object sender, EventArgs e)
       {
            OpenFileDialog dialog = new OpenFileDialog();
            dialog.Filter = "PDF document (*.pdf)|*.pdf";
            DialogResult result = dialog.ShowDialog();
            if (result == DialogResult.OK)
            {
                try
                {
                    string pdfFile = dialog.FileName;
                    this.pdfDocumentViewer1.LoadFromFile(pdfFile);
                }
                catch (Exception exe)
                {
                    MessageBox.Show(exe.Message, "Spire.PdfViewer Demo", MessageBoxButtons.OK, MessageBoxIcon.Error);
                }

            }
        }
Private Sub Form1_Load(sender As Object, e As EventArgs)
		Dim pdfDoc As String = "D:\michelle\e-iceblue\Spire.PDFViewer\Demos\Data\PDFViewer.pdf"
		If File.Exists(pdfDoc) Then
			Me.pdfDocumentViewer1.LoadFromFile(pdfDoc)
		End If
End Sub

Private Sub btnOpen_Click(sender As Object, e As EventArgs)
	Dim dialog As New OpenFileDialog()
	dialog.Filter = "PDF document (*.pdf)|*.pdf"
	Dim result As DialogResult = dialog.ShowDialog()
	If result = DialogResult.OK Then
		Try
			Dim pdfFile As String = dialog.FileName
		Me.pdfDocumentViewer1.LoadFromFile(pdfFile)
		Catch exe As Exception
			MessageBox.Show(exe.Message, "Spire.PdfViewer Demo", MessageBoxButtons.OK, MessageBoxIcon.[Error])

		End Try
	End If
End Sub
Load the PDF document and use the "this.pdfDocumentViewer1.SaveAsImage(currentPage - 1)" to save the current PDF page as image.
private void pdfDocumentViewer1_PdfLoaded(object sender, EventArgs args)
{
            this.comBoxFrom.Items.Clear();
            this.comboxTo.Items.Clear();

            int totalPage = this.pdfDocumentViewer1.PageCount;
            for (int i = 1; i <= totalPage; i++)
            {
                this.comBoxFrom.Items.Add(i.ToString());
                this.comboxTo.Items.Add(i.ToString());


            }
            this.comBoxFrom.SelectedIndex = 0;
            this.comboxTo.SelectedIndex = 0;

 }
private void btnExport_Click(object sender, EventArgs e)
 {
            if (this.pdfDocumentViewer1.PageCount > 0)
            {
                SaveFileDialog dialog = new SaveFileDialog();
                dialog.Filter = "JPG Format(*.jpg)|*.jpg|BMP Format(*.bmp)|*.bmp|PNG Format(*.png)|*.png|GIF Format(*.gif)|*.gif";
                DialogResult result = dialog.ShowDialog();
                string fileName = dialog.FileName;
                if (result == DialogResult.OK)
                {

                    int currentPage = this.pdfDocumentViewer1.CurrentPageNumber;
                    Bitmap image = this.pdfDocumentViewer1.SaveAsImage(currentPage - 1);
                    image.Save(fileName);
                    MessageBox.Show("You have exported current page to an image:\n" + fileName, "Spire.PdfViewer Demo", MessageBoxButtons.OK, MessageBoxIcon.Information);


                    Dictionary dictionaryImages = new Dictionary();
                    dictionaryImages.Add(fileName, image);

                    this._formImages = new FormImages();
                    this._formImages.DictionaryImages = dictionaryImages;
                    this._formImages.Show();

                  }
              }
  }
Private Sub pdfDocumentViewer1_PdfLoaded(sender As Object, args As EventArgs)
	Me.comBoxFrom.Items.Clear()
	Me.comboxTo.Items.Clear()
	Dim totalPage As Integer = Me.pdfDocumentViewer1.PageCount
	For i As Integer = 1 To totalPage
		Me.comBoxFrom.Items.Add(i.ToString())
		Me.comboxTo.Items.Add(i.ToString())
	Next
	Me.comBoxFrom.SelectedIndex = 0
	Me.comboxTo.SelectedIndex = 0
End Sub
Private Sub btnExport_Click(sender As Object, e As EventArgs)
	If Me.pdfDocumentViewer1.PageCount > 0 Then
		Dim dialog As New SaveFileDialog()
		dialog.Filter = "JPG Format(*.jpg)|*.jpg|BMP Format(*.bmp)|*.bmp|PNG Format(*.png)|*.png|GIF Format(*.gif)|*.gif"
		Dim result As DialogResult = dialog.ShowDialog()
		Dim fileName As String = dialog.FileName
		If result = DialogResult.OK Then
			Dim currentPage As Integer = Me.pdfDocumentViewer1.CurrentPageNumber
			Dim image As Bitmap = Me.pdfDocumentViewer1.SaveAsImage(currentPage - 1)
			image.Save(fileName)
			MessageBox.Show("You have exported current page to an image:" & vbLf & fileName, "Spire.PdfViewer Demo", MessageBoxButtons.OK, MessageBoxIcon.Information)
			Dim dictionaryImages As New Dictionary(Of String, Image)()
			dictionaryImages.Add(fileName, image)
			Me._formImages = New FormImages()
			Me._formImages.DictionaryImages = dictionaryImages
			Me._formImages.Show()
		End If
	End If
End Sub
Save multiple pages as images by selecting the PDF export range from the start page to the end page. And use the "this.pdfDocumentViewer1.SaveAsImage(fromPage, toPage)" method to save the images.
private void btnMultiExport_Click(object sender, EventArgs e)
{
            if (this.pdfDocumentViewer1.PageCount <= 0)
            {
                return;
            }

            int fromPage = this.comBoxFrom.SelectedIndex;
            int toPage = this.comboxTo.SelectedIndex;
            if (fromPage > toPage)
            {
                MessageBox.Show("End page number must be not less than started page number!", "Spire.PdfViewer Demo", MessageBoxButtons.OK, MessageBoxIcon.Warning);
                return;
            }
            else
            {
                FolderBrowserDialog dialog = new FolderBrowserDialog();


                DialogResult result = dialog.ShowDialog();
                if (result == DialogResult.OK)
                {

                    string path = dialog.SelectedPath;
                    Bitmap[] images = this.pdfDocumentViewer1.SaveAsImage(fromPage, toPage);
                    Dictionary dictionaryImages = new Dictionary();
                    for (int i = 0; i < images.Length; i++)
                    {
                        string name = "image" + (i + 1 + fromPage).ToString() + ".bmp";
                        string fileName = path + "\\" + name;
                        images[i].Save(fileName);
                        dictionaryImages.Add(fileName, images[i]);

                    }
                    string message = "You have exported " + (fromPage + 1).ToString() + "-" + (toPage + 1).ToString() + " pages as images to:\n"
                       + path;
                    MessageBox.Show(message, "Spire.PdfViewer Demo", MessageBoxButtons.OK, MessageBoxIcon.Information);

                    this._formImages = new FormImages();
                    this._formImages.DictionaryImages = dictionaryImages;
                    this._formImages.Show();

                }
            }
   }
Private Sub btnMultiExport_Click(sender As Object, e As EventArgs)
		If Me.pdfDocumentViewer1.PageCount <= 0 Then
			Return
		End If

		Dim fromPage As Integer = Me.comBoxFrom.SelectedIndex
		Dim toPage As Integer = Me.comboxTo.SelectedIndex
		If fromPage > toPage Then
			MessageBox.Show("End page number must be not less than started page number!", "Spire.PdfViewer Demo", MessageBoxButtons.OK, MessageBoxIcon.Warning)
			Return
		Else
			Dim dialog As New FolderBrowserDialog()
			Dim result As DialogResult = dialog.ShowDialog()
			If result = DialogResult.OK Then
				Dim path As String = dialog.SelectedPath
				Dim images As Bitmap() = Me.pdfDocumentViewer1.SaveAsImage(fromPage, toPage)
				Dim dictionaryImages As Dictionary(Of [String], Image) = New Dictionary(Of String, Image)()
				For i As Integer = 0 To images.Length - 1
					Dim name As String = "image" & (i + 1 + fromPage).ToString() & ".bmp"
					Dim fileName As String = path & "\" & name
					images(i).Save(fileName)
					dictionaryImages.Add(fileName, images(i))
				Next
				Dim message As String = "You have exported " & (fromPage + 1).ToString() & "-" & (toPage + 1).ToString() & " pages as images to:" & vbLf & path
				MessageBox.Show(message, "Spire.PdfViewer Demo", MessageBoxButtons.OK, MessageBoxIcon.Information)
				Me._formImages = New FormImages()
				Me._formImages.DictionaryImages = dictionaryImages
				Me._formImages.Show()
			End If
		End If
	End Sub
Display the images in the second Form: FormImages.
using System;
using System.Collections.Generic;
using System.Drawing;
using System.IO;
using System.Windows.Forms;
using Spire.PdfViewer.Forms;

namespace  pdf2images1
{
    public partial class FormImages : Form
    {

        private Dictionary _dictionaryImags;

        public Dictionary DictionaryImages
        {
            get { return this._dictionaryImags; }
            set
            {
                this._dictionaryImags = value;
                this.ViewImages();
            }
        }
        public FormImages()
        {
            InitializeComponent();
        }

        public void ViewImages()
        {
            if (this.DictionaryImages != null && this.DictionaryImages.Count > 0)
            {
                this.panelImages1.Controls.Clear();
                String image_name = "";
                int panelHeight = 0;
                int panelWidth = 0;

                foreach (KeyValuePair pair in this.DictionaryImages)
                {
                    image_name = pair.Key;

                    Panel panelImage = new Panel();
                    panelImage.AutoSize = true;


                    PictureBox ptrBox = new PictureBox();
                    ptrBox.Height = 150;
                    ptrBox.Width = 200;

                    ptrBox.SizeMode = PictureBoxSizeMode.Zoom;

                    ptrBox.Image = pair.Value;
                    ptrBox.Cursor = Cursors.Hand;

                    panelImage.Controls.Add(ptrBox);

                    LinkLabel lbl = new LinkLabel();
                    String imageName = Path.GetFileName(pair.Key);
                    lbl.Text = imageName;
                    int x = (Int32)(ptrBox.Width / 2 - lbl.Width / 2);
                    int y = ptrBox.Height;
                    lbl.Left = x;
                    lbl.Top = y;
                    panelImage.Controls.Add(lbl);

                    this.panelImages1.Controls.Add(panelImage);

                    this.SetClickEventHandler(ptrBox, lbl, image_name);
                    panelHeight = panelImage.Height;
                    panelWidth = panelImage.Width;

                }
                int nimages = this._dictionaryImags.Count;
                if (nimages >= 4)
                {

                    int n = (Int32)Math.Ceiling(Math.Sqrt(nimages));

                    this.Width = panelWidth * n + 20 * (n - 1) + 40;
                    this.Height = panelHeight * n + 20 * (n - 1) + 40;
                }
            }
        }
        private void SetClickEventHandler(PictureBox ptrBox, LinkLabel lbl, string imageName)
        {
            ptrBox.Click += new EventHandler(delegate(Object sender, EventArgs args)
            {
                System.Diagnostics.Process process = new System.Diagnostics.Process();
                System.Diagnostics.ProcessStartInfo info = new System.Diagnostics.ProcessStartInfo(imageName);
                process.StartInfo = info;
                process.Start();
            });

            lbl.Click += new EventHandler(delegate(Object sender, EventArgs args)
            {
                System.Diagnostics.Process process = new System.Diagnostics.Process();
                System.Diagnostics.ProcessStartInfo info = new System.Diagnostics.ProcessStartInfo(imageName);
                process.StartInfo = info;
                process.Start();
            });

        }
    }
}
Imports System.Collections.Generic
Imports System.Drawing
Imports System.IO
Imports System.Windows.Forms

Namespace pdf2images1
	Public Partial Class FormImages
		Inherits Form
		Private _dictionaryImags As Dictionary(Of [String], Image)
		Public Property DictionaryImages() As Dictionary(Of [String], Image)
			Get
				Return Me._dictionaryImags
			End Get
			Set
				Me._dictionaryImags = value
				Me.ViewImages()
			End Set
		End Property
		Public Sub New()
			InitializeComponent()
		End Sub

		Public Sub ViewImages()
			If Me.DictionaryImages IsNot Nothing AndAlso Me.DictionaryImages.Count > 0 Then
				Me.panelImages1.Controls.Clear()
				Dim image_name As [String] = ""
				Dim panelHeight As Integer = 0
				Dim panelWidth As Integer = 0

				For Each pair As KeyValuePair(Of [String], Image) In Me.DictionaryImages
					image_name = pair.Key

					Dim panelImage As New Panel()
					panelImage.AutoSize = True


					Dim ptrBox As New PictureBox()
					ptrBox.Height = 150
					ptrBox.Width = 200

					ptrBox.SizeMode = PictureBoxSizeMode.Zoom

					ptrBox.Image = pair.Value
					ptrBox.Cursor = Cursors.Hand

					panelImage.Controls.Add(ptrBox)

					Dim lbl As New LinkLabel()
					Dim imageName As [String] = Path.GetFileName(pair.Key)
					lbl.Text = imageName
					Dim x As Integer = CType(ptrBox.Width \ 2 - lbl.Width \ 2, Int32)
					Dim y As Integer = ptrBox.Height
					lbl.Left = x
					lbl.Top = y
					panelImage.Controls.Add(lbl)

					Me.panelImages1.Controls.Add(panelImage)

					Me.SetClickEventHandler(ptrBox, lbl, image_name)
					panelHeight = panelImage.Height

					panelWidth = panelImage.Width
				Next
				Dim nimages As Integer = Me._dictionaryImags.Count
				If nimages >= 4 Then

					Dim n As Integer = CType(Math.Truncate(Math.Ceiling(Math.Sqrt(nimages))), Int32)

					Me.Width = panelWidth * n + 20 * (n - 1) + 40
					Me.Height = panelHeight * n + 20 * (n - 1) + 40
				End If
			End If
		End Sub
		Private Sub SetClickEventHandler(ptrBox As PictureBox, lbl As LinkLabel, imageName As String)
			AddHandler ptrBox.Click, New EventHandler(Function(sender As [Object], args As EventArgs) Do
				Dim process As New System.Diagnostics.Process()
				Dim info As New System.Diagnostics.ProcessStartInfo(imageName)
				process.StartInfo = info
				process.Start()
			End Function)

			AddHandler lbl.Click, New EventHandler(Function(sender As [Object], args As EventArgs) Do
				Dim process As New System.Diagnostics.Process()
				Dim info As New System.Diagnostics.ProcessStartInfo(imageName)
				process.StartInfo = info
				process.Start()
			End Function)
		End Sub
	End Class
End Namespace
Step 4: Debug the project
Click the Debug or Press F5 to launch the project. You can preview as below.
Export Page 4-7

Display Image 4-7

Export PDF to Image Solution 2
This method is much simple and it needs a Form generated dynamically. Two buttons are provided. One is for exporting the current PDF page, the other is for exporting multiple pages. The difference between the first method and the second lies in you can choose any export range in the first method. For example, you can choose page 4-7 to save as images, but when you use method two, you have to save all the pages from 1-7 since it only support to save page from 1 to current page as images. Please look at the procedure.
Step 1: Create a new project
- Create a new project in Console Application.
- Set the target Framework to be .NET Framework 2 or above.
- Add System. Drawing and Spire.PdfViewer.Forms. dll as references and add the below namespaces at the top of the method.
using System;
using System.Drawing;
using System.IO;
using System.Windows.Forms;
using Spire.PdfViewer.Forms;
Imports System.Drawing
Imports System.IO
Imports System.Windows.Forms
Imports Spire.PdfViewer.Forms
Step 2: Export PDF file pages to images
Load a PDF file from system
viewer = new PdfDocumentViewer();
viewer.LoadFromFile(@"D:\michelle\e-iceblue\Spire.PDFViewer\Demos\Data\PDFViewer.pdf");
viewer = New PdfDocumentViewer()
viewer.LoadFromFile("D:\michelle\e-iceblue\Spire.PDFViewer\Demos\Data\PDFViewer.pdf")
Create a new Form and design it. Except setting the properties of this Form, two buttons are added also. One is for exporting one page, and the other multiple pages.
            //form and child components
            Form mainForm = new Form();
            mainForm.Text = "Spire.PdfView Demo - Export";
            mainForm.Size = new System.Drawing.Size(800, 600);
            mainForm.StartPosition = FormStartPosition.CenterScreen;

            TableLayoutPanel table = new TableLayoutPanel();
            table.ColumnCount = 3;
            table.ColumnStyles.Add(new ColumnStyle(SizeType.Percent, 50));
            table.ColumnStyles.Add(new ColumnStyle(SizeType.Absolute, 20));
            table.ColumnStyles.Add(new ColumnStyle(SizeType.Percent, 50));
            table.RowCount = 2;
            table.RowStyles.Add(new RowStyle(SizeType.Percent, 100));
            table.RowStyles.Add(new RowStyle(SizeType.Absolute, 30));

            table.Controls.Add(viewer, 0, 0);
            table.SetColumnSpan(viewer, 3);
            viewer.Dock = DockStyle.Fill;

            //Export current page to one image
            Button button = new Button();
            button.Text = "Export to one image";
            button.Size = new Size(180, 24);
            button.TextAlign = ContentAlignment.MiddleCenter;
            table.Controls.Add(button, 0, 1);
            button.Dock = DockStyle.Right;
            button.Click += ExportToOneImage;

            //Export current pdf document to multiple images
            button = new Button();
            button.Text = "Export to multiple images";
            button.Size = new Size(180, 24);
            button.TextAlign = ContentAlignment.MiddleCenter;
            table.Controls.Add(button, 2, 1);
            button.Dock = DockStyle.Left;
            button.Click += ExportToMultipleImages;

            mainForm.Controls.Add(table);
            table.Dock = DockStyle.Fill;

            Application.Run(mainForm);
	'form and child components
	Dim mainForm As New Form()
	mainForm.Text = "Spire.PdfView Demo - Export"
	mainForm.Size = New System.Drawing.Size(800, 600)
	mainForm.StartPosition = FormStartPosition.CenterScreen

	Dim table As New TableLayoutPanel()
	table.ColumnCount = 3
	table.ColumnStyles.Add(New ColumnStyle(SizeType.Percent, 50))
	table.ColumnStyles.Add(New ColumnStyle(SizeType.Absolute, 20))
	table.ColumnStyles.Add(New ColumnStyle(SizeType.Percent, 50))
	table.RowCount = 2
	table.RowStyles.Add(New RowStyle(SizeType.Percent, 100))
	table.RowStyles.Add(New RowStyle(SizeType.Absolute, 30))

	table.Controls.Add(viewer, 0, 0)
	table.SetColumnSpan(viewer, 3)
	viewer.Dock = DockStyle.Fill

	'Export current page to one image
	Dim button As New Button()
	button.Text = "Export to one image"
	button.Size = New Size(180, 24)
	button.TextAlign = ContentAlignment.MiddleCenter
	table.Controls.Add(button, 0, 1)
	button.Dock = DockStyle.Right
	AddHandler button.Click, AddressOf ExportToOneImage

	'Export current pdf document to multiple images
	button = New Button()
	button.Text = "Export to multiple images"
	button.Size = New Size(180, 24)
	button.TextAlign = ContentAlignment.MiddleCenter
	table.Controls.Add(button, 2, 1)
	button.Dock = DockStyle.Left
	AddHandler button.Click, AddressOf ExportToMultipleImages

	mainForm.Controls.Add(table)
	table.Dock = DockStyle.Fill

	Application.Run(mainForm)
Save the current PDF page as one image.
private static void ExportToOneImage(object sender, EventArgs e)
      {
         if (viewer.PageCount > 0)
          {
                SaveFileDialog dialog = new SaveFileDialog();
                dialog.Filter = "PNG Format(*.png)|*.png";
                if (dialog.ShowDialog() == DialogResult.OK)
                {
                    int currentPage = viewer.CurrentPageNumber;
                    Bitmap image = viewer.SaveAsImage(currentPage - 1);
                    image.Save(dialog.FileName);
                    MessageBox.Show("You have exported current page to an image:\n" + dialog.FileName, "Spire.PdfViewer Demo", MessageBoxButtons.OK, MessageBoxIcon.Information);
                }
            }
        }
Private Shared Sub ExportToOneImage(sender As Object, e As EventArgs)
	If viewer.PageCount > 0 Then
		Dim dialog As New SaveFileDialog()
		dialog.Filter = "PNG Format(*.png)|*.png"
		If dialog.ShowDialog() = DialogResult.OK Then
			Dim currentPage As Integer = viewer.CurrentPageNumber
			Dim image As Bitmap = viewer.SaveAsImage(currentPage - 1)
			image.Save(dialog.FileName)
			MessageBox.Show("You have exported current page to an image:" & vbLf & dialog.FileName, "Spire.PdfViewer Demo", MessageBoxButtons.OK, MessageBoxIcon.Information)
		End If
	End If
End Sub
Save multiple PDF pages to images.
private static void ExportToMultipleImages(object sender, EventArgs e)
        {
            if (viewer.PageCount > 0)
            {
                FolderBrowserDialog dialog = new FolderBrowserDialog();
                if (dialog.ShowDialog() == DialogResult.OK)
                {
                    int currentPage = viewer.CurrentPageNumber;
                    Bitmap[] images = viewer.SaveAsImage(0, currentPage - 1);
                    for (int i = 0; i < images.Length; i++)
                    {
                        String fileName = Path.Combine(dialog.SelectedPath, String.Format("PDFViewer-{0}.png", i));
                        images[i].Save(fileName);
                    }
                    string message = "You have exported 1" + "-" + currentPage.ToString() + " pages as images to:\n" + dialog.SelectedPath;
                    MessageBox.Show(message, "Spire.PdfViewer Demo", MessageBoxButtons.OK, MessageBoxIcon.Information);
                }
            }
        }
Private Shared Sub ExportToMultipleImages(sender As Object, e As EventArgs)
	If viewer.PageCount > 0 Then
		Dim dialog As New FolderBrowserDialog()
		If dialog.ShowDialog() = DialogResult.OK Then
			Dim currentPage As Integer = viewer.CurrentPageNumber
			Dim images As Bitmap() = viewer.SaveAsImage(0, currentPage - 1)
			For i As Integer = 0 To images.Length - 1
				Dim fileName As [String] = Path.Combine(dialog.SelectedPath, [String].Format("PDFViewer-{0}.png", i))
				images(i).Save(fileName)
			Next
			Dim message As String = "You have exported 1" & "-" & currentPage.ToString() & " pages as images to:" & vbLf & dialog.SelectedPath
			MessageBox.Show(message, "Spire.PdfViewer Demo", MessageBoxButtons.OK, MessageBoxIcon.Information)
		End If
	End If
End Sub
Step 3: Debug the project
Press F5 or click Debug to launch the project. Then, preview the effect.
Form

Export Multiple PDF Pages

Obviously, the second method is easier than the first one. But if you have a PDF document with hundreds of pages, solution 1 can exporting the specified pages in a fast speed and, to a large extent, it escapes the trouble of saving numerous PDF pages as images. While, for some PDF file with a few pages, solution 2 is more convenient.
Spire.PDFViewer is a powerful PDF Viewer component performed on .NET and WPF. It enables developers to load PDF document from stream, file and byte array. Also it is available on viewing PDF/A-1B, PDF/X1A and enables to open and read encrypted PDF files Click to know more
As its read only characteristic, PDF enjoys great popularity among business field. Especially, when sign contracts or send invoices, almost all the business contacts and invoices must be printed. Thus, printing PDF document pages becomes an unavoidable process, which requires a well knowledge of print PDF document in a quick way.
This program guide aims at introducing a method to print PDF document via PDF Viewer component Spire.PDFViewer with C#, VB.NET.
This method enables you not only to print PDF document pages but also to open any PDF document on system via Spire.PDFViewer. That is to say, one method can open and print many PDF files. Please look at the procedure below.
Step 1: Create a new project
- Create a new project in Visual Studio. Please note that this project needs a Form
- Set the Target framework of this project to be .NET Framework 2 or above in Properties
Step 2: Add reference and Set up the Form
- Add Spire.PDFViewer Form Dll as reference from your downloaded Spire.PDFViewer.
- Add a toolScript and pdfDocumentViewer in the default Form "Form1".
- Add two buttons and a ComboBox in Form1 from toolScript dropdown list.
- Set the "Name", "Display Style", "Text" and "ToolTipText" of button1 in Properties to be "btnOpen", "Text", "Open" and "Open PDF document" and button2 to be "btnPrint", "Text", "Print" and "Print PDF document".
- Set the Dock property of pdfDocumentViewer in order to view PDF file page in enough space.
Step 3: Print PDF Document Pages via PDF Viewer
Add below namespaces at the top of the method.
using System.IO;
using Spire.PdfViewer.Forms;
Imports System.IO
Imports Spire.PdfViewer.Forms
Load a PDF document from system
        private void Form1_Load(object sender, EventArgs e)
        {
            string pdfDoc = @"D:\e-iceblue\Spire.PDFViewer\Demos\Data\Spire.Office.pdf";
            if (File.Exists(pdfDoc))
            {
                this.pdfDocumentViewer1.LoadFromFile(pdfDoc);
            }

        }
	Private Sub Form1_Load(sender As Object, e As EventArgs)
	   Dim pdfDoc As String = "D:\e-iceblue\Spire.PDFViewer\Demos\Data\Spire.Office.pdf"
	        If File.Exists(pdfDoc) Then
	            Me.pdfDocumentViewer1.LoadFromFile(pdfDoc)
	        End If

	End Sub
Open the PDF document
        private void btnOpen_Click(object sender, EventArgs e)
        {
            OpenFileDialog dialog = new OpenFileDialog();
            dialog.Filter = "PDF document (*.pdf)|*.pdf";
            DialogResult result = dialog.ShowDialog();
            if (result == DialogResult.OK)
            {

                string pdfFile = dialog.FileName;
                this.pdfDocumentViewer1.LoadFromFile(pdfFile);
            }
        }
	Private Sub btnOpen_Click(sender As Object, e As EventArgs)
		Dim dialog As New OpenFileDialog()
		dialog.Filter = "PDF document (*.pdf)|*.pdf"
		Dim result As DialogResult = dialog.ShowDialog()
	         If result = DialogResult.OK Then

		Dim pdfFile As String = dialog.FileName
		Me.pdfDocumentViewer1.LoadFromFile(pdfFile)
		End If
	End Sub
Print PDF document pages via PDF Viewer
        private void btnPrint_Click(object sender, EventArgs e)
        {
            if (this.pdfDocumentViewer1.PageCount > 0)
            {
                this.pdfDocumentViewer1.Print();
            }
        }


        private void pdfDocumentViewer1_PdfLoaded(object sender, EventArgs args)
        {
            this.comBoxPages.Items.Clear();
            int totalPage = this.pdfDocumentViewer1.PageCount;

            for (int i = 1; i <= totalPage; i++)
            {
                this.comBoxPages.Items.Add(i.ToString());
            }

            this.comBoxPages.SelectedIndex = 0;
        }

        private void pdfDocumentViewer1_PageNumberChanged(object sender, EventArgs args)
        {
            if (this.comBoxPages.Items.Count <= 0)
                return;
            if (this.pdfDocumentViewer1.CurrentPageNumber != this.comBoxPages.SelectedIndex + 1)
            {
                this.comBoxPages.SelectedIndex = this.pdfDocumentViewer1.CurrentPageNumber - 1;
            }
        }

        private void comBoxPages_SelectedIndexChanged(object sender, EventArgs e)
        {
            int soucePage = this.pdfDocumentViewer1.CurrentPageNumber;
            int targetPage = this.comBoxPages.SelectedIndex + 1;
            if (soucePage != targetPage)
            {
                this.pdfDocumentViewer1.GoToPage(targetPage);
            }
        }
	Private Sub btnPrint_Click(sender As Object, e As EventArgs)
		If Me.pdfDocumentViewer1.PageCount > 0 Then
			Me.pdfDocumentViewer1.Print()
		End If
	End Sub


	Private Sub pdfDocumentViewer1_PdfLoaded(sender As Object, args As EventArgs)
	         Me.comBoxPages.Items.Clear()
		Dim totalPage As Integer = Me.pdfDocumentViewer1.PageCount

		For i As Integer = 1 To totalPage
			Me.comBoxPages.Items.Add(i.ToString())
		Next

		Me.comBoxPages.SelectedIndex = 0
		End Sub

	Private Sub pdfDocumentViewer1_PageNumberChanged(sender As Object, args As EventArgs)
		If Me.comBoxPages.Items.Count <= 0 Then
			Return
		End If
		If Me.pdfDocumentViewer1.CurrentPageNumber <> Me.comBoxPages.SelectedIndex + 1 Then
			Me.comBoxPages.SelectedIndex = Me.pdfDocumentViewer1.CurrentPageNumber - 1
		End If
	End Sub

	Private Sub comBoxPages_SelectedIndexChanged(sender As Object, e As EventArgs)
		Dim soucePage As Integer = Me.pdfDocumentViewer1.CurrentPageNumber
		Dim targetPage As Integer = Me.comBoxPages.SelectedIndex + 1
		If soucePage <> targetPage Then
			Me.pdfDocumentViewer1.GoToPage(targetPage)
		End If
	End Sub
Step 4: Press F5 or debug the project
After debugging, you can preview the effect.
The First Page
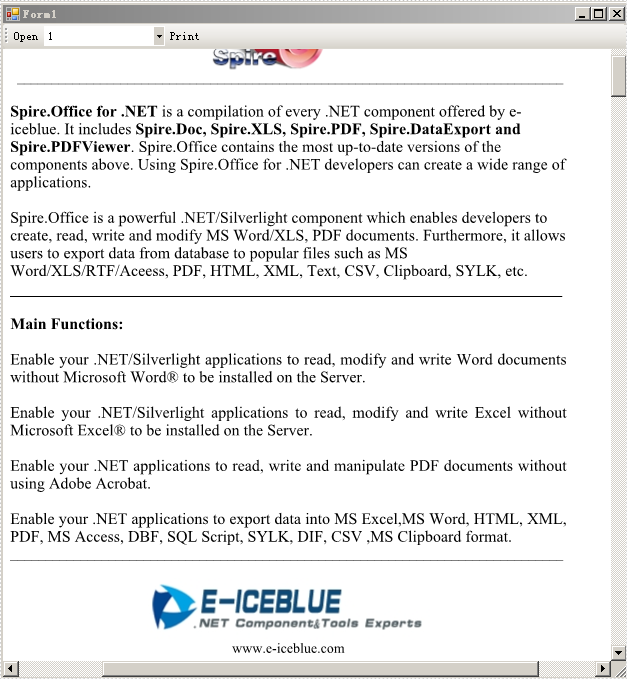
The Fourth Page

When you click the "Open" button, there will be a dialog box appears and then you can open another PDF document from system. Also, you can select any page in the dropdown list of the ComboBox and click "Print" button to print it.
