
Knowledgebase (2344)
Children categories
Grouping data in a pivot table simplifies data analysis by consolidating similar items into meaningful categories. For example, you can group dates into months or years to see trends over time, or group numbers into ranges like price levels or age groups for easier comparison and analysis. In this article, we will demonstrate how to group data in Excel pivot tables based on dates and numbers in C# using Spire.XLS for .NET.
- Group Pivot Table Data in Excel Based on Dates in C#
- Group Pivot Table Data in Excel Based on Numbers in C#
Install Spire.XLS for .NET
To begin with, you need to add the DLL files included in the Spire.XLS for .NET package as references in your .NET project. The DLL files can be either downloaded from this link or installed via NuGet.
PM> Install-Package Spire.XLS
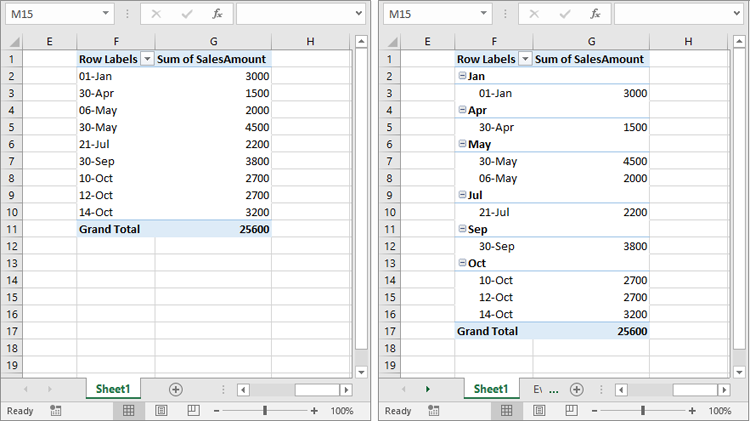
Group Pivot Table Data in Excel Based on Dates in C#
The IPivotField.CreateGroup(DateTime start, DateTime end, PivotGroupByTypes[] groupByArray) method in Spire.XLS for .NET allows developers to group data in Excel pivot tables based on date and time. It requires three parameters: a start date time, an end date time, and an array of grouping categories specified by the PivotGroupByTypes enum.
The list below shows the categories that can be used when grouping by date and time:
- Days
- Months
- Quarters
- Years
- Seconds
- Minutes
- Hours
The steps below demonstrate how to group the data in a pivot table by date and time using Spire.XLS for .NET:
- Create an instance of the Workbook class.
- Load an Excel file using the Workbook.LoadFromFile() method.
- Access the worksheet that contains the pivot table using the Workbook.Worksheets[] property.
- Get the pivot table using the Worksheet.PivotTables[] property.
- Get the specific pivot field that you want to group using the XlsPivotTable.PivotFields[] property.
- Create two instances of the DateTime class to specify the start date time and end date time.
- Create a PivotGroupByTypes array to specify the grouping categories, such as days and months.
- Group the data of the selected pivot field based on the specified grouping categories using the IPivotField.CreateGroup(DateTime start, DateTime end, PivotGroupByTypes[] groupByArray) method.
- Refresh the pivot table using the XlsPivotTable.IsRefreshOnLoad property.
- Save the result file using the Workbook.SaveToFile() method.
- C#
using Spire.Xls;
using Spire.Xls.Core.Spreadsheet.PivotTables;
using System;

namespace GroupDataInPivotTableByDates
{
    internal class Program
    {
        static void Main(string[] args)
        {
            // Create an instance of the Workbook class
            Workbook workbook = new Workbook();
            // Load an Excel file
            workbook.LoadFromFile("Sample1.xlsx");

            // Get the first worksheet
            Worksheet sheet = workbook.Worksheets[0];

            // Get the first pivot table in the worksheet
            XlsPivotTable pt = sheet.PivotTables[0] as XlsPivotTable;

            // Get the "Date" pivot field
            PivotField ptField = pt.PivotFields["Date"] as PivotField;
            // Specify the start date time and end date time
            DateTime start = new DateTime(2024, 1, 1);
            DateTime end = new DateTime(2024, 10, 14);

            // Create a PivotGroupByTypes array to specify the grouping categories, such as days and months
            PivotGroupByTypes[] groupByTypes = new PivotGroupByTypes[]
            {
                PivotGroupByTypes.Days,
                PivotGroupByTypes.Months
            };

            // Group the data in the pivot field based on the specified grouping categories
            ptField.CreateGroup(start, end, groupByTypes);

            // Refresh the pivot table
            pt.Cache.IsRefreshOnLoad = true;

            // Save the result file
            workbook.SaveToFile("GroupPivotTableDataByDates.xlsx", FileFormat.Version2016);
            workbook.Dispose();
        }
    }
}
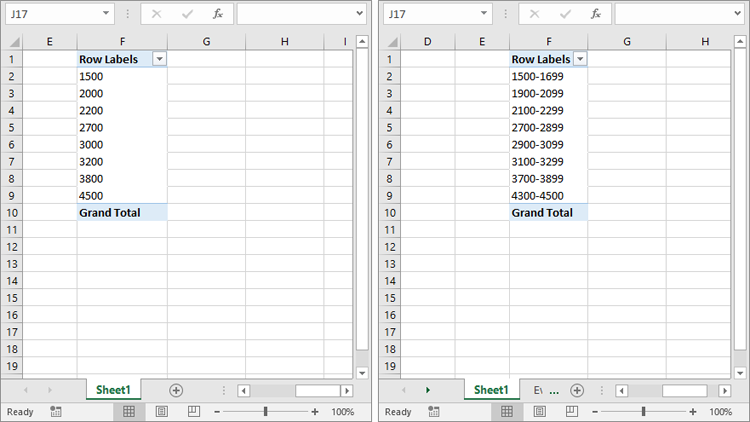
Group Pivot Table Data in Excel Based on Numbers in C#
In addition to grouping based on date and time, Spire.XLS for .NET also enables developers to group pivot table data based on numeric values using another overload of the CreateGroup() method: CreateGroup(double startValue, double endValue, double intervalValue). The detailed steps are as follows.
- Create an instance of the Workbook class.
- Load an Excel file using the Workbook.LoadFromFile() method.
- Access the worksheet that contains the pivot table using the Workbook.Worksheets[] property.
- Get the pivot table using the Worksheet.PivotTables[] property.
- Get the specific pivot field that you want to group using the XlsPivotTable.PivotFields[] property.
- Group the data in the selected pivot field based on numeric values using the IPivotField.CreateGroup(double startValue, double endValue, double intervalValue) method.
- Calculate the pivot table data using the XlsPivotTable.CalculateData() method.
- Refresh the pivot table using the XlsPivotTable.IsRefreshOnLoad property.
- Save the result file using the Workbook.SaveToFile() method.
- C#
using Spire.Xls;
using Spire.Xls.Core.Spreadsheet.PivotTables;

namespace GroupDataInPivotTableByNumbers
{
    internal class Program
    {
        static void Main(string[] args)
        {
            // Create an instance of the Workbook class
            Workbook workbook = new Workbook();
            // Load an Excel file
            workbook.LoadFromFile("Sample2.xlsx");

            // Get the first worksheet
            Worksheet pivotSheet = workbook.Worksheets[0];

            // Get the first pivot table in the worksheet
            XlsPivotTable pt = pivotSheet.PivotTables[0] as XlsPivotTable;

            // Group data of the "SalesAmount" pivot field based on based on numeric values
            PivotField ptField = pt.PivotFields["SalesAmount"] as PivotField;
            ptField.CreateGroup(1500, 4500, 200);

            // Calculate the pivot table data
            pt.CalculateData();
            // Refresh the pivot table
            pt.Cache.IsRefreshOnLoad = true;

            // Save the result file
            workbook.SaveToFile("GroupPivotTableDataByNumbers.xlsx", FileFormat.Version2016);
            workbook.Dispose();
        }
    }
}
Apply for a Temporary License
If you'd like to remove the evaluation message from the generated documents, or to get rid of the function limitations, please request a 30-day trial license for yourself.
In Word, each paragraph should convey a unique idea or point, helping to organize information in a way that is easy for readers to understand. Inserting new paragraphs allows you to introduce new concepts or expand on different aspects of a topic, making the text clearer. In this article, you will learn how to insert a new paragraph in Word in Python using Spire.Doc for Python.
- Add a Paragraph at the End of a Word Document in Python
- Insert a Paragraph at a Specified Location in Word in Python
Install Spire.Doc for Python
This scenario requires Spire.Doc for Python and plum-dispatch v1.7.4. They can be easily installed in your Windows through the following pip commands.
pip install Spire.Doc
If you are unsure how to install, please refer to this tutorial: How to Install Spire.Doc for Python on Windows
Add a Paragraph at the End of a Word Document in Python
To add a new paragraph at the end, you need to get the last section of the Word document through the Document.LastSection property, and then add a paragraph at the end of the section through the Section.AddParagraph() method. The following are the detailed steps:
- Create a Document instance.
- Load a Word document using Document.LoadFromFile() method.
- Get the last section of the document using Document.LastSection property.
- Add a paragraph at the end of the section using Section.AddParagraph() method, and then add text to it using Paragraph.AppendText() method.
- Create a ParagraphStyle object and set the font name, size, style of the paragraph text.
- Apply the paragraph style using Paragraph.ApplyStyle() method
- Save the result document using Document.SaveToFile() method.
- Python
from spire.doc import *
from spire.doc.common import *

# Create a Document object
doc = Document()

# Load a Word document
doc.LoadFromFile("Test.docx")

# Get the first section
section = doc.LastSection

# Add a paragraph at the end and set its text content
para = section.AddParagraph()
para.AppendText("Add a paragraph to the end of the document.")

# Set the paragraph style
style = ParagraphStyle(doc)
style.Name = "Style1"
style.CharacterFormat.FontName = "Times New Roman"
style.CharacterFormat.FontSize = 12
style.CharacterFormat.TextColor = Color.get_Blue()
style.CharacterFormat.Bold= True
doc.Styles.Add(style)
para.ApplyStyle("Style1")
para.Format.BeforeSpacing = 10

# Save the result file
doc.SaveToFile("AddParagraph.docx", FileFormat.Docx2016)
doc.Close()

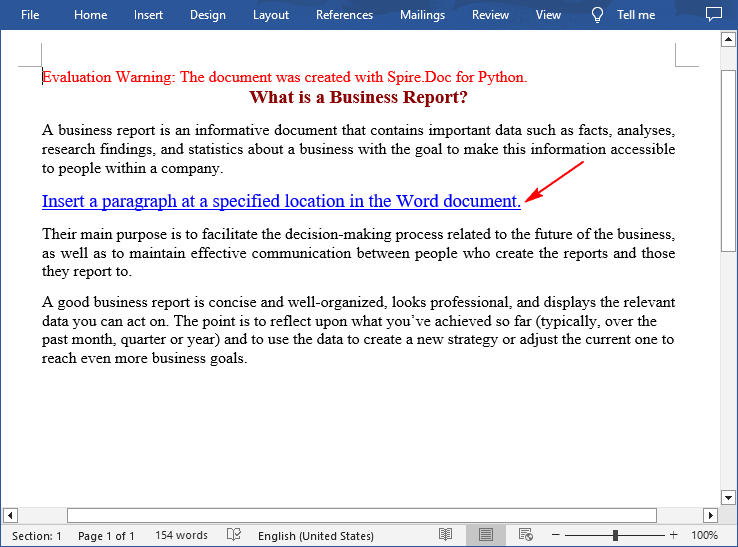
Insert a Paragraph at a Specified Location in Word in Python
You can also add a paragraph and then insert it to a specified position in Word through the Section.Paragraphs.Insert(index: int, paragraph: IParagraph) method. The following are the detailed steps:
- Create a Document instance.
- Load a Word document using Document.LoadFromFile() method.
- Get a specified section using Document.Sections[] property.
- Add a paragraph using Section.AddParagraph() method, and then add text to it using Paragraph.AppendText() method.
- Set the font name, size, style of the paragraph text.
- Insert the newly added paragraph at a specified index using Section.Paragraphs.Insert(index: int, paragraph: IParagraph) method.
- Save the result document using Document.SaveToFile() method.
- Python
from spire.doc import *
from spire.doc.common import *

# Create a Document object
doc = Document()

# Load a Word document
doc.LoadFromFile("Test.docx")

# Get the first section
section = doc.Sections[0]

# Add a paragraph and set its text content
para = section.AddParagraph()
textRange = para.AppendText("Insert a paragraph at a specified location in the Word document.")

# Set the font name, size, color and style
textRange.CharacterFormat.TextColor = Color.get_Blue()
textRange.CharacterFormat.FontName = "Times New Roman"
textRange.CharacterFormat.FontSize = 14
textRange.CharacterFormat.UnderlineStyle = UnderlineStyle.Single

# Insert the paragraph as the third paragraph
section.Paragraphs.Insert(2, para)

# Set spacing after the paragraph
para.Format.AfterSpacing = 10

# Save the result file
doc.SaveToFile("InsertParagraph.docx", FileFormat.Docx2016)
doc.Close()
Apply for a Temporary License
If you'd like to remove the evaluation message from the generated documents, or to get rid of the function limitations, please request a 30-day trial license for yourself.
Python: Insert, Retrieve, Reorder, and Remove Slides in PowerPoint Sections
2024-11-26 01:20:18 Written by AdministratorPowerPoint presentations are a powerful tool for presenting information in an organized and engaging manner. To further enhance the organization of slides, PowerPoint allows users to group slides into sections. This feature makes navigating and managing large presentations much easier. In this article, we'll show you how to manage slides within PowerPoint sections in Python using Spire.Presentation for Python. Specifically, we'll cover how to add, retrieve, reorder, and remove slides in these sections.
- Insert Slides into a PowerPoint Section in Python
- Retrieve Slides from a PowerPoint Section in Python
- Reorder Slides in a PowerPoint Section in Python
- Remove Slides from a PowerPoint Section in Python
Install Spire.Presentation for Python
This scenario requires Spire.Presentation for Python and plum-dispatch v1.7.4. They can be easily installed in your Windows through the following pip command.
pip install Spire.Presentation
If you are unsure how to install, please refer to this tutorial: How to Install Spire.Presentation for Python on Windows
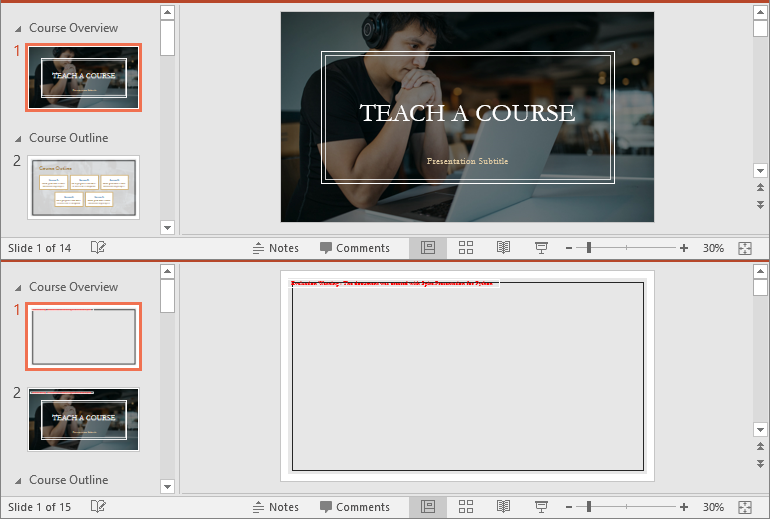
Insert Slides into a PowerPoint Section in Python
Inserting slides is essential when you want to introduce new content to a section. Using Spire.Presentation for Python, you can quickly insert a slide into a section with the Section.Insert() method. The detailed steps are as follows.
- Create an instance of the Presentation class.
- Load a PowerPoint presentation using the Presentation.LoadFromFile() method.
- Get a specific section through its index (0-based) using the Presentation.SectionList(index) property.
- Add a new slide to the presentation, then insert it into the section using the Section.Insert() method.
- Remove the added slide from the presentation.
- Save the resulting presentation using the Presentation.SaveToFile() method.
- Python
from spire.presentation import *

# Create an instance of the Presentation class
presentation = Presentation()
# Load a PowerPoint presentation
presentation.LoadFromFile("Example.pptx")

# Access the first section
first_section = presentation.SectionList.get_Item(0)

# Add a new slide to the presentation and insert it at the start of the section
slide = presentation.Slides.Append()
first_section.Insert(0, slide)

# Remove the added slide from the presentation
presentation.Slides.Remove(slide)

# Save the modified presentation
presentation.SaveToFile("InsertSlidesInSection.pptx", FileFormat.Pptx2016)
# Close the Presentation object
presentation.Dispose()
Retrieve Slides from a PowerPoint Section in Python
Retrieving slides from a specific section allows you to focus on a smaller group of slides for tasks such as reordering or applying custom formatting. Using the Section.GetSlides() method in Spire.Presentation for Python, you can easily access all the slides in a particular section. The detailed steps are as follows.
- Create an instance of the Presentation class.
- Load a PowerPoint presentation using the Presentation.LoadFromFile() method.
- Get a specific section through its index (0-based) using the Presentation.SectionList(index) property.
- Retrieve the slides within the section using the Section.GetSlides() method.
- Iterate through the retrieved slides and get the slide number (1-based) of each slide.
- Python
from spire.presentation import *

# Create an instance of the Presentation class
presentation = Presentation()
# Load a PowerPoint presentation
presentation.LoadFromFile("Example.pptx")

# Retrieve the slides in the 3rd section
section = presentation.SectionList.get_Item(2)
slides = section.GetSlides()

output_content = "The slide numbers in this section are:\n"

# Get the slide number of each slide in the section
for slide in slides:
    output_content += str(slide.SlideNumber) + " "

# Save the slide number to a text file
with open("slide_numbers.txt", "w") as file:
    file.write(output_content)

Reorder Slides in a PowerPoint Section in Python
Reordering slides is important to ensure related content is in the right order. Spire.Presentation for Python offers the Section.Move() method, which allows you to move a slide to a new position within a section. The detailed steps are as follows.
- Create an instance of the Presentation class.
- Load a PowerPoint presentation using the Presentation.LoadFromFile() method.
- Get a specific section through its index (0-based) using the Presentation.SectionList(index) property.
- Move a specific slide in the section to another position using the Section.Move() method.
- Save the resulting presentation using the Presentation.SaveToFile() method.
- Python
from spire.presentation import *

# Create an instance of the Presentation class
presentation = Presentation()
# Load a PowerPoint presentation
presentation.LoadFromFile("Example.pptx")

# Access the 3rd section
section = presentation.SectionList.get_Item(2)

# Retrieve the slides in the section
slides = section.GetSlides()

# Move the 1st slide in the section to the specified position
section.Move(2, slides[0])

# Save the modified presentation
presentation.SaveToFile("ReorderSlidesInSection.pptx", FileFormat.Pptx2016)
# Close the Presentation object
presentation.Dispose()
Remove Slides from a PowerPoint Section in Python
Removing slides from a section streamlines your presentation, particularly when some slides become outdated or unnecessary. With Spire.Presentation for Python, you can easily remove a single slide or multiple slides from a section using the Section.RemoveAt() or Section.RemoveRange() method. The detailed steps are as follows.
- Create an instance of the Presentation class.
- Load a PowerPoint presentation using the Presentation.LoadFromFile() method.
- Get a specific section through its index (0-based) using the Presentation.SectionList(index) property.
- Remove a specific slide or a range of slides from the presentation using the Section.RemoveAt() or Section.RemoveRange() method.
- Save the resulting presentation using the Presentation.SaveToFile() method.
- Python
from spire.presentation import *

# Create an instance of the Presentation class
presentation = Presentation()
# Load a PowerPoint presentation
presentation.LoadFromFile("Example.pptx")

# Access the 3rd section
section = presentation.SectionList.get_Item(2)

# Remove the first slide from the section
section.RemoveAt(0)

# Or remove a range of slides from the section
# section.RemoveRange(0, 2)

# Save the modified presentation
presentation.SaveToFile("RemoveSlidesInSection.pptx", FileFormat.Pptx2016)
# Close the Presentation object
presentation.Dispose()
Apply for a Temporary License
If you'd like to remove the evaluation message from the generated documents, or to get rid of the function limitations, please request a 30-day trial license for yourself.
