
Knowledgebase (2344)
Children categories
Python: Remove Backgrounds from PowerPoint Slide or Slide Masters
2024-11-06 01:03:12 Written by KoohjiA well-chosen background can enhance a presentation's appeal, but overly elaborate colors or images may distract viewers and obscure the main message. Additionally, when reusing templates, the original background may not suit the new content. In these cases, removing the background becomes essential to keep your slides clear and focused. This article will show you how to remove backgrounds from PowerPoint slides or slide masters in Python with Spire.Presentation for Python, giving you the flexibility to create clean, professional presentations that keep the audience's attention on what matters.
- Remove Backgrounds from the Specified Slide
- Remove Backgrounds from All Slides
- Remove Backgrounds from PowerPoint Slide Masters
Install Spire.Presentation for Python
This scenario requires Spire.Presentation for Python and plum-dispatch v1.7.4. They can be easily installed in your Windows through the following pip command.
pip install Spire.Presentation
If you are unsure how to install, please refer to this tutorial: How to Install Spire.Presentation for Python on Windows
Remove Backgrounds from the Specified Slide
There are typically two types of backgrounds in PowerPoint: background colors and background images. Although these backgrounds differ in their setup, the method to clear them is the same - using the BackgroundType property provided by Spire.Presentation for Python. Let's take a closer look at how to remove backgrounds from a PowerPoint slide with it.
Steps to remove background from a specified slide:
- Create an object for the Presentation class.
- Load a PowerPoint presentation from the local storage using Presentation.LoadFromFile() method.
- Get a certain slide with Presentation.Slides[] method.
- Remove the background by configuring BackgroundType property to none.
- Save the modified PowerPoint presentation using Presentation.SaveToFile() method, and release the memory.
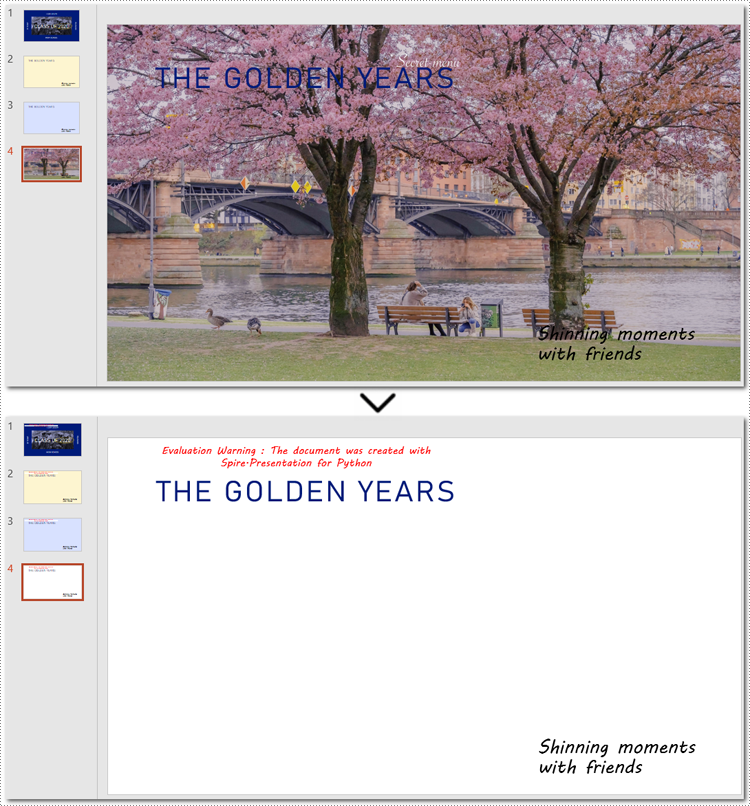
Here is the code example of removing the background on the fourth slide:
- Python
from spire.presentation import *

# Create a Presentation document object
presentation = Presentation()
# Read the presentation document from file
presentation.LoadFromFile("imagebackground.pptx")

# Get the fourth slide
slide = presentation.Slides[3]

# Remove the background by setting the background type
slide.SlideBackground.Type = BackgroundType.none

# Save the modified presentation
presentation.SaveToFile("RemoveBackground.pptx", FileFormat.Pptx2010)

# Release resource
presentation.Dispose()
Remove Backgrounds from All Slides
Batch-deleting all slide backgrounds follows nearly the same steps as deleting a single slide background. The main difference is that you'll need to loop through each slide before setting the background type to ensure no slides are missed.
Steps to remove backgrounds from PowerPoint slides in a batch:
- Instantiate a Presentation class.
- Specify the file path to read a PowerPoint presentation using Presentation.LoadFromFile() method.
- Loop through each slide in the presentation.
- Remove all backgournds by applying BackgroundType.none property to each slide.
- Save the updated PowerPoint presentation as a new file with Presentation.SaveToFile() method, and release the resource.
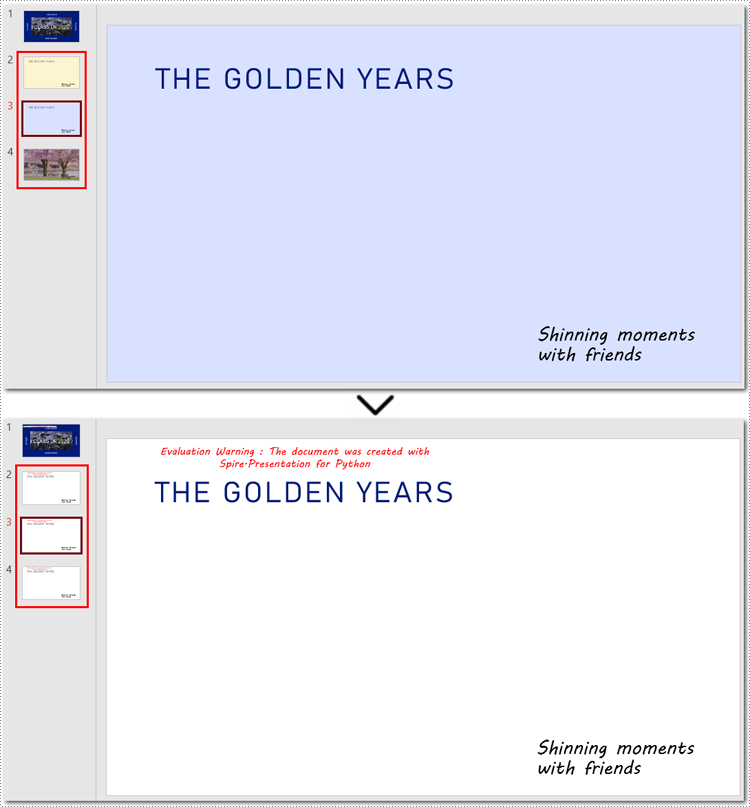
Below is the code example for removing each background from PowerPoint slides:
- Python
from spire.presentation import *

# Create a Presentation document object
presentation = Presentation()
# Read the presentation document from file
presentation.LoadFromFile("presentation.pptx")

# Loop through each slide
for slide in presentation.Slides:
    # Remove the background image or color by setting the background type
    slide.SlideBackground.Type = BackgroundType.none

# Save the modified presentation
presentation.SaveToFile("RemoveBackground_allSlides.pptx", FileFormat.Pptx2010)

# Release resource
presentation.Dispose()
How to Remove Backgrounds from PowerPoint Slide Masters
If the slide background still exists after using the above method, you may need to remove the slide master's background instead. Unlike individual slides, setting the background of a slide master applies changes across all slides, so removing the slide master background can efficiently clear all backgrounds at once.
Steps to remove backgrounds from PowerPoint slide masters:
- Create an instance of the Presentation class.
- Load a presentation from the disk with Presentation.LoadFromFile() method.
- Retrieve a specified slide master using Presentation.Masters[] method.
- Access the background of the slide master with Masters.SlideBackground property.
- Remove the background by setting BackgroundType property to none.
- Save the newly modified PowerPoint presentation with Presentation.SaveToFile() method.
Note: Since the process of batch-removing slide master backgrounds is almost similar to deleting background from a slide master, this section will show the steps in the code comments rather than listing them separately.
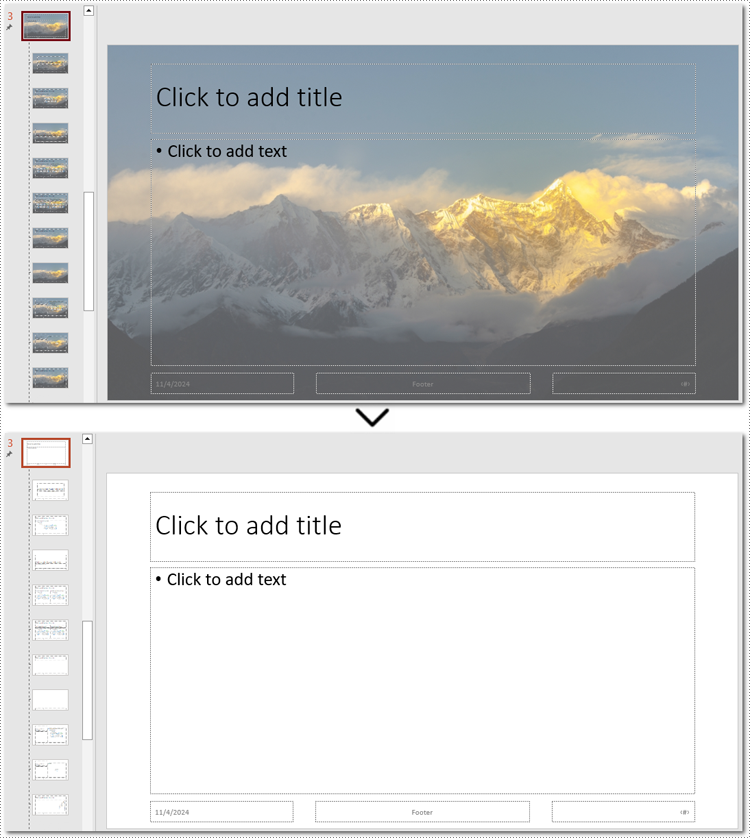
Here is an example of removing the background from the third slide master:
- Python
from spire.presentation import *


# Create a Presentation object
presentation = Presentation()

# Load the sample file from the disk
presentation.LoadFromFile("presentation.pptx")

# Get the third slide master
master = presentation.Masters[2]

# Access the background of the slide master
SlideBackground = master.SlideBackground

# Clear the background by setting the slide master background style to none
master.SlideBackground.Type = BackgroundType.none

# Loop through each slide master
#for master in presentation.Masters:
    # Set the background type to none to remove it
    #master.SlideBackground.Type = BackgroundType.none

# Save the result presentation
presentation.SaveToFile("remove_background.pptx", FileFormat.Pptx2013)

# Release resources
presentation.Dispose()
Apply for a Temporary License
If you'd like to remove the evaluation message from the generated documents, or to get rid of the function limitations, please request a 30-day trial license for yourself.
HTML is widely used to present content in web browsers, but preserving its exact layout when sharing or printing can be challenging. PDF, by contrast, is a universally accepted format that reliably maintains document layout across various devices and operating systems. Converting HTML to PDF is particularly useful in web development, especially when creating printable versions of web pages or generating reports from web data.
Spire.PDF for .NET now supports a streamlined method to convert HTML to PDF in C# using the ChromeHtmlConverter class. This tutorial provides step-by-step guidance on performing this conversion effectively.
- Convert HTML to PDF with ChromeHtmlConverter in C#
- Generate Output Logs During HTML to PDF Conversion in C#
Install Spire.PDF for .NET
To begin with, you need to add the DLL files included in the Spire.PDF for.NET package as references in your .NET project. The DLLs files can be either downloaded from this link or installed via NuGet.
PM> Install-Package Spire.PDF
Install Google Chrome
This method requires Google Chrome to perform the conversion. If Chrome is not already installed, you can download it from this link and install it.
Convert HTML to PDF using ChromeHtmlConverter in C#
You can utilize the ChromeHtmlConverter.ConvertToPdf() method to convert an HTML file to a PDF using the Chrome plugin. This method accepts 3 parameters, including the input HTML file path, output PDF file path, and ConvertOptions which allows customization of conversion settings like conversion timeout, PDF paper size and page margins. The detailed steps are as follows.
- Create an instance of the ChromeHtmlConverter class and provide the path to the Chrome plugin (chrome.exe) as a parameter in the class constructor.
- Create an instance of the ConvertOptions class.
- Customize the conversion settings, such as the conversion timeout, the paper size and page margins of the converted PDF through the properties of the ConvertOptions class.
- Convert an HTML file to PDF using the ChromeHtmlConverter.ConvertToPdf() method.
- C#
using Spire.Additions.Chrome;

namespace ConvertHtmlToPdfUsingChrome
{
    internal class Program
    {
        static void Main(string[] args)
        {
            //Specify the input URL and output PDF file path
            string inputUrl = @"https://www.e-iceblue.com/Tutorials/Spire.PDF/Spire.PDF-Program-Guide/C-/VB.NET-Convert-Image-to-PDF.html";
            string outputFile = @"HtmlToPDF.pdf";

            //Specify the path to the Chrome plugin
            string chromeLocation = @"C:\Program Files\Google\Chrome\Application\chrome.exe";

            //Create an instance of the ChromeHtmlConverter class
            ChromeHtmlConverter converter = new ChromeHtmlConverter(chromeLocation);

            // Create an instance of the ConvertOptions class
            ConvertOptions options = new ConvertOptions();
            //Set conversion timeout
            options.Timeout = 10 * 3000;
            //Set paper size and page margins of the converted PDF
            options.PageSettings = new PageSettings()
            {
                PaperWidth = 8.27,
                PaperHeight = 11.69,
                MarginTop = 0,
                MarginLeft = 0,
                MarginRight = 0,
                MarginBottom = 0

            };

            //Convert the URL to PDF
            converter.ConvertToPdf(inputUrl, outputFile, options);
        }
    }
}
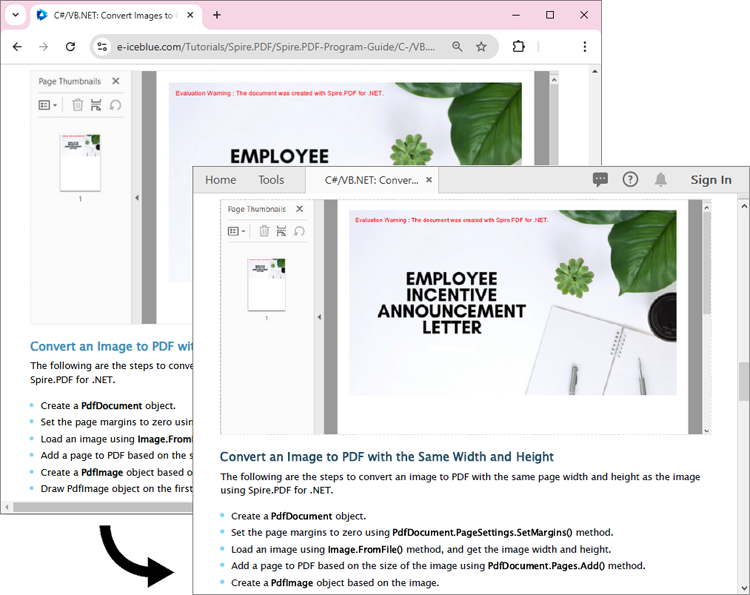
The converted PDF file maintains the same appearance as if the HTML file were printed to PDF directly through the Chrome browser:
Generate Output Logs During HTML to PDF Conversion in C#
Spire.PDF for .NET enables you to generate output logs during HTML to PDF conversion using the Logger class. The detailed steps are as follows.
- Create an instance of the ChromeHtmlConverter class and provide the path to the Chrome plugin (chrome.exe) as a parameter in the class constructor.
- Enable Logging by creating a Logger object and assigning it to the ChromeHtmlConverter.Logger property.
- Create an instance of the ConvertOptions class.
- Customize the conversion settings, such as the conversion timeout, the paper size and page margins of the converted PDF through the properties of the ConvertOptions class.
- Convert an HTML file to PDF using the ChromeHtmlConverter.ConvertToPdf() method.
- C#
using Spire.Additions.Chrome;

namespace ConvertHtmlToPdfUsingChrome
{
    internal class Program
    {
        static void Main(string[] args)
        {
            //Specify the input URL and output PDF file path
            string inputUrl = @"https://www.e-iceblue.com/Tutorials/Spire.PDF/Spire.PDF-Program-Guide/C-/VB.NET-Convert-Image-to-PDF.html";
            string outputFile = @"HtmlToPDF.pdf";

            // Specify the log file path
            string logFilePath = @"Logs.txt";

            //Specify the path to the Chrome plugin
            string chromeLocation = @"C:\Program Files\Google\Chrome\Application\chrome.exe";

            //Create an instance of the ChromeHtmlConverter class
            ChromeHtmlConverter converter = new ChromeHtmlConverter(chromeLocation);
            //Enable logging
            converter.Logger = new Logger(logFilePath);

            //Create an instance of the ConvertOptions class
            ConvertOptions options = new ConvertOptions();
            //Set conversion timeout
            options.Timeout = 10 * 3000;
            //Set paper size and page margins of the converted PDF
            options.PageSettings = new PageSettings()
            {
                PaperWidth = 8.27,
                PaperHeight = 11.69,
                MarginTop = 0,
                MarginLeft = 0,
                MarginRight = 0,
                MarginBottom = 0

            };

            //Convert the URL to PDF
            converter.ConvertToPdf(inputUrl, outputFile, options);
        }
    }
}
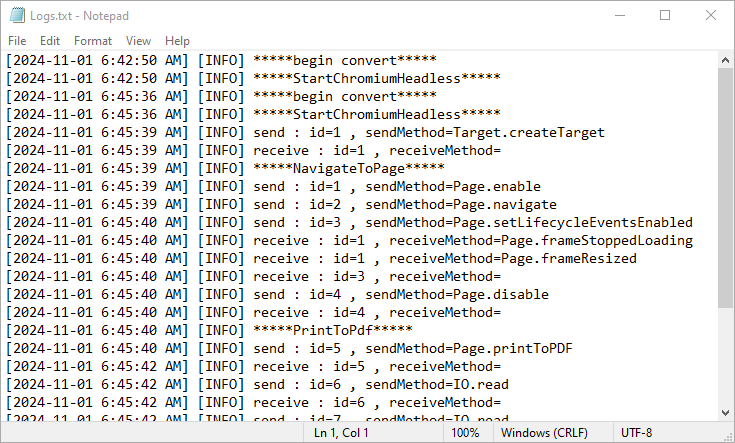
Here is the screenshot of the output log file:
Apply for a Temporary License
If you'd like to remove the evaluation message from the generated documents, or to get rid of the function limitations, please request a 30-day trial license for yourself.
PDF forms are essential tools for collecting information across various industries. Understanding how to import and export this data in different formats like FDF, XFDF, and XML can greatly enhance your data management processes. For instance, importing form data allows you to update or pre-fill PDF forms with existing information, saving time and increasing accuracy. Conversely, exporting form data enables you to share collected information effortlessly with other applications, facilitating seamless integration and minimizing manual entry errors. In this article, we will introduce how to import and export PDF form data in Python using Spire.PDF for Python.
- Import PDF Form Data from FDF, XFDF or XML Files in Python
- Export PDF Form Data to FDF, XFDF or XML Files in Python
Install Spire.PDF for Python
This scenario requires Spire.PDF for Python and plum-dispatch v1.7.4. They can be easily installed in your Windows through the following pip command.
pip install Spire.PDF
If you are unsure how to install, please refer to this tutorial: How to Install Spire.PDF for Python on Windows
Import PDF Form Data from FDF, XFDF or XML Files in Python
Spire.PDF for Python offers the PdfFormWidget.ImportData() method for importing PDF form data from FDF, XFDF, or XML files. The detailed steps are as follows.
- Create an object of the PdfDocument class.
- Load a PDF document using PdfDocument.LoadFromFile() method.
- Get the form of the PDF document using PdfDocument.Form property.
- Import form data from an FDF, XFDF or XML file using PdfFormWidget.ImportData() method.
- Save the resulting document using PdfDocument.SaveToFile() method.
- Python
from spire.pdf.common import *
from spire.pdf import *
# Create an object of the PdfDocument class
pdf = PdfDocument()
# Load a PDF document
pdf.LoadFromFile("Forms.pdf")
# Get the form of the document
pdfForm = pdf.Form
formWidget = PdfFormWidget(pdfForm)
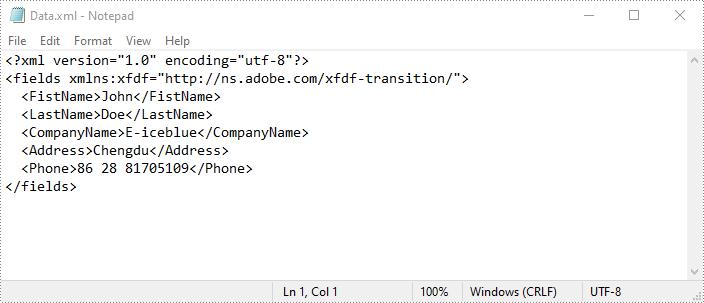
# Import PDF form data from an XML file
formWidget.ImportData("Data.xml", DataFormat.Xml)
# Import PDF form data from an FDF file
# formWidget.ImportData("Data.fdf", DataFormat.Fdf)
# Import PDF form data from an XFDF file
# formWidget.ImportData("Data.xfdf", DataFormat.XFdf)
# Save the resulting document
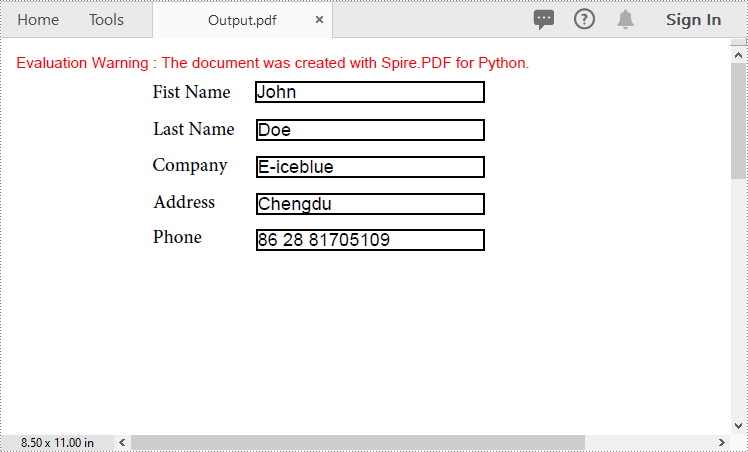
pdf.SaveToFile("Output.pdf")
# Close the PdfDocument object
pdf.Close()
Export PDF Form Data to FDF, XFDF or XML Files in Python
Spire.PDF for Python also enables developers to export PDF form data to FDF, XFDF, or XML files by using the PdfFormWidget.ExportData() method. The detailed steps are as follows.
- Create an object of the PdfDocument class.
- Load a PDF document using PdfDocument.LoadFromFile() method.
- Get the form of the PDF document using PdfDocument.Form property.
- Export form data to an FDF, XFDF or XML file using PdfFormWidget.ExportData() method.
- Python
from spire.pdf.common import *
from spire.pdf import *

# Create an object of the PdfDocument class
pdf = PdfDocument()
# Load a PDF document
pdf.LoadFromFile("Forms.pdf")

# Get the form of the document
pdfForm = pdf.Form
formWidget = PdfFormWidget(pdfForm)

# Export PDF form data to an XML file
formWidget.ExportData("Data.xml", DataFormat.Xml, "Form")

# Export PDF form data to an FDF file
# formWidget.ExportData("Data.fdf", DataFormat.Fdf, "Form")

# Export PDF form data to an XFDF file
# formWidget.ExportData("Data.xfdf", DataFormat.XFdf, "Form")

# Close the PdfDocument object
pdf.Close()
Apply for a Temporary License
If you'd like to remove the evaluation message from the generated documents, or to get rid of the function limitations, please request a 30-day trial license for yourself.
