
Knowledgebase (2344)
Children categories
Transforming text to numbers and vice versa in Excel is essential for effective data management. By converting text to numbers, you enhance the accuracy of calculations and data processing, which is vital for activities such as financial reporting and statistical analysis. Conversely, changing numbers to text can improve formatting, making outputs clearer and more readable, ultimately presenting data in a more user-friendly way.
In this article, you will learn how to convert text to numbers and numbers to text in Excel using Spire.XLS for .NET.
Install Spire.XLS for .NET
To begin with, you need to add the DLL files included in the Spire.XLS for .NET package as references in your .NET project. The DLL files can be either downloaded from this link or installed via NuGet.
PM> Install-Package Spire.XLS
Convert Text to Numbers in C#
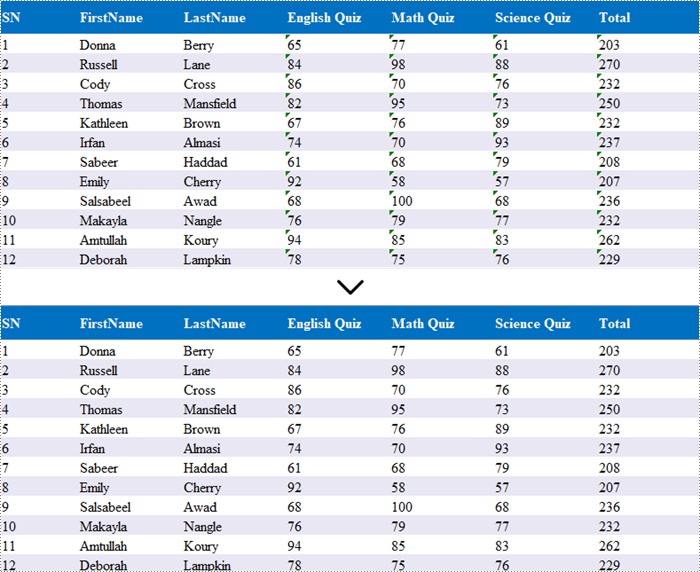
When you import data from an external source into Excel, you might notice a small green triangle in the upper-left corner of certain cells. This triangle serves as an error indicator, signaling that the number is formatted as text. When numbers are stored as text, it can lead to unexpected outcomes, such as formulas not calculating correctly and displaying as text instead of yielding results.
To convert text-formatted numbers back to numeric format, you can use the CellRange.ConvertToNumber() method. The CellRange object can refer to either a single cell or a range of cells.
Here are the steps to convert text to numbers in Excel:
- Create a Workbook object.
- Load an Excel file using Workbook.LoadFromFile() method.
- Access a specific worksheet with Workbook.Worksheets[index] property.
- Retrieve a cell or range of cells using Worksheet.Range property.
- Convert the text in the cell(s) to numbers using CellRange.ConvertToNumber() method.
- Save the document as a new Excel file.
- C#
using Spire.Xls;

namespace ConvertTextToNumbers
{
    class Program
    {
        static void Main(string[] args)
        {

            // Create a Workbook object
            Workbook workbook = new Workbook();

            // Load an Excel document
            workbook.LoadFromFile("C:\\Users\\Administrator\\Desktop\\Input.xlsx");

            // Get a specific worksheet
            Worksheet worksheet = workbook.Worksheets[0];

            // Get a cell range
            CellRange range = worksheet.Range["D2:G13"];

            // Convert text to number
            range.ConvertToNumber();

            // Save the workbook to a different Excel file
            workbook.SaveToFile("TextToNumbers.xlsx", ExcelVersion.Version2013);

            // Dispose resources
            workbook.Dispose();
        }
    }
}
Convert Numbers to Text in C#
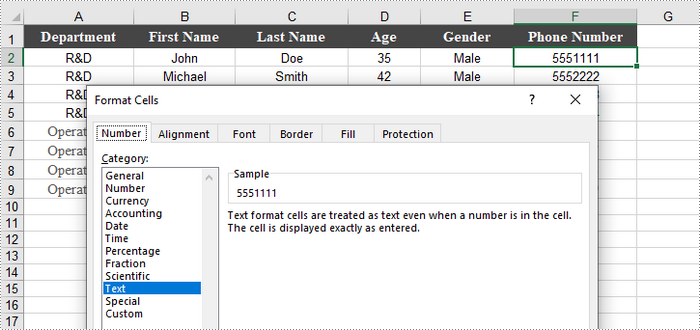
When working with numerical data in Excel, you may find occasions where converting numbers to text is necessary. This is especially crucial for data that requires specific formatting, such as IDs or phone numbers, where leading zeros must be preserved.
To convert a number in a cell to text, you can set the CellRange.NumberFormat property to @. The CellRange object can represent either a single cell or a range of cells.
Here are the steps to convert numbers to text in Excel:
- Create a Workbook object.
- Load an Excel file using Workbook.LoadFromFile() method.
- Access a specific worksheet through Workbook.Worksheets[index] property.
- Retrieve a specific cell or range of cells using Worksheet.Range property.
- Convert the numbers in the cell(s) to text by setting CellRange.NumberFormat to @.
- Save the document as a new Excel file.
- C#
using Spire.Xls;

namespace ConvertNumbersToText
{
    class Program
    {
        static void Main(string[] args)
        {
            // Create a Workbook object
            Workbook workbook = new Workbook();

            // Load an Excel document
            workbook.LoadFromFile("C:\\Users\\Administrator\\Desktop\\Employee.xlsx");

            // Get a specific worksheet
            Worksheet worksheet = workbook.Worksheets[0];

            // Get a cell range
            CellRange cellRange = worksheet.Range["F2:F9"];

            // Convert numbers in the cell range to text
            cellRange.NumberFormat = "@";

            // Save the workbook to a different Excel file
            workbook.SaveToFile("NumbersToText.xlsx", ExcelVersion.Version2013);

            // Dispose resources
            workbook.Dispose();
        }
    }
}
Apply for a Temporary License
If you'd like to remove the evaluation message from the generated documents, or to get rid of the function limitations, please request a 30-day trial license for yourself.
Setting view preferences in PDF documents is a crucial feature that can significantly enhance user experience. By configuring options like page layout, display mode, and zoom level, you ensure recipients view the document as intended, without manual adjustments. This is especially useful for business reports, design plans, or educational materials, where consistent presentation is crucial for effectively delivering information and leaving a professional impression. This article will show how to set view preferences of PDF documents with Python code using Spire.PDF for Python.
Install Spire.PDF for Python
This scenario requires Spire.PDF for Python and plum-dispatch v1.7.4. They can be easily installed in your Windows through the following pip command.
pip install Spire.PDF
If you are unsure how to install, please refer to: How to Install Spire.PDF for Python on Windows
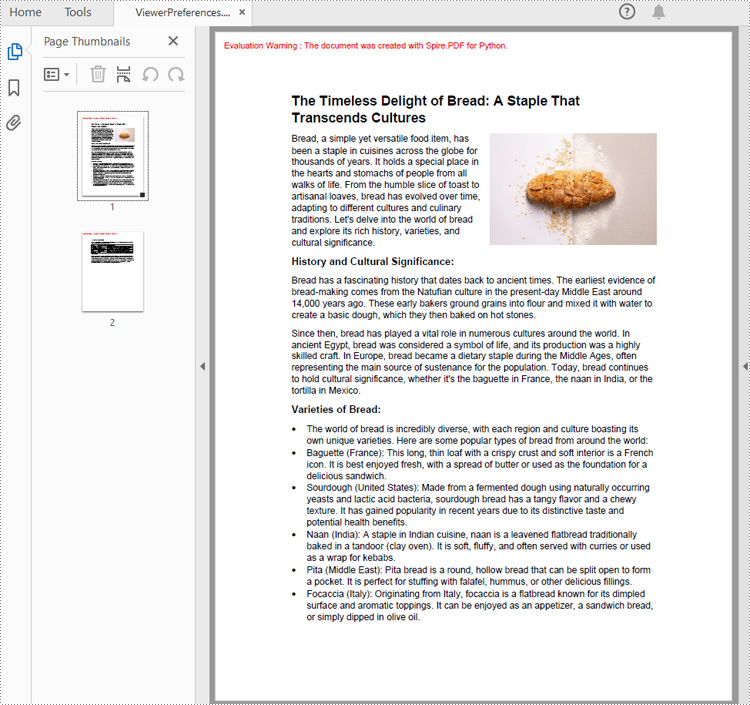
Set PDF Viewer Preferences with Python
Viewer preferences allow document creators to define how a PDF document is displayed when opened, including page layout, window layout, and display mode. Developers can use the properties under ViewerPreferences class to set those display options. The detailed steps are as follows:
- Create a PdfDocument object.
- Load a PDF document using PdfDocument.LoadFromFile() method.
- Get the ViewerPreferences through using PdfDocument.ViewerPreferences property.
- Set the viewer preferences using properties under ViewerPreferences class.
- Save the document using PdfDocument.SaveToFile() method.
- Python
from spire.pdf import *

# Create a PdfDocument object
pdf = PdfDocument()

# Load a PDF file
pdf.LoadFromFile("Sample.pdf")

# Get the viewer preferences
preferences = pdf.ViewerPreferences

# Set the viewer preferences
preferences.FitWindow = True
preferences.CenterWindow = True
preferences.HideMenubar = True
preferences.HideToolbar = True
preferences.DisplayTitle = True
preferences.HideWindowUI = True
preferences.PageLayout = PdfPageLayout.SinglePage
preferences.BookMarkExpandOrCollapse = True
preferences.PrintScaling = PrintScalingMode.AppDefault
preferences.PageMode = PdfPageMode.UseThumbs

# Save the document
pdf.SaveToFile("output/ViewerPreferences.pdf")
pdf.Close()
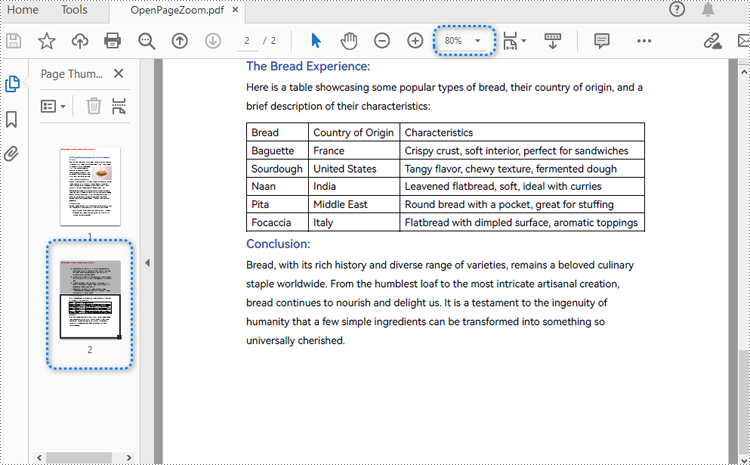
Set the Opening Page and Zoom Level with Python
By creating PDF actions and setting them to be executed when the document is opened, developers can configure additional viewer preferences, such as the initial page display and zoom level. Here are the steps to follow:
- Create a PdfDocument object.
- Load a PDF document using PdfDocument.LoadFromFile() method.
- Get a page using PdfDocument.Pages.get_Item() method.
- Create a PdfDestination object and set the location and zoom factor of the destination.
- Create a PdfGoToAction object using the destination.
- Set the action as the document open action through PdfDocument.AfterOpenAction property.
- Save the document using PdfDocument.SaveToFile() method.
- Python
from spire.pdf import *

# Create a PdfDocument object
pdf = PdfDocument()

# Load a PDF file
pdf.LoadFromFile("Sample1.pdf")

# Get the second page
page = pdf.Pages.get_Item(1)

# Create a PdfDestination object
dest = PdfDestination(page)
# Set the location and zoom factor of the destination
dest.Mode = PdfDestinationMode.Location
dest.Location = PointF(0.0, page.Size.Height / 2)
dest.Zoom = 0.8

# Create a PdfGoToAction object
action = PdfGoToAction(dest)

# Set the action as the document open action
pdf.AfterOpenAction = action

# Save the document
pdf.SaveToFile("output/OpenPageZoom.pdf")
pdf.Close()
Apply for a Temporary License
If you'd like to remove the evaluation message from the generated documents, or to get rid of the function limitations, please request a 30-day trial license for yourself.
Pivot charts are a powerful tool in Excel that allows you to visualize data from pivot tables in an easy-to-understand format. They enable users to summarize large datasets, highlight trends, and make data-driven decisions through interactive graphs. Whether you're analyzing sales figures, performance metrics, or any other form of data, pivot charts provide a dynamic way to represent complex data visually. In this article, we will demonstrate how to create pivot charts in Excel in Python using Spire.XLS for Python.
- Create Pivot Charts in Excel in Python
- Show or Hide Field Buttons in Pivot Charts in Excel in Python
- Format Pivot Chart Series in Excel in Python
Install Spire.XLS for Python
This scenario requires Spire.XLS for Python and plum-dispatch v1.7.4. They can be easily installed in your Windows through the following pip command.
pip install Spire.XLS
If you are unsure how to install, please refer to this tutorial: How to Install Spire.XLS for Python on Windows
Create Pivot Charts in Excel in Python
Spire.XLS for Python provides the Worksheet.Charts.Add(pivotChartType:ExcelChartType, pivotTable:IPivotTable) method to create a pivot chart based on a specific pivot table in Excel. The detailed steps are as follows:
- Create an object of the Workbook class.
- Load an Excel file using Workbook.LoadFromFile() method.
- Get a specific worksheet in the Excel file using Workbook.Worksheets[index] property.
- Get a specific pivot table in the worksheet using Worksheet.PivotTables[index] property.
- Add a pivot chart based on the pivot table to the worksheet using Worksheet.Charts.Add(pivotChartType:ExcelChartType, pivotTable:IPivotTable) method.
- Set the position and title of the pivot chart.
- Save the resulting file using Workbook.SaveToFile() method.
- Python
from spire.xls import *
from spire.xls.common import *

# Create a Workbook object
workbook = Workbook()
# Load an Excel file
workbook.LoadFromFile("PivotTable.xlsx")

# Get the first worksheet
sheet = workbook.Worksheets[0]

# Get the first pivot table in the worksheet
pivotTable = sheet.PivotTables[0]

# Create a clustered column chart based on the pivot table
pivotChart = sheet.Charts.Add(ExcelChartType.ColumnClustered, pivotTable)
# Set chart position
pivotChart.TopRow = 1
pivotChart.LeftColumn = 11
pivotChart.RightColumn = 20
pivotChart.BottomRow = 15

# Set chart title to null
pivotChart.ChartTitle = ""

# Save the resulting file
workbook.SaveToFile("CreatePivotChart.xlsx", ExcelVersion.Version2013)
workbook.Dispose()
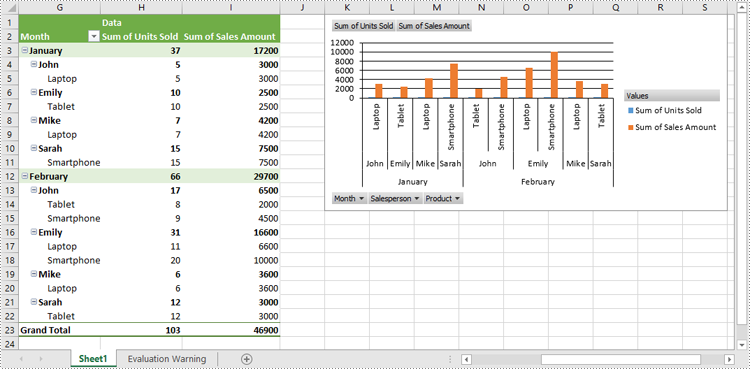
Show or Hide Field Buttons in Pivot Charts in Excel in Python
You can show or hide the following field buttons in a pivot chart with Spire.XLS for Python:
- Entire Field Buttons
- Report Filter Field Buttons
- Legend Field Buttons
- Axis Field Buttons
- Value Field Buttons
The detailed steps are as follows:
- Create an object of the Workbook class.
- Load an Excel file using Workbook.LoadFromFile() method.
- Get a specific worksheet in the Excel file using Workbook.Worksheets[index] property.
- Get a specific pivot table in the worksheet using Worksheet.PivotTables[index] property.
- Add a pivot chart based on the pivot table to the worksheet using Worksheet.Charts.Add(pivotChartType:ExcelChartType, pivotTable:IPivotTable) method.
- Set the position and title of the pivot chart.
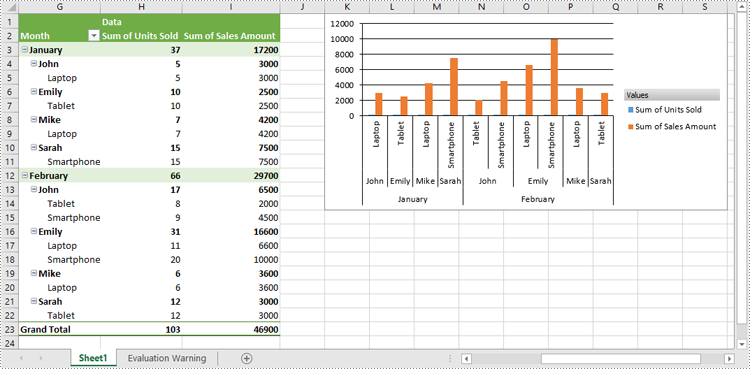
- Hide specific field buttons in the pivot chart, such as the axis field buttons and the value field buttons, using Chart.DisplayAxisFieldButtons and Chart.DisplayValueFieldButtons properties.
- Save the resulting file using Workbook.SaveToFile() method.
- Python
from spire.xls import *
from spire.xls.common import *

# Create a Workbook object
workbook = Workbook()
# Load an Excel file
workbook.LoadFromFile("CreatePivotChart.xlsx")

# Get the first worksheet
sheet = workbook.Worksheets[0]

# Get the first pivot table in the worksheet
pivotTable = sheet.PivotTables[0]

# Create a clustered column chart based on the pivot table
pivotChart = sheet.Charts.Add(ExcelChartType.ColumnClustered, pivotTable)
# Set chart position
pivotChart.TopRow = 1
pivotChart.LeftColumn = 11
pivotChart.RightColumn = 20
pivotChart.BottomRow = 15

# Set chart title to null
pivotChart.ChartTitle = ""

# Hide specific field buttons
pivotChart.DisplayAxisFieldButtons = False
pivotChart.DisplayValueFieldButtons = False
# pivotChart.DisplayLegendFieldButtons = False
# pivotChart.ShowReportFilterFieldButtons = False
# pivotChart.DisplayEntireFieldButtons = False

# Save the resulting file
workbook.SaveToFile("HideFieldButtons.xlsx", ExcelVersion.Version2013)
workbook.Dispose()
Format Pivot Chart Series in Excel in Python
When generating a pivot chart using a pivot table as the data source with Spire.XLS for Python, the chart series are not automatically created. You need to add the series to the pivot chart and then apply the desired formatting. The detailed steps are as follows.
- Create an object of the Workbook class.
- Load an Excel file using Workbook.LoadFromFile() method.
- Get a specific worksheet in the Excel file using Workbook.Worksheets[index] property.
- Get a specific pivot table in the worksheet using Worksheet.PivotTables[index] property.
- Add a pivot chart based on the pivot table to the worksheet using Worksheet.Charts.Add(pivotChartType:ExcelChartType, pivotTable:IPivotTable) method.
- Set the position and title of the pivot chart.
- Add series to the chart using Chart.Series.Add() method and then apply the desired formatting to the series.
- Save the resulting file using Workbook.SaveToFile() method.
- Python
from spire.xls import *
from spire.xls.common import *

# Create a Workbook object
workbook = Workbook()
# Load an Excel file
workbook.LoadFromFile("CreatePivotChart.xlsx")

# Get the first worksheet
sheet = workbook.Worksheets[0]

# Get the first pivot table in the worksheet
pivotTable = sheet.PivotTables[0]

# Create a clustered column chart based on the pivot table
pivotChart = sheet.Charts.Add(ExcelChartType.ColumnClustered, pivotTable)
# Set chart position
pivotChart.TopRow = 1
pivotChart.LeftColumn = 11
pivotChart.RightColumn = 20
pivotChart.BottomRow = 15

# Set chart title to null
pivotChart.ChartTitle = ""

# Add chart series
series = pivotChart.Series.Add(ExcelChartType.ColumnClustered)
# Set bar width
series.GetCommonSerieFormat().GapWidth = 10
# Set overlap
# series.GetCommonSerieFormat().Overlap = 100

# Save the resulting file
workbook.SaveToFile("FormatChartSeries.xlsx", ExcelVersion.Version2013)
workbook.Dispose()

Apply for a Temporary License
If you'd like to remove the evaluation message from the generated documents, or to get rid of the function limitations, please request a 30-day trial license for yourself.
