
Knowledgebase (2344)
Children categories
Python: Create, Modify, and Copy Slide Master in PowerPoint Presentations
2024-05-13 01:14:23 Written by KoohjiSlide Master in PowerPoint presentations is a powerful feature that lies at the heart of designing consistent and professional-looking slideshows. It's essentially a blueprint or a template that controls the overall design and layout of the slides, allowing users to establish uniformity across presentations without having to manually format each slide individually. In this article, we will explore how to harness the power of Spire.Presentation for Python to create, modify, and apply slide masters in PowerPoint presentations within Python programs.
- Create and Apply Slide Masters in PowerPoint Presentations
- Modify Slide Masters in PowerPoint Presentations
- Copy Slide Masters Between PowerPoint Presentations
Install Spire.Presentation for Python
This scenario requires Spire.Presentation for Python and plum-dispatch v1.7.4. They can be easily installed in your Windows through the following pip command.
pip install Spire.Presentation
If you are unsure how to install, please refer to: How to Install Spire.Presentation for Python on Windows
Create and Apply Slide Masters in PowerPoint Presentations
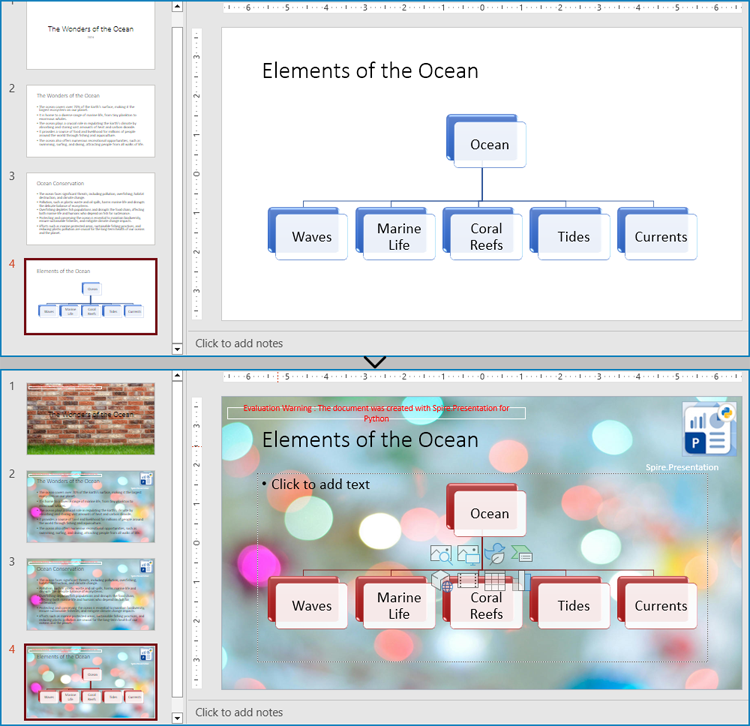
Every PowerPoint presentation in PowerPoint, regardless of whether it is newly created or not, will have at least one slide master. Developers can modify the default master or create new ones and apply them to slides with Spire.Presentation for Python to achieve a consistent style and content layout across the presentation.
The detailed steps for creating new slide masters and applying them to the slides in a presentation file are as follows:
- Create an object of Presentation class and load a PowerPoint presentation using Presentation.LoadFromFile() method.
- Create slide masters using Presentation.Masters.AppendSlide() method.
- Use the methods under IMasterSlide class to set the backgrounds, customize color schemes, insert images, shapes, and text, etc.
- Apply the slide masters to specific slides through ISlide.Layout property.
- Save the presentation using Presentation.SaveToFile() method.
- Python
from spire.presentation.common import *
from spire.presentation import *

# Create an instance of Presentation class
pres = Presentation()

# Load a Presentation file
pres.LoadFromFile("Sample.pptx")

# Add a cover slide master and a body slide master
master1 = pres.Masters.AppendSlide(pres.Masters.get_Item(0))
coverMaster = pres.Masters.get_Item(master1)
master2 = pres.Masters.AppendSlide(pres.Masters.get_Item(0))
bodyMaster = pres.Masters.get_Item(master2)

# Set background images for the two slide masters
pic1 = "Background1.jpg"
pic2 = "Background2.jpg"

rect = RectangleF.FromLTRB (0, 0, pres.SlideSize.Size.Width, pres.SlideSize.Size.Height)
coverMaster.SlideBackground.Fill.FillType = FillFormatType.Picture
image1 = coverMaster.Shapes.AppendEmbedImageByPath (ShapeType.Rectangle, pic1, rect)
coverMaster.SlideBackground.Fill.PictureFill.Picture.EmbedImage = image1.PictureFill.Picture.EmbedImage

bodyMaster.SlideBackground.Fill.FillType = FillFormatType.Picture
image2 = bodyMaster.Shapes.AppendEmbedImageByPath (ShapeType.Rectangle, pic2, rect)
bodyMaster.SlideBackground.Fill.PictureFill.Picture.EmbedImage = image2.PictureFill.Picture.EmbedImage

# Insert a logo to the body slide master
logo = "Logo.png"
bodyMaster.Shapes.AppendEmbedImageByPath(ShapeType.Rectangle, logo, RectangleF.FromLTRB(pres.SlideSize.Size.Width - 110, 10, pres.SlideSize.Size.Width - 10, 110))

# Insert text to the body slide master
shape = bodyMaster.Shapes.AppendShape(ShapeType.Rectangle, RectangleF.FromLTRB(pres.SlideSize.Size.Width - 210, 110, pres.SlideSize.Size.Width - 10, 150))
shape.Fill.FillType = FillFormatType.none
shape.Line.FillType = FillFormatType.none
shape.TextFrame.Text = "Spire.Presentation"

# Set the color scheme for the two slide masters
coverMaster.Theme.ColorScheme.Accent1.Color = Color.get_Red()
coverMaster.Theme.ColorScheme.Accent2.Color = Color.get_Blue()

bodyMaster.Theme.ColorScheme.Accent1.Color = Color.get_Brown()
coverMaster.Theme.ColorScheme.Accent2.Color = Color.get_Green()

# Apply the first master with layout to the first slide
pres.Slides.get_Item(0).Layout = coverMaster.Layouts.GetByType(SlideLayoutType.Title)

# Apply the second master with layout to other slides
for i in range(1, pres.Slides.Count):
    pres.Slides.get_Item(i).Layout = bodyMaster.Layouts.GetByType(SlideLayoutType.TitleAndObject)

# Save the document
pres.SaveToFile("output/CreateAndApplySlideMaster.pptx", FileFormat.Pptx2016)
pres.Dispose()
Modify Slide Masters in PowerPoint Presentations
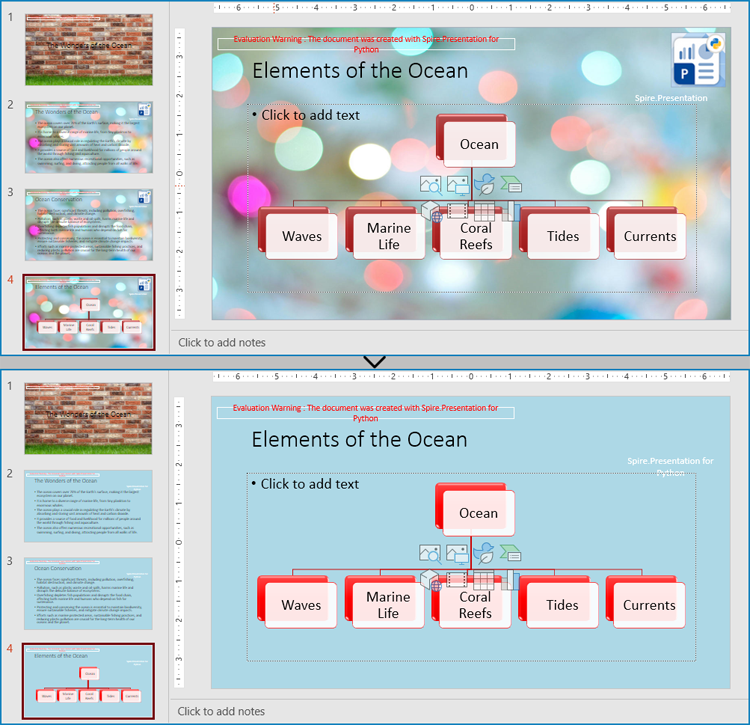
A presentation can have multiple slide masters, which can be applied to different slides to achieve a unified style application and modification for different types of slides.
The Presentation.Masters.get_Item() method in Spire.Presentation for Python allows developers to retrieve the specified slide master in the presentation by index and modify the master. The following step-by-step example demonstrates how to retrieve a slide master and modify its background, color scheme, and embedded images:
- Create an object of Presentation class and load a PowerPoint presentation using Presentation.LoadFromFile() method.
- Get a slide master through Presentation.Masters property.
- Use the methods under IMasterSlide class to change the background, set the color scheme, delete and insert text and images, etc.
- Save the presentation using Presentation.SaveToFile() method.
- Python
from spire.presentation.common import *
from spire.presentation import *

# Create an object of Presentation
pres = Presentation()

# Load a PowerPoint presentation
pres.LoadFromFile("output/CreateAndApplySlideMaster.pptx")

# Get the third slide master
master = pres.Masters[2]

# Change the background
master.SlideBackground.Type = BackgroundType.Custom
master.SlideBackground.Fill.FillType = FillFormatType.Solid
master.SlideBackground.Fill.SolidColor.Color = Color.get_LightBlue()

# Change the color sheme
master.Theme.ColorScheme.Accent1.Color = Color.get_Red()
master.Theme.ColorScheme.Accent2.Color = Color.get_Green()

# Remove the pictures in the slide master
pictures = [shape for shape in master.Shapes if isinstance(shape, SlidePicture)]
for picture in pictures:
    master.Shapes.Remove(picture)

# Change the text in the slide master
texts = [shape for shape in master.Shapes if isinstance(shape, IAutoShape)]
for text in texts:
    if len(text.TextFrame.Text) != 0:
        text.TextFrame.Text = "Spire.Presentation for Python"

# Save the presentation
pres.SaveToFile("output/ModifySlideMaster.pptx", FileFormat.Pptx2016)
pres.Dispose()
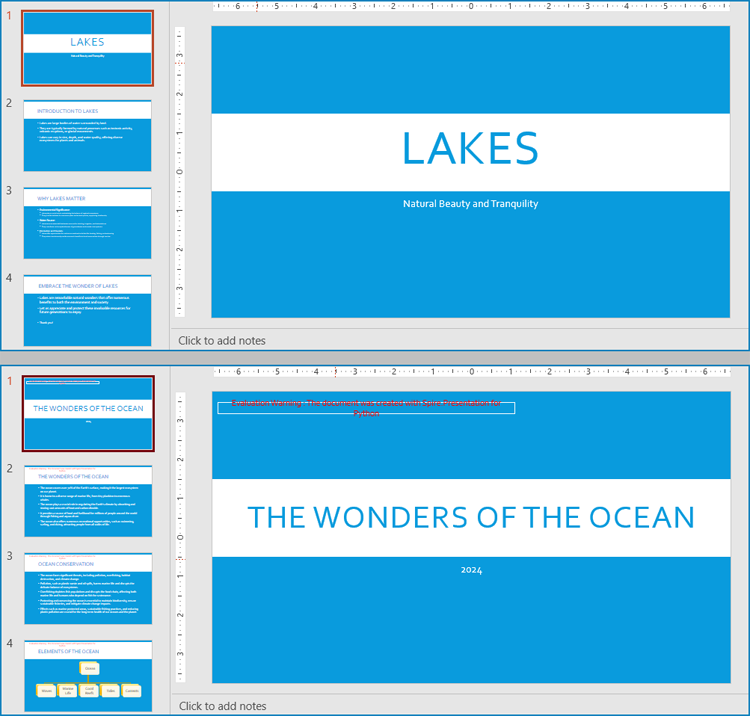
Copy Slide Masters Between PowerPoint Presentations
Applying the slide style of a presentation to another presentation can be achieved by copying the slide master between presentations and applying the master style to the specified slides. The following are the steps to copy the slide master between presentations and apply it to the specified slides:
- Create two objects of Presentation class and load two presentation documents using Presentation.LoadFromFile() method.
- Get the slide master of the second presentation using Presentation.Masters.get_Item() method.
- Add the slide master to the first presentation using Presentation.Masters.AppendSlide() method.
- Apply the slide master to the slides in the second presentation through ISlide.Layout property.
- Save the first presentation using Presentation.SaveToFile() method.
- Python
from spire.presentation import *
from spire.presentation.common import *

# Create two objects of Presentation
pres1 = Presentation()
pres2 = Presentation()

# Load two PowerPoint documents
pres1.LoadFromFile("Sample.pptx")
pres2.LoadFromFile("Template.pptx")

# Get the slide master of the second presentation
master = pres2.Masters.get_Item(0)

# Add the slide master to the first presentation
index = pres1.Masters.AppendSlide(master)

# Apply the slide master to the first presentation
pres1.Slides.get_Item(0).Layout = pres1.Masters.get_Item(index).Layouts.GetByType(SlideLayoutType.Title)
for i in range(1, pres1.Slides.Count):
    pres1.Slides.get_Item(i).Layout = pres1.Masters.get_Item(index).Layouts.GetByType(SlideLayoutType.TitleAndObject)

# Save the first presentation
pres1.SaveToFile("output/CopySlideMaster.pptx", FileFormat.Pptx2013)
pres1.Dispose()
pres2.Dispose()
Apply for a Temporary License
If you'd like to remove the evaluation message from the generated documents, or to get rid of the function limitations, please request a 30-day trial license for yourself.
TIFF is a popular image format used in scanning and archiving due to its high quality and support for a wide range of color spaces. On the other hand, PDFs are widely used for document exchange because they preserve the layout and formatting of a document while compressing the file size. Conversion between these formats can be useful for various purposes such as archival, editing, or sharing documents.
In this article, you will learn how to convert PDF to TIFF and TIFF to PDF using the Spire.PDF for Python and Pillow libraries.
Install Spire.PDF for Python
This situation relies on the combination of Spire.PDF for Python and Pillow (PIL). Spire.PDF is used to read, create and convert PDF documents, while the PIL library is used for handling TIFF files and accessing their frames.
The libraries can be easily installed on your device through the following pip command.
pip install Spire.PDF
pip install pillow
Convert PDF to TIFF in Python
To complete the PDF to TIFF conversion, you first need to load the PDF document and convert the individual pages into image streams using Spire.PDF. Subsequently, these image streams are then merged together using the functionality of the PIL library, resulting in a consolidated TIFF image.
The following are the steps to convert PDF to TIFF using Python.
- Create a PdfDocument object.
- Load a PDF document from a specified file path.
- Iterate through the pages in the document.
- Convert each page into an image stream using PdfDocument.SaveAsImage() method.
- Convert the image stream into a PIL image.
- Combine these PIL images into a single TIFF image.
- Python
from spire.pdf.common import *
from spire.pdf import *

from PIL import Image
from io import BytesIO

# Create a PdfDocument object
doc = PdfDocument()

# Load a PDF document
doc.LoadFromFile("C:\\Users\\Administrator\\Desktop\\Input.pdf")

# Create an empty list to store PIL Images
images = []

# Iterate through all pages in the document
for i in range(doc.Pages.Count):

    # Convert a specific page to an image stream
    with doc.SaveAsImage(i) as imageData:

        # Open the image stream as a PIL image
        img = Image.open(BytesIO(imageData.ToArray()))

        # Append the PIL image to list
        images.append(img)

# Save the PIL Images as a multi-page TIFF file
images[0].save("Output/ToTIFF.tiff", save_all=True, append_images=images[1:])

# Dispose resources
doc.Dispose()
Convert TIFF to PDF in Python
With the assistance of the PIL library, you can load a TIFF file and transform each frame into distinct PNG files. Afterwards, you can utilize Spire.PDF to draw these PNG files onto pages within a PDF document.
To convert a TIFF image to a PDF document using Python, follow these steps.
- Create a PdfDocument object.
- Load a TIFF image.
- Iterate though the frames in the TIFF image.
- Get a specific frame, and save it as a PNG file.
- Add a page to the PDF document.
- Draw the image on the page at the specified location using PdfPageBase.Canvas.DrawImage() method.
- Save the document to a PDF file.
- Python
from spire.pdf.common import *
from spire.pdf import *

from PIL import Image
import io

# Create a PdfDocument object
doc = PdfDocument()

# Set the page margins to 0
doc.PageSettings.SetMargins(0.0)

# Load a TIFF image
tiff_image = Image.open("C:\\Users\\Administrator\\Desktop\\TIFF.tiff")

    # Go to the current frame
    tiff_image.seek(i)

    # Extract the image of the current frame
    frame_image = tiff_image.copy()

    # Save the image to a PNG file
    frame_image.save(f"temp/output_frame_{i}.png")

    # Load the image file to PdfImage
    image = PdfImage.FromFile(f"temp/output_frame_{i}.png")

    # Get image width and height
    width = image.PhysicalDimension.Width
    height = image.PhysicalDimension.Height

    # Add a page to the document
    page = doc.Pages.Add(SizeF(width, height))

    # Draw image at (0, 0) of the page
    page.Canvas.DrawImage(image, 0.0, 0.0, width, height)

# Save the document to a PDF file
doc.SaveToFile("Output/TiffToPdf.pdf",FileFormat.PDF)

# Dispose resources
doc.Dispose()
Apply for a Temporary License
If you'd like to remove the evaluation message from the generated documents, or to get rid of the function limitations, please request a 30-day trial license for yourself.
In a Word document, content controls are special elements that can be used to add interactivity and dynamic content, making the document more interactive and functional. Through content controls, users can easily insert, delete, or modify content in specific sections without altering the overall structure of the document, making it easier to create various types of documents and improve efficiency. This article will introduce how to use Spire.Doc for Java to modify content controls in Word documents within a Java project.
- Modify Content Controls in the Body using Java
- Modify Content Controls within Paragraphs using Java
- Modify Content Controls Wrapping Table Rows using Java
- Modify Content Controls Wrapping Table Cells using Java
- Modify Content Controls within Table Cells using Java
Install Spire.Doc for Java
First, you're required to add the Spire.Doc.jar file as a dependency in your Java program. The JAR file can be downloaded from this link. If you use Maven, you can easily import the JAR file in your application by adding the following code to your project's pom.xml file.
<repositories>
    <repository>
        <id>com.e-iceblue</id>
        <name>e-iceblue</name>
        <url>https://repo.e-iceblue.com/nexus/content/groups/public/</url>
    </repository>
</repositories>
<dependencies>
    <dependency>
        <groupId>e-iceblue</groupId>
        <artifactId>spire.doc</artifactId>
        <version>14.6.0</version>
    </dependency>
</dependencies>
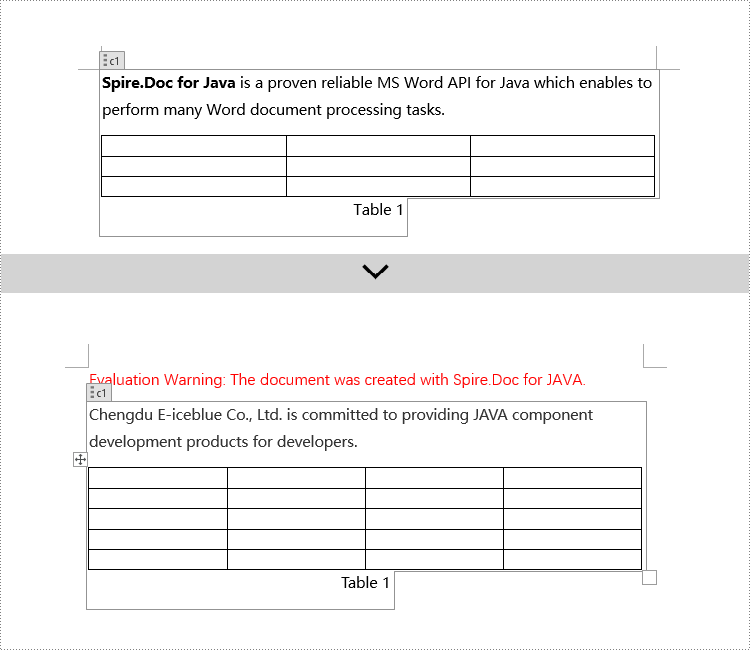
Modify Content Controls in the Body using Java
In Spire.Doc, to modify content controls in the body, you need to work with objects of the StructureDocumentTag type. By iterating through the collection of child objects in Section.getBody(), you can find objects of type StructureDocumentTag and make the necessary changes. Here are the detailed steps:
- Create a Document object.
- Load a document using the Document.loadFromFile() method.
- Get the body of a section in the document using Section.getBody().
- Iterate through the collection of child objects in the body using Body.getChildObjects() to find objects of type StructureDocumentTag.
- Access the collection of child objects in StructureDocumentTag.getChildObjects() and perform the required modifications based on the type of the child objects.
- Save the document using the Document.saveToFile() method.
- Java
import com.spire.doc.*;
import com.spire.doc.documents.*;
import java.util.*;

public class ModifyContentControlInBody {
    public static void main(String[] args) {
        // Create a new document object
        Document doc = new Document();

        // Load document content from file
        doc.loadFromFile("Sample1.docx");

        // Get the body of the document
        Body body = doc.getSections().get(0).getBody();

        // Create lists for paragraphs and tables
        List<Paragraph> paragraphs = new ArrayList<>();
        List<Table> tables = new ArrayList<>();
        for (int i = 0; i < body.getChildObjects().getCount(); i++) {

            // Get the document object
            DocumentObject documentObject = body.getChildObjects().get(i);

            // If it is a StructureDocumentTag object
            if (documentObject instanceof StructureDocumentTag) {
                StructureDocumentTag structureDocumentTag = (StructureDocumentTag) documentObject;

                // If the tag is "c1" or the alias is "c1"
                if (structureDocumentTag.getSDTProperties().getTag().equals("c1") || structureDocumentTag.getSDTProperties().getAlias().equals("c1")) {
                    for (int j = 0; j < structureDocumentTag.getChildObjects().getCount(); j++) {
                        // If it is a paragraph object
                        if (structureDocumentTag.getChildObjects().get(j) instanceof Paragraph) {
                            Paragraph paragraph = (Paragraph) structureDocumentTag.getChildObjects().get(j);
                            paragraphs.add(paragraph);
                        }

                        // If it is a table object
                        if (structureDocumentTag.getChildObjects().get(j) instanceof Table) {
                            Table table = (Table) structureDocumentTag.getChildObjects().get(j);
                            tables.add(table);
                        }
                    }
                }
            }
        }

        // Modify the text content of the first paragraph
        paragraphs.get(0).setText("Chengdu E-iceblue Co., Ltd. is committed to providing JAVA component development products for developers.");

        // Reset the cells of the first table to 5 rows and 4 columns
        tables.get(0).resetCells(5, 4);

        // Save the modified document to a file
        doc.saveToFile("Modify Content Controls in Word Document Body.docx", FileFormat.Docx_2016);

        // Close the document and release document resources
        doc.close();
        doc.dispose();
    }
}
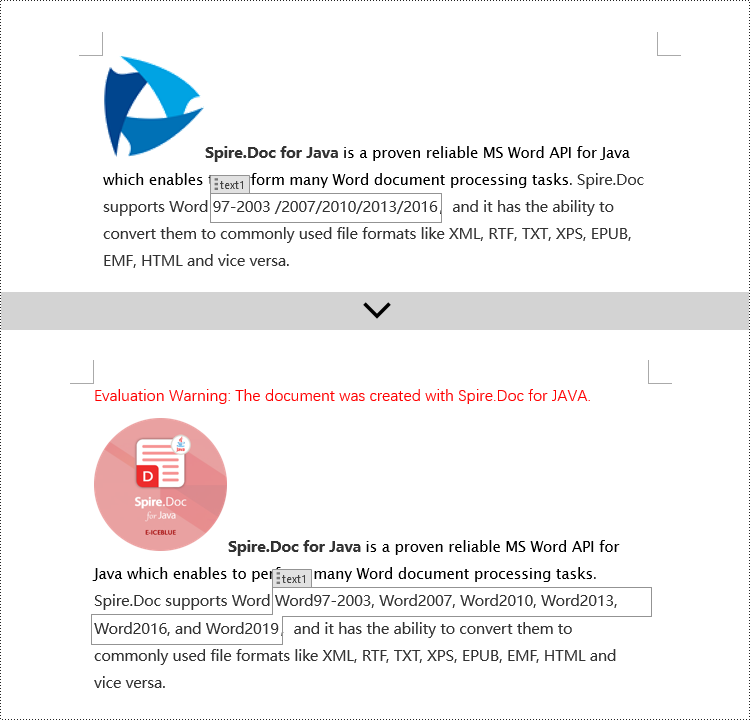
Modify Content Controls within Paragraphs using Java
In Spire.Doc, to modify content controls within a paragraph, you need to use objects of type StructureDocumentTagInline. The specific steps involve iterating through the collection of child objects in a paragraph, finding objects of type StructureDocumentTagInline, and then making the necessary modifications. Here are the detailed steps:
- Create a Document object.
- Load a document using the Document.loadFromFile() method.
- Get the body of a section using Section.getBody().
- Retrieve the first paragraph of the body using Body.getParagraphs().get(0).
- Iterate through the collection of child objects in the paragraph using Paragraph.getChildObjects() to find objects of type StructureDocumentTagInline.
- Access the collection of child objects in StructureDocumentTagInline using StructureDocumentTagInline.getChildObjects() and perform the necessary modifications based on the type of child objects.
- Save the document using the Document.saveToFile() method.
- Java
import com.spire.doc.*;
import com.spire.doc.documents.*;
import com.spire.doc.fields.*;

public class ModifyContentControlInParagraph {
    public static void main(String[] args) {
        // Create a new Document object
        Document doc = new Document();

        // Load document content from a file
        doc.loadFromFile("Sample2.docx");

        // Get the body of the document
        Body body = doc.getSections().get(0).getBody();

        // Get the first paragraph of the body
        Paragraph paragraph = body.getParagraphs().get(0);

        // Iterate through the child objects in the paragraph
        for (int i = 0; i < paragraph.getChildObjects().getCount(); i++) {

            // Check if the child object is of type StructureDocumentTagInline
            if (paragraph.getChildObjects().get(i) instanceof StructureDocumentTagInline) {

                // Convert the child object to StructureDocumentTagInline type
                StructureDocumentTagInline structureDocumentTagInline = (StructureDocumentTagInline) paragraph.getChildObjects().get(i);

                // Check if the Tag or Alias property of the document tag is "text1"
                if (structureDocumentTagInline.getSDTProperties().getTag().equals("text1") || structureDocumentTagInline.getSDTProperties().getAlias().equals("text1")) {

                    // Iterate through the child objects in the StructureDocumentTagInline object
                    for (int j = 0; j < structureDocumentTagInline.getChildObjects().getCount(); j++) {

                        // Check if the child object is a TextRange object
                        if (structureDocumentTagInline.getChildObjects().get(j) instanceof TextRange) {

                            // Convert the child object to TextRange type
                            TextRange range = (TextRange) structureDocumentTagInline.getChildObjects().get(j);

                            // Set the text content to the specified content
                            range.setText("Word97-2003, Word2007, Word2010, Word2013, Word2016, and Word2019");
                        }
                    }
                }

                // Check if the Tag or Alias property of the document tag is "logo1"
                if (structureDocumentTagInline.getSDTProperties().getTag().equals("logo1") || structureDocumentTagInline.getSDTProperties().getAlias().equals("logo1")) {

                    // Iterate through the child objects in the StructureDocumentTagInline object
                    for (int j = 0; j < structureDocumentTagInline.getChildObjects().getCount(); j++) {

                        // Check if the child object is an image
                        if (structureDocumentTagInline.getChildObjects().get(j) instanceof DocPicture) {

                            // Convert the child object to DocPicture type
                            DocPicture docPicture = (DocPicture) structureDocumentTagInline.getChildObjects().get(j);

                            // Load the specified image
                            docPicture.loadImage("Doc-Java.png");

                            // Set the width and height of the image
                            docPicture.setWidth(100);
                            docPicture.setHeight(100);
                        }
                    }
                }
            }
        }

        // Save the modified document to a new file
        doc.saveToFile("Modified Content Controls in Paragraphs of a Word Document.docx", FileFormat.Docx_2016);

        // Close the document and release document resources
        doc.close();
        doc.dispose();
    }
}
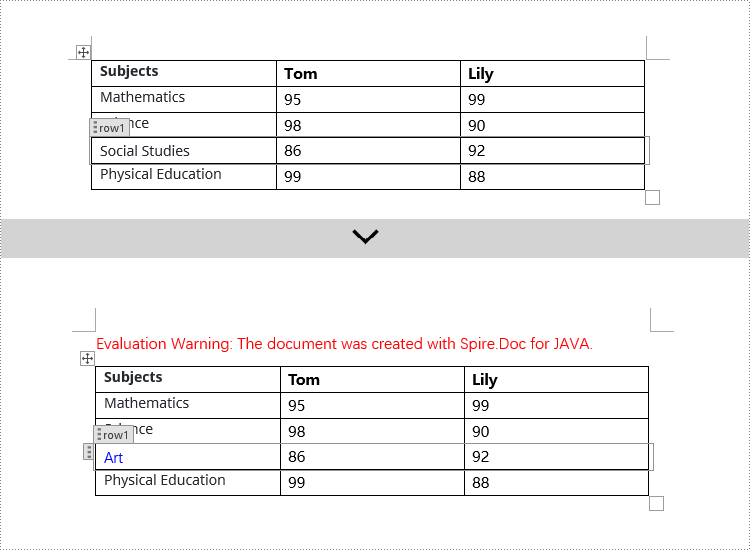
Modify Content Controls Wrapping Table Rows using Java
In Spire.Doc, to modify content controls in table rows, you need to iterate through the collection of table's child objects, find objects of type StructureDocumentTagRow, and then make the necessary changes. Here are the detailed steps:
- Create a Document object.
- Load a document using the Document.loadFromFile() method.
- Get the body of a section in the document using Section.getBody().
- Get the first table in the body using Body.getTables().get(0).
- Iterate through the table's child objects collection using Table.getChildObjects() to find objects of type StructureDocumentTagRow.
- Access the cell collection of the table row content controls using StructureDocumentTagRow.getCells(), and then perform the required modifications on the cell contents.
- Save the document using Document.saveToFile() method.
- Java
import com.spire.doc.*;
import com.spire.doc.documents.*;
import com.spire.doc.fields.*;
import java.awt.*;

public class ModifyTextContentControlInTableRow {
    public static void main(String[] args) {
        // Create a new document object
        Document doc = new Document();

        // Load a document from a file
        doc.loadFromFile("Sample3.docx");

        // Get the body of the document
        Body body = doc.getSections().get(0).getBody();

        // Get the first table
        Table table = body.getTables().get(0);

        // Iterate through the child objects in the table
        for (int i = 0; i < table.getChildObjects().getCount(); i++) {

            // Check if the child object is of type StructureDocumentTagRow
            if (table.getChildObjects().get(i) instanceof StructureDocumentTagRow) {

                // Convert the child object to a StructureDocumentTagRow object
                StructureDocumentTagRow structureDocumentTagRow = (StructureDocumentTagRow) table.getChildObjects().get(i);

                // Check if the Tag or Alias property of the StructureDocumentTagRow is "row1"
                if (structureDocumentTagRow.getSDTProperties().getTag().equals("row1") || structureDocumentTagRow.getSDTProperties().getAlias().equals("row1")) {

                    // Clear the paragraphs in the cell
                    structureDocumentTagRow.getCells().get(0).getParagraphs().clear();

                    // Add a paragraph in the cell and set the text
                    TextRange textRange = structureDocumentTagRow.getCells().get(0).addParagraph().appendText("Art");
                    textRange.getCharacterFormat().setTextColor(Color.BLUE);
                }
            }
        }

        // Save the modified document to a file
        doc.saveToFile("ModifiedTableRowContentControl.docx", FileFormat.Docx_2016);

        // Close the document and release the document resources
        doc.close();
        doc.dispose();
    }
}
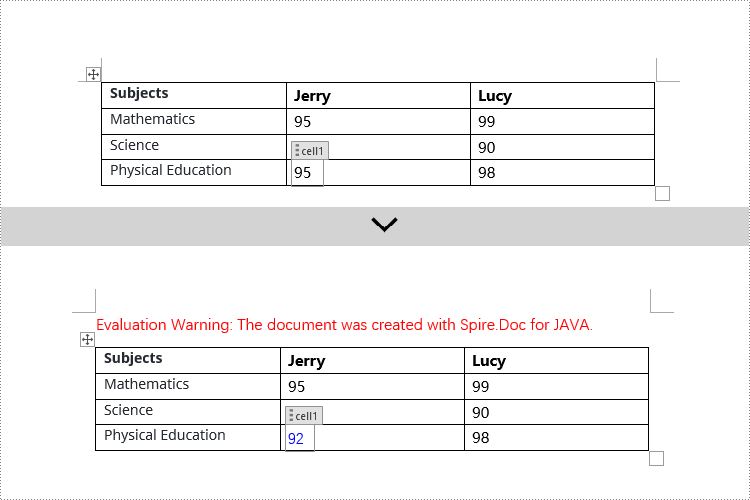
Modify Content Controls Wrapping Table Cells using Java
In Spire.Doc, to manipulate content control objects in table cells, you need to use a specific type of object called StructureDocumentTagCell. This can be done by examining the collection of child objects in TableRow.getChildObjects(), finding objects of type StructureDocumentTagCell, and then performing the necessary operations. Here are the detailed steps:
- Create a Document object.
- Load a document using the Document.loadFromFile() method.
- Get the body of a section in the document using Section.getBody().
- Get the first table in the body using Body.getTables().get(0).
- Iterate through the collection of table rows using Table.getRows() and access each TableRow object.
- Iterate through the collection of child objects in the table row using TableRow.getChildObjects() to find objects of type StructureDocumentTagCell.
- Access the collection of paragraphs in StructureDocumentTagCell.getParagraphs() for the content control in the table cell and perform the necessary modifications on the content.
- Save the document using the Document.saveToFile() method.
- Java
import com.spire.doc.*;
import com.spire.doc.documents.*;
import com.spire.doc.fields.*;
import java.awt.*;

public class ModifyTextContentControlInTableCell {
    public static void main(String[] args) {
        // Create a new document object
        Document doc = new Document();

        // Load the document from a file
        doc.loadFromFile("Sample4.docx");

        // Get the body of the document
        Body body = doc.getSections().get(0).getBody();

        // Get the first table in the document
        Table table = body.getTables().get(0);

        // Iterate through the rows of the table
        for (int i = 0; i < table.getRows().getCount(); i++) {

            // Iterate through the child objects in each row
            for (int j = 0; j < table.getRows().get(i).getChildObjects().getCount(); j++) {

                // Check if the child object is a StructureDocumentTagCell
                if (table.getRows().get(i).getChildObjects().get(j) instanceof StructureDocumentTagCell) {

                    // Convert the child object to StructureDocumentTagCell type
                    StructureDocumentTagCell structureDocumentTagCell = (StructureDocumentTagCell) table.getRows().get(i).getChildObjects().get(j);

                    // Check if the Tag or Alias property of structureDocumentTagCell is "cell1"
                    if (structureDocumentTagCell.getSDTProperties().getTag().equals("cell1") || structureDocumentTagCell.getSDTProperties().getAlias().equals("cell1")) {

                        // Clear the paragraphs in the cell
                        structureDocumentTagCell.getParagraphs().clear();

                        // Add a new paragraph and append text to it
                        TextRange textRange = structureDocumentTagCell.addParagraph().appendText("92");
                        textRange.getCharacterFormat().setTextColor(Color.BLUE);
                    }
                }
            }
        }

        // Save the modified document to a new file
        doc.saveToFile("ModifiedTableCellContentControl.docx", FileFormat.Docx_2016);

        // Close the document and release the document resources
        doc.close();
        doc.dispose();
    }
}
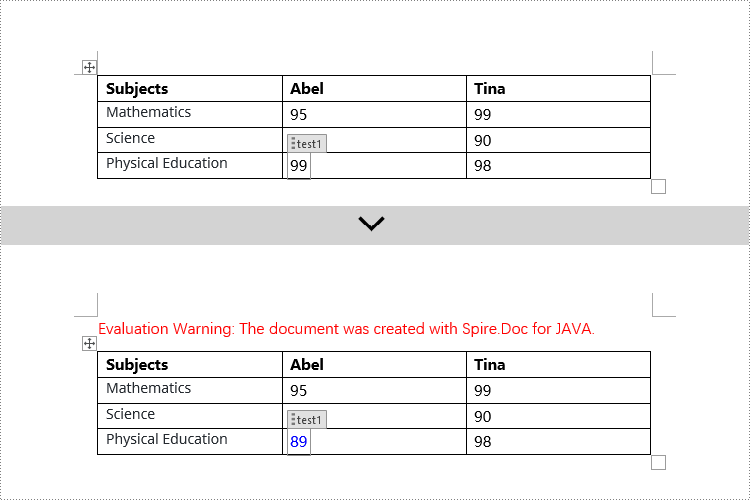
Modify Content Controls within Table Cells using Java
This example demonstrates how to modify content controls in paragraphs within table cells. Firstly, you need to access the collection of paragraphs in a cell using TableCell.getParagraphs(), then iterate through the child objects collection of each paragraph using Paragraph.getChildObjects(), and search for objects of type StructureDocumentTagInline within it for modification.
- Create a Document object.
- Load a document using Document.loadFromFile() method.
- Get the body of a section in the document using Section.getBody().
- Get the first table in the body using Body.getTables().get(0).
- Iterate through the collection of table rows using Table.getRows(), accessing each TableRow object.
- Iterate through the collection of cells in a row using TableRow.getCells(), accessing each TableCell object.
- Iterate through the collection of paragraphs in a cell using TableCell.getParagraphs(), accessing each Paragraph object.
- Iterate through the collection of child objects in a paragraph using Paragraph.getChildObjects(), looking for objects of type StructureDocumentTagInline.
- Access the collection of child objects in StructureDocumentTagInline using StructureDocumentTagInline.getChildObjects(), and perform the necessary modification based on the type of child object.
- Save the document using Document.saveToFile() method.
- Java
import com.spire.doc.*;
import com.spire.doc.documents.*;
import com.spire.doc.fields.*;
import java.awt.*;

public class ModifyTextContentControlInParagraphOfTableCell {
    public static void main(String[] args) {
        // Create a new Document object
        Document doc = new Document();

        // Load document content from a file
        doc.loadFromFile("Sample5.docx");

        // Get the body of the document
        Body body = doc.getSections().get(0).getBody();

        // Get the first table
        Table table = body.getTables().get(0);

        // Iterate through the rows of the table
        for (int r = 0; r < table.getRows().getCount(); r++) {

            // Iterate through the cells in the table row
            for (int c = 0; c < table.getRows().get(r).getCells().getCount(); c++) {

                // Iterate through the paragraphs in the cell
                for (int p = 0; p < table.getRows().get(r).getCells().get(c).getParagraphs().getCount(); p++) {

                    // Get the paragraph object
                    Paragraph paragraph = table.getRows().get(r).getCells().get(c).getParagraphs().get(p);

                    // Iterate through the child objects in the paragraph
                    for (int i = 0; i < paragraph.getChildObjects().getCount(); i++) {

                        // Check if the child object is of type StructureDocumentTagInline
                        if (paragraph.getChildObjects().get(i) instanceof StructureDocumentTagInline) {

                            // Convert it to a StructureDocumentTagInline object
                            StructureDocumentTagInline structureDocumentTagInline = (StructureDocumentTagInline) paragraph.getChildObjects().get(i);

                            // Check if the Tag or Alias property of StructureDocumentTagInline is "test1"
                            if (structureDocumentTagInline.getSDTProperties().getTag().equals("test1") || structureDocumentTagInline.getSDTProperties().getAlias().equals("test1")) {

                                // Iterate through the child objects of StructureDocumentTagInline
                                for (int j = 0; j < structureDocumentTagInline.getChildObjects().getCount(); j++) {

                                    // Check if the child object is of type TextRange
                                    if (structureDocumentTagInline.getChildObjects().get(j) instanceof TextRange) {

                                        // Convert it to a TextRange object
                                        TextRange textRange = (TextRange) structureDocumentTagInline.getChildObjects().get(j);

                                        // Set the text content
                                        textRange.setText("89");

                                        // Set the text color
                                        textRange.getCharacterFormat().setTextColor(Color.BLUE);
                                    }
                                }
                            }
                        }
                    }
                }
            }
        }

        // Save the modified document to a new file
        doc.saveToFile("ModifiedContentControlInParagraphsOfTableCell.docx", FileFormat.Docx_2016);

        // Close the document and release document resources
        doc.close();
        doc.dispose();
    }
}
Apply for a Temporary License
If you'd like to remove the evaluation message from the generated documents, or to get rid of the function limitations, please request a 30-day trial license for yourself.
