
Knowledgebase (2417)
Children categories
Copying data in Excel is a fundamental feature that allows you to quickly and efficiently reproduce data. It can be especially valuable when building spreadsheets with similar structures, or needing to propagate the same information across multiple areas of your workbook. By mastering the art of copying in Excel, you can boost your productivity and reduce the risk of manual data entry errors. In this article, we will explain how to copy rows, columns and cells in Excel in Python using Spire.XLS for Python.
Install Spire.XLS for Python
This scenario requires Spire.XLS for Python and plum-dispatch v1.7.4. They can be easily installed in your Windows through the following pip command.
pip install Spire.XLS
If you are unsure how to install, please refer to this tutorial: How to Install Spire.XLS for Python on Windows
Copy Rows in Excel in Python
You can use the Worksheet.CopyRow(sourceRow, destSheet, destRowIndex, copyOptions) method provided by Spire.XLS for Python to easily copy a row in the same or between different worksheets in Excel. The detailed steps are as follows.
- Create an object of the Workbook class.
- Load an Excel file using the Workbook.LoadFromFile() method.
- Get the source worksheet and the destination worksheet using the Workbook.Worksheets[index] property.
- Get the desired row that you want to copy using the Worksheet.Rows[index] property.
- Copy the row and its format from the source worksheet to the destination worksheet using the Worksheet.CopyRow(sourceRow, destSheet, destRowIndex, copyOptions) method.
- Copy the column widths of cells in the source row to the corresponding cells in the destination row.
- Save the workbook to a file using the Workbook.SaveToFile() method.
- Python
from spire.xls import *
from spire.xls.common import *

# Create a Workbook object
workbook = Workbook()
# Load an Excel file
workbook.LoadFromFile("ContactList.xlsx")

# Get the source worksheet
sheet1 = workbook.Worksheets[0]
# Get the destination worksheet
sheet2 = workbook.Worksheets[1]

# Get the desired row that you want to copy
row = sheet1.Rows[0]

# Copy the row from the source worksheet to the first row of the destination worksheet
sheet1.CopyRow(row, sheet2, 1, CopyRangeOptions.All)

columns = sheet1.Columns.Length
# Copy the column widths of the cells in the source row to the corresponding cells in the destination row
for i in range(columns):
    column_width = row.Columns[i].ColumnWidth
    sheet2.Rows[0].Columns[i].ColumnWidth = column_width

# Save the workbook to a file
workbook.SaveToFile("CopyRow.xlsx", ExcelVersion.Version2016)
workbook.Dispose()
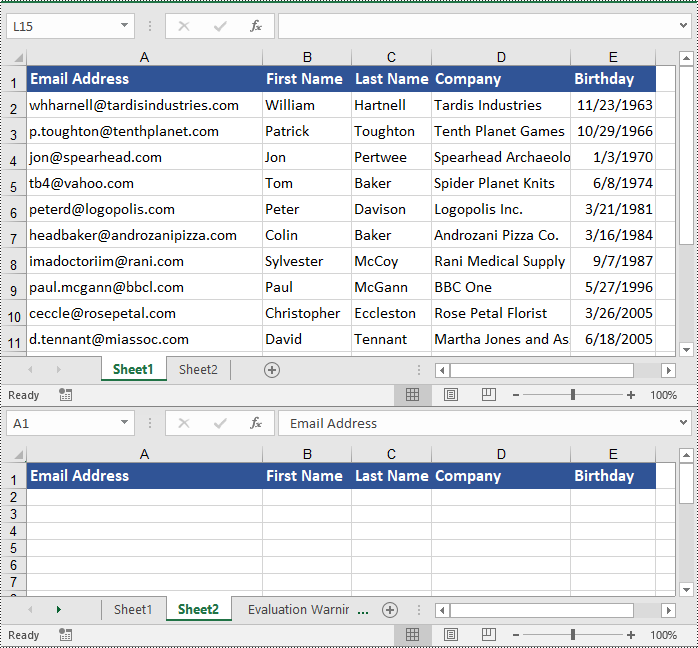
Copy Columns in Excel in Python
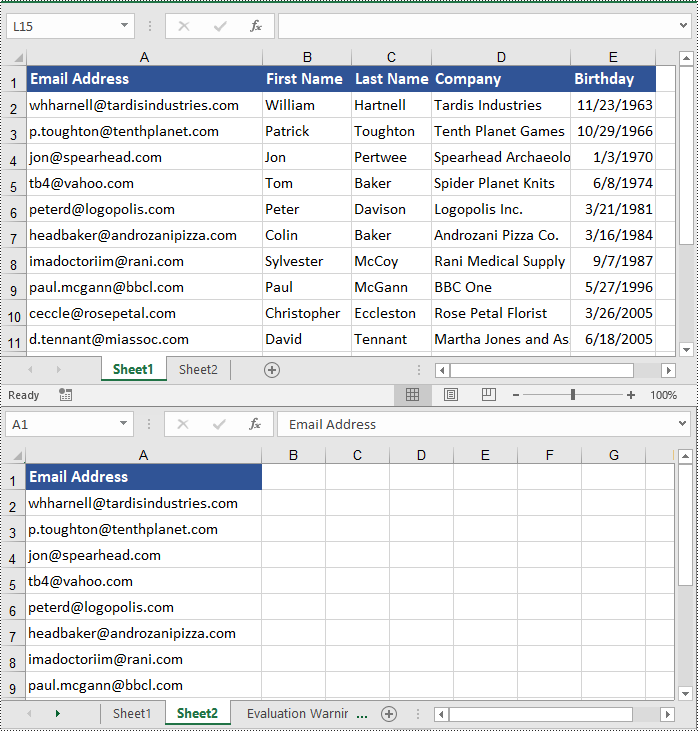
To copy a column in an Excel worksheet, you can use the Worksheet.CopyColumn(sourceColumn, destSheet, destColIndex, copyOptions) method. The detailed steps are as follows.
- Create an object of the Workbook class.
- Load an Excel file using the Workbook.LoadFromFile() method.
- Get the source worksheet and the destination worksheet using the Workbook.Worksheets[index] property.
- Get the desired column that you want to copy using the Worksheet.Columns[index] property.
- Copy the column and its format from the source worksheet to the destination worksheet using the Worksheet.CopyColumn(sourceColumn, destSheet, destColIndex, copyOptions) method.
- Copy the row heights of cells in the source column to the corresponding cells in the destination column.
- Save the workbook to a file using the Workbook.SaveToFile() method.
- Python
from spire.xls import *
from spire.xls.common import *

# Create a Workbook object
workbook = Workbook()
# Load an Excel file
workbook.LoadFromFile("ContactList.xlsx")

# Get the source worksheet
sheet1 = workbook.Worksheets[0]
# Get the destination worksheet
sheet2 = workbook.Worksheets[1]

# Get the desired column that you want to copy
column = sheet1.Columns[0]

# Copy the column from the source worksheet to the first column of the destination worksheet
sheet1.CopyColumn(column, sheet2, 1, CopyRangeOptions.All)

rows = column.Rows.Length
# Copy the row heights of cells in the source column to the corresponding cells in the destination column
for i in range(rows):
    row_height = column.Rows[i].RowHeight
    sheet2.Columns[0].Rows[i].RowHeight = row_height

# Save the workbook to a file
workbook.SaveToFile("CopyColumn.xlsx", ExcelVersion.Version2016)
workbook.Dispose()
Copy Cells in Excel in Python
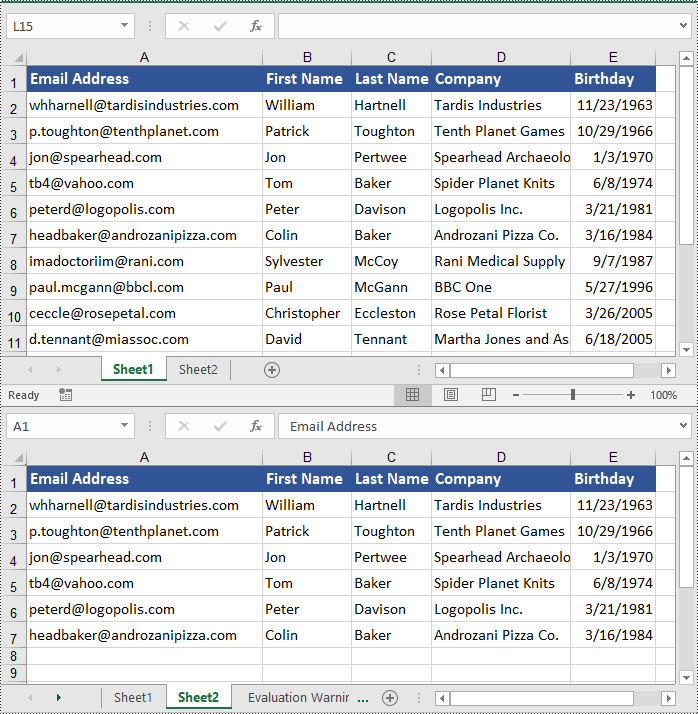
In addition to copying entire rows and columns, you are also able to copy an individual cell or a range of cells using the CellRange.Copy(destRange, copyOptions) method. The detailed steps are as follows.
- Create an object of the Workbook class.
- Load an Excel file using the Workbook.LoadFromFile() method.
- Get the source worksheet and the destination worksheet using the Workbook.Worksheets[index] property.
- Get the source cell range and the destination cell range using the Worksheet.Range[] property.
- Copy the source cell range and its format from the source worksheet to the destination cell range in the destination worksheet using the CellRange.Copy(destRange, copyOptions) method.
- Copy the row heights and column widths of the source cell range to the destination cell range.
- Save the workbook to a file using the Workbook.SaveToFile() method.
- Python
from spire.xls import *
from spire.xls.common import *

# Create a Workbook object
workbook = Workbook()
# Load an Excel file
workbook.LoadFromFile("ContactList.xlsx")

# Get the source worksheet
sheet1 = workbook.Worksheets[0]
# Get the destination worksheet
sheet2 = workbook.Worksheets[1]

# Get the source cell range
range1 = sheet1.Range["A1:E7"]
# Get the destination cell range
range2 = sheet2.Range["A1:E7"]

# Copy the source cell range from the source worksheet to the destination cell range in the destination worksheet
range1.Copy(range2, CopyRangeOptions.All)

# Copy the row heights and column widths of the source cell range to the destination cell range
for i, row in enumerate(range1.Rows):
    for j, column in enumerate(row.Columns):
        range2.Rows[i].Columns[j].ColumnWidth = column.ColumnWidth
        range2.Rows[i].RowHeight = row.RowHeight

# Save the workbook to a file
workbook.SaveToFile("CopyCells.xlsx", ExcelVersion.Version2016)
workbook.Dispose()
Apply for a Temporary License
If you'd like to remove the evaluation message from the generated documents, or to get rid of the function limitations, please request a 30-day trial license for yourself.
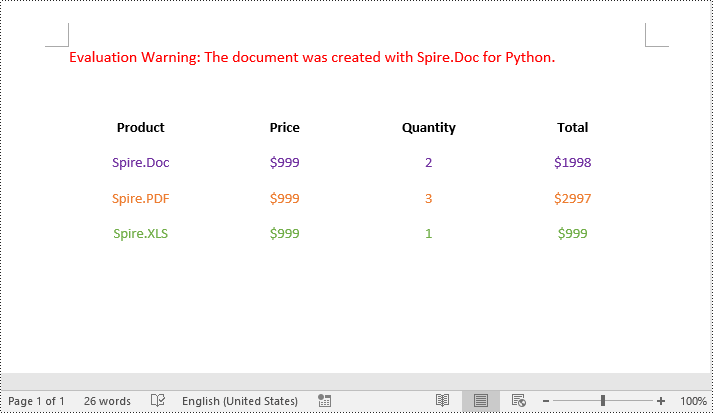
Tables are a powerful formatting tool in Word, allowing you to organize and present data effectively. However, the default table borders may not always align with your document's style and purpose. By selectively changing or removing the borders, you can achieve a variety of visual effects to suit your requirements. In this article, we will explore how to change and remove borders for tables in Word documents in Python using Spire.Doc for Python.
Install Spire.Doc for Python
This scenario requires Spire.Doc for Python. It can be easily installed in your Windows through the following pip command.
pip install Spire.Doc
If you are unsure how to install, please refer to this tutorial: How to Install Spire.Doc for Python on Windows
Change Borders for a Table in Word in Python
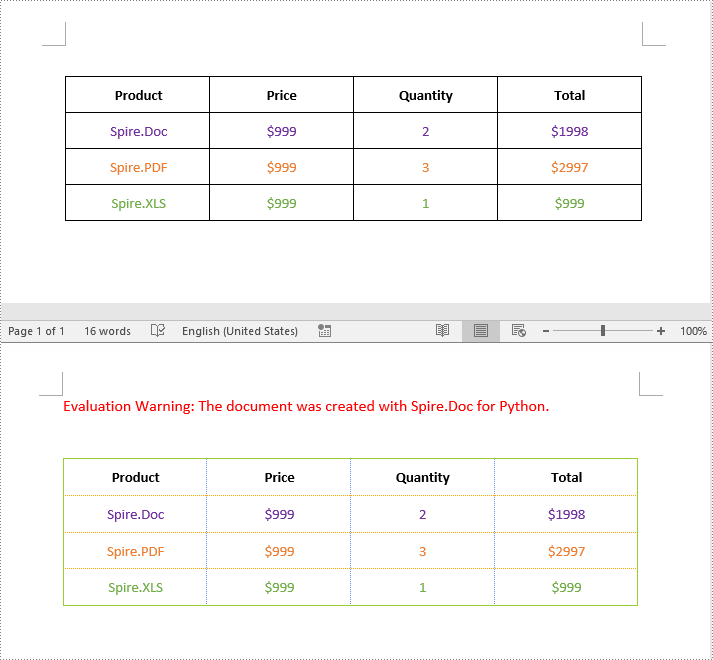
Spire.Doc for Python empowers you to retrieve the borders collection of a table by using the Table.TableFormat.Borders property. Once retrieved, you can access individual borders (like top border, bottom border, left border, right border, horizontal border, and vertical border) from the collection and then modify them by adjusting their line style, width, and color. The detailed steps are as follows.
- Create an object of the Document class.
- Load a Word document using Document.LoadFromFile() method.
- Get a specific section using Document.Sections[index] property.
- Get a specific table using Section.Tables[index] property.
- Get the borders collection of the table using Table.TableFormat.Borders property.
- Get an individual border, such as the top border from the borders collection using Borders.Top property, and then change its line style, width and color.
- Refer to the above step to get other individual borders from the borders collection, and then change their line style, width and color.
- Save the resulting document using Document.SaveToFile() method.
- Python
from spire.doc import *
from spire.doc.common import *

# Create an object of the Document class
document = Document()
# Load a Word document
document.LoadFromFile("Table.docx")

# Add a section to the document
section = document.Sections.get_Item(0)

# Get the first table in the section
table = section.Tables.get_Item(0) if isinstance(section.Tables.get_Item(0), Table) else None

# Get the collection of the borders
borders = table.TableFormat.Borders

# Get the top border and change border style, line width, and color
topBorder = borders.Top
topBorder.BorderType = BorderStyle.Single
topBorder.LineWidth = 1.0
topBorder.Color = Color.get_YellowGreen()

# Get the left border and change border style, line width, and color
leftBorder = borders.Left
leftBorder.BorderType = BorderStyle.Single
leftBorder.LineWidth = 1.0
leftBorder.Color = Color.get_YellowGreen()

# Get the right border and change border style, line width, and color
rightBorder = borders.Right
rightBorder.BorderType = BorderStyle.Single
rightBorder.LineWidth = 1.0
rightBorder.Color = Color.get_YellowGreen()

# Get the bottom border and change border style, line width, and color
bottomBorder = borders.Bottom
bottomBorder.BorderType = BorderStyle.Single
bottomBorder.LineWidth = 1.0
bottomBorder.Color = Color.get_YellowGreen()

# Get the horizontal border and change border style, line width, and color
horizontalBorder = borders.Horizontal
horizontalBorder.BorderType = BorderStyle.Dot
horizontalBorder.LineWidth = 1.0
horizontalBorder.Color = Color.get_Orange()

# Get the vertical border and change border style, line width, and color
verticalBorder = borders.Vertical
verticalBorder.BorderType = BorderStyle.Dot
verticalBorder.LineWidth = 1.0
verticalBorder.Color = Color.get_CornflowerBlue()

# Save the resulting document
document.SaveToFile("ChangeBorders.docx", FileFormat.Docx2013)
document.Close()
Remove Borders from a Table in Word in Python
To remove borders from a table, you need to set the BorderType property of the borders to BorderStyle.none. The detailed steps are as follows.
- Create an object of the Document class.
- Load a Word document using Document.LoadFromFile() method.
- Get a specific section using Document.Sections[index] property.
- Get a specific table using Section.Tables[index] property.
- Get the borders collection of the table using Table.TableFormat.Borders property.
- Get an individual border, such as the top border from the borders collection using Borders.Top property. Then set the BorderType property of the top border to BorderStyle.none.
- Refer to the above step to get other individual borders from the borders collection and then set the BorderType property of the borders to BorderStyle.none.
- Save the resulting document using Document.SaveToFile() method.
- Python
from spire.doc import *
from spire.doc.common import *

# Initialize an instance of the Document class
document = Document()
document.LoadFromFile("ChangeBorders.docx")

# Add a section to the document
section = document.Sections.get_Item(0)

# Get the first table in the section
table = section.Tables.get_Item(0) if isinstance(section.Tables.get_Item(0), Table) else None

# Get the borders collection of the table
borders = table.TableFormat.Borders

# Remove top border
topBorder = borders.Top
topBorder.BorderType = BorderStyle.none

# Remove left border
leftBorder = borders.Left
leftBorder.BorderType = BorderStyle.none

# Remove right border
rightBorder = borders.Right
rightBorder.BorderType = BorderStyle.none

# Remove bottom border
bottomBorder = borders.Bottom
bottomBorder.BorderType = BorderStyle.none

# remove inside horizontal border
horizontalBorder = borders.Horizontal
horizontalBorder.BorderType = BorderStyle.none

# Remove inside vertical border
verticalBorder = borders.Vertical
verticalBorder.BorderType = BorderStyle.none

# Save the resulting document
document.SaveToFile("RemoveBorders.docx", FileFormat.Docx2013)
document.Close()
Apply for a Temporary License
If you'd like to remove the evaluation message from the generated documents, or to get rid of the function limitations, please request a 30-day trial license for yourself.
PowerPoint presentations often serve as repositories of essential data and information shared during meetings, lectures, and conferences. They frequently include tables for data presentation and basic analysis. However, to further analyze the data or integrate it into reports and spreadsheets, it becomes necessary to extract these tables and save them in other formats. By leveraging Python, users can efficiently extract tables from PowerPoint presentations, transforming static slides into dynamic data sets ready for processing.
This article aims to demonstrate how to extract tables from PowerPoint presentations and write them to text and Excel worksheets using Spire.Presentation for Python, thereby enhancing the utilization of data in presentations and streamlining the data extraction process.
- Extract Table Data from PowerPoint Presentations to Text Files
- Extract Table Data from PowerPoint Presentations to Excel Worksheets
Install Spire.Presentation for Python
This scenario requires Spire.Presentation for Python and plum-dispatch v1.7.4. They can be easily installed in your Windows through the following pip command.
pip install Spire.Presentation
If you are unsure how to install, please refer to: How to Install Spire.Presentation for Python on Windows
Extract Table Data from PowerPoint Presentations to Text Files
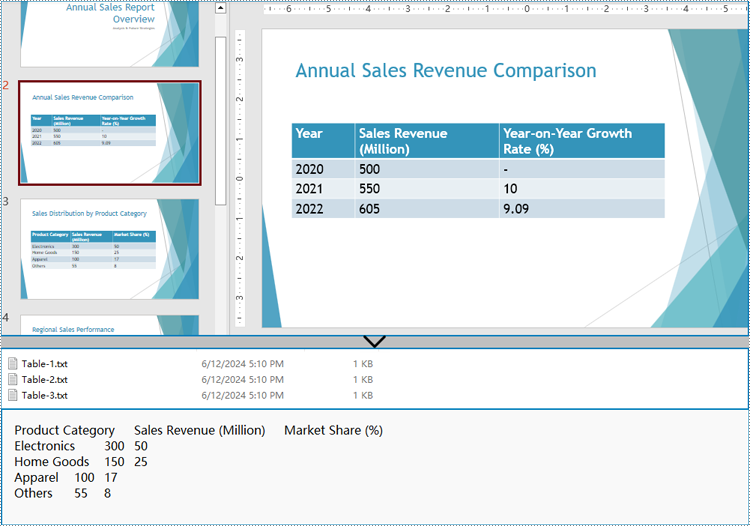
Spire.Presentation for Python provides the ITable class which represents a table in a presentation slide. By iterating through the shapes in each slide to check if it’s an instance of ITable class, developers can retrieve all the tables in the presentation file and get the data in the tables.
The detailed steps for extracting tables from PowerPoint presentations and writing them to text files are as follows:
- Create an instance of Presentation class and load a PowerPoint file using Presentation.LoadFromFile() method.
- Iterate through all the slides in the file and then all the shapes in the slides.
- Check if a shape is an instance of ITable class. If it is, iterate through the rows and then the cells in each row. Get the cell values using TableRow[].TextFrame.Text property and append them to strings.
- Write the table data to text files.
- Python
from spire.presentation import *
from spire.presentation.common import *

# Create an instance of Presentation
presentation = Presentation()

# Load a PowerPoint file
presentation.LoadFromFile("Sample.pptx")

tables = []
# Iterate through all the slides
for slide in presentation.Slides:
    # Iterate through all the shapes
    for shape in slide.Shapes:
        # Check whether the shape is a table
        if isinstance(shape, ITable):
            tableData = ""
            # Iterate through all the rows
            for row in shape.TableRows:
                rowData = ""
                # Iterate through all the cells in the row
                for i in range(0, row.Count):
                    # Get the cell value
                    cellValue = row[i].TextFrame.Text
                    rowData += (cellValue + "\t" if i < row.Count - 1 else cellValue)
                tableData += (rowData + "\n")
            tables.append(tableData)

# Write the tables to text files
for idx, table in enumerate(tables, start=1):
    fileName = f"output/Tables/Table-{idx}.txt"
    with open(fileName, "w") as f:
        f.write(table)
presentation.Dispose()
Extract Table Data from PowerPoint Presentations to Excel Worksheets
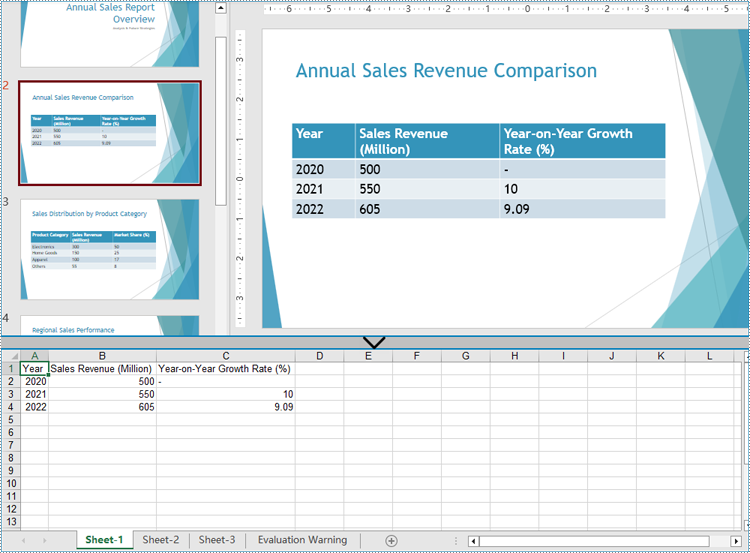
After extracting table data from presentations using Spire.Presentation for Python, developers can further utilize Spire.XLS for Python to write this data into Excel worksheets, facilitating further analysis, referencing, and format conversion.
Install Spire.XLS for Python via PyPI:
pip install Spire.XLS
The detailed steps for extracting tables from PowerPoint presentations and writing them to Excel worksheets are as follows:
- Create an instance of Presentation class and load a PowerPoint file using Presentation.LoadFromFile() method.
- Create an instance of Workbook class and clear the default worksheets.
- Iterate through the slides in the presentation and then the shapes in the slides to check if the shapes are instances of ITable class. Append all the ITable instances to a list.
- Iterate through the tables in the list and add a worksheet to the workbook for each table using Workbook.Worksheets.Add() method.
- Iterate through the rows of each table and then the cells in the rows to get the cell values through TableRow.TextFrame.Text property. Write the values to the corresponding cells in the worksheet through Worksheet.Range[].Value property.
- Save the workbook using Workbook.SaveToFile() method.
- Python
from spire.presentation import *
from spire.presentation.common import *
from spire.xls import *
from spire.xls.common import *

# Create an instance of Presentation
presentation = Presentation()

# Load a PowerPoint file
presentation.LoadFromFile("Sample.pptx")

# Create an Excel file and clear the default worksheets
workbook = Workbook()
workbook.Worksheets.Clear()

tables = []
# Iterate through all the slides
for slide in presentation.Slides:
    # Iterate through all the shapes
    for shape in slide.Shapes:
        # Check whether the shape is a table
        if isinstance(shape, ITable):
            tables.append(shape)

# Iterate through all the tables
for t in range(len(tables)):
    table = tables[t]
    sheet = workbook.Worksheets.Add(f"Sheet-{t+1}")
    for i in range(0, table.TableRows.Count):
        row = table.TableRows[i]
        for j in range(0, row.Count):
            sheet.Range[i + 1, j + 1].Value = row[j].TextFrame.Text
    # Autofit rows and columns
    sheet.AllocatedRange.AutoFitColumns()
    sheet.AllocatedRange.AutoFitRows()

# Save the Excel file
workbook.SaveToFile("output/PresentationTables.xlsx", FileFormat.Version2016)

presentation.Dispose()
workbook.Dispose()
Apply for a Temporary License
If you'd like to remove the evaluation message from the generated documents, or to get rid of the function limitations, please request a 30-day trial license for yourself.
