Knowledgebase (2344)
Children categories
In a Word document, content controls allow the content of the document to be dynamically updated and modified, providing users with more flexible editing and management options. Through content controls, users can easily insert, delete, or modify content in specific sections without altering the overall structure of the document. This article will explain how to use Spire.Doc for .NET to modify content controls in a Word document within a C# project.
- Modify Content Controls in the Body using C#
- Modify Content Controls within Paragraphs using C#
- Modify Content Controls Wrapping Table Rows using C#
- Modify Content Controls Wrapping Table Cells using C#
- Modify Content Controls within Table Cells using C#
Install Spire.Doc for .NET
To begin with, you need to add the DLL files included in the Spire.Doc for .NET package as references in your .NET project. The DLL files can be either downloaded from this link or installed via NuGet.
PM> Install-Package Spire.Doc
Modify Content Controls in the Body using C#
In Spire.Doc, the object type for content controls in the body is StructureDocumentTag. You can iterate through the collection of child objects in Section.Body to find objects of type StructureDocumentTag and then modify them. Here are the detailed steps:
- Create a Document object.
- Load a document using the Document.LoadFromFile() method.
- Access the body of a section in the document using Section.Body.
- Iterate through the collection of child objects in the body, Body.ChildObjects, to find objects of type StructureDocumentTag.
- Access the StructureDocumentTag.ChildObjects collection and perform the necessary modification operations based on the type of child objects.
- Save the document using the Document.SaveToFile() method.
- C#
using Spire.Doc;
using Spire.Doc.Documents;
using System.Collections.Generic;
namespace SpireDocDemo
{
internal class Program
{
static void Main(string[] args)
{
// Create a new document object
Document doc = new Document();
// Load document content from a file
doc.LoadFromFile("Sample1.docx");
// Get the body of the document
Body body = doc.Sections[0].Body;
// Create lists for paragraphs and tables
List<Paragraph> paragraphs = new List<Paragraph>();
List<Table> tables = new List<Table>();
for (int i = 0; i < body.ChildObjects.Count; i++)
{
// Get the document object
DocumentObject documentObject = body.ChildObjects[i];
// If it is a StructureDocumentTag object
if (documentObject.DocumentObjectType == DocumentObjectType.StructureDocumentTag)
{
StructureDocumentTag structureDocumentTag = (StructureDocumentTag)documentObject;
// If the tag is "c1" or the alias is "c1"
if (structureDocumentTag.SDTProperties.Tag == "c1" || structureDocumentTag.SDTProperties.Alias == "c1")
{
for (int j = 0; j < structureDocumentTag.ChildObjects.Count; j++)
{
// If it is a paragraph object
if (structureDocumentTag.ChildObjects[j].DocumentObjectType == DocumentObjectType.Paragraph)
{
Paragraph paragraph = (Paragraph)structureDocumentTag.ChildObjects[j];
paragraphs.Add(paragraph);
}
// If it is a table object
if (structureDocumentTag.ChildObjects[j].DocumentObjectType == DocumentObjectType.Table)
{
Table table = (Table)structureDocumentTag.ChildObjects[j];
tables.Add(table);
}
}
}
}
}
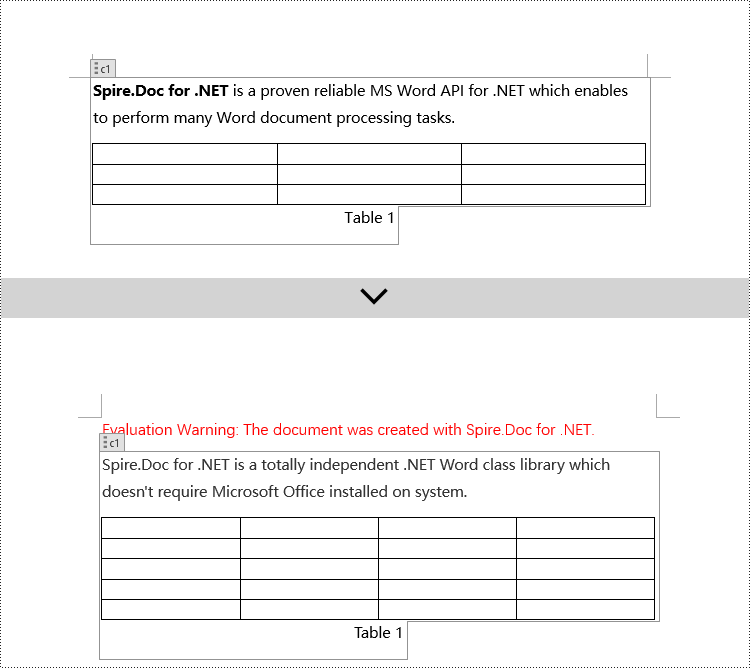
// Modify the text content of the first paragraph
paragraphs[0].Text = "Spire.Doc for .NET is a totally independent .NET Word class library which doesn't require Microsoft Office installed on system.";
// Reset the cells of the first table
tables[0].ResetCells(5, 4);
// Save the modified document to a file
doc.SaveToFile("ModifyBodyContentControls.docx", FileFormat.Docx2016);
// Release document resources
doc.Dispose();
}
}
}
Modify Content Controls within Paragraphs using C#
In Spire.Doc, the object type for content controls within paragraphs is StructureDocumentTagInline. To modify them, you need to iterate through the collection of child objects of Paragraph.ChildObjects, find objects of type StructureDocumentTagInline, and then make the necessary modifications. Here are the detailed steps:
- Create a Document object.
- Load a document using the Document.LoadFromFile() method.
- Access the body of a section in the document using Section.Body.
- Get the first paragraph of the body using Body.Paragraphs[0].
- Iterate through the collection of child objects of the paragraph, Paragraph.ChildObjects, to find objects of type StructureDocumentTagInline.
- Access the collection of child objects of StructureDocumentTagInline, StructureDocumentTagInline.ChildObjects, and perform the required modifications based on the type of the child objects.
- Save the document using the Document.SaveToFile() method.
- C#
using Spire.Doc;
using Spire.Doc.Documents;
using Spire.Doc.Fields;
using System.Collections.Generic;
namespace SpireDocDemo
{
internal class Program
{
static void Main(string[] args)
{
// Create a new Document object
Document doc = new Document();
// Load document content from a file
doc.LoadFromFile("Sample2.docx");
// Get the body of the document
Body body = doc.Sections[0].Body;
// Get the first paragraph in the body
Paragraph paragraph = body.Paragraphs[0];
// Iterate through child objects in the paragraph
for (int i = 0; i < paragraph.ChildObjects.Count; i++)
{
// Check if the child object is StructureDocumentTagInline
if (paragraph.ChildObjects[i].DocumentObjectType == DocumentObjectType.StructureDocumentTagInline)
{
// Convert the child object to StructureDocumentTagInline type
StructureDocumentTagInline structureDocumentTagInline = (StructureDocumentTagInline)paragraph.ChildObjects[i];
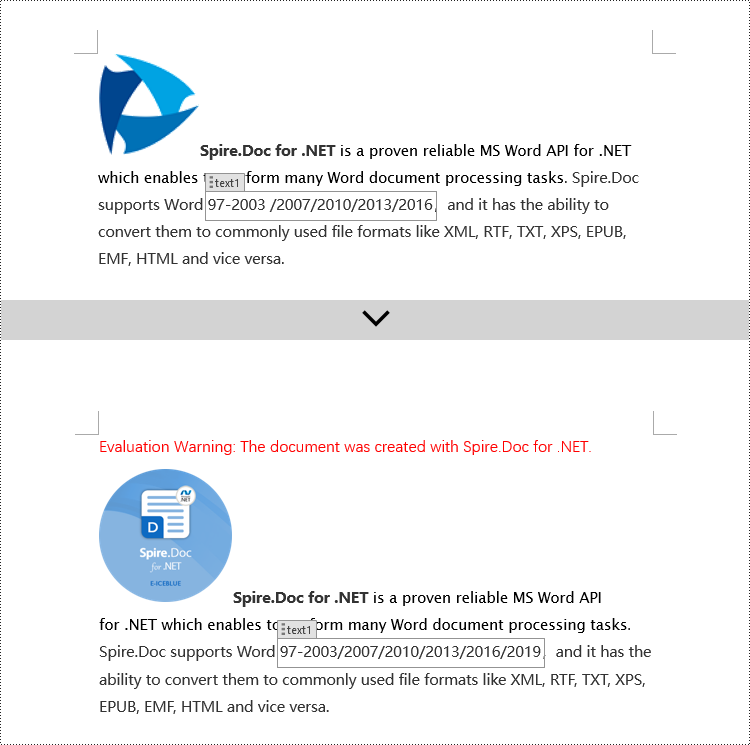
// Check if the Tag or Alias property is "text1"
if (structureDocumentTagInline.SDTProperties.Tag == "text1" || structureDocumentTagInline.SDTProperties.Alias == "text1")
{
// Iterate through child objects in the StructureDocumentTagInline object
for (int j = 0; j < structureDocumentTagInline.ChildObjects.Count; j++)
{
// Check if the child object is a TextRange object
if (structureDocumentTagInline.ChildObjects[j].DocumentObjectType == DocumentObjectType.TextRange)
{
// Convert the child object to TextRange type
TextRange range = (TextRange)structureDocumentTagInline.ChildObjects[j];
// Set the text content to a specified content
range.Text = "97-2003/2007/2010/2013/2016/2019";
}
}
}
// Check if the Tag or Alias property is "logo1"
if (structureDocumentTagInline.SDTProperties.Tag == "logo1" || structureDocumentTagInline.SDTProperties.Alias == "logo1")
{
// Iterate through child objects in the StructureDocumentTagInline object
for (int j = 0; j < structureDocumentTagInline.ChildObjects.Count; j++)
{
// Check if the child object is an image
if (structureDocumentTagInline.ChildObjects[j].DocumentObjectType == DocumentObjectType.Picture)
{
// Convert the child object to DocPicture type
DocPicture docPicture = (DocPicture)structureDocumentTagInline.ChildObjects[j];
// Load a specified image
docPicture.LoadImage("Doc-NET.png");
// Set the width and height of the image
docPicture.Width = 100;
docPicture.Height = 100;
}
}
}
}
}
// Save the modified document to a new file
doc.SaveToFile("ModifiedContentControlsInParagraph.docx", FileFormat.Docx2016);
// Release resources of the Document object
doc.Dispose();
}
}
}
Modify Content Controls Wrapping Table Rows using C#
In Spire.Doc, the object type for a table row content control is StructureDocumentTagRow. To modify it, you need to iterate through the child objects collection of Table.ChildObjects, find objects of type StructureDocumentTagRow, and then make the necessary modifications. Here are the detailed steps:
- Create a Document object.
- Load a document using the Document.LoadFromFile() method.
- Access the body of a section using Section.Body.
- Get the first table in the body using Body.Tables[0].
- Iterate through the child objects collection of the table, Table.ChildObjects, to find objects of type StructureDocumentTagRow.
- Access the collection of cells in the StructureDocumentTagRow.Cells table row content control and make the required modifications to the cell contents.
- Save the document using the Document.SaveToFile() method.
- C#
using Spire.Doc;
using Spire.Doc.Documents;
using Spire.Doc.Fields;

namespace SpireDocDemo
{
    internal class Program
    {
        static void Main(string[] args)
        {
            // Create a new document object
            Document doc = new Document();

            // Load the document from a file
            doc.LoadFromFile("Sample3.docx");

            // Get the body of the document
            Body body = doc.Sections[0].Body;

            // Get the first table
            Table table = (Table)body.Tables[0];

            // Iterate through the child objects in the table
            for (int i = 0; i < table.ChildObjects.Count; i++)
            {
                // Check if the child object is of type StructureDocumentTagRow
                if (table.ChildObjects[i].DocumentObjectType == DocumentObjectType.StructureDocumentTagRow)
                {
                    // Convert the child object to a StructureDocumentTagRow object
                    StructureDocumentTagRow structureDocumentTagRow = (StructureDocumentTagRow)table.ChildObjects[i];

                    // Check if the Tag or Alias property of the StructureDocumentTagRow is "row1"
                    if (structureDocumentTagRow.SDTProperties.Tag == "row1" || structureDocumentTagRow.SDTProperties.Alias == "row1")
                    {
                        // Clear the paragraphs in the cell
                        structureDocumentTagRow.Cells[0].Paragraphs.Clear();

                        // Add a paragraph in the cell and set the text
                        TextRange textRange = structureDocumentTagRow.Cells[0].AddParagraph().AppendText("Arts");
                        textRange.CharacterFormat.TextColor = System.Drawing.Color.Blue;
                    }
                }
            }

            // Save the modified document to a file
            doc.SaveToFile("ModifiedTableRowContentControl.docx", FileFormat.Docx2016);

            // Release document resources
            doc.Dispose();
        }
    }
}
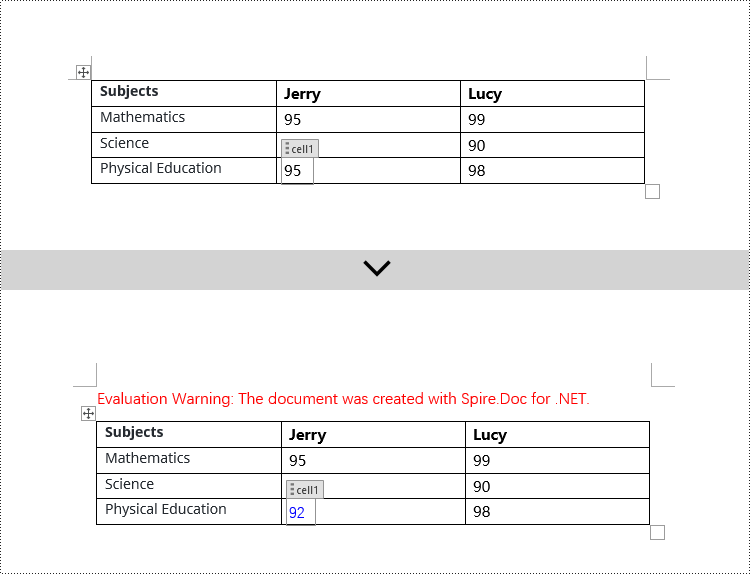
Modify Content Controls Wrapping Table Cells using C#
In Spire.Doc, the object type for the content control in a table cell is StructureDocumentTagCell. You need to iterate through the collection of child objects in TableRow.ChildObjects, find objects of type StructureDocumentTagCell, and then perform operations on them. Here are the detailed steps:
- Create a Document object.
- Load a document using the Document.LoadFromFile() method.
- Get the body of a section using Section.Body.
- Get the first table in the body using Body.Tables[0].
- Iterate through the collection of table rows Table.Rows, accessing each TableRow object.
- Iterate through the collection of child objects in the table row TableRow.ChildObjects, finding objects of type StructureDocumentTagCell.
- Access the collection of paragraphs in the StructureDocumentTagCell content control cell, and perform the necessary modifications to the content.
- Save the document using the Document.SaveToFile() method.
- C#
using Spire.Doc;
using Spire.Doc.Documents;
using Spire.Doc.Fields;

namespace SpireDocDemo
{
    internal class Program
    {
        static void Main(string[] args)
        {
             // Create a new document object
            Document doc = new Document();

            // Load the document from a file
            doc.LoadFromFile("Sample4.docx");

            // Get the body of the document
            Body body = doc.Sections[0].Body;

            // Get the first table in the document
            Table table = (Table)body.Tables[0];

            // Iterate through the rows of the table
            for (int i = 0; i < table.Rows.Count; i++)
            {
                // Iterate through the child objects in each row
                for (int j = 0; j < table.Rows[i].ChildObjects.Count; j++)
                {
                    // Check if the child object is a StructureDocumentTagCell
                    if (table.Rows[i].ChildObjects[j].DocumentObjectType == DocumentObjectType.StructureDocumentTagCell)
                    {
                        // Convert the child object to StructureDocumentTagCell type
                        StructureDocumentTagCell structureDocumentTagCell = (StructureDocumentTagCell)table.Rows[i].ChildObjects[j];

                        // Check if the Tag or Alias property of structureDocumentTagCell is "cell1"
                        if (structureDocumentTagCell.SDTProperties.Tag == "cell1" || structureDocumentTagCell.SDTProperties.Alias == "cell1")
                        {
                            // Clear the paragraphs in the cell
                            structureDocumentTagCell.Paragraphs.Clear();

                            // Add a new paragraph and add text to it
                            TextRange textRange = structureDocumentTagCell.AddParagraph().AppendText("92");
                            textRange.CharacterFormat.TextColor = System.Drawing.Color.Blue;
                        }
                    }
                }
            }

            // Save the modified document to a new file
            doc.SaveToFile("ModifiedTableCellContentControl.docx", FileFormat.Docx2016);

            // Dispose of the document object
            doc.Dispose();
        }
    }
}
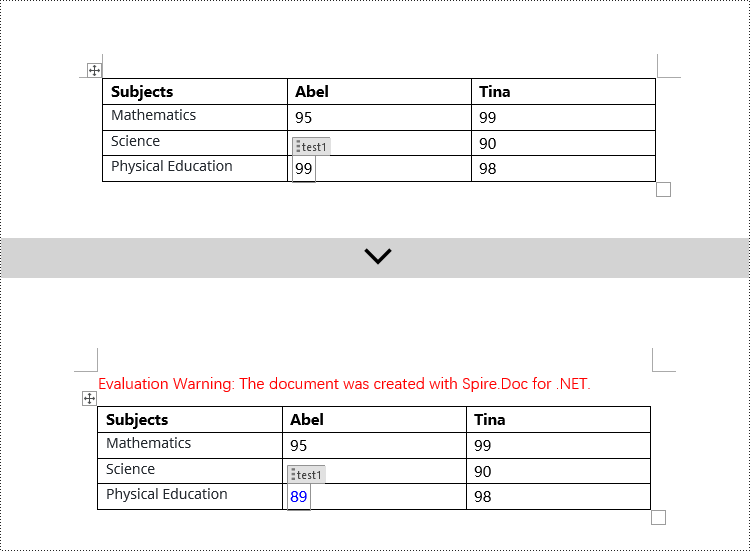
Modify Content Controls within Table Cells using C#
This case demonstrates modifying content controls within paragraphs in table cells. You need to first access the collection of paragraphs in the cell TableCell.Paragraphs, then iterate through the collection of child objects in each paragraph Paragraph.ChildObjects, find objects of type StructureDocumentTagInline, and make modifications to them. Here are the detailed steps:
- Create a Document object.
- Load a document using the Document.LoadFromFile() method.
- Get the body of a section using Section.Body.
- Get the first table in the body using Body.Tables[0].
- Iterate through the collection of table rows Table.Rows, accessing each TableRow object.
- Iterate through the collection of cells in the table row TableRow.Cells, accessing each TableCell object.
- Iterate through the collection of paragraphs in the cell TableCell.Paragraphs, accessing each Paragraph object.
- Iterate through the collection of child objects in the paragraph Paragraph.ChildObjects, finding objects of type StructureDocumentTagInline.
- Access the ChildObjects collection of the StructureDocumentTagInline object, and perform the necessary modifications based on the type of the child objects.
- Save the document using the Document.SaveToFile() method.
- C#
using Spire.Doc;
using Spire.Doc.Documents;
using Spire.Doc.Fields;

namespace SpireDocDemo
{
    internal class Program
    {
        static void Main(string[] args)
        {
            // Create a new Document object
            Document doc = new Document();

            // Load document content from file
            doc.LoadFromFile("Sample5.docx");

            // Get the body of the document
            Body body = doc.Sections[0].Body;

            // Get the first table
            Table table = (Table)body.Tables[0];

            // Iterate through the rows of the table
            for (int r = 0; r < table.Rows.Count; r++)
            {
                // Iterate through the cells in the table row
                for (int c = 0; c < table.Rows[r].Cells.Count; c++)
                {
                    // Iterate through the paragraphs in the cell
                    for (int p = 0; p < table.Rows[r].Cells[c].Paragraphs.Count; p++)
                    {
                        // Get the paragraph object
                        Paragraph paragraph = table.Rows[r].Cells[c].Paragraphs[p];

                        // Iterate through the child objects in the paragraph
                        for (int i = 0; i < paragraph.ChildObjects.Count; i++)
                        {
                            // Check if the child object is of type StructureDocumentTagInline
                            if (paragraph.ChildObjects[i].DocumentObjectType == DocumentObjectType.StructureDocumentTagInline)
                            {
                                // Convert to StructureDocumentTagInline object
                                StructureDocumentTagInline structureDocumentTagInline = (StructureDocumentTagInline)paragraph.ChildObjects[i];

                                // Check if the Tag or Alias property of StructureDocumentTagInline is "test1"
                                if (structureDocumentTagInline.SDTProperties.Tag == "test1" || structureDocumentTagInline.SDTProperties.Alias == "test1")
                                {
                                    // Iterate through the child objects of StructureDocumentTagInline
                                    for (int j = 0; j < structureDocumentTagInline.ChildObjects.Count; j++)
                                    {
                                        // Check if the child object is of type TextRange
                                        if (structureDocumentTagInline.ChildObjects[j].DocumentObjectType == DocumentObjectType.TextRange)
                                        {
                                            // Convert to TextRange object
                                            TextRange textRange = (TextRange)structureDocumentTagInline.ChildObjects[j];

                                            // Set the text content
                                            textRange.Text = "89";

                                            // Set text color
                                            textRange.CharacterFormat.TextColor = System.Drawing.Color.Blue;
                                        }
                                    }
                                }
                            }
                        }
                    }
                }
            }

            // Save the modified document to a new file
            doc.SaveToFile("ModifiedContentControlInParagraphOfTableCell.docx", FileFormat.Docx2016);

            // Dispose of the Document object resources
            doc.Dispose();
        }
    }
}
Apply for a Temporary License
If you'd like to remove the evaluation message from the generated documents, or to get rid of the function limitations, please request a 30-day trial license for yourself.
C#: Create a Table Of Contents for a Newly Created Word Document
2024-04-24 01:11:13 Written by KoohjiCreating a table of contents in a newly created Word document is an important means to enhance document quality, improve reading experience, and effectively convey information. As a navigational guide for the document, the table of contents provides readers with a way to quickly locate and navigate through the document's content. Through the table of contents, readers can swiftly grasp the document's structure and content organization, saving reading time and boosting work efficiency. This article will explain how to use Spire.Doc for .NET to create a table of contents for a newly created Word document within a C# project.
- C# Create a Table Of Contents Using Heading Styles
- C# Create a Table Of Contents Using Outline Level Styles
- C# Create a Table Of Contents Using Image Captions
- C# Create a Table Of Contents Using Table Captions
Install Spire.Doc for .NET
To begin with, you need to add the DLL files included in the Spire.Doc for .NET package as references in your .NET project. The DLL files can be either downloaded from this link or installed via NuGet.
PM> Install-Package Spire.Doc
C# Create a Table Of Contents Using Heading Styles
Using heading styles to create a table of contents is a method to automatically generate a table of contents in a Word document by identifying title and subtitles in the document using different levels of heading styles. Here are the detailed steps:
- Create a Document object.
- Add a section using the Document.AddSection() method.
- Add a paragraph using the Section.AddParagraph() method.
- Create a table of contents object using the Paragraph.AppendTOC(int lowerLevel, int upperLevel) method.
- Create a CharacterFormat object and set the font.
- Apply a heading style to the paragraph using the Paragraph.ApplyStyle(BuiltinStyle.Heading1) method.
- Add text content using the Paragraph.AppendText() method.
- Apply character formatting to the text using the TextRange.ApplyCharacterFormat() method.
- Update the table of contents using the Document.UpdateTableOfContents() method.
- Save the document using the Document.SaveToFile() method.
- C#
using Spire.Doc;
using Spire.Doc.Documents;
using Spire.Doc.Fields;
using Spire.Doc.Formatting;
namespace SpireDocDemo
{
internal class Program
{
static void Main(string[] args)
{
// Create a new document object
Document doc = new Document();
// Add a section to the document
Section section = doc.AddSection();
// Add a paragraph
Paragraph TOCparagraph = section.AddParagraph();
TOCparagraph.AppendTOC(1, 3);
// Create a CharacterFormat object and set the font
CharacterFormat characterFormat1 = new CharacterFormat(doc);
characterFormat1.FontName = "Microsoft YaHei";
// Create another CharacterFormat object
CharacterFormat characterFormat2 = new CharacterFormat(doc);
characterFormat2.FontName = "Microsoft YaHei";
characterFormat2.FontSize = 12;
// Add a paragraph with Heading 1 style
Paragraph paragraph = section.Body.AddParagraph();
paragraph.ApplyStyle(BuiltinStyle.Heading1);
// Add text and apply character formatting
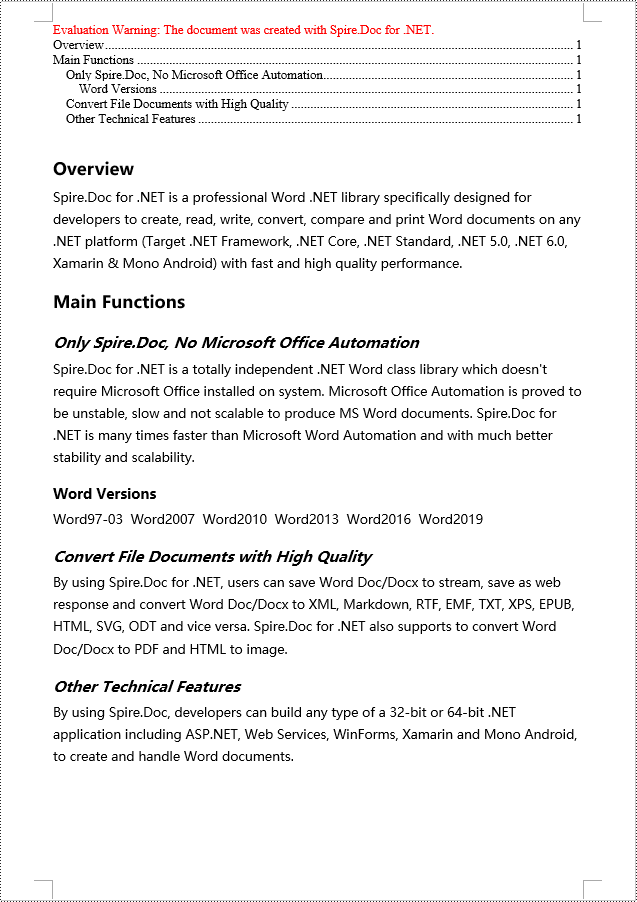
TextRange textRange1 = paragraph.AppendText("Overview");
textRange1.ApplyCharacterFormat(characterFormat1);
// Add regular content
paragraph = section.Body.AddParagraph();
TextRange textRange2 = paragraph.AppendText("Spire.Doc for .NET is a professional Word .NET library specifically designed for developers to create, read, write, convert, compare and print Word documents on any .NET platform (Target .NET Framework, .NET Core, .NET Standard, .NET 5.0, .NET 6.0, Xamarin & Mono Android) with fast and high quality performance.");
textRange2.ApplyCharacterFormat(characterFormat2);
// Add a paragraph with Heading 1 style
paragraph = section.Body.AddParagraph();
paragraph.ApplyStyle(BuiltinStyle.Heading1);
textRange1 = paragraph.AppendText("Main Functions");
textRange1.ApplyCharacterFormat(characterFormat1);
// Add a paragraph with Heading 2 style
paragraph = section.Body.AddParagraph();
paragraph.ApplyStyle(BuiltinStyle.Heading2);
textRange1 = paragraph.AppendText("Only Spire.Doc, No Microsoft Office Automation");
textRange1.ApplyCharacterFormat(characterFormat1);
// Add regular content
paragraph = section.Body.AddParagraph();
textRange2 = paragraph.AppendText("Spire.Doc for .NET is a totally independent .NET Word class library which doesn't require Microsoft Office installed on system. Microsoft Office Automation is proved to be unstable, slow and not scalable to produce MS Word documents. Spire.Doc for .NET is many times faster than Microsoft Word Automation and with much better stability and scalability.");
textRange2.ApplyCharacterFormat(characterFormat2);
// Add a paragraph with Heading 3 style
paragraph = section.Body.AddParagraph();
paragraph.ApplyStyle(BuiltinStyle.Heading3);
textRange1 = paragraph.AppendText("Word Versions");
textRange1.ApplyCharacterFormat(characterFormat1);
paragraph = section.Body.AddParagraph();
textRange2 = paragraph.AppendText("Word97-03 Word2007 Word2010 Word2013 Word2016 Word2019");
textRange2.ApplyCharacterFormat(characterFormat2);
// Add a paragraph with Heading 2 style
paragraph = section.Body.AddParagraph();
paragraph.ApplyStyle(BuiltinStyle.Heading2);
textRange1 = paragraph.AppendText("Convert File Documents with High Quality");
textRange1.ApplyCharacterFormat(characterFormat1);
// Add regular content
paragraph = section.Body.AddParagraph();
textRange2 = paragraph.AppendText("By using Spire.Doc for .NET, users can save Word Doc/Docx to stream, save as web response and convert Word Doc/Docx to XML, Markdown, RTF, EMF, TXT, XPS, EPUB, HTML, SVG, ODT and vice versa. Spire.Doc for .NET also supports to convert Word Doc/Docx to PDF and HTML to image.");
textRange2.ApplyCharacterFormat(characterFormat2);
// Add a paragraph with Heading 2 style
paragraph = section.Body.AddParagraph();
paragraph.ApplyStyle(BuiltinStyle.Heading2);
textRange1 = paragraph.AppendText("Other Technical Features");
textRange1.ApplyCharacterFormat(characterFormat1);
// Add regular content
paragraph = section.Body.AddParagraph();
textRange2 = paragraph.AppendText("By using Spire.Doc, developers can build any type of a 32-bit or 64-bit .NET application including ASP.NET, Web Services, WinForms, Xamarin and Mono Android, to create and handle Word documents.");
textRange2.ApplyCharacterFormat(characterFormat2);
// Update the table of contents
doc.UpdateTableOfContents();
// Save the document
doc.SaveToFile("CreateTOCUsingHeadingStyles.docx", FileFormat.Docx2016);
// Release resources
doc.Dispose();
}
}
}
C# Create a Table Of Contents Using Outline Level Styles
In a Word document, a table of contents can also be created using outline level styles. The ParagraphFormat.OutlineLevel property can be used to specify the level style of a paragraph in the outline. Subsequently, these outline level styles can be applied to the table of contents creation rules through the TableOfContent.SetTOCLevelStyle() method. Here are the detailed steps:
- Create a Document object.
- Add a section using the Document.AddSection() method.
- Create a ParagraphStyle object and set the outline level using ParagraphStyle.ParagraphFormat.OutlineLevel = OutlineLevel.Level1.
- Add the created ParagraphStyle object to the document using the Document.Styles.Add() method.
- Add a paragraph using the Section.AddParagraph() method.
- Create a table of contents object using the Paragraph.AppendTOC(int lowerLevel, int upperLevel) method.
- Set the default setting for creating the table of contents with heading styles to False, TableOfContent.UseHeadingStyles = false.
- Apply the outline level style to the table of contents rules using the TableOfContent.SetTOCLevelStyle(int levelNumber, string styleName) method.
- Create a CharacterFormat object and set the font.
- Apply the style to the paragraph using the Paragraph.ApplyStyle(ParagraphStyle.Name) method.
- Add text content using the Paragraph.AppendText() method.
- Apply character formatting to the text using the TextRange.ApplyCharacterFormat() method.
- Update the table of contents using the Document.UpdateTableOfContents() method.
- Save the document using the Document.SaveToFile() method.
- C#
using Spire.Doc;
using Spire.Doc.Documents;
using Spire.Doc.Fields;
using Spire.Doc.Formatting;

namespace SpireDocDemo
{
    internal class Program
    {
        static void Main(string[] args)
        {
            // Create a document object
            Document doc = new Document();
            Section section = doc.AddSection();

            // Define Outline Level 1
            ParagraphStyle titleStyle1 = new ParagraphStyle(doc);
            titleStyle1.Name = "T1S";
            titleStyle1.ParagraphFormat.OutlineLevel = OutlineLevel.Level1;
            titleStyle1.CharacterFormat.Bold = true;
            titleStyle1.CharacterFormat.FontName = "Microsoft YaHei";
            titleStyle1.CharacterFormat.FontSize = 18f;
            titleStyle1.ParagraphFormat.HorizontalAlignment = HorizontalAlignment.Left;
            doc.Styles.Add(titleStyle1);

            // Define Outline Level 2
            ParagraphStyle titleStyle2 = new ParagraphStyle(doc);
            titleStyle2.Name = "T2S";
            titleStyle2.ParagraphFormat.OutlineLevel = OutlineLevel.Level2;
            titleStyle2.CharacterFormat.Bold = true;
            titleStyle2.CharacterFormat.FontName = "Microsoft YaHei";
            titleStyle2.CharacterFormat.FontSize = 16f;
            titleStyle2.ParagraphFormat.HorizontalAlignment = HorizontalAlignment.Left;
            doc.Styles.Add(titleStyle2);

            // Define Outline Level 3
            ParagraphStyle titleStyle3 = new ParagraphStyle(doc);
            titleStyle3.Name = "T3S";
            titleStyle3.ParagraphFormat.OutlineLevel = OutlineLevel.Level3;
            titleStyle3.CharacterFormat.Bold = true;
            titleStyle3.CharacterFormat.FontName = "Microsoft YaHei";
            titleStyle3.CharacterFormat.FontSize = 14f;
            titleStyle3.ParagraphFormat.HorizontalAlignment = HorizontalAlignment.Left;
            doc.Styles.Add(titleStyle3);

            // Add a paragraph
            Paragraph TOCparagraph = section.AddParagraph();
            TableOfContent toc = TOCparagraph.AppendTOC(1, 3);
            toc.UseHeadingStyles = false;
            toc.UseHyperlinks = true;
            toc.UseTableEntryFields = false;
            toc.RightAlignPageNumbers = true;
            toc.SetTOCLevelStyle(1, titleStyle1.Name);
            toc.SetTOCLevelStyle(2, titleStyle2.Name);
            toc.SetTOCLevelStyle(3, titleStyle3.Name);

            // Define character format
            CharacterFormat characterFormat = new CharacterFormat(doc);
            characterFormat.FontName = "Microsoft YaHei";
            characterFormat.FontSize = 12;

            // Add a paragraph and apply outline level style 1
            Paragraph paragraph = section.Body.AddParagraph();
            paragraph.ApplyStyle(titleStyle1.Name);
            paragraph.AppendText("Overview");

            // Add a paragraph and set the text content
            paragraph = section.Body.AddParagraph();
            TextRange textRange = paragraph.AppendText("Spire.Doc for .NET is a professional Word .NET library specifically designed for developers to create, read, write, convert, compare and print Word documents on any .NET platform (Target .NET Framework, .NET Core, .NET Standard, .NET 5.0, .NET 6.0, Xamarin & Mono Android) with fast and high quality performance.");
            textRange.ApplyCharacterFormat(characterFormat);

            // Add a paragraph and apply outline level style 1
            paragraph = section.Body.AddParagraph();
            paragraph.ApplyStyle(titleStyle1.Name);
            paragraph.AppendText("Main Functions");

            // Add a paragraph and apply outline level style 2
            paragraph = section.Body.AddParagraph();
            paragraph.ApplyStyle(titleStyle2.Name);
            paragraph.AppendText("Only Spire.Doc, No Microsoft Office Automation");

            // Add a paragraph and set the text content
            paragraph = section.Body.AddParagraph();
            textRange = paragraph.AppendText("Spire.Doc for .NET is a totally independent .NET Word class library which doesn't require Microsoft Office installed on system. Microsoft Office Automation is proved to be unstable, slow and not scalable to produce MS Word documents. Spire.Doc for .NET is many times faster than Microsoft Word Automation and with much better stability and scalability.");
            textRange.ApplyCharacterFormat(characterFormat);

            // Add a paragraph and apply outline level style 3
            paragraph = section.Body.AddParagraph();
            paragraph.ApplyStyle(titleStyle3.Name);
            paragraph.AppendText("Word Versions");

            // Add a paragraph and set the text content
            paragraph = section.Body.AddParagraph();
            textRange = paragraph.AppendText("Word97-03  Word2007  Word2010  Word2013  Word2016  Word2019");
            textRange.ApplyCharacterFormat(characterFormat);

            // Add a paragraph and apply outline level style 2
            paragraph = section.Body.AddParagraph();
            paragraph.ApplyStyle(titleStyle2.Name);
            paragraph.AppendText("Convert File Documents with High Quality");

            // Add a paragraph and set the text content
            paragraph = section.Body.AddParagraph();
            textRange = paragraph.AppendText("By using Spire.Doc for .NET, users can save Word Doc/Docx to stream, save as web response and convert Word Doc/Docx to XML, Markdown, RTF, EMF, TXT, XPS, EPUB, HTML, SVG, ODT and vice versa. Spire.Doc for .NET also supports to convert Word Doc/Docx to PDF and HTML to image.");
            textRange.ApplyCharacterFormat(characterFormat);

            // Add a paragraph and apply outline level style 2
            paragraph = section.Body.AddParagraph();
            paragraph.ApplyStyle(titleStyle2.Name);
            paragraph.AppendText("Other Technical Features");

            // Add a paragraph and set the text content
            paragraph = section.Body.AddParagraph();
            textRange = paragraph.AppendText("By using Spire.Doc, developers can build any type of a 32-bit or 64-bit .NET application including ASP.NET, Web Services, WinForms, Xamarin and Mono Android, to create and handle Word documents.");
            textRange.ApplyCharacterFormat(characterFormat);

            // Update the table of contents
            doc.UpdateTableOfContents();

            // Save the document
            doc.SaveToFile("CreateTOCUsingOutlineStyles.docx", FileFormat.Docx2016);

            // Release resources
            doc.Dispose();
        }
    }
}
C# Create a Table Of Contents Using Image Captions
Using the Spire.Doc library, you can create a table of contents based on image captions with the TableOfContent tocForImage = new TableOfContent(Document, " \\h \\z \\c \"Image\"") method. Here are the detailed steps:
- Create a Document object.
- Add a section using the Document.AddSection() method.
- Create a table of content object with TableOfContent tocForImage = new TableOfContent(Document, " \\h \\z \\c \"Image\"") and specify the style of the table of contents.
- Add a paragraph using the Section.AddParagraph() method.
- Add the table of content object to the paragraph using the Paragraph.Items.Add(tocForImage) method.
- Add a field separator using the Paragraph.AppendFieldMark(FieldMarkType.FieldSeparator) method.
- Add the text content "TOC" using the Paragraph.AppendText("TOC") method.
- Add a field end mark using the Paragraph.AppendFieldMark(FieldMarkType.FieldEnd) method.
- Add an image using the Paragraph.AppendPicture() method.
- Add a caption paragraph for the image using the DocPicture.AddCaption() method, including product information and formatting.
- Update the table of contents to reflect changes in the document using the Document.UpdateTableOfContents(tocForImage) method.
- Save the document using the Document.SaveToFile() method.
- C#
using Spire.Doc;
using Spire.Doc.Documents;
using Spire.Doc.Fields;
using Spire.Doc.Formatting;
namespace SpireDocDemo
{
internal class Program
{
static void Main(string[] args)
{
// Create a document object
Document doc = new Document();
// Add a section to the document
Section section = doc.AddSection();
// Create a table of content object for images
TableOfContent tocForImage = new TableOfContent(doc, " \\h \\z \\c \"Picture\"");
// Add a paragraph to the section
Paragraph tocParagraph = section.Body.AddParagraph();
// Add the TOC object to the paragraph
tocParagraph.Items.Add(tocForImage);
// Add a field separator
tocParagraph.AppendFieldMark(FieldMarkType.FieldSeparator);
// Add text content
tocParagraph.AppendText("TOC");
// Add a field end mark
tocParagraph.AppendFieldMark(FieldMarkType.FieldEnd);
// Add a blank paragraph to the section
section.Body.AddParagraph();
// Add a paragraph to the section
Paragraph paragraph = section.Body.AddParagraph();
// Add an image
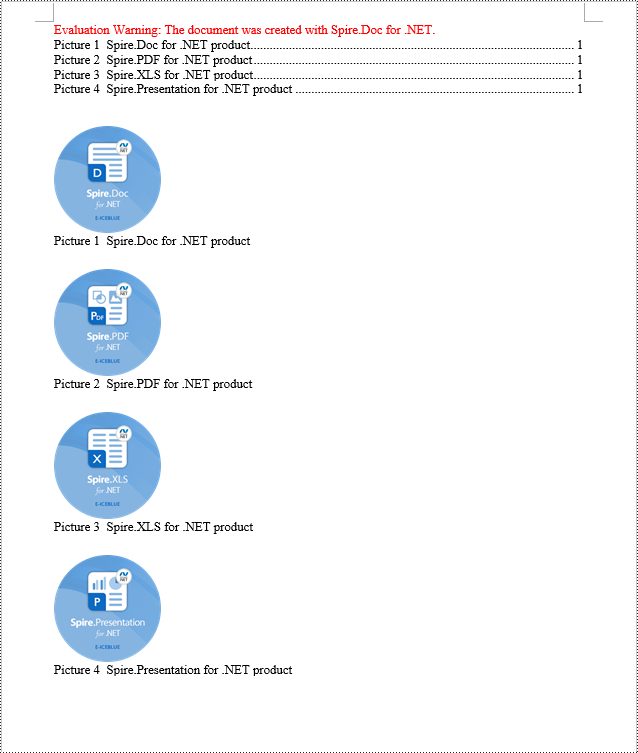
DocPicture docPicture = paragraph.AppendPicture("images/Doc-NET.png");
docPicture.Width = 100;
docPicture.Height = 100;
// Add a caption paragraph for the image
Paragraph pictureCaptionParagraph = docPicture.AddCaption("Picture", CaptionNumberingFormat.Number, CaptionPosition.BelowItem) as Paragraph;
pictureCaptionParagraph.AppendText(" Spire.Doc for .NET product");
pictureCaptionParagraph.Format.AfterSpacing = 20;
// Continue adding paragraphs to the section
paragraph = section.Body.AddParagraph();
docPicture = paragraph.AppendPicture("images/PDF-NET.png");
docPicture.Width = 100;
docPicture.Height = 100;
pictureCaptionParagraph = docPicture.AddCaption("Picture", CaptionNumberingFormat.Number, CaptionPosition.BelowItem) as Paragraph;
pictureCaptionParagraph.AppendText(" Spire.PDF for .NET product");
pictureCaptionParagraph.Format.AfterSpacing = 20;
paragraph = section.Body.AddParagraph();
docPicture = paragraph.AppendPicture("images/XLS-NET.png");
docPicture.Width = 100;
docPicture.Height = 100;
pictureCaptionParagraph = docPicture.AddCaption("Picture", CaptionNumberingFormat.Number, CaptionPosition.BelowItem) as Paragraph;
pictureCaptionParagraph.AppendText(" Spire.XLS for .NET product");
pictureCaptionParagraph.Format.AfterSpacing = 20;
paragraph = section.Body.AddParagraph();
docPicture = paragraph.AppendPicture("images/PPT-NET.png");
docPicture.Width = 100;
docPicture.Height = 100;
pictureCaptionParagraph = docPicture.AddCaption("Picture", CaptionNumberingFormat.Number, CaptionPosition.BelowItem) as Paragraph;
pictureCaptionParagraph.AppendText(" Spire.Presentation for .NET product");
// Update the table of contents
doc.UpdateTableOfContents(tocForImage);
// Save the document to a file
doc.SaveToFile("CreateTOCWithImageCaptions.docx", Spire.Doc.FileFormat.Docx2016);
// Dispose of the document object
doc.Dispose();
}
}
}
C# Create a Table Of Contents Using Table Captions
You can also create a table of contents using table captions by using the method TableOfContent tocForTable = new TableOfContent(Document, " \\h \\z \\c \"Table\""). Here are the detailed steps:
- Create a Document object.
- Add a section using the Document.AddSection() method.
- Create a table of content object TableOfContent tocForTable = new TableOfContent(Document, " \\h \\z \\c \"Table\"") and specify the style of the table of contents.
- Add a paragraph using the Section.AddParagraph() method.
- Add the table of content object to the paragraph using the Paragraph.Items.Add(tocForTable) method.
- Add a field separator using the Paragraph.AppendFieldMark(FieldMarkType.FieldSeparator) method.
- Add the text content "TOC" using the Paragraph.AppendText("TOC") method.
- Add a field end mark using the Paragraph.AppendFieldMark(FieldMarkType.FieldEnd) method.
- Add a table using the Section.AddTable() method and set the number of rows and columns using the Table.ResetCells(int rowsNum, int columnsNum) method.
- Add a table caption paragraph using the Table.AddCaption() method, including product information and formatting.
- Update the table of contents to reflect changes in the document using the Document.UpdateTableOfContents(tocForTable) method.
- Save the document using the Document.SaveToFile() method.
- C#
using Spire.Doc;
using Spire.Doc.Documents;
using Spire.Doc.Fields;
using Spire.Doc.Formatting;
namespace SpireDocDemo
{
internal class Program
{
static void Main(string[] args)
{
// Create a new document
Document doc = new Document();
// Add a section to the document
Section section = doc.AddSection();
// Create a TableOfContent object
TableOfContent tocForTable = new TableOfContent(doc, " \\h \\z \\c \"Table\"");
// Add a paragraph in the section to place the TableOfContent object
Paragraph tocParagraph = section.Body.AddParagraph();
tocParagraph.Items.Add(tocForTable);
tocParagraph.AppendFieldMark(FieldMarkType.FieldSeparator);
tocParagraph.AppendText("TOC");
tocParagraph.AppendFieldMark(FieldMarkType.FieldEnd);
// Add two empty paragraphs in the section
section.Body.AddParagraph();
section.Body.AddParagraph();
// Add a table in the section
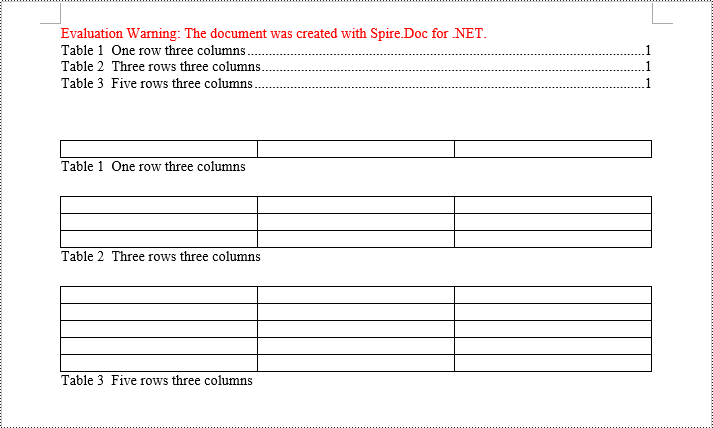
Table table = section.Body.AddTable(true);
table.ResetCells(1, 3);
// Add a caption paragraph for the table
Paragraph tableCaptionParagraph = table.AddCaption("Table", CaptionNumberingFormat.Number, CaptionPosition.BelowItem) as Paragraph;
tableCaptionParagraph.AppendText(" One row three columns");
tableCaptionParagraph.Format.AfterSpacing = 18;
// Add a new table in the section
table = section.Body.AddTable(true);
table.ResetCells(3, 3);
// Add a caption paragraph for the second table
tableCaptionParagraph = table.AddCaption("Table", CaptionNumberingFormat.Number, CaptionPosition.BelowItem) as Paragraph;
tableCaptionParagraph.AppendText(" Three rows three columns");
tableCaptionParagraph.Format.AfterSpacing = 18;
// Add another new table in the section
table = section.Body.AddTable(true);
table.ResetCells(5, 3);
// Add a caption paragraph for the third table
tableCaptionParagraph = table.AddCaption("Table", CaptionNumberingFormat.Number, CaptionPosition.BelowItem) as Paragraph;
tableCaptionParagraph.AppendText(" Five rows three columns");
// Update the table of contents
doc.UpdateTableOfContents(tocForTable);
// Save the document to a specified file
doc.SaveToFile("CreateTOCUsingTableCaptions.docx", Spire.Doc.FileFormat.Docx2016);
// Dispose resources
doc.Dispose();
}
}
}
Apply for a Temporary License
If you'd like to remove the evaluation message from the generated documents, or to get rid of the function limitations, please request a 30-day trial license for yourself.
Spire.XLS for Python is a high-performance library for reading and writing Excel spreadsheets in Python. With Spire.XLS, you can create, read, edit, and convert XLS and XLSX files without the need for Microsoft Excel to be installed on your system.
This article demonstrates how to install Spire.XLS for Python on Mac.
Step 1
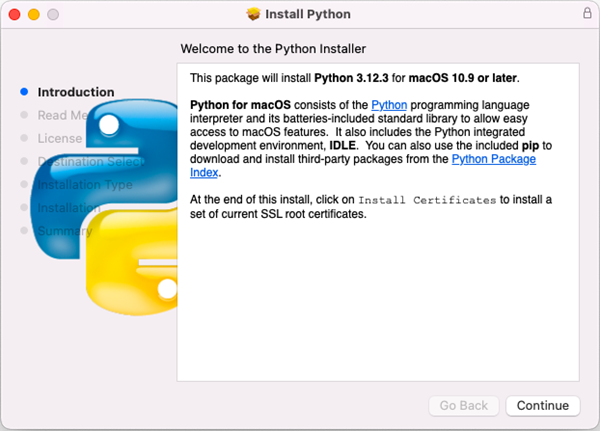
Download the most recent version of Python for macOS and install it on your Mac. If you have already completed this step, proceed directly to step 2.
Step 2
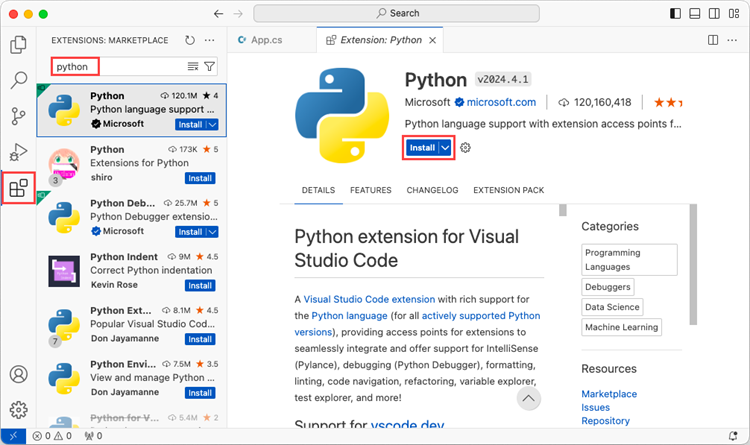
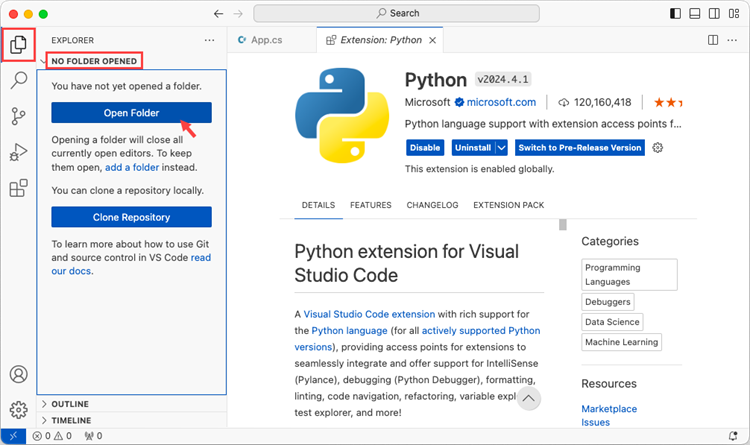
Open VS Code and search for 'Python' in the Extensions panel. Click 'Install' to add support for Python in your VS Code.
Step 3
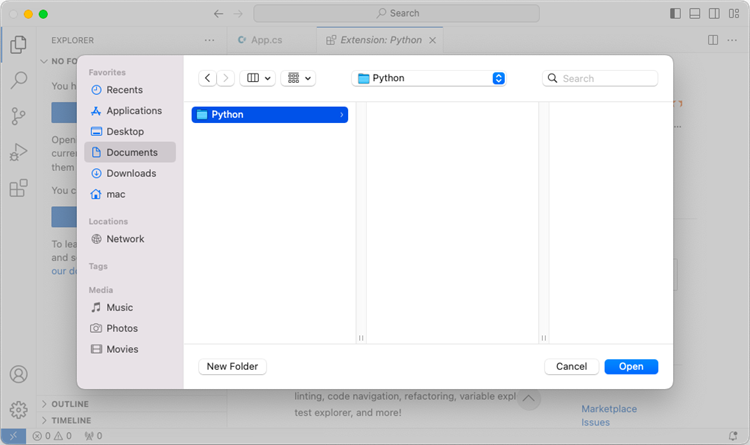
Click 'Explorer' > 'NO FOLRDER OPENED' > 'Open Folder'.
Choose an existing folder as the workspace, or you can create a new folder and then open it.
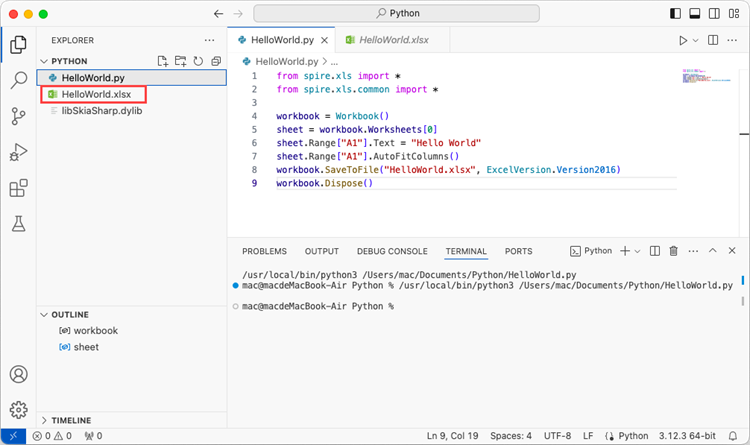
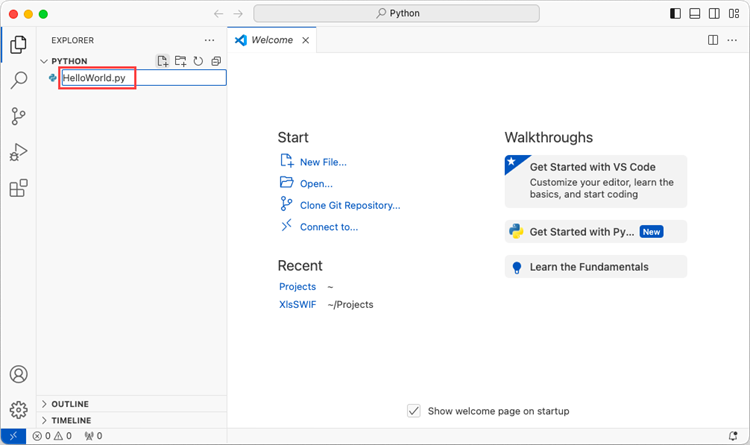
Add a .py file to the folder you just opened and name it whatever you want (in this case, HelloWorld.py).
Step 4
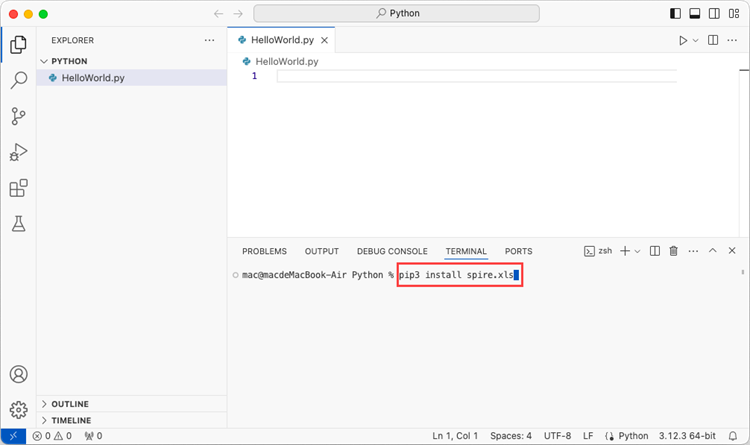
Use the keyboard shortcut Ctrl + ` to open the Terminal. Then, install Spire.XLS for Python by entering the following command line in the terminal.
pip3 install spire.xls
Note that pip3 is a package installer specifically designed for Python 3.x versions, while pip is a package installer for Python 2.x versions. If you are working with Python 2.x, you can use the pip command.
Step 5
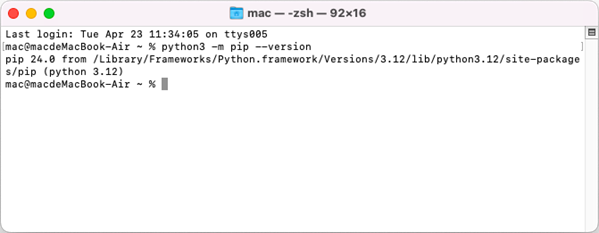
Open a Terminal window on your Mac, and type the following command to obtain the installation path of Python on your system.
python3 -m pip --version
Step 6
Add the following code snippet to the 'HelloWorld.py' file.
- Python
from spire.xls.common import *
from spire.xls import *

workbook = Workbook()
sheet = workbook.Worksheets[0]
sheet.Range["A1"].Text = "Hello World"
sheet.Range["A1"].AutoFitColumns()
workbook.SaveToFile("HelloWorld.xlsx", ExcelVersion.Version2010)
workbook.Dispose()
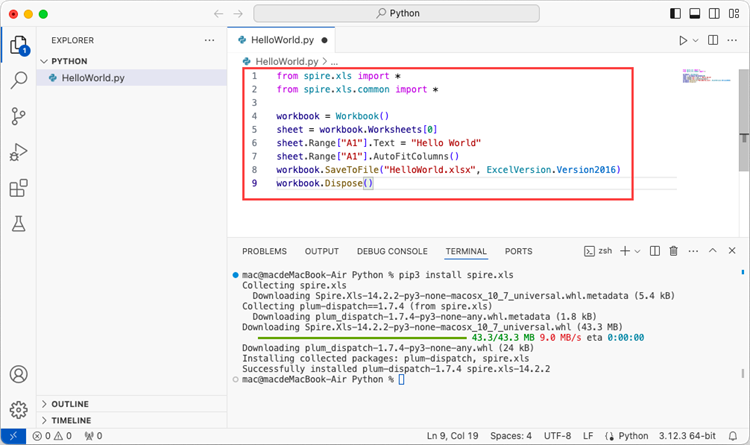
After executing the Python file, you will find the resulting Excel document displayed in the 'EXPLORER' panel.