
Knowledgebase (2345)
Children categories
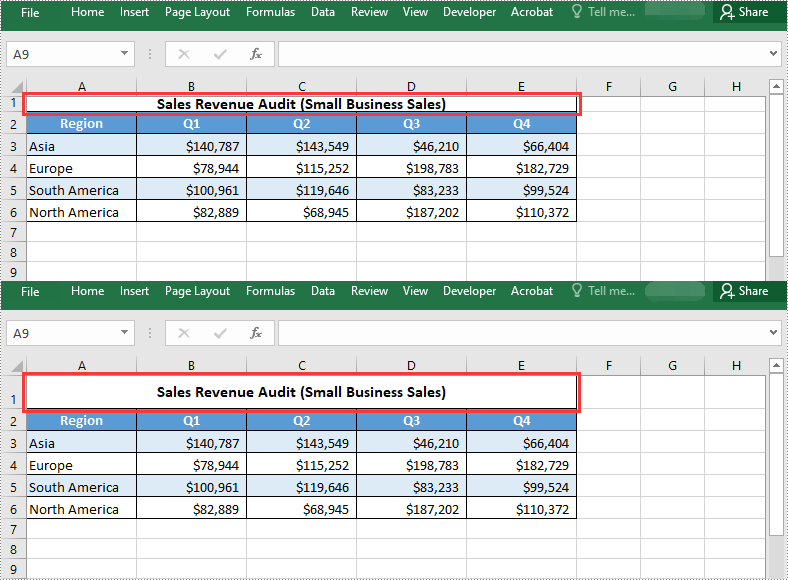
Proper row height and column width are essential for optimizing data readability and ensuring that all content is fully visible in Excel. While the default row height and column width settings may be suitable in some cases, they may not be sufficient when dealing with lengthy text, large numbers, or complex formulas. In such cases, it becomes necessary to set appropriate row heights and column widths. In this article, we will explain how to set row height and column width in Excel in Python using Spire.XLS for Python.
Install Spire.XLS for Python
This scenario requires Spire.XLS for Python and plum-dispatch v1.7.4. They can be easily installed in your Windows through the following pip command.
pip install Spire.XLS
If you are unsure how to install, please refer to this tutorial: How to Install Spire.XLS for Python on Windows
Set Row Height in Excel in Python
Spire.XLS for Python provides the Worksheet.SetRowHeight() method to set the height for a specific row. The detailed steps are as follows:
- Create a Workbook object.
- Load an Excel file using Workbook.LoadFromFile() method.
- Get a specific worksheet using Workbook.Worksheets[] property.
- Set the height of a specific row using Worksheet.SetRowHeight() method.
- Save the resulting file using Workbook.SaveToFile() method.
- Python
from spire.xls import *
from spire.xls.common import *

# Create a Workbook object
workbook = Workbook()
# Load an Excel file
workbook.LoadFromFile("Sample.xlsx")

# Get the first worksheet
worksheet = workbook.Worksheets[0]

# Set the height of the first row
worksheet.SetRowHeight(1, 25)

# Save the resulting file
workbook.SaveToFile("SetRowHeight.xlsx", ExcelVersion.Version2016)
workbook.Dispose()
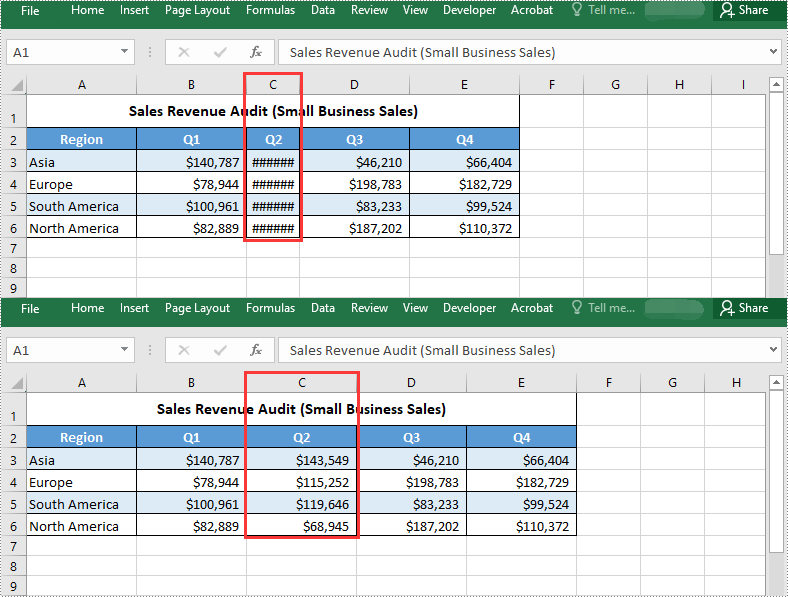
Set Column Width in Excel in Python
To set the width of a specific column, you can use the Worksheet.SetColumnWidth() method. The detailed steps are as follows:
- Create a Workbook object.
- Load an Excel file using Workbook.LoadFromFile() method.
- Get a specific worksheet using Workbook.Worksheets[] property.
- Set the width of a specific column using Worksheet.SetColumnWidth() method.
- Save the resulting file using Workbook.SaveToFile() method.
- Python
from spire.xls import *
from spire.xls.common import *

# Create a Workbook object
workbook = Workbook()
# Load an Excel file
workbook.LoadFromFile("Sample.xlsx")

# Get the first worksheet
worksheet = workbook.Worksheets[0]

# Set the width of the third column
worksheet.SetColumnWidth(3, 15)

# Save the resulting file
workbook.SaveToFile("SetColumnWidth.xlsx", ExcelVersion.Version2016)
workbook.Dispose()
Apply for a Temporary License
If you'd like to remove the evaluation message from the generated documents, or to get rid of the function limitations, please request a 30-day trial license for yourself.
The Find and Replace feature in Word offers a reliable and efficient solution for updating text within your documents. It eliminates the need for exhaustive manual searching and editing by automatically locating and replacing the desired text throughout the entire document. This not only saves time but also guarantees that every instance of the targeted text is updated consistently. In this article, we will demonstrate how to find and replace text in a Word document in Python using Spire.Doc for Python.
- Find Text and Replace All Its Instances with New Text
- Find Text and Replace Its First Instance with New Text
- Find and Replace Text Using a Regular Expression
- Find and Replace Text with an Image
Install Spire.Doc for Python
This scenario requires Spire.Doc for Python and plum-dispatch v1.7.4. They can be easily installed in your Windows through the following pip command.
pip install Spire.Doc
If you are unsure how to install, please refer to this tutorial: How to Install Spire.Doc for Python on Windows
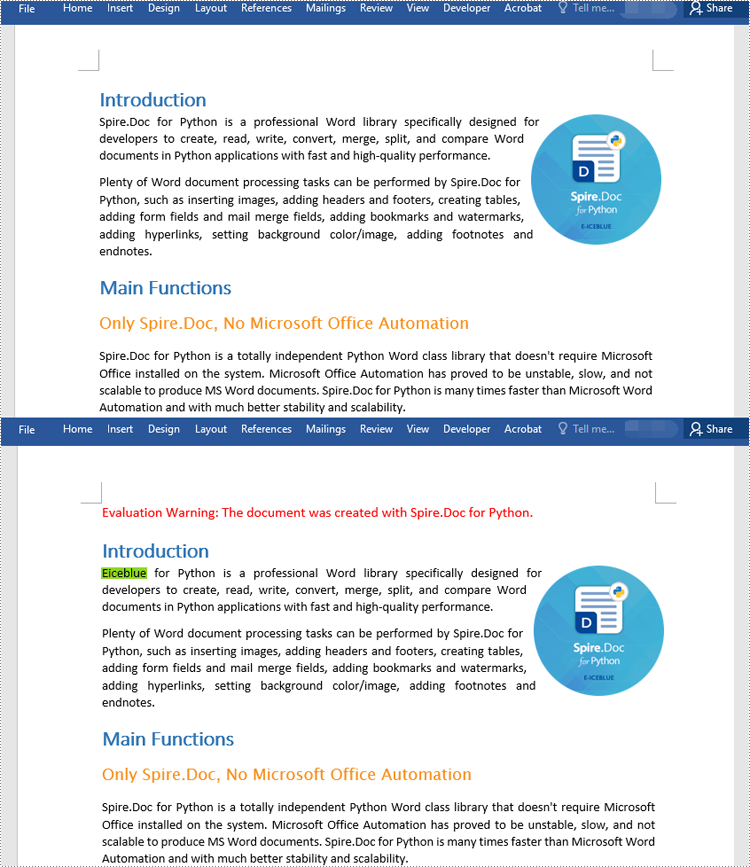
Find Text and Replace All Its Instances with New Text
You can find a text and replace all its instances with another text easily using the Document.Replace() method. The detailed steps are as follows:
- Create a Document object.
- Load a Word document using Document.LoadFromFile() method.
- Find a specific text and replace all its instances with another text using Document.Replace() method.
- Save the resulting document using Document.SaveToFile() method.
- Python
from spire.doc import *
from spire.doc.common import *

# Create a Document object
document = Document()
# Load a Word document
document.LoadFromFile("Sample.docx")

# Find a specific text and replace all its instances with another text
document.Replace("Spire.Doc", "Eiceblue", False, True)

# Save the resulting document
document.SaveToFile("ReplaceAllOccurrencesOfText.docx", FileFormat.Docx2016)
document.Close()
Find Text and Replace Its First Instance with New Text
Spire.Doc for Python provides the Document.ReplaceFirst property which enables you to change the replacement mode from replacing all instances to replacing the first instance. The following steps explain how to find a text and replace its first instance in a Word document:
- Create a Document object.
- Load a Word document using Document.LoadFromFile() method.
- Change the replacement mode to replace the first instance by setting the Document.ReplaceFirst property as True.
- Replace the first instance of a text with another text using Document.Replace() method.
- Save the resulting document using Document.SaveToFile() method.
- Python
from spire.doc import *
from spire.doc.common import *

# Create a Document object
document = Document()
# Load a Word document
document.LoadFromFile("Sample.docx")

# Change the replacement mode to replace the first match
document.ReplaceFirst = True

# Replace the first instance of a text with another text
document.Replace("Spire.Doc", "Eiceblue", False, True)

# Save the resulting document
document.SaveToFile("ReplaceFirstOccurrenceOfText.docx", FileFormat.Docx2016)
document.Close()
Find and Replace Text Using a Regular Expression
You can replace a text matching a regular expression with new text by passing a Regex object and the new text to the Document.Replace() method as parameters. The detailed steps are as follows:
- Create a Document object.
- Load a Word document using Document.LoadFromFile() method.
- Create a Regex object to match the specific text.
- Replace the text matching the regex with another text using Document.Replace() method.
- Save the resulting document using Document.SaveToFile() method.
- Python
from spire.doc import *
from spire.doc.common import *
# Create a Document object
document = Document()
# Load a Word document
document.LoadFromFile("Sample1.docx")
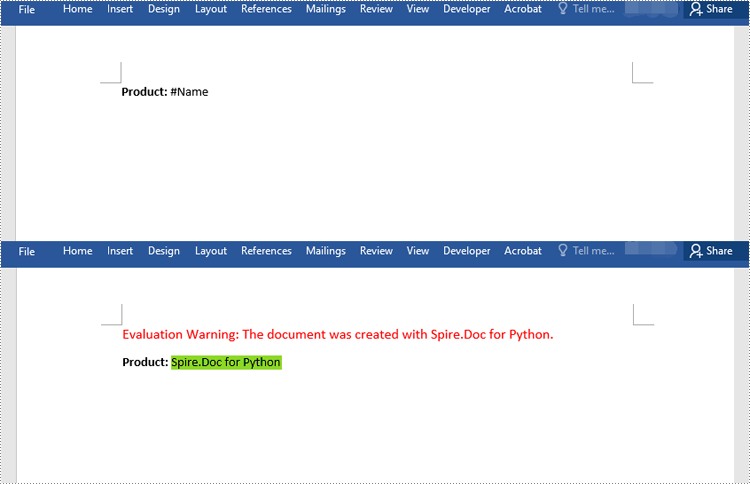
# Create a regex to match the text that starts with #
regex = Regex("""\\#\\w+\\b""")
# Find the text matching the regex and replace it with another text
document.Replace(regex, "Spire.Doc for Python")
#save the document
document.SaveToFile("ReplaceTextUsingRegex.docx", FileFormat.Docx2016)
document.Close()
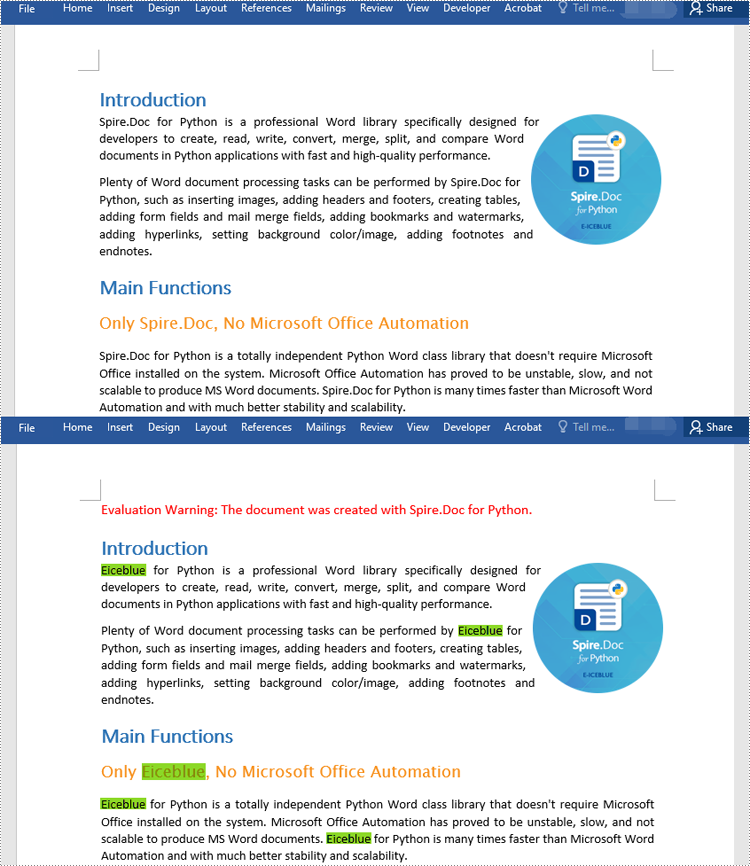
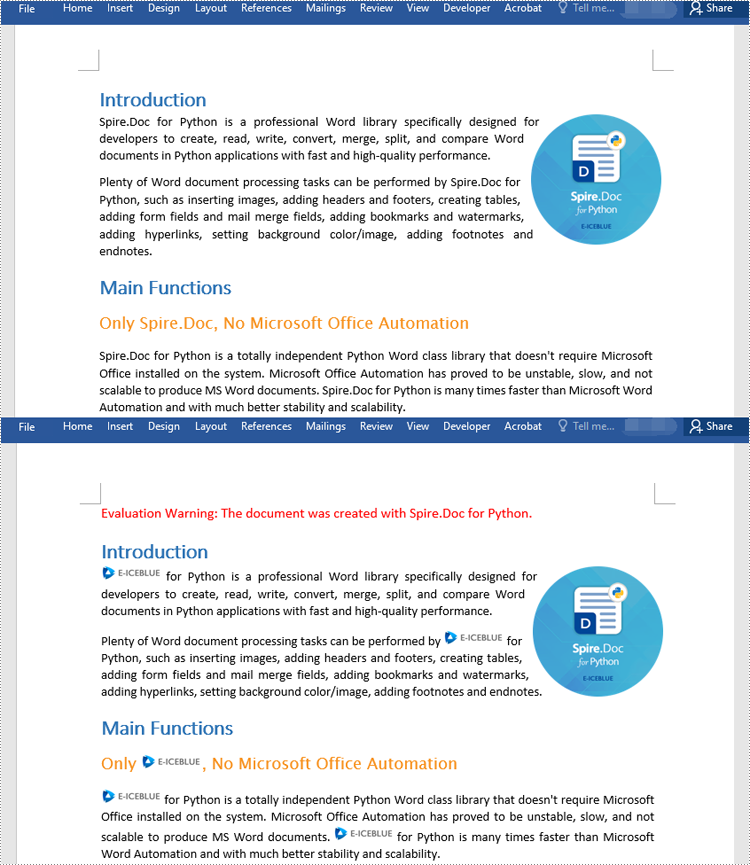
Find and Replace Text with an Image
Spire.Doc for Python doesn't offer a direct method to replace text with image, but you can achieve this by inserting the image at the position of the text and then removing the text from the document. The detailed steps are as follows:
- Create a Document object.
- Load a Word document using Document.LoadFromFile() method.
- Find a specific text in the document using Document.FindAllString() method.
- Loop through the found results.
- Create a DocPicture object and load an image using DocPicture.LoadImage() method.
- Get the found text as a single text range and then get the index of the text range in its owner paragraph.
- Insert an image at the position of the text range and then remove the text range from the document.
- Save the resulting document using Document.SaveToFile() method.
- Python
from spire.doc import *
from spire.doc.common import *

# Create a Document object
document = Document()
# Load a Word document
document.LoadFromFile("Sample.docx")

# Find a specific text in the document
selections = document.FindAllString("Spire.Doc", True, True)
index = 0
testRange = None

# Loop through the found results
for selection in selections:
    # Load an image
    pic = DocPicture(document)
    pic.LoadImage("logo.png")
    # Get the found text as a single text range
    testRange = selection.GetAsOneRange()
    # Get the index of the text range in its owner paragraph
    index = testRange.OwnerParagraph.ChildObjects.IndexOf(testRange)
    # Insert an image at the index
    testRange.OwnerParagraph.ChildObjects.Insert(index, pic)
    # Remove the text range
    testRange.OwnerParagraph.ChildObjects.Remove(testRange)

# Save the resulting document
document.SaveToFile("ReplaceTextWithImage.docx", FileFormat.Docx2016)
document.Close()
Apply for a Temporary License
If you'd like to remove the evaluation message from the generated documents, or to get rid of the function limitations, please request a 30-day trial license for yourself.
Superscript and subscript are formatting styles used in typography and writing to position characters or numbers above or below the normal line of text. Superscript is a smaller-sized text or symbol that is raised above the baseline. It is commonly used for mathematical exponents, footnotes, and ordinal indicators. Subscript, on the other hand, is a smaller-sized text or symbol that is positioned below the baseline. It is often used for chemical formulas, mathematical expressions and some linguistic notations. These formatting styles can help users distinguish specific elements within text and convey information more effectively. In this article, we will show you how to apply superscript and subscript in Excel by using Spire.XLS for Python.
Install Spire.XLS for Python
This scenario requires Spire.XLS for Python and plum-dispatch v1.7.4. They can be easily installed in your Windows through the following pip command.
pip install Spire.XLS
If you are unsure how to install, please refer to this tutorial: How to Install Spire.XLS for Python on Windows
Apply Superscript and Subscript in Excel
To apply the superscript or subscript style to specific characters in excel, you need to create a custom font first and set the superscript or subscript property of it. And then assign the font to the specific characters within the cell using CellRange.RichText.SetFont() method provided by Spire.XLS for Python. The detailed steps are as follows:
- Create an object of Workbook class.
- Get the first worksheet of it using Workbook.Worksheets[int index] property.
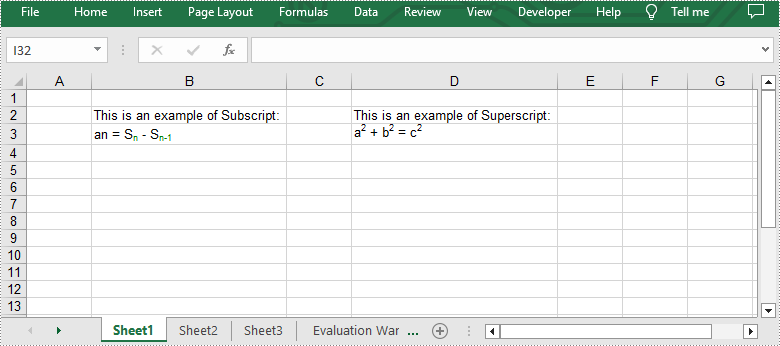
- Get the specific cells using Worksheet.Range[string name] property and add desired text to them.
- Get a cell by using Worksheet.Range[string name] property and add rich text to it by CellRange.RichText.Text property.
- Create a custom font using Workbook.CreateFont() method.
- Enable the subscript property of the font by setting ExcelFont.IsSubscript property to true.
- Assign the font to specific characters of the added rich text in the cell by calling CellRange.RichText.SetFont() method.
- Likewise, get another cell using Worksheet.Range[string name] property and add rich text to it by CellRange.RichText.Text property.
- Create a custom font using Workbook.CreateFont() method.
- Enable the superscript property of the font by setting ExcelFont.IsSuperscript property to true.
- Assign the font to specific characters of the added rich text in the cell by calling CellRange.RichText.SetFont() method.
- Automatically adjust column widths to fit text length using Worksheet.AllocatedRange.AutoFitColumns() method.
- Save the result file using Workbook.SaveToFile() method.
- Python
from spire.xls import *
from spire.xls.common import *

outputFile = "ApplySubscriptAndSuperscript.xlsx"

# Create an object of Workbook class
workbook = Workbook()

# Get the first worksheet
sheet = workbook.Worksheets[0]

# Add text to the specific cells
sheet.Range["B2"].Text = "This is an example of Subscript:"
sheet.Range["D2"].Text = "This is an example of Superscript:"

# Add rich text to a specific cell
range = sheet.Range["B3"]
range.RichText.Text = "an = Sn - Sn-1"

# Create a custom font
font = workbook.CreateFont()

# Enable the subscript property of the font by setting the IsSubscript property to "true"
font.IsSubscript = True

# Set the font color
font.Color = Color.get_Green()

# Assign the font to specific characters of the added rich text
range.RichText.SetFont(6, 6, font)
range.RichText.SetFont(11, 13, font)

# Add rich text to another cell
range = sheet.Range["D3"]
range.RichText.Text = "a2 + b2 = c2"

# Create a custom font
font = workbook.CreateFont()

# Enable the superscript property of the font by setting the IsSuperscript property to "true"
font.IsSuperscript = True

# Assign the font to specific characters of the added rich text
range.RichText.SetFont(1, 1, font)
range.RichText.SetFont(6, 6, font)
range.RichText.SetFont(11, 11, font)

# Autofit the column widths
sheet.AllocatedRange.AutoFitColumns()

# Save the result file
workbook.SaveToFile(outputFile, ExcelVersion.Version2013)
workbook.Dispose()
Apply for a Temporary License
If you'd like to remove the evaluation message from the generated documents, or to get rid of the function limitations, please request a 30-day trial license for yourself.
