
Knowledgebase (2345)
Children categories
The ability to set a password for a PDF document or remove the password from an encrypted PDF document is invaluable for securing sensitive information while maintaining the flexibility and convenience of working with PDF files. By setting up passwords for PDF documents, individuals can control access to their files, preventing unauthorized viewing, editing, or copying. Conversely, unprotecting a PDF document can make the document accessible or editable again. In this article, you will learn how to password-protect PDF documents as well as how to remove passwords from encrypt PDF documents using Spire.PDF for Python.
Install Spire.PDF for Python
This scenario requires Spire.PDF for Python and plum-dispatch v1.7.4. They can be easily installed in your Windows through the following pip command.
pip install Spire.PDF
If you are unsure how to install, please refer to this tutorial: How to Install Spire.PDF for Python on Windows
Protect PDF with Password in Python
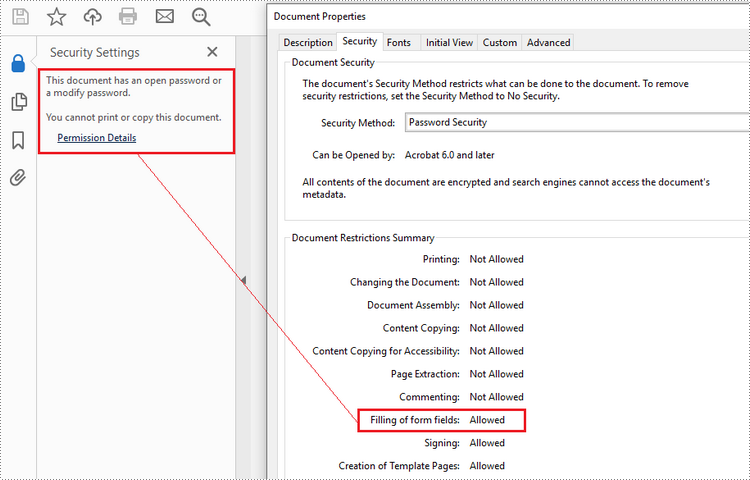
There are two types of passwords that can be used for security purposes: the "open password" and the "permission password". An open password, also known as a user password, is used to restrict unauthorized access to a PDF file. A permission password, also referred to as a master password or owner password, allows you to set various restrictions on what others can do with the PDF file. If a PDF file is secured with both types of passwords, it can be opened with either password.
The PdfDocument.Security.Encrypt(String openPassword, String permissionPassword, PdfPermissionsFlags permissions, PdfEncryptionKeySize keySize) method offered by Spire.PDF for Python allows you to protect PDF files with an open password and/or a permission password. The parameter PdfPermessionsFlags is used to specify the user's permission to operate the document.
Here are the steps to password-protect a PDF with Spire.PDF for Python.
- Create a PdfDocument object.
- Load a sample PDF file using PdfDocument.LoadFromFile() method.
- Encrypt the PDF file with an open password and permission password using PdfDocument.Security.Encrypt(String openPassword, String permissionPassword, PdfPermissionsFlags permissions, PdfEncryptionKeySize keySize) method.
- Save the result file using PdfDocument.SaveToFile() method.
- Python
from spire.pdf.common import *
from spire.pdf import *

# Create a PdfDocument object
doc = PdfDocument()

# Load a sample PDF file
doc.LoadFromFile("C:/Users/Administrator/Desktop/input.pdf")

# Encrypt the PDF file with an open password and a permission password
doc.Security.Encrypt("openPsd", "permissionPsd", PdfPermissionsFlags.FillFields, PdfEncryptionKeySize.Key128Bit)

# Save the result file
doc.SaveToFile("output/Encrypted.pdf", FileFormat.PDF)
Remove Password from an Encrypted PDF in Python
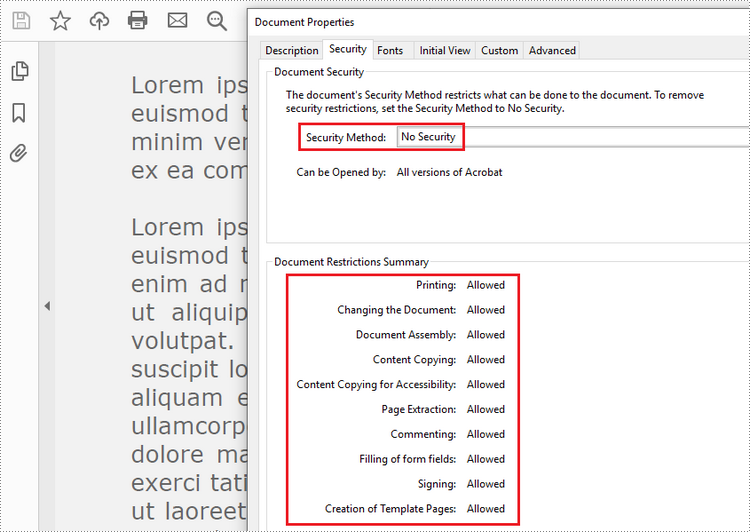
To remove the password from a PDF file, call the PdfDocument.Security.Encrypt() method and leave the open password and permission password empty. The following are the detailed steps.
- Create a PdfDocument object.
- Load an encrypted PDF file using PdfDocument.LoadFromFile(String fileName, String password) method.
- Decrypt the PDF file by setting the open password and permission password to empty using PdfSecurity.Encrypt(String openPassword, String permissionPassword, PdfPermissionsFlags permissions, PdfEncryptionKeySize keySize, String originalPermissionPassword) method.
- Save the result file using PdfDocument.SaveToFile() method.
- Python
from spire.pdf.common import *
from spire.pdf import *

# Create a PdfDocument object
doc = PdfDocument()

# Load an encrypted PDF file
doc.LoadFromFile("C:/Users/Administrator/Desktop/Encrypted.pdf", "openPsd")

# Set the open password and permission password as empty
doc.Security.Encrypt(str(), str(), PdfPermissionsFlags.Default, PdfEncryptionKeySize.Key128Bit, "permissionPsd")

# Save the result file
doc.SaveToFile("output/RemovePassword.pdf", FileFormat.PDF)
Apply for a Temporary License
If you'd like to remove the evaluation message from the generated documents, or to get rid of the function limitations, please request a 30-day trial license for yourself.
How to Merge Excel Files in Python (.xls & .xlsx) - No Excel Required
2023-11-03 01:27:30 Written by hayes Liu
Merging Excel files is a common task for data analysts and financial teams working with large datasets. While Microsoft Excel supports manual merging, it becomes inefficient and error-prone when dealing with large volumes of files.
In this step-by-step guide, you will learn how to merge multiple Excel files (.xls and .xlsx) using Python and Spire.XLS for Python library. Whether you're combining workbooks, merging worksheets, or automating bulk Excel file processing, this guide will help you save time and streamline your workflow with practical solutions.
Table of Contents
- Why Merge Excel Files with Python?
- Getting Started with Spire.XLS for Python
- How to Merge Multiple Excel Files into One Workbook using Python
- How to Combine Multiple Excel Worksheets into a Single Worksheet using Python
- Conclusion
- FAQs: Merge Excel Files with Python
Why Merge Excel Files with Python?
Using Python to merge Excel files brings several key advantages:
- Automation: Save time and eliminate repetitive manual work by automating the merging process.
- No Excel Dependency: Merge files without installing Microsoft Excel—ideal for headless, server-side, or cloud environments.
- Flexible Merging: Customize merging by selecting specific sheets, ranges, columns, or rows.
- Scalability: Handle hundreds or even thousands of Excel files with consistent performance.
- Error Reduction: Reduce manual errors and ensure data accuracy with automated scripts.
Whether you’re consolidating monthly reports or merging large datasets, Python helps streamline the process efficiently.
Getting Started with Spire.XLS for Python
Spire.XLS for Python is a standalone library that allows developers to create, read, edit, and save Excel files without the need for Microsoft Excel installation.
Key Features Include:
- Supports Multiple Formats: .xls, .xlsx, and more.
- Worksheet Operations: Copy, rename, delete, and merge worksheets seamlessly across workbooks.
- Formula & Formatting Preservation: Retain formulas and formatting during editing or merging.
- Advanced Features: Includes chart creation, conditional formatting, pivot tables, and more.
- File Conversion: Convert Excel files to PDF, HTML, CSV, and more.
Installation
Run the following pip command in your terminal or command prompt to install Spire.XLS from PyPI:
pip install spire.xls
How to Merge Multiple Excel Files into One Workbook using Python
When working with multiple Excel files, consolidating all worksheets into a single workbook can simplify data management and reporting. This approach preserves each original worksheet separately, making it easy to organize and review data from different sources such as department budgets, regional reports, or monthly summaries.
Steps
To merge multiple Excel files into a single workbook using Python, follow these steps:
- Loop through the files.
- Load each Excel file using LoadFromFile().
- For the first file, assign it as the base workbook.
- For subsequent files, copy all worksheets into the base workbook using AddCopy().
- Save the final combined workbook to a new file.
Code Example
import os
from spire.xls import *

# Folder containing Excel files to merge
input_folder = './sample_files'
# Output file name for the merged workbook
output_file = 'merged_workbook.xlsx'

# Initialize merged workbook as None
merged_workbook = None

# Iterate over all files in the input folder
for filename in os.listdir(input_folder):
    # Process only Excel files with .xls or .xlsx extensions
    if filename.endswith('.xlsx') or filename.endswith('.xls'):
        file_path = os.path.join(input_folder, filename)

        # Load the current Excel file into a Workbook object
        source_workbook = Workbook()
        source_workbook.LoadFromFile(file_path)

        if merged_workbook is None:
            # For the first file, assign it as the base merged workbook
            merged_workbook = source_workbook
        else:
            # For subsequent files, copy each worksheet into the merged workbook
            for i in range(source_workbook.Worksheets.Count):
                sheet = source_workbook.Worksheets.get_Item(i)
                merged_workbook.Worksheets.AddCopy(sheet, WorksheetCopyType.CopyAll)

# Save the combined workbook to the specified output file
merged_workbook.SaveToFile(output_file, ExcelVersion.Version2016)
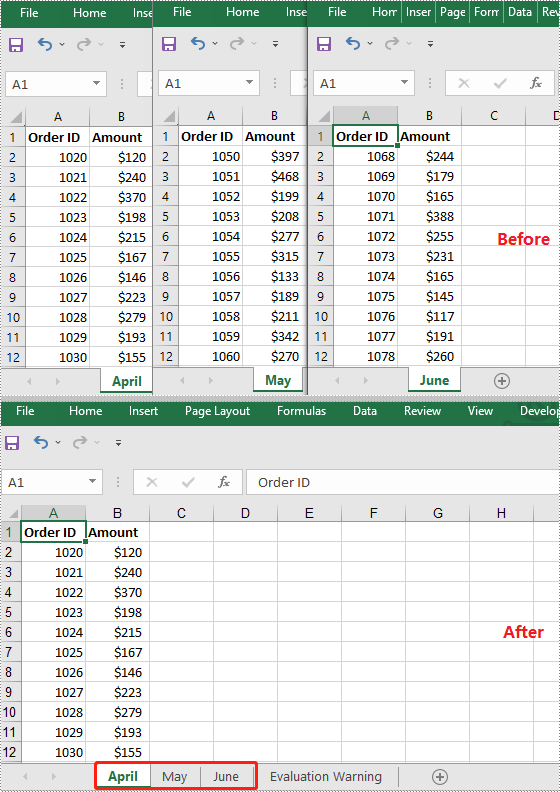
How to Combine Multiple Excel Worksheets into a Single Worksheet using Python
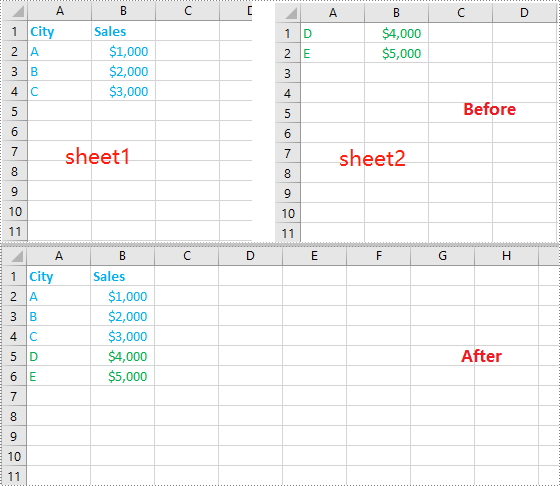
Merging data from multiple Excel worksheets into one worksheet allows you to aggregate information efficiently, especially when working with data such as sales logs, survey responses, or performance reports.
Steps
To combine worksheet data from multiple Excel files into a single worksheet using Python, follow these steps:
- Create a new workbook and select its first worksheet as the destination.
- Loop through the files.
- Load each Excel file using LoadFromFile().
- Get the desired worksheet that you want to merge from the current file.
- Copy the used cell range from the desired worksheet to the destination worksheet, placing data consecutively below the previously copied content.
- Save the combined data into a new Excel file.
Code Example
import os
from spire.xls import *

# Folder containing Excel files to merge
input_folder = './excel_worksheets'
# Output file name for the merged workbook
output_file = 'merged_into_one_sheet.xlsx'

# Create a new workbook to hold merged data
merged_workbook = Workbook()
# Use the first worksheet in the new workbook as the merge target
merged_sheet = merged_workbook.Worksheets[0]

# Initialize the starting row for copying data
current_row = 1

# Loop through all files in the input folder
for filename in os.listdir(input_folder):
    # Process only Excel files (.xls or .xlsx)
    if filename.endswith('.xlsx') or filename.endswith('.xls'):
        file_path = os.path.join(input_folder, filename)

        # Load the current Excel file
        workbook = Workbook()
        workbook.LoadFromFile(file_path)

        # Get the first worksheet from the current workbook
        sheet = workbook.Worksheets[0]

        # Get the used range from the first worksheet
        source_range = sheet.Range

        # Set the destination range in the merged worksheet starting at current_row
        dest_range = merged_sheet.Range[current_row, 1]

        # Copy data from the used range to the destination range
        source_range.Copy(dest_range)

        # Update current_row to the row after the last copied row to prevent overlap
        current_row += sheet.LastRow

# Save the merged workbook to the specified output file in Excel 2016 format
merged_workbook.SaveToFile(output_file, ExcelVersion.Version2016)
Conclusion
When merging multiple Excel files into a single document—whether by appending sheets or combining data row by row—using a Python library like Spire.XLS enables automation and improves accuracy. This approach can help streamline workflows, especially in enterprise scenarios that require handling large datasets without relying on Microsoft Excel.
FAQs: Merge Excel Files with Python
Q1: Can I merge .xls and .xlsx files together?
A1: Yes. Spire.XLS handles both formats without needing conversion.
Q2: Do I need Excel installed on my machine to use Spire.XLS?
A2: No. Spire.XLS is standalone and works without Microsoft Office installed.
Q3: Can I merge only specific sheets from each workbook?
A3: Yes. You can customize your code to merge sheets by name or index. For example:
sheet = source_workbook.Worksheets["Summary"]
Q4: How do I avoid copying header rows multiple times?
A4: Add logic like:
if current_row > 1:
    start_row = 2 # Skip header

else:
    start_row = 1
Q5: Can I keep track of which file each row came from?
A5: Yes. Add a new column in the merged sheet containing the source file name for each row.
Q6: Is there a file size or row limit when using Spire.XLS?
A6: Spire.XLS follows the same row and column limits as Excel: .xlsx supports up to 1,048,576 rows × 16,384 columns, and .xls supports up to 65,536 rows × 256 columns.
Q7: Can I preserve formulas and formatting while merging?
A7: Yes. When merging Excel files, formatting and formulas are preserved.
SmartArt in Microsoft PowerPoint is a valuable tool that allows users to create visually appealing diagrams, charts, and graphics to represent information or concepts. It provides a quick and easy way to transform plain text into visually engaging visuals, making it easier for the audience to understand and remember the information being presented. In this article, we will demonstrate how to create, read and delete SmartArt in a PowerPoint in Python using Spire.Presentation for Python.
- Create SmartArt in PowerPoint in Python
- Read SmartArt in PowerPoint in Python
- Delete SmartArt from PowerPoint in Python
Install Spire.Presentation for Python
This scenario requires Spire.Presentation for Python and plum-dispatch v1.7.4. They can be easily installed in your Windows through the following pip command.
pip install Spire.Presentation
If you are unsure how to install, please refer to this tutorial: How to Install Spire.Presentation for Python on Windows
Create SmartArt in PowerPoint in Python
Spire.Presentation for Python provides the ISlide.Shapes.AppendSmartArt() method to add a SmartArt graphic to a specific slide of a PowerPoint presentation. The detailed steps are as follows.
- Create an object of the Presentation class.
- Load a PowerPoint presentation using Presentation.LoadFromFile() method.
- Get a specified slide by its index using Presentation.Slides[index] property.
- Insert a SmartArt graphic into the specified slide using ISlide.Shapes.AppendSmartArt() method.
- Set the style and color of the SmartArt using ISmartArt.Style and ISmartArt.ColorStyle properties.
- Loop through the nodes in the SmartArt and remove all default nodes using ISmartArt.Nodes.RemoveNode() method.
- Add a node to the SmartArt using ISmartArt.Nodes.AddNode() method.
- Add two sub-nodes to the node using ISmartArtNode.ChildNodes.AddNode() method.
- Add two sub-nodes to the first sub-node and the second sub-node respectively using ISmartArtNode.ChildNodes.AddNode() method.
- Add text to each node and sub-node using ISmartArtNode.TextFrame.Text property, and then set the font size for the text using ISmartArtNode.TextFrame.TextRange.FontHeight property.
- Save the resulting presentation using Presentation.SaveToFile() method.
- Python
from spire.presentation.common import *
from spire.presentation import *

# Create a Presentation object
presentation = Presentation()
# Load a PowerPoint presentation
presentation.LoadFromFile("Sample.pptx")

# Get the first slide
slide = presentation.Slides[0]

# Add a SmartArt (Organization Chart) to the slide
smartArt = slide.Shapes.AppendSmartArt(200, 60, 500, 430, SmartArtLayoutType.OrganizationChart)

# Set style and color for the SmartArt
smartArt.Style = SmartArtStyleType.ModerateEffect
smartArt.ColorStyle = SmartArtColorType.ColorfulAccentColors5to6

# Remove the default nodes from the SmartArt
list = []
for node in smartArt.Nodes:
    list.append(node)
for subnode in list:
    smartArt.Nodes.RemoveNode(subnode)

# Add a node to the SmartArt
node = smartArt.Nodes.AddNode()

# Add two sub-nodes to the node
subNode1 = node.ChildNodes.AddNode()
subNode2 = node.ChildNodes.AddNode()

# Add two sub-nodes to the first sub-node
subsubNode1 = subNode1.ChildNodes.AddNode()
subsubNode2 = subNode1.ChildNodes.AddNode()
# Add two sub-nodes to the second sub-node
subsubNode3 = subNode2.ChildNodes.AddNode()
subsubNode4 = subNode2.ChildNodes.AddNode()

# Set text and font size for the node and sub-nodes
node.TextFrame.Text = "CEO"
node.TextFrame.TextRange.FontHeight = 14.0
subNode1.TextFrame.Text = "Development Manager"
subNode1.TextFrame.TextRange.FontHeight = 12.0
subNode2.TextFrame.Text = "Quality Assurance Manager"
subNode2.TextFrame.TextRange.FontHeight = 12.0
subsubNode1.TextFrame.Text = "Developer A"
subsubNode1.TextFrame.TextRange.FontHeight = 12.0
subsubNode2.TextFrame.Text = "Developer B"
subsubNode2.TextFrame.TextRange.FontHeight = 12.0
subsubNode3.TextFrame.Text = "Tester A"
subsubNode3.TextFrame.TextRange.FontHeight = 12.0
subsubNode4.TextFrame.Text = "Tester B"
subsubNode4.TextFrame.TextRange.FontHeight = 12.0

# Save the resulting presentation
presentation.SaveToFile("InsertSmartArt.pptx", FileFormat.Pptx2016)
presentation.Dispose()

Read SmartArt in PowerPoint in Python
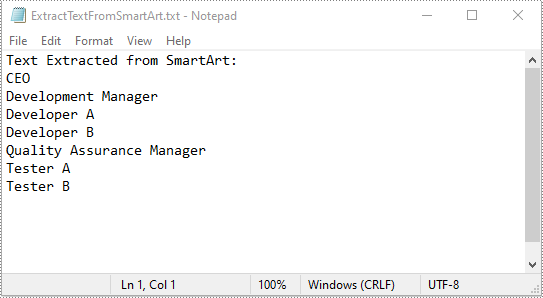
To read the text of SmartArt graphics on a PowerPoint slide, you need to find the SmartArt shapes on the slide, then loop through all nodes of each SmartArt shape, and finally retrieve the text of each node through the ISmartArtNode.TextFrame.Text property. The detailed steps are as follows.
- Create an object of the Presentation class.
- Load a PowerPoint presentation using Presentation.LoadFromFile() method.
- Get a specific slide using Presentation.Slides[index] property.
- Create a list to store the extracted text.
- Loop through all the shapes on the slide.
- Check if the shapes are of ISmartArt type. If the result is True, loop through all the nodes of each SmartArt shape, then retrieve the text from each node through ISmartArtNode.TextFrame.Text property and append the text to the list.
- Write the text in the list into a text file.
- Python
from spire.presentation.common import *
from spire.presentation import *

# Create a Presentation object
presentation = Presentation()
# Load a PowerPoint presentation
presentation.LoadFromFile("InsertSmartArt.pptx")

# Get the first slide
slide = presentation.Slides[0]

# Create a list to store the extracted text
str = []
str.append("Text Extracted from SmartArt:")

# Loop through the shapes on the slide and find the SmartArt shapes
for shape in slide.Shapes:
    if isinstance(shape, ISmartArt):
        smartArt = shape
        # Extract text from the SmartArt shapes and append the text to the list
        for node in smartArt.Nodes:
            str.append(node.TextFrame.Text)

# Write the text in the list into a text file
with open("ExtractTextFromSmartArt.txt", "w", encoding = "utf-8") as text_file:
    for text in str:
        text_file.write(text + "\n")

presentation.Dispose()
Delete SmartArt from PowerPoint in Python
To delete SmartArt graphics from a PowerPoint slide, you need to loop through all the shapes on the slide, find the SmartArt shapes and then delete them from the slide using ISlide.Shapes.Remove() method. The detailed steps are as follows.
- Create an object of the Presentation class.
- Load a PowerPoint presentation using Presentation.LoadFromFile() method.
- Get a specific slide using Presentation.Slides[index] property.
- Create a list to store the SmartArt shapes.
- Loop through all the shapes on the slide.
- Check if the shapes are of ISmartArt type. If the result is True, append them to the list.
- Loop through the SmartArt shapes in the list, then remove them from the slide one by one using ISlide.Shapes.Remove() method.
- Save the resulting presentation using Presentation.SaveToFile() method.
- Python
from spire.presentation.common import *
from spire.presentation import *

# Create a Presentation object
presentation = Presentation()
# Load a PowerPoint presentation
presentation.LoadFromFile("InsertSmartArt.pptx")

# Get the first slide
slide = presentation.Slides[0]

# Create a list to store the SmartArt shapes
list = []

# Loop through all the shapes on the slide
for shape in slide.Shapes:
    # Find the SmartArt shapes and append them to the list
    if isinstance (shape, ISmartArt):
        list.append(shape)

# Remove the SmartArt from the slide
for smartArt in list:
    slide.Shapes.Remove(smartArt)

# Save the resulting presentation
presentation.SaveToFile("DeleteSmartArt.pptx", FileFormat.Pptx2016)
presentation.Dispose()
Apply for a Temporary License
If you'd like to remove the evaluation message from the generated documents, or to get rid of the function limitations, please request a 30-day trial license for yourself.
