CSV를 PDF로 변환하는 4가지 효율적인 방법
목차
Pypi로 설치
pip install spire.xls
관련 링크
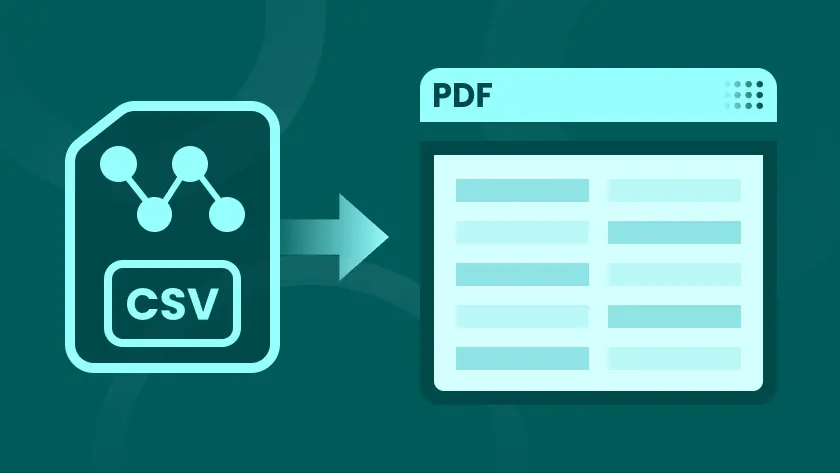
CSV(쉼표로 구분된 값) 파일은 데이터를 저장하고 공유하는 데 널리 사용되는 형식입니다. 단순성과 사용 편의성으로 인해 데이터 저장에 이상적이지만 PDF와 같이 세련된 형식의 서식 옵션이 부족합니다. CSV 파일을 PDF로 변환하는 것은 전문적인 보고서를 작성하거나 대용량 데이터 세트를 일관되고 읽기 쉬운 형식으로 인쇄하기 위한 일반적인 요구 사항입니다.
이 기사에서는 기술 지식이 거의 없는 사용자부터 자동화된 솔루션을 찾는 고급 사용자에 이르기까지 다양한 사용자에게 적합한 수동 및 자동화된 방법을 포함하여 CSV를 PDF로 변환하는 네 가지 효율적인 방법을 살펴보겠습니다.
CSV를 PDF로 변환할 때의 이점
CSV를 PDF로 변환하면 다음과 같은 여러 가지 이점이 있습니다.
- 전문적인 프레젠테이션 : PDF를 사용하면 데이터를 깔끔하고 구조화된 방식으로 표시할 수 있어 보고서, 프레젠테이션 또는 클라이언트와 공유하는 데 더 적합합니다.
- 보안 : CSV 파일과 달리 PDF는 암호로 보호할 수 있어 데이터의 무결성을 보장하고 무단 편집을 방지할 수 있습니다.
- 범용 접근성 : PDF는 거의 모든 장치에서 쉽게 열 수 있는 보편적으로 인정되는 형식이므로 공유에 이상적입니다.
이제 CSV 파일을 PDF로 변환하는 네 가지 효율적인 방법을 살펴보겠습니다.
방법 1: Microsoft Excel 사용
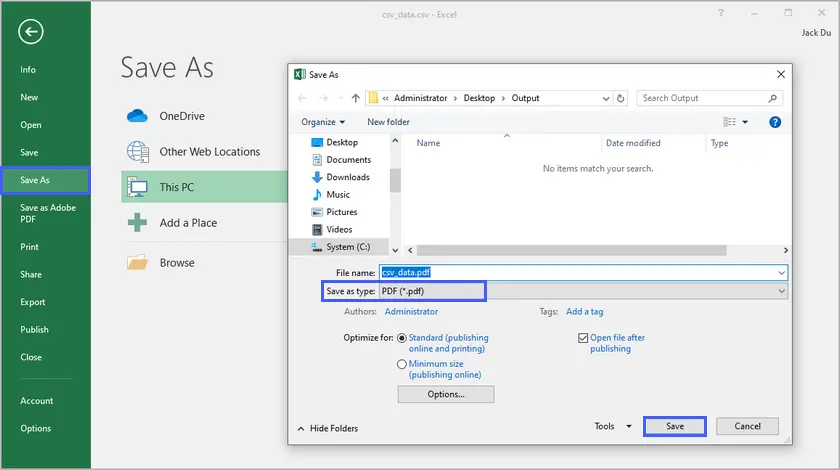
대부분의 사용자에게 Microsoft Excel은 CSV 파일을 PDF로 변환하는 데 가장 사용하기 쉬운 도구 중 하나입니다. 몇 가지 간단한 단계만으로 CSV 데이터를 열고 서식을 지정한 다음 PDF로 저장할 수 있습니다.
단계:
- CSV 파일을 두 번 클릭하거나 Excel을 열고 파일 > 열기를 선택하여 Excel에서 CSV 파일을 엽니다.
- CSV 파일이 열리면 필요에 따라 서식을 조정할 수 있습니다(예: 열 너비 변경, 정렬 조정, 셀 테두리 적용).
- 파일 > 다른 이름으로 저장으로 이동합니다.
- “다른 이름으로 저장 유형" 드롭다운에서 PDF를 선택합니다.
- 위치를 선택하고 저장을 클릭합니다.
장점:
- Excel에 익숙한 사용자에게는 간단하고 직관적입니다.
- 더 나은 프레젠테이션을 위해 열 너비 조정, 색상 추가 또는 그래프 포함과 같은 사용자 지정 옵션.
단점:
- 무료가 아닌 Excel이 필요합니다.
- 수천 개의 행이 있는 대용량 CSV 파일에는 적합하지 않을 수 있습니다.
방법 2: Google Sheets 사용
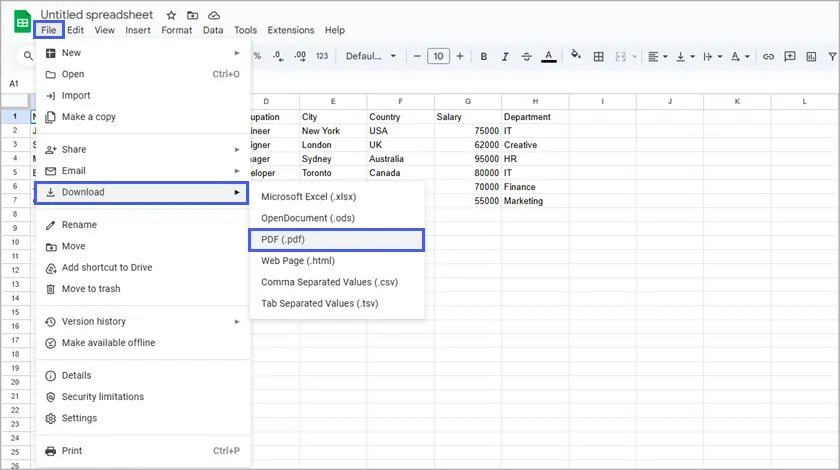
Google Sheets는 Excel과 유사하게 작동하는 무료 클라우드 기반 스프레드시트 도구입니다. 인터넷에 연결된 모든 장치에서 액세스할 수 있으며 CSV에서 PDF로의 변환을 쉽게 처리할 수 있습니다.
단계:
- CSV 파일을 Google 드라이브에 업로드합니다.
- Google Sheets로 파일을 엽니다.
- 열 너비를 조정하고 테두리나 색상을 추가하는 등 원하는 대로 데이터 서식을 지정합니다.
- 파일 > 다운로드 > PDF 문서로 이동합니다.
- PDF 내보내기 설정에서 레이아웃 및 페이지 크기 기본 설정을 선택한 다음 내보내기를 클릭합니다.
장점:
- 어디서나 무료로 액세스할 수 있습니다.
- 소프트웨어 설치가 필요 없으며 Google 계정만 있으면 됩니다.
단점:
- Excel에 비해 사용자 지정이 제한적입니다.
- 인터넷 연결이 필요합니다.
방법 3: 온라인 변환기 사용
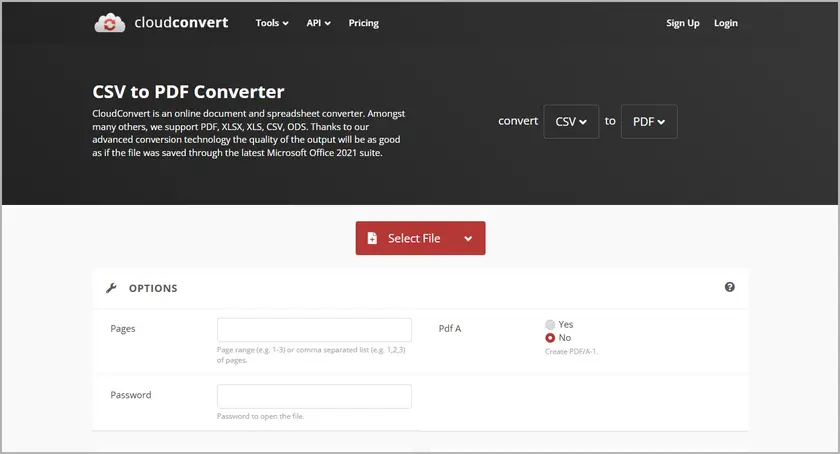
빠르고 간편한 솔루션을 원한다면 온라인 변환기가 이상적입니다. CSV 파일을 업로드하고 몇 분 안에 PDF로 다운로드할 수 있는 다양한 웹사이트가 있습니다. CloudConvert와 같은 웹사이트를 사용하면 소프트웨어를 설치하지 않고도 파일을 간단하게 변환할 수 있습니다.
단계:
- CloudConvert와 같은 온라인 변환기로 이동합니다.
- 웹사이트에 CSV 파일을 업로드합니다.
- 변환 버튼을 클릭하고 변환이 완료되면 결과 PDF를 다운로드합니다.
장점:
- 빠르고 편리하며 아무것도 설치할 필요가 없습니다.
- 일회성 또는 가끔 변환이 필요한 사용자에게 적합합니다.
단점:
- 사용자 지정 옵션이 제한적입니다. 보이는 것이 전부입니다.
- 타사 웹사이트에 민감한 데이터를 업로드할 때의 개인 정보 보호 문제.
방법 4: Python 자동화 사용(Spire.XLS for Python 사용)
보다 자동화되고 사용자 정의 가능한 솔루션이 필요한 사용자에게 Python은 CSV 파일을 PDF로 변환하는 작업을 보다 유연하게 처리할 수 있는 강력한 도구입니다. Spire.XLS for Python은 이 프로세스를 쉽게 자동화하는 데 도움이 되는 라이브러리입니다.
단계:
- 다음 명령을 사용하여 Spire.XLS for Python을 설치합니다.
- CSV 데이터를 읽고 서식을 지정하고 PDF로 변환하는 Python 스크립트를 작성합니다.
- 스크립트를 실행하면 CSV 파일이 PDF로 변환되어 공유하거나 인쇄할 수 있습니다.
pip install spire.xls
다음은 예제 스크립트입니다.
from spire.xls import *
from spire.xls.common import *

# Create a Workbook object
workbook = Workbook()

# Load a CSV file into the workbook (starting at cell A1)
workbook.LoadFromFile("C:/Users/Administrator/Desktop/csv_data.csv", ",", 1, 1)

# Set conversion settings to adjust sheet layout
workbook.ConverterSetting.SheetFitToPageRetainPaperSize = True  # Retain paper size during conversion
workbook.ConverterSetting.SheetFitToWidth = True  # Fit sheet to width during conversion

# Get the first worksheet from the workbook
sheet = workbook.Worksheets[0]

# Set paper size to A4
sheet.PageSetup.PaperSize = PaperSizeType.PaperA4

# Set uniform margins for the sheet
sheet.PageSetup.LeftMargin = 0.5
sheet.PageSetup.RightMargin = 0.5
sheet.PageSetup.TopMargin = 0.5
sheet.PageSetup.BottomMargin = 0.5

# Enable printing of gridlines
sheet.PageSetup.IsPrintGridlines = True

# Autofit all columns in the worksheet (optimizing column width)
for i in range(1, sheet.Columns.Length + 1):
    sheet.AutoFitColumn(i)

# Set a default row height for all rows
sheet.DefaultRowHeight = 18

# Save the worksheet as a PDF
sheet.SaveToPdf("CSVToPDF.pdf")
workbook.Dispose()
출력:

장점:
- PDF 레이아웃 및 서식에 대한 완전한 제어.
- 자동화 또는 대량의 CSV 파일 처리에 이상적입니다.
- 사용자 지정 보고서를 생성하거나 PDF 디자인을 조정할 수 있습니다.
단점:
- 기본적인 프로그래밍 지식이 필요합니다.
- Python 환경과 Spire.XLS for Python을 설정해야 합니다.
다음은 Python에서 CSV를 PDF로 변환하는 전체 가이드입니다.
수동 방법과 자동화된 방법의 사용 시기
수동 방법과 자동화된 방법 중 선택은 필요에 따라 다릅니다.
- 수동 방법(Excel, Google Sheets 및 온라인 변환기)은 속도와 사용 편의성이 우선시되는 일회성 또는 소규모 변환에 적합합니다.
- 자동화된 방법(Python with Spire.XLS for Python)은 반복적인 작업, 대규모 데이터 세트 또는 수동 도구가 제공할 수 없는 사용자 지정 서식이 필요한 경우에 더 좋습니다.
변환 전 CSV 데이터 서식 지정 모범 사례
CSV 파일이 PDF 형식으로 보기 좋게 표시되도록 하려면 다음과 같은 몇 가지 모범 사례를 따르십시오.
- 데이터 구성 : 불필요한 행과 열을 제거하고 데이터가 일관적인지 확인합니다.
- 열 너비 조정 : 텍스트가 잘리지 않도록 열이 충분히 넓은지 확인합니다.
- 가독성을 위한 텍스트 정렬 : 각 열 내의 텍스트를 적절하게 정렬하여 변환된 PDF가 깔끔하고 구조화되어 보이도록 합니다.
- 머리글 및 바닥글 추가 : 열을 설명하는 의미 있는 머리글과 페이지 번호 또는 문서 제목과 같은 추가 정보를 위한 바닥글을 포함합니다.
결론
CSV 파일을 PDF로 변환하는 것은 Excel 및 Google Sheets를 사용하는 간단한 수동 방법부터 Spire.XLS for Python을 사용한 Python 스크립팅과 같은 보다 자동화된 솔루션에 이르기까지 여러 가지 방법으로 수행할 수 있습니다. 각 방법은 일회성 프로젝트를 진행하든 장기적인 자동화 솔루션을 찾고 있든 필요에 따라 뚜렷한 이점을 제공합니다.
단순성과 편의성을 찾고 있다면 Excel이나 Google Sheets가 최선의 선택일 수 있습니다. 그러나 자동화되고 반복 가능한 변환이나 대규모 데이터 세트 처리의 경우 Python은 뛰어난 유연성과 제어 기능을 제공합니다. 프로젝트에 가장 적합한 방법을 선택하고 지금 바로 CSV 데이터를 세련되고 전문적인 PDF로 변환해 보세요!
자주 묻는 질문
Q1. CSV 파일을 PDF로 변환하는 가장 좋은 방법은 무엇입니까?
가장 좋은 방법은 필요에 따라 다릅니다. Excel과 Google Sheets는 수동 변환에 적합하며, Python 자동화는 대규모 또는 반복적인 작업에 대해 더 많은 제어 기능을 제공합니다.
Q2. PDF로 변환할 때 CSV 데이터의 페이지 레이아웃을 조정할 수 있습니까?
예, Excel 및 Google Sheets는 페이지 나누기 및 열 너비 변경과 같은 레이아웃 조정 기능을 제공합니다. Python을 사용하면 페이지 크기, 글꼴 및 표 스타일을 보다 고급으로 제어할 수 있습니다.
Q3. 여러 CSV 파일을 한 번에 PDF로 일괄 변환할 수 있습니까?
예, Python 스크립팅을 사용하면 여러 CSV 파일을 PDF로 일괄 변환할 수 있으므로 대규모 변환을 자동화하는 데 이상적입니다.
Q4. 소프트웨어를 설치하지 않고 CSV를 PDF로 변환할 수 있습니까?
예, 온라인 변환기를 사용하면 소프트웨어를 설치하지 않고도 CSV를 PDF로 변환할 수 있습니다. 그러나 더 나은 사용자 지정 및 제어를 위해서는 Excel 또는 Python과 같은 오프라인 방법을 사용하는 것이 좋습니다.
참고 항목
Convertir CSV en PDF : 4 méthodes efficaces
Table des matières
- Avantages de la conversion de CSV en PDF
- Méthode 1. Utilisation de Microsoft Excel
- Méthode 2. Utilisation de Google Sheets
- Méthode 3. Utilisation d'un convertisseur en ligne
- Méthode 4. Automatisation avec Python
- Quand utiliser les méthodes manuelles ou automatisées
- Meilleures pratiques
- Conclusion
- FAQ
Installer avec Pypi
pip install spire.xls
Liens connexes
Les fichiers CSV (Comma-Separated Values) sont un format populaire pour stocker et partager des données. Leur simplicité et leur facilité d'utilisation les rendent idéaux pour le stockage de données, mais ils n'ont pas les options de formatage des formats plus soignés comme le PDF. La conversion de fichiers CSV en PDF est une exigence courante pour créer des rapports professionnels ou pour imprimer de grands ensembles de données dans un format cohérent et facile à lire.
Dans cet article, nous explorerons quatre façons efficaces de convertir un CSV en PDF, des méthodes manuelles et automatisées, qui s'adresseront à une variété d'utilisateurs, de ceux ayant peu de connaissances techniques aux utilisateurs plus avancés à la recherche d'une solution automatisée.
- Méthode 1. Utilisation de Microsoft Excel
- Méthode 2. Utilisation de Google Sheets
- Méthode 3. Utilisation d'un convertisseur en ligne
- Méthode 4. Automatisation avec Python
Avantages de la conversion de CSV en PDF
La conversion de CSV en PDF offre plusieurs avantages :
- Présentation professionnelle : Les PDF permettent une présentation soignée et structurée des données, ce qui est plus adapté pour les rapports, les présentations ou le partage avec des clients.
- Sécurité : Contrairement aux fichiers CSV, les PDF peuvent être protégés par un mot de passe, garantissant l'intégrité de vos données et empêchant les modifications non autorisées.
- Accessibilité universelle : Les PDF sont un format universellement accepté qui peut être facilement ouvert sur presque tous les appareils, ce qui les rend idéaux pour le partage.
Plongeons maintenant dans les quatre façons efficaces de convertir des fichiers CSV en PDF.
Méthode 1 : Utilisation de Microsoft Excel
Pour la plupart des utilisateurs, Microsoft Excel est l'un des outils les plus simples à utiliser pour convertir des fichiers CSV en PDF. En quelques étapes simples, vous pouvez ouvrir vos données CSV, les formater et les enregistrer en tant que PDF.
Étapes :
- Ouvrez le fichier CSV dans Excel en double-cliquant dessus ou en ouvrant Excel et en sélectionnant Fichier > Ouvrir.
- Une fois le fichier CSV ouvert, vous pouvez ajuster le formatage selon vos besoins (par exemple, modifier la largeur des colonnes, ajuster les alignements, appliquer des bordures de cellule).
- Allez dans Fichier > Enregistrer sous.
- Dans le menu déroulant « Type », sélectionnez PDF.
- Choisissez un emplacement et cliquez sur Enregistrer.
Avantages :
- Simple et intuitif pour les utilisateurs familiers avec Excel.
- Options de personnalisation comme l'ajustement de la largeur des colonnes, l'ajout de couleurs ou même l'inclusion de graphiques pour une meilleure présentation.
Inconvénients :
- Nécessite Excel, qui n'est pas gratuit.
- Peut ne pas être idéal pour les gros fichiers CSV avec des milliers de lignes.
Méthode 2 : Utilisation de Google Sheets
Google Sheets est un outil de feuille de calcul gratuit basé sur le cloud qui fonctionne de manière similaire à Excel. Il est accessible depuis n'importe quel appareil avec une connexion Internet et peut gérer facilement les conversions de CSV en PDF.
Étapes :
- Importez votre fichier CSV sur Google Drive.
- Ouvrez le fichier avec Google Sheets.
- Formatez les données à votre guise, par exemple en ajustant la largeur des colonnes et en ajoutant des bordures ou des couleurs.
- Allez dans Fichier > Télécharger > Document PDF.
- Dans les paramètres d'exportation PDF, sélectionnez les préférences de mise en page et de format de page, puis cliquez sur Exporter.
Avantages :
- Gratuit et accessible de n'importe où.
- Aucune installation de logiciel requise — juste un compte Google.
Inconvénients :
- Personnalisation limitée par rapport à Excel.
- Nécessite une connexion Internet.
Méthode 3 : Utilisation d'un convertisseur en ligne
Pour une solution rapide et sans tracas, les convertisseurs en ligne sont idéaux. Il existe divers sites Web qui vous permettent de télécharger votre fichier CSV et de le télécharger en PDF en quelques minutes. Des sites Web comme CloudConvert simplifient la conversion de fichiers sans installer de logiciel.
Étapes :
- Allez sur un convertisseur en ligne comme CloudConvert.
- Importez votre fichier CSV sur le site Web.
- Cliquez sur le bouton Convertir, et une fois la conversion terminée, téléchargez le PDF résultant.
Avantages :
- Rapide et pratique — pas besoin d'installer quoi que ce soit.
- Parfait pour les utilisateurs qui n'ont besoin que d'une conversion ponctuelle ou occasionnelle.
Inconvénients :
- Options de personnalisation limitées — ce que vous voyez est ce que vous obtenez.
- Préoccupations de confidentialité lors du téléchargement de données sensibles sur des sites Web tiers.
Méthode 4 : Automatisation avec Python (avec Spire.XLS for Python)
Pour les utilisateurs qui ont besoin d'une solution plus automatisée et personnalisable, Python est un outil puissant qui peut gérer la conversion de fichiers CSV en PDF avec plus de flexibilité. Spire.XLS for Python est une bibliothèque qui peut aider à automatiser ce processus en toute simplicité.
Étapes :
- Installez Spire.XLS for Python en utilisant la commande suivante :
- Écrivez un script Python pour lire les données CSV, les formater et les convertir en PDF.
- Exécutez le script, et le fichier CSV sera converti en PDF, prêt à être partagé ou imprimé.
pip install spire.xls
Voici un exemple de script :
from spire.xls import *
from spire.xls.common import *

# Create a Workbook object
workbook = Workbook()

# Load a CSV file into the workbook (starting at cell A1)
workbook.LoadFromFile("C:/Users/Administrator/Desktop/csv_data.csv", ",", 1, 1)

# Set conversion settings to adjust sheet layout
workbook.ConverterSetting.SheetFitToPageRetainPaperSize = True  # Retain paper size during conversion
workbook.ConverterSetting.SheetFitToWidth = True  # Fit sheet to width during conversion

# Get the first worksheet from the workbook
sheet = workbook.Worksheets[0]

# Set paper size to A4
sheet.PageSetup.PaperSize = PaperSizeType.PaperA4

# Set uniform margins for the sheet
sheet.PageSetup.LeftMargin = 0.5
sheet.PageSetup.RightMargin = 0.5
sheet.PageSetup.TopMargin = 0.5
sheet.PageSetup.BottomMargin = 0.5

# Enable printing of gridlines
sheet.PageSetup.IsPrintGridlines = True

# Autofit all columns in the worksheet (optimizing column width)
for i in range(1, sheet.Columns.Length + 1):
    sheet.AutoFitColumn(i)

# Set a default row height for all rows
sheet.DefaultRowHeight = 18

# Save the worksheet as a PDF
sheet.SaveToPdf("CSVToPDF.pdf")
workbook.Dispose()
Sortie :
Avantages :
- Contrôle total sur la mise en page et le formatage du PDF.
- Idéal pour l'automatisation ou le traitement d'un grand nombre de fichiers CSV.
- Vous permet de générer des rapports personnalisés ou d'ajuster la conception de vos PDF.
Inconvénients :
- Nécessite des connaissances de base en programmation.
- Nécessite la configuration de l'environnement Python et de Spire.XLS for Python.
Voici le guide complet sur la conversion de CSV en PDF en Python.
Quand utiliser les méthodes manuelles ou automatisées
Le choix entre les méthodes manuelles et automatisées dépend de vos besoins :
- Les méthodes manuelles (Excel, Google Sheets et les convertisseurs en ligne) sont parfaites pour les conversions ponctuelles ou à petite échelle où la vitesse et la facilité d'utilisation sont des priorités.
- Les méthodes automatisées (Python avec Spire.XLS for Python) sont meilleures pour les tâches répétitives, les grands ensembles de données ou lorsque vous avez besoin d'un formatage personnalisé que les outils manuels ne peuvent pas fournir.
Meilleures pratiques pour formater les données CSV avant la conversion
Pour vous assurer que votre fichier CSV a une belle apparence au format PDF, voici quelques meilleures pratiques :
- Organisez vos données : Supprimez les lignes et les colonnes inutiles et assurez-vous que les données sont cohérentes.
- Ajustez la largeur des colonnes : Assurez-vous que les colonnes sont suffisamment larges pour éviter de tronquer le texte.
- Alignez le texte pour la lisibilité : Assurez un alignement correct du texte dans chaque colonne, ce qui garantit que le PDF converti aura un aspect soigné et structuré.
- Ajoutez des en-têtes et des pieds de page : Incluez des en-têtes significatifs pour décrire les colonnes et des pieds de page pour des informations supplémentaires, telles que le numéro de page ou le titre du document.
Conclusion
La conversion de fichiers CSV en PDF peut se faire de plusieurs manières, des méthodes manuelles simples comme l'utilisation d'Excel et de Google Sheets à des solutions plus automatisées comme le script Python avec Spire.XLS for Python. Chaque méthode offre des avantages distincts en fonction de vos besoins, que vous travailliez sur un projet ponctuel ou que vous recherchiez une solution automatisée à long terme.
Si vous recherchez la simplicité et la commodité, Excel ou Google Sheets pourraient être votre meilleur choix. Cependant, pour les conversions automatisées et répétables ou la gestion de grands ensembles de données, Python offre une grande flexibilité et un grand contrôle. Choisissez la méthode qui convient le mieux à votre projet et commencez dès aujourd'hui à convertir vos données CSV en un PDF soigné et professionnel !
FAQ
Q1. Quelle est la meilleure méthode pour convertir un fichier CSV en PDF ?
La meilleure méthode dépend de vos besoins : Excel et Google Sheets sont parfaits pour la conversion manuelle, tandis que l'automatisation avec Python offre plus de contrôle pour les tâches à grande échelle ou récurrentes.
Q2. Est-il possible d'ajuster la mise en page des données CSV lors de la conversion en PDF ?
Oui, Excel et Google Sheets offrent des ajustements de mise en page comme les sauts de page et les changements de largeur de colonne. Python permet un contrôle plus avancé sur la taille de la page, les polices et les styles de tableau.
Q3. Puis-je convertir par lots plusieurs fichiers CSV en PDF en une seule fois ?
Oui, les scripts Python permettent la conversion par lots de plusieurs fichiers CSV en PDF, ce qui le rend idéal pour automatiser les conversions à grande échelle.
Q4. Puis-je convertir un CSV en PDF sans installer de logiciel ?
Oui, les convertisseurs en ligne permettent la conversion de CSV en PDF sans installer de logiciel. Cependant, pour une meilleure personnalisation et un meilleur contrôle, les méthodes hors ligne comme Excel ou Python sont préférables.
Voir aussi
Convertir CSV a PDF: 4 métodos eficientes
Tabla de Contenidos
Instalar con Pypi
pip install spire.xls
Enlaces Relacionados
Los archivos CSV (Valores Separados por Comas) son un formato popular para almacenar y compartir datos. Su simplicidad y facilidad de uso los hacen ideales para el almacenamiento de datos, pero carecen de las opciones de formato de formatos más pulidos como el PDF. Convertir archivos CSV a PDF es un requisito común para crear informes profesionales o para imprimir grandes conjuntos de datos en un formato consistente y fácil de leer.
En este artículo, exploraremos cuatro formas eficientes de convertir CSV a PDF, tanto métodos manuales como automatizados, que se adaptarán a una variedad de usuarios, desde aquellos con pocos conocimientos técnicos hasta usuarios más avanzados que buscan una solución automatizada.
- Método 1. Usando Microsoft Excel
- Método 2. Usando Google Sheets
- Método 3. Usando un Convertidor en Línea
- Método 4. Usando Automatización con Python
Beneficios de Convertir CSV a PDF
Convertir CSV a PDF ofrece varios beneficios:
- Presentación Profesional: Los PDF permiten una presentación ordenada y estructurada de los datos, lo que es más adecuado para informes, presentaciones o para compartir con clientes.
- Seguridad: A diferencia de los archivos CSV, los PDF pueden protegerse con contraseña, garantizando la integridad de sus datos y evitando ediciones no autorizadas.
- Accesibilidad Universal: Los PDF son un formato universalmente aceptado que se puede abrir fácilmente en casi cualquier dispositivo, lo que los hace ideales para compartir.
Ahora, profundicemos en las cuatro formas eficientes de convertir archivos CSV a PDF.
Método 1: Usando Microsoft Excel
Para la mayoría de los usuarios, Microsoft Excel es una de las herramientas más fáciles de usar para convertir archivos CSV a PDF. Con unos simples pasos, puede abrir sus datos CSV, darles formato y guardarlos como PDF.
Pasos:
- Abra el archivo CSV en Excel haciendo doble clic en él o abriendo Excel y seleccionando Archivo > Abrir.
- Una vez que el archivo CSV está abierto, puede ajustar el formato según sea necesario (por ejemplo, cambiar el ancho de las columnas, ajustar las alineaciones, aplicar bordes a las celdas).
- Vaya a Archivo > Guardar como.
- En el menú desplegable "Guardar como tipo", seleccione PDF.
- Elija una ubicación y haga clic en Guardar.
Pros:
- Simple e intuitivo para usuarios familiarizados con Excel.
- Opciones de personalización como ajustar el ancho de las columnas, agregar color o incluso incluir gráficos para una mejor presentación.
Contras:
- Requiere Excel, que no es gratuito.
- Puede que no sea ideal para archivos CSV grandes con miles de filas.
Método 2: Usando Google Sheets
Google Sheets es una herramienta de hoja de cálculo gratuita y basada en la nube que funciona de manera similar a Excel. Es accesible desde cualquier dispositivo con conexión a Internet y puede manejar fácilmente las conversiones de CSV a PDF.
Pasos:
- Suba su archivo CSV a Google Drive.
- Abra el archivo con Google Sheets.
- Dé formato a los datos a su gusto, como ajustar el ancho de las columnas y agregar bordes o colores.
- Vaya a Archivo > Descargar > Documento PDF.
- En la configuración de exportación de PDF, seleccione las preferencias de diseño y tamaño de página, luego haga clic en Exportar.
Pros:
- Gratuito y accesible desde cualquier lugar.
- No se requiere instalación de software, solo una cuenta de Google.
Contras:
- Personalización limitada en comparación con Excel.
- Requiere una conexión a Internet.
Método 3: Usando un Convertidor en Línea
Para una solución rápida y sin complicaciones, los convertidores en línea son ideales. Hay varios sitios web que le permiten cargar su archivo CSV y descargarlo como PDF en minutos. Sitios web como CloudConvert simplifican la conversión de archivos sin necesidad de instalar ningún software.
Pasos:
- Vaya a un convertidor en línea como CloudConvert.
- Cargue su archivo CSV al sitio web.
- Haga clic en el botón Convertir y, una vez que se complete la conversión, descargue el PDF resultante.
Pros:
- Rápido y conveniente, no es necesario instalar nada.
- Perfecto para usuarios que solo necesitan una conversión única u ocasional.
Contras:
- Opciones de personalización limitadas: lo que ve es lo que obtiene.
- Preocupaciones de privacidad al cargar datos confidenciales en sitios web de terceros.
Método 4: Usando Automatización con Python (con Spire.XLS para Python)
Para los usuarios que requieren una solución más automatizada y personalizable, Python es una herramienta poderosa que puede manejar la conversión de archivos CSV a PDF con más flexibilidad. Spire.XLS para Python es una biblioteca que puede ayudar a automatizar este proceso con facilidad.
Pasos:
- Instale Spire.XLS para Python usando el siguiente comando:
- Escriba un script de Python para leer los datos CSV, darles formato y convertirlos en un PDF.
- Ejecute el script y el archivo CSV se convertirá en un PDF, listo para compartir o imprimir.
pip install spire.xls
Aquí hay un script de ejemplo:
from spire.xls import *
from spire.xls.common import *

# Create a Workbook object
workbook = Workbook()

# Load a CSV file into the workbook (starting at cell A1)
workbook.LoadFromFile("C:/Users/Administrator/Desktop/csv_data.csv", ",", 1, 1)

# Set conversion settings to adjust sheet layout
workbook.ConverterSetting.SheetFitToPageRetainPaperSize = True  # Retain paper size during conversion
workbook.ConverterSetting.SheetFitToWidth = True  # Fit sheet to width during conversion

# Get the first worksheet from the workbook
sheet = workbook.Worksheets[0]

# Set paper size to A4
sheet.PageSetup.PaperSize = PaperSizeType.PaperA4

# Set uniform margins for the sheet
sheet.PageSetup.LeftMargin = 0.5
sheet.PageSetup.RightMargin = 0.5
sheet.PageSetup.TopMargin = 0.5
sheet.PageSetup.BottomMargin = 0.5

# Enable printing of gridlines
sheet.PageSetup.IsPrintGridlines = True

# Autofit all columns in the worksheet (optimizing column width)
for i in range(1, sheet.Columns.Length + 1):
    sheet.AutoFitColumn(i)

# Set a default row height for all rows
sheet.DefaultRowHeight = 18

# Save the worksheet as a PDF
sheet.SaveToPdf("CSVToPDF.pdf")
workbook.Dispose()
Salida:
Pros:
- Control total sobre el diseño y el formato del PDF.
- Ideal para la automatización o el procesamiento de grandes cantidades de archivos CSV.
- Le permite generar informes personalizados o ajustar el diseño de sus PDF.
Contras:
- Requiere conocimientos básicos de programación.
- Requiere configurar el entorno de Python y Spire.XLS para Python.
Aquí está la guía completa sobre cómo convertir CSV a PDF en Python.
Cuándo Usar Métodos Manuales vs. Automatizados
La elección entre métodos manuales y automatizados depende de sus necesidades:
- Métodos manuales (Excel, Google Sheets y convertidores en línea) son perfectos para conversiones únicas o de pequeña escala donde la velocidad y la facilidad de uso son prioridades.
- Métodos automatizados (Python con Spire.XLS para Python) son mejores para tareas repetitivas, grandes conjuntos de datos o cuando necesita un formato personalizado que las herramientas manuales no pueden proporcionar.
Mejores Prácticas para Formatear Datos CSV Antes de la Conversión
Para asegurarse de que su archivo CSV se vea bien en formato PDF, aquí hay algunas mejores prácticas:
- Organice sus datos: elimine las filas y columnas innecesarias y asegúrese de que los datos sean consistentes.
- Ajuste el ancho de las columnas: asegúrese de que las columnas sean lo suficientemente anchas para evitar truncar el texto.
- Alinee el texto para facilitar la lectura: asegúrese de la alineación adecuada del texto dentro de cada columna, lo que garantiza que el PDF convertido se verá ordenado y estructurado.
- Agregue encabezados y pies de página: incluya encabezados significativos para describir las columnas y pies de página para obtener información adicional, como el número de página o el título del documento.
Conclusión
La conversión de archivos CSV a PDF se puede realizar de varias maneras, desde métodos manuales simples como el uso de Excel y Google Sheets hasta soluciones más automatizadas como la creación de scripts en Python con Spire.XLS para Python. Cada método ofrece distintas ventajas según sus necesidades, ya sea que esté trabajando en un proyecto único o buscando una solución automatizada a largo plazo.
Si busca simplicidad y conveniencia, Excel o Google Sheets podrían ser su mejor opción. Sin embargo, para conversiones automatizadas y repetibles o para manejar grandes conjuntos de datos, Python ofrece una gran flexibilidad y control. ¡Elija el método que mejor se adapte a su proyecto y comience a convertir sus datos CSV en un PDF pulido y profesional hoy mismo!
Preguntas Frecuentes
P1. ¿Cuál es el mejor método para convertir un archivo CSV a PDF?
El mejor método depende de sus necesidades: Excel y Google Sheets son excelentes para la conversión manual, mientras que la automatización con Python ofrece más control para tareas a gran escala o recurrentes.
P2. ¿Es posible ajustar el diseño de la página para los datos CSV al convertirlos a PDF?
Sí, Excel y Google Sheets ofrecen ajustes de diseño como saltos de página y cambios en el ancho de las columnas. Python permite un control más avanzado sobre el tamaño de la página, las fuentes y los estilos de tabla.
P3. ¿Puedo convertir por lotes varios archivos CSV a PDF a la vez?
Sí, la creación de scripts en Python permite la conversión por lotes de múltiples archivos CSV a PDF, lo que lo hace ideal para automatizar conversiones a gran escala.
P4. ¿Puedo convertir CSV a PDF sin instalar ningún software?
Sí, los convertidores en línea permiten la conversión de CSV a PDF sin instalar ningún software. Sin embargo, para una mejor personalización y control, se prefieren los métodos sin conexión como Excel o Python.
Ver También
CSV in PDF umwandeln: 4 effiziente Methoden
Inhaltsverzeichnis
- Vorteile der Konvertierung von CSV in PDF
- Methode 1. Verwendung von Microsoft Excel
- Methode 2. Verwendung von Google Sheets
- Methode 3. Verwendung eines Online-Konverters
- Methode 4. Verwendung von Python-Automatisierung
- Wann manuelle vs. automatisierte Methoden verwenden sollte
- Beste Vorgehensweisen
- Fazit
- Häufig gestellte Fragen
Mit Pypi installieren
pip install spire.xls
Verwandte Links
CSV-Dateien (Comma-Separated Values) sind ein beliebtes Format zum Speichern und Austauschen von Daten. Ihre Einfachheit und Benutzerfreundlichkeit machen sie ideal für die Datenspeicherung, aber ihnen fehlen die Formatierungsoptionen von ausgefeilteren Formaten wie PDF. Die Konvertierung von CSV-Dateien in PDF ist eine häufige Anforderung zur Erstellung professioneller Berichte oder zum Drucken großer Datenmengen in einem konsistenten, leicht lesbaren Format.
In diesem Artikel werden wir vier effiziente Möglichkeiten zur Konvertierung von CSV in PDF untersuchen, sowohl manuelle als auch automatisierte Methoden, die für eine Vielzahl von Benutzern geeignet sind – von denen mit geringen technischen Kenntnissen bis hin zu fortgeschrittenen Benutzern, die eine automatisierte Lösung suchen.
- Methode 1. Verwendung von Microsoft Excel
- Methode 2. Verwendung von Google Sheets
- Methode 3. Verwendung eines Online-Konverters
- Methode 4. Verwendung von Python-Automatisierung
Vorteile der Konvertierung von CSV in PDF
Die Konvertierung von CSV in PDF bietet mehrere Vorteile:
- Professionelle Präsentation: PDFs ermöglichen eine saubere und strukturierte Darstellung von Daten, die sich besser für Berichte, Präsentationen oder den Austausch mit Kunden eignet.
- Sicherheit: Im Gegensatz zu CSV-Dateien können PDFs passwortgeschützt werden, was die Integrität Ihrer Daten gewährleistet und unbefugte Bearbeitungen verhindert.
- Universelle Zugänglichkeit: PDFs sind ein universell anerkanntes Format, das auf fast jedem Gerät problemlos geöffnet werden kann, was sie ideal für den Austausch macht.
Lassen Sie uns nun in die vier effizienten Möglichkeiten eintauchen, CSV-Dateien in ein PDF zu konvertieren.
Methode 1: Verwendung von Microsoft Excel
Für die meisten Benutzer ist Microsoft Excel eines der einfachsten Werkzeuge zur Konvertierung von CSV-Dateien in PDF. Mit wenigen einfachen Schritten können Sie Ihre CSV-Daten öffnen, formatieren und als PDF speichern.
Schritte:
- Öffnen Sie die CSV-Datei in Excel, indem Sie darauf doppelklicken oder Excel öffnen und Datei > Öffnen wählen.
- Sobald die CSV-Datei geöffnet ist, können Sie die Formatierung nach Bedarf anpassen (z. B. Spaltenbreiten ändern, Ausrichtungen anpassen, Zellränder anwenden).
- Gehen Sie zu Datei > Speichern unter.
- Wählen Sie im Dropdown-Menü „Dateityp“ die Option PDF aus.
- Wählen Sie einen Speicherort und klicken Sie auf Speichern.
Vorteile:
- Einfach und intuitiv für Benutzer, die mit Excel vertraut sind.
- Anpassungsoptionen wie das Anpassen von Spaltenbreiten, das Hinzufügen von Farben oder sogar das Einfügen von Diagrammen für eine bessere Präsentation.
Nachteile:
- Erfordert Excel, das nicht kostenlos ist.
- Möglicherweise nicht ideal für große CSV-Dateien mit Tausenden von Zeilen.
Methode 2: Verwendung von Google Sheets
Google Sheets ist ein kostenloses, cloudbasiertes Tabellenkalkulationstool, das ähnlich wie Excel funktioniert. Es ist von jedem Gerät mit Internetverbindung aus zugänglich und kann CSV-zu-PDF-Konvertierungen problemlos durchführen.
Schritte:
- Laden Sie Ihre CSV-Datei auf Google Drive hoch.
- Öffnen Sie die Datei mit Google Sheets.
- Formatieren Sie die Daten nach Ihren Wünschen, z. B. durch Anpassen der Spaltenbreiten und Hinzufügen von Rändern oder Farben.
- Gehen Sie zu Datei > Herunterladen > PDF-Dokument.
- Wählen Sie in den PDF-Exporteinstellungen die Layout- und Seitengrößenpräferenzen aus und klicken Sie dann auf Exportieren.
Vorteile:
- Kostenlos und von überall zugänglich.
- Keine Softwareinstallation erforderlich – nur ein Google-Konto.
Nachteile:
- Begrenzte Anpassungsmöglichkeiten im Vergleich zu Excel.
- Erfordert eine Internetverbindung.
Methode 3: Verwendung eines Online-Konverters
Für eine schnelle und unkomplizierte Lösung sind Online-Konverter ideal. Es gibt verschiedene Websites, auf denen Sie Ihre CSV-Datei hochladen und in wenigen Minuten als PDF herunterladen können. Websites wie CloudConvert machen es einfach, Dateien ohne Installation von Software zu konvertieren.
Schritte:
- Gehen Sie zu einem Online-Konverter wie CloudConvert.
- Laden Sie Ihre CSV-Datei auf die Website hoch.
- Klicken Sie auf die Schaltfläche Konvertieren, und laden Sie das resultierende PDF herunter, sobald die Konvertierung abgeschlossen ist.
Vorteile:
- Schnell und bequem – keine Installation erforderlich.
- Perfekt für Benutzer, die nur eine einmalige oder gelegentliche Konvertierung benötigen.
Nachteile:
- Begrenzte Anpassungsoptionen – was Sie sehen, ist was Sie bekommen.
- Datenschutzbedenken beim Hochladen sensibler Daten auf Websites von Drittanbietern.
Methode 4: Verwendung von Python-Automatisierung (mit Spire.XLS for Python)
Für Benutzer, die eine stärker automatisierte und anpassbare Lösung benötigen, ist Python ein leistungsstarkes Werkzeug, das die Konvertierung von CSV-Dateien in PDF mit mehr Flexibilität handhaben kann. Spire.XLS for Python ist eine Bibliothek, die diesen Prozess mühelos automatisieren kann.
Schritte:
- Installieren Sie Spire.XLS for Python mit dem folgenden Befehl:
- Schreiben Sie ein Python-Skript, um die CSV-Daten zu lesen, zu formatieren und in ein PDF zu konvertieren.
- Führen Sie das Skript aus, und die CSV-Datei wird in ein PDF konvertiert, das zum Teilen oder Drucken bereit ist.
pip install spire.xls
Hier ist ein Beispielskript:
from spire.xls import *
from spire.xls.common import *

# Create a Workbook object
workbook = Workbook()

# Load a CSV file into the workbook (starting at cell A1)
workbook.LoadFromFile("C:/Users/Administrator/Desktop/csv_data.csv", ",", 1, 1)

# Set conversion settings to adjust sheet layout
workbook.ConverterSetting.SheetFitToPageRetainPaperSize = True  # Retain paper size during conversion
workbook.ConverterSetting.SheetFitToWidth = True  # Fit sheet to width during conversion

# Get the first worksheet from the workbook
sheet = workbook.Worksheets[0]

# Set paper size to A4
sheet.PageSetup.PaperSize = PaperSizeType.PaperA4

# Set uniform margins for the sheet
sheet.PageSetup.LeftMargin = 0.5
sheet.PageSetup.RightMargin = 0.5
sheet.PageSetup.TopMargin = 0.5
sheet.PageSetup.BottomMargin = 0.5

# Enable printing of gridlines
sheet.PageSetup.IsPrintGridlines = True

# Autofit all columns in the worksheet (optimizing column width)
for i in range(1, sheet.Columns.Length + 1):
    sheet.AutoFitColumn(i)

# Set a default row height for all rows
sheet.DefaultRowHeight = 18

# Save the worksheet as a PDF
sheet.SaveToPdf("CSVToPDF.pdf")
workbook.Dispose()
Ausgabe:
Vorteile:
- Volle Kontrolle über das PDF-Layout und die Formatierung.
- Ideal für die Automatisierung oder Verarbeitung großer Mengen von CSV-Dateien.
- Ermöglicht es Ihnen, benutzerdefinierte Berichte zu erstellen oder das Design Ihrer PDFs anzupassen.
Nachteile:
- Erfordert grundlegende Programmierkenntnisse.
- Erfordert die Einrichtung der Python-Umgebung und von Spire.XLS for Python.
Hier ist die vollständige Anleitung zur Konvertierung von CSV in PDF in Python.
Wann manuelle vs. automatisierte Methoden verwenden sollte
Die Wahl zwischen manuellen und automatisierten Methoden hängt von Ihren Bedürfnissen ab:
- Manuelle Methoden (Excel, Google Sheets und Online-Konverter) sind perfekt für einmalige oder kleine Konvertierungen, bei denen Geschwindigkeit und Benutzerfreundlichkeit im Vordergrund stehen.
- Automatisierte Methoden (Python mit Spire.XLS for Python) sind besser für sich wiederholende Aufgaben, große Datensätze oder wenn Sie eine benutzerdefinierte Formatierung benötigen, die manuelle Werkzeuge nicht bieten können.
Beste Vorgehensweisen zur Formatierung von CSV-Daten vor der Konvertierung
Um sicherzustellen, dass Ihre CSV-Datei im PDF-Format gut aussieht, finden Sie hier einige bewährte Vorgehensweisen:
- Organisieren Sie Ihre Daten: Entfernen Sie unnötige Zeilen und Spalten und stellen Sie sicher, dass die Daten konsistent sind.
- Passen Sie die Spaltenbreiten an: Stellen Sie sicher, dass die Spalten breit genug sind, um das Abschneiden von Text zu vermeiden.
- Richten Sie den Text für die Lesbarkeit aus: Stellen Sie die richtige Ausrichtung des Textes in jeder Spalte sicher, damit das konvertierte PDF ordentlich und strukturiert aussieht.
- Fügen Sie Kopf- und Fußzeilen hinzu: Fügen Sie aussagekräftige Kopfzeilen zur Beschreibung der Spalten und Fußzeilen für zusätzliche Informationen wie Seitenzahl oder Dokumenttitel hinzu.
Fazit
Die Konvertierung von CSV-Dateien in PDF kann auf verschiedene Weisen erfolgen, von einfachen, manuellen Methoden wie der Verwendung von Excel und Google Sheets bis hin zu stärker automatisierten Lösungen wie Python-Skripting mit Spire.XLS for Python. Jede Methode bietet je nach Ihren Bedürfnissen unterschiedliche Vorteile – egal, ob Sie an einem einmaligen Projekt arbeiten oder eine langfristige, automatisierte Lösung suchen.
Wenn Sie nach Einfachheit und Bequemlichkeit suchen, sind Excel oder Google Sheets möglicherweise die beste Wahl. Für automatisierte, wiederholbare Konvertierungen oder die Verarbeitung großer Datensätze bietet Python jedoch große Flexibilität und Kontrolle. Wählen Sie die Methode, die für Ihr Projekt am besten geeignet ist, und beginnen Sie noch heute damit, Ihre CSV-Daten in ein ausgefeiltes, professionelles PDF zu konvertieren!
Häufig gestellte Fragen
F1. Was ist die beste Methode, um eine CSV-Datei in ein PDF zu konvertieren?
Die beste Methode hängt von Ihren Bedürfnissen ab: Excel und Google Sheets eignen sich hervorragend für die manuelle Konvertierung, während die Python-Automatisierung mehr Kontrolle für umfangreiche oder wiederkehrende Aufgaben bietet.
F2. Ist es möglich, das Seitenlayout für CSV-Daten bei der Konvertierung in PDF anzupassen?
Ja, Excel und Google Sheets bieten Layoutanpassungen wie Seitenumbrüche und Änderungen der Spaltenbreite. Python ermöglicht eine erweiterte Kontrolle über Seitengröße, Schriftarten und Tabellenstile.
F3. Kann ich mehrere CSV-Dateien gleichzeitig in PDFs konvertieren?
Ja, Python-Skripting ermöglicht die Stapelkonvertierung mehrerer CSV-Dateien in PDFs und ist somit ideal für die Automatisierung umfangreicher Konvertierungen.
F4. Kann ich CSV in PDF konvertieren, ohne Software zu installieren?
Ja, Online-Konverter ermöglichen die Konvertierung von CSV in PDF ohne Installation von Software. Für eine bessere Anpassung und Kontrolle werden jedoch Offline-Methoden wie Excel oder Python bevorzugt.
Siehe auch
Конвертировать CSV в PDF: 4 эффективных способа
Содержание
- Преимущества преобразования CSV в PDF
- Метод 1. Использование Microsoft Excel
- Метод 2. Использование Google Sheets
- Метод 3. Использование онлайн-конвертера
- Метод 4. Автоматизация с помощью Python
- Когда использовать ручные и автоматизированные методы
- Лучшие практики
- Заключение
- Часто задаваемые вопросы
Установить с помощью Pypi
pip install spire.xls
Похожие ссылки
Файлы CSV (значения, разделенные запятыми) — популярный формат для хранения и обмена данными. Их простота и удобство использования делают их идеальными для хранения данных, но им не хватает возможностей форматирования более совершенных форматов, таких как PDF. Преобразование файлов CSV в PDF — это обычное требование для создания профессиональных отчетов или для печати больших наборов данных в единообразном, удобном для чтения формате.
В этой статье мы рассмотрим четыре эффективных способа преобразования CSV в PDF, как ручные, так и автоматизированные, которые подойдут самым разным пользователям — от тех, у кого мало технических знаний, до более продвинутых пользователей, ищущих автоматизированное решение.
- Метод 1. Использование Microsoft Excel
- Метод 2. Использование Google Sheets
- Метод 3. Использование онлайн-конвертера
- Метод 4. Автоматизация с помощью Python
Преимущества преобразования CSV в PDF
Преобразование CSV в PDF дает несколько преимуществ:
- Профессиональное представление: PDF-файлы обеспечивают аккуратное и структурированное представление данных, что больше подходит для отчетов, презентаций или обмена с клиентами.
- Безопасность: в отличие от файлов CSV, PDF-файлы могут быть защищены паролем, что обеспечивает целостность ваших данных и предотвращает несанкционированное редактирование.
- Универсальная доступность: PDF-файлы являются общепринятым форматом, который можно легко открыть практически на любом устройстве, что делает их идеальными для обмена.
Теперь давайте рассмотрим четыре эффективных способа преобразования файлов CSV в PDF.
Метод 1: Использование Microsoft Excel
Для большинства пользователей Microsoft Excel — один из самых простых инструментов для преобразования файлов CSV в PDF. С помощью нескольких простых шагов вы можете открыть данные CSV, отформатировать их и сохранить в формате PDF.
Шаги:
- Откройте файл CSV в Excel, дважды щелкнув его или открыв Excel и выбрав Файл > Открыть .
- После открытия файла CSV вы можете настроить форматирование по мере необходимости (например, изменить ширину столбцов, настроить выравнивание, применить границы ячеек).
- Перейдите в Файл > Сохранить как .
- В раскрывающемся списке « Тип файла " выберите PDF .
- Выберите местоположение и нажмите Сохранить .
Плюсы:
- Просто и интуитивно понятно для пользователей, знакомых с Excel.
- Возможности настройки, такие как изменение ширины столбцов, добавление цвета или даже включение графиков для лучшего представления.
Минусы:
- Требуется Excel, который не является бесплатным.
- Может быть не идеальным для больших файлов CSV с тысячами строк.
Метод 2: Использование Google Sheets
Google Sheets — это бесплатный облачный инструмент для работы с электронными таблицами, который работает аналогично Excel. Он доступен с любого устройства с подключением к Интернету и может легко выполнять преобразование CSV в PDF.
Шаги:
- Загрузите свой CSV-файл на Google Диск.
- Откройте файл с помощью Google Sheets.
- Отформатируйте данные по своему вкусу, например, изменив ширину столбцов и добавив границы или цвета.
- Перейдите в Файл > Скачать > Документ PDF .
- В настройках экспорта PDF выберите предпочтения макета и размера страницы, затем нажмите Экспорт .
Плюсы:
- Бесплатно и доступно из любого места.
- Не требуется установка программного обеспечения — только учетная запись Google.
Минусы:
- Ограниченные возможности настройки по сравнению с Excel.
- Требуется подключение к Интернету.
Метод 3: Использование онлайн-конвертера
Для быстрого и простого решения идеально подходят онлайн-конвертеры. Существуют различные веб-сайты, которые позволяют загрузить файл CSV и скачать его в формате PDF за считанные минуты. Веб-сайты, такие как CloudConvert, упрощают преобразование файлов без установки какого-либо программного обеспечения.
Шаги:
- Перейдите в онлайн-конвертер, например CloudConvert.
- Загрузите свой CSV-файл на веб-сайт.
- Нажмите кнопку Конвертировать, и после завершения преобразования загрузите полученный PDF-файл.
Плюсы:
- Быстро и удобно — не нужно ничего устанавливать.
- Идеально подходит для пользователей, которым требуется одноразовое или периодическое преобразование.
Минусы:
- Ограниченные возможности настройки — что видишь, то и получаешь.
- Проблемы с конфиденциальностью при загрузке конфиденциальных данных на сторонние веб-сайты.
Метод 4: Автоматизация с помощью Python (с Spire.XLS for Python)
Для пользователей, которым требуется более автоматизированное и настраиваемое решение, Python является мощным инструментом, который может выполнять преобразование файлов CSV в PDF с большей гибкостью. Spire.XLS for Python — это библиотека, которая может с легкостью автоматизировать этот процесс.
Шаги:
- Установите Spire.XLS for Python с помощью следующей команды:
- Напишите скрипт на Python для чтения данных CSV, их форматирования и преобразования в PDF.
- Запустите скрипт, и CSV-файл будет преобразован в PDF, готовый для совместного использования или печати.
pip install spire.xls
Вот пример скрипта:
from spire.xls import *
from spire.xls.common import *

# Create a Workbook object
workbook = Workbook()

# Load a CSV file into the workbook (starting at cell A1)
workbook.LoadFromFile("C:/Users/Administrator/Desktop/csv_data.csv", ",", 1, 1)

# Set conversion settings to adjust sheet layout
workbook.ConverterSetting.SheetFitToPageRetainPaperSize = True  # Retain paper size during conversion
workbook.ConverterSetting.SheetFitToWidth = True  # Fit sheet to width during conversion

# Get the first worksheet from the workbook
sheet = workbook.Worksheets[0]

# Set paper size to A4
sheet.PageSetup.PaperSize = PaperSizeType.PaperA4

# Set uniform margins for the sheet
sheet.PageSetup.LeftMargin = 0.5
sheet.PageSetup.RightMargin = 0.5
sheet.PageSetup.TopMargin = 0.5
sheet.PageSetup.BottomMargin = 0.5

# Enable printing of gridlines
sheet.PageSetup.IsPrintGridlines = True

# Autofit all columns in the worksheet (optimizing column width)
for i in range(1, sheet.Columns.Length + 1):
    sheet.AutoFitColumn(i)

# Set a default row height for all rows
sheet.DefaultRowHeight = 18

# Save the worksheet as a PDF
sheet.SaveToPdf("CSVToPDF.pdf")
workbook.Dispose()
Вывод:
Плюсы:
- Полный контроль над макетом и форматированием PDF.
- Идеально подходит для автоматизации или обработки большого количества файлов CSV.
- Позволяет создавать настраиваемые отчеты или изменять дизайн ваших PDF-файйлов.
Минусы:
- Требуются базовые знания в области программирования.
- Требуется настройка среды Python и Spire.XLS for Python.
Вот полное руководство по преобразованию CSV в PDF на Python.
Когда использовать ручные и автоматизированные методы
Выбор между ручными и автоматизированными методами зависит от ваших потребностей:
- Ручные методы (Excel, Google Sheets и онлайн-конвертеры) идеально подходят для одноразовых или мелкомасштабных преобразований, где приоритетами являются скорость и простота использования.
- Автоматизированные методы (Python с Spire.XLS for Python) лучше подходят для повторяющихся задач, больших наборов данных или когда вам требуется специальное форматирование, которое не могут предоставить ручные инструменты.
Лучшие практики форматирования данных CSV перед преобразованием
Чтобы ваш CSV-файл хорошо выглядел в формате PDF, вот несколько лучших практик:
- Организуйте свои данные: удалите ненужные строки и столбцы и убедитесь, что данные согласованы.
- Отрегулируйте ширину столбцов: убедитесь, что столбцы достаточно широки, чтобы избежать усечения текста.
- Выровняйте текст для удобства чтения: обеспечьте правильное выравнивание текста в каждом столбце, что гарантирует, что преобразованный PDF-файл будет выглядеть аккуратно и структурированно.
- Добавьте верхние и нижние колонтитулы: включите содержательные заголовки для описания столбцов и нижние колонтитулы для дополнительной информации, такой как номер страницы или заголовок документа.
Заключение
Преобразование файлов CSV в PDF можно выполнить несколькими способами: от простых ручных методов, таких как использование Excel и Google Sheets, до более автоматизированных решений, таких как написание сценариев на Python с помощью Spire.XLS for Python. Каждый метод предлагает определенные преимущества в зависимости от ваших потребностей — работаете ли вы над разовым проектом или ищете долгосрочное автоматизированное решение.
Если вы ищете простоту и удобство, Excel или Google Sheets могут быть вашим лучшим выбором. Однако для автоматизированных, повторяемых преобразований или обработки больших наборов данных Python предлагает большую гибкость и контроль. Выберите метод, который лучше всего подходит для вашего проекта, и начните преобразовывать данные CSV в безупречный профессиональный PDF-файл уже сегодня!
Часто задаваемые вопросы
В1. Какой лучший метод для преобразования файла CSV в PDF?
Лучший метод зависит от ваших потребностей: Excel и Google Sheets отлично подходят для ручного преобразования, в то время как автоматизация на Python предлагает больше контроля для крупномасштабных или повторяющихся задач.
В2. Можно ли настроить макет страницы для данных CSV при преобразовании в PDF?
Да, Excel и Google Sheets предлагают настройки макета, такие как разрывы страниц и изменение ширины столбцов. Python позволяет более расширенно управлять размером страницы, шрифтами и стилями таблиц.
В3. Могу ли я одновременно пакетно преобразовать несколько файлов CSV в PDF?
Да, написание сценариев на Python позволяет выполнять пакетное преобразование нескольких файлов CSV в PDF, что делает его идеальным для автоматизации крупномасштабных преобразований.
В4. Могу ли я преобразовать CSV в PDF без установки какого-либо программного обеспечения?
Да, онлайн-конвертеры позволяют преобразовывать CSV в PDF без установки какого-либо программного обеспечения. Однако для лучшей настройки и контроля предпочтительны автономные методы, такие как Excel или Python.
Смотрите также
Convert CSV to PDF: 4 Efficient Methods
Table of Contents
Install with Pypi
pip install spire.xls
Related Links
CSV (Comma-Separated Values) files are a popular format for storing and sharing data. Their simplicity and ease of use make them ideal for data storage, but they lack the formatting options of more polished formats like PDF. Converting CSV files to PDF is a common requirement for creating professional reports or for printing large sets of data in a consistent, easy-to-read format.
In this article, we’ll explore four efficient ways to convert CSV to PDF, both manual and automated methods, that will cater to a variety of users—from those with little technical knowledge to more advanced users looking for an automated solution.
- Method 1. Using Microsoft Excel
- Method 2. Using Google Sheets
- Method 3. Using an Online Converter
- Method 4. Using Python Automation
Benefits of Converting CSV to PDF
Converting CSV to PDF offers several benefits:
- Professional Presentation : PDFs allow for a neat and structured presentation of data, which is more suitable for reports, presentations, or sharing with clients.
- Security : Unlike CSV files, PDFs can be password-protected, ensuring the integrity of your data and preventing unauthorized edits.
- Universal Accessibility : PDFs are a universally accepted format that can be easily opened on almost any device, making them ideal for sharing.
Now let’s dive into the four efficient ways to convert CSV files into a PDF.
Method 1: Using Microsoft Excel
For most users, Microsoft Excel is one of the easiest tools to use for converting CSV files to PDF. With a few simple steps, you can open your CSV data, format it, and save it as a PDF.
Steps:
- Open the CSV file in Excel by double-clicking it or opening Excel and selecting File > Open .
- Once the CSV file is opened, you can adjust the formatting as needed (e.g., change column widths, adjust alignments, apply cell borders).
- Go to File > Save As .
- In the “ Save as type " dropdown, select PDF .
- Choose a location and click Save .
Pros:
- Simple and intuitive for users familiar with Excel.
- Customization options like adjusting column widths, adding color, or even including graphs for better presentation.
Cons:
- Requires Excel, which is not free.
- May not be ideal for large CSV files with thousands of rows.
Method 2: Using Google Sheets
Google Sheets is a free, cloud-based spreadsheet tool that works similarly to Excel. It’s accessible from any device with an internet connection and can handle CSV to PDF conversions easily.
Steps:
- Upload your CSV file to Google Drive.
- Open the file with Google Sheets.
- Format the data to your liking, such as adjusting column widths and adding borders or colors.
- Go to File > Download > PDF Document .
- In the PDF export settings, select the layout and page size preferences, then click Export .
Pros:
- Free and accessible from anywhere.
- No software installation required—just a Google account.
Cons:
- Limited customization compared to Excel.
- Requires an internet connection.
Method 3: Using an Online Converter
For a quick, no-fuss solution, online converters are ideal. There are various websites that allow you to upload your CSV file and download it as a PDF in minutes. Websites like CloudConvert make it simple to convert files without installing any software.
Steps:
- Go to an online converter like CloudConvert.
- Upload your CSV file to the website.
- Click the Convert button, and once the conversion is complete, download the resulting PDF.
Pros:
- Fast and convenient—no need to install anything.
- Perfect for users who only need a one-time or occasional conversion.
Cons:
- Limited customization options—what you see is what you get.
- Privacy concerns when uploading sensitive data to third-party websites.
Method 4: Using Python Automation (with Spire.XLS for Python)
For users who require a more automated and customizable solution, Python is a powerful tool that can handle the conversion of CSV files to PDF with more flexibility. Spire.XLS for Python is a library that can help automate this process with ease.
Steps:
- Install Spire.XLS for Python using the following command:
- Write a Python script to read the CSV data, format it, and convert it into a PDF.
- Run the script, and the CSV file will be converted into a PDF, ready for sharing or printing.
pip install spire.xls
Here’s an example script:
from spire.xls import *
from spire.xls.common import *

# Create a Workbook object
workbook = Workbook()

# Load a CSV file into the workbook (starting at cell A1)
workbook.LoadFromFile("C:/Users/Administrator/Desktop/csv_data.csv", ",", 1, 1)

# Set conversion settings to adjust sheet layout
workbook.ConverterSetting.SheetFitToPageRetainPaperSize = True  # Retain paper size during conversion
workbook.ConverterSetting.SheetFitToWidth = True  # Fit sheet to width during conversion

# Get the first worksheet from the workbook
sheet = workbook.Worksheets[0]

# Set paper size to A4
sheet.PageSetup.PaperSize = PaperSizeType.PaperA4

# Set uniform margins for the sheet
sheet.PageSetup.LeftMargin = 0.5
sheet.PageSetup.RightMargin = 0.5
sheet.PageSetup.TopMargin = 0.5
sheet.PageSetup.BottomMargin = 0.5

# Enable printing of gridlines
sheet.PageSetup.IsPrintGridlines = True

# Autofit all columns in the worksheet (optimizing column width)
for i in range(1, sheet.Columns.Length + 1):
    sheet.AutoFitColumn(i)

# Set a default row height for all rows
sheet.DefaultRowHeight = 18

# Save the worksheet as a PDF
sheet.SaveToPdf("CSVToPDF.pdf")
workbook.Dispose()
Output:
Pros:
- Full control over the PDF layout and formatting.
- Ideal for automation or processing large numbers of CSV files.
- Allows you to generate custom reports or tweak the design of your PDFs.
Cons:
- Requires basic programming knowledge.
- Requires setting up the Python environment and Spire.XLS for Python.
Here is the full guide on converting CSV to PDF in Python.
When to Use Manual vs. Automated Methods
Choosing between manual and automated methods depends on your needs:
- Manual Methods (Excel, Google Sheets, and online converters) are perfect for one-off or small-scale conversions where speed and ease of use are priorities.
- Automated Methods (Python with Spire.XLS for Python) are better for repetitive tasks, large datasets, or when you need custom formatting that manual tools can't provide.
Best Practices for Formatting CSV Data Before Conversion
To ensure your CSV file looks good in PDF format, here are a few best practices:
- Organize Your Data : Remove unnecessary rows and columns, and ensure that data is consistent.
- Adjust Column Widths : Make sure the columns are wide enough to avoid truncating text.
- Align Text for Readability : Ensure proper alignment of text within each column, which ensures that the converted PDF will look neat and structured.
- Add Headers and Footers : Include meaningful headers to describe the columns and footers for additional information, such as the page number or document title.
Conclusion
Converting CSV files to PDF can be done in several ways, from simple, manual methods like using Excel and Google Sheets tomore automated solutions like Python scripting with Spire.XLS for Python. Each method offers distinct advantages depending on your needs—whether you’re working on a one-time project or looking for a long-term, automated solution.
If you’re looking for simplicity and convenience, Excel or Google Sheets might be your best bet. However, for automated, repeatable conversions or handling large datasets, Python offers great flexibility and control. Choose the method that works best for your project and start converting your CSV data into a polished, professional PDF today!
FAQs
Q1. What is the best method to convert a CSV file to a PDF?
The best method depends on your needs: Excel and Google Sheets are great for manual conversion, while Python automation offers more control for large-scale or recurring tasks.
Q2. Is it possible to adjust the page layout for CSV data when converting to PDF?
Yes, Excel and Google Sheets offer layout adjustments like page breaks and column width changes. Python allows more advanced control over page size, fonts, and table styles.
Q3. Can I batch convert multiple CSV files to PDFs at once?
Yes, Python scripting allows batch conversion of multiple CSV files into PDFs, making it ideal for automating large-scale conversions.
Q4. Can I convert CSV to PDF without installing any software?
Yes, online converters allow for CSV to PDF conversion without installing any software. However, for better customization and control, offline methods like Excel or Python are preferred.
See Also
Modi semplici per eliminare l'intestazione nei documenti di Word
Indice
Installa con Nuget
PM> Install-Package Spire.Doc
Link Correlati
A volte le intestazioni nei documenti di Word possono essere più fastidiose che utili, specialmente quando si modifica un report, un modello o un documento non creato da soli. Le intestazioni extra potrebbero ripetersi su ogni pagina, rovinare il layout o mostrare testo obsoleto che non si desidera più. Se stai cercando di eliminare le intestazioni nei documenti di Word, rimuoverle completamente o eliminare un'intestazione da una singola pagina, questa guida ti illustra ogni opzione passo dopo passo. Imparerai sia metodi manuali rapidi che un modo semplice per gestirlo automaticamente usando il codice.
- Elimina tutte le intestazioni in Word
- Elimina intestazione da una singola pagina
- Rimuovi intestazioni da più documenti Word con C#
- La conclusione
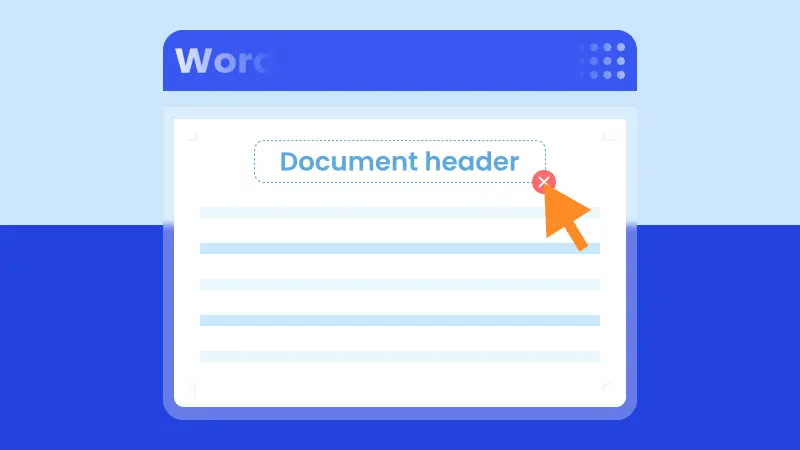
Elimina tutte le intestazioni nei documenti di Word
Quando desideri un documento pulito senza intestazioni, rimuoverle tutte in una volta è la soluzione più semplice. In Word, le intestazioni sono collegate tra le pagine per impostazione predefinita, quindi l'eliminazione di un'intestazione su una pagina spesso la rimuove dall'intero documento. In questa sezione, ci concentreremo su come rimuovere tutte le intestazioni nei documenti di Word in modo rapido e sicuro, in modo che il tuo file abbia esattamente l'aspetto che desideri prima di iniziare a modificare il contenuto.
Passaggi per eliminare tutte le intestazioni nei documenti di Word:
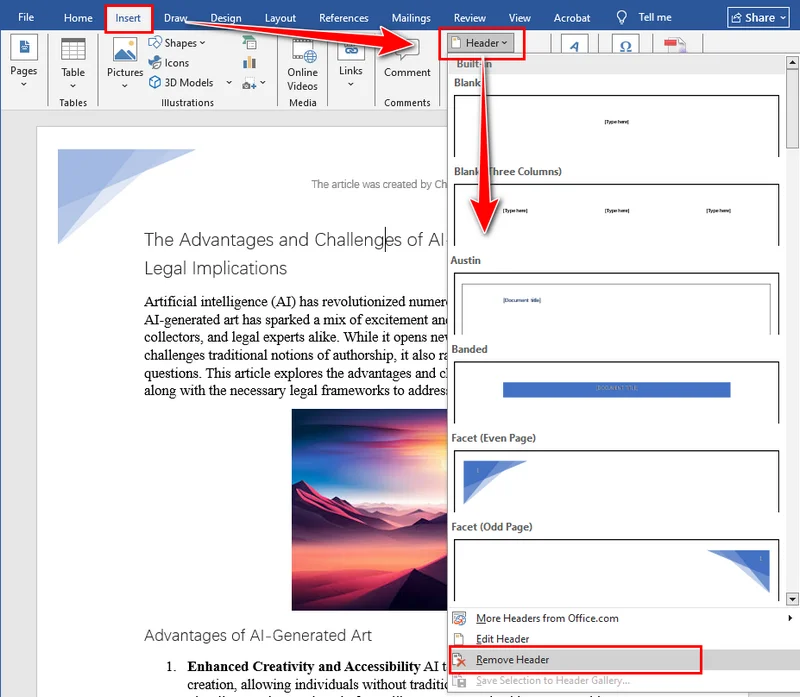
Apri il tuo documento Word, vai alla scheda Inserisci e fai clic su Intestazione. Nel menu a discesa, scorri fino in fondo e seleziona Rimuovi intestazione. Word eliminerà istantaneamente tutte le intestazioni dal tuo documento.
Ecco un'illustrazione che mostra dove trovare l'opzione Rimuovi intestazione in Word:
Elimina intestazione da una singola pagina
Naturalmente, potresti non voler sempre rimuovere ogni intestazione dal tuo documento. A volte, è sufficiente eliminare l'intestazione da una singola pagina, ad esempio rimuovendola dalla prima pagina di un report, da una pagina del titolo o da una sezione specifica che non dovrebbe mostrare alcuna intestazione. Word collega le intestazioni tra le sezioni per impostazione predefinita, quindi eliminarne una potrebbe influire sulle altre se non si presta attenzione. Nella parte successiva, vedremo come rimuovere un'intestazione da una pagina in Word senza modificare il resto del documento.
Rimuovi intestazione dalla prima pagina in Word
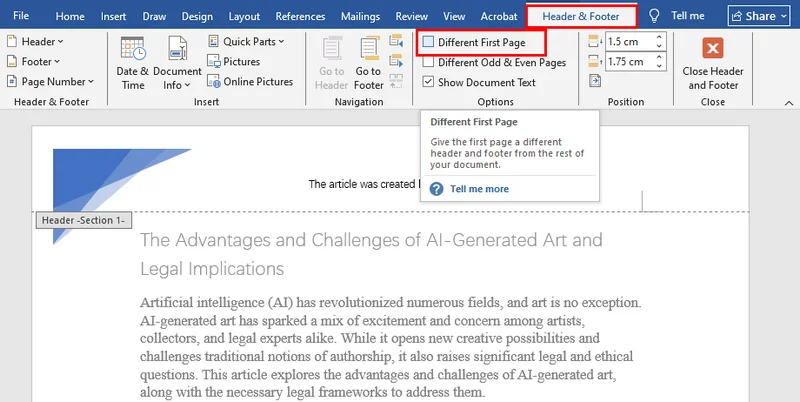
Se desideri rimuovere l'intestazione solo dalla prima pagina, ad esempio una pagina del titolo o di copertina, segui questi passaggi:
- Fai doppio clic sull'area dell'intestazione nella prima pagina per aprire la scheda Intestazione e piè di pagina.
- Nella scheda Intestazione e piè di pagina, seleziona la casella per Diversi per la prima pagina.
- Elimina il contenuto dell'intestazione nella prima pagina.
Elimina l'intestazione da qualsiasi singola pagina in Word
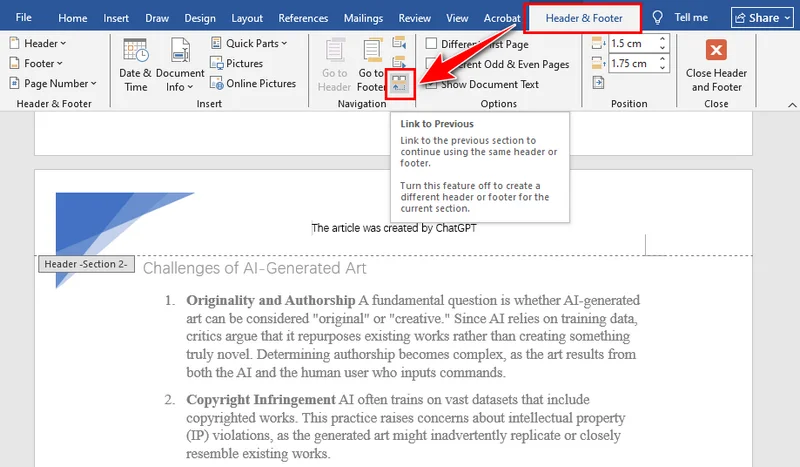
Per rimuovere l'intestazione da una pagina specifica (non la prima), dovrai creare un'interruzione di sezione in modo che l'intestazione possa essere modificata separatamente:
- Fai doppio clic sull'area dell'intestazione nella pagina che desideri modificare.
- Nella scheda Intestazione e piè di pagina, fai clic su Collega a precedente per disattivare il collegamento all'intestazione della pagina precedente.
- Elimina il contenuto dell'intestazione in questa pagina.
- (Facoltativo) Aggiungi una nuova intestazione per questa pagina o per le pagine successive.
Rimuovi intestazioni da più documenti Word con C#
L'eliminazione manuale delle intestazioni da più documenti di Word può richiedere molto tempo, specialmente quando si lavora con report, modelli o file in blocco. L'uso di C# per rimuovere le intestazioni dai file di Word non solo consente di risparmiare tempo, ma garantisce anche la coerenza tra tutti i documenti. Con Spire.Doc, puoi eliminare rapidamente tutte le intestazioni, incluse la prima pagina, le pagine dispari e le pagine pari, senza aprire Word manualmente. Questo metodo è ideale per l'elaborazione in batch o per situazioni in cui è necessario un modo rapido e affidabile per ripulire le intestazioni su più documenti.
L'installazione di Spire.Doc è semplice. Puoi scaricarlo dal sito Web ufficiale ed eseguire un'installazione personalizzata, oppure semplicemente cercare Spire.Doc in NuGet e aggiungerlo direttamente al tuo progetto. Entrambi i metodi facilitano un avvio rapido senza configurazioni complicate.
Passaggi per rimuovere le intestazioni nei documenti di Word con C#:
- Crea un'istanza di Document e carica un file Word.
- Accedi alla sezione tramite Document.Sections[].
- Ottieni le intestazioni per la prima pagina, le pagine dispari e pari usando Section.HeadersFooters[HeaderFooterType hfType].
- Elimina le intestazioni chiamando HeaderFooter.ChildObjects.Clear().
- Salva il documento usando Document.SaveToFile().
Ecco l'esempio di codice completo:
using Spire.Doc;
using Spire.Doc.Documents;

namespace RemoveHeader
{
    class Program
    {
        static void Main(string[] args)
        {
            //Create a Document instance
            Document doc = new Document();

            //Load a Word document
            doc.LoadFromFile("HeaderFooter.docx");

            //Get the first section
            Section section = doc.Sections[0];

            //Iterate through all paragraphs in the section
            foreach (Paragraph para in section.Paragraphs)
            {
                //Iterate through all child objects in each paragraph
                foreach (DocumentObject obj in para.ChildObjects)
                {
                    //Delete header in the first page
                    HeaderFooter header;
                    header = section.HeadersFooters[HeaderFooterType.HeaderFirstPage];
                    if (header != null)
                        header.ChildObjects.Clear();

                    //Delete headers in the odd pages
                    header = section.HeadersFooters[HeaderFooterType.HeaderOdd];
                    if (header != null)
                        header.ChildObjects.Clear();

                    //Delete headers in the even pages
                    header = section.HeadersFooters[HeaderFooterType.HeaderEven];
                    if (header != null)
                        header.ChildObjects.Clear();
                }
            }

            //Save the result document
            doc.SaveToFile("RemoveHeader.docx", FileFormat.Docx);
        }
    }
}
La conclusione
Questo articolo si concentra su come eliminare le intestazioni nei documenti di Word. Sia che tu voglia rimuovere tutte le intestazioni o solo l'intestazione di una singola pagina, in questa guida troverai istruzioni dettagliate passo dopo passo. Per un numero limitato di file, Microsoft Word è sufficiente, ma se devi gestire più documenti, è altamente consigliato l'uso di Spire.Doc per la rimozione automatizzata. Gli utenti interessati possono anche provare una prova gratuita di 30 giorni per esplorare più funzionalità.
LEGGI ANCHE
Maneiras simples de remover o cabeçalho em documentos do Word
Índice
Instalar com o Nuget
PM> Install-Package Spire.Doc
Links Relacionados
Às vezes, os cabeçalhos em documentos do Word podem ser mais irritantes do que úteis — especialmente quando você está editando um relatório, modelo ou documento que não criou. Cabeçalhos extras podem se repetir em todas as páginas, bagunçar seu layout ou mostrar texto desatualizado que você não quer mais. Se você está procurando eliminar cabeçalhos em documentos do Word, removê-los completamente ou excluir um cabeçalho de uma única página, este guia o orienta em cada opção passo a passo. Você aprenderá tanto métodos manuais rápidos quanto uma maneira simples de lidar com isso automaticamente usando código.
- Eliminar Todos os Cabeçalhos no Word
- Excluir Cabeçalho de uma Única Página
- Remover Cabeçalhos de Vários Documentos do Word com C#
- A Conclusão
Eliminar Todos os Cabeçalhos em Documentos do Word
Quando você quer um documento limpo sem cabeçalhos, removê-los todos de uma vez é a solução mais simples. No Word, os cabeçalhos são conectados entre as páginas por padrão, então excluir um cabeçalho em uma página geralmente o remove de todo o documento. Nesta seção, vamos nos concentrar em como remover todos os cabeçalhos em documentos do Word de forma rápida e segura, para que seu arquivo fique exatamente como você deseja antes de começar a editar o conteúdo.
Passos para excluir todos os cabeçalhos em documentos do Word:
Abra seu documento do Word, vá para a guia Inserir e clique em Cabeçalho. No menu suspenso, role até o final e selecione Remover Cabeçalho. O Word excluirá instantaneamente todos os cabeçalhos do seu documento.
Aqui está uma ilustração mostrando onde encontrar a opção Remover Cabeçalho no Word:
Excluir Cabeçalho de uma Única Página
Claro, você pode nem sempre querer remover todos os cabeçalhos do seu documento. Às vezes, você só precisa excluir o cabeçalho de uma única página — por exemplo, removê-lo da primeira página de um relatório, de uma página de rosto ou de uma seção específica que não deve mostrar nenhum cabeçalho. O Word vincula os cabeçalhos entre as seções por padrão, então excluir um pode afetar outros se você não for cuidadoso. Na próxima parte, veremos como remover um cabeçalho de uma página no Word sem alterar o resto do seu documento.
Remover Cabeçalho da Primeira Página no Word
Se você deseja remover o cabeçalho apenas da primeira página — por exemplo, uma página de rosto ou capa — siga estes passos:
- Clique duas vezes na área do cabeçalho na primeira página para abrir a guia Cabeçalho e Rodapé.
- Na guia Cabeçalho e Rodapé, marque a caixa para Primeira Página Diferente.
- Exclua o conteúdo do cabeçalho na primeira página.
Excluir o Cabeçalho de Qualquer Página Única no Word
Para remover o cabeçalho de uma página específica (não a primeira), você precisará criar uma quebra de seção para que o cabeçalho possa ser editado separadamente:
- Clique duas vezes na área do cabeçalho na página que você deseja editar.
- Na guia Cabeçalho e Rodapé, clique em Vincular ao Anterior para desativar o vínculo com o cabeçalho da página anterior.
- Exclua o conteúdo do cabeçalho nesta página.
- (Opcional) Adicione um novo cabeçalho para esta página ou para as páginas seguintes.
Remover Cabeçalhos de Vários Documentos do Word com C#
Excluir manualmente cabeçalhos de vários documentos do Word pode ser demorado, especialmente quando você está trabalhando com relatórios, modelos ou arquivos em massa. Usar C# para remover cabeçalhos de arquivos do Word não apenas economiza tempo, mas também garante consistência em todos os documentos. Com o Spire.Doc, você pode eliminar rapidamente todos os cabeçalhos — incluindo primeira página, páginas ímpares e páginas pares — sem abrir o Word manualmente. Este método é ideal para processamento em lote ou situações em que você precisa de uma maneira rápida e confiável de limpar cabeçalhos em vários documentos.
A instalação do Spire.Doc é simples. Você pode baixá-lo do site oficial e realizar uma instalação personalizada, ou simplesmente procurar por Spire.Doc no NuGet e adicioná-lo diretamente ao seu projeto. Ambos os métodos facilitam o início rápido, sem configuração complicada.
Passos para remover cabeçalhos em documentos do Word com C#:
- Crie uma instância de Document e carregue um arquivo do Word.
- Acesse a seção via Document.Sections[].
- Obtenha cabeçalhos para a primeira página, páginas ímpares e pares usando Section.HeadersFooters[HeaderFooterType hfType].
- Exclua os cabeçalhos chamando HeaderFooter.ChildObjects.Clear().
- Salve o documento usando Document.SaveToFile().
Aqui está o exemplo de código completo:
using Spire.Doc;
using Spire.Doc.Documents;

namespace RemoveHeader
{
    class Program
    {
        static void Main(string[] args)
        {
            //Create a Document instance
            Document doc = new Document();

            //Load a Word document
            doc.LoadFromFile("HeaderFooter.docx");

            //Get the first section
            Section section = doc.Sections[0];

            //Iterate through all paragraphs in the section
            foreach (Paragraph para in section.Paragraphs)
            {
                //Iterate through all child objects in each paragraph
                foreach (DocumentObject obj in para.ChildObjects)
                {
                    //Delete header in the first page
                    HeaderFooter header;
                    header = section.HeadersFooters[HeaderFooterType.HeaderFirstPage];
                    if (header != null)
                        header.ChildObjects.Clear();

                    //Delete headers in the odd pages
                    header = section.HeadersFooters[HeaderFooterType.HeaderOdd];
                    if (header != null)
                        header.ChildObjects.Clear();

                    //Delete headers in the even pages
                    header = section.HeadersFooters[HeaderFooterType.HeaderEven];
                    if (header != null)
                        header.ChildObjects.Clear();
                }
            }

            //Save the result document
            doc.SaveToFile("RemoveHeader.docx", FileFormat.Docx);
        }
    }
}
A Conclusão
Este artigo foca em como eliminar cabeçalhos em documentos do Word. Se você deseja remover todos os cabeçalhos ou apenas o cabeçalho de uma única página, encontrará instruções detalhadas passo a passo neste guia. Para um pequeno número de arquivos, o Microsoft Word é suficiente, mas se você precisar lidar com vários documentos, é altamente recomendável usar o Spire.Doc para remoção automatizada. Os usuários interessados também podem experimentar uma avaliação gratuita de 30 dias para explorar mais recursos.
LEIA TAMBÉM
Word 문서에서 머리글을 제거하는 간단한 방법
Nuget으로 설치
PM> Install-Package Spire.Doc
관련 링크
때로는 Word 문서의 머리글이 도움이 되기보다는 성가실 수 있습니다. 특히 직접 만들지 않은 보고서, 템플릿 또는 문서를 편집할 때 더욱 그렇습니다. 추가 머리글이 모든 페이지에 반복되거나, 레이아웃을 망가뜨리거나, 더 이상 원하지 않는 오래된 텍스트를 표시할 수 있습니다. Word 문서에서 머리글을 제거하거나, 완전히 제거하거나, 단일 페이지에서 머리글을 삭제하려는 경우 이 가이드에서 각 옵션을 단계별로 안내합니다. 빠른 수동 방법과 코드를 사용하여 자동으로 처리하는 간단한 방법을 모두 배우게 됩니다.
Word 문서의 모든 머리글 제거
머리글이 없는 깔끔한 문서를 원할 때 한 번에 모두 제거하는 것이 가장 간단한 해결책입니다. Word에서는 기본적으로 머리글이 페이지 간에 연결되어 있으므로 한 페이지에서 머리글을 삭제하면 종종 전체 문서에서 제거됩니다. 이 섹션에서는 Word 문서의 모든 머리글을 빠르고 안전하게 제거하여 콘텐츠 편집을 시작하기 전에 파일이 원하는 대로 정확하게 보이도록 하는 방법에 중점을 둘 것입니다.
Word 문서의 모든 머리글을 삭제하는 단계:
Word 문서를 열고 삽입 탭으로 이동한 다음 머리글을 클릭합니다. 드롭다운 메뉴에서 아래로 스크롤하여 머리글 제거를 선택합니다. Word는 문서에서 모든 머리글을 즉시 삭제합니다.
다음은 Word에서 머리글 제거 옵션을 찾을 수 있는 위치를 보여주는 그림입니다.
단일 페이지에서 머리글 삭제
물론 항상 문서에서 모든 머리글을 제거하고 싶지는 않을 수 있습니다. 때로는 단일 페이지에서만 머리글을 삭제해야 할 때가 있습니다. 예를 들어 보고서의 첫 페이지, 제목 페이지 또는 머리글이 표시되어서는 안 되는 특정 섹션에서 제거하는 경우입니다. Word는 기본적으로 섹션 간에 머리글을 연결하므로 조심하지 않으면 하나를 삭제하면 다른 머리글에 영향을 줄 수 있습니다. 다음 부분에서는 문서의 나머지 부분을 변경하지 않고 Word의 한 페이지에서 머리글을 제거하는 방법을 살펴보겠습니다.
Word의 첫 페이지에서 머리글 제거
첫 페이지(예: 제목 또는 표지)에서만 머리글을 제거하려면 다음 단계를 따르십시오.
- 첫 페이지의 머리글 영역을 두 번 클릭하여 머리글 및 바닥글 탭을 엽니다.
- 머리글 및 바닥글 탭에서 첫 페이지를 다르게 지정 확인란을 선택합니다.
- 첫 페이지의 머리글 내용을 삭제합니다.
Word의 단일 페이지에서 머리글 삭제
특정 페이지(첫 페이지가 아님)에서 머리글을 제거하려면 머리글을 별도로 편집할 수 있도록 구역 나누기를 만들어야 합니다.
- 편집하려는 페이지의 머리글 영역을 두 번 클릭합니다.
- 머리글 및 바닥글 탭에서 이전 머리글에 연결을 클릭하여 이전 페이지의 머리글과의 연결을 끕니다.
- 이 페이지의 머리글 내용을 삭제합니다.
- (선택 사항) 이 페이지 또는 다음 페이지에 새 머리글을 추가합니다.
C#으로 여러 Word 문서의 머리글 제거
여러 Word 문서에서 수동으로 머리글을 삭제하는 것은 시간이 많이 걸릴 수 있으며, 특히 보고서, 템플릿 또는 대량 파일로 작업할 때 더욱 그렇습니다. C#을 사용하여 Word 파일에서 머리글을 제거하면 시간을 절약할 수 있을 뿐만 아니라 모든 문서에서 일관성을 보장할 수 있습니다. Spire.Doc을 사용하면 Word를 수동으로 열지 않고도 첫 페이지, 홀수 페이지, 짝수 페이지를 포함한 모든 머리글을 빠르게 제거할 수 있습니다. 이 방법은 일괄 처리 또는 여러 문서에서 머리글을 빠르고 안정적으로 정리해야 하는 상황에 이상적입니다.
Spire.Doc 설치는 간단합니다. 공식 웹사이트에서 다운로드하여 사용자 지정 설치를 수행하거나 NuGet에서 Spire.Doc을 검색하여 프로젝트에 직접 추가할 수 있습니다. 두 방법 모두 복잡한 설정 없이 빠르게 시작할 수 있습니다.
C#으로 Word 문서의 머리글을 제거하는 단계:
- Document 인스턴스를 만들고 Word 파일을 로드합니다.
- Document.Sections[]를 통해 섹션에 액세스합니다.
- Section.HeadersFooters[HeaderFooterType hfType]을 사용하여 첫 페이지, 홀수 페이지 및 짝수 페이지의 머리글을 가져옵니다.
- HeaderFooter.ChildObjects.Clear()를 호출하여 머리글을 삭제합니다.
- Document.SaveToFile()을 사용하여 문서를 저장합니다.
다음은 전체 코드 예제입니다.
using Spire.Doc;
using Spire.Doc.Documents;

namespace RemoveHeader
{
    class Program
    {
        static void Main(string[] args)
        {
            //Create a Document instance
            Document doc = new Document();

            //Load a Word document
            doc.LoadFromFile("HeaderFooter.docx");

            //Get the first section
            Section section = doc.Sections[0];

            //Iterate through all paragraphs in the section
            foreach (Paragraph para in section.Paragraphs)
            {
                //Iterate through all child objects in each paragraph
                foreach (DocumentObject obj in para.ChildObjects)
                {
                    //Delete header in the first page
                    HeaderFooter header;
                    header = section.HeadersFooters[HeaderFooterType.HeaderFirstPage];
                    if (header != null)
                        header.ChildObjects.Clear();

                    //Delete headers in the odd pages
                    header = section.HeadersFooters[HeaderFooterType.HeaderOdd];
                    if (header != null)
                        header.ChildObjects.Clear();

                    //Delete headers in the even pages
                    header = section.HeadersFooters[HeaderFooterType.HeaderEven];
                    if (header != null)
                        header.ChildObjects.Clear();
                }
            }

            //Save the result document
            doc.SaveToFile("RemoveHeader.docx", FileFormat.Docx);
        }
    }
}
결론
이 기사에서는 Word 문서에서 머리글을 제거하는 방법에 중점을 둡니다. 모든 머리글을 제거하든 단일 페이지 머리글만 제거하든 이 가이드에서 자세한 단계별 지침을 찾을 수 있습니다. 소수의 파일의 경우 Microsoft Word로 충분하지만 여러 문서를 처리해야 하는 경우 Spire.Doc을 사용하여 자동 제거하는 것이 좋습니다. 관심 있는 사용자는 30일 무료 평가판을 사용하여 더 많은 기능을 탐색할 수도 있습니다.
함께 읽기
Méthodes simples pour supprimer l'en-tête des documents Word
Table des matières
Installer avec Nuget
PM> Install-Package Spire.Doc
Liens connexes
Parfois, les en-têtes dans les documents Word peuvent être plus gênants qu'utiles, surtout lorsque vous modifiez un rapport, un modèle ou un document que vous n'avez pas créé vous-même. Des en-têtes supplémentaires peuvent se répéter sur chaque page, perturber votre mise en page ou afficher un texte obsolète que vous ne voulez plus. Si vous cherchez à éliminer les en-têtes dans les documents Word, à les supprimer complètement ou à supprimer un en-tête d'une seule page, ce guide vous explique chaque option étape par étape. Vous apprendrez à la fois des méthodes manuelles rapides et une manière simple de le gérer automatiquement en utilisant du code.
- Éliminer tous les en-têtes dans Word
- Supprimer l'en-tête d'une seule page
- Supprimer les en-têtes de plusieurs documents Word avec C#
- La conclusion
Éliminer tous les en-têtes dans les documents Word
Lorsque vous voulez un document propre sans aucun en-tête, les supprimer tous en une seule fois est la solution la plus simple. Dans Word, les en-têtes sont liés entre les pages par défaut, donc supprimer un en-tête sur une page le supprime souvent de tout le document. Dans cette section, nous nous concentrerons sur la manière de supprimer tous les en-têtes dans les documents Word rapidement et en toute sécurité, afin que votre fichier ait exactement l'apparence que vous souhaitez avant de commencer à modifier le contenu.
Étapes pour supprimer tous les en-têtes dans les documents Word :
Ouvrez votre document Word, allez dans l'onglet Insertion, et cliquez sur En-tête. Dans le menu déroulant, faites défiler vers le bas et sélectionnez Supprimer l'en-tête. Word supprimera instantanément tous les en-têtes de votre document.
Voici une illustration montrant où trouver l'option Supprimer l'en-tête dans Word :
Supprimer l'en-tête d'une seule page
Bien sûr, vous ne voudrez peut-être pas toujours supprimer tous les en-têtes de votre document. Parfois, vous avez juste besoin de supprimer l'en-tête d'une seule page — par exemple, le retirer de la première page d'un rapport, d'une page de titre ou d'une section spécifique qui ne devrait afficher aucun en-tête. Word lie les en-têtes entre les sections par défaut, donc en supprimer un pourrait affecter les autres si vous n'êtes pas prudent. Dans la partie suivante, nous verrons comment supprimer un en-tête d'une page dans Word sans modifier le reste de votre document.
Retirer l'en-tête de la première page dans Word
Si vous souhaitez uniquement supprimer l'en-tête de la première page — par exemple, une page de titre ou de couverture — suivez ces étapes :
- Double-cliquez sur la zone de l'en-tête de la première page pour ouvrir l'onglet En-tête & Pied de page.
- Dans l'onglet En-tête & Pied de page, cochez la case Première page différente.
- Supprimez le contenu de l'en-tête de la première page.
Supprimer l'en-tête de n'importe quelle page unique dans Word
Pour supprimer l'en-tête d'une page spécifique (pas la première), vous devrez créer un saut de section pour que l'en-tête puisse être modifié séparément :
- Double-cliquez sur la zone de l'en-tête de la page que vous souhaitez modifier.
- Dans l'onglet En-tête & Pied de page, cliquez sur Lier au précédent pour désactiver le lien avec l'en-tête de la page précédente.
- Supprimez le contenu de l'en-tête de cette page.
- (Facultatif) Ajoutez un nouvel en-tête pour cette page ou les pages suivantes.
Supprimer les en-têtes de plusieurs documents Word avec C#
La suppression manuelle des en-têtes de plusieurs documents Word peut prendre beaucoup de temps, surtout lorsque vous travaillez avec des rapports, des modèles ou des fichiers en vrac. Utiliser C# pour supprimer les en-têtes des fichiers Word non seulement fait gagner du temps mais assure également la cohérence entre tous les documents. Avec Spire.Doc, vous pouvez rapidement éliminer tous les en-têtes — y compris ceux de la première page, des pages impaires et des pages paires — sans ouvrir Word manuellement. Cette méthode est idéale pour le traitement par lots ou les situations où vous avez besoin d'un moyen rapide et fiable de nettoyer les en-têtes de plusieurs documents.
L'installation de Spire.Doc est simple. Vous pouvez le télécharger depuis le site officiel et effectuer une installation personnalisée, ou simplement rechercher Spire.Doc dans NuGet et l'ajouter directement à votre projet. Les deux méthodes permettent de démarrer rapidement sans configuration compliquée.
Étapes pour supprimer les en-têtes dans les documents Word avec C# :
- Créez une instance de Document et chargez un fichier Word.
- Accédez à la section via Document.Sections[].
- Obtenez les en-têtes pour la première page, les pages impaires et les pages paires en utilisant Section.HeadersFooters[HeaderFooterType hfType].
- Supprimez les en-têtes en appelant HeaderFooter.ChildObjects.Clear().
- Enregistrez le document en utilisant Document.SaveToFile().
Voici l'exemple de code complet :
using Spire.Doc;
using Spire.Doc.Documents;

namespace RemoveHeader
{
    class Program
    {
        static void Main(string[] args)
        {
            //Create a Document instance
            Document doc = new Document();

            //Load a Word document
            doc.LoadFromFile("HeaderFooter.docx");

            //Get the first section
            Section section = doc.Sections[0];

            //Iterate through all paragraphs in the section
            foreach (Paragraph para in section.Paragraphs)
            {
                //Iterate through all child objects in each paragraph
                foreach (DocumentObject obj in para.ChildObjects)
                {
                    //Delete header in the first page
                    HeaderFooter header;
                    header = section.HeadersFooters[HeaderFooterType.HeaderFirstPage];
                    if (header != null)
                        header.ChildObjects.Clear();

                    //Delete headers in the odd pages
                    header = section.HeadersFooters[HeaderFooterType.HeaderOdd];
                    if (header != null)
                        header.ChildObjects.Clear();

                    //Delete headers in the even pages
                    header = section.HeadersFooters[HeaderFooterType.HeaderEven];
                    if (header != null)
                        header.ChildObjects.Clear();
                }
            }

            //Save the result document
            doc.SaveToFile("RemoveHeader.docx", FileFormat.Docx);
        }
    }
}
La conclusion
Cet article se concentre sur la manière d'éliminer les en-têtes dans les documents Word. Que vous souhaitiez supprimer tous les en-têtes ou seulement l'en-tête d'une seule page, vous trouverez des instructions détaillées étape par étape dans ce guide. Pour un petit nombre de fichiers, Microsoft Word est suffisant, mais si vous devez traiter plusieurs documents, l'utilisation de Spire.Doc pour une suppression automatisée est fortement recommandée. Les utilisateurs intéressés peuvent également essayer un essai gratuit de 30 jours pour explorer plus de fonctionnalités.
LIRE AUSSI