Чередующиеся строки в Excel — это просто: быстрый способ чередовать цвета строк
Содержание
Установить с помощью Pypi
pip install Spire.XLS
Похожие ссылки
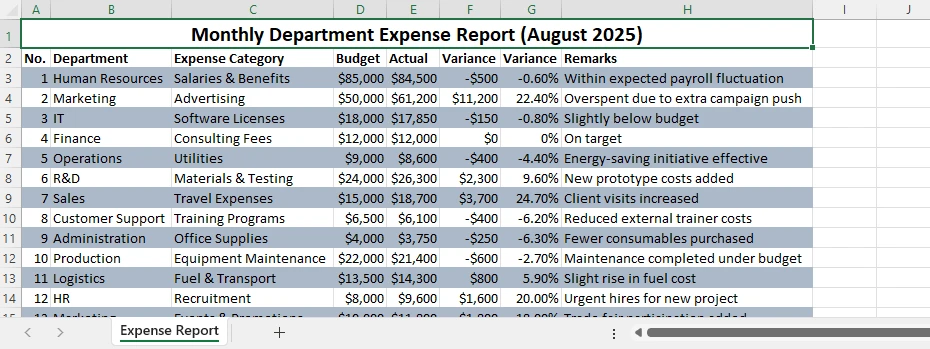
При работе с большими электронными таблицами Excel строки данных могут легко сливаться, что затрудняет точное отслеживание информации. Чередование цветов строк в Excel — часто называемое полосатые строки — предоставляет простой и эффективный способ улучшить читаемость, улучшить визуальную структуру и уменьшить количество ошибок в финансовых отчетах, списках запасов или больших сводках данных.
Excel предлагает несколько быстрых и гибких способов применения чередующихся цветов строк. Вы можете использовать Условное форматирование для точного контроля, Стили таблиц для мгновенных результатов или автоматизировать процесс для нескольких файлов с помощью Python с Spire.XLS for Python. Каждый подход имеет свои преимущества в зависимости от того, как часто вы работаете с данными Excel.
Чередование цветов строк не только облегчает чтение данных, но и помогает поддерживать чистый, профессиональный вид на разных листах. В этом руководстве вы узнаете, как чередовать цвета строк в Excel шаг за шагом — охватывая как встроенные методы, так и автоматизацию на Python для продвинутых пользователей.
Обзор методов
Вы можете изучить каждый метод ниже:
- Чередование цветов строк в Excel с помощью условного форматирования
- Применение встроенных стилей таблиц для окрашивания каждой второй строки
- Автоматизация чередования цветов строк в Excel с помощью Python
- Сравнение методов
Зачем и как чередовать цвета строк в Excel
Чередование цветов строк улучшает читаемость, сравнение данных и профессиональное представление. Этот метод помогает вашим глазам следить за каждой строкой по столбцам, снижая риск ошибок при чтении. Многие пользователи полагаются на ручную раскраску — выбирая каждую вторую строку и применяя цвет фона — но этот подход неэффективен. Когда вы вставляете или удаляете строки, цвета больше не выравниваются должным образом.
Однако этот ручной метод быстро становится непрактичным, особенно при вставке или удалении строк. К счастью, Excel предоставляет более умные и динамичные подходы, которые автоматически поддерживают постоянство цвета. Давайте рассмотрим, как чередовать цвета строк в Excel с помощью встроенных инструментов, прежде чем переходить к автоматизированному методу на Python.
Метод 1 – Использование условного форматирования для чередования цветов строк
Условное форматирование — одна из самых гибких функций Excel. Она позволяет применять динамические стили на основе логических правил, что делает ее идеальной для автоматического чередования цветов строк без необходимости каждый раз вручную настраивать формат.
Шаг 1: Выберите диапазон данных
Выделите диапазон ячеек, который вы хотите отформатировать, например A1:D20. Правило будет применяться только в этом выделении.
Шаг 2: Создайте правило условного форматирования
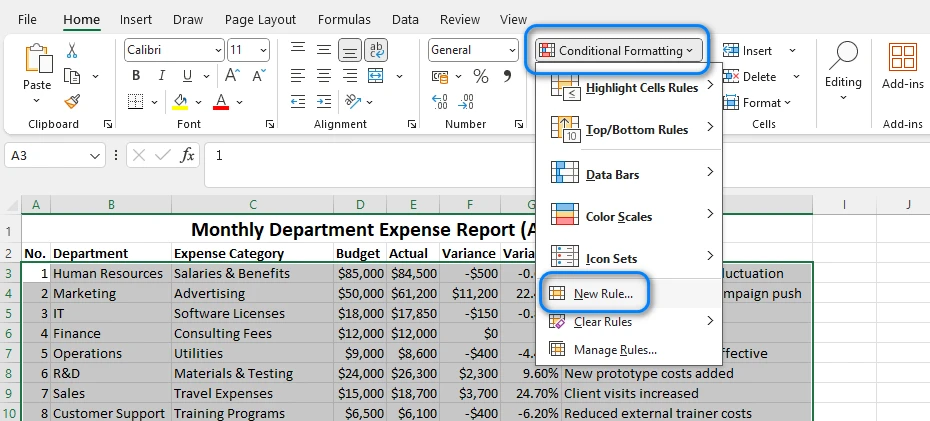
Перейдите к Главная → Условное форматирование → Новое правило
Шаг 3: Введите формулу
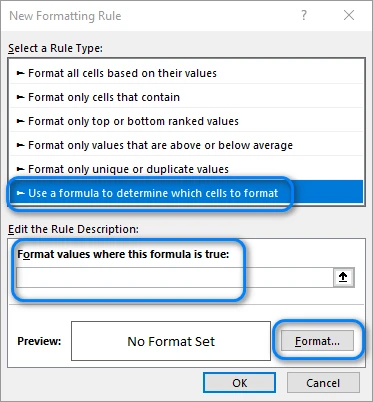
Выберите Использовать формулу для определения форматируемых ячеек. В поле формулы введите:
=MOD(ROW(),2)=0
Эта формула проверяет, является ли номер строки четным. Вы можете изменить «0» на «1», если хотите, чтобы цветовой узор начинался с первой строки, а не со второй.
Шаг 4: Выберите цвет заливки
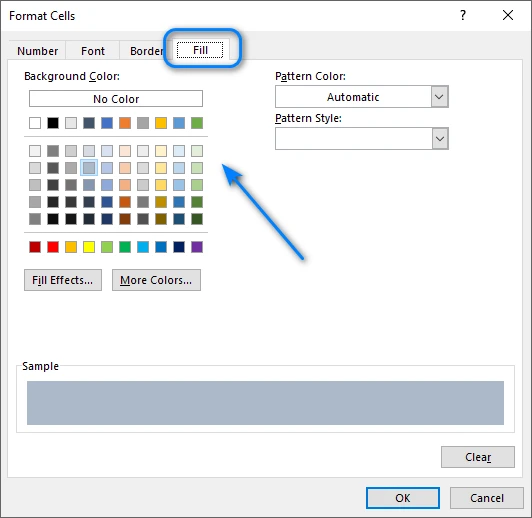
Нажмите Формат → Заливка, выберите предпочитаемый цвет фона (рекомендуется светлый оттенок) и подтвердите. После применения Excel автоматически окрашивает каждую четную строку. Если вы вставите новые строки, узор будет динамически обновляться.
Ниже приведен пример результата:
Советы и вариации
- Используйте =MOD(ROW(),3)=0 чтобы окрашивать каждую третью строку.
- Комбинируйте с форматированием текста или границ для более продвинутого стиля.
- Чтобы удалить правило, перейдите к Условное форматирование → Управление правилами → Удалить.
Условное форматирование предлагает высокую гибкость и отлично работает, когда вам нужен полный контроль над тем, какие строки окрашиваются.
Похожая статья: Применение условного форматирования в Excel с помощью Python
Метод 2 – Применение стилей таблиц для встроенного чередования цветов строк
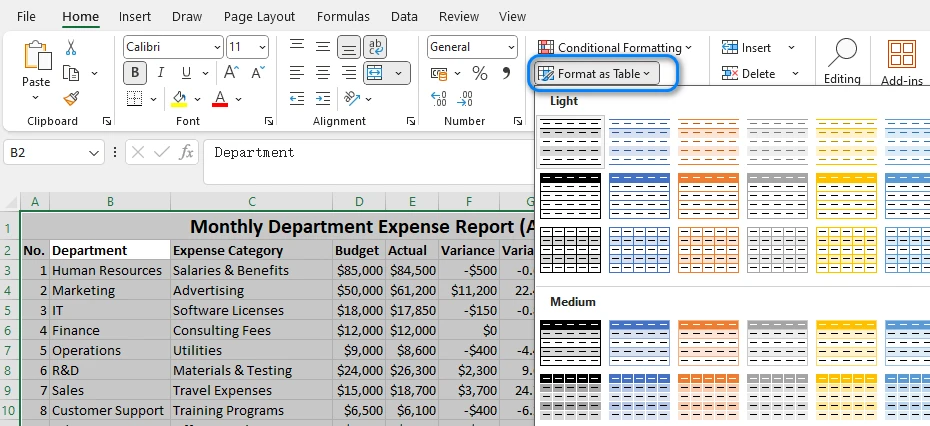
Если вам нужен быстрый встроенный вариант, не требующий формул, функция Excel Форматировать как таблицу может мгновенно применить чередующиеся цвета строк. Это идеальный вариант для пользователей, которые ценят скорость и предпочитают минимальную настройку.
Шаг 1: Отформатируйте диапазон как таблицу
Выделите свои данные, затем нажмите Главная → Форматировать как таблицу и выберите любой предопределенный стиль. Excel мгновенно применяет полосатые строки и создает структуру таблицы с опциями сортировки и фильтрации.
Шаг 2: Настройте параметры таблицы
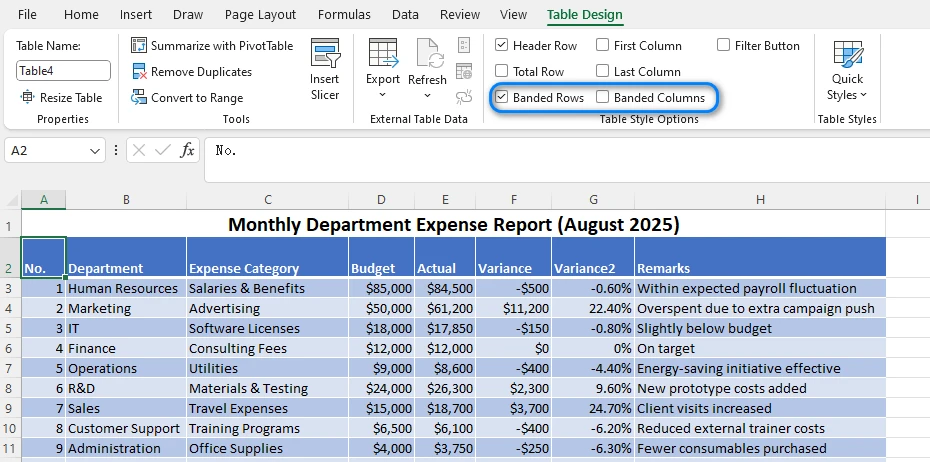
На вкладке Конструктор таблиц вы можете переключать Чередующиеся строки или Чередующиеся столбцы вкл/выкл. Вы также можете настроить цветовую схему, выбрав другой стиль таблицы.
Шаг 3: Настройте внешний вид таблицы
Вы можете переименовать таблицу, изменить цвета заголовков или добавить строку итогов. При добавлении новых строк чередующийся цветовой узор автоматически расширяется.
Преимущества и ограничения
- Быстрый и профессиональный внешний вид
- Автоматически обновляется с новыми данными
Но:
- Менее гибкий, чем условное форматирование
- Ограниченная настройка цветовых интервалов
Для большинства пользователей Excel Стили таблиц являются самым быстрым способом окрасить каждую вторую строку без формул. Это самый быстрый способ применить чередующийся цвет строк в Excel для быстрой форматировки данных.
Вам также может понравиться: Создание или удаление таблиц в Excel с помощью Python
Метод 3 – Автоматизация чередования цветов строк в Excel с помощью Python
Хотя встроенные опции Excel хорошо работают для отдельных файлов, они становятся трудоемкими при многократном применении. Если вы часто работаете с несколькими электронными таблицами или нуждаетесь в единообразном стиле для отчетов, автоматизация на Python предлагает масштабируемую альтернативу.
Используя Spire.XLS for Python, вы можете легко управлять стилями форматирования, автоматизировать раскраску строк и даже применять условную логику, экономя значительное время при обработке больших или повторяющихся задач.
Шаг 1: Установите и импортируйте Spire.XLS
Установите пакет с помощью pip:
pip install spire.xls
Затем импортируйте его:
from spire.xls import Workbook, Color, ExcelVersion
Шаг 2: Загрузите и получите доступ к листу
workbook = Workbook()
workbook.LoadFromFile("input.xlsx")
sheet = workbook.Worksheets[0]
Это загружает ваш файл Excel и получает доступ к первому листу.
Шаг 3: Автоматически примените чередующиеся цвета строк
for i in range(1, sheet.LastRow):
    if i % 2 == 0:
        style = sheet.Rows.get_Item(i).Style
        style.Color = Color.get_LightGray()
Объяснение:
- Цикл проверяет, является ли номер строки четным (
i % 2 == 0). - Если это так, применяется новый стиль со светло-серым фоном.
- Вы можете настроить цвет, используя любой поддерживаемый цвет RGB или цвет темы.
- Для каждой третьей или четвертой строки измените значение модуля (например,
i % 3 == 0).
Этот метод можно адаптировать для разных узоров или нескольких листов в одной книге.
Шаг 4: Сохраните файл
workbook.SaveToFile("output.xlsx", ExcelVersion.Version2016)
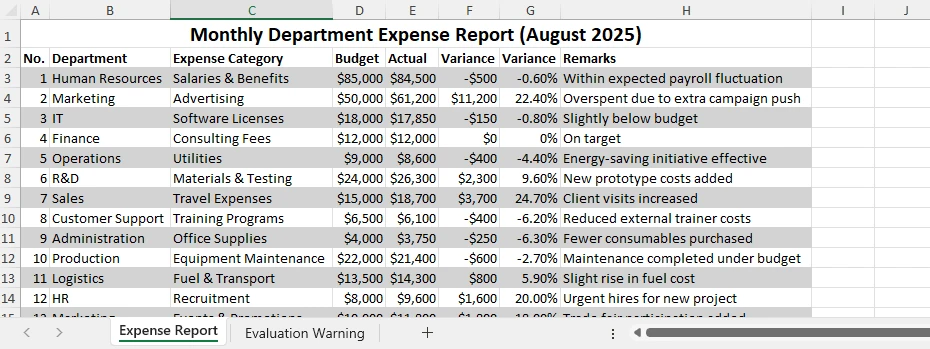
Новый файл сохранит все изменения форматирования, и вы сможете открыть его прямо в Excel. Ниже приведен пример выходного файла:
Преимущества метода Python
- Автоматизирует повторяющиеся задачи форматирования
- Работает с несколькими листами или файлами
- Уменьшает количество ручных ошибок
- Бесшовно интегрируется с другими рабочими процессами обработки данных
Для больших или повторяющихся задач автоматизация с помощью Spire.XLS for Python является практичным способом оптимизировать ваш рабочий процесс и поддерживать единообразное форматирование в нескольких файлах. Если вы хотите узнать больше о навыках автоматизации Excel с помощью Python, ознакомьтесь с руководствами по Spire.XLS for Python.
Сравнение методов
| Метод | Автоматизация | Настройка | Динамические обновления | Лучше всего для |
|---|---|---|---|---|
| Ручная раскраска | ❌ | Высокая | ❌ | Быстрые, одноразовые правки |
| Условное форматирование | ✅ | Высокая | ✅ | Гибкое форматирование |
| Стиль таблицы | ✅ | Средняя | ✅ | Быстрое оформление таблиц |
| Автоматизация на Python | ✅ | Высокая | ✅ | Пакетные или крупномасштабные задачи |
Каждый подход имеет свои преимущества, но автоматизация предлагает наилучшую эффективность для расширенного или повторяющегося форматирования Excel.
Часто задаваемые вопросы о чередовании цветов строк в Excel
В1: Как автоматически чередовать цвета строк в Excel?
Вы можете использовать условное форматирование с формулой =MOD(ROW(),2)=0 или применить стиль таблицы для мгновенного форматирования данных.
В2: Могу ли я чередовать цвета строк без использования таблицы?
Да. Условное форматирование работает с любым диапазоном и автоматически обновляется при добавлении или удалении строк.
В3: Как окрасить каждую вторую строку в Excel с помощью Python?
Вы можете автоматизировать процесс, используя Spire.XLS for Python, перебирая строки и применяя стиль к четным.
В4: Могу ли я изменить цветовой узор на каждые 3 строки вместо 2?
Да. Измените формулу на =MOD(ROW(),3)=0 или измените условие в вашем коде Python (if i % 3 == 0:).
Заключение
Чередование цветов строк в Excel — один из самых простых, но эффективных способов сделать ваши данные более легкими для чтения и понимания. Вы можете чередовать цвета строк в Excel легко, используя условное форматирование, стили таблиц или автоматизацию на Python.
Для тех, кто работает с большими наборами данных или нуждается в автоматизации, Spire.XLS for Python позволяет легко применять чередующиеся цвета и другие задачи форматирования программно. Вы также можете использовать Free Spire.XLS for Python для несложных задач в Excel.
Какой бы метод вы ни выбрали, эти техники помогут вам поддерживать ясность и последовательность в ваших листах Excel.
Смотрите также
Excel Banded Rows Made Simple: Alternate Row Colors Fast
Table of Contents
Install with Pypi
pip install Spire.XLS
Related Links
When working with large Excel spreadsheets, rows of data can easily blend together, making it difficult to keep track of information accurately. Alternating row colors in Excel — often called banded rows — provides an easy and effective way to improve readability, enhance visual structure, and reduce mistakes in financial reports, inventory lists, or large data summaries.
Excel offers several quick and flexible ways to apply alternate row colors. You can use Conditional Formatting for precise control, Table Styles for instant results, or automate the process across multiple files using Python with Spire.XLS for Python. Each approach has its own advantages depending on how frequently you work with Excel data.
Alternating row colors not only make your data easier to read but also help maintain a clean, professional look across different worksheets. In this guide, you’ll learn how to alternate row colors in Excel step by step—covering both built-in methods and Python automation for advanced users.
Methods Overview
You can explore each method below:
- Alternate Row Colors in Excel by Conditional Formatting
- Apply Built-in Table Styles to Color Every Other Row
- Automate Alternating Excel Row Colors with Python
- Comparison of Methods
Why and How to Alternate Row Colors in Excel
Alternating row colors improves readability, data comparison, and professional presentation. This technique helps your eyes follow each row across columns, reducing the risk of reading errors. Many users rely on manual coloring—selecting every other row and applying a background color—but this approach is inefficient. When you insert or delete rows, the colors no longer align properly.
However, this manual method quickly becomes impractical, especially when rows are inserted or deleted. Fortunately, Excel provides smarter and dynamic approaches that automatically maintain color consistency. Let’s explore how to alternate row colors in Excel using built-in tools before moving on to the automated Python method.
Method 1 – Use Conditional Formatting to Alternate Row Colors
Conditional Formatting is one of Excel’s most flexible features. It lets you apply dynamic styles based on logical rules — making it perfect for automatically alternating row colors without manually adjusting the format each time.
Step 1: Select the Data Range
Highlight the range of cells you want to format, such as A1:D20. The rule will apply only within this selection.
Step 2: Create a Conditional Formatting Rule
Navigate to Home → Conditional Formatting → New Rule
Step 3: Enter the Formula
Choose Use a formula to determine which cells to format. In the formula box, type:
=MOD(ROW(),2)=0
This formula checks whether a row number is even. You can change the “0” to “1” if you want the color pattern to start from the first row instead of the second.
Step 4: Choose a Fill Color
Click Format → Fill, select your preferred background color (a light shade is recommended), and confirm. Once applied, Excel automatically colors every even-numbered row. If you insert new rows, the pattern will update dynamically.
Below is an example of the result:
Tips and Variations
- Use =MOD(ROW(),3)=0 to color every third row instead.
- Combine with text or border formatting for more advanced styling.
- To remove the rule, go to Conditional Formatting → Manage Rules → Delete.
Conditional Formatting offers high flexibility and works perfectly when you need full control over which rows are colored.
Related Article: Apply Conditional Formatting in Excel Using Python
Method 2 – Apply Table Styles for Built-in Alternate Row Colors
If you want a quick, built-in option that requires no formulas, Excel’s Format as Table feature can instantly apply alternate row colors. It’s ideal for users who value speed and prefer minimal setup.
Step 1: Format the Range as a Table
Select your data, then click Home → Format as Table and choose any predefined style. Excel instantly applies banded rows and creates a table structure with sorting and filtering options.
Step 2: Adjust the Table Settings
Under the Table Design tab, you can toggle Banded Rows or Banded Columns on or off. You can also customize the color scheme by choosing a different table style.
Step 3: Customize the Table Appearance
You can rename the table, change header colors, or add a Total Row. When new rows are added, the alternating color pattern automatically expands.
Advantages and Limitations
- Quick and professional appearance
- Automatically updates with new data
But:
- Less flexible than Conditional Formatting
- Limited customization of color intervals
For most Excel users, Table Styles are the fastest way to color every other row without formulas. This is the fastest way to apply alternate row color in Excel for quick data formatting.
You may also like: Create or Delete Tables in Excel with Python
Method 3 – Automate Alternating Row Colors in Excel with Python
While Excel’s built-in options work well for single files, they become time-consuming when applied repeatedly. If you frequently handle multiple spreadsheets or need consistent styling across reports, Python automation offers a scalable alternative.
Using Spire.XLS for Python, you can easily control formatting styles, automate row coloring, and even apply conditional logic — saving significant time when processing large or repeated tasks.
Step 1: Install and Import Spire.XLS
Install the package using pip:
pip install spire.xls
Then import it:
from spire.xls import Workbook, Color, ExcelVersion
Step 2: Load and Access the Worksheet
workbook = Workbook()
workbook.LoadFromFile("input.xlsx")
sheet = workbook.Worksheets[0]
This loads your Excel file and accesses the first worksheet.
Step 3: Apply Alternate Row Colors Automatically
for i in range(1, sheet.LastRow):
    if i % 2 == 0:
        style = sheet.Rows.get_Item(i).Style
        style.Color = Color.get_LightGray()
Explanation:
- The loop checks if a row number is even (
i % 2 == 0). - If true, a new style is applied with a light gray background.
- You can customize the color using any supported RGB or theme color.
- For every third or fourth row, adjust the modulus value (e.g.,
i % 3 == 0).
This method can be adapted for different patterns or multiple worksheets within the same workbook.
Step 4: Save the File
workbook.SaveToFile("output.xlsx", ExcelVersion.Version2016)
The new file will retain all formatting changes, and you can open it directly in Excel. Below is a example of the output file:
Benefits of the Python Method
- Automates repetitive formatting tasks
- Works across multiple sheets or files
- Reduces manual errors
- Integrates seamlessly with other data processing workflows
For large or repetitive tasks, automating with Spire.XLS for Python is a practical way to streamline your workflow and maintain consistent formatting across multiple files. If you want to learn more Python Excel automation skills, check out Spire.XLS for Python tutorials.
Comparison of Methods
| Method | Automation | Customization | Dynamic Updates | Best For |
|---|---|---|---|---|
| Manual Coloring | ❌ | High | ❌ | Quick, one-time edits |
| Conditional Formatting | ✅ | High | ✅ | Flexible formatting |
| Table Style | ✅ | Medium | ✅ | Fast table design |
| Python Automation | ✅ | High | ✅ | Batch or large-scale tasks |
Each approach has its advantages, but automation offers the best efficiency for advanced or repeated Excel formatting.
Frequently Asked Questions About Alternating Row Colors in Excel
Q1: How do I alternate row colors in Excel automatically?
You can use Conditional Formatting with the formula =MOD(ROW(),2)=0 or apply a Table Style to format your data instantly.
Q2: Can I alternate row colors without using a table?
Yes. Conditional Formatting works on any range and updates automatically when you add or remove rows.
Q3: How to color every other row in Excel using Python?
You can automate the process using Spire.XLS for Python, looping through rows and applying a style to even-numbered ones.
Q4: Can I change the color pattern to every 3 rows instead of 2?
Yes. Modify the formula to =MOD(ROW(),3)=0 or change the condition in your Python code (if i % 3 == 0:).
Conclusion
Alternating row colors in Excel is one of the simplest yet most effective ways to make your data easier to read and understand. You can alternate row colors in Excel easily using Conditional Formatting, Table Styles, or Python automation.
For those who work with large datasets or need automation, Spire.XLS for Python makes it easy to apply alternating colors and other formatting tasks programmatically. You can also use Free Spire.XLS for Python for lightweight Excel tasks.
Whichever method you choose, these techniques will help you maintain clarity and consistency in your Excel sheets.
See Also
Modify or Edit PDF Files in Java: Practical Code Examples Included

Working with PDF files is a common requirement in many Java applications—whether you’re generating invoices, modifying contracts, or adding annotations to reports. While the PDF format is reliable for sharing documents, editing it programmatically can be tricky without the right library.
In this tutorial, you’ll learn how to add, replace, remove, and secure content in a PDF file using Spire.PDF for Java , a comprehensive and developer-friendly PDF API. We’ll walk through examples of adding pages, text, images, tables, annotations, replacing content, deleting elements, and securing files with watermarks and passwords.
Table of Contents:
- Why Use Spire.PDF to Edit PDF in Java
- Setting Up Your Java Environment
- Adding Content to a PDF File
- Replacing Content in a PDF File
- Removing Content from a PDF File
- Securing Your PDF File
- Conclusion
- FAQs About Editing PDF in Java
Why Use Spire.PDF to Edit PDF in Java
Spire.PDF offers a comprehensive set of features that make it an excellent choice for developers looking to work with PDF files in Java. Here are some reasons why you should consider using Spire.PDF:
- Ease of Use : The API is straightforward and intuitive, allowing you to perform complex operations with minimal code.
- Rich Features : Spire.PDF supports a wide range of functionalities, including text and image manipulation, page management, and security features.
- High Performance : The library is optimized for performance, ensuring that even large PDF files can be processed quickly.
- No Dependencies : Spire.PDF is a standalone library, meaning you won’t have to include any additional dependencies in your project.
By leveraging Spire.PDF, you can easily handle PDF files without getting bogged down in the complexities of the format itself.
Setting Up Your Java Environment
Installation
To begin using Spire.PDF, you'll first need to add it to your project. You can download the library from its official website or include it via Maven:
For Maven users:
<repositories>
    <repository>
        <id>com.e-iceblue</id>
        <name>e-iceblue</name>
        <url>https://repo.e-iceblue.com/nexus/content/groups/public/</url>
    </repository>
</repositories>
<dependencies>
    <dependency>
        <groupId>e-iceblue</groupId>
        <artifactId>spire.pdf</artifactId>
        <version>11.9.6</version>
    </dependency>
</dependencies>
For manual setup:
Download Spire.PDF for Java from the official website and add the JAR file to your project’s classpath.
Initiate Document Loading
Once you have the library set up, you can start loading PDF documents. Here’s how to do it:
PdfDocument doc = new PdfDocument();
doc.loadFromFile("C:\\Users\\Administrator\\Desktop\\sample.pdf");
This snippet initializes a new PdfDocument object and loads a PDF file from the specified path. By calling loadFromFile , you prepare the document for further editing.
Adding Content to a PDF File in Java
Add a New Page
Adding a new page to an existing PDF document is quite simple. Here’s how you can do it:
// Add a new page
PdfPageBase new_page = doc.getPages().add(PdfPageSize.A4, new PdfMargins(54));
// Draw text or do other operations on the page
new_page.getCanvas().drawString("This is a Newly-Added Page.", new PdfTrueTypeFont(new Font("Times New Roman",Font.PLAIN,18)), PdfBrushes.getBlue(), 0, 0);
In this code, we create a new page with A4 size and specified margins using the add method. We then draw a string on the new page using a specified font and color. The drawString method places the text at the top-left corner of the page, allowing you to add content quickly.
Add Text to a PDF File
To insert text into a specific area of an existing page, use the following code:
// Get a specific page
PdfPageBase page = doc.getPages().get(0);
// Define a rectangle for placing the text
Rectangle2D.Float rect = new Rectangle2D.Float(54, 300, (float) page.getActualSize().getWidth() - 108, 100);
// Create a brush and a font
PdfSolidBrush brush = new PdfSolidBrush(new PdfRGBColor(Color.BLUE));
PdfTrueTypeFont font = new PdfTrueTypeFont(new Font("Times New Roman",Font.PLAIN,18));
// Draw text on the page at the specified area
page.getCanvas().drawString("This Line is Created By Spire.PDF for Java.",font, brush, rect);
This snippet retrieves the first page of the document and defines a rectangle where the text will be placed. The Rectangle2D.Float class allows you to specify the exact dimensions for positioning the text. We then draw the specified text with a blue brush and custom font using the drawString method, which ensures that the text is rendered in the defined area.
Add an Image to a PDF File
Inserting images into a PDF is straightforward as well:
// Get a specific page
PdfPageBase page = doc.getPages().get(0);
// Load an image
PdfImage image = PdfImage.fromFile("C:\\Users\\Administrator\\Desktop\\logo.png");
// Specify coordinates for adding image
float x = 54;
float y = 300;
// Draw image on the page at the specified coordinates
page.getCanvas().drawImage(image, x, y);
Here, we load an image from a specified file path and draw it on the first page at the defined coordinates (x, y). The drawImage method allows you to position the image precisely, making it easy to incorporate visuals into your document.
Add a Table to a PDF File
Adding tables is also supported in Spire.PDF:
// Get a specific page
PdfPageBase page = doc.getPages().get(0);
// Create a table
PdfTable table = new PdfTable();
// Define table data
String[][] data = {
        new String[]{"Name", "Age", "Country"},
        new String[]{"Alice", "25", "USA"},
        new String[]{"Bob", "30", "UK"},
        new String[]{"Charlie", "28", "Canada"}
};
// Assign data to the table
table.setDataSource(data);
// Set table style
PdfTableStyle style = new PdfTableStyle();
style.getDefaultStyle().setFont(new PdfTrueTypeFont(new Font("Arial", Font.PLAIN, 12)));
table.setStyle(style);
// Draw the table on the page
table.draw(page, new Point2D.Float(50, 80));
In this example, we create a table and define its data source using a 2D array. After assigning the data, we set a style for the table using PdfTableStyle , which allows you to customize the font and appearance of the table. Finally, we use the draw method to render the table on the first page at the specified coordinates.
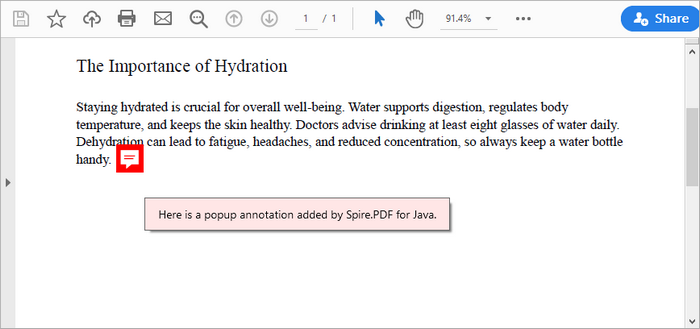
Add an Annotation or Comment
Annotations can enhance the interactivity of PDFs:
// Get a specific page
PdfPageBase page = doc.getPages().get(0);
// Create a free text annotation
PdfPopupAnnotation popupAnnotation = new PdfPopupAnnotation();
popupAnnotation.setLocation(new Point2D.Double(90, 260));
// Set the content of the annotation
popupAnnotation.setText("Here is a popup annotation added by Spire.PDF for Java.");
// Set the icon and color of the annotation
popupAnnotation.setIcon(PdfPopupIcon.Comment);
popupAnnotation.setColor(new PdfRGBColor(Color.RED));
// Add the annotation to the collection of the annotations
page.getAnnotations().add(popupAnnotation);
This snippet creates a popup annotation at a specified location on the page. By calling setLocation , you definewhere the annotation appears. The setText method allows you to specify the content displayed in the annotation, while you can set the icon and color to customize its appearance. Finally, the annotation is added to the page's collection of annotations.
You may also like: Add Page Numbers to a PDF Document in Java
Replacing Content in a PDF File in Java
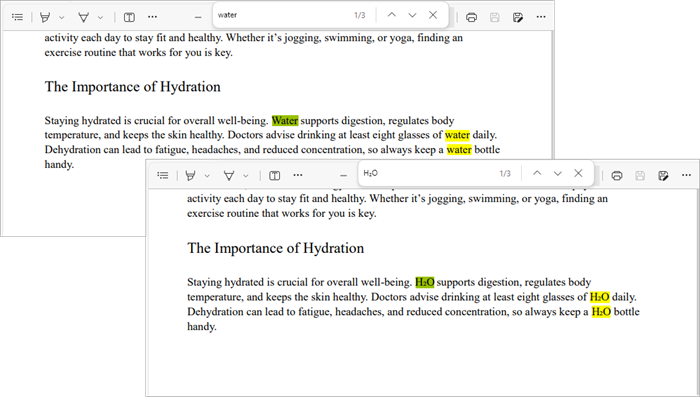
Replace Text in a PDF File
To replace existing text within a PDF, you can use the following code:
// Create a PdfTextReplaceOptions object
PdfTextReplaceOptions textReplaceOptions = new PdfTextReplaceOptions();
// Specify the options for text replacement
textReplaceOptions.setReplaceType(EnumSet.of(ReplaceActionType.IgnoreCase));
// Iterate through the pages
for (int i = 0; i < doc.getPages().getCount(); i++) {

// Get a specific page
PdfPageBase page = doc.getPages().get(i);
// Create a PdfTextReplacer object based on the page
PdfTextReplacer textReplacer = new PdfTextReplacer(page);
// Set the replace options
textReplacer.setOptions(textReplaceOptions);
// Replace all occurrences of target text with new text
textReplacer.replaceAllText("Water", "H₂O");
}
In this example, we create a PdfTextReplaceOptions object to specify replacement options, such as ignoring case sensitivity. We then iterate through all pages of the document, creating a PdfTextReplacer for each page. The replaceAllText method is called on the text replacer to replace all occurrences of "Water" with "H₂O".
Replace an Image in a PDF File
Replacing an image follows a similar pattern:
// Get a specific page
PdfPageBase page = doc.getPages().get(0);
// Load an image
PdfImage image = PdfImage.fromFile("C:\\Users\\Administrator\\Desktop\\logo.png");
// Get the image information from the page
PdfImageHelper imageHelper = new PdfImageHelper();
PdfImageInfo[] imageInfo = imageHelper.getImagesInfo(page);
// Replace Image
imageHelper.replaceImage(imageInfo[0], image);
This code retrieves the image information from the specified page using the PdfImageHelper class. After loading a new image from a file, we call replaceImage to replace the first image found on the page with the new one.
You may also like: Replace Fonts in PDF Documents in Java
Removing Content from a PDF File in Java
Remove a Page from a PDF File
To remove an entire page from a PDF, use the following code:
// Remove a specific page
doc.getPages().removeAt(0);
This straightforward command removes the first page from the document. By calling removeAt , you specify the index of the page to be removed, simplifying page management in your PDF.
Delete an Image from a PDF File
To remove an image from a page:
// Get a specific page
PdfPageBase page = pdf.getPages().get(0);
// Get the image information from the page
PdfImageHelper imageHelper = new PdfImageHelper();
PdfImageInfo[] imageInfos = imageHelper.getImagesInfo(page);
// Delete the specified image on the page
imageHelper.deleteImage(imageInfos[0]);
This code retrieves all images from the first page and deletes the first image using the deleteImage method from PdfImageHelper .
Delete an Annotation
Removing an annotation is simple as well:
// Get a specific page
PdfPageBase page = pdf.getPages().get(0);
// Remove the specified annotation
page.getAnnotationsWidget().removeAt(0);
This snippet removes the first annotation from the specified page. The removeAt method is used to specify which annotation to remove, ensuring that the document can be kept clean and free of unnecessary comments.
Delete an Attachment
To delete an attachment from a PDF:
// Get the attachments collection
PdfAttachmentCollection attachments = doc.getAttachments();
// Remove a specific attachment
attachments.removeAt(0);
This code retrieves the collection of attachments from the document and removes the first one using the removeAt method.
Securing Your PDF File in Java
Apply a Watermark to a PDF File
Watermarks can be added for branding or copyright purposes:
// Create a font and a brush
PdfTrueTypeFont font = new PdfTrueTypeFont(new Font("Arial Black", Font.PLAIN, 50), true);
PdfBrush brush = PdfBrushes.getBlue();
// Specify the watermark text
String watermarkText = "DO NOT COPY";
// Specify the opacity level
float opacity = 0.6f;
// Iterate through the pages
for (int i = 0; i < doc.getPages().getCount(); i++) {
    PdfPageBase page = doc.getPages().get(i);
    // Set the transparency level for the watermark
    page.getCanvas().setTransparency(opacity);
    // Measure the size of the watermark text
    Dimension2D textSize = font.measureString(watermarkText);
    // Get the width and height of the page
    double pageWidth = page.getActualSize().getWidth();
    double pageHeight = page.getActualSize().getHeight();
    // Calculate the position to center the watermark on the page
    double x = (pageWidth - textSize.getWidth()) / 2;
    double y = (pageHeight - textSize.getHeight()) / 2;
    // Draw the watermark text on the page at the calculated position
    page.getCanvas().drawString(watermarkText, font, brush, x, y);
}
This code configures the appearance of a text watermark and places it at the center of each page in a PDF file using the drawString method, effectively discouraging unauthorized copying.
Password Protect a PDF File
To secure your PDF with a password:
// Specify the user and owner passwords
String userPassword = "open_psd";
String ownerPassword = "permission_psd";
// Create a PdfSecurityPolicy object with the two passwords
PdfSecurityPolicy securityPolicy = new PdfPasswordSecurityPolicy(userPassword, ownerPassword);
// Set encryption algorithm
securityPolicy.setEncryptionAlgorithm(PdfEncryptionAlgorithm.AES_256);
// Set document permissions (If you do not set, the default is Forbid All)
securityPolicy.setDocumentPrivilege(PdfDocumentPrivilege.getAllowAll());
// Restrict editing
securityPolicy.getDocumentPrivilege().setAllowModifyContents(false);
securityPolicy.getDocumentPrivilege().setAllowCopyContentAccessibility(false);
securityPolicy.getDocumentPrivilege().setAllowContentCopying(false);
// Encrypt the PDF file
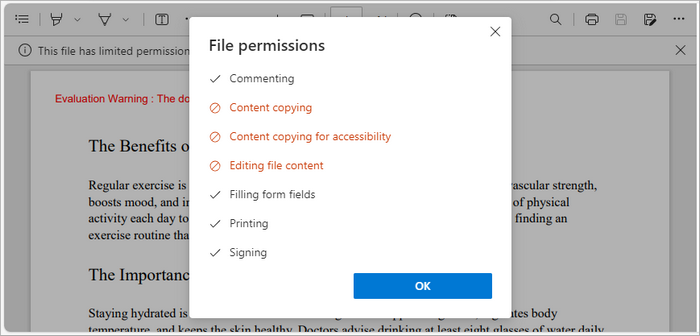
doc.encrypt(securityPolicy);
This code applies password protection and encryption to a PDF document by defining a user password (for opening) and an owner password (for permissions like editing and printing). The PdfSecurityPolicy object manages security settings, including the AES-256 encryption algorithm and permission levels. Finally, doc.encrypt(securityPolicy) encrypts the document, ensuring only authorized users can access or modify it.
You may also like: How to Add Digital Signatures to PDF in Java
Conclusion
Editing PDF files in Java is often seen as challenging, but with Spire.PDF for Java, it becomes a straightforward and efficient process. This library provides developers with the flexibility to create, modify, replace, and secure PDF content using clean, easy-to-understand APIs. From adding pages and images to encrypting sensitive documents, Spire.PDF simplifies every step of the workflow while maintaining professional output quality.
Beyond basic editing, Spire.PDF’s capabilities extend to automation and enterprise-level solutions. Whether you’re integrating PDF manipulation into a document management system, or generating customized reports, the library offers a stable and scalable foundation for long-term projects. With its comprehensive feature set and strong performance, Spire.PDF for Java is a reliable choice for developers seeking precision, efficiency, and control over PDF documents.
FAQs About Editing PDF in Java
Q1. What is the best library for editing PDFs in Java?
Spire.PDF for Java is a popular choice among developers worldwide, which provides comprehensive range of features for effective PDF manipulation.
Q2. Can I edit existing text in a PDF using Java?
With Spire.PDF for Java, you can replace or modify existing text using classes like PdfTextReplacer along with customizable options for case sensitivity and matching behavior.
Q3. How to insert or replace images in a PDF in Java?
With Spire.PDF for Java, you can use drawImage() to insert images and PdfImageHelper.replaceImage() to replace existing ones on a specific page.
Q4. Can I annotate a PDF file in Java?
Yes, annotations such as highlights, comments, and stamps can be added using the appropriate annotation classes provided by Spire.PDF for Java.
Q5. Can I extract text and images from an existing PDF file?
Yes, you can. Spire.PDF for Java provides methods to extract text, images, and other elements from PDFs easily. For detailed instructions and code examples, refer to: How to Read PDFs in Java: Extract Text, Images, and More
Get a Free License
To fully experience the capabilities of Spire.PDF for Java without any evaluation limitations, you can request a free 30-day trial license.
Python TXT to CSV Tutorial | Convert TXT Files to CSV in Python

When working with data in Python, converting TXT files to CSV is a common and essential task for data analysis, reporting, or sharing data between applications. TXT files often store unstructured plain text, which can be difficult to process, while CSV files organize data into rows and columns, making it easier to work with and prepare for analysis. This tutorial explains how to convert TXT to CSV in Python efficiently, covering single-file conversion, batch conversion, and tips for handling different delimiters.
Table of Contents
- What is a CSV File
- Python TXT to CSV Library - Installation
- Convert a TXT File to CSV in Python (Step-by-Step)
- Automate Batch Conversion of Multiple TXT Files
- Advanced Tips for Python TXT to CSV Conversion
- Conclusion
- FAQs: Python Text to CSV
What is a CSV File?
A CSV (Comma-Separated Values) file is a simple text-based file format used to store tabular data. Each line in a CSV file represents a row, and values within the row are separated by commas (or another delimiter such as tabs or semicolons).
CSV is widely supported by spreadsheet applications, databases, and programming languages like Python. Its simple format makes it easy to import, export, and use across platforms such as Excel, Google Sheets, R, and SQL for data analysis and automation.
An Example CSV File:
Name, Age, City

John, 28, New York

Alice, 34, Los Angeles

Bob, 25, Chicago
Python TXT to CSV Library - Installation
To perform TXT to CSV conversion in Python, we will use Spire.XLS for Python, a powerful library for creating and manipulating Excel and CSV files, without requiring Microsoft Excel to be installed.

You can install it directly from PyPI with the following command:
pip install Spire.XLS
If you need instructions for the installation, visit the guide on How to Install Spire.XLS for Python.
Convert a TXT File to CSV in Python (Step-by-Step)
Converting a text file to CSV in Python is straightforward. You can complete the task in just a few steps. Below is a basic outline of the process:
- Prepare and read the text file: Load your TXT file and read its content line by line.
- Split the text data: Separate each line into fields using a specific delimiter such as a space, tab, or comma.
- Write data to CSV: Use Spire.XLS to write the processed data into a new CSV file.
- Verify the output: Check the CSV in Excel, Google Sheets, or a text editor.
The following code demonstrates how to export a TXT file to CSV using Python:
from spire.xls import *
# Read the txt file
with open("data.txt", "r", encoding="utf-8") as file:
lines = file.readlines()
# Process each line by splitting based on spaces (you can change the delimiter if needed)
processed_data = [line.strip().split() for line in lines]
# Create an Excel workbook
workbook = Workbook()
# Get the first worksheet
sheet = workbook.Worksheets[0]
# Write data from the processed list to the worksheet
for row_num, row_data in enumerate(processed_data):
for col_num, cell_data in enumerate(row_data):
# Write data into cells
sheet.Range[row_num + 1, col_num + 1].Value = cell_data
# Save the sheet as CSV file (UTF-8 encoded)
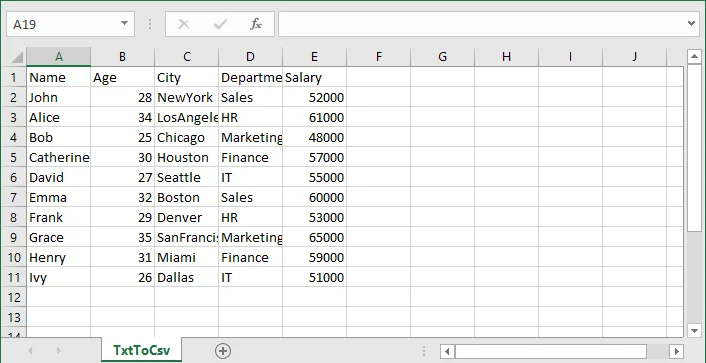
sheet.SaveToFile("TxtToCsv.csv", ",", Encoding.get_UTF8())
# Dispose the workbook to release resources
workbook.Dispose()
TXT to CSV Output:
If you are also interested in converting a TXT file to Excel, see the guide on converting TXT to Excel in Python.
Automate Batch Conversion of Multiple TXT Files
If you have multiple text files that you want to convert to CSV automatically, you can loop through all .txt files in a folder and convert them one by one.
The following code demonstrates how to batch convert multiple TXT files to CSV in Python:
import os
from spire.xls import *

# Folder containing TXT files
input_folder = "txt_files"
output_folder = "csv_files"

# Create output folder if it doesn't exist
os.makedirs(output_folder, exist_ok=True)

# Function to process a single TXT file
def convert_txt_to_csv(file_path, output_path):
    # Read the TXT file
    with open(file_path, "r", encoding="utf-8") as f:
        lines = f.readlines()

    # Process each line (split by space, modify if your delimiter is different)
    processed_data = [line.strip().split() for line in lines if line.strip()]

    # Create workbook and access the first worksheet
    workbook = Workbook()
    sheet = workbook.Worksheets[0]

    # Write processed data into the sheet
    for row_num, row_data in enumerate(processed_data):
        for col_num, cell_data in enumerate(row_data):
            sheet.Range[row_num + 1, col_num + 1].Value = cell_data

    # Save the sheet as CSV with UTF-8 encoding
    sheet.SaveToFile(output_path, ",", Encoding.get_UTF8())
    workbook.Dispose()
    print(f"Converted '{file_path}' -> '{output_path}'")

# Loop through all TXT files in the folder and convert each to a CSV file with the same file name
for filename in os.listdir(input_folder):
    if filename.lower().endswith(".txt"):
        input_path = os.path.join(input_folder, filename)
        output_name = os.path.splitext(filename)[0] + ".csv"
        output_path = os.path.join(output_folder, output_name)

        convert_txt_to_csv(input_path, output_path)
Advanced Tips for Python TXT to CSV Conversion
Converting text files to CSV can involve variations in text file layout and potential errors, so these tips will help you handle different scenarios more effectively.
1. Handle Different Delimiters
Not all text files use spaces to separate values. If your TXT file uses tabs, commas, or other characters, you can adjust the split() function to match the delimiter.
- For tab-separated files (.tsv):
processed_data = [line.strip().split('\t') for line in lines]
- For comma-separated files:
processed_data = [line.strip().split(',') for line in lines]
- For custom delimiters (e.g., |):
processed_data = [line.strip().split('|') for line in lines]
This ensures that your data is correctly split into columns before writing to CSV.
2. Add Error Handling
When reading or writing files, it's a good practice to use try-except blocks to catch potential errors. This makes your script more robust and prevents unexpected crashes.
try:
    # your code here
except Exception as e:
print("Error:", e)
Tip: Use descriptive error messages to help understand the problem.
- Skip Empty Lines
Sometimes, text files may have empty lines. You can filter out the blank lines to avoid creating empty rows in CSV:
processed_data = [line.strip().split() for line in lines if line.strip()]
Conclusion
In this article, you learned how to convert a TXT file to CSV format in Python using Spire.XLS for Python. This conversion is an essential step in data preparation, helping organize raw text into a structured format suitable for analysis, reporting, and sharing. With Spire.XLS for Python, you can automate the text to CSV conversion, handle different delimiters, and efficiently manage multiple text files.
If you have any questions or need technical assistance about Python TXT to CSV conversion, visit our Support Forum for help.
FAQs: Python Text to CSV
Q1: Can I convert TXT files to CSV without Microsoft Excel installed?
A1: Yes. Spire.XLS for Python works independently of Microsoft Excel, allowing you to create and export CSV files directly.
Q2: How to batch convert multiple TXT files to CSV in Python?
A2: Use a loop to read all TXT files in a folder and apply the conversion function for each. The tutorial includes a ready-to-use Python example for batch conversion.
Q3: How do I handle empty lines or inconsistent rows in TXT files when converting to CSV?
A3: Filter out empty lines during processing and implement checks for consistent column counts to avoid errors or blank rows in the output CSV.
Q4: How do I convert TXT files with tabs or custom delimiters to CSV in Python?
A4: You can adjust the split() function in your Python script to match the delimiter in your TXT file-tabs (\t), commas, or custom characters-before writing to CSV.
Come adattare automaticamente la larghezza delle colonne in Excel (5 metodi)
Indice
- Cos'è l'Adattamento Automatico in Excel?
- Adattamento Automatico delle Colonne Tramite il Mouse
- Adattamento Automatico delle Colonne Tramite la Barra Multifunzione di Excel
- Adattamento Automatico delle Colonne con Scorciatoie da Tastiera
- Adattamento Automatico delle Colonne Tramite VBA
- Adattamento Automatico della Larghezza delle Colonne Tramite Python
- Problemi Comuni dell'Adattamento Automatico e Come Risolverli
- Conclusione
- Domande Frequenti sull'Adattamento Automatico di Excel
Installa con Pypi
pip install Spire.XLS
Link Correlati
Quando si lavora con Excel, ci si imbatte spesso in colonne troppo strette per visualizzare tutto il testo o troppo larghe, sprecando spazio prezioso. Regolare manualmente ogni colonna può richiedere molto tempo, specialmente in fogli di calcolo di grandi dimensioni. È qui che entra in gioco l'Adattamento Automatico.
La funzione di Adattamento Automatico di Excel regola automaticamente la larghezza delle colonne (e l'altezza delle righe) per adattarla alla dimensione del contenuto. È uno strumento semplice ma potente che aiuta a rendere i fogli di lavoro puliti, leggibili e professionali.
In questo articolo, imparerai cinque modi semplici per adattare automaticamente la larghezza delle colonne in Excel — da rapide azioni con il mouse all'automazione avanzata con VBA e Python. Che tu sia un utente occasionale di Excel o qualcuno che gestisce dati regolarmente, questi metodi ti faranno risparmiare tempo e miglioreranno il tuo flusso di lavoro.
- Metodo 1: Adattamento Automatico delle Colonne Tramite il Mouse
- Metodo 2: Adattamento Automatico delle Colonne Tramite la Barra Multifunzione di Excel
- Metodo 3: Adattamento Automatico delle Colonne con Scorciatoie da Tastiera
- Metodo 4: Adattamento Automatico delle Colonne Tramite VBA
- Metodo 5: Adattamento Automatico della Larghezza delle Colonne Tramite Python
Cos'è l'Adattamento Automatico in Excel?
L'Adattamento Automatico è una funzione integrata in Microsoft Excel che ridimensiona automaticamente la larghezza delle colonne o l'altezza delle righe per adattarle al contenuto al loro interno. Invece di trascinare manualmente il bordo della colonna, l'Adattamento Automatico regola le dimensioni in modo che tutto il testo, i numeri o le intestazioni siano completamente visibili senza essere tagliati o lasciare spazio vuoto extra.
Ad esempio, se una colonna contiene voci di testo di lunghezze diverse, l'Adattamento Automatico assicura che ogni colonna diventi abbastanza larga da visualizzare la voce più lunga. È possibile applicare l'Adattamento Automatico a una singola colonna, a più colonne o persino all'intero foglio di lavoro contemporaneamente.
Metodo 1: Adattamento Automatico delle Colonne Tramite il Mouse
Il modo più rapido e intuitivo per adattare automaticamente le colonne in Excel è usare il mouse. Questo metodo non richiede scorciatoie da tastiera o navigazione nei menu, rendendolo ideale per regolazioni rapide durante la revisione dei dati.
Passaggi:
- Seleziona la/le colonna/e che desideri regolare.
- Per selezionare una singola colonna, fai clic sull'intestazione della colonna (ad es., A , B ,C ).
- Per selezionare più colonne, fai clic e trascina sulle intestazioni o tieni premuto Ctrl (Windows) o Comando (Mac) mentre selezioni ciascuna di esse.
- Passa il mouse sul bordo destro di qualsiasi intestazione di colonna selezionata.
- Il cursore si trasformerà in una freccia a due punte ( ↔) .
- Fai doppio clic sul bordo.
- Excel ridimensionerà istantaneamente la/le colonna/e selezionata/e in modo che il contenuto della cella più largo si adatti perfettamente.
Suggerimenti:
- Puoi adattare automaticamente tutte le colonne contemporaneamente selezionando l'intero foglio (premi Ctrl + A ) e facendo doppio clic su qualsiasi bordo di colonna.
- Se hai unito celle o hai testo a capo, l'Adattamento Automatico di Excel potrebbe non comportarsi come previsto — affronteremo questo argomento nella sezione Problemi Comuni dell'Adattamento Automatico.
- Questo metodo funziona anche per le righe — basta fare doppio clic sul confine della riga.
Metodo 2: Adattamento Automatico delle Colonne Tramite la Barra Multifunzione di Excel
Se preferisci usare i menu di Excel invece delle azioni del mouse, la Barra Multifunzione offre un modo comodo per adattare automaticamente colonne e righe. Questo approccio è particolarmente utile quando si lavora con più celle o quando si desidera esplorare opzioni di formattazione correlate.
Passaggi:
- Seleziona le colonne che desideri regolare.
- Fai clic e trascina sulle intestazioni delle colonne (ad esempio, da A a D), o premi Ctrl + A per selezionare tutte le colonne.
- Vai alla scheda Home sulla Barra Multifunzione.
- Nel gruppo Celle, fai clic sul menu a discesa Formato.
- Scegli Adatta Larghezza Colonne dal menu.
Excel ridimensionerà istantaneamente le colonne selezionate in modo che tutto il contenuto delle celle sia visibile senza sovrapposizioni o troncamenti.

Metodo 3: Adattamento Automatico delle Colonne con Scorciatoie da Tastiera
Le scorciatoie da tastiera sono il modo più veloce per adattare automaticamente le colonne una volta memorizzati i tasti. Eliminano la necessità di navigare nei menu o usare il mouse.
Per Windows:
-
Seleziona la/le colonna/e da regolare.
-
Premi Alt + H , poi O , e poi I . (Premi ogni tasto in sequenza, non tutti insieme.)
Excel ridimensionerà automaticamente le colonne selezionate per adattarle al contenuto.
Per Mac:
-
Seleziona la/le colonna/e.
-
Premi: Comando + Opzione + 0 (zero)
Questo adatta automaticamente all'istante le colonne selezionate.
Suggerimento:
Se vuoi adattare automaticamente tutte le colonne del tuo foglio di lavoro contemporaneamente, premi Ctrl + A (o Comando + A su Mac) per selezionare tutte le celle, quindi usa la scorciatoia sopra.
Metodo 4: Adattamento Automatico delle Colonne Tramite VBA
Se hai spesso bisogno di adattare automaticamente le colonne come parte di un processo ripetitivo — come dopo l'importazione di dati o la generazione di report — usare VBA (Visual Basic for Applications) può farti risparmiare molto tempo.
Passaggi:
-
Premi Alt + F11 per aprire l'editor VBA.
-
Fai clic su Inserisci → Modulo .
-
Copia e incolla il seguente codice:
- Premi F5 o torna a Excel ed esegui la macro.
Sub AutoFit_All_Columns()
    Cells.EntireColumn.AutoFit
End Sub
Questa macro ridimensiona automaticamente tutte le colonne nel foglio di lavoro attivo per adattarle al loro contenuto.
Se vuoi adattare automaticamente solo colonne specifiche, puoi modificare il codice in questo modo:
Sub AutoFit_Specific_Columns()
    Columns("A:D").AutoFit
End Sub
Metodo 5: Adattamento Automatico della Larghezza delle Colonne Tramite Python
Per sviluppatori o analisti di dati che gestiscono file Excel programmaticamente, Python offre un modo potente per automatizzare la formattazione delle colonne. Usando Spire.XLS for Python, puoi facilmente adattare automaticamente le colonne senza aprire Excel.
Passaggio 1: Installa la Libreria
Esegui il seguente comando nel tuo terminale o prompt dei comandi:
pip install Spire.XLS
Passaggio 2: Adattamento Automatico delle Colonne con Spire.XLS
Ecco un esempio completo:
from spire.xls import *

# Create a new workbook
workbook = Workbook()

# Load an existing Excel file or create a new one
workbook.LoadFromFile("input.xlsx")

# Get the first worksheet
sheet = workbook.Worksheets[0]

# AutoFit all columns in the worksheet
sheet.AllocatedRange.AutoFitColumns()

# Save the modified file
workbook.SaveToFile("AutoFit_Output.xlsx", ExcelVersion.Version2016)
workbook.Dispose()
Questa flessibilità rende Spire.XLS un'ottima scelta per attività di reporting automatizzato o esportazione di dati, specialmente quando si gestiscono file Excel in operazioni batch.
Output:

Leggi anche: Adattamento Automatico di Righe e Colonne in Excel Tramite Python
Problemi Comuni dell'Adattamento Automatico e Come Risolverli
A volte l'Adattamento Automatico non si comporta come previsto. Ecco alcuni problemi comuni e soluzioni rapide:
| Problema | Causa | Soluzione |
|---|---|---|
| L'Adattamento Automatico non ridimensiona le celle unite | Excel non può adattare automaticamente le celle unite | Separa temporaneamente le celle, ridimensiona, quindi unisci di nuovo |
| Il testo a capo viene ancora tagliato | L'altezza della riga non si regola automaticamente | Usa Adatta Altezza Righe o abilita Testo a capo |
| Le colonne nascoste non vengono ridimensionate | Le colonne sono nascoste | Mostra colonne prima di applicare l'Adattamento Automatico |
| I risultati delle formule non sono visibili | La formula si aggiorna dopo l'Adattamento Automatico | Ricalcola (premi F9) prima di eseguire l'Adattamento Automatico |
Conclusione
L'Adattamento Automatico è uno degli strumenti di formattazione più semplici ma più utili di Excel. Che tu stia ridimensionando le colonne manualmente, usando scorciatoie o automatizzando con VBA o Python, questi metodi possono migliorare notevolmente la leggibilità e l'efficienza del flusso di lavoro.
Per soluzioni rapide, il doppio clic o l'uso della Barra Multifunzione funzionano meglio. Per l'automazione frequente, VBA o Spire.XLS for Python ti consentono di integrare l'Adattamento Automatico in attività di elaborazione dati più grandi. Qualunque metodo tu scelga, risparmierai tempo e manterrai i tuoi fogli di calcolo puliti e professionali.
Domande Frequenti sull'Adattamento Automatico di Excel
D1. Posso adattare automaticamente sia righe che colonne contemporaneamente?
Sì. Seleziona tutte le celle (Ctrl + A), quindi scegli Formato → Adatta Larghezza Colonne e Adatta Altezza Righe dalla Barra Multifunzione.
D2. Perché l'Adattamento Automatico non funziona con le celle unite?
Excel non può calcolare la larghezza corretta per le celle unite. Dovrai ridimensionarle manualmente.
D3. Posso impostare l'Adattamento Automatico in modo che si esegua automaticamente quando i dati cambiano?
Sì, utilizzando una macro evento VBA (ad es., Worksheet_Change) o uno script Python che si aggiorna dopo ogni aggiornamento dei dati.
D4. Spire.XLS richiede l'installazione di Excel?
No. Spire.XLS for Python è una libreria autonoma che non dipende da Microsoft Excel.
Vedi Anche
Como autoajustar a largura da coluna no Excel (5 maneiras)
Índice
- O que é o AutoFit no Excel?
- AutoAjustar Colunas Usando o Mouse
- AutoAjustar Colunas Usando a Faixa de Opções do Excel
- AutoAjustar Colunas com Atalhos de Teclado
- AutoAjustar Colunas Usando VBA
- AutoAjustar Largura da Coluna Usando Python
- Problemas Comuns do AutoFit e Como Corrigi-los
- Conclusão
- Perguntas Frequentes sobre o AutoFit do Excel
Instalar com Pypi
pip install Spire.XLS
Links Relacionados
Ao trabalhar com o Excel, você frequentemente encontra colunas que são muito estreitas para exibir todo o texto ou muito largas e desperdiçam espaço valioso. Ajustar cada coluna manualmente pode ser demorado, especialmente em planilhas grandes. É aí que o AutoFit entra.
O recurso AutoFit do Excel ajusta automaticamente a largura das colunas (e a altura das linhas) para corresponder ao tamanho do conteúdo. É uma ferramenta simples, mas poderosa, que ajuda a tornar suas planilhas limpas, legíveis e profissionais.
Neste artigo, você aprenderá cinco maneiras fáceis de AutoAjustar a largura da coluna no Excel — desde ações rápidas com o mouse até automação avançada com VBA и Python. Seja você um usuário ocasional do Excel ou alguém que gerencia dados regularmente, esses métodos economizarão seu tempo e melhorarão seu fluxo de trabalho.
- Método 1: AutoAjustar Colunas Usando o Mouse
- Método 2: AutoAjustar Colunas Usando a Faixa de Opções do Excel
- Método 3: AutoAjustar Colunas com Atalhos de Teclado
- Método 4: AutoAjustar Colunas Usando VBA
- Método 5: AutoAjustar Largura da Coluna Usando Python
O que é o AutoFit no Excel?
AutoFit é um recurso integrado no Microsoft Excel que redimensiona automaticamente a largura das colunas ou a altura das linhas para ajustar o conteúdo dentro delas. Em vez de arrastar a borda da coluna manualmente, o AutoFit ajusta as dimensões para que todo o texto, números ou cabeçalhos fiquem totalmente visíveis sem cortar ou deixar espaço em branco extra.
Por exemplo, se uma coluna contiver entradas de texto de comprimentos variados, o AutoFit garante que cada coluna se torne larga o suficiente para exibir a entrada mais longa. Você pode aplicar o AutoFit a uma única coluna, a várias colunas ou até mesmo à planilha inteira de uma vez.
Método 1: AutoAjustar Colunas Usando o Mouse
A maneira mais rápida e intuitiva de AutoAjustar colunas no Excel é usando o mouse. Este método não requer atalhos de teclado ou navegação em menus, tornando-o ideal para ajustes rápidos ao revisar dados.
Passos:
- Selecione a(s) coluna(s) que deseja ajustar.
- Para selecionar uma única coluna, clique no cabeçalho da coluna (por exemplo, A, B, C).
- Para selecionar várias colunas, clique e arraste sobre os cabeçalhos ou mantenha pressionada a tecla Ctrl (Windows) ou Command (Mac) enquanto seleciona cada uma.
- Passe o mouse sobre a borda direita de qualquer cabeçalho de coluna selecionado.
- O cursor mudará para uma seta de duas pontas ( ↔).
- Clique duas vezes na borda.
- O Excel redimensionará instantaneamente a(s) coluna(s) selecionada(s) para que o conteúdo da célula mais larga se ajuste perfeitamente.
Dicas:
- Você pode AutoAjustar todas as colunas de uma vez selecionando a planilha inteira (pressione Ctrl + A) e clicando duas vezes em qualquer borda de coluna.
- Se você mesclou células ou quebrou o texto, o AutoFit do Excel pode não se comportar como esperado — abordaremos isso na seção Problemas Comuns do AutoFit.
- Este método também funciona para linhas — basta clicar duas vezes na borda da linha.
Método 2: AutoAjustar Colunas Usando a Faixa de Opções do Excel
Se você prefere usar os menus do Excel em vez de ações do mouse, a Faixa de Opções oferece uma maneira conveniente de AutoAjustar colunas e linhas. Essa abordagem é especialmente útil ao trabalhar com várias células ou quando você deseja explorar opções de formatação relacionadas.
Passos:
- Selecione as colunas que deseja ajustar.
- Clique e arraste sobre os cabeçalhos das colunas (por exemplo, de A a D) ou pressione Ctrl + A para selecionar todas as colunas.
- Vá para a guia Página Inicial na Faixa de Opções.
- No grupo Células, clique no menu suspenso Formatar.
- Escolha AutoAjustar Largura da Coluna no menu.
O Excel redimensionará instantaneamente as colunas selecionadas para que todo o conteúdo das células fique visível sem sobreposição ou truncamento.
Método 3: AutoAjustar Colunas com Atalhos de Teclado
Os atalhos de teclado são a maneira mais rápida de AutoAjustar colunas depois que você memoriza as teclas. Eles eliminam a necessidade de navegar por menus ou usar o mouse.
Para Windows:
-
Selecione a(s) coluna(s) a serem ajustadas.
-
Pressione Alt + H, depois O e, em seguida, I. (Pressione cada tecla em sequência, não todas de uma vez.)
O Excel redimensionará automaticamente as colunas selecionadas para ajustar o conteúdo.
Para Mac:
-
Selecione a(s) coluna(s).
-
Pressione: Command + Option + 0 (zero)
Isso AutoAjusta instantaneamente as colunas selecionadas.
Dica:
Se você deseja AutoAjustar todas as colunas em sua planilha de uma vez, pressione Ctrl + A (ou Command + A no Mac) para selecionar todas as células e, em seguida, use o atalho acima.
Método 4: AutoAjustar Colunas Usando VBA
Se você precisa frequentemente AutoAjustar colunas como parte de um processo repetitivo — como após a importação de dados ou a geração de relatórios — usar VBA (Visual Basic for Applications) pode economizar um tempo significativo.
Passos:
-
Pressione Alt + F11 para abrir o editor do VBA.
-
Clique em Inserir → Módulo.
-
Copie e cole o seguinte código:
- Pressione F5 ou retorne ao Excel e execute a macro.
Sub AutoFit_All_Columns()
    Cells.EntireColumn.AutoFit
End Sub
Esta macro redimensiona automaticamente todas as colunas na planilha ativa para ajustar seu conteúdo.
Se você deseja AutoAjustar apenas colunas específicas, pode modificar o código da seguinte forma:
Sub AutoFit_Specific_Columns()
    Columns("A:D").AutoFit
End Sub
Método 5: AutoAjustar Largura da Coluna Usando Python
Para desenvolvedores ou analistas de dados que gerenciam arquivos do Excel programaticamente, o Python oferece uma maneira poderosa de automatizar a formatação de colunas. Usando Spire.XLS for Python, você pode facilmente AutoAjustar colunas sem abrir o Excel.
Passo 1: Instale a Biblioteca
Execute o seguinte comando em seu terminal ou prompt de comando:
pip install Spire.XLS
Passo 2: AutoAjustar Colunas com Spire.XLS
Aqui está um exemplo completo:
from spire.xls import *

# Crie uma nova pasta de trabalho
workbook = Workbook()

# Carregue um arquivo Excel existente ou crie um novo
workbook.LoadFromFile("input.xlsx")

# Obtenha a primeira planilha
sheet = workbook.Worksheets[0]

# AutoAjuste todas as colunas na planilha
sheet.AllocatedRange.AutoFitColumns()

# Salve o arquivo modificado
workbook.SaveToFile("AutoFit_Output.xlsx", ExcelVersion.Version2016)
workbook.Dispose()
Essa flexibilidade torna o Spire.XLS uma ótima escolha para tarefas automatizadas de relatórios ou exportação de dados, especialmente ao lidar com arquivos do Excel em operações em lote.
Saída:
Leia mais: AutoAjustar Linhas e Colunas no Excel Usando Python
Problemas Comuns do AutoFit e Como Corrigi-los
Às vezes, o AutoFit não se comporta como esperado. Aqui estão alguns problemas comuns e soluções rápidas:
| Problema | Causa | Solução |
|---|---|---|
| O AutoFit não redimensiona células mescladas | O Excel não consegue AutoAjustar células mescladas | Desfaça a mesclagem das células temporariamente, redimensione e mescle novamente |
| O texto quebrado ainda é cortado | A altura da linha não se ajusta automaticamente | Use AutoAjustar Altura da Linha ou habilite a Quebra de Texto |
| Colunas ocultas não são redimensionadas | As colunas estão ocultas | Reexibir colunas antes de aplicar o AutoFit |
| Resultados de fórmulas não estão visíveis | A fórmula é atualizada após o AutoFit | Recalcule (pressione F9) antes de executar o AutoFit |
Conclusão
O AutoFit é uma das ferramentas de formatação mais simples e úteis do Excel. Seja redimensionando colunas manualmente, usando atalhos ou automatizando com VBA ou Python, esses métodos podem melhorar drasticamente a legibilidade e a eficiência do fluxo de trabalho.
Para correções rápidas, clicar duas vezes ou usar a Faixa de Opções funciona melhor. Para automação frequente, o VBA ou o Spire.XLS for Python permite integrar o AutoFit em tarefas maiores de processamento de dados. Qualquer que seja o método escolhido, você economizará tempo e manterá suas planilhas com aparência limpa e profissional.
Perguntas Frequentes Sobre o AutoFit do Excel
P1. Posso AutoAjustar linhas e colunas ao mesmo tempo?
Sim. Selecione todas as células (Ctrl + A), depois escolha Formatar → AutoAjustar Largura da Coluna e AutoAjustar Altura da Linha na Faixa de Opções.
P2. Por que o AutoFit não funciona com células mescladas?
O Excel não consegue calcular a largura correta para células mescladas. Você precisará redimensioná-las manualmente.
P3. Posso configurar o AutoFit para ser executado automaticamente quando os dados mudam?
Sim, usando uma macro de evento VBA (por exemplo, Worksheet_Change) ou um script Python que atualiza após cada atualização de dados.
P4. O Spire.XLS requer que o Excel esteja instalado?
Não. O Spire.XLS for Python é uma biblioteca autônoma que não depende do Microsoft Excel.
Veja Também
Excel에서 열 너비 자동 맞춤하는 방법 (5가지)
목차
Pypi로 설치
pip install Spire.XLS
관련 링크
Excel로 작업할 때 모든 텍스트를 표시하기에는 너무 좁거나 너무 넓어서 귀중한 공간을 낭비하는 열을 자주 접하게 됩니다. 각 열을 수동으로 조정하는 것은 특히 대규모 스프레드시트에서 시간이 많이 걸릴 수 있습니다. 바로 여기에서 자동 맞춤이 사용됩니다.
Excel의 자동 맞춤 기능은 내용의 크기에 맞게 열 너비(및 행 높이)를 자동으로 조정합니다. 워크시트를 깔끔하고 읽기 쉬우며 전문적으로 보이게 만드는 간단하면서도 강력한 도구입니다.
이 문서에서는 빠른 마우스 작업부터 VBA 및 Python을 사용한 고급 자동화에 이르기까지 Excel에서 열 너비를 자동 맞춤하는 다섯 가지 쉬운 방법을 배웁니다. 가끔 Excel을 사용하는 사용자이든 정기적으로 데이터를 관리하는 사람이든 이러한 방법은 시간을 절약하고 작업 흐름을 개선해 줄 것입니다.
- 방법 1: 마우스를 사용하여 열 자동 맞춤
- 방법 2: Excel 리본을 사용하여 열 자동 맞춤
- 방법 3: 키보드 단축키로 열 자동 맞춤
- 방법 4: VBA를 사용하여 열 자동 맞춤
- 방법 5: Python을 사용하여 열 너비 자동 맞춤
Excel의 자동 맞춤이란 무엇인가요?
자동 맞춤은 Microsoft Excel의 기본 제공 기능으로, 열 너비나 행 높이를 내용에 맞게 자동으로 조정합니다. 열 테두리를 수동으로 끄는 대신, 자동 맞춤은 모든 텍스트, 숫자 또는 머리글이 잘리거나 추가 공백을 남기지 않고 완전히 보이도록 크기를 조정합니다.
예를 들어, 열에 다양한 길이의 텍스트 항목이 포함된 경우 자동 맞춤은 각 열이 가장 긴 항목을 표시할 수 있을 만큼 충분히 넓어지도록 합니다. 단일 열, 여러 열 또는 전체 워크시트에 한 번에 자동 맞춤을 적용할 수 있습니다.
방법 1: 마우스를 사용하여 열 자동 맞춤
Excel에서 열을 자동 맞춤하는 가장 빠르고 직관적인 방법은 마우스를 사용하는 것입니다. 이 방법은 키보드 단축키나 메뉴 탐색이 필요하지 않으므로 데이터를 검토하는 동안 빠른 조정에 이상적입니다.
단계:
- 조정하려는 열을 선택합니다.
- 단일 열을 선택하려면 열 머리글(예: A, B, C)을 클릭합니다.
- 여러 열을 선택하려면 머리글을 클릭하고 드래그하거나 각 열을 선택하는 동안 Ctrl(Windows) 또는 Command(Mac)를 누르고 있습니다.
- 선택한 열 머리글의 오른쪽 테두리 위로 마우스를 가져갑니다.
- 커서가 양방향 화살표(↔)로 바뀝니다.
- 테두리를 두 번 클릭합니다.
- Excel은 가장 넓은 셀 내용이 완벽하게 맞도록 선택한 열의 크기를 즉시 조정합니다.
팁:
- 전체 시트를 선택(Ctrl + A 누름)하고 아무 열 테두리나 두 번 클릭하여 모든 열을 한 번에 자동 맞춤할 수 있습니다.
- 셀을 병합했거나 텍스트를 줄 바꿈한 경우 Excel의 자동 맞춤이 예상대로 작동하지 않을 수 있습니다. 이 문제는 일반적인 자동 맞춤 문제 섹션에서 다루겠습니다.
- 이 방법은 행에도 적용됩니다. 대신 행 경계를 두 번 클릭하기만 하면 됩니다.
방법 2: Excel 리본을 사용하여 열 자동 맞춤
마우스 작업 대신 Excel 메뉴를 사용하는 것을 선호하는 경우 리본은 열과 행을 자동 맞춤하는 편리한 방법을 제공합니다. 이 접근 방식은 여러 셀로 작업하거나 관련 서식 옵션을 탐색하려는 경우에 특히 유용합니다.
단계:
- 조정하려는 열을 선택합니다.
- 열 머리글(예: A부터 D까지)을 클릭하고 드래그하거나 Ctrl + A를 눌러 모든 열을 선택합니다.
- 리본의 홈 탭으로 이동합니다.
- 셀 그룹에서 서식 드롭다운을 클릭합니다.
- 메뉴에서 열 너비 자동 맞춤을 선택합니다.
Excel은 모든 셀 내용이 겹치거나 잘리지 않고 보이도록 선택한 열의 크기를 즉시 조정합니다.
방법 3: 키보드 단축키로 열 자동 맞춤
키보드 단축키는 키를 외우고 나면 열을 자동 맞춤하는 가장 빠른 방법입니다. 메뉴를 탐색하거나 마우스를 사용할 필요가 없습니다.
Windows의 경우:
-
조정할 열을 선택합니다.
-
Alt + H를 누른 다음 O를 누르고 I를 누릅니다. (각 키를 한 번에 누르지 말고 순서대로 누릅니다.)
Excel은 내용에 맞게 선택한 열의 크기를 자동으로 조정합니다.
Mac의 경우:
-
열을 선택합니다.
-
누르기: Command + Option + 0 (영)
이렇게 하면 선택한 열이 즉시 자동 맞춤됩니다.
팁:
워크시트의 모든 열을 한 번에 자동 맞춤하려면 Ctrl + A(Mac의 경우 Command + A)를 눌러 모든 셀을 선택한 다음 위의 단축키를 사용합니다.
방법 4: VBA를 사용하여 열 자동 맞춤
데이터 가져오기 또는 보고서 생성 후와 같이 반복적인 프로세스의 일부로 열을 자주 자동 맞춤해야 하는 경우 VBA(Visual Basic for Applications)를 사용하면 상당한 시간을 절약할 수 있습니다.
단계:
-
Alt + F11을 눌러 VBA 편집기를 엽니다.
-
삽입 → 모듈을 클릭합니다.
-
다음 코드를 복사하여 붙여넣습니다.
- F5를 누르거나 Excel로 돌아가서 매크로를 실행합니다.
Sub AutoFit_All_Columns()
    Cells.EntireColumn.AutoFit
End Sub
이 매크로는 활성 워크시트의 모든 열 크기를 내용에 맞게 자동으로 조정합니다.
특정 열만 자동 맞춤하려면 다음과 같이 코드를 수정할 수 있습니다.
Sub AutoFit_Specific_Columns()
    Columns("A:D").AutoFit
End Sub
방법 5: Python을 사용하여 열 너비 자동 맞춤
프로그래밍 방식으로 Excel 파일을 관리하는 개발자나 데이터 분석가에게 Python은 열 서식을 자동화하는 강력한 방법을 제공합니다. Spire.XLS for Python을 사용하면 Excel을 열지 않고도 열을 쉽게 자동 맞춤할 수 있습니다.
1단계: 라이브러리 설치
터미널 또는 명령 프롬프트에서 다음 명령을 실행합니다.
pip install Spire.XLS
2단계: Spire.XLS로 열 자동 맞춤
다음은 전체 예제입니다.
from spire.xls import *

# Create a new workbook
workbook = Workbook()

# Load an existing Excel file or create a new one
workbook.LoadFromFile("input.xlsx")

# Get the first worksheet
sheet = workbook.Worksheets[0]

# AutoFit all columns in the worksheet
sheet.AllocatedRange.AutoFitColumns()

# Save the modified file
workbook.SaveToFile("AutoFit_Output.xlsx", ExcelVersion.Version2016)
workbook.Dispose()
이러한 유연성 덕분에 Spire.XLS는 자동화된 보고 또는 데이터 내보내기 작업, 특히 일괄 작업에서 Excel 파일을 처리할 때 훌륭한 선택이 됩니다.
출력:
더 읽어보기: Python을 사용하여 Excel에서 행 및 열 자동 맞춤
일반적인 자동 맞춤 문제 및 해결 방법
때로는 자동 맞춤이 예상대로 작동하지 않을 수 있습니다. 다음은 몇 가지 일반적인 문제와 빠른 해결 방법입니다.
| 문제 | 원인 | 해결책 |
|---|---|---|
| 자동 맞춤이 병합된 셀의 크기를 조정하지 않음 | Excel이 병합된 셀을 자동 맞춤할 수 없음 | 셀을 일시적으로 병합 해제하고 크기를 조정한 다음 다시 병합 |
| 줄 바꿈된 텍스트가 여전히 잘림 | 행 높이가 자동으로 조정되지 않음 | 행 높이 자동 맞춤 사용 또는 줄 바꿈 텍스트 활성화 |
| 숨겨진 열 크기 조정 안 됨 | 열이 숨겨져 있음 | 자동 맞춤을 적용하기 전에 열 숨기기 취소 |
| 수식 결과가 보이지 않음 | 자동 맞춤 후 수식 업데이트 | 자동 맞춤을 실행하기 전에 다시 계산(F9 누름) |
결론
자동 맞춤은 Excel의 가장 간단하면서도 가장 유용한 서식 도구 중 하나입니다. 열 크기를 수동으로 조정하든, 바로 가기를 사용하든, VBA 또는 Python으로 자동화하든, 이러한 방법은 가독성과 작업 흐름 효율성을 크게 향상시킬 수 있습니다.
빠른 수정을 위해서는 두 번 클릭하거나 리본을 사용하는 것이 가장 좋습니다. 빈번한 자동화를 위해 VBA 또는 Spire.XLS for Python을 사용하면 자동 맞춤을 더 큰 데이터 처리 작업에 통합할 수 있습니다. 어떤 방법을 선택하든 시간을 절약하고 스프레드시트를 깔끔하고 전문적으로 유지할 수 있습니다.
Excel 자동 맞춤에 대한 FAQ
Q1. 행과 열을 동시에 자동 맞춤할 수 있나요?
예. 모든 셀을 선택(Ctrl + A)한 다음 리본에서 서식 → 열 너비 자동 맞춤 및 행 높이 자동 맞춤을 선택합니다.
Q2. 자동 맞춤이 병합된 셀에서 작동하지 않는 이유는 무엇인가요?
Excel은 병합된 셀의 올바른 너비를 계산할 수 없습니다. 수동으로 크기를 조정해야 합니다.
Q3. 데이터가 변경될 때 자동 맞춤이 자동으로 실행되도록 설정할 수 있나요?
예, VBA 이벤트 매크로(예: Worksheet_Change) 또는 모든 데이터 새로 고침 후에 업데이트되는 Python 스크립트를 사용하여 가능합니다.
Q4. Spire.XLS를 사용하려면 Excel이 설치되어 있어야 하나요?
아니요. Spire.XLS for Python은 Microsoft Excel에 의존하지 않는 독립 실행형 라이브러리입니다.
참고 항목
Comment ajuster automatiquement la largeur des colonnes dans Excel (5 méthodes)
Table des matières
- Qu’est-ce que l’Ajustement automatique dans Excel ?
- Ajuster automatiquement les colonnes à l'aide de la souris
- Ajuster automatiquement les colonnes à l'aide du ruban Excel
- Ajuster automatiquement les colonnes avec les raccourcis clavier
- Ajuster automatiquement les colonnes à l'aide de VBA
- Ajuster automatiquement la largeur des colonnes à l'aide de Python
- Problèmes courants d'Ajustement automatique et comment les résoudre
- Conclusion
- FAQ sur l'Ajustement automatique d'Excel
Installer avec Pypi
pip install Spire.XLS
Liens connexes
Lorsque vous travaillez avec Excel, vous rencontrez souvent des colonnes trop étroites pour afficher tout le texte ou trop larges, gaspillant un espace précieux. L'ajustement manuel de chaque colonne peut prendre beaucoup de temps, surtout dans les grandes feuilles de calcul. C'est là qu'intervient l'Ajustement automatique.
La fonctionnalité d'Ajustement automatique d'Excel ajuste automatiquement la largeur des colonnes (et la hauteur des lignes) pour correspondre à la taille du contenu. C'est un outil simple mais puissant qui aide à rendre vos feuilles de calcul propres, lisibles et professionnelles.
Dans cet article, vous apprendrez cinq façons simples d'ajuster automatiquement la largeur des colonnes dans Excel — des actions rapides à la souris à l'automatisation avancée avec VBA et Python. Que vous soyez un utilisateur occasionnel d'Excel ou quelqu'un qui gère régulièrement des données, ces méthodes vous feront gagner du temps et amélioreront votre flux de travail.
- Méthode 1 : Ajuster automatiquement les colonnes à l'aide de la souris
- Méthode 2 : Ajuster automatiquement les colonnes à l'aide du ruban Excel
- Méthode 3 : Ajuster automatiquement les colonnes avec les raccourcis clavier
- Méthode 4 : Ajuster automatiquement les colonnes à l'aide de VBA
- Méthode 5 : Ajuster automatiquement la largeur des colonnes à l'aide de Python
Qu'est-ce que l'Ajustement automatique dans Excel ?
L'Ajustement automatique est une fonctionnalité intégrée de Microsoft Excel qui redimensionne automatiquement la largeur des colonnes ou la hauteur des lignes pour s'adapter au contenu qu'elles renferment. Au lieu de faire glisser manuellement la bordure de la colonne, l'Ajustement automatique ajuste les dimensions pour que tout le texte, les chiffres ou les en-têtes soient entièrement visibles sans être coupés ou laisser d'espace vide supplémentaire.
Par exemple, si une colonne contient des entrées de texte de longueurs variables, l'Ajustement automatique garantit que chaque colonne devient suffisamment large pour afficher l'entrée la plus longue. Vous pouvez appliquer l'Ajustement automatique à une seule colonne, à plusieurs colonnes ou même à la feuille de calcul entière en une seule fois.
Méthode 1 : Ajuster automatiquement les colonnes à l'aide de la souris
La manière la plus rapide et la plus intuitive d'ajuster automatiquement les colonnes dans Excel est d'utiliser votre souris. Cette méthode ne nécessite aucun raccourci clavier ni navigation dans les menus, ce qui la rend idéale pour des ajustements rapides lors de la révision des données.
Étapes :
- Sélectionnez la ou les colonnes que vous souhaitez ajuster.
- Pour sélectionner une seule colonne, cliquez sur l'en-tête de la colonne (par ex., A , B ,C ).
- Pour sélectionner plusieurs colonnes, cliquez et faites glisser sur les en-têtes ou maintenez la touche Ctrl (Windows) ou Commande (Mac) enfoncée tout en sélectionnant chacune d'elles.
- Passez la souris sur la bordure droite de n'importe quel en-tête de colonne sélectionné.
- Le curseur se transformera en une flèche à double tête ( ↔) .
- Double-cliquez sur la bordure.
- Excel redimensionnera instantanément la ou les colonnes sélectionnées pour que le contenu de la cellule la plus large s'adapte parfaitement.
Conseils :
- Vous pouvez ajuster automatiquement toutes les colonnes à la fois en sélectionnant la feuille entière (appuyez sur Ctrl + A ) et en double-cliquant sur n'importe quelle bordure de colonne.
- Si vous avez fusionné des cellules ou renvoyé du texte à la ligne, l'Ajustement automatique d'Excel pourrait ne pas se comporter comme prévu — nous aborderons ce point dans la section Problèmes courants d'Ajustement automatique.
- Cette méthode fonctionne également pour les lignes — il suffit de double-cliquer sur la bordure de la ligne à la place.
Méthode 2 : Ajuster automatiquement les colonnes à l'aide du ruban Excel
Si vous préférez utiliser les menus d'Excel plutôt que les actions de la souris, le Ruban offre un moyen pratique d'ajuster automatiquement les colonnes et les lignes. Cette approche est particulièrement utile lorsque vous travaillez avec plusieurs cellules ou lorsque vous souhaitez explorer des options de formatage connexes.
Étapes :
- Sélectionnez les colonnes que vous souhaitez ajuster.
- Cliquez et faites glisser sur les en-têtes de colonne (par exemple, de A à D), ou appuyez sur Ctrl + A pour sélectionner toutes les colonnes.
- Allez dans l'onglet Accueil du Ruban.
- Dans le groupe Cellules, cliquez sur le menu déroulant Format.
- Choisissez Ajuster la largeur de colonne dans le menu.
Excel redimensionnera instantanément les colonnes sélectionnées pour que tout le contenu des cellules soit visible sans chevauchement ni troncature.
Méthode 3 : Ajuster automatiquement les colonnes avec les raccourcis clavier
Les raccourcis clavier sont le moyen le plus rapide d'ajuster automatiquement les colonnes une fois que vous avez mémorisé les touches. Ils éliminent le besoin de naviguer dans les menus ou d'utiliser votre souris.
Pour Windows :
-
Sélectionnez la ou les colonnes à ajuster.
-
Appuyez sur Alt + H , puis O , et then I . (Appuyez sur chaque touche en séquence, pas toutes en même temps.)
Excel redimensionnera automatiquement les colonnes sélectionnées pour s'adapter au contenu.
Pour Mac :
-
Sélectionnez la ou les colonnes.
-
Appuyez sur : Commande + Option + 0 (zéro)
Cela ajuste instantanément les colonnes sélectionnées.
Conseil :
Si vous souhaitez ajuster automatiquement toutes les colonnes de votre feuille de calcul en une seule fois, appuyez sur Ctrl + A (ou Commande + A sur Mac) pour sélectionner toutes les cellules, puis utilisez le raccourci ci-dessus.
Méthode 4 : Ajuster automatiquement les colonnes à l'aide de VBA
Si vous avez souvent besoin d'ajuster automatiquement les colonnes dans le cadre d'un processus répétitif — comme après l'importation de données ou la génération de rapports — l'utilisation de VBA (Visual Basic for Applications) peut vous faire gagner un temps considérable.
Étapes :
-
Appuyez sur Alt + F11 pour ouvrir l'éditeur VBA.
-
Cliquez sur Insertion → Module .
-
Copiez et collez le code suivant :
- Appuyez sur F5 ou retournez à Excel et exécutez la macro.
Sub AutoFit_All_Columns()
    Cells.EntireColumn.AutoFit
End Sub
Cette macro redimensionne automatiquement toutes les colonnes de la feuille de calcul active pour s'adapter à leur contenu.
Si vous ne souhaitez ajuster automatiquement que des colonnes spécifiques, vous pouvez modifier le code comme ceci :
Sub AutoFit_Specific_Columns()
    Columns("A:D").AutoFit
End Sub
Méthode 5 : Ajuster automatiquement la largeur des colonnes à l'aide de Python
Pour les développeurs ou les analystes de données qui gèrent les fichiers Excel par programmation, Python offre un moyen puissant d'automatiser le formatage des colonnes. En utilisant Spire.XLS for Python, vous pouvez facilement ajuster automatiquement les colonnes sans ouvrir Excel.
Étape 1 : Installer la bibliothèque
Exécutez la commande suivante dans votre terminal ou invite de commandes :
pip install Spire.XLS
Étape 2 : Ajuster automatiquement les colonnes avec Spire.XLS
Voici un exemple complet :
from spire.xls import *

# Create a new workbook
workbook = Workbook()

# Load an existing Excel file or create a new one
workbook.LoadFromFile("input.xlsx")

# Get the first worksheet
sheet = workbook.Worksheets[0]

# AutoFit all columns in the worksheet
sheet.AllocatedRange.AutoFitColumns()

# Save the modified file
workbook.SaveToFile("AutoFit_Output.xlsx", ExcelVersion.Version2016)
workbook.Dispose()
Cette flexibilité fait de Spire.XLS un excellent choix pour les tâches de reporting automatisé ou d'exportation de données, en particulier lors du traitement de fichiers Excel en opérations par lots.
Sortie :
Lire la suite : Ajuster automatiquement les lignes et les colonnes dans Excel en utilisant Python
Problèmes courants d'Ajustement automatique et comment les résoudre
Parfois, l'Ajustement automatique ne se comporte pas comme prévu. Voici quelques problèmes courants et leurs solutions rapides :
| Problème | Cause | Solution |
|---|---|---|
| L'Ajustement automatique ne redimensionne pas les cellules fusionnées | Excel ne peut pas ajuster automatiquement les cellules fusionnées | Défusionner temporairement les cellules, redimensionner, puis fusionner à nouveau |
| Le texte renvoyé à la ligne est toujours coupé | La hauteur de ligne ne s'ajuste pas automatiquement | Utilisez Ajuster la hauteur de ligne ou activez le renvoi à la ligne automatique |
| Les colonnes masquées ne sont pas redimensionnées | Les colonnes sont masquées | Afficher les colonnes avant d'appliquer l'Ajustement automatique |
| Les résultats des formules ne sont pas visibles | La formule se met à jour après l'Ajustement automatique | Recalculer (appuyez sur F9) avant d'exécuter l'Ajustement automatique |
Conclusion
L'Ajustement automatique est l'un des outils de formatage les plus simples mais aussi les plus utiles d'Excel. Que vous redimensionniez les colonnes manuellement, utilisiez des raccourcis ou automatisiez avec VBA ou Python, ces méthodes peuvent considérablement améliorer la lisibilité et l'efficacité du flux de travail.
Pour des corrections rapides, le double-clic ou l'utilisation du Ruban fonctionnent le mieux. Pour une automatisation fréquente, VBA ou Spire.XLS for Python vous permettent d'intégrer l'Ajustement automatique dans des tâches de traitement de données plus importantes. Quelle que soit la méthode que vous choisissez, vous gagnerez du temps et garderez vos feuilles de calcul propres et professionnelles.
FAQ sur l'Ajustement automatique d'Excel
Q1. Puis-je ajuster automatiquement les lignes et les colonnes en même temps ?
Oui. Sélectionnez toutes les cellules (Ctrl + A), puis choisissez Format → Ajuster la largeur de colonne et Ajuster la hauteur de ligne depuis le Ruban.
Q2. Pourquoi l'Ajustement automatique ne fonctionne-t-il pas avec les cellules fusionnées ?
Excel ne peut pas calculer la largeur correcte pour les cellules fusionnées. Vous devrez les redimensionner manuellement.
Q3. Puis-je configurer l'Ajustement automatique pour qu'il s'exécute automatiquement lorsque les données changent ?
Oui, en utilisant une macro événementielle VBA (par ex., Worksheet_Change) ou un script Python qui se met à jour après chaque actualisation des données.
Q4. Spire.XLS nécessite-t-il l'installation d'Excel ?
Non. Spire.XLS for Python est une bibliothèque autonome qui ne dépend pas de Microsoft Excel.
Voir aussi
Cómo autoajustar el ancho de columna en Excel (5 maneras)
Tabla de Contenidos
- ¿Qué es Autoajustar en Excel?
- Autoajustar Columnas Usando el Ratón
- Autoajustar Columnas Usando la Cinta de Opciones de Excel
- Autoajustar Columnas con Atajos de Teclado
- Autoajustar Columnas Usando VBA
- Autoajustar el Ancho de Columna Usando Python
- Problemas Comunes de Autoajuste y Cómo Solucionarlos
- Conclusión
- Preguntas Frecuentes sobre el Autoajuste de Excel
Instalar con Pypi
pip install Spire.XLS
Enlaces Relacionados
Cuando trabajas con Excel, a menudo te encuentras con columnas que son demasiado estrechas para mostrar todo el texto o demasiado anchas y desperdician un espacio valioso. Ajustar cada columna manualmente puede llevar mucho tiempo, especialmente en hojas de cálculo grandes. Ahí es donde entra en juego Autoajustar.
La función Autoajustar de Excel ajusta automáticamente el ancho de las columnas (y el alto de las filas) para que coincida con el tamaño del contenido. Es una herramienta simple pero potente que ayuda a que tus hojas de trabajo se vean limpias, legibles y profesionales.
En este artículo, aprenderás cinco formas fáciles de autoajustar el ancho de las columnas en Excel, desde acciones rápidas con el ratón hasta la automatización avanzada con VBA y Python. Ya seas un usuario ocasional de Excel o alguien que gestiona datos con regularidad, estos métodos te ahorrarán tiempo y mejorarán tu flujo de trabajo.
- Método 1: Autoajustar Columnas Usando el Ratón
- Método 2: Autoajustar Columnas Usando la Cinta de Opciones de Excel
- Método 3: Autoajustar Columnas con Atajos de Teclado
- Método 4: Autoajustar Columnas Usando VBA
- Método 5: Autoajustar el Ancho de Columna Usando Python
¿Qué es Autoajustar en Excel?
Autoajustar es una función integrada en Microsoft Excel que redimensiona automáticamente el ancho de las columnas o el alto de las filas para adaptarse al contenido que contienen. En lugar de arrastrar manualmente el borde de la columna, Autoajustar ajusta las dimensiones para que todo el texto, los números o los encabezados sean completamente visibles sin cortarse ni dejar espacio en blanco adicional.
Por ejemplo, si una columna contiene entradas de texto de diferentes longitudes, Autoajustar asegura que cada columna se vuelva lo suficientemente ancha como para mostrar la entrada más larga. Puedes aplicar Autoajustar a una sola columna, a varias columnas o incluso a toda la hoja de trabajo a la vez.
Método 1: Autoajustar Columnas Usando el Ratón
La forma más rápida e intuitiva de autoajustar columnas en Excel es usando el ratón. Este método no requiere atajos de teclado ni navegación por menús, lo que lo hace ideal para ajustes rápidos mientras se revisan los datos.
Pasos:
- Selecciona la(s) columna(s) que deseas ajustar.
- Para seleccionar una sola columna, haz clic en el encabezado de la columna (p. ej., A, B, C).
- Para seleccionar varias columnas, haz clic y arrastra sobre los encabezados o mantén presionada la tecla Ctrl (Windows) o Comando (Mac) mientras seleccionas cada una.
- Coloca el cursor sobre el borde derecho de cualquier encabezado de columna seleccionado.
- El cursor cambiará a una flecha de dos puntas ( ↔).
- Haz doble clic en el borde.
- Excel redimensionará instantáneamente la(s) columna(s) seleccionada(s) para que el contenido de la celda más ancha se ajuste perfectamente.
Consejos:
- Puedes autoajustar todas las columnas a la vez seleccionando toda la hoja (presiona Ctrl + A) y haciendo doble clic en cualquier borde de columna.
- Si has combinado celdas o tienes texto ajustado, es posible que el Autoajuste de Excel no se comporte como se espera; abordaremos esto en la sección Problemas Comunes de Autoajuste.
- Este método también funciona para filas; simplemente haz doble clic en el borde de la fila en su lugar.
Método 2: Autoajustar Columnas Usando la Cinta de Opciones de Excel
Si prefieres usar los menús de Excel en lugar de las acciones del ratón, la Cinta de Opciones proporciona una forma conveniente de autoajustar columnas y filas. Este enfoque es especialmente útil cuando se trabaja con múltiples celdas o cuando se desean explorar opciones de formato relacionadas.
Pasos:
- Selecciona las columnas que deseas ajustar.
- Haz clic y arrastra sobre los encabezados de las columnas (por ejemplo, de la A a la D), o presiona Ctrl + A para seleccionar todas las columnas.
- Ve a la pestaña Inicio en la Cinta de Opciones.
- En el grupo Celdas, haz clic en el menú desplegable Formato.
- Elige Autoajustar ancho de columna en el menú.
Excel redimensionará instantáneamente las columnas seleccionadas para que todo el contenido de las celdas sea visible sin superposición ni truncamiento.
Método 3: Autoajustar Columnas con Atajos de Teclado
Los atajos de teclado son la forma más rápida de autoajustar columnas una vez que has memorizado las teclas. Eliminan la necesidad de navegar por los menús o usar el ratón.
Para Windows:
-
Selecciona la(s) columna(s) a ajustar.
-
Presiona Alt + H, luego O y luego I. (Presiona cada tecla en secuencia, no todas a la vez).
Excel redimensionará automáticamente las columnas seleccionadas para ajustarse al contenido.
Para Mac:
-
Selecciona la(s) columna(s).
-
Presiona: Comando + Opción + 0 (cero)
Esto autoajusta instantáneamente las columnas seleccionadas.
Consejo:
Si deseas autoajustar todas las columnas de tu hoja de trabajo a la vez, presiona Ctrl + A (o Comando + A en Mac) para seleccionar todas las celdas y luego usa el atajo anterior.
Método 4: Autoajustar Columnas Usando VBA
Si necesitas autoajustar columnas con frecuencia como parte de un proceso repetitivo, como después de importar datos o generar informes, usar VBA (Visual Basic for Applications) puede ahorrarte un tiempo considerable.
Pasos:
-
Presiona Alt + F11 para abrir el editor de VBA.
-
Haz clic en Insertar → Módulo.
-
Copia y pega el siguiente código:
- Presiona F5 o vuelve a Excel y ejecuta la macro.
Sub AutoFit_All_Columns()
    Cells.EntireColumn.AutoFit
End Sub
Esta macro redimensiona automáticamente todas las columnas de la hoja de trabajo activa para ajustarse a su contenido.
Si solo deseas autoajustar columnas específicas, puedes modificar el código de esta manera:
Sub AutoFit_Specific_Columns()
    Columns("A:D").AutoFit
End Sub
Método 5: Autoajustar el Ancho de Columna Usando Python
Para los desarrolladores o analistas de datos que gestionan archivos de Excel mediante programación, Python ofrece una forma potente de automatizar el formato de las columnas. Usando Spire.XLS for Python, puedes autoajustar fácilmente las columnas sin abrir Excel.
Paso 1: Instalar la Biblioteca
Ejecuta el siguiente comando en tu terminal o símbolo del sistema:
pip install Spire.XLS
Paso 2: Autoajustar Columnas con Spire.XLS
Aquí tienes un ejemplo completo:
from spire.xls import *

# Create a new workbook
workbook = Workbook()

# Load an existing Excel file or create a new one
workbook.LoadFromFile("input.xlsx")

# Get the first worksheet
sheet = workbook.Worksheets[0]

# AutoFit all columns in the worksheet
sheet.AllocatedRange.AutoFitColumns()

# Save the modified file
workbook.SaveToFile("AutoFit_Output.xlsx", ExcelVersion.Version2016)
workbook.Dispose()
Esta flexibilidad hace de Spire.XLS una excelente opción para tareas automatizadas de informes o exportación de datos, especialmente al manejar archivos de Excel en operaciones por lotes.
Salida:
Leer más: Autoajustar Filas y Columnas en Excel Usando Python
Problemas Comunes de Autoajuste y Cómo Solucionarlos
A veces, el Autoajuste no se comporta como se espera. Aquí hay algunos problemas comunes y soluciones rápidas:
| Problema | Causa | Solución |
|---|---|---|
| El Autoajuste no redimensiona las celdas combinadas | Excel no puede autoajustar celdas combinadas | Descombina las celdas temporalmente, redimensiona y luego vuelve a combinar |
| El texto ajustado todavía se corta | La altura de la fila no se ajusta automáticamente | Usa Autoajustar alto de fila o habilita Ajustar texto |
| Las columnas ocultas no se redimensionan | Las columnas están ocultas | Mostrar columnas antes de aplicar el Autoajuste |
| Los resultados de las fórmulas no son visibles | La fórmula se actualiza después del Autoajuste | Recalcula (presiona F9) antes de ejecutar el Autoajuste |
Conclusión
Autoajustar es una de las herramientas de formato más simples pero más útiles de Excel. Ya sea que estés redimensionando columnas manualmente, usando atajos o automatizando con VBA o Python, estos métodos pueden mejorar drásticamente la legibilidad y la eficiencia del flujo de trabajo.
Para soluciones rápidas, hacer doble clic o usar la Cinta de Opciones funciona mejor. Para la automatización frecuente, VBA o Spire.XLS for Python te permiten integrar el Autoajuste en tareas de procesamiento de datos más grandes. Cualquiera que sea el método que elijas, ahorrarás tiempo y mantendrás tus hojas de cálculo con un aspecto limpio y profesional.
Preguntas Frecuentes Sobre el Autoajuste de Excel
P1. ¿Puedo autoajustar tanto filas como columnas al mismo tiempo?
Sí. Selecciona todas las celdas (Ctrl + A), luego elige Formato → Autoajustar ancho de columna y Autoajustar alto de fila desde la Cinta de Opciones.
P2. ¿Por qué el Autoajuste no funciona con celdas combinadas?
Excel no puede calcular el ancho correcto para las celdas combinadas. Deberás redimensionarlas manualmente.
P3. ¿Puedo configurar el Autoajuste para que se ejecute automáticamente cuando cambian los datos?
Sí, usando una macro de evento de VBA (p. ej., Worksheet_Change) o un script de Python que se actualiza después de cada actualización de datos.
P4. ¿Spire.XLS requiere que Excel esté instalado?
No. Spire.XLS for Python es una biblioteca independiente que no depende de Microsoft Excel.
Ver También
Spaltenbreite in Excel automatisch anpassen (5 Wege)
Inhaltsverzeichnis
- Was ist AutoAnpassen in Excel?
- Spalten automatisch anpassen mit der Maus
- Spalten automatisch anpassen über das Excel-Menüband
- Spalten automatisch anpassen mit Tastenkombinationen
- Spalten automatisch anpassen mit VBA
- Spaltenbreite automatisch anpassen mit Python
- Häufige Probleme mit AutoAnpassen und deren Lösungen
- Fazit
- FAQs zu Excel AutoAnpassen
Mit Pypi installieren
pip install Spire.XLS
Verwandte Links
Bei der Arbeit mit Excel stößt man oft auf Spalten, die entweder zu schmal sind, um den gesamten Text anzuzeigen, oder zu breit und wertvollen Platz verschwenden. Jede Spalte manuell anzupassen, kann zeitaufwändig sein, besonders in großen Tabellenblättern. Hier kommt AutoAnpassen ins Spiel.
Die AutoAnpassen-Funktion von Excel passt die Spaltenbreiten (und Zeilenhöhen) automatisch an die Größe des Inhalts an. Es ist ein einfaches, aber leistungsstarkes Werkzeug, das Ihre Arbeitsblätter sauber, lesbar und professionell aussehen lässt.
In diesem Artikel lernen Sie fünf einfache Möglichkeiten, die Spaltenbreite in Excel automatisch anzupassen – von schnellen Mausaktionen bis hin zur fortgeschrittenen Automatisierung mit VBA und Python. Egal, ob Sie gelegentlich Excel verwenden oder regelmäßig Daten verwalten, diese Methoden sparen Ihnen Zeit und verbessern Ihren Arbeitsablauf.
- Methode 1: Spalten automatisch anpassen mit der Maus
- Methode 2: Spalten automatisch anpassen über das Excel-Menüband
- Methode 3: Spalten automatisch anpassen mit Tastenkombinationen
- Methode 4: Spalten automatisch anpassen mit VBA
- Methode 5: Spaltenbreite automatisch anpassen mit Python
Was ist AutoAnpassen in Excel?
AutoAnpassen ist eine integrierte Funktion in Microsoft Excel, die die Breite von Spalten oder die Höhe von Zeilen automatisch an den Inhalt anpasst. Anstatt den Spaltenrand manuell zu ziehen, passt AutoAnpassen die Abmessungen so an, dass alle Texte, Zahlen oder Überschriften vollständig sichtbar sind, ohne abgeschnitten zu werden oder zusätzlichen leeren Raum zu hinterlassen.
Wenn eine Spalte beispielsweise Texteinträge unterschiedlicher Länge enthält, stellt AutoAnpassen sicher, dass jede Spalte breit genug wird, um den längsten Eintrag anzuzeigen. Sie können AutoAnpassen auf eine einzelne Spalte, mehrere Spalten oder sogar das gesamte Arbeitsblatt auf einmal anwenden.
Methode 1: Spalten automatisch anpassen mit der Maus
Der schnellste und intuitivste Weg, Spalten in Excel automatisch anzupassen, ist die Verwendung der Maus. Diese Methode erfordert keine Tastenkombinationen oder Menünavigation und ist daher ideal für schnelle Anpassungen bei der Überprüfung von Daten.
Schritte:
- Wählen Sie die Spalte(n) aus, die Sie anpassen möchten.
- Um eine einzelne Spalte auszuwählen, klicken Sie auf den Spaltenkopf (z. B. A, B, C).
- Um mehrere Spalten auszuwählen, klicken und ziehen Sie über die Köpfe oder halten Sie Strg (Windows) oder Befehl (Mac) gedrückt, während Sie jede einzelne auswählen.
- Bewegen Sie den Mauszeiger über den rechten Rand eines ausgewählten Spaltenkopfes.
- Der Cursor ändert sich in einen Doppelpfeil (↔).
- Doppelklicken Sie auf den Rand.
- Excel passt die ausgewählte(n) Spalte(n) sofort so an, dass der breiteste Zelleninhalt perfekt passt.
Tipps:
- Sie können alle Spalten auf einmal automatisch anpassen, indem Sie das gesamte Blatt auswählen (drücken Sie Strg + A) und auf einen beliebigen Spaltenrand doppelklicken.
- Wenn Sie Zellen verbunden oder Text umbrochen haben, verhält sich die AutoAnpassen-Funktion von Excel möglicherweise nicht wie erwartet – wir werden dies im Abschnitt Häufige Probleme mit AutoAnpassen behandeln.
- Diese Methode funktioniert auch für Zeilen – doppelklicken Sie einfach stattdessen auf den Zeilenrand.
Methode 2: Spalten automatisch anpassen über das Excel-Menüband
Wenn Sie lieber die Menüs von Excel anstelle von Mausaktionen verwenden, bietet das Menüband eine bequeme Möglichkeit, Spalten und Zeilen automatisch anzupassen. Dieser Ansatz ist besonders hilfreich, wenn Sie mit mehreren Zellen arbeiten oder verwandte Formatierungsoptionen erkunden möchten.
Schritte:
- Wählen Sie die Spalten aus, die Sie anpassen möchten.
- Klicken und ziehen Sie über die Spaltenköpfe (zum Beispiel A bis D) oder drücken Sie Strg + A, um alle Spalten auszuwählen.
- Gehen Sie zum Tab Start im Menüband.
- Klicken Sie in der Gruppe Zellen auf das Dropdown-Menü Format.
- Wählen Sie Spaltenbreite automatisch anpassen aus dem Menü.
Excel passt die ausgewählten Spalten sofort so an, dass alle Zelleninhalte ohne Überlappung oder Kürzung sichtbar sind.
Methode 3: Spalten automatisch anpassen mit Tastenkombinationen
Tastenkombinationen sind der schnellste Weg, Spalten automatisch anzupassen, sobald Sie sich die Tasten gemerkt haben. Sie machen die Navigation durch Menüs oder die Verwendung der Maus überflüssig.
Für Windows:
-
Wählen Sie die Spalte(n) zum Anpassen aus.
-
Drücken Sie Alt + H, dann O und dann I. (Drücken Sie jede Taste nacheinander, nicht alle auf einmal.)
Excel passt die ausgewählten Spalten automatisch an den Inhalt an.
Für Mac:
-
Wählen Sie die Spalte(n) aus.
-
Drücken Sie: Befehl + Option + 0 (Null)
Dies passt die ausgewählten Spalten sofort automatisch an.
Tipp:
Wenn Sie alle Spalten in Ihrem Arbeitsblatt auf einmal automatisch anpassen möchten, drücken Sie Strg + A (oder Befehl + A auf dem Mac), um alle Zellen auszuwählen, und verwenden Sie dann die obige Tastenkombination.
Methode 4: Spalten automatisch anpassen mit VBA
Wenn Sie häufig Spalten als Teil eines sich wiederholenden Prozesses automatisch anpassen müssen – wie nach dem Datenimport oder der Berichterstellung – kann die Verwendung von VBA (Visual Basic for Applications) erheblich Zeit sparen.
Schritte:
-
Drücken Sie Alt + F11, um den VBA-Editor zu öffnen.
-
Klicken Sie auf Einfügen → Modul.
-
Kopieren Sie den folgenden Code und fügen Sie ihn ein:
- Drücken Sie F5 oder kehren Sie zu Excel zurück und führen Sie das Makro aus.
Sub AutoFit_All_Columns()
    Cells.EntireColumn.AutoFit
End Sub
Dieses Makro passt alle Spalten im aktiven Arbeitsblatt automatisch an ihren Inhalt an.
Wenn Sie nur bestimmte Spalten automatisch anpassen möchten, können Sie den Code wie folgt ändern:
Sub AutoFit_Specific_Columns()
    Columns("A:D").AutoFit
End Sub
Methode 5: Spaltenbreite automatisch anpassen mit Python
Für Entwickler oder Datenanalysten, die Excel-Dateien programmgesteuert verwalten, bietet Python eine leistungsstarke Möglichkeit, die Spaltenformatierung zu automatisieren. Mit Spire.XLS for Python können Sie Spalten einfach automatisch anpassen, ohne Excel zu öffnen.
Schritt 1: Installieren Sie die Bibliothek
Führen Sie den folgenden Befehl in Ihrem Terminal oder Ihrer Eingabeaufforderung aus:
pip install Spire.XLS
Schritt 2: Spalten mit Spire.XLS automatisch anpassen
Hier ist ein vollständiges Beispiel:
from spire.xls import *

# Create a new workbook
workbook = Workbook()

# Load an existing Excel file or create a new one
workbook.LoadFromFile("input.xlsx")

# Get the first worksheet
sheet = workbook.Worksheets[0]

# AutoFit all columns in the worksheet
sheet.AllocatedRange.AutoFitColumns()

# Save the modified file
workbook.SaveToFile("AutoFit_Output.xlsx", ExcelVersion.Version2016)
workbook.Dispose()
Diese Flexibilität macht Spire.XLS zu einer ausgezeichneten Wahl für automatisierte Berichts- oder Datenexportaufgaben, insbesondere bei der Stapelverarbeitung von Excel-Dateien.
Ausgabe:
Lesen Sie weiter: Zeilen und Spalten in Excel mit Python automatisch anpassen
Häufige Probleme mit AutoAnpassen und deren Lösungen
Manchmal verhält sich AutoAnpassen nicht wie erwartet. Hier sind einige häufige Probleme und schnelle Lösungen:
| Problem | Ursache | Lösung |
|---|---|---|
| AutoAnpassen ändert die Größe von verbundenen Zellen nicht | Excel kann verbundene Zellen nicht automatisch anpassen | Heben Sie die Zellverbindung vorübergehend auf, passen Sie die Größe an und verbinden Sie sie dann erneut |
| Umgebrochener Text wird immer noch abgeschnitten | Zeilenhöhe passt sich nicht automatisch an | Verwenden Sie Zeilenhöhe automatisch anpassen oder aktivieren Sie den Textumbruch |
| Ausgeblendete Spalten ändern ihre Größe nicht | Spalten sind ausgeblendet | Blenden Sie Spalten ein, bevor Sie AutoAnpassen anwenden |
| Formelergebnisse nicht sichtbar | Formel wird nach AutoAnpassen aktualisiert | Neu berechnen (drücken Sie F9), bevor Sie AutoAnpassen ausführen |
Fazit
AutoAnpassen ist eines der einfachsten und dennoch nützlichsten Formatierungswerkzeuge von Excel. Ob Sie Spalten manuell anpassen, Tastenkombinationen verwenden oder mit VBA oder Python automatisieren, diese Methoden können die Lesbarkeit und die Effizienz des Arbeitsablaufs drastisch verbessern.
Für schnelle Korrekturen funktioniert Doppelklicken oder die Verwendung des Menübands am besten. Für häufige Automatisierungen ermöglichen VBA oder Spire.XLS for Python die Integration von AutoAnpassen in größere Datenverarbeitungsaufgaben. Welche Methode Sie auch wählen, Sie sparen Zeit und halten Ihre Tabellenblätter sauber und professionell.
FAQs zu Excel AutoAnpassen
F1. Kann ich Zeilen und Spalten gleichzeitig automatisch anpassen?
Ja. Wählen Sie alle Zellen aus (Strg + A) und wählen Sie dann Format → Spaltenbreite automatisch anpassen und Zeilenhöhe automatisch anpassen aus dem Menüband.
F2. Warum funktioniert AutoAnpassen nicht bei verbundenen Zellen?
Excel kann die korrekte Breite für verbundene Zellen nicht berechnen. Sie müssen sie manuell anpassen.
F3. Kann ich AutoAnpassen so einstellen, dass es bei Datenänderungen automatisch ausgeführt wird?
Ja, durch die Verwendung eines VBA-Ereignismakros (z. B. Worksheet_Change) oder eines Python-Skripts, das nach jeder Datenaktualisierung aktualisiert wird.
F4. Benötigt Spire.XLS eine installierte Excel-Version?
Nein. Spire.XLS for Python ist eine eigenständige Bibliothek, die nicht von Microsoft Excel abhängig ist.