Come creare un grafico a torta in PowerPoint passo dopo passo
Indice
Installa con Pypi
pip install spire.presentation
Link Correlati

Rendere i tuoi dati facili da capire può essere complicato, specialmente se non sei sicuro di come trasformare i numeri in elementi visivi. Se hai mai aperto PowerPoint e ti sei chiesto come creare rapidamente un grafico, sei nel posto giusto. In questa guida, imparerai come creare un grafico a torta in PowerPoint, passo dopo passo. Tratteremo tutto, dall'aggiunta di un grafico alla personalizzazione di colori ed etichette, in modo che le tue diapositive appaiano chiare e professionali. Alla fine, sarai in grado di mostrare i tuoi dati in un modo semplice, attraente e facile da capire per chiunque.
- Crea Grafico a Torta Manualmente
- Crea Grafico a Torta Automaticamente
- La Conclusione
- Domande Frequenti
Come Creare un Grafico a Torta in PowerPoint Manualmente
Creare un grafico a torta in PowerPoint è più facile di quanto si possa pensare. In questo capitolo, ti guideremo passo dopo passo attraverso il processo. Innanzitutto, assicurati di avere i tuoi dati pronti insieme a una presentazione PowerPoint. Soprattutto, avrai bisogno di Microsoft PowerPoint o di un'altra app di modifica delle presentazioni installata sul tuo dispositivo. In questo tutorial, useremo Microsoft PowerPoint come esempio. Una volta che sei pronto, tuffiamoci nella guida di oggi.
Passaggio 1: Apri la Tua Presentazione
Inizia individuando e aprendo il file PowerPoint in cui desideri aggiungere il tuo grafico.
Passaggio 2: Scegli la Diapositiva
Seleziona la diapositiva in cui deve apparire il grafico a torta. Assicurati che sia pronta per i dati che vuoi mostrare.
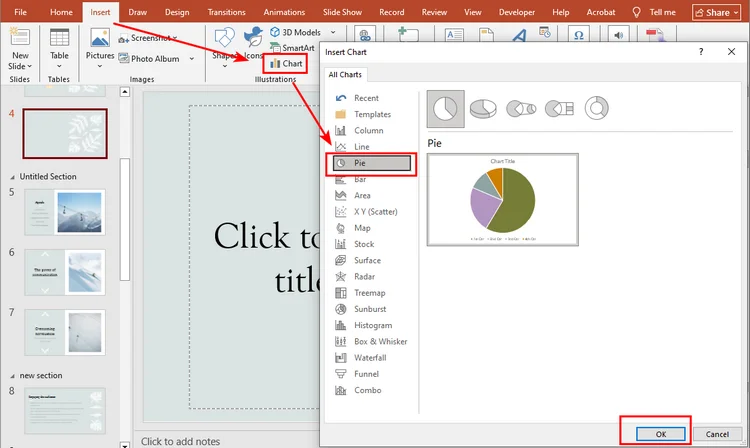
Passaggio 3: Inserisci il Grafico
Vai alla scheda Inserisci sulla Barra multifunzione in alto e fai clic su Grafico.
Passaggio 4: Scegli il Tuo Grafico a Torta
Nella finestra di dialogo Inserisci grafico, seleziona Torta dal pannello di sinistra. Vedrai diversi tipi di grafici a torta: se vuoi creare un grafico a torta 3D sulla diapositiva, scegli la seconda opzione. Fai clic su OK per inserire il grafico.
Passaggio 5: Inserisci i Tuoi Dati
PowerPoint mostrerà dati predefiniti in un foglio simile a Excel. Sostituiscili con i tuoi numeri per soddisfare le esigenze della tua presentazione.

Passaggio 6: Personalizza il Grafico
Fai clic sul grafico e vai alla scheda Progettazione grafico sulla Barra multifunzione. Qui puoi cambiare lo stile, i colori, le etichette o persino passare a un altro tipo di grafico. Sperimenta finché non avrà l'aspetto giusto per la tua diapositiva.
Ecco l'aspetto finale del grafico a torta: 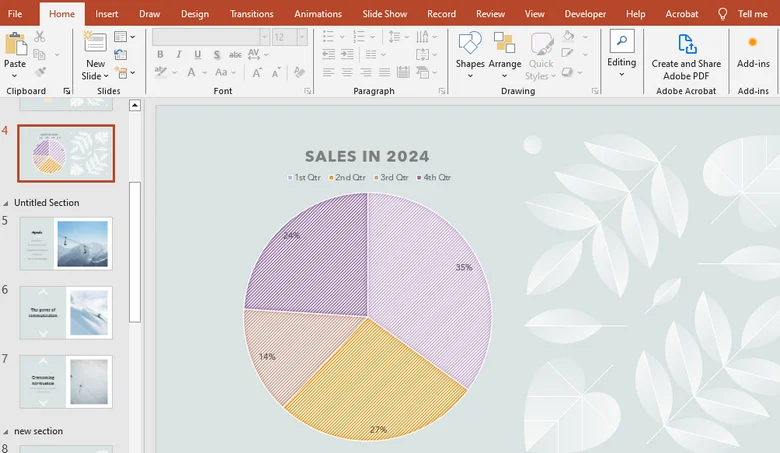
Come Creare Automaticamente un Grafico a Torta in una Presentazione PowerPoint
Dopo aver imparato come aggiungere manualmente un grafico a torta in PowerPoint, avrai probabilmente notato che i passaggi possono essere un po' noiosi, specialmente quando si aggiornano i dati o si personalizza il grafico. Quindi, c'è un modo più veloce?
L'uso del codice per generare grafici è un'ottima soluzione. Con Spire.Presentation, una libreria PowerPoint professionale, puoi creare facilmente grafici in modo automatico, gestendo tutto, dalla configurazione del file all'inserimento dei dati e alla personalizzazione del grafico, in un unico passaggio.
Ecco una guida dettagliata su come creare un grafico in PowerPoint utilizzando Spire.Presentation:
Passaggio 1: Installa Spire.Presentation
In questo tutorial, useremo Spire.Presentation for Python. Puoi installarlo tramite pip aprendo il tuo ambiente Python (ad esempio, il terminale di VSCode) ed eseguendo:
pip install spire.presentation
Premi Invio, e la libreria verrà installata.
Passaggio 2: Scrivi il Codice
Ecco la logica generale per creare un grafico a torta con Spire.Presentation:
- Importa il file �?Carica la presentazione PowerPoint con cui vuoi lavorare o crea una nuova presentazione.
- Accedi alla diapositiva di destinazione �?Seleziona la diapositiva in cui verrà inserito il grafico a torta.
- Inserisci il grafico a torta �?Aggiungi un oggetto grafico a torta alla diapositiva.
- Imposta il titolo del grafico �?Dai un titolo al tuo grafico a torta.
- Aggiungi dati al grafico �?Riempi il grafico a torta con il tuo set di dati.
- Personalizza i colori del grafico �?Regola i colori per rendere il grafico visivamente accattivante.
Di seguito è riportato il codice Python completo che mostra come creare un grafico a torta durante la creazione di una nuova presentazione PowerPoint:
from spire.presentation.common import *
from spire.presentation import *
# Create a Presentation instance
presentation = Presentation()
# Add a pie chart at a specified location on the first slide
rect = RectangleF.FromLTRB (40, 100, 590, 420)
chart = presentation.Slides[0].Shapes.AppendChartInit (ChartType.Pie, rect, False)
# Set and format chart title
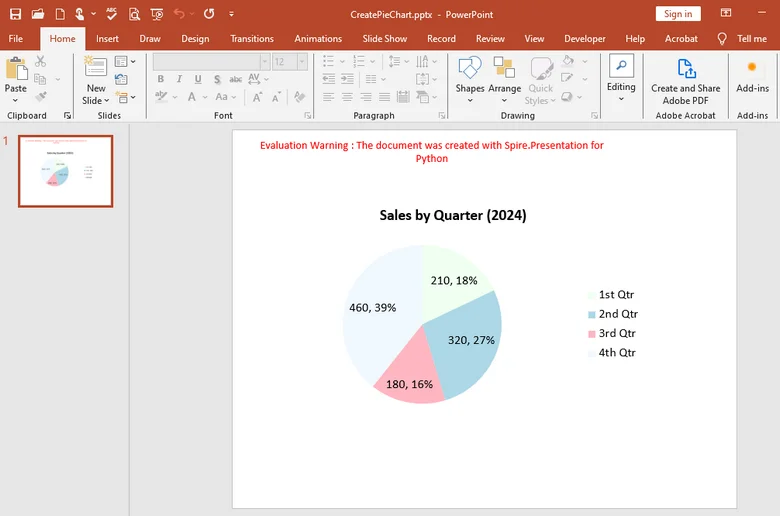
chart.ChartTitle.TextProperties.Text = "Sales by Quarter (2024)"
chart.ChartTitle.TextProperties.IsCentered = True
chart.ChartTitle.Height = 30
chart.HasTitle = True
# Define some data
quarters = ["1st Qtr", "2nd Qtr", "3rd Qtr", "4th Qtr"]
sales = [210, 320, 180, 460]
# Append data to ChartData, which represents a data table where the chart data is stored
chart.ChartData[0,0].Text = "Quarters"
chart.ChartData[0,1].Text = "Sales"
i = 0
while i < len(quarters):
chart.ChartData[i + 1,0].Text = quarters[i]
chart.ChartData[i + 1,1].NumberValue = sales[i]
i += 1
# Set series labels and category labels
chart.Series.SeriesLabel = chart.ChartData["B1","B1"]
chart.Categories.CategoryLabels = chart.ChartData["A2","A5"]
# Set values for series
chart.Series[0].Values = chart.ChartData["B2","B5"]
# Add data points to series
for i, unusedItem in enumerate(chart.Series[0].Values):
cdp = ChartDataPoint(chart.Series[0])
cdp.Index = i
chart.Series[0].DataPoints.Add(cdp)
# Fill each data point with a different color
chart.Series[0].DataPoints[0].Fill.FillType = FillFormatType.Solid
chart.Series[0].DataPoints[0].Fill.SolidColor.Color = Color.get_Honeydew()
chart.Series[0].DataPoints[1].Fill.FillType = FillFormatType.Solid
chart.Series[0].DataPoints[1].Fill.SolidColor.Color = Color.get_LightBlue()
chart.Series[0].DataPoints[2].Fill.FillType = FillFormatType.Solid
chart.Series[0].DataPoints[2].Fill.SolidColor.Color = Color.get_LightPink()
chart.Series[0].DataPoints[3].Fill.FillType = FillFormatType.Solid
chart.Series[0].DataPoints[3].Fill.SolidColor.Color = Color.get_AliceBlue()
# Set the data labels to display label value and percentage value
chart.Series[0].DataLabels.LabelValueVisible = True
chart.Series[0].DataLabels.PercentValueVisible = True
# Save the result file
presentation.SaveToFile("E:/Administrator/Python1/output/CreatePieChart.pptx", FileFormat.Pptx2016)
presentation.Dispose()
Ecco il grafico a torta realizzato da Spire.Presentation:
Con Spire.Presentation, puoi fare molto di più che creare semplici grafici a torta. Ti consente anche di generare grafici a colonne, grafici a linee, grafici a barre e molti altri tipi di elementi visivi direttamente nelle tue diapositive. Inoltre, la libreria supporta più linguaggi di programmazione: che tu preferisca C#, Java, Python o JavaScript, puoi creare e personalizzare facilmente grafici con poche righe di codice.
La Conclusione
In questa guida, abbiamo esaminato passo dopo passo come creare un grafico a torta in PowerPoint, dall'inserimento manuale del grafico alla personalizzazione del suo stile e dei suoi colori. Mentre il metodo manuale funziona bene per compiti semplici, Spire.Presentation funziona meglio in situazioni complicate. Con questa libreria professionale, puoi automatizzare l'intero processo, dall'aggiunta di grafici e l'inserimento di dati alla personalizzazione del loro aspetto. Provalo subito ottenendo una licenza temporanea per 30 giorni, rendendo la creazione di grafici più veloce ed efficiente che mai.
Domande Frequenti sulla Creazione di un Grafico a Torta in PowerPoint
1. Come si crea un grafico a torta passo dopo passo in PowerPoint?
Vai su Inserisci �?Grafico �?Torta, quindi sostituisci i dati di esempio con i tuoi e regola lo stile del grafico in Progettazione grafico.
2. Come posso mostrare le percentuali in un grafico a torta?
Fai clic sul grafico, seleziona Etichette dati �?Altre opzioni e seleziona Percentuale per visualizzare i valori come percentuali.
3. Come si crea un grafico a torta di avanzamento in PowerPoint?
Usa un grafico a Torta o ad Anello con due valori �?avanzamento e rimanente �?e formatta le fette con colori diversi.
4. Posso automatizzare la creazione di grafici a torta?
Sì. Puoi usare Spire.Presentation per generare e modificare grafici automaticamente dopo aver ottenuto una licenza temporanea.
LEGGI ANCHE
Como criar um gráfico de pizza no PowerPoint passo a passo
Índice
Instalar com Pypi
pip install spire.presentation
Links Relacionados
Tornar seus dados fáceis de entender pode ser complicado, especialmente se você não tem certeza de como transformar números em visuais. Se você já abriu o PowerPoint e se perguntou como fazer um gráfico rapidamente, você está no lugar certo. Neste guia, você aprenderá como criar um gráfico de pizza no PowerPoint, passo a passo. Cobriremos tudo, desde adicionar um gráfico até personalizar cores e rótulos, para que seus slides pareçam claros e profissionais. Ao final, você será capaz de mostrar seus dados de uma forma simples, atraente e fácil para qualquer um entender.
- Criar Gráfico de Pizza Manualmente
- Criar Gráfico de Pizza Automaticamente
- A Conclusão
- Perguntas Frequentes
Como Criar um Gráfico de Pizza no PowerPoint Manualmente
Fazer um gráfico de pizza no PowerPoint é mais fácil do que você imagina. Neste capítulo, vamos guiá-lo passo a passo pelo processo. Primeiro, certifique-se de que seus dados estão prontos, juntamente com uma apresentação do PowerPoint. Mais importante, você precisará do Microsoft PowerPoint ou de outro aplicativo de edição de apresentações instalado em seu dispositivo. Neste tutorial, usaremos o Microsoft PowerPoint como nosso exemplo. Quando estiver pronto, vamos mergulhar no guia de hoje.
Passo 1: Abra Sua Apresentação
Comece localizando e abrindo o arquivo do PowerPoint onde você deseja adicionar seu gráfico.
Passo 2: Escolha o Slide
Selecione o slide onde o gráfico de pizza deve aparecer. Certifique-se de que ele está pronto para os dados que você deseja mostrar.
Passo 3: Inserir o Gráfico
Vá para a guia Inserir na Faixa de Opções na parte superior e clique em Gráfico.
Passo 4: Escolha Seu Gráfico de Pizza
Na caixa de diálogo Inserir Gráfico, selecione Pizza no painel esquerdo. Você verá vários tipos de gráficos de pizza �?se quiser criar um gráfico de Pizza 3D no slide, escolha a segunda opção. Clique em OK para inserir o gráfico.
Passo 5: Insira Seus Dados
O PowerPoint mostrará dados padrão em uma planilha semelhante ao Excel. Substitua-os por seus próprios números para atender às necessidades da sua apresentação.
Passo 6: Personalize o Gráfico
Clique no gráfico e vá para a guia Design do Gráfico na Faixa de Opções. Aqui, você pode alterar o estilo, cores, rótulos ou até mesmo mudar para outro tipo de gráfico. Brinque com as opções até que ele fique perfeito para o seu slide.
Aqui está a aparência final do gráfico de pizza:
Como Criar um Gráfico de Pizza em uma Apresentação do PowerPoint Automaticamente
Depois de aprender a adicionar um gráfico de pizza manualmente no PowerPoint, você provavelmente notou que os passos podem ser um pouco tediosos, especialmente ao atualizar dados ou personalizar o gráfico. Então, existe uma maneira mais rápida?
Usar código para gerar gráficos é uma ótima solução. Com o Spire.Presentation, uma biblioteca profissional para PowerPoint, você pode criar gráficos facilmente de forma automática, cuidando de tudo, desde a configuração do arquivo até a entrada de dados e a personalização do gráfico, de uma só vez.
Aqui está um guia detalhado sobre como criar um gráfico no PowerPoint usando o Spire.Presentation:
Passo 1: Instale o Spire.Presentation
Neste tutorial, usaremos o Spire.Presentation for Python. Você pode instalá-lo via pip abrindo seu ambiente Python (por exemplo, o terminal do VSCode) e executando:
pip install spire.presentation
Pressione Enter, e a biblioteca será instalada.
Passo 2: Escreva o Código
Aqui está a lógica geral para criar um gráfico de pizza com o Spire.Presentation:
- Importar o arquivo �?Carregue a apresentação do PowerPoint com a qual você deseja trabalhar ou crie uma nova apresentação.
- Acessar o slide de destino �?Selecione o slide onde o gráfico de pizza será inserido.
- Inserir o gráfico de pizza �?Adicione um objeto de gráfico de pizza ao slide.
- Definir o título do gráfico �?Dê um título ao seu gráfico de pizza.
- Adicionar dados ao gráfico �?Preencha o gráfico de pizza com seu conjunto de dados.
- Personalizar as cores do gráfico �?Ajuste as cores para tornar o gráfico visualmente atraente.
Abaixo está o código Python completo mostrando como criar um gráfico de pizza ao fazer uma nova apresentação do PowerPoint:
from spire.presentation.common import *
from spire.presentation import *

# Create a Presentation instance
presentation = Presentation()

# Add a pie chart at a specified location on the first slide
rect = RectangleF.FromLTRB (40, 100, 590, 420)
chart = presentation.Slides[0].Shapes.AppendChartInit (ChartType.Pie, rect, False)

# Set and format chart title
chart.ChartTitle.TextProperties.Text = "Sales by Quarter (2024)"
chart.ChartTitle.TextProperties.IsCentered = True
chart.ChartTitle.Height = 30
chart.HasTitle = True

# Define some data
quarters = ["1st Qtr", "2nd Qtr", "3rd Qtr", "4th Qtr"]
sales = [210, 320, 180, 460]

# Append data to ChartData, which represents a data table where the chart data is stored
chart.ChartData[0,0].Text = "Quarters"
chart.ChartData[0,1].Text = "Sales"
i = 0
while i < len(quarters):
    chart.ChartData[i + 1,0].Text = quarters[i]
    chart.ChartData[i + 1,1].NumberValue = sales[i]
    i += 1

# Set series labels and category labels
chart.Series.SeriesLabel = chart.ChartData["B1","B1"]
chart.Categories.CategoryLabels = chart.ChartData["A2","A5"]

# Set values for series
chart.Series[0].Values = chart.ChartData["B2","B5"]

# Add data points to series
for i, unusedItem in enumerate(chart.Series[0].Values):
    cdp = ChartDataPoint(chart.Series[0])
    cdp.Index = i
    chart.Series[0].DataPoints.Add(cdp)

# Fill each data point with a different color
chart.Series[0].DataPoints[0].Fill.FillType = FillFormatType.Solid
chart.Series[0].DataPoints[0].Fill.SolidColor.Color = Color.get_Honeydew()
chart.Series[0].DataPoints[1].Fill.FillType = FillFormatType.Solid
chart.Series[0].DataPoints[1].Fill.SolidColor.Color = Color.get_LightBlue()
chart.Series[0].DataPoints[2].Fill.FillType = FillFormatType.Solid
chart.Series[0].DataPoints[2].Fill.SolidColor.Color = Color.get_LightPink()
chart.Series[0].DataPoints[3].Fill.FillType = FillFormatType.Solid
chart.Series[0].DataPoints[3].Fill.SolidColor.Color = Color.get_AliceBlue()

# Set the data labels to display label value and percentage value
chart.Series[0].DataLabels.LabelValueVisible = True
chart.Series[0].DataLabels.PercentValueVisible = True

# Save the result file
presentation.SaveToFile("E:/Administrator/Python1/output/CreatePieChart.pptx", FileFormat.Pptx2016)
presentation.Dispose()
Aqui está o gráfico de pizza feito pelo Spire.Presentation:
Com o Spire.Presentation, você pode fazer muito mais do que apenas criar gráficos de pizza. Ele também permite que você gere gráficos de colunas, gráficos de linhas, gráficos de barras e muitos outros tipos de visuais diretamente em seus slides. Além disso, a biblioteca suporta várias linguagens de programação �?quer você prefira C#, Java, Python ou JavaScript, você pode criar e personalizar gráficos facilmente com apenas algumas linhas de código.
A Conclusão
Neste guia, percorremos passo a passo como criar um gráfico de pizza no PowerPoint, desde a inserção manual do gráfico até a personalização de seu estilo e cores. Embora o método manual funcione bem para tarefas simples, o Spire.Presentation funciona melhor em situações complicadas. Com esta biblioteca profissional, você pode automatizar todo o processo �?desde adicionar gráficos e inserir dados até personalizar sua aparência. Experimente imediatamente obtendo uma licença temporária por 30 dias, tornando a criação de gráficos mais rápida e eficiente do que nunca.
Perguntas Frequentes sobre a Criação de um Gráfico de Pizza no PowerPoint
1. Como crio um gráfico de pizza passo a passo no PowerPoint?
Vá para Inserir �?Gráfico �?Pizza, depois substitua os dados de exemplo pelos seus e ajuste o estilo do gráfico em Design do Gráfico.
2. Como posso mostrar porcentagens em um gráfico de pizza?
Clique no gráfico, selecione Rótulos de Dados �?Mais Opções e marque Porcentagem para exibir os valores como porcentagens.
3. Como faço um gráfico de pizza de progresso no PowerPoint?
Use um gráfico de Pizza ou Rosca com dois valores �?progresso e restante �?e formate as fatias com cores diferentes.
4. Posso automatizar a criação de gráficos de pizza?
Sim. Você pode usar o Spire.Presentation para gerar e editar gráficos automaticamente após obter uma licença temporária.
LEIA TAMBÉM
PowerPoint에서 원형 차트를 단계별로 만드는 방법
Pypi로 설치
pip install spire.presentation
관련 링크
데이터를 이해하기 쉽게 만드는 것은 까다로울 수 있으며, 특히 숫자를 시각 자료로 바꾸는 방법을 잘 모르는 경우 더욱 그렇습니다. PowerPoint를 열고 빠르게 차트를 만드는 방법을 궁금해한 적이 있다면 제대로 찾아오셨습니다. 이 가이드에서는 PowerPoint에서 원형 차트를 만드는 방법을 단계별로 배웁니다. 차트 추가부터 색상 및 레이블 사용자 지정까지 모든 것을 다루므로 슬라이드가 명확하고 전문적으로 보일 것입니다. 마지막에는 간단하고 매력적이며 누구나 이해하기 쉬운 방식으로 데이터를 표시할 수 있게 될 것입니다.
PowerPoint에서 수동으로 원형 차트를 만드는 방법
PowerPoint에서 원형 차트를 만드는 것은 생각보다 쉽습니다. 이 장에서는 그 과정을 단계별로 안내합니다. 먼저, 데이터와 함께 PowerPoint 프레젠테이션을 준비했는지 확인하세요. 가장 중요한 것은 장치에 Microsoft PowerPoint 또는 다른 프레젠테이션 편집 앱이 설치되어 있어야 한다는 것입니다. 이 튜토리얼에서는 Microsoft PowerPoint를 예로 사용하겠습니다. 준비가 되면 오늘의 가이드를 시작하겠습니다.
1단계: 프레젠테이션 열기
차트를 추가하려는 PowerPoint 파일을 찾아 엽니다.
2단계: 슬라이드 선택
원형 차트가 나타나야 할 슬라이드를 선택합니다. 표시하려는 데이터에 맞게 준비되었는지 확인하세요.
3단계: 차트 삽입
상단의 리본 메뉴에서 삽입 탭으로 이동하여 차트를 클릭합니다.
4단계: 원형 차트 선택
차트 삽입 대화 상자의 왼쪽 패널에서 원형을 선택합니다. 여러 유형의 원형 차트가 표시됩니다. 슬라이드에 3D 원형 차트를 만들려면 두 번째 옵션을 선택하세요. 확인을 클릭하여 차트를 삽입합니다.
5단계: 데이터 입력
PowerPoint는 Excel과 유사한 시트에 기본 데이터를 표시합니다. 프레젠테이션 요구 사항에 맞게 자신의 숫자로 바꾸세요.
6단계: 차트 사용자 지정
차트를 클릭하고 리본의 차트 디자인 탭으로 이동합니다. 여기에서 스타일, 색상, 레이블을 변경하거나 다른 차트 유형으로 전환할 수도 있습니다. 슬라이드에 딱 맞게 보일 때까지 여러 가지를 시도해 보세요.
다음은 원형 차트의 최종 모습입니다:
PowerPoint 프레젠테이션에서 자동으로 원형 차트를 만드는 방법
PowerPoint에서 수동으로 원형 차트를 추가하는 방법을 배운 후, 특히 데이터를 업데이트하거나 차트를 사용자 지정할 때 단계가 약간 지루할 수 있다는 것을 눈치채셨을 것입니다. 그렇다면 더 빠른 방법이 있을까요?
코드를 사용하여 차트를 생성하는 것은 훌륭한 해결책입니다. 전문적인 PowerPoint 라이브러리인 Spire.Presentation을 사용하면 파일 설정부터 데이터 입력 및 차트 사용자 지정까지 모든 것을 한 번에 처리하여 자동으로 차트를 쉽게 만들 수 있습니다.
다음은 Spire.Presentation을 사용하여 PowerPoint에서 차트를 만드는 방법에 대한 자세한 가이드입니다:
1단계: Spire.Presentation 설치
이 튜토리얼에서는 Spire.Presentation for Python을 사용합니다. Python 환경(예: VSCode 터미널)을 열고 다음을 실행하여 pip를 통해 설치할 수 있습니다.
pip install spire.presentation
Enter 키를 누르면 라이브러리가 설치됩니다.
2단계: 코드 작성
다음은 Spire.Presentation으로 원형 차트를 만들기 위한 전체적인 논리입니다:
- 파일 가져오기 – 작업하려는 PowerPoint 프레젠테이션을 로드하거나 새 프레젠테이션을 만듭니다.
- 대상 슬라이드에 액세스 – 원형 차트가 삽입될 슬라이드를 선택합니다.
- 원형 차트 삽입 – 슬라이드에 원형 차트 개체를 추가합니다.
- 차트 제목 설정 – 원형 차트에 제목을 지정합니다.
- 차트에 데이터 추가 – 데이터 세트로 원형 차트를 채웁니다.
- 차트 색상 사용자 지정 – 차트를 시각적으로 매력적으로 만들기 위해 색상을 조정합니다.
다음은 새 PowerPoint 프레젠테이션을 만들면서 원형 차트를 만드는 방법을 보여주는 전체 Python 코드입니다:
from spire.presentation.common import *
from spire.presentation import *

# Create a Presentation instance
presentation = Presentation()

# Add a pie chart at a specified location on the first slide
rect = RectangleF.FromLTRB (40, 100, 590, 420)
chart = presentation.Slides[0].Shapes.AppendChartInit (ChartType.Pie, rect, False)

# Set and format chart title
chart.ChartTitle.TextProperties.Text = "Sales by Quarter (2024)"
chart.ChartTitle.TextProperties.IsCentered = True
chart.ChartTitle.Height = 30
chart.HasTitle = True

# Define some data
quarters = ["1st Qtr", "2nd Qtr", "3rd Qtr", "4th Qtr"]
sales = [210, 320, 180, 460]

# Append data to ChartData, which represents a data table where the chart data is stored
chart.ChartData[0,0].Text = "Quarters"
chart.ChartData[0,1].Text = "Sales"
i = 0
while i < len(quarters):
    chart.ChartData[i + 1,0].Text = quarters[i]
    chart.ChartData[i + 1,1].NumberValue = sales[i]
    i += 1

# Set series labels and category labels
chart.Series.SeriesLabel = chart.ChartData["B1","B1"]
chart.Categories.CategoryLabels = chart.ChartData["A2","A5"]

# Set values for series
chart.Series[0].Values = chart.ChartData["B2","B5"]

# Add data points to series
for i, unusedItem in enumerate(chart.Series[0].Values):
    cdp = ChartDataPoint(chart.Series[0])
    cdp.Index = i
    chart.Series[0].DataPoints.Add(cdp)

# Fill each data point with a different color
chart.Series[0].DataPoints[0].Fill.FillType = FillFormatType.Solid
chart.Series[0].DataPoints[0].Fill.SolidColor.Color = Color.get_Honeydew()
chart.Series[0].DataPoints[1].Fill.FillType = FillFormatType.Solid
chart.Series[0].DataPoints[1].Fill.SolidColor.Color = Color.get_LightBlue()
chart.Series[0].DataPoints[2].Fill.FillType = FillFormatType.Solid
chart.Series[0].DataPoints[2].Fill.SolidColor.Color = Color.get_LightPink()
chart.Series[0].DataPoints[3].Fill.FillType = FillFormatType.Solid
chart.Series[0].DataPoints[3].Fill.SolidColor.Color = Color.get_AliceBlue()

# Set the data labels to display label value and percentage value
chart.Series[0].DataLabels.LabelValueVisible = True
chart.Series[0].DataLabels.PercentValueVisible = True

# Save the result file
presentation.SaveToFile("E:/Administrator/Python1/output/CreatePieChart.pptx", FileFormat.Pptx2016)
presentation.Dispose()
다음은 Spire.Presentation으로 만든 원형 차트입니다:
Spire.Presentation을 사용하면 단순히 원형 차트를 만드는 것 이상의 훨씬 더 많은 작업을 수행할 수 있습니다. 또한 슬라이드에서 직접 세로 막대형 차트, 꺾은선형 차트, 가로 막대형 차트 및 기타 여러 유형의 시각 자료를 생성할 수 있습니다. 또한 이 라이브러리는 여러 프로그래밍 언어를 지원합니다. C#, Java, Python 또는 JavaScript 중 어떤 것을 선호하든 몇 줄의 코드만으로 쉽게 차트를 만들고 사용자 지정할 수 있습니다.
결론
이 가이드에서는 차트를 수동으로 삽입하는 것부터 스타일과 색상을 사용자 지정하는 것까지 PowerPoint에서 원형 차트를 만드는 방법을 단계별로 살펴보았습니다. 수동 방법은 간단한 작업에는 잘 작동하지만 복잡한 상황에서는 Spire.Presentation이 더 잘 작동합니다. 이 전문 라이브러리를 사용하면 차트 추가 및 데이터 입력부터 모양 사용자 지정까지 전체 프로세스를 자동화할 수 있습니다. 30일 임시 라이선스를 받아 즉시 사용해 보세요. 차트 생성이 그 어느 때보다 빠르고 효율적으로 이루어집니다.
PowerPoint에서 원형 차트 만들기에 대한 자주 묻는 질문
1. PowerPoint에서 단계별로 원형 차트를 어떻게 만드나요?
삽입 → 차트 → 원형으로 이동한 다음 샘플 데이터를 자신의 데이터로 바꾸고 차트 디자인에서 차트 스타일을 조정합니다.
2. 원형 차트에 백분율을 어떻게 표시하나요?
차트를 클릭하고 데이터 레이블 → 추가 옵션을 선택한 다음 백분율을 선택하여 값을 백분율로 표시합니다.
3. PowerPoint에서 진행률 원형 차트를 어떻게 만드나요?
진행률과 나머지 두 가지 값이 있는 원형 또는 도넛형 차트를 사용하고 조각을 다른 색상으로 서식 지정합니다.
4. 원형 차트 생성을 자동화할 수 있나요?
예. 임시 라이선스를 받은 후 Spire.Presentation을 사용하여 차트를 자동으로 생성하고 편집할 수 있습니다.
함께 읽기
Comment créer un graphique en secteurs dans PowerPoint étape par étape
Table des matières
Installer avec Pypi
pip install spire.presentation
Liens connexes
Rendre vos données faciles à comprendre peut être délicat, surtout si vous ne savez pas comment transformer des chiffres en visuels. Si vous avez déjà ouvert PowerPoint en vous demandant comment créer rapidement un graphique, vous êtes au bon endroit. Dans ce guide, vous apprendrez comment créer un graphique en secteurs dans PowerPoint, étape par étape. Nous couvrirons tout, de l'ajout d'un graphique à la personnalisation des couleurs et des étiquettes, pour que vos diapositives aient l'air claires et professionnelles. À la fin, vous serez capable de présenter vos données d'une manière simple, attrayante et facile à comprendre pour tout le monde.
- Créer un graphique en secteurs manuellement
- Créer un graphique en secteurs automatiquement
- La conclusion
- FAQ
Comment créer un graphique en secteurs dans PowerPoint manuellement
Faire un graphique en secteurs dans PowerPoint est plus facile que vous ne le pensez. Dans ce chapitre, nous vous guiderons étape par étape à travers le processus. Tout d'abord, assurez-vous d'avoir vos données prêtes ainsi qu'une présentation PowerPoint. Plus important encore, vous aurez besoin de Microsoft PowerPoint ou d'une autre application d'édition de présentations installée sur votre appareil. Dans ce tutoriel, nous utiliserons Microsoft PowerPoint comme exemple. Une fois que vous êtes prêt, plongeons dans le guide d'aujourd'hui.
Étape 1 : Ouvrez votre présentation
Commencez par localiser et ouvrir le fichier PowerPoint où vous souhaitez ajouter votre graphique.
Étape 2 : Choisissez la diapositive
Sélectionnez la diapositive où le graphique en secteurs doit apparaître. Assurez-vous qu'elle est prête pour les données que vous voulez montrer.
Étape 3 : Insérez le graphique
Allez à l'onglet Insertion sur le Ruban en haut et cliquez sur Graphique.
Étape 4 : Choisissez votre graphique en secteurs
Dans la boîte de dialogue Insérer un graphique, sélectionnez Secteurs dans le panneau de gauche. Vous verrez plusieurs types de graphiques en secteurs. Si vous voulez créer un graphique en secteurs 3D sur la diapositive, choisissez la deuxième option. Cliquez sur OK pour insérer le graphique.
Étape 5 : Saisissez vos données
PowerPoint affichera des données par défaut dans une feuille de type Excel. Remplacez-les par vos propres chiffres pour correspondre aux besoins de votre présentation.
Étape 6 : Personnalisez le graphique
Cliquez sur le graphique et allez à l'onglet Création de graphique sur le Ruban. Ici, vous pouvez changer le style, les couleurs, les étiquettes, ou même passer à un autre type de graphique. Jouez avec les options jusqu'à ce qu'il ait l'air parfait pour votre diapositive.
Voici l'aspect final du graphique en secteurs :
Comment créer un graphique en secteurs dans une présentation PowerPoint automatiquement
Après avoir appris à ajouter un graphique en secteurs manuellement dans PowerPoint, vous avez probablement remarqué que les étapes peuvent être un peu fastidieuses, surtout lors de la mise à jour des données ou de la personnalisation du graphique. Alors, y a-t-il un moyen plus rapide ?
Utiliser du code pour générer des graphiques est une excellente solution. Avec Spire.Presentation, une bibliothèque PowerPoint professionnelle, vous pouvez facilement créer des graphiques automatiquement, gérant tout, de la configuration du fichier à la saisie des données et à la personnalisation du graphique en une seule fois.
Voici un guide détaillé sur la façon de créer un graphique dans PowerPoint en utilisant Spire.Presentation :
Étape 1 : Installez Spire.Presentation
Dans ce tutoriel, nous utiliserons Spire.Presentation for Python. Vous pouvez l'installer via pip en ouvrant votre environnement Python (par exemple, le terminal de VSCode) et en exécutant :
pip install spire.presentation
Appuyez sur Entrée, et la bibliothèque sera installée.
Étape 2 : Écrivez le code
Voici la logique globale pour créer un graphique en secteurs avec Spire.Presentation :
- Importer le fichier �?Chargez la présentation PowerPoint avec laquelle vous voulez travailler ou créez une nouvelle présentation.
- Accéder à la diapositive cible �?Sélectionnez la diapositive où le graphique en secteurs sera inséré.
- Insérer le graphique en secteurs �?Ajoutez un objet graphique en secteurs à la diapositive.
- Définir le titre du graphique �?Donnez un titre à votre graphique en secteurs.
- Ajouter des données au graphique �?Remplissez le graphique en secteurs avec votre jeu de données.
- Personnaliser les couleurs du graphique �?Ajustez les couleurs pour rendre le graphique visuellement attrayant.
Ci-dessous se trouve le code Python complet montrant comment créer un graphique en secteurs tout en créant une nouvelle présentation PowerPoint :
from spire.presentation.common import *
from spire.presentation import *

# Create a Presentation instance
presentation = Presentation()

# Add a pie chart at a specified location on the first slide
rect = RectangleF.FromLTRB (40, 100, 590, 420)
chart = presentation.Slides[0].Shapes.AppendChartInit (ChartType.Pie, rect, False)

# Set and format chart title
chart.ChartTitle.TextProperties.Text = "Sales by Quarter (2024)"
chart.ChartTitle.TextProperties.IsCentered = True
chart.ChartTitle.Height = 30
chart.HasTitle = True

# Define some data
quarters = ["1st Qtr", "2nd Qtr", "3rd Qtr", "4th Qtr"]
sales = [210, 320, 180, 460]

# Append data to ChartData, which represents a data table where the chart data is stored
chart.ChartData[0,0].Text = "Quarters"
chart.ChartData[0,1].Text = "Sales"
i = 0
while i < len(quarters):
    chart.ChartData[i + 1,0].Text = quarters[i]
    chart.ChartData[i + 1,1].NumberValue = sales[i]
    i += 1

# Set series labels and category labels
chart.Series.SeriesLabel = chart.ChartData["B1","B1"]
chart.Categories.CategoryLabels = chart.ChartData["A2","A5"]

# Set values for series
chart.Series[0].Values = chart.ChartData["B2","B5"]

# Add data points to series
for i, unusedItem in enumerate(chart.Series[0].Values):
    cdp = ChartDataPoint(chart.Series[0])
    cdp.Index = i
    chart.Series[0].DataPoints.Add(cdp)

# Fill each data point with a different color
chart.Series[0].DataPoints[0].Fill.FillType = FillFormatType.Solid
chart.Series[0].DataPoints[0].Fill.SolidColor.Color = Color.get_Honeydew()
chart.Series[0].DataPoints[1].Fill.FillType = FillFormatType.Solid
chart.Series[0].DataPoints[1].Fill.SolidColor.Color = Color.get_LightBlue()
chart.Series[0].DataPoints[2].Fill.FillType = FillFormatType.Solid
chart.Series[0].DataPoints[2].Fill.SolidColor.Color = Color.get_LightPink()
chart.Series[0].DataPoints[3].Fill.FillType = FillFormatType.Solid
chart.Series[0].DataPoints[3].Fill.SolidColor.Color = Color.get_AliceBlue()

# Set the data labels to display label value and percentage value
chart.Series[0].DataLabels.LabelValueVisible = True
chart.Series[0].DataLabels.PercentValueVisible = True

# Save the result file
presentation.SaveToFile("E:/Administrator/Python1/output/CreatePieChart.pptx", FileFormat.Pptx2016)
presentation.Dispose()
Voici le graphique en secteurs créé par Spire.Presentation :
Avec Spire.Presentation, vous pouvez faire bien plus que simplement créer des graphiques en secteurs. Il vous permet également de générer des histogrammes, des graphiques linéaires, des diagrammes à barres et de nombreux autres types de visuels directement dans vos diapositives. De plus, la bibliothèque prend en charge plusieurs langages de programmation. Que vous préfériez C#, Java, Python ou JavaScript, vous pouvez facilement créer et personnaliser des graphiques avec seulement quelques lignes de code.
La conclusion
Dans ce guide, nous avons expliqué comment créer un graphique en secteurs dans PowerPoint étape par étape, de l'insertion manuelle du graphique à la personnalisation de son style et de ses couleurs. Bien que la méthode manuelle fonctionne bien pour des tâches simples, Spire.Presentation est plus efficace dans des situations complexes. Avec cette bibliothèque professionnelle, vous pouvez automatiser tout le processus, de l'ajout de graphiques et de la saisie de données à la personnalisation de leur apparence. Essayez-le immédiatement en obtenant une licence temporaire de 30 jours, rendant la création de graphiques plus rapide et plus efficace que jamais.
FAQ sur la création d'un graphique en secteurs dans PowerPoint
1. Comment créer un graphique en secteurs étape par étape dans PowerPoint ?
Allez dans Insertion �?Graphique �?Secteurs, puis remplacez les données d'exemple par les vôtres et ajustez le style du graphique sous Création de graphique.
2. Comment puis-je afficher des pourcentages dans un graphique en secteurs ?
Cliquez sur le graphique, sélectionnez Étiquettes de données �?Autres options, et cochez Pourcentage pour afficher les valeurs en pourcentages.
3. Comment faire un graphique en secteurs de progression dans PowerPoint ?
Utilisez un graphique en secteurs ou en anneau avec deux valeurs �?progression et restant �?et formatez les parts avec des couleurs différentes.
4. Puis-je automatiser la création de graphiques en secteurs ?
Oui. Vous pouvez utiliser Spire.Presentation pour générer et modifier des graphiques automatiquement après avoir obtenu une licence temporaire.
À LIRE AUSSI
- Comment créer un graphique à bulles dans PowerPoint en C#, VB.NET
- Comment supprimer un graphique d'une diapositive PowerPoint en C#, VB.NET
- Python : Créer ou modifier des tableaux dans des présentations PowerPoint
- Comment créer un graphique en utilisant des données Excel dans PowerPoint en C#, VB.NET
Cómo crear un gráfico circular en PowerPoint paso a paso
Tabla de Contenidos
Instalar con Pypi
pip install spire.presentation
Enlaces Relacionados
Hacer que tus datos sean fáciles de entender puede ser complicado, especialmente si no estás seguro de cómo convertir números en elementos visuales. Si alguna vez has abierto PowerPoint y te has preguntado cómo hacer un gráfico rápidamente, estás en el lugar correcto. En esta guía, aprenderás cómo crear un gráfico circular en PowerPoint, paso a paso. Cubriremos todo, desde agregar un gráfico hasta personalizar colores y etiquetas, para que tus diapositivas se vean claras y profesionales. Al final, podrás mostrar tus datos de una manera que sea simple, atractiva y fácil de entender para cualquiera.
- Crear Gráfico Circular Manualmente
- Crear Gráfico Circular Automáticamente
- La Conclusión
- Preguntas Frecuentes
Cómo Crear un Gráfico Circular en PowerPoint Manualmente
Hacer un gráfico circular en PowerPoint es más fácil de lo que piensas. En este capítulo, te guiaremos paso a paso a través del proceso. Primero, asegúrate de tener tus datos listos junto con una presentación de PowerPoint. Lo más importante es que necesitarás Microsoft PowerPoint u otra aplicación de edición de presentaciones instalada en tu dispositivo. En este tutorial, usaremos Microsoft PowerPoint como nuestro ejemplo. Una vez que estés listo, vamos a sumergirnos en la guía de hoy.
Paso 1: Abre Tu Presentación
Comienza por localizar y abrir el archivo de PowerPoint donde quieres agregar tu gráfico.
Paso 2: Elige la Diapositiva
Selecciona la diapositiva donde debe aparecer el gráfico circular. Asegúrate de que esté lista para los datos que quieres mostrar.
Paso 3: Inserta el Gráfico
Ve a la pestaña Insertar en la Cinta de opciones en la parte superior y haz clic en Gráfico.
Paso 4: Elige Tu Gráfico Circular
En el cuadro de diálogo Insertar Gráfico, selecciona Circular en el panel izquierdo. Verás varios tipos de gráficos circulares; si quieres crear un gráfico circular 3D en la diapositiva, elige la segunda opción. Haz clic en Aceptar para insertar el gráfico.
Paso 5: Ingresa Tus Datos
PowerPoint mostrará datos predeterminados en una hoja similar a Excel. Reemplázalos con tus propios números para que coincidan con las necesidades de tu presentación.
Paso 6: Personaliza el Gráfico
Haz clic en el gráfico y ve a la pestaña Diseño de Gráfico en la Cinta de opciones. Aquí, puedes cambiar el estilo, los colores, las etiquetas o incluso cambiar a otro tipo de gráfico. Juega con las opciones hasta que se vea perfecto para tu diapositiva.
Aquí está el aspecto final del gráfico circular:
Cómo Crear un Gráfico Circular en una Presentación de PowerPoint Automáticamente
Después de aprender a agregar un gráfico circular manualmente en PowerPoint, probablemente hayas notado que los pasos pueden ser un poco tediosos, especialmente al actualizar datos o personalizar el gráfico. Entonces, ¿hay una manera más rápida?
Usar código para generar gráficos es una gran solución. Con Spire.Presentation, una biblioteca profesional de PowerPoint, puedes crear gráficos fácilmente de forma automática, manejando todo, desde la configuración del archivo hasta la entrada de datos y la personalización del gráfico, todo de una vez.
Aquí tienes una guía detallada sobre cómo crear un gráfico en PowerPoint usando Spire.Presentation:
Paso 1: Instala Spire.Presentation
En este tutorial, usaremos Spire.Presentation for Python. Puedes instalarlo a través de pip abriendo tu entorno de Python (por ejemplo, la terminal de VSCode) y ejecutando:
pip install spire.presentation
Presiona Enter, y la biblioteca se instalará.
Paso 2: Escribe el Código
Aquí está la lógica general para crear un gráfico circular con Spire.Presentation:
- Importar el archivo �?Carga la presentación de PowerPoint con la que quieres trabajar o crea una nueva presentación.
- Acceder a la diapositiva de destino �?Selecciona la diapositiva donde se insertará el gráfico circular.
- Insertar el gráfico circular �?Agrega un objeto de gráfico circular a la diapositiva.
- Establecer el título del gráfico �?Dale un título a tu gráfico circular.
- Agregar datos al gráfico �?Rellena el gráfico circular con tu conjunto de datos.
- Personalizar los colores del gráfico �?Ajusta los colores para que el gráfico sea visualmente atractivo.
A continuación se muestra el código completo de Python que muestra cómo crear un gráfico circular al hacer una nueva presentación de PowerPoint:
from spire.presentation.common import *
from spire.presentation import *

# Create a Presentation instance
presentation = Presentation()

# Add a pie chart at a specified location on the first slide
rect = RectangleF.FromLTRB (40, 100, 590, 420)
chart = presentation.Slides[0].Shapes.AppendChartInit (ChartType.Pie, rect, False)

# Set and format chart title
chart.ChartTitle.TextProperties.Text = "Sales by Quarter (2024)"
chart.ChartTitle.TextProperties.IsCentered = True
chart.ChartTitle.Height = 30
chart.HasTitle = True

# Define some data
quarters = ["1st Qtr", "2nd Qtr", "3rd Qtr", "4th Qtr"]
sales = [210, 320, 180, 460]

# Append data to ChartData, which represents a data table where the chart data is stored
chart.ChartData[0,0].Text = "Quarters"
chart.ChartData[0,1].Text = "Sales"
i = 0
while i < len(quarters):
    chart.ChartData[i + 1,0].Text = quarters[i]
    chart.ChartData[i + 1,1].NumberValue = sales[i]
    i += 1

# Set series labels and category labels
chart.Series.SeriesLabel = chart.ChartData["B1","B1"]
chart.Categories.CategoryLabels = chart.ChartData["A2","A5"]

# Set values for series
chart.Series[0].Values = chart.ChartData["B2","B5"]

# Add data points to series
for i, unusedItem in enumerate(chart.Series[0].Values):
    cdp = ChartDataPoint(chart.Series[0])
    cdp.Index = i
    chart.Series[0].DataPoints.Add(cdp)

# Fill each data point with a different color
chart.Series[0].DataPoints[0].Fill.FillType = FillFormatType.Solid
chart.Series[0].DataPoints[0].Fill.SolidColor.Color = Color.get_Honeydew()
chart.Series[0].DataPoints[1].Fill.FillType = FillFormatType.Solid
chart.Series[0].DataPoints[1].Fill.SolidColor.Color = Color.get_LightBlue()
chart.Series[0].DataPoints[2].Fill.FillType = FillFormatType.Solid
chart.Series[0].DataPoints[2].Fill.SolidColor.Color = Color.get_LightPink()
chart.Series[0].DataPoints[3].Fill.FillType = FillFormatType.Solid
chart.Series[0].DataPoints[3].Fill.SolidColor.Color = Color.get_AliceBlue()

# Set the data labels to display label value and percentage value
chart.Series[0].DataLabels.LabelValueVisible = True
chart.Series[0].DataLabels.PercentValueVisible = True

# Save the result file
presentation.SaveToFile("E:/Administrator/Python1/output/CreatePieChart.pptx", FileFormat.Pptx2016)
presentation.Dispose()
Aquí está el gráfico circular hecho por Spire.Presentation:
Con Spire.Presentation, puedes hacer mucho más que solo crear gráficos circulares. También te permite generar gráficos de columnas, gráficos de líneas, gráficos de barras y muchos otros tipos de elementos visuales directamente en tus diapositivas. Además, la biblioteca admite múltiples lenguajes de programación; ya sea que prefieras C#, Java, Python o JavaScript, puedes crear y personalizar gráficos fácilmente con solo unas pocas líneas de código.
La Conclusión
En esta guía, hemos recorrido cómo crear un gráfico circular en PowerPoint paso a paso, desde insertar el gráfico manualmente hasta personalizar su estilo y colores. Si bien el método manual funciona bien para tareas simples, Spire.Presentation funciona mejor en situaciones complicadas. Con esta biblioteca profesional, puedes automatizar todo el proceso, desde agregar gráficos e ingresar datos hasta personalizar su apariencia. Pruébalo de inmediato obteniendo una licencia temporal por 30 días, haciendo que la creación de gráficos sea más rápida y eficiente que nunca.
Preguntas Frecuentes sobre la Creación de un Gráfico Circular en PowerPoint
1. ¿Cómo creo un gráfico circular paso a paso en PowerPoint?
Ve a Insertar �?Gráfico �?Circular, luego reemplaza los datos de muestra con los tuyos y ajusta el estilo del gráfico en Diseño de Gráfico.
2. ¿Cómo puedo mostrar porcentajes en un gráfico circular?
Haz clic en el gráfico, selecciona Etiquetas de Datos �?Más Opciones, y marca Porcentaje para mostrar los valores como porcentajes.
3. ¿Cómo hago un gráfico circular de progreso en PowerPoint?
Usa un gráfico Circular o de Anillo con dos valores: progreso y restante, y formatea las porciones con diferentes colores.
4. ¿Puedo automatizar la creación de gráficos circulares?
Sí. Puedes usar Spire.Presentation para generar y editar gráficos automáticamente después de obtener una licencia temporal.
TAMBIÉN LEA
Wie man ein Kuchendiagramm in PowerPoint Schritt für Schritt erstellt
Inhaltsverzeichnis
Mit Pypi installieren
pip install spire.presentation
Verwandte Links
Daten verständlich darzustellen, kann knifflig sein, besonders wenn Sie nicht sicher sind, wie Sie Zahlen in visuelle Darstellungen umwandeln können. Wenn Sie jemals PowerPoint geöffnet und sich gefragt haben, wie man schnell ein Diagramm erstellt, sind Sie hier genau richtig. In dieser Anleitung lernen Sie Schritt für Schritt, wie Sie ein Kreisdiagramm in PowerPoint erstellen. Wir behandeln alles, vom Hinzufügen eines Diagramms bis zur Anpassung von Farben und Beschriftungen, damit Ihre Folien klar und professionell aussehen. Am Ende werden Sie in der Lage sein, Ihre Daten auf eine Weise darzustellen, die einfach, ansprechend und für jeden leicht verständlich ist.
- Kreisdiagramm manuell erstellen
- Kreisdiagramm automatisch erstellen
- Das Fazit
- Häufig gestellte Fragen
Wie man ein Kreisdiagramm in PowerPoint manuell erstellt
Ein Kreisdiagramm in PowerPoint zu erstellen, ist einfacher, als Sie vielleicht denken. In diesem Kapitel führen wir Sie Schritt für Schritt durch den Prozess. Stellen Sie zunächst sicher, dass Sie Ihre Daten und eine PowerPoint-Präsentation bereit haben. Am wichtigsten ist, dass Sie Microsoft PowerPoint oder eine andere Präsentationsbearbeitungs-App auf Ihrem Gerät installiert haben. In diesem Tutorial verwenden wir Microsoft PowerPoint als Beispiel. Sobald Sie bereit sind, tauchen wir in die heutige Anleitung ein.
Schritt 1: Öffnen Sie Ihre Präsentation
Beginnen Sie damit, die PowerPoint-Datei zu suchen und zu öffnen, in der Sie Ihr Diagramm hinzufügen möchten.
Schritt 2: Wählen Sie die Folie
Wählen Sie die Folie aus, auf der das Kreisdiagramm erscheinen soll. Stellen Sie sicher, dass sie für die Daten, die Sie zeigen möchten, bereit ist.
Schritt 3: Fügen Sie das Diagramm ein
Gehen Sie zum Tab Einfügen im Menüband oben und klicken Sie auf Diagramm.
Schritt 4: Wählen Sie Ihr Kreisdiagramm
Im Dialogfeld Diagramm einfügen wählen Sie im linken Bereich Kreis aus. Sie sehen verschiedene Arten von Kreisdiagrammen �?wenn Sie ein 3D-Kreisdiagramm auf der Folie erstellen möchten, wählen Sie die zweite Option. Klicken Sie auf OK, um das Diagramm einzufügen.
Schritt 5: Geben Sie Ihre Daten ein
PowerPoint zeigt Standarddaten in einem Excel-ähnlichen Blatt an. Ersetzen Sie sie durch Ihre eigenen Zahlen, um sie an die Anforderungen Ihrer Präsentation anzupassen.
Schritt 6: Passen Sie das Diagramm an
Klicken Sie auf das Diagramm und gehen Sie zum Tab Diagrammentwurf im Menüband. Hier können Sie den Stil, die Farben, die Beschriftungen ändern oder sogar zu einem anderen Diagrammtyp wechseln. Probieren Sie es aus, bis es genau richtig für Ihre Folie aussieht.
Hier ist das endgültige Aussehen des Kreisdiagramms:
Wie man ein Kreisdiagramm in einer PowerPoint-Präsentation automatisch erstellt
Nachdem Sie gelernt haben, wie man ein Kreisdiagramm manuell in PowerPoint hinzufügt, haben Sie wahrscheinlich bemerkt, dass die Schritte etwas mühsam sein können, insbesondere beim Aktualisieren von Daten oder Anpassen des Diagramms. Gibt es also einen schnelleren Weg?
Die Verwendung von Code zur Erstellung von Diagrammen ist eine großartige Lösung. Mit Spire.Presentation, einer professionellen PowerPoint-Bibliothek, können Sie Diagramme einfach automatisch erstellen und alles von der Dateieinrichtung über die Dateneingabe bis hin zur Diagrammanpassung in einem Arbeitsgang erledigen.
Hier ist eine detaillierte Anleitung, wie Sie ein Diagramm in PowerPoint mit Spire.Presentation erstellen:
Schritt 1: Installieren Sie Spire.Presentation
In diesem Tutorial verwenden wir Spire.Presentation for Python. Sie können es über pip installieren, indem Sie Ihre Python-Umgebung (zum Beispiel das VSCode-Terminal) öffnen und Folgendes ausführen:
pip install spire.presentation
Drücken Sie Enter, und die Bibliothek wird installiert.
Schritt 2: Schreiben Sie den Code
Hier ist die allgemeine Logik zur Erstellung eines Kreisdiagramms mit Spire.Presentation:
- Importieren Sie die Datei �?Laden Sie die PowerPoint-Präsentation, mit der Sie arbeiten möchten, oder erstellen Sie eine neue Präsentation.
- Greifen Sie auf die Ziel-Folie zu �?Wählen Sie die Folie aus, auf der das Kreisdiagramm eingefügt werden soll.
- Fügen Sie das Kreisdiagramm ein �?Fügen Sie ein Kreisdiagramm-Objekt zur Folie hinzu.
- Legen Sie den Diagrammtitel fest �?Geben Sie Ihrem Kreisdiagramm einen Titel.
- Fügen Sie Daten zum Diagramm hinzu �?Füllen Sie das Kreisdiagramm mit Ihrem Datensatz.
- Passen Sie die Diagrammfarben an �?Passen Sie die Farben an, um das Diagramm visuell ansprechend zu gestalten.
Unten finden Sie den vollständigen Python-Code, der zeigt, wie man ein Kreisdiagramm erstellt, während man eine neue PowerPoint-Präsentation anlegt:
from spire.presentation.common import *
from spire.presentation import *

# Create a Presentation instance
presentation = Presentation()

# Add a pie chart at a specified location on the first slide
rect = RectangleF.FromLTRB (40, 100, 590, 420)
chart = presentation.Slides[0].Shapes.AppendChartInit (ChartType.Pie, rect, False)

# Set and format chart title
chart.ChartTitle.TextProperties.Text = "Sales by Quarter (2024)"
chart.ChartTitle.TextProperties.IsCentered = True
chart.ChartTitle.Height = 30
chart.HasTitle = True

# Define some data
quarters = ["1st Qtr", "2nd Qtr", "3rd Qtr", "4th Qtr"]
sales = [210, 320, 180, 460]

# Append data to ChartData, which represents a data table where the chart data is stored
chart.ChartData[0,0].Text = "Quarters"
chart.ChartData[0,1].Text = "Sales"
i = 0
while i < len(quarters):
    chart.ChartData[i + 1,0].Text = quarters[i]
    chart.ChartData[i + 1,1].NumberValue = sales[i]
    i += 1

# Set series labels and category labels
chart.Series.SeriesLabel = chart.ChartData["B1","B1"]
chart.Categories.CategoryLabels = chart.ChartData["A2","A5"]

# Set values for series
chart.Series[0].Values = chart.ChartData["B2","B5"]

# Add data points to series
for i, unusedItem in enumerate(chart.Series[0].Values):
    cdp = ChartDataPoint(chart.Series[0])
    cdp.Index = i
    chart.Series[0].DataPoints.Add(cdp)

# Fill each data point with a different color
chart.Series[0].DataPoints[0].Fill.FillType = FillFormatType.Solid
chart.Series[0].DataPoints[0].Fill.SolidColor.Color = Color.get_Honeydew()
chart.Series[0].DataPoints[1].Fill.FillType = FillFormatType.Solid
chart.Series[0].DataPoints[1].Fill.SolidColor.Color = Color.get_LightBlue()
chart.Series[0].DataPoints[2].Fill.FillType = FillFormatType.Solid
chart.Series[0].DataPoints[2].Fill.SolidColor.Color = Color.get_LightPink()
chart.Series[0].DataPoints[3].Fill.FillType = FillFormatType.Solid
chart.Series[0].DataPoints[3].Fill.SolidColor.Color = Color.get_AliceBlue()

# Set the data labels to display label value and percentage value
chart.Series[0].DataLabels.LabelValueVisible = True
chart.Series[0].DataLabels.PercentValueVisible = True

# Save the result file
presentation.SaveToFile("E:/Administrator/Python1/output/CreatePieChart.pptx", FileFormat.Pptx2016)
presentation.Dispose()
Hier ist das mit Spire.Presentation erstellte Kreisdiagramm:
Mit Spire.Presentation können Sie viel mehr als nur Kreisdiagramme erstellen. Es ermöglicht Ihnen auch, Säulendiagramme zu generieren, Liniendiagramme, Balkendiagramme und viele andere Arten von visuellen Darstellungen direkt in Ihren Folien. Außerdem unterstützt die Bibliothek mehrere Programmiersprachen �?egal ob Sie C#, Java, Python oder JavaScript bevorzugen, Sie können Diagramme einfach mit nur wenigen Codezeilen erstellen und anpassen.
Das Fazit
In dieser Anleitung haben wir Schritt für Schritt gezeigt, wie man ein Kreisdiagramm in PowerPoint erstellt, vom manuellen Einfügen des Diagramms bis zur Anpassung von Stil und Farben. Während die manuelle Methode für einfache Aufgaben gut funktioniert, ist Spire.Presentation in komplexeren Situationen besser geeignet. Mit dieser professionellen Bibliothek können Sie den gesamten Prozess automatisieren �?vom Hinzufügen von Diagrammen und der Eingabe von Daten bis zur Anpassung ihres Erscheinungsbildes. Probieren Sie es sofort aus, indem Sie eine temporäre Lizenz für 30 Tage erhalten, was die Erstellung von Diagrammen schneller und effizienter als je zuvor macht.
Häufig gestellte Fragen zum Erstellen eines Kreisdiagramms in PowerPoint
1. Wie erstelle ich Schritt für Schritt ein Kreisdiagramm in PowerPoint?
Gehen Sie zu Einfügen �?Diagramm �?Kreis, ersetzen Sie dann die Beispieldaten durch Ihre eigenen und passen Sie den Diagrammstil unter Diagrammentwurf an.
2. Wie kann ich Prozentsätze in einem Kreisdiagramm anzeigen?
Klicken Sie auf das Diagramm, wählen Sie Datenbeschriftungen �?Weitere Optionen und aktivieren Sie Prozent, um Werte als Prozentsätze anzuzeigen.
3. Wie erstelle ich ein Fortschritts-Kreisdiagramm in PowerPoint?
Verwenden Sie ein Kreis- oder Ringdiagramm mit zwei Werten �?Fortschritt und verbleibend �?und formatieren Sie die Segmente mit unterschiedlichen Farben.
4. Kann ich die Erstellung von Kreisdiagrammen automatisieren?
Ja. Sie können Spire.Presentation verwenden, um Diagramme automatisch zu generieren und zu bearbeiten, nachdem Sie eine temporäre Lizenz erhalten haben.
AUCH LESEN
Как создать круговую диаграмму в PowerPoint пошагово
Содержание
Установить с помощью Pypi
pip install spire.presentation
Похожие ссылки
Сделать ваши данные легкими для понимания может быть непросто, особенно если вы не знаете, как превратить цифры в визуальные образы. Если вы когда-либо открывали PowerPoint и задавались вопросом, как быстро создать диаграмму, вы попали по адресу. В этом руководстве вы шаг за шагом узнаете, как создать круговую диаграмму в PowerPoint. Мы рассмотрим все: от добавления диаграммы до настройки цветов и меток, чтобы ваши слайды выглядели четкими и профессиональными. К концу вы сможете представлять свои данные в простой, привлекательной и понятной для всех форме.
- Создать круговую диаграмму вручную
- Создать круговую диаграмму автоматически
- Заключение
- Часто задаваемые вопросы
Как создать круговую диаграмму в PowerPoint вручную
Создать круговую диаграмму в PowerPoint проще, чем вы думаете. В этой главе мы пошагово проведем вас через этот процесс. Сначала убедитесь, что у вас готовы данные и презентация PowerPoint. Самое главное, на вашем устройстве должен быть установлен Microsoft PowerPoint или другое приложение для редактирования презентаций. В этом руководстве мы будем использовать Microsoft PowerPoint в качестве примера. Как только вы будете готовы, давайте приступим к сегодняшнему руководству.
Шаг 1: Откройте вашу презентацию
Начните с поиска и открытия файла PowerPoint, в который вы хотите добавить диаграмму.
Шаг 2: Выберите слайд
Выберите слайд, на котором должна появиться круговая диаграмма. Убедитесь, что он готов для данных, которые вы хотите показать.
Шаг 3: Вставьте диаграмму
Перейдите на вкладку Вставка на Ленте вверху и нажмите Диаграмма.
Шаг 4: Выберите круговую диаграмму
В диалоговом окне Вставка диаграммы выберите Круговая на левой панели. Вы увидите несколько типов круговых диаграмм �?если вы хотите создать объемную круговую диаграмму на слайде, выберите второй вариант. Нажмите OK, чтобы вставить диаграмму.
Шаг 5: Введите ваши данные
PowerPoint покажет данные по умолчанию в листе, похожем на Excel. Замените их своими собственными цифрами в соответствии с потребностями вашей презентации.
Шаг 6: Настройте диаграмму
Нажмите на диаграмму и перейдите на вкладку Конструктор диаграмм на Ленте. Здесь вы можете изменить стиль, цвета, метки или даже переключиться на другой тип диаграммы. Поэкспериментируйте, пока она не будет выглядеть идеально для вашего слайда.
Вот окончательный вид круговой диаграммы:
Как создать круговую диаграмму в презентации PowerPoint автоматически
После того, как вы научились добавлять круговую диаграмму в PowerPoint вручную, вы, вероятно, заметили, что шаги могут быть немного утомительными, особенно при обновлении данных или настройке диаграммы. Итак, есть ли более быстрый способ?
Использование кода для создания диаграмм �?отличное решение. С помощью Spire.Presentation, профессиональной библиотеки для PowerPoint, вы можете легко создавать диаграммы автоматически, управляя всем: от настройки файла до ввода данных и настройки диаграммы за один раз.
Вот подробное руководство о том, как создать диаграмму в PowerPoint с использованием Spire.Presentation:
Шаг 1: Установите Spire.Presentation
В этом руководстве мы будем использовать Spire.Presentation for Python. Вы можете установить его через pip, открыв свою среду Python (например, терминал VSCode) и выполнив:
pip install spire.presentation
Нажмите Enter, и библиотека будет установлена.
Шаг 2: Напишите код
Вот общая логика создания круговой диаграммы с помощью Spire.Presentation:
- Импортируйте файл �?Загрузите презентацию PowerPoint, с которой вы хотите работать, или создайте новую.
- Доступ к целевому слайду �?Выберите слайд, на который будет вставлена круговая диаграмма.
- Вставьте круговую диаграмму �?Добавьте объект круговой диаграммы на слайд.
- Установите заголовок диаграммы �?Дайте вашей круговой диаграмме заголовок.
- Добавьте данные в диаграмму �?Заполните круговую диаграмму вашим набором данных.
- Настройте цвета диаграммы �?Настройте цвета, чтобы сделать диаграмму визуально привлекательной.
Ниже приведен полный код на Python, показывающий, как создать круговую диаграмму при создании новой презентации PowerPoint:
from spire.presentation.common import *
from spire.presentation import *

# Create a Presentation instance
presentation = Presentation()

# Add a pie chart at a specified location on the first slide
rect = RectangleF.FromLTRB (40, 100, 590, 420)
chart = presentation.Slides[0].Shapes.AppendChartInit (ChartType.Pie, rect, False)

# Set and format chart title
chart.ChartTitle.TextProperties.Text = "Sales by Quarter (2024)"
chart.ChartTitle.TextProperties.IsCentered = True
chart.ChartTitle.Height = 30
chart.HasTitle = True

# Define some data
quarters = ["1st Qtr", "2nd Qtr", "3rd Qtr", "4th Qtr"]
sales = [210, 320, 180, 460]

# Append data to ChartData, which represents a data table where the chart data is stored
chart.ChartData[0,0].Text = "Quarters"
chart.ChartData[0,1].Text = "Sales"
i = 0
while i < len(quarters):
    chart.ChartData[i + 1,0].Text = quarters[i]
    chart.ChartData[i + 1,1].NumberValue = sales[i]
    i += 1

# Set series labels and category labels
chart.Series.SeriesLabel = chart.ChartData["B1","B1"]
chart.Categories.CategoryLabels = chart.ChartData["A2","A5"]

# Set values for series
chart.Series[0].Values = chart.ChartData["B2","B5"]

# Add data points to series
for i, unusedItem in enumerate(chart.Series[0].Values):
    cdp = ChartDataPoint(chart.Series[0])
    cdp.Index = i
    chart.Series[0].DataPoints.Add(cdp)

# Fill each data point with a different color
chart.Series[0].DataPoints[0].Fill.FillType = FillFormatType.Solid
chart.Series[0].DataPoints[0].Fill.SolidColor.Color = Color.get_Honeydew()
chart.Series[0].DataPoints[1].Fill.FillType = FillFormatType.Solid
chart.Series[0].DataPoints[1].Fill.SolidColor.Color = Color.get_LightBlue()
chart.Series[0].DataPoints[2].Fill.FillType = FillFormatType.Solid
chart.Series[0].DataPoints[2].Fill.SolidColor.Color = Color.get_LightPink()
chart.Series[0].DataPoints[3].Fill.FillType = FillFormatType.Solid
chart.Series[0].DataPoints[3].Fill.SolidColor.Color = Color.get_AliceBlue()

# Set the data labels to display label value and percentage value
chart.Series[0].DataLabels.LabelValueVisible = True
chart.Series[0].DataLabels.PercentValueVisible = True

# Save the result file
presentation.SaveToFile("E:/Administrator/Python1/output/CreatePieChart.pptx", FileFormat.Pptx2016)
presentation.Dispose()
Вот круговая диаграмма, созданная с помощью Spire.Presentation:
С помощью Spire.Presentation вы можете делать гораздо больше, чем просто создавать круговые диаграммы. Он также позволяет создавать столбчатые диаграммы, линейные диаграммы, гистограммы и многие другие типы визуализаций прямо в ваших слайдах. Кроме того, библиотека поддерживает несколько языков программирования �?предпочитаете ли вы C#, Java, Python или JavaScript, вы можете легко создавать и настраивать диаграммы всего несколькими строками кода.
Заключение
В этом руководстве мы пошагово рассмотрели, как создать круговую диаграмму в PowerPoint, от ручной вставки диаграммы до настройки ее стиля и цветов. Хотя ручной метод хорошо подходит для простых задач, Spire.Presentation работает лучше в сложных ситуациях. С помощью этой профессиональной библиотеки вы можете автоматизировать весь процесс �?от добавления диаграмм и ввода данных до настройки их внешнего вида. Попробуйте его немедленно, получив временную лицензию на 30 дней, что сделает создание диаграмм быстрее и эффективнее, чем когда-либо.
Часто задаваемые вопросы о создании круговой диаграммы в PowerPoint
1. Как мне пошагово создать круговую диаграмму в PowerPoint?
Перейдите в Вставка �?Диаграмма �?Круговая, затем замените образцы данных своими собственными и настройте стиль диаграммы в разделе Конструктор диаграмм.
2. Как я могу показать проценты в круговой диаграмме?
Нажмите на диаграмму, выберите Метки данных �?Дополнительные параметры и установите флажок Проценты, чтобы отображать значения в виде процентов.
3. Как мне сделать круговую диаграмму прогресса в PowerPoint?
Используйте круговую или кольцевую диаграмму с двумя значениями �?прогресс и оставшаяся часть �?и отформатируйте секторы разными цветами.
4. Могу ли я автоматизировать создание круговой диаграммы?
Да. Вы можете использовать Spire.Presentation для автоматического создания и редактирования диаграмм после получения временной лицензии.
ЧИТАЙТЕ ТАКЖЕ
Da DataFrame Pandas a Excel in Python: Guida passo passo
Indice
- Perché usare Spire.XLS per convertire DataFrame Pandas in Excel
- Prerequisiti per convertire DataFrame Pandas in Excel
- Esportare un singolo DataFrame Pandas in Excel con formattazione
- Convertire più DataFrame Pandas in un unico file Excel
- Scrivere DataFrame Pandas in un file Excel esistente
- Personalizzazione avanzata per l'esportazione di DataFrame Pandas in Excel
- Conclusione
- Domande frequenti
Installa con Pypi
pip install pandas spire.xls
Link correlati

Lavorare con dati tabulari è un compito comune per gli sviluppatori Python e Pandas è la libreria di riferimento per la manipolazione e l'analisi dei dati. Spesso, gli sviluppatori devono esportare i DataFrame di Pandas in Excel per la reportistica, la collaborazione in team o ulteriori analisi dei dati. Sebbene Pandas fornisca la funzione to_excel per esportazioni di base, la creazione di report Excel professionali con intestazioni formattate, celle stilizzate, fogli multipli e grafici può essere impegnativa.
Questo tutorial dimostra come scrivere un singolo DataFrame o più DataFrame in Excel utilizzando Spire.XLS per Python, una libreria Excel multifunzionale che consente la personalizzazione completa dei file Excel direttamente da Python, senza la necessità di installare Microsoft Excel.
Indice
- Perché usare Spire.XLS per convertire DataFrame Pandas in Excel
- Prerequisiti per convertire DataFrame Pandas in Excel
- Esportare un singolo DataFrame Pandas in Excel con formattazione
- Convertire più DataFrame Pandas in un unico file Excel
- Scrivere DataFrame Pandas in un file Excel esistente
- Personalizzazione avanzata per l'esportazione di DataFrame Pandas in Excel
- Conclusione
- Domande frequenti
Perché usare Spire.XLS per convertire DataFrame Pandas in Excel
Mentre Pandas fornisce funzionalità di esportazione Excel di base, Spire.XLS le estende offrendo il pieno controllo sulla creazione di file Excel. Invece di scrivere semplicemente dati grezzi, gli sviluppatori possono:
- Organizzare più DataFrame in fogli separati all'interno di un'unica cartella di lavoro.
- Personalizzare intestazioni, caratteri, colori e formattazione delle celle per produrre layout professionali.
- Adattare automaticamente le colonne e regolare l'altezza delle righe per una migliore leggibilità.
- Aggiungere grafici, formule e altre funzionalità di Excel direttamente da Python
Prerequisiti per convertire DataFrame Pandas in Excel
Prima di esportare un DataFrame Pandas in Excel, assicurati di aver installato le seguenti librerie richieste. Puoi farlo eseguendo il seguente comando nel terminale del tuo progetto:
pip install pandas spire.xls
Queste librerie ti consentono di scrivere DataFrame in Excel con fogli multipli, formattazione personalizzata, grafici accattivanti e layout strutturati.
Esportare un singolo DataFrame Pandas in Excel con formattazione
L'esportazione di un singolo DataFrame in un file Excel è lo scenario più comune. Utilizzando Spire.XLS, non solo puoi esportare il tuo DataFrame, ma anche formattare le intestazioni, stilizzare le celle e aggiungere grafici per rendere il tuo report professionale.
Vediamo questo processo passo dopo passo.
Passaggio 1: creare un DataFrame di esempio
Per prima cosa, dobbiamo creare un DataFrame. Qui abbiamo nomi di dipendenti, reparti e stipendi. Ovviamente, puoi sostituirlo con il tuo set di dati.
import pandas as pd
from spire.xls import *

# Create a simple DataFrame
df = pd.DataFrame({
    'Employee': ['Alice', 'Bob', 'Charlie'],
    'Department': ['HR', 'Finance', 'IT'],
    'Salary': [5000, 6000, 7000]
})
Passaggio 2: creare una cartella di lavoro e accedere al primo foglio
Ora creeremo una nuova cartella di lavoro Excel e prepareremo il primo foglio di lavoro. Diamo un nome significativo in modo che sia facile da capire.
# Create a new workbook
workbook = Workbook()
sheet = workbook.Worksheets[0]
sheet.Name = "Employee Data"
Passaggio 3: scrivere le intestazioni delle colonne
Scriveremo le intestazioni nella prima riga, le metteremo in grassetto e aggiungeremo uno sfondo grigio chiaro, in modo che tutto appaia ordinato.
# Write column headers
for colIndex, colName in enumerate(df.columns, start=1):
    cell = sheet.Range[1, colIndex]
    cell.Text = colName
    cell.Style.Font.IsBold = True                # Make headers bold
    cell.Style.Color = Color.get_LightGray()     # Light gray background
Passaggio 4: scrivere le righe di dati
Successivamente, scriviamo ogni riga dal DataFrame. Per i numeri, utilizziamo la proprietà NumberValue in modo che Excel possa riconoscerli per calcoli e grafici.
# Write data rows
for rowIndex, row in enumerate(df.values, start=2):
    for colIndex, value in enumerate(row, start=1):
        cell = sheet.Range[rowIndex, colIndex]
        if isinstance(value, (int, float)):
            cell.NumberValue = value
        else:
            cell.Text = str(value)
Passaggio 5: applicare i bordi e adattare automaticamente le colonne
Per dare al tuo foglio Excel un aspetto curato e simile a una tabella, aggiungiamo i bordi e regoliamo automaticamente la larghezza delle colonne.
# Apply borders and auto-fit columns
usedRange = sheet.AllocatedRange
usedRange.BorderAround(LineStyleType.Thin, Color.get_Black()) # Outside borders
usedRange.BorderInside(LineStyleType.Thin, Color.get_Black()) # Inside borders
usedRange.AutoFitColumns()
Passaggio 6: aggiungere un grafico per visualizzare i dati
I grafici ti aiutano a comprendere rapidamente le tendenze. Qui, creeremo un istogramma che confronta gli stipendi.
# Add a chart
chart = sheet.Charts.Add()
chart.ChartType = ExcelChartType.ColumnClustered
chart.DataRange = sheet.Range["A1:C4"]        # Data range for chart
chart.SeriesDataFromRange = False
chart.LeftColumn = 5                          # Chart position
chart.TopRow = 1
chart.RightColumn = 10
chart.BottomRow = 16
chart.ChartTitle = "Employee Salary Comparison"
chart.ChartTitleArea.Font.Size = 12
chart.ChartTitleArea.Font.IsBold = True
Passaggio 7: salvare la cartella di lavoro
Infine, salva la cartella di lavoro nella posizione desiderata.
# Save the Excel file
workbook.SaveToFile("DataFrameWithChart.xlsx", ExcelVersion.Version2016)
workbook.Dispose()
Risultato:
Il file Excel XLSX generato dal DataFrame di Pandas ha questo aspetto:

Una volta generato il file Excel, può essere ulteriormente elaborato, ad esempio convertito in PDF per una facile condivisione:
workbook.SaveToFile("ToPdf.pdf", FileFormat.PDF)
Per maggiori dettagli, consulta la guida sulla conversione di Excel in PDF in Python.
Convertire più DataFrame Pandas in un unico file Excel
Quando si creano report in Excel, spesso è necessario inserire più set di dati in fogli separati. Utilizzando Spire.XLS, ogni DataFrame di Pandas può essere scritto nel proprio foglio di lavoro, garantendo che i dati correlati siano organizzati in modo chiaro e facili da analizzare. I seguenti passaggi dimostrano questo flusso di lavoro.
Passaggio 1: creare più DataFrame di esempio
Prima di esportare, creiamo due DataFrame separati: uno per le informazioni sui dipendenti e un altro per i prodotti. Ogni DataFrame andrà nel proprio foglio Excel.
import pandas as pd
from spire.xls import *

# Sample DataFrames
df1 = pd.DataFrame({'Name': ['Alice', 'Bob'], 'Age': [25, 30]})
df2 = pd.DataFrame({'Product': ['Laptop', 'Phone'], 'Price': [1000, 500]})

# List of DataFrames with corresponding sheet names
dataframes = [
    (df1, "Employees"),
    (df2, "Products")
]
Qui, dataframes è un elenco di tuple che associa ogni DataFrame al nome del foglio in cui dovrebbe apparire.
Passaggio 2: creare una nuova cartella di lavoro
Successivamente, creiamo una nuova cartella di lavoro Excel per memorizzare tutti i DataFrame.
# Create a new workbook
workbook = Workbook()
Questo inizializza una cartella di lavoro vuota con tre fogli predefiniti. Li rinomineremo e popoleremo nel passaggio successivo.
Passaggio 3: scorrere ogni DataFrame e scrivere nel proprio foglio
Invece di scrivere ogni DataFrame individualmente, possiamo scorrere il nostro elenco ed elaborarli allo stesso modo. Ciò riduce il codice duplicato e semplifica la gestione di più set di dati.
for i, (df, sheet_name) in enumerate(dataframes):
    # Get or create a sheet
    if i < workbook.Worksheets.Count:
        sheet = workbook.Worksheets[i]
    else:
        sheet = workbook.Worksheets.Add()

    sheet.Name = sheet_name

    # Write headers with bold font and background color
    for colIndex, colName in enumerate(df.columns, start=1):
        cell = sheet.Range[1, colIndex]
        cell.Text = colName
        cell.Style.Font.IsBold = True
        cell.Style.Color = Color.get_LightGray()
        sheet.Columns[colIndex - 1].ColumnWidth = 15  # Set fixed column width

    # Write rows of data
    for rowIndex, row in enumerate(df.values, start=2):
        for colIndex, value in enumerate(row, start=1):
            cell = sheet.Range[rowIndex, colIndex]
            if isinstance(value, (int, float)):
                cell.NumberValue = value
            else:
                cell.Text = str(value)

    # Apply thin borders around the used range
    usedRange = sheet.AllocatedRange
    usedRange.BorderAround(LineStyleType.Thin, Color.get_Black()) # Outside borders
    usedRange.BorderInside(LineStyleType.Thin, Color.get_Black()) # Inside borders
Utilizzando questo ciclo, possiamo facilmente aggiungere più DataFrame in futuro senza riscrivere lo stesso codice.
Passaggio 4: salvare la cartella di lavoro
Infine, salviamo il file Excel. Entrambi i set di dati sono ora ordinatamente organizzati in un unico file con fogli separati, intestazioni formattate e bordi appropriati.
# Save the workbook
workbook.SaveToFile("MultipleDataFrames.xlsx", ExcelVersion.Version2016)
workbook.Dispose()
Ora il tuo file Excel è pronto per essere condiviso o analizzato ulteriormente.
Risultato:

Il file MultipleDataFrames.xlsx contiene due fogli:
- Dipendenti (con nomi ed età)
- Prodotti (con dettagli e prezzi dei prodotti)
Questa organizzazione rende i file Excel multi-report puliti e facili da navigare.
Scrivere DataFrame Pandas in un file Excel esistente
In alcuni casi, invece di creare un nuovo file Excel, potrebbe essere necessario scrivere i DataFrame in una cartella di lavoro esistente. Ciò può essere facilmente ottenuto caricando la cartella di lavoro esistente, aggiungendo un nuovo foglio o accedendo al foglio desiderato e scrivendo i dati del DataFrame utilizzando la stessa logica.
Il codice seguente mostra come scrivere un DataFrame Pandas in un file Excel esistente:
import pandas as pd
from spire.xls import *
# Load an existing Excel file
workbook = Workbook()
workbook.LoadFromFile("MultipleDataFrames.xlsx")
# Create a new DataFrame to add
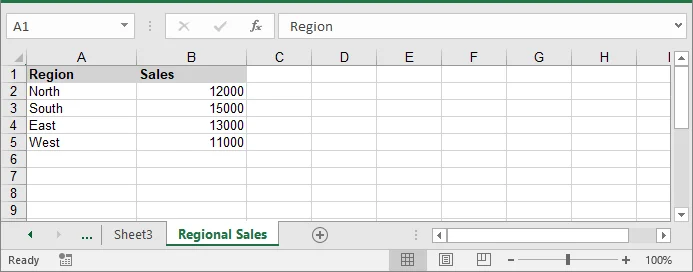
new_df = pd.DataFrame({
'Region': ['North', 'South', 'East', 'West'],
'Sales': [12000, 15000, 13000, 11000]
})
# Add a new worksheet for the new DataFrame
new_sheet = workbook.Worksheets.Add("Regional Sales")
# Write headers
for colIndex, colName in enumerate(new_df.columns, start=1):
cell = new_sheet.Range[1, colIndex]
cell.Text = colName
cell.Style.Font.IsBold = True
cell.Style.Color = Color.get_LightGray()
new_sheet.Columns[colIndex - 1].ColumnWidth = 15
# Write data rows
for rowIndex, row in enumerate(new_df.values, start=2):
for colIndex, value in enumerate(row, start=1):
cell = new_sheet.Range[rowIndex, colIndex]
if isinstance(value, (int, float)):
cell.NumberValue = value
else:
cell.Text = str(value)
# Save the changes
workbook.SaveToFile("DataFrameToExistingWorkbook.xlsx", ExcelVersion.Version2016)
workbook.Dispose()
Personalizzazione avanzata per l'esportazione di DataFrame Pandas in Excel
Oltre alle esportazioni di base, i DataFrame di Pandas possono essere personalizzati in Excel per soddisfare requisiti di reporting specifici. Opzioni avanzate, come la selezione di colonne specifiche e l'inclusione o l'esclusione dell'indice, consentono di creare file Excel più puliti, leggibili e professionali. Gli esempi seguenti dimostrano come applicare queste personalizzazioni.
1. Seleziona colonne specifiche
A volte potresti non aver bisogno di esportare tutte le colonne da un DataFrame. Selezionando solo le colonne pertinenti, puoi mantenere i tuoi report Excel concisi e mirati. Il codice seguente dimostra come scorrere le colonne scelte durante la scrittura di intestazioni e righe:
import pandas as pd
from spire.xls import *

# Create a DataFrame
df = pd.DataFrame({
    'Employee': ['Alice', 'Bob', 'Charlie'],
    'Department': ['HR', 'Finance', 'IT'],
    'Salary': [5000, 6000, 7000]
})

# Set the columns to export
columns_to_export = ['Employee', 'Department']

# Create a new workbook and access the first sheet
workbook = Workbook()
sheet = workbook.Worksheets[0]

# Write headers
for colIndex, colName in enumerate(columns_to_export, start=1):
    sheet.Range[1, colIndex].Text = colName

# Write rows
for rowIndex, row in enumerate(df[columns_to_export].values, start=2):
    for colIndex, value in enumerate(row, start=1):
        sheet.Range[rowIndex, colIndex].Text = value

# Save the Excel file
workbook.SaveToFile("select_columns.xlsx")
workbook.Dispose()
2. Includi o escludi indice
Per impostazione predefinita, l'indice del DataFrame non è incluso nell'esportazione. Se il tuo report richiede identificatori di riga o indici numerici, puoi aggiungerli manualmente. Questo frammento di codice mostra come includere l'indice insieme alle colonne selezionate:
# Write header for index
sheet.Range[1, 1].Text = "Index"

# Write index values (numeric)
for rowIndex, idx in enumerate(df.index, start=2):
    sheet.Range[rowIndex, 1].NumberValue = idx  # Use NumberValue for numeric

# Write headers for other columns
for colIndex, colName in enumerate(columns_to_export, start=2):
    sheet.Range[1, colIndex].Text = colName

# Write the data rows
for rowIndex, row in enumerate(df[columns_to_export].values, start=2):
    for colIndex, value in enumerate(row, start=2):
        if isinstance(value, (int, float)):
            sheet.Range[rowIndex, colIndex].NumberValue = value
        else:
            sheet.Range[rowIndex, colIndex].Text = str(value)

# Save the workbook
workbook.SaveToFile("include_index.xlsx", ExcelVersion.Version2016)
workbook.Dispose()
Conclusione
Esportare un DataFrame Pandas in Excel è semplice, ma la produzione di report professionali e ben formattati richiede un controllo aggiuntivo. Utilizzando Pandas per la preparazione dei dati e Spire.XLS per Python per creare e formattare file Excel, è possibile generare cartelle di lavoro strutturate, leggibili e visivamente organizzate. Questo approccio funziona sia per singoli DataFrame che per più set di dati, rendendo facile la creazione di report Excel pronti per l'analisi, la condivisione o ulteriori manipolazioni.
Domande frequenti
D1: Come posso esportare un DataFrame Pandas in Excel in Python?
R1: Puoi usare librerie come Spire.XLS per scrivere un DataFrame in un file Excel. Ciò ti consente di trasferire dati tabulari da Python a Excel mantenendo il controllo sulla formattazione e sul layout.
D2: Posso esportare più di un DataFrame in un singolo file Excel?
R2: Sì. È possibile scrivere più DataFrame in fogli separati all'interno della stessa cartella di lavoro. Ciò aiuta a mantenere i set di dati correlati organizzati in un unico file.
D3: Come aggiungo intestazioni e formatto le celle in Excel da un DataFrame?
R3: Le intestazioni possono essere rese in grassetto, colorate o avere larghezze fisse. I valori numerici possono essere memorizzati come numeri e il testo come stringhe. La formattazione migliora la leggibilità dei report.
D4: È possibile includere grafici nel file Excel esportato?
R4: Sì. Grafici come istogrammi o grafici a linee possono essere aggiunti in base ai dati del tuo DataFrame per aiutare a visualizzare tendenze o confronti.
D5: Ho bisogno di Microsoft Excel installato per esportare i DataFrame?
R5: Non necessariamente. Alcune librerie, tra cui Spire.XLS, possono creare e formattare file Excel interamente in Python senza fare affidamento sull'installazione di Excel.
Vedi anche
DataFrame do Pandas para Excel em Python: Guia Passo a Passo
Índice
- Por que usar o Spire.XLS para converter DataFrame do Pandas para Excel
- Pré-requisitos para converter DataFrame do Pandas para Excel
- Exportar um único DataFrame do Pandas para Excel com formatação
- Converter múltiplos DataFrames do Pandas para um único arquivo Excel
- Escrever DataFrames do Pandas em um arquivo Excel existente
- Personalização avançada para exportar DataFrames do Pandas para Excel
- Conclusão
- Perguntas Frequentes
Instalar com Pypi
pip install pandas spire.xls
Links Relacionados
Trabalhar com dados tabulares é uma tarefa comum para desenvolvedores Python, e o Pandas é a biblioteca de referência para manipulação e análise de dados. Frequentemente, os desenvolvedores precisam exportar DataFrames do Pandas para o Excel para relatórios, colaboração em equipe ou análise de dados adicional. Embora o Pandas forneça a função to_excel para exportações básicas, criar relatórios profissionais do Excel com cabeçalhos formatados, células estilizadas, várias planilhas e gráficos pode ser um desafio.
Este tutorial demonstra como escrever um único DataFrame ou múltiplos DataFrames para o Excel usando o Spire.XLS for Python, uma biblioteca multifuncional do Excel que permite a personalização completa de arquivos do Excel diretamente do Python, sem a necessidade de ter o Microsoft Excel instalado.
Índice
- Por que usar o Spire.XLS para converter DataFrame do Pandas para Excel
- Pré-requisitos para converter DataFrame do Pandas para Excel
- Exportar um único DataFrame do Pandas para Excel com formatação
- Converter múltiplos DataFrames do Pandas para um único arquivo Excel
- Escrever DataFrames do Pandas em um arquivo Excel existente
- Personalização avançada para exportar DataFrames do Pandas para Excel
- Conclusão
- Perguntas Frequentes
Por que usar o Spire.XLS para converter DataFrame do Pandas para Excel
Embora o Pandas forneça funcionalidades básicas de exportação para o Excel, o Spire.XLS estende isso, dando controle total sobre a criação de arquivos do Excel. Em vez de apenas escrever dados brutos, os desenvolvedores podem:
- Organizar múltiplos DataFrames em planilhas separadas dentro de uma única pasta de trabalho.
- Personalizar cabeçalhos, fontes, cores e formatação de células para produzir layouts profissionais.
- Ajustar automaticamente as colunas e as alturas das linhas para melhorar a legibilidade.
- Adicionar gráficos, fórmulas e outros recursos do Excel diretamente do Python
Pré-requisitos para converter DataFrame do Pandas para Excel
Antes de exportar um DataFrame do Pandas para o Excel, certifique-se de ter as seguintes bibliotecas necessárias instaladas. Você pode fazer isso executando o seguinte comando no terminal do seu projeto:
pip install pandas spire.xls
Essas bibliotecas permitem que você escreva DataFrames no Excel com várias planilhas, formatação personalizada, gráficos atraentes e layouts estruturados.
Exportar um único DataFrame do Pandas para Excel com formatação
Exportar um único DataFrame para um arquivo Excel é o cenário mais comum. Usando o Spire.XLS, você pode não apenas exportar seu DataFrame, mas também formatar cabeçalhos, estilizar células e adicionar gráficos para tornar seu relatório com aparência profissional.
Vamos passar por este processo passo a passo.
Passo 1: Criar um DataFrame de Amostra
Primeiro, precisamos criar um DataFrame. Aqui, temos nomes de funcionários, departamentos e salários. Você pode, é claro, substituir isso pelo seu próprio conjunto de dados.
import pandas as pd
from spire.xls import *

# Create a simple DataFrame
df = pd.DataFrame({
    'Employee': ['Alice', 'Bob', 'Charlie'],
    'Department': ['HR', 'Finance', 'IT'],
    'Salary': [5000, 6000, 7000]
})
Passo 2: Criar uma Pasta de Trabalho e Acessar a Primeira Planilha
Agora vamos criar uma nova pasta de trabalho do Excel e preparar a primeira planilha. Vamos dar a ela um nome significativo para que seja fácil de entender.
# Create a new workbook
workbook = Workbook()
sheet = workbook.Worksheets[0]
sheet.Name = "Employee Data"
Passo 3: Escrever Cabeçalhos de Coluna
Vamos escrever os cabeçalhos na primeira linha, deixá-los em negrito e adicionar um fundo cinza claro, para que tudo pareça organizado.
# Write column headers
for colIndex, colName in enumerate(df.columns, start=1):
    cell = sheet.Range[1, colIndex]
    cell.Text = colName
    cell.Style.Font.IsBold = True                # Make headers bold
    cell.Style.Color = Color.get_LightGray()     # Light gray background
Passo 4: Escrever as Linhas de Dados
Em seguida, escrevemos cada linha do DataFrame. Para números, usamos a propriedade NumberValue para que o Excel possa reconhecê-los para cálculos e gráficos.
# Write data rows
for rowIndex, row in enumerate(df.values, start=2):
    for colIndex, value in enumerate(row, start=1):
        cell = sheet.Range[rowIndex, colIndex]
        if isinstance(value, (int, float)):
            cell.NumberValue = value
        else:
            cell.Text = str(value)
Passo 5: Aplicar Bordas e Ajustar Colunas Automaticamente
Para dar à sua planilha do Excel uma aparência polida, semelhante a uma tabela, vamos adicionar bordas e ajustar automaticamente a largura das colunas.
# Apply borders and auto-fit columns
usedRange = sheet.AllocatedRange
usedRange.BorderAround(LineStyleType.Thin, Color.get_Black()) # Outside borders
usedRange.BorderInside(LineStyleType.Thin, Color.get_Black()) # Inside borders
usedRange.AutoFitColumns()
Passo 6: Adicionar um Gráfico para Visualizar Dados
Gráficos ajudam você a entender rapidamente as tendências. Aqui, criaremos um gráfico de colunas comparando salários.
# Add a chart
chart = sheet.Charts.Add()
chart.ChartType = ExcelChartType.ColumnClustered
chart.DataRange = sheet.Range["A1:C4"]        # Data range for chart
chart.SeriesDataFromRange = False
chart.LeftColumn = 5                          # Chart position
chart.TopRow = 1
chart.RightColumn = 10
chart.BottomRow = 16
chart.ChartTitle = "Employee Salary Comparison"
chart.ChartTitleArea.Font.Size = 12
chart.ChartTitleArea.Font.IsBold = True
Passo 7: Salvar a Pasta de Trabalho
Finalmente, salve a pasta de trabalho no local desejado.
# Save the Excel file
workbook.SaveToFile("DataFrameWithChart.xlsx", ExcelVersion.Version2016)
workbook.Dispose()
Resultado:
O arquivo Excel XLSX gerado a partir do DataFrame do Pandas se parece com isto:
Uma vez que o arquivo Excel é gerado, ele pode ser processado posteriormente, como ser convertido para PDF para fácil compartilhamento:
workbook.SaveToFile("ToPdf.pdf", FileFormat.PDF)
Para mais detalhes, consulte o guia sobre como converter Excel para PDF em Python.
Converter Múltiplos DataFrames do Pandas para um Único Arquivo Excel
Ao criar relatórios no Excel, vários conjuntos de dados geralmente precisam ser colocados em planilhas separadas. Usando o Spire.XLS, cada DataFrame do Pandas pode ser escrito em sua própria planilha, garantindo que os dados relacionados sejam organizados de forma clara e fáceis de analisar. Os passos a seguir demonstram este fluxo de trabalho.
Passo 1: Criar Múltiplos DataFrames de Amostra
Antes de exportar, criamos dois DataFrames separados - um para informações de funcionários e outro para produtos. Cada DataFrame irá para sua própria planilha do Excel.
import pandas as pd
from spire.xls import *

# Sample DataFrames
df1 = pd.DataFrame({'Name': ['Alice', 'Bob'], 'Age': [25, 30]})
df2 = pd.DataFrame({'Product': ['Laptop', 'Phone'], 'Price': [1000, 500]})

# List of DataFrames with corresponding sheet names
dataframes = [
    (df1, "Employees"),
    (df2, "Products")
]
Aqui, dataframes é uma lista de tuplas que associa cada DataFrame ao nome da planilha em que deve aparecer.
Passo 2: Criar uma Nova Pasta de Trabalho
Em seguida, criamos uma nova pasta de trabalho do Excel para armazenar todos os DataFrames.
# Create a new workbook
workbook = Workbook()
Isso inicializa uma pasta de trabalho em branco com três planilhas padrão. Vamos renomeá-las e preenchê-las no próximo passo.
Passo 3: Percorrer Cada DataFrame e Escrever em sua Própria Planilha
Em vez de escrever cada DataFrame individualmente, podemos percorrer nossa lista e processá-los da mesma maneira. Isso reduz o código duplicado e facilita o manuseio de mais conjuntos de dados.
for i, (df, sheet_name) in enumerate(dataframes):
    # Get or create a sheet
    if i < workbook.Worksheets.Count:
        sheet = workbook.Worksheets[i]
    else:
        sheet = workbook.Worksheets.Add()

    sheet.Name = sheet_name

    # Write headers with bold font and background color
    for colIndex, colName in enumerate(df.columns, start=1):
        cell = sheet.Range[1, colIndex]
        cell.Text = colName
        cell.Style.Font.IsBold = True
        cell.Style.Color = Color.get_LightGray()
        sheet.Columns[colIndex - 1].ColumnWidth = 15  # Set fixed column width

    # Write rows of data
    for rowIndex, row in enumerate(df.values, start=2):
        for colIndex, value in enumerate(row, start=1):
            cell = sheet.Range[rowIndex, colIndex]
            if isinstance(value, (int, float)):
                cell.NumberValue = value
            else:
                cell.Text = str(value)

    # Apply thin borders around the used range
    usedRange = sheet.AllocatedRange
    usedRange.BorderAround(LineStyleType.Thin, Color.get_Black()) # Outside borders
    usedRange.BorderInside(LineStyleType.Thin, Color.get_Black()) # Inside borders
Usando este loop, podemos facilmente adicionar mais DataFrames no futuro sem reescrever o mesmo código.
Passo 4: Salvar a Pasta de Trabalho
Finalmente, salvamos o arquivo Excel. Ambos os conjuntos de dados estão agora organizados de forma limpa em um único arquivo com planilhas separadas, cabeçalhos formatados e bordas adequadas.
# Save the workbook
workbook.SaveToFile("MultipleDataFrames.xlsx", ExcelVersion.Version2016)
workbook.Dispose()
Agora seu arquivo Excel está pronto para ser compartilhado ou analisado posteriormente.
Resultado:
O arquivo MultipleDataFrames.xlsx contém duas planilhas:
- Funcionários (com nomes e idades)
- Produtos (com detalhes e preços dos produtos)
Esta organização torna os arquivos Excel com múltiplos relatórios limpos e fáceis de navegar.
Escrever DataFrames do Pandas em um Arquivo Excel Existente
Em alguns casos, em vez de criar um novo arquivo Excel, você pode precisar escrever DataFrames em uma pasta de trabalho existente. Isso pode ser facilmente alcançado carregando a pasta de trabalho existente, adicionando uma nova planilha ou acessando a planilha desejada e escrevendo os dados do DataFrame usando a mesma lógica.
O código a seguir mostra como escrever um DataFrame do Pandas em um arquivo Excel existente:
import pandas as pd
from spire.xls import *

# Load an existing Excel file
workbook = Workbook()
workbook.LoadFromFile("MultipleDataFrames.xlsx")

# Create a new DataFrame to add
new_df = pd.DataFrame({
    'Region': ['North', 'South', 'East', 'West'],
    'Sales': [12000, 15000, 13000, 11000]
})

# Add a new worksheet for the new DataFrame
new_sheet = workbook.Worksheets.Add("Regional Sales")

# Write headers
for colIndex, colName in enumerate(new_df.columns, start=1):
    cell = new_sheet.Range[1, colIndex]
    cell.Text = colName
    cell.Style.Font.IsBold = True
    cell.Style.Color = Color.get_LightGray()
    new_sheet.Columns[colIndex - 1].ColumnWidth = 15

# Write data rows
for rowIndex, row in enumerate(new_df.values, start=2):
    for colIndex, value in enumerate(row, start=1):
        cell = new_sheet.Range[rowIndex, colIndex]
        if isinstance(value, (int, float)):
            cell.NumberValue = value
        else:
            cell.Text = str(value)

# Save the changes
workbook.SaveToFile("DataFrameToExistingWorkbook.xlsx", ExcelVersion.Version2016)
workbook.Dispose()
Personalização Avançada para Exportar DataFrames do Pandas para o Excel
Além das exportações básicas, os DataFrames do Pandas podem ser personalizados no Excel para atender a requisitos específicos de relatórios. Opções avançadas - como selecionar colunas específicas e incluir ou excluir o índice - permitem criar arquivos Excel mais limpos, legíveis e profissionais. Os exemplos a seguir demonstram como aplicar essas personalizações.
1. Selecionar Colunas Específicas
Às vezes, você pode não precisar exportar todas as colunas de um DataFrame. Ao selecionar apenas as colunas relevantes, você pode manter seus relatórios do Excel concisos e focados. O código a seguir demonstra como percorrer as colunas escolhidas ao escrever cabeçalhos e linhas:
import pandas as pd
from spire.xls import *

# Create a DataFrame
df = pd.DataFrame({
    'Employee': ['Alice', 'Bob', 'Charlie'],
    'Department': ['HR', 'Finance', 'IT'],
    'Salary': [5000, 6000, 7000]
})

# Set the columns to export
columns_to_export = ['Employee', 'Department']

# Create a new workbook and access the first sheet
workbook = Workbook()
sheet = workbook.Worksheets[0]

# Write headers
for colIndex, colName in enumerate(columns_to_export, start=1):
    sheet.Range[1, colIndex].Text = colName

# Write rows
for rowIndex, row in enumerate(df[columns_to_export].values, start=2):
    for colIndex, value in enumerate(row, start=1):
        sheet.Range[rowIndex, colIndex].Text = value

# Save the Excel file
workbook.SaveToFile("select_columns.xlsx")
workbook.Dispose()
2. Incluir ou Excluir Índice
Por padrão, o índice do DataFrame não é incluído na exportação. Se o seu relatório exigir identificadores de linha ou índices numéricos, você pode adicioná-los manualmente. Este trecho de código mostra como incluir o índice ao lado das colunas selecionadas:
# Write header for index
sheet.Range[1, 1].Text = "Index"

# Write index values (numeric)
for rowIndex, idx in enumerate(df.index, start=2):
    sheet.Range[rowIndex, 1].NumberValue = idx  # Use NumberValue for numeric

# Write headers for other columns
for colIndex, colName in enumerate(columns_to_export, start=2):
    sheet.Range[1, colIndex].Text = colName

# Write the data rows
for rowIndex, row in enumerate(df[columns_to_export].values, start=2):
    for colIndex, value in enumerate(row, start=2):
        if isinstance(value, (int, float)):
            sheet.Range[rowIndex, colIndex].NumberValue = value
        else:
            sheet.Range[rowIndex, colIndex].Text = str(value)

# Save the workbook
workbook.SaveToFile("include_index.xlsx", ExcelVersion.Version2016)
workbook.Dispose()
Conclusão
Exportar um DataFrame do Pandas para o Excel é simples, mas produzir relatórios profissionais e bem formatados requer controle adicional. Usando o Pandas para a preparação de dados e o Spire.XLS for Python para criar e formatar arquivos do Excel, você pode gerar pastas de trabalho estruturadas, legíveis e visualmente organizadas. Essa abordagem funciona tanto para DataFrames únicos quanto para múltiplos conjuntos de dados, facilitando a criação de relatórios do Excel prontos para análise, compartilhamento ou manipulação posterior.
Perguntas Frequentes
P1: Como posso exportar um DataFrame do Pandas para o Excel em Python?
R1: Você pode usar bibliotecas como o Spire.XLS para escrever um DataFrame em um arquivo Excel. Isso permite transferir dados tabulares do Python para o Excel, mantendo o controle sobre a formatação e o layout.
P2: Posso exportar mais de um DataFrame para um único arquivo Excel?
R2: Sim. Múltiplos DataFrames podem ser escritos em planilhas separadas na mesma pasta de trabalho. Isso ajuda a manter conjuntos de dados relacionados organizados em um único arquivo.
P3: Como adiciono cabeçalhos e formato células no Excel a partir de um DataFrame?
R3: Os cabeçalhos podem ser colocados em negrito, coloridos ou ter larguras fixas. Valores numéricos podem ser armazenados como números e texto como strings. A formatação melhora a legibilidade dos relatórios.
P4: É possível incluir gráficos no arquivo Excel exportado?
R4: Sim. Gráficos como os de colunas ou linhas podem ser adicionados com base nos dados do seu DataFrame para ajudar a visualizar tendências ou comparações.
P5: Preciso ter o Microsoft Excel instalado para exportar DataFrames?
R5: Não necessariamente. Algumas bibliotecas, incluindo o Spire.XLS, podem criar e formatar arquivos do Excel inteiramente em Python sem depender da instalação do Excel.
Veja Também
Python에서 Pandas DataFrame을 Excel로 변환: 단계별 가이드
목차
Pypi�?설치
pip install pandas spire.xls
관�?링크
Pandas�?데이�?조작 �?분석�?위한 기본 라이브러리입니다. 종종 개발자는 보고, 팀 공동 작업 또는 추가 데이�?분석�?위해 Pandas DataFrame�?Excel�?내보내야 합니�? Pandas�?기본 내보내기�?위한 to_excel 함수�?제공하지�?서식�?지정된 헤더, 스타일이 지정된 셀, 여러 시트 �?차트가 포함�?전문적인 Excel 보고서를 만드�?것은 어려�?�?있습니다.
�?자습서에서는 Microsoft Excel�?설치�?필요 없이 Python에서 직접 Excel 파일�?완벽하게 사용�?정의�?�?있는 다기�?Excel 라이브러리인 Spire.XLS for Python�?사용하여 단일 DataFrame 또는 여러 DataFrame�?Excel�?쓰는 방법�?보여줍니�?
목차
- Pandas DataFrame�?Excel�?변환하�?�?Spire.XLS�?사용하는 이유
- Pandas DataFrame�?Excel�?변환하�?위한 전제 조건
- 서식�?있는 단일 Pandas DataFrame�?Excel�?내보내기
- 여러 Pandas DataFrame�?하나�?Excel 파일�?변�?/a>
- 기존 Excel 파일�?Pandas DataFrame 쓰기
- Pandas DataFrame�?Excel�?내보내기 위한 고급 사용�?정의
- 결론
- 자주 묻는 질문
Pandas DataFrame�?Excel�?변환하�?�?Spire.XLS�?사용하는 이유
Pandas�?기본 Excel 내보내기 기능�?제공하지�?Spire.XLS�?Excel 파일 생성�?완벽하게 제어하여 이를 확장합니�? 개발자는 원시 데이터를 쓰는 대�?다음�?수행�?�?있습니다.
- 여러 DataFrame�?단일 통합 문서 내의 별도 시트�?구성합니�?
- 헤더, 글�? 색상 �?셀 서식�?사용�?정의하여 전문적인 레이아웃�?만듭니다.
- 가독성�?높이�?위해 열을 자동 맞춤하고 �?높이�?조정합니�?
- Python에서 직접 차트, 수식 �?기타 Excel 기능�?추가합니�?
Pandas DataFrame�?Excel�?변환하�?위한 전제 조건
Pandas DataFrame�?Excel�?내보내기 전에 다음 필수 라이브러리가 설치되어 있는지 확인하십시오. 프로젝트 터미널에�?다음 명령�?실행하여 �?작업�?수행�?�?있습니다.
pip install pandas spire.xls
이러�?라이브러리를 사용하면 여러 시트, 사용�?정의 서식, 매력적인 차트 �?구조화된 레이아웃으로 DataFrame�?Excel�?�?�?있습니다.
서식�?있는 단일 Pandas DataFrame�?Excel�?내보내기
단일 DataFrame�?Excel 파일�?내보내는 것이 가�?일반적인 시나리오입니�? Spire.XLS�?사용하면 DataFrame�?내보�?�?있을 뿐만 아니�?헤더 서식�?지정하�?셀 스타일을 지정하�?차트�?추가하여 보고서를 전문가처럼 보이�?만들 �?있습니다.
�?과정�?단계별로 살펴보겠습니�?
1단계: 샘플 DataFrame 만들�?/h3>
먼저 DataFrame�?만들어야 합니�? 여기에는 직원 이름, 부�?�?급여가 있습니다. 물론 이것�?자신�?데이�?세트�?바꿀 �?있습니다.
import pandas as pd
from spire.xls import *

# Create a simple DataFrame
df = pd.DataFrame({
    'Employee': ['Alice', 'Bob', 'Charlie'],
    'Department': ['HR', 'Finance', 'IT'],
    'Salary': [5000, 6000, 7000]
})
2단계: 통합 문서 만들�?�?�?번째 시트 액세�?/h3>
이제 �?Excel 통합 문서�?만들�?�?번째 워크시트�?준비합니다. 이해하기 쉽도�?의미 있는 이름�?지정해 보겠습니�?
# Create a new workbook
workbook = Workbook()
sheet = workbook.Worksheets[0]
sheet.Name = "Employee Data"
3단계: �?헤더 쓰기
헤더�?�?번째 행에 쓰고 굵게 표시하고 밝은 회색 배경�?추가하여 모든 것이 깔끔하게 보이도록 합니�?
# Write column headers
for colIndex, colName in enumerate(df.columns, start=1):
    cell = sheet.Range[1, colIndex]
    cell.Text = colName
    cell.Style.Font.IsBold = True                # Make headers bold
    cell.Style.Color = Color.get_LightGray()     # Light gray background
4단계: 데이�?�?쓰기
다음으로 DataFrame�?�?행을 씁니�? 숫자�?경우 NumberValue 속성�?사용하여 Excel�?계산 �?차트�?대�?인식�?�?있도�?합니�?
# Write data rows
for rowIndex, row in enumerate(df.values, start=2):
    for colIndex, value in enumerate(row, start=1):
        cell = sheet.Range[rowIndex, colIndex]
        if isinstance(value, (int, float)):
            cell.NumberValue = value
        else:
            cell.Text = str(value)
5단계: 테두�?적용 �?�?자동 맞춤
Excel 시트�?세련�?테이�?모양�?부여하�?위해 테두리를 추가하고 �?너비�?자동으로 조정�?보겠습니�?
# Apply borders and auto-fit columns
usedRange = sheet.AllocatedRange
usedRange.BorderAround(LineStyleType.Thin, Color.get_Black()) # Outside borders
usedRange.BorderInside(LineStyleType.Thin, Color.get_Black()) # Inside borders
usedRange.AutoFitColumns()
6단계: 데이�?시각화를 위한 차트 추가
차트�?추세�?빠르�?이해하는 �?도움�?됩니�? 여기서는 급여�?비교하는 세로 막대�?차트�?만들 것입니다.
# Add a chart
chart = sheet.Charts.Add()
chart.ChartType = ExcelChartType.ColumnClustered
chart.DataRange = sheet.Range["A1:C4"]        # Data range for chart
chart.SeriesDataFromRange = False
chart.LeftColumn = 5                          # Chart position
chart.TopRow = 1
chart.RightColumn = 10
chart.BottomRow = 16
chart.ChartTitle = "Employee Salary Comparison"
chart.ChartTitleArea.Font.Size = 12
chart.ChartTitleArea.Font.IsBold = True
7단계: 통합 문서 저�?/h3>
마지막으�?통합 문서�?원하�?위치�?저장합니다.
# Save the Excel file
workbook.SaveToFile("DataFrameWithChart.xlsx", ExcelVersion.Version2016)
workbook.Dispose()
결과:
Pandas DataFrame에서 생성�?Excel XLSX 파일은 다음�?같습니다.
workbook.SaveToFile("ToPdf.pdf", FileFormat.PDF)
자세�?내용은 Python에서 Excel�?PDF�?변�?/a>하는 가이드�?참조하십시오.
여러 Pandas DataFrame�?하나�?Excel 파일�?변�?/h2>
Excel 보고서를 만들 �?여러 데이�?세트�?별도�?시트�?배치해야 하는 경우가 많습니다. Spire.XLS�?사용하면 �?Pandas DataFrame�?자체 워크시트�?�?�?있으므�?관�?데이터가 명확하게 구성되고 분석하기 쉽습니다. 다음 단계�?�?워크플로�?보여줍니�?
1단계: 여러 샘플 DataFrame 만들�?/h3>
내보내기 전에 직원 정보용과 제품용으�?�?개의 개별 DataFrame�?만듭니다. �?DataFrame은 자체 Excel 시트�?들어갑니�?
import pandas as pd
from spire.xls import *

# Sample DataFrames
df1 = pd.DataFrame({'Name': ['Alice', 'Bob'], 'Age': [25, 30]})
df2 = pd.DataFrame({'Product': ['Laptop', 'Phone'], 'Price': [1000, 500]})

# List of DataFrames with corresponding sheet names
dataframes = [
    (df1, "Employees"),
    (df2, "Products")
]
여기�?dataframes�?�?DataFrame�?표시되어�?하는 시트 이름�?쌍으�?연결하는 튜플 목록입니�?
2단계: �?통합 문서 만들�?/h3>
다음으로 모든 DataFrame�?저장할 �?Excel 통합 문서�?만듭니다.
# Create a new workbook
workbook = Workbook()
이렇�?하면 �?개의 기본 시트가 있는 �?통합 문서가 초기화됩니다. 다음 단계에서 이름�?바꾸�?채울 것입니다.
3단계: �?DataFrame�?반복하고 자체 시트�?쓰기
�?DataFrame�?개별적으�?작성하는 대�?목록�?반복하고 동일�?방식으로 처리�?�?있습니다. 이렇�?하면 중복 코드가 줄어들고 �?많은 데이�?세트�?�?쉽게 처리�?�?있습니다.
for i, (df, sheet_name) in enumerate(dataframes):
    # Get or create a sheet
    if i < workbook.Worksheets.Count:
        sheet = workbook.Worksheets[i]
    else:
        sheet = workbook.Worksheets.Add()

    sheet.Name = sheet_name

    # Write headers with bold font and background color
    for colIndex, colName in enumerate(df.columns, start=1):
        cell = sheet.Range[1, colIndex]
        cell.Text = colName
        cell.Style.Font.IsBold = True
        cell.Style.Color = Color.get_LightGray()
        sheet.Columns[colIndex - 1].ColumnWidth = 15  # Set fixed column width

    # Write rows of data
    for rowIndex, row in enumerate(df.values, start=2):
        for colIndex, value in enumerate(row, start=1):
            cell = sheet.Range[rowIndex, colIndex]
            if isinstance(value, (int, float)):
                cell.NumberValue = value
            else:
                cell.Text = str(value)

    # Apply thin borders around the used range
    usedRange = sheet.AllocatedRange
    usedRange.BorderAround(LineStyleType.Thin, Color.get_Black()) # Outside borders
    usedRange.BorderInside(LineStyleType.Thin, Color.get_Black()) # Inside borders
�?루프�?사용하면 나중�?동일�?코드�?다시 작성하지 않고�?�?많은 DataFrame�?쉽게 추가�?�?있습니다.
4단계: 통합 문서 저�?/h3>
마지막으�?Excel 파일�?저장합니다. 이제 �?데이�?세트가 모두 별도�?시트, 서식�?지정된 헤더 �?적절�?테두리가 있는 하나�?파일�?깔끔하게 정리되었습니�?
# Save the workbook
workbook.SaveToFile("MultipleDataFrames.xlsx", ExcelVersion.Version2016)
workbook.Dispose()
이제 Excel 파일�?공유하거�?추가�?분석�?준비가 되었습니�?
결과:
기존 Excel 파일�?Pandas DataFrame 쓰기
경우�?따라 �?Excel 파일�?만드�?대�?기존 통합 문서�?DataFrame�?써야 �?수도 있습니다. 기존 통합 문서�?로드하고 �?시트�?추가하거�?원하�?시트�?액세스한 다음 동일�?논리�?사용하여 DataFrame 데이터를 작성하면 �?작업�?쉽게 수행�?�?있습니다.
다음 코드�?Pandas DataFrame�?기존 Excel 파일�?쓰는 방법�?보여줍니�?
import pandas as pd
from spire.xls import *

# Load an existing Excel file
workbook = Workbook()
workbook.LoadFromFile("MultipleDataFrames.xlsx")

# Create a new DataFrame to add
new_df = pd.DataFrame({
    'Region': ['North', 'South', 'East', 'West'],
    'Sales': [12000, 15000, 13000, 11000]
})

# Add a new worksheet for the new DataFrame
new_sheet = workbook.Worksheets.Add("Regional Sales")

# Write headers
for colIndex, colName in enumerate(new_df.columns, start=1):
    cell = new_sheet.Range[1, colIndex]
    cell.Text = colName
    cell.Style.Font.IsBold = True
    cell.Style.Color = Color.get_LightGray()
    new_sheet.Columns[colIndex - 1].ColumnWidth = 15

# Write data rows
for rowIndex, row in enumerate(new_df.values, start=2):
    for colIndex, value in enumerate(row, start=1):
        cell = new_sheet.Range[rowIndex, colIndex]
        if isinstance(value, (int, float)):
            cell.NumberValue = value
        else:
            cell.Text = str(value)

# Save the changes
workbook.SaveToFile("DataFrameToExistingWorkbook.xlsx", ExcelVersion.Version2016)
workbook.Dispose()
Pandas DataFrame�?Excel�?내보내기 위한 고급 사용�?정의
기본 내보내기 외에�?특정 보고 요구 사항�?충족하도�?Excel에서 Pandas DataFrame�?사용�?정의�?�?있습니다. 특정 �?선택, 인덱�?포함 또는 제외와 같은 고급 옵션�?사용하면 �?깨끗하고 읽기 쉬우�?전문적인 Excel 파일�?만들 �?있습니다. 다음 예에서는 이러�?사용�?정의�?적용하는 방법�?보여줍니�?
1. 특정 �?선택
경우�?따라 DataFrame�?모든 열을 내보�?필요가 없을 수도 있습니다. 관�?열만 선택하여 Excel 보고서를 간결하고 집중적으�?유지�?�?있습니다. 다음 코드�?헤더와 행을 작성�?�?선택�?열을 반복하는 방법�?보여줍니�?
import pandas as pd
from spire.xls import *

# Create a DataFrame
df = pd.DataFrame({
    'Employee': ['Alice', 'Bob', 'Charlie'],
    'Department': ['HR', 'Finance', 'IT'],
    'Salary': [5000, 6000, 7000]
})

# Set the columns to export
columns_to_export = ['Employee', 'Department']

# Create a new workbook and access the first sheet
workbook = Workbook()
sheet = workbook.Worksheets[0]

# Write headers
for colIndex, colName in enumerate(columns_to_export, start=1):
    sheet.Range[1, colIndex].Text = colName

# Write rows
for rowIndex, row in enumerate(df[columns_to_export].values, start=2):
    for colIndex, value in enumerate(row, start=1):
        sheet.Range[rowIndex, colIndex].Text = value

# Save the Excel file
workbook.SaveToFile("select_columns.xlsx")
workbook.Dispose()
2. 인덱�?포함 또는 제외
기본적으�?DataFrame 인덱스는 내보내기�?포함되지 않습니다. 보고서에 �?식별자나 숫자 인덱스가 필요�?경우 수동으로 추가�?�?있습니다. �?코드 조각은 선택�?열과 함께 인덱스를 포함하는 방법�?보여줍니�?
# Write header for index
sheet.Range[1, 1].Text = "Index"

# Write index values (numeric)
for rowIndex, idx in enumerate(df.index, start=2):
    sheet.Range[rowIndex, 1].NumberValue = idx  # Use NumberValue for numeric

# Write headers for other columns
for colIndex, colName in enumerate(columns_to_export, start=2):
    sheet.Range[1, colIndex].Text = colName

# Write the data rows
for rowIndex, row in enumerate(df[columns_to_export].values, start=2):
    for colIndex, value in enumerate(row, start=2):
        if isinstance(value, (int, float)):
            sheet.Range[rowIndex, colIndex].NumberValue = value
        else:
            sheet.Range[rowIndex, colIndex].Text = str(value)

# Save the workbook
workbook.SaveToFile("include_index.xlsx", ExcelVersion.Version2016)
workbook.Dispose()
결론
Pandas DataFrame�?Excel�?내보내는 것은 간단하지�?전문적이�?�?서식�?보고서를 작성하려�?추가 제어가 필요합니�? 데이�?준비를 위해 Pandas�?사용하고 Excel 파일�?만들�?서식�?지정하�?위해 Spire.XLS for Python�?사용하면 구조화되�?읽기 쉬우�?시각적으�?구성�?통합 문서�?생성�?�?있습니다. �?접근 방식은 단일 DataFrame�?여러 데이�?세트 모두�?적용되므�?분석, 공유 또는 추가 조작�?위해 준비된 Excel 보고서를 쉽게 만들 �?있습니다.
자주 묻는 질문
Q1: Python에서 Pandas DataFrame�?Excel�?어떻�?내보�?�?있나�?
A1: Spire.XLS와 같은 라이브러리를 사용하여 DataFrame�?Excel 파일�?�?�?있습니다. 이를 통해 서식 �?레이아웃�?대�?제어�?유지하면�?테이�?형식 데이터를 Python에서 Excel�?전송�?�?있습니다.
Q2: �?이상�?DataFrame�?단일 Excel 파일�?내보�?�?있나�?
A2: �? 여러 DataFrame�?동일�?통합 문서 내의 별도 시트�?�?�?있습니다. 이렇�?하면 관�?데이�?세트�?하나�?파일�?정리하는 �?도움�?됩니�?
Q3: DataFrame에서 Excel�?헤더�?추가하고 셀 서식�?어떻�?지정하나요?
A3: 헤더�?굵게 표시하거�?색상�?지정하거나 고정 너비�?가�?�?있습니다. 숫자 값은 숫자�? 텍스트는 문자열로 저장할 �?있습니다. 서식�?지정하�?보고서의 가독성�?향상됩니�?
Q4: 내보�?Excel 파일�?차트�?포함�?�?있나�?
A4: �? DataFrame 데이터를 기반으로 세로 막대�?또는 꺾은선형 차트와 같은 차트�?추가하여 추세�?비교�?시각화하�?�?도움�?�?�?있습니다.
Q5: DataFrame�?내보내려�?Microsoft Excel�?설치되어 있어�?하나�?
A5: 반드�?그렇지�?않습니다. Spire.XLS�?포함�?일부 라이브러리는 Excel 설치�?의존하지 않고 Python 내에�?전적으로 Excel 파일�?만들�?서식�?지정할 �?있습니다.
참고 항목
- Python에서 CSV�?JSON으로 변환하�?방법
- Python에서 JSON�?CSV�?- 전체 가이드
- Python에서 XML�?CSV�?변환하�?방법
- Python에서 CSV�?XML�?변�?/a>