5 Best Free HTML to Word Converters (Tested & Recommended)
Table of Contents
Install with Maven
pip install Spire.Doc
Related Links
Have you ever found a valuable webpage and wished you could save it for offline use? While bookmarking works, a more practical solution is to convert the page into a Word document. This way, you can access, reference, and edit the content anytime without relying on an internet connection. Fortunately, there are plenty of free HTML to Word converters available online. In this article, I’ll share the top 5 tested and recommended tools that make it easy to convert HTML to Word with accuracy and speed. 
Convertio – Convert HTML to Word Documents Quickly and Accurately
When it comes to how to convert HTML to Word documents, Convertio quickly stood out. It’s a cloud-based converter that supports more than 300 file formats and over 25,600 conversion combinations. You just upload your file, pick the output format, and hit “Convert.” Within a couple of minutes, the job is done. Since everything runs in your browser, there’s no software to install, and you can use it on any device. 
Pros
- Extensive format support: 300+ file formats and 25,600+ conversion types.
- User-friendly: Upload → choose format → convert in one click.
- Cloud processing: No local resources needed; fast performance.
- Cross-platform: Works in any browser on any device.
- Secure handling: Uploaded files are deleted instantly; converted files are removed after 24 hours.
- Custom settings: Some conversions (e.g., video) allow adjustments for quality, codec, aspect ratio, etc.
Cons
- Free plan limitations: File size capped at 100 MB; larger files require a paid plan.
- Internet dependency: Cannot be used offline.
- Speed may vary: Conversion times can be longer during peak usage.
- Conversion quality: Tables are converted accurately, but pages with both images and text may not convert well.
CLOUDXDOCS – The Easiest Way to Convert HTML to Word Online
CLOUDXDOCX makes it simple to convert HTML to Word documents quickly and accurately. Just upload or drag your HTML file into the browser, and in seconds you’ll have a Word document that preserves the original formatting. The tool works on Mac, Windows, Linux, and any other platform without needing to install software.
Beyond basic conversion, this HTML-to-Word converter integrates AI-powered features, allowing you to interact with your document, get smart suggestions, and even edit the Word file online. All files are securely transferred with SSL/TLS encryption, stored temporarily in the cloud with multi-device access and version history, and deleted after processing. 
Pros
- High-quality conversion: Both tables and pages containing images and text can be converted precisely, preserving the original HTML formatting.
- Fast and user-friendly: Upload, convert, and download in seconds.
- No watermark: Free conversion without added marks.
- Cross-platform compatibility: Works in any browser on Mac, Windows, Linux, etc.
- Secure: SSL/TLS encryption, GDPR compliant, temporary storage with automatic deletion.
- AI-assisted editing: Interact with documents and get intelligent suggestions.
- Cloud storage with version history: Access documents on multiple devices anytime.
Cons
- Requires internet connection: Cannot be used offline.
- Some features limited in free plan: Advanced AI and editing options require signing in.
CloudConvert – Flexible HTML to Word Doc Converter with Multi-Format Support
CloudConvert is a versatile online file converter that supports almost any file type, including documents, images, spreadsheets, presentations, audio, and video. You can convert files directly from your browser without installing software, while customizing settings like quality and format options. Trusted by users worldwide and ISO 27001 certified, CloudConvert ensures your files remain secure and private. 
Pros
- Extensive format support: Converts almost any file type across audio, video, documents, images, spreadsheets, and presentations.
- High-quality conversions: Adjust settings like quality and format options for precise results.
- Browser-based: No software installation required, works on any platform.
- Secure: ISO 27001 certified, user files remain private.
- Customizable: Many conversion types can be adjusted to fit specific needs.
Cons
- Free plan limits: Conversion speed and file size are limited in the free version.
- Dependent on internet connection: Cannot convert offline.
FreeConvert – Convert HTML Documents to Word for Free
FreeConvert’s Document Converter lets you convert a wide range of document files online quickly and securely. It supports over 40 document formats, including DOC, PDF, HTML, PPT, ODP, and more. You can upload files directly from your browser (up to 1GB for free) and convert them without installing any app. FreeConvert ensures high-quality conversions using both open-source and proprietary tools, and protects your files with 256-bit SSL encryption, automatically deleting them after a few hours. 
Pros
- Wide format support: Convert DOC, PDF, PPT, HTML, XLS, ODT, and many more.
- High-quality conversions: Uses open-source and proprietary software to maintain accuracy.
- Free and browser-based: No installation required, works on any platform.
- Secure: Files encrypted with 256-bit SSL and automatically deleted after a few hours.
- Simple workflow: Upload, select format, and convert with a single click.
Cons
- Free plan limits: Conversion time and file size are restricted (max 1GB).
- Dependent on internet connection: Cannot convert offline.
- Ads in free version: You need to disable your browser’s ad blocker to use the tool, or subscribe for an ad-free experience.
- Compatibility issues: The output file from the conversion may have problems and cannot be opened in Microsoft Word.
AnyConv – Simple HTML to Word Converter for Everyday Use
AnyConv is a free online converter that lets you quickly convert HTML documents to DOC directly in your browser. It supports batch conversion, works across all devices and platforms, and preserves the original quality of your files. You can upload multiple HTML files at once, and the converted DOC files are available instantly for download. All conversions are secure, with files automatically deleted after one hour, ensuring your data privacy. 
Pros
- Fast and easy: Upload files, convert, and download within seconds.
- Batch conversion: Convert multiple HTML files to DOC simultaneously.
- Cross-platform: Works in any modern browser on Windows, Mac, Linux, iPhone, or Android.
- High-quality conversion: Original formatting and content are preserved.
- Free and secure: No signup required, files deleted automatically after 1 hour.
Cons
- File size limit: Maximum upload size is 100 MB for free users.
- Dependent on internet: Cannot convert offline.
- Compatibility issues: Very complex HTML with advanced CSS or scripts may not convert perfectly.
Bonus Tip: Convert HTML to Word Doc Automatically
Unlike online converters that depend on internet access and often come with file limits, Spire.Doc works completely offline. It can be integrated into your applications or workflows, enabling you to convert HTML to Word documents automatically without manual uploads. This makes it ideal for businesses or developers who need a secure, scalable, and hands-free solution.
Here’s an example of how to handle the HTML-to-Word conversion in Python using Spire.Doc. Besides Python, Spire.Doc also supports other popular programming languages like Java and C#, making it easy to integrate into different development environments. 
from spire.doc import *
from spire.doc.common import *

# Create an object of the Document class
document = Document()
# Load an HTML file
document.LoadFromFile("Input.html", FileFormat.Html, XHTMLValidationType.none)

# Save the HTML file to a .docx file
document.SaveToFile("HtmlToWord.docx", FileFormat.Docx2016)
document.Close()
This code first loads the HTML file and then uses the Document.SaveToFile() method to save it as a Word document. In addition, this method can also be used to convert HTML to PDF, or to export Word documents to other formats.
The Bottom Line
In this article, we explored the top 5 HTML to Word converters, comparing them in terms of speed, free usage limits, and output quality. Each tool has its strengths and limitations, from quick online conversions to batch processing capabilities. For users seeking a more reliable, offline, and automatable solution, Spire.Doc is a great option, allowing you to integrate HTML-to-Word conversion seamlessly into your applications or workflows.
Format Excel with Python: From Basics to Professional Reports
When working with spreadsheets, readability is just as important as the data itself. A well-formatted Excel file makes it easier to analyze, present, and share information. Instead of manually adjusting styles in Excel, you can use Python for Excel formatting to automate the process and save significant time.
This tutorial shows you how to format Excel with Python using the library Spire.XLS for Python. We’ll cover basic styling, advanced formatting, and practical use cases, while also explaining the key classes and properties that make Excel formatting in Python efficient.
Here's What's Covered:
- Why Use Python for Excel Formatting
- Setting Up the Environment and Project
- Basic Excel Formatting in Python
- Extended Excel Formatting in Python
- Key APIs for Excel Styling in Python
- Use Case: Formatting an Excel Report with Python
- Conclusion
- FAQ
Why Use Python for Excel Formatting
Formatting Excel manually is time-consuming, especially when handling large datasets or generating reports dynamically. By using Python Excel formatting, you can:
- Apply consistent formatting to multiple workbooks.
- Automate repetitive tasks like setting fonts, borders, and colors.
- Generate styled reports programmatically for business or research.
- Save time while improving accuracy and presentation quality.
With Python, you can quickly build scripts that apply professional-looking styles to your spreadsheets. Next, let’s see how to set up the environment.
Setting Up the Environment and Project
To follow this tutorial, you need to install Spire.XLS for Python, a library designed for working with Excel files. It supports creating, reading, modifying, and formatting Excel documents programmatically.
Install Spire.XLS for Python
Install the library via pip:
pip install Spire.XLS
Then import it in your Python script:
from spire.xls import *
Creating or Loading an Excel Workbook
Before we start formatting, we need a workbook to work with.
Create a new workbook:
workbook = Workbook()
sheet = workbook.Worksheets[0]
Or load an existing file:
workbook = Workbook()
workbook.LoadFromFile("input.xlsx")
sheet = workbook.Worksheets[0]
After applying formatting, save the result:
workbook.SaveToFile("output/formatted_output.xlsx", ExcelVersion.Version2016)
With the workbook ready, let’s move on to formatting examples.
Basic Excel Formatting in Python
Before diving into advanced operations, it’s important to master the fundamental Excel formatting features in Python. These basic techniques—such as fonts, alignment, borders, background colors, and adjusting column widths or row heights—are the building blocks of clear, professional spreadsheets. Once familiar with them, you can combine and extend these methods to create more complex styles later.
1. Formatting Fonts
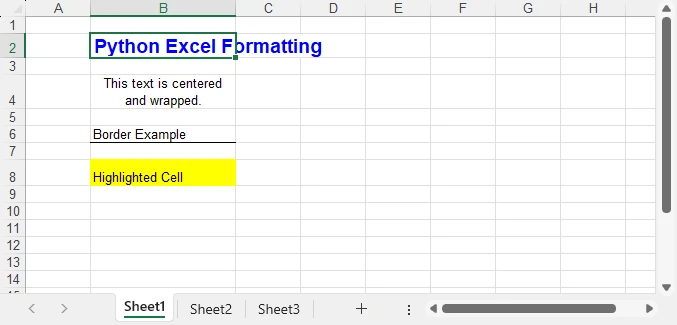
Changing font properties is one of the most frequent tasks when working with styled Excel sheets. In Spire.XLS for Python, font settings are accessed through the CellRange.Style.Font object, which lets you control the typeface, size, color, and emphasis (bold, italic, underline).
cell = sheet.Range[2, 2]
cell.Text = "Python Excel Formatting"

cell.Style.Font.FontName = "Arial"
cell.Style.Font.Size = 14
cell.Style.Font.Color = Color.get_Blue()
cell.Style.Font.IsBold = True
This modifies the text appearance directly within the cell by adjusting its style attributes.
2. Alignment and Wrapping
Cell alignment is managed through the HorizontalAlignment and VerticalAlignment properties of the Style object. In addition, the WrapText property ensures that longer text fits within a cell without overflowing.
cell = sheet.Range[4, 2]
cell.Text = "This text is centered and wrapped."

cell.Style.HorizontalAlignment = HorizontalAlignType.Center
cell.Style.VerticalAlignment = VerticalAlignType.Center
cell.Style.WrapText = True
This produces neatly centered text that remains readable even when it spans multiple lines.
3. Adding Borders
Borders are defined through the Borders collection on the Style object, where you can set the line style and color for each edge individually.
cell = sheet.Range[6, 2]
cell.Text = "Border Example"

cell.Style.Borders[BordersLineType.EdgeBottom].LineStyle = LineStyleType.Thin
cell.Style.Borders[BordersLineType.EdgeBottom].Color = Color.get_Black()
This adds a thin black line to separate the cell from the content below.
4. Background Colors
Cell background is controlled by the Style.Color property. This is often used to highlight headers or important values.
cell = sheet.Range[8, 2]
cell.Text = "Highlighted Cell"
cell.Style.Color = Color.get_Yellow()
This makes the cell stand out in the worksheet.
5. Setting Column Widths and Row Heights
Besides styling text and borders, adjusting the column widths and row heights ensures that your content fits properly without overlapping or leaving excessive blank space.
# Set specific column width
sheet.Columns[1].ColumnWidth = 20
# Set specific row height
sheet.Rows[7].RowHeight = 20
In addition to specifying widths and heights, Excel rows and columns can also be automatically adjusted to fit their content:
- Use Worksheet.AutoFitColumn(columnIndex) or Worksheet.AutoFitRow(rowIndex) to adjust a specific column or row.
- Use CellRange.AutoFitColumns() or CellRange.AutoFitRows() to adjust all columns or rows in a selected range.
This helps create well-structured spreadsheets where data is both readable and neatly aligned.
Preview of Basic Formatting Result
Here’s what the basic Excel formatting looks like in practice:
In addition to these visual styles, you can also customize how numbers, dates, or currency values are displayed—see How to Set Excel Number Format in Python for details.
Extended Excel Formatting in Python
Instead of formatting individual cells, you can also work with ranges and reusable styles. These operations typically involve the CellRange object for merging and sizing, and the Workbook.Styles collection for creating reusable Style definitions.
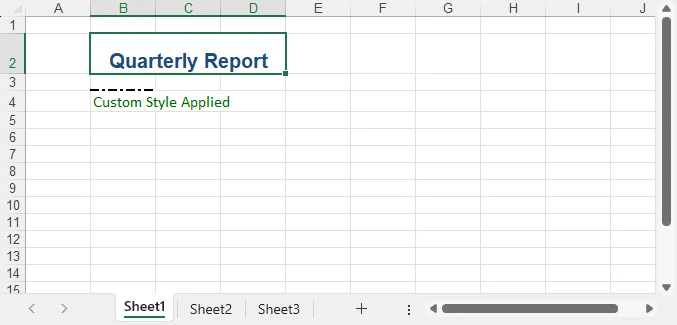
1. Merging Cells
Merging cells is often used to create report titles or section headers that span multiple columns.
range = sheet.Range[2, 2, 2, 4]
range.Merge()
range.Text = "Quarterly Report"
range.Style.HorizontalAlignment = HorizontalAlignType.Center
range.RowHeight = 30
Here, three columns (B2:D2) are merged into one, styled as a bold, centered title with a shaded background—perfect for highlighting key sections in a report.
2. Applying Built-in Styles
Excel comes with a set of predefined styles that can be applied quickly. In Spire.XLS, you can directly assign these built-in styles to ranges.
range.BuiltInStyle = BuiltInStyles.Heading1
This instantly applies Excel’s built-in Heading 1 style, giving the range a consistent and professional appearance without manually setting fonts, borders, or colors.
3. Creating a Custom Style and Applying It
Creating a custom style is useful when you need to apply the same formatting rules across multiple cells or sheets. The Workbook.Styles.Add() method allows you to define a named style that can be reused throughout the workbook.
# Create a custom style
custom_style = workbook.Styles.Add("CustomStyle")
custom_style.Font.FontName = "Calibri"
custom_style.Font.Size = 12
custom_style.Font.Color = Color.get_DarkGreen()
custom_style.Borders[BordersLineType.EdgeTop].LineStyle = LineStyleType.MediumDashDot

# Apply style to a cell
cell = sheet.Range[4, 2]
cell.Text = "Custom Style Applied"
cell.Style = custom_style
This method makes Excel style management in Python more efficient, especially when working with large datasets.
Preview of Advanced Formatting Result
Below is an example showing the results of merged cells, built-in styles, and a custom style applied:
For highlighting data patterns and trends, you can also use conditional rules—see How to Apply Conditional Formatting in Python Excel.
Key APIs for Excel Styling in Python
After exploring both basic and advanced formatting examples, it’s helpful to step back and look at the core classes, properties, and methods that make Excel styling in Python possible. Understanding these elements will give you the foundation to write scripts that are flexible, reusable, and easier to maintain.
The following table summarizes the most important classes, properties, and methods for formatting Excel with Python. You can use it as a quick reference whenever you need to recall the key styling options.
| Class / Property / Method | Description |
|---|---|
| Workbook / Worksheet | Represent Excel files and individual sheets. |
| Workbook.LoadFromFile() / SaveToFile() | Load and save Excel files. |
| Workbook.Styles.Add() | Create and define a custom reusable style that can be applied across cells. |
| CellRange | Represents one or more cells; used for applying styles or formatting. |
| CellRange.Style | Represents formatting information (font, alignment, borders, background, text wrapping, etc.). |
| CellRange.Merge() | Merge multiple cells into a single cell. |
| CellRange.BuiltInStyle | Apply one of Excel’s predefined built-in styles (e.g., Heading1). |
| CellRange.BorderAround() / BorderInside() | Apply border formatting to the outside or inside of a range. |
| CellRange.ColumnWidth / RowHeight | Adjust the width of columns and the height of rows. |
| CellRange.NumberFormat | Defines the display format for numbers, dates, or currency. |
With these building blocks, you can handle common formatting tasks—such as fonts, borders, alignment, colors, and number formats—in a structured and highly customizable way. This ensures that your spreadsheets look professional, remain easy to manage, and can be consistently styled across different Python automation projects. For more details, see the Spire.XLS for Python API reference.
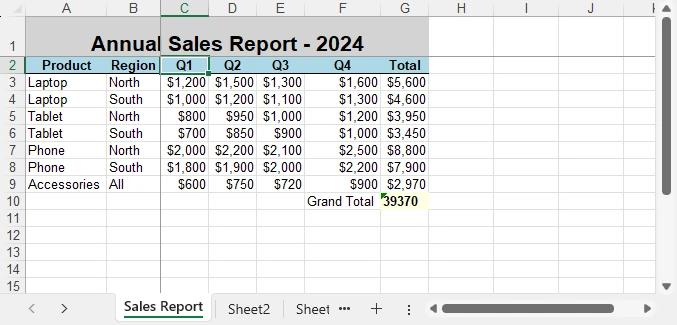
Real-World Use Case: Formatting an Annual Excel Sales Report with Python
Now that we’ve explored both basic and advanced Excel formatting techniques, let’s apply them in a real-world scenario. The following example demonstrates how to generate a comprehensive Excel annual sales report with Python. By combining structured data, regional breakdowns, and advanced formatting, the report becomes much easier to interpret and presents business data in a clear and professional way.
from spire.xls import *

workbook = Workbook()
sheet = workbook.Worksheets[0]
sheet.Name = "Sales Report"

# Report title
title = sheet.Range[1, 1, 1, 7]
title.Merge()
title.Text = "Annual Sales Report - 2024"
title.Style.Font.IsBold = True
title.Style.Font.Size = 16
title.Style.HorizontalAlignment = HorizontalAlignType.Center
title.Style.Color = Color.get_LightGray()
title.RowHeight = 30

# Data
data = [
    ["Product", "Region", "Q1", "Q2", "Q3", "Q4", "Total"],
    ["Laptop", "North", 1200, 1500, 1300, 1600, 5600],
    ["Laptop", "South", 1000, 1200, 1100, 1300, 4600],
    ["Tablet", "North", 800, 950, 1000, 1200, 3950],
    ["Tablet", "South", 700, 850, 900, 1000, 3450],
    ["Phone", "North", 2000, 2200, 2100, 2500, 8800],
    ["Phone", "South", 1800, 1900, 2000, 2200, 7900],
    ["Accessories", "All", 600, 750, 720, 900, 2970],
    ["", "", "", "", "", "Grand Total", 39370]
]

for r in range(len(data)):
    for c in range(len(data[r])):
        sheet.Range[r+2, c+1].Text = str(data[r][c])

# Header formatting
header = sheet.Range[2, 1, 2, 7]
header.Style.Font.IsBold = True
header.Style.Color = Color.get_LightBlue()
header.Style.HorizontalAlignment = HorizontalAlignType.Center
header.Style.Borders[BordersLineType.EdgeBottom].LineStyle = LineStyleType.Thin

# Numeric columns as currency
for row in range(3, 10):
    for col in range(3, 8):
        cell = sheet.Range[row, col]
        if cell.Text.isdigit():
            cell.NumberValue = float(cell.Text)
            cell.NumberFormat = "$#,##0"

# Highlight totals
grand_total = sheet.Range[10, 7]
grand_total.Style.Color = Color.get_LightYellow()
grand_total.Style.Font.IsBold = True

# Freeze the first row and the first two columns
sheet.FreezePanes(2, 3)

# Auto fit columns
sheet.AllocatedRange.AutoFitColumns()

workbook.SaveToFile("output/annual_sales_report.xlsx", ExcelVersion.Version2016)
This script combines several formatting techniques—such as a merged and styled title, bold headers with borders, currency formatting, highlighted totals, and frozen panes—into a single workflow. Applying these styles programmatically improves readability and ensures consistency across every report, which is especially valuable for business and financial data.
Here’s the final styled annual sales report generated with Python:
Conclusion
Formatting Excel with Python is a practical way to automate report generation and ensure professional presentation of data. By combining basic styling with advanced techniques like custom styles and column adjustments, you can create clear, consistent, and polished spreadsheets.
Whether you are working on financial reports, research data, or business dashboards, formatting Excel with Python helps you save time while maintaining presentation quality. With the right use of styles, properties, and formatting options, your spreadsheets will not only contain valuable data but also deliver it in a visually effective way.
You can apply for a free temporary license to unlock the full functionality of Spire.XLS for Python or try Free Spire.XLS for Python to get started quickly.
FAQ - Excel Fpormatting in Python
Q1: Can you format Excel with Python?
Yes. Python provides libraries that allow you to apply fonts, colors, borders, alignment, conditional formatting, and more to Excel files programmatically.
Q2: How to do formatting in Python?
For Excel formatting, you can use a library such as Spire.XLS for Python. It lets you change fonts, set alignment, adjust column widths, merge cells, and apply custom or built-in styles through code.
Q3: Can I use Python to edit Excel?
Yes. Python can not only format but also create, read, modify, and save Excel files, making it useful for dynamic reporting and data automation.
Q4: What’s the best way to automate repeated Excel styling tasks?
Define custom styles or reusable functions that standardize formatting rules across multiple workbooks and sheets. This ensures consistency and saves time.
JSON to CSV in Python – Complete Guide for Flat & Nested JSON

JSON (JavaScript Object Notation) is the most widely used format for structured data in web applications, APIs, and configuration files. CSV (Comma-Separated Values) is a popular format for data analysis, reporting, and seamless integration with Excel. Converting JSON to CSV is a common requirement for developers, data engineers, and analysts who need to transform hierarchical JSON data into a tabular format for easier processing, visualization, and automation.
This step-by-step guide demonstrates how to convert JSON to CSV using Python, including techniques for handling flat and nested JSON data, and optimizing performance for large JSON datasets. By following this tutorial, you can streamline your data workflows and efficiently integrate JSON data into Excel or other tabular systems.
What You Will Learn
- Why Convert JSON to CSV
- Understanding JSON Structures
- Python JSON to CSV Converter – Installation
- Step-by-Step JSON to CSV Conversion in Python
- Performance Tips for Exporting Large or Complex JSON Files to CSV
- Conclusion
- FAQs
Why Convert JSON to CSV?
Although JSON is ideal for hierarchical and complex data, CSV offers several practical advantages:
- Spreadsheet Compatibility: CSV files can be opened in Excel, Google Sheets, and other BI tools.
- Ease of Analysis: Tabular data is easier to filter, sort, summarize, and visualize.
- Data Pipeline Integration: Many ETL workflows and reporting systems rely on CSV for seamless data integration.
Real-World Use Cases:
- API Data Extraction: Transform JSON responses from web APIs into CSV for analysis or reporting.
- Reporting Automation: Convert application or system logs into CSV for automated dashboards or scheduled reports.
- Data Analytics: Prepare hierarchical JSON data for Excel, Google Sheets, or BI tools like Tableau to perform pivot tables and visualizations.
- ETL Pipelines: Flatten and export JSON from databases or log files into CSV for batch processing or integration into data warehouses.
Converting JSON files to CSV format bridges the gap between structured storage and table-based analytics, making it a common requirement in reporting, data migration, and analytics pipelines.
Understanding JSON Structures
Before implementing JSON to CSV conversion in Python, it is important to understand the two common structures of JSON data:
- Flat JSON: Each object contains simple key-value pairs.
[
    {"name": "Alice", "age": 28, "city": "New York"},
    {"name": "Bob", "age": 34, "city": "Los Angeles"}
]
- Nested JSON: Objects contain nested dictionaries or arrays.
[
    {
        "name": "Alice",
        "age": 28,
        "contacts": {"email": "alice@example.com", "phone": "123-456"}
    }
]
Flat JSON can be directly mapped to CSV columns, while nested JSON requires flattening to ensure proper tabular representation.
Python JSON to CSV Converter - Installation
To export JSON to CSV in Python, you can use Spire.XLS for Python, a spreadsheet library that enables Python developers to create, read, manipulate, and export spreadsheet files directly from Python. It supports common formats like .xls, .xlsx, .csv, and .ods.
Installation
You can install the library from PyPI via pip:
pip install spire.xls
If you need assistance with the installation, refer to this tutorial: How to Install Spire.XLS for Python on Windows.
Once installed, you can import it into your Python scripts:
from spire.xls import *
This setup allows seamless JSON-to-CSV conversion with complete control over the workbook structure and output format.
Step-by-Step JSON to CSV Conversion in Python
Converting JSON to CSV involves four main steps: loading JSON data, creating a workbook, writing headers and rows, and exporting the final file as CSV. Below, we’ll go through the process for both flat JSON and nested JSON.
Handling Flat JSON Data
Step 1: Load JSON and Create Workbook
First, load your JSON file into Python and create a new workbook where the data will be written.
import json
from spire.xls import *

# Load JSON data
with open('data.json') as f:
    data = json.load(f)

# Create workbook and worksheet
workbook = Workbook()
sheet = workbook.Worksheets[0]
Explanation:
- json.load parses your JSON file into Python objects (lists and dictionaries).
- Workbook() creates a new Excel workbook in memory.
- workbook.Worksheets[0] accesses the first worksheet where data will be written.
Step 2: Write Headers Dynamically
Next, generate column headers from the JSON keys. This ensures that the CSV reflects the structure of your data.
# Extract headers from JSON keys
headers = list(data[0].keys())

# Write headers to the first row
for col, header in enumerate(headers, start=1):
    sheet.Range[1, col].Value = header
Explanation:
- list(data[0].keys()) retrieves all top-level JSON keys.
- sheet.Range[1, col].Value writes headers in the first row, starting from column 1.
Step 3: Write Data Rows
After headers are set, populate the worksheet row by row with values from each JSON object.
# Populate values from each JSON object to the subsequent rows
for row_index, item in enumerate(data, start=2):
    for col_index, key in enumerate(headers, start=1):
        value = item.get(key, "")
        sheet.Range[row_index, col_index].Value = str(value) if value is not None else ""
Explanation:
- Loop starts from row 2 because row 1 is reserved for headers.
- Each JSON object is mapped to a row, and each key is mapped to a column.
Step 4: Save the Worksheet as CSV
Finally, save the worksheet as a CSV file and clean up resources.
# Save the worksheet as a CSV file
sheet.SaveToFile("output.csv", ",", Encoding.get_UTF8())
workbook.Dispose()
Resulting CSV (output.csv):
This example uses Python’s built-in json module to parse JSON data. For more details on its functions and usage, refer to the Python json module documentation.
If you also want to implement JSON to Excel conversion, see our guide on converting JSON to/from Excel in Python.
Handling Nested JSON with Dictionaries and Arrays
When JSON objects contain nested dictionaries or arrays, direct CSV export is not possible because CSV is a flat format. To ensure compatibility, nested fields must be flattened to preserve all data in a readable CSV format.
Suppose you have the following JSON file (nested.json) with nested data:
[
    {
        "Name": "Alice",
        "Age": 28,
        "City": "New York",
        "Contacts": {"Email": "alice@example.com", "Phone": "123-456"},
        "Skills": ["Python", "Excel", "SQL"]
    },
    {
        "Name": "Bob",
        "Age": 34,
        "City": "Los Angeles",
        "Contacts": {"Email": "bob@example.com", "Phone": "987-654"},
        "Skills": ["Java", "CSV", "JSON"]
    }
]
This JSON contains:
- Flat fields: Name, Age, City
- Nested dictionary: Contacts
- Array: Skills
To export all fields to CSV, nested dictionaries need to be flattened, and arrays need to be joined into semicolon-separated strings. The following steps show you how to achieve this.
Step 1: Flatten Nested JSON Data
Flattening nested JSON with dictionaries and arrays involves converting nested dictionaries into dot-notation keys and joining array values into a single string. The following helper function performs this flattening:
import json
from spire.xls import *

# ---------------------------
# Step 1: Flatten nested JSON
# ---------------------------
def flatten_json(item):
    flat = {}
    for key, value in item.items():
        if isinstance(value, dict):
            for sub_key, sub_value in value.items():
                flat[f"{key}.{sub_key}"] = sub_value
        elif isinstance(value, list):
            flat[key] = "; ".join(map(str, value))
        else:
            flat[key] = value
    return flat

with open('nested.json') as f:
    data = json.load(f)

flat_data = [flatten_json(item) for item in data]
Explanation:
- flatten_json() checks each field in the JSON object.
- If the value is a dictionary, its keys are prefixed with the parent key (dot notation).
- If the value is a list, all elements are joined into one string separated by semicolons.
- Other values are kept as they are.
- Finally, the original nested JSON is transformed into flat_data, which can now be exported using the same workflow as flat JSON.
Step 2: Export Flattened Data to CSV
After flattening, the export process is the same as flat JSON: create a workbook, generate headers, write rows, and save as CSV.
# ------------------------------------------------
# Step 2: Export flattened data to CSV
# (create workbook, write headers, populate rows, save)
# ------------------------------------------------
workbook = Workbook()
sheet = workbook.Worksheets[0]

# Generate headers from flattened JSON keys
headers = list(flat_data[0].keys())
for col, header in enumerate(headers, start=1):
    sheet.Range[1, col].Value = header

# Populate rows from flat_data
for row_index, item in enumerate(flat_data, start=2):
    for col_index, key in enumerate(headers, start=1):
        value = item.get(key, "")
        sheet.Range[row_index, col_index].Value = str(value) if value is not None else ""

# Save the worksheet as CSV (comma delimiter, UTF-8)
sheet.SaveToFile("output.csv", ",", Encoding.get_UTF8())

# Clean up resources
workbook.Dispose()
Explanation:
- Headers and rows are generated from flat_data (instead of the original data).
- This ensures nested fields (Contacts.Email, Contacts.Phone) and arrays (Skills) are properly included in the CSV.
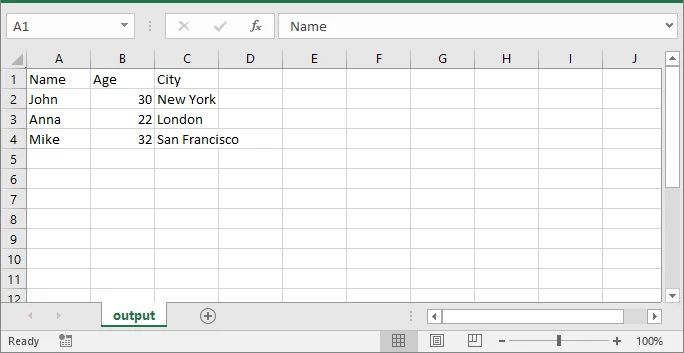
Resulting CSV (output.csv):
Performance Tips for Exporting Large or Complex JSON Files to CSV
When working with large or complex JSON files, applying a few practical strategies can help optimize memory usage, improve performance, and ensure your CSV output remains clean and accurate.
- For very large datasets, process JSON in chunks to avoid memory issues.
- When arrays are very long, consider splitting into multiple rows instead of joining with semicolons.
- Maintain consistent JSON keys for cleaner CSV output.
- Test the CSV output in Excel to verify formatting, especially for dates and numeric values.
Conclusion
Converting JSON to CSV in Python is essential for developers and data engineers. With Spire.XLS for Python, you can:
- Convert flat and nested JSON into structured CSV.
- Maintain consistent headers and data formatting.
- Handle large datasets efficiently.
- Export directly to CSV or Excel without additional dependencies.
By following this guide, you can seamlessly transform JSON into CSV for reporting, analytics, and integration.
FAQs
Q1: Can Spire.XLS for Python convert nested JSON objects to CSV?
A1: Yes. You can flatten nested JSON objects, including dictionaries and arrays, and export them as readable CSV columns with dynamic headers. This ensures all hierarchical data is preserved in a tabular format.
Q2: How do I install Spire.XLS for Python?
A2: You can install it via pip with the command:
pip install spire.xls
Then import it into your Python script using:
from spire.xls import
This setup enables seamless JSON-to-CSV conversion in Python.
Q3: Can I join array elements from JSON into a single CSV cell?
A3: Yes. You can join array elements from JSON into a single CSV cell using a delimiter like ;. This keeps multiple values readable and consistent in your exported CSV file.
Q4: How can I optimize performance when converting large JSON files to CSV in Python?
A4: To handle large JSON files efficiently: flatten nested JSON before writing, process data row-by-row, and export in batches. This minimizes memory usage and ensures smooth CSV generation.
Q5: Can I customize the CSV delimiter or column order when exporting JSON to CSV?
A5: Yes. Spire.XLS allows you to set custom delimiters (e.g., comma, semicolon, or tab) and manually define the column order, giving you full control over professional CSV output.
Convert Markdown to HTML in C# .NET (Strings, Files & Batch)

Markdown (md) is a widely adopted lightweight markup language known for its simplicity and readability. Developers, technical writers, and content creators often use it for documentation, README files, blogs, and technical notes. While Markdown is easy to write and read in its raw form, displaying it on websites or integrating it into web applications requires HTML. Converting Markdown to HTML is therefore a fundamental task for developers working with content management systems, documentation pipelines, or web-based applications.
In this tutorial, you will learn how to convert Markdown to HTML in C#. The guide covers converting both Markdown strings and files to HTML, as well as batch processing multiple Markdown documents efficiently. By the end, you’ll have practical, ready-to-use examples that you can apply directly to real-world projects.
Table of Contents
- Understanding Markdown and HTML: Key Differences and Use Cases
- C# Library for Markdown to HTML Conversion
- Convert a Markdown String to HTML in C# (Step-by-Step)
- Convert a Single Markdown File to HTML in C# (Step-by-Step)
- Batch Convert Multiple Markdown Files to HTML in C#
- Additional Tips for Efficient Markdown to HTML Conversion in C#
- Conclusion
- FAQs
Understanding Markdown and HTML: Key Differences and Use Cases
What is Markdown?
Markdown is a lightweight markup language that allows developers and writers to create structured documents using plain text. It uses straightforward syntax for headings, lists, links, images, code blocks, and more. Its readability in raw form makes it ideal for writing documentation, README files, technical blogs, and collaborative notes.
Example Markdown:
# Project Title

This is a **bold** statement.

- Feature 1

- Feature 2
What is HTML?
HTML (HyperText Markup Language) is the foundational language of the web. Unlike Markdown, HTML provides precise control over document structure, formatting, multimedia embedding, and web interactivity. While Markdown focuses on simplicity, HTML is indispensable for web pages and application content.
Example HTML Output:
<h1>Project Title</h1>
<p>This is a <strong>bold</strong> statement.</p>
<ul>
  <li>Feature 1</li>
  <li>Feature 2</li>
</ul>
Key Differences and Use Cases
| Feature | Markdown | HTML |
|---|---|---|
| Complexity | Simple, minimal syntax | More detailed, verbose |
| Readability | Readable in raw form | Harder to read directly |
| Use Cases | Documentation, readmes, blogs | Websites, web apps, emails |
Use Case Tip: Use Markdown for author-friendly writing, then convert it to HTML for web display, automated documentation pipelines, or content management systems.
C# Library for Markdown to HTML Conversion
For C# developers, one of the most practical libraries for Markdown-to-HTML conversion is Spire.Doc for .NET. This library offers robust document processing capabilities, supporting not only loading Markdown files and converting content to HTML, but also extending to other formats, such as Markdown to Word and PDF. With this flexibility, developers can easily choose the output format that best fits their project needs.
Key Features
- Load Markdown files and convert to HTML
- Preserve headings, lists, links, images, and other Markdown formatting in HTML output
- Batch process multiple Markdown documents efficiently
- Integrate seamlessly with .NET applications without requiring Microsoft Office
- Compatible with .NET Framework and .NET Core
Installation
You can easily add the required library to your C# project in two ways:
- Using NuGet (Recommended)
Run the following command in your Package Manager Console:
This method ensures that the library and its dependencies are automatically downloaded and integrated into your project.Install-Package Spire.Doc - Manual Installation
Alternatively, you can download the library DLL and manually add it as a reference in your project. This approach is useful if you need offline installation or prefer direct control over the library files.
Tip: Using NuGet is generally recommended for faster setup and easier version management.
Convert a Markdown String to HTML in C# (Step-by-Step)
In many applications, Markdown content may be generated dynamically or stored in a database as a string. This section demonstrates how you can convert a Markdown string into a fully formatted HTML file using C#.
Steps to Convert a Markdown String to HTML
- Prepare the Markdown string that you want to convert.
- Save the Markdown string to a .md file with WriteAllText.
- Load the Markdown file into a Document object using LoadFromFile with FileFormat.Markdown.
- Save the document as an HTML file using SaveToFile with FileFormat.Html.
Example Code
using Spire.Doc;
using System;
using System.IO;
namespace MarkdownToHtml
{
internal class Program
{
static void Main(string[] args)
{
// Define the markdown string
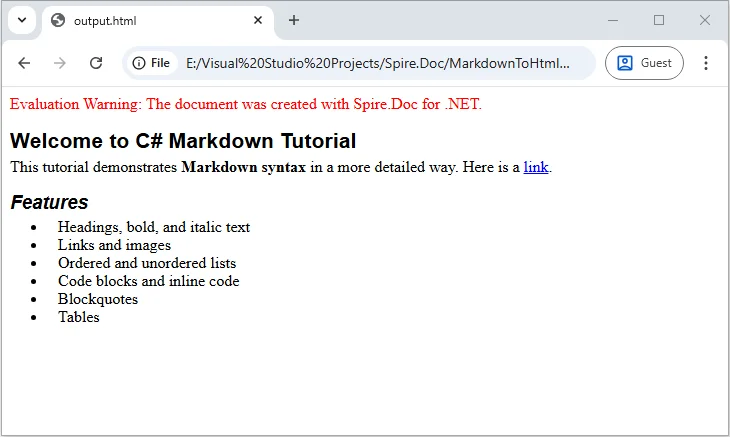
string markdown = @"
# Welcome to C# Markdown Tutorial
This tutorial demonstrates **Markdown syntax** in a more detailed way.
Here is a [link](https://example.com).
## Features
- Headings, bold, and italic text
- Links and images
- Ordered and unordered lists
- Code blocks and inline code
- Blockquotes
- Tables
";
// Define the file paths
string markdownFilePath = "example.md"; // Path to save the Markdown file
string outputHtmlPath = "output.html"; // Path to save the converted HTML file
// Create a Markdown file from the markdown string
File.WriteAllText(markdownFilePath, markdown);
// Load the Markdown file
Document document = new Document();
document.LoadFromFile(markdownFilePath, FileFormat.Markdown);
// Save as HTML
document.SaveToFile(outputHtmlPath, FileFormat.Html);
// Close the document
document.Close();
Console.WriteLine($"Markdown string converted to HTML at: {outputHtmlPath}");
}
}
}
Convert a Single Markdown File to HTML in C# (Step-by-Step)
If you have a Markdown file ready, converting it to HTML for web pages or email templates is straightforward. With Spire.Doc, you can load your Markdown file and export it as a fully formatted HTML document, preserving all styling, including headings, lists, links, images, and other formatting elements.
Steps to Convert a Markdown File to HTML
- Prepare the Markdown file you want to convert.
- Load the file into a Document object using LoadFromFile with the FileFormat.Markdown parameter.
- Save the loaded document as HTML using SaveToFile with FileFormat.Html.
Example Code
using Spire.Doc;
using System;

namespace MarkdownToHtml
{
    internal class Program
    {
        static void Main(string[] args)
        {
            // Path to the Markdown file
            string markdownFile = @"C:\Docs\example.md";
            // Path to save the converted HTML file
            string htmlFile = @"C:\Docs\example.html";

            // Load the Markdown file
            Document document = new Document();
            document.LoadFromFile(markdownFile, FileFormat.Markdown);

            // Save as HTML file
            document.SaveToFile(htmlFile, FileFormat.Html);

            // Close the document
            document.Close();

            Console.WriteLine($"Converted '{markdownFile}' to HTML successfully!");
        }
    }
}
Batch Convert Multiple Markdown Files to HTML in C#
If you have a collection of Markdown files that need to be converted at once, you can use the following C# example to batch process and convert them into HTML.
Example Code
using Spire.Doc;
using System;
using System.IO;

namespace MarkdownToHtml
{
    internal class Program
    {
        static void Main(string[] args)
        {
            // Define the input folder containing Markdown files
            string inputFolder = @"C:\Docs\MarkdownFiles";
            // Define the output folder where converted HTML files will be saved
            string outputFolder = @"C:\Docs\HtmlFiles";

            // Create the output folder if it does not already exist
            Directory.CreateDirectory(outputFolder);

            // Loop through all Markdown (.md) files in the input folder
            foreach (string file in Directory.GetFiles(inputFolder, "*.md"))
            {
                // Load the Markdown file into a Document object
                Document doc = new Document();
                doc.LoadFromFile(file, FileFormat.Markdown);

                // Get the file name without extension
                string fileName = Path.GetFileNameWithoutExtension(file);
                // Build the output path with .html extension
                string outputPath = Path.Combine(outputFolder, fileName + ".html");

                // Save the document as an HTML file
                doc.SaveToFile(outputPath, FileFormat.Html);

                // Print a confirmation message for each converted file
                Console.WriteLine($"Converted {file} to HTML.");
            }

            // Print a final message when batch conversion is complete
            Console.WriteLine("Batch conversion complete.");
        }
    }
}
Additional Tips for Efficient Markdown to HTML Conversion in C#
Converting Markdown to HTML is straightforward, but applying a few practical strategies can help handle advanced scenarios, improve performance, and ensure your HTML output is clean and consistent. Here are some key tips to enhance your conversion workflow:
-
Implement Error Handling When processing multiple files, wrap your conversion logic in try-catch blocks to handle invalid Markdown, missing files, or access permission issues. This ensures your batch conversion won’t fail entirely due to a single problematic file.
try { Document doc = new Document(); doc.LoadFromFile(filePath, FileFormat.Markdown); doc.SaveToFile(outputPath, FileFormat.Html); } catch (Exception ex) { Console.WriteLine($"Failed to convert {filePath}: {ex.Message}"); } -
Optimize Batch Conversion Performance
For large numbers of Markdown files, consider using asynchronous or parallel processing. This reduces conversion time and avoids high memory usage:Parallel.ForEach(Directory.GetFiles(inputFolder, "*.md"), file => { // Conversion logic }); -
Post-Process HTML Output
After conversion, you can enhance the HTML by injecting CSS styles, adding custom attributes, or minifying the output. This is especially useful when integrating HTML into web pages or applications.string htmlContent = File.ReadAllText(outputPath); htmlContent = "<link rel='stylesheet' href='https://cdn.e-iceblue.com/style.css'>" + htmlContent; File.WriteAllText(outputPath, htmlContent); -
Maintain UTF-8 Encoding
Always save Markdown and HTML files with UTF-8 encoding to preserve special characters, symbols, and multilingual content, ensuring consistent rendering across browsers and devices.
Conclusion
In this tutorial, you learned how to convert Markdown to HTML in C#, covering single Markdown strings, individual files, and batch processing multiple documents.
These examples provide a solid foundation for integrating Markdown to HTML conversion into various .NET applications, including documentation systems, blogs, and other content-driven projects. By applying these methods, you can efficiently manage Markdown content and produce consistent, well-structured HTML output.
FAQs
Q1: Can I convert Markdown with images and links using Spire.Doc in C#?
A1: Yes. The library allows you to convert Markdown files that include images, hyperlinks, headings, lists, and code blocks into fully formatted HTML. This ensures the output closely matches your source content.
Q2: Do I need Microsoft Office installed to convert Markdown to HTML in C#?
A2: No. Spire.Doc is a standalone library for .NET, so you can convert Markdown to HTML in C# without Microsoft Office, making it easy to integrate into both desktop and web applications.
Q3: How can I batch convert multiple Markdown files to HTML in C# efficiently?
A3: You can loop through all Markdown files in a folder and convert them using Spire.Doc’s Document.LoadFromFile and SaveToFile methods. This approach allows batch conversion of Markdown documents to HTML in .NET quickly and reliably.
Q4: Can I convert Markdown to HTML dynamically in an ASP.NET application using C#?
A4: Yes. You can dynamically convert Markdown content stored as strings or files to HTML in ASP.NET using Spire.Doc, which is useful for web apps, blogs, or CMS platforms.
Q5: Is Spire.Doc compatible with .NET Core and .NET 6 for Markdown to HTML conversion?
A5: Yes. It supports .NET Framework, .NET Core, .NET 5, and .NET 6+, making it ideal for modern C# projects that require Markdown to HTML conversion.
Q6: Can I customize the HTML output after converting Markdown in C#?
A6: Yes. After conversion, you can add CSS, modify HTML tags, or inject styles programmatically in C# to match your website or application’s design requirements.
Q7: Can Spire.Doc convert other document formats besides Markdown?
A7: Yes. It can convert a wide range of formats, such as Word to PDF or Word to HTML, giving you flexibility to manage different document types in C# projects.
Q8: How do I preserve special characters and encoding when converting Markdown to HTML in C#?
A8: Always save your Markdown files with UTF-8 encoding to ensure special characters, symbols, and multilingual content are preserved during Markdown to HTML conversion.
How to Convert TXT Files to Excel Spreadsheets Quickly
Table of Contents
Install with Maven
Install-Package Spire.XLS
Related Links

Page Content:
- Method 1. Import Text to Microsoft Excel and Save as Excel Format
- Method 2. Convert TXT to Excel Format with C#
Intro
Working with plain text files (.txt) is common, but when it comes to managing large datasets, TXT files often lack structure and usability. By converting TXT to Excel, you can take advantage of Excel's features such as filtering, formulas, pivot tables, and data visualization. In this guide, you'll learn three effective methods to convert TXT files into Excel (XLSX or CSV) format—using Microsoft Excel, a free online TXT to Excel converter, and Python programming.
Differences Between TXT, CSV, and Excel Files
Before starting the conversion, it's important to understand the differences between these formats:
- TXT files – Store unstructured or plain text, often separated by spaces, tabs, or custom delimiters.
- CSV files – A structured form of text file where data is separated by commas, making it easier to import into spreadsheets or databases.
- Excel files (XLS/XLSX) – Native Microsoft Excel formats that support advanced data manipulation features, including formulas, charts, and multiple worksheets.
Converting TXT to Excel allows you to transform raw text data into a structured and interactive format.
Method 1. Import Text to Microsoft Excel and Save as Excel Format
For users who prefer not to rely on external tools, Excel itself provides a reliable method to convert TXT files into structured spreadsheets. With this method, you have no need to download any other APIs or software. As long as you can get access to Microsoft Excel, you can manage the conversion in seconds.
Follow the steps below to get started:
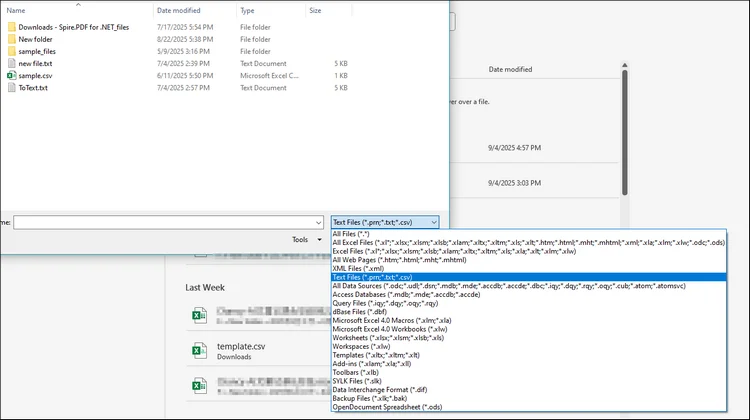
Step 1. Open Microsoft Excel and go to File > Open > Browse to open your TXT file.

Step 2. A window will pop out to let you select file. The default file format contains excel files only, so you should adjust the file format from the right bottom corner to "All Files" or "Text files".
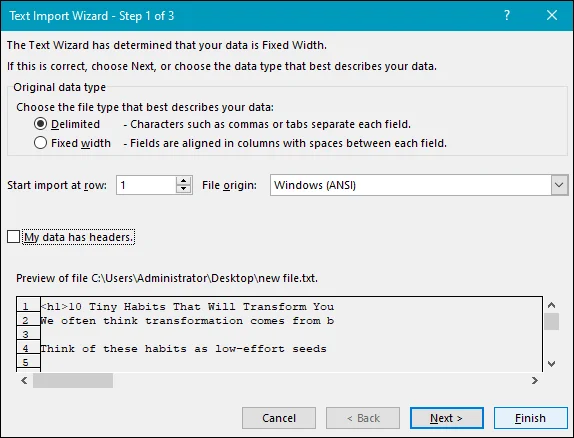
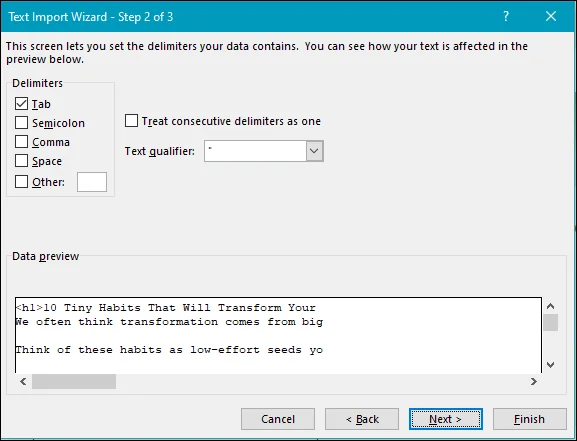
Step 3. The Text Import Wizard will appear. Choose the file type (Delimited or Fixed width).
Select the correct delimiter (such as tab, space, or comma).
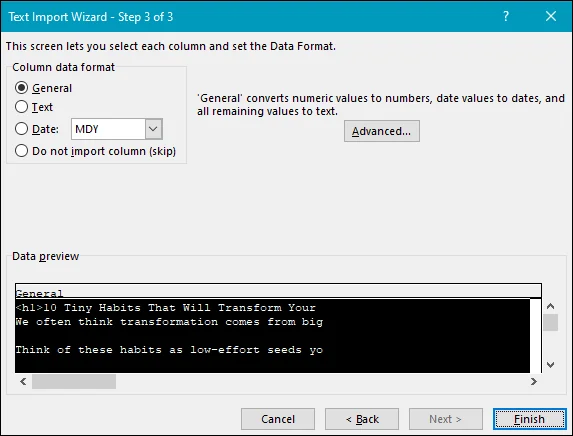
Adjust column data formats if needed, then click Finish.
Step 4. Save the file as .xlsx or .csv.

Method 2. Convert TXT to Excel Format with C#
For developers or advanced users handling large amounts of data, code provides a reliable way to automate TXT to Excel conversion. Let me introduce Spire.XLS for .NET to you, a professional Excel library designed for developers to create Excel files, read, edit, convert, and print Excel files within .NET applications without relying on Microsoft Excel.
Spire.XLS for .NET supports both XLS and XLSX formats along with CSV, ODS, PDF, HTML, and other file types, making it a flexible solution for handling spreadsheet data. With its rich feature set—including formula calculation, chart creation, pivot tables, data import/export, and advanced formatting. It helps developers automate Excel-related tasks efficiently while ensuring high performance and ease of integration.
Now, follow the steps below to convert your TXT files to Excel format with Spire.XLS for .NET:
Step 1. Install Spire.XLS DLL on your computer with NuGet using the following code or download from the official website.
Step 2. Copy the following code and don't forget to customize according to your specific file needs:
using Spire.Xls;
using System.IO;
using System.Collections.Generic;

class TxtToExcelConverter
{
    static void Main()
    {
        // Open a text file and read all lines in it
        string[] lines = File.ReadAllLines("Data.txt");

        // Create a list to store the data in text file
        List data = new List();

        // Split data into rows and columns and add to the list
        foreach (string line in lines)
        {
            data.Add(line.Trim().Split('\t')); // Adjust delimiter as needed
        }

        // Create a Workbook object
        Workbook workbook = new Workbook();

        // Get the first worksheet
        Worksheet sheet = workbook.Worksheets[0];

        // Iterate through the rows and columns in the data list
        for (int row = 0; row < data.Count; row++)
        {
            for (int col = 0; col < data[row].Length; col++)
            {
                // Write the text data in specified cells
                sheet.Range[row + 1, col + 1].Value = data[row][col];

                // Set the header row to Bold
                sheet.Range[1, col + 1].Style.Font.IsBold = true;
            }
        }

        // Autofit columns
        sheet.AllocatedRange.AutoFitColumns();

        // Save the Excel file
        workbook.SaveToFile("TXTtoExcel.xlsx", ExcelVersion.Version2016);
        workbook.Dispose();
    }
}
RESULT: 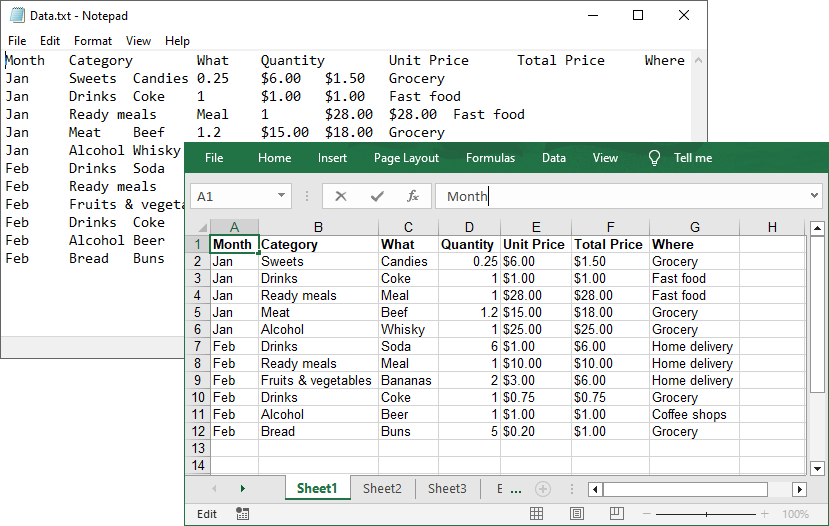
Conclusion
Converting TXT files into Excel format makes it easier to analyze, organize, and share your data. In this post, we explored three methods:
- Microsoft Excel import – quick and built-in for manual conversions.
- Python scripting – powerful and flexible for automation and large datasets.
Choose the method that best suits your needs and start turning plain text into structured, usable Excel spreadsheets.
Get a Free License
To fully experience the capabilities of Spire.XLS for .NET without any evaluation limitations, you can request a free 30-day trial license.
See Also:
HTML to RTF Conversion in C# (Full Code Examples)
Converting HTML to RTF in C# is a key task for developers working with web content that needs to be transformed into editable, universally compatible documents. HTML excels at web display with dynamic styles and structure, while RTF is ideal for shareable, editable files in tools like Word or WordPad.
For .NET developers, using libraries like Spire.Doc can streamline the process. In this tutorial, we'll explore how to use C# to convert HTML to RTF, covering everything from basic implementations to advanced scenarios such as handling HTML images, batch conversion.
- Why Use Spire.Doc for HTML to RTF Conversion?
- Getting Started
- Convert HTML to RTF (C# Code Examples)
- Advanced Conversion Scenarios
- Final Thoughts
- Common Questions
Why Use Spire.Doc for HTML to RTF Conversion?
Spire.Doc for .NET is a lightweight, feature-rich library for creating, editing, and converting Word and RTF documents in .NET applications (supports .NET Framework, .NET Core, and .NET 5+). For HTML to rich text conversion, it offers key benefits:
- Preserves HTML formatting (fonts, colors, links, lists, tables).
- Supports loading HTML from strings or local files.
- No dependency on Microsoft Word or other third-party software.
- Intuitive API with minimal code required.
Getting Started
1. Create a C# Project
If you’re starting from scratch, create a new Console App (.NET Framework/.NET Core) project in Visual Studio. This example uses a console app for simplicity, but the code works in WinForms, WPF, or ASP.NET projects too.
2. Install Spire.Doc via NuGet
The fastest way to add Spire.Doc to your C# project is through NuGet Package Manager:
- Open your C# project in Visual Studio.
- Right-click the project in the Solution Explorer → Select Manage NuGet Packages.
- Search for Spire.Doc and click Install to add the latest version to your project.
Alternatively, use the NuGet Package Manager Console with this command:
Install-Package Spire.Doc
Convert HTML to RTF (C# Code Examples)
Spire.Doc’s Document class handles HTML loading and RTF saving. Below are two common scenarios:
Scenario 1: Convert HTML String to RTF in C#
Use this when HTML content is dynamic (e.g., from user input, APIs, or databases).
using Spire.Doc;
using Spire.Doc.Documents;
namespace HtmlToRtfConverter
{
class Program
{
static void Main(string[] args)
{
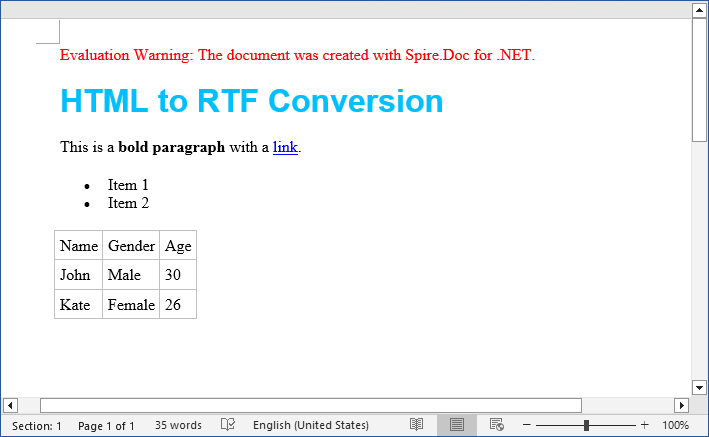
// Create a Document object
Document doc = new Document();
// Define your HTML content
string htmlString = @"
<html>
<body>
<h1 style='color: #00BFFF; font-family: Arial'>HTML to RTF Conversion</h1>
<p>This is a <b>bold paragraph</b> with a <a href='https://www.e-iceblue.com'>link</a>.</p>
<ul>
<li>Item 1 </li>
<li>Item 2</li>
</ul>
<table border='1' cellpadding='5'>
<tr><td>Name</td><td>Gender</td><td>Age</td></tr>
<tr><td>John</td><td>Male</td><td>30</td></tr>
<tr><td>Kate</td><td>Female</td><td>26</td></tr>
</table>
</body>
</html>";
// Add a paragraph in Word
Paragraph para = doc.AddSection().AddParagraph();
// Append the HTML string to the paragraph
para.AppendHTML(htmlString);
// Save the document as RTF
doc.SaveToFile("HtmlStringToRtf.rtf", FileFormat.Rtf);
doc.Dispose();
}
}
}
In this code:
- Document Object: Represents an empty document.
- HTML String: You can customize this to include any valid HTML (styles, media, or dynamic content from databases/APIs).
- AppendHTML(): Parses HTML tags (e.g.,
<h1>,<table>,<a>) and inserts them into a paragraph. - SaveToFile(): Writes the converted content to an RTF file.
Output:
The SaveToFile method accepts different FileFormat parameters. You can change it to implement HTML to Word conversion in C#.
Scenario 2: Convert HTML File to RTF File
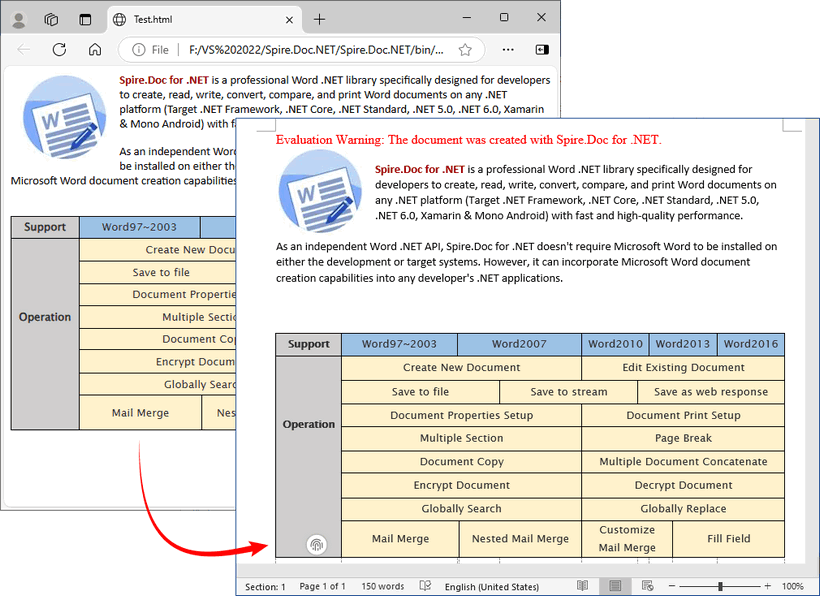
For static HTML files (e.g., templates or saved web pages), use LoadFromFile with parameter FileFormat.Html:
using Spire.Doc;

namespace ConvertHtmlToRTF
{
    class Program
    {
        static void Main()
        {
            // Create a Document object
            Document doc = new Document();

            // Load an HTML file
            doc.LoadFromFile("Test.html", FileFormat.Html);

            // Save the HTML file as rtf format
            doc.SaveToFile("HTMLtoRTF.rtf", FileFormat.Rtf);
            doc.Dispose();
        }
    }
}
This code simplifies HTML-to-RTF conversion into three core steps:
- Creates a Document object.
- Loads an existing HTML file using LoadFromFile() with the FileFormat.Html parameter.
- Saves the loaded HTML as an RTF format using SaveToFile() with the FileFormat.Rtf parameter.
Output:
Spire.Doc supports bidirectional conversion, so you can convert the RTF file back to HTML in C# when needed.
Advanced Conversion Scenarios
1. Handling Images in HTML
Spire.Doc preserves images embedded in HTML (via <img> tags). For local images, ensure the src path is correct. For remote images (URLs), Spire.Doc automatically downloads and embeds them.
// HTML with local and remote images
string htmlWithImages = @"<html>
    <body>
        <h3>HTML with Images</h3>
        <p>Local image: <img src='https://cdn.e-iceblue.com/C:\Users\Administrator\Desktop\HelloWorld.png' alt='Sample Image' width='200'></p>
        <p>Remote image: <img src='https://www.e-iceblue.com/images/art_images/csharp-html-to-rtf.png' alt='Online Image'></p>
    </body>
    </html>";

// Append the HTML string to a paragraph
Paragraph para = doc.AddSection().AddParagraph();
para.AppendHTML(htmlWithImages);

// Save the document as RTF
doc.SaveToFile("HtmlWithImage.rtf", FileFormat.Rtf);
2. Batch Conversion of Multiple HTML Files
Process an entire directory of HTML files with a loop:
string inputDir = @"C:\Input\HtmlFiles";
string outputDir = @"C:\Output\RtfFiles";

// Create output directory if it doesn't exist
Directory.CreateDirectory(outputDir);

// Get all .html files in input directory
foreach (string htmlFile in Directory.EnumerateFiles(inputDir, "*.html"))
{
   using (Document doc = new Document())
   {
      doc.LoadFromFile(htmlFile, FileFormat.Html, XHTMLValidationType.None);

      // Use the same filename but with .rtf extension
      string fileName = Path.GetFileNameWithoutExtension(htmlFile) + ".rtf";
      string outputPath = Path.Combine(outputDir, fileName);

      doc.SaveToFile(outputPath, FileFormat.Rtf);
Final Thoughts
Converting HTML to RTF in C# is straightforward with Spire.Doc for .NET. This library eliminates the need for manual parsing and ensures consistent formatting across outputs. Whether you’re working with HTML strings or files, this article provides practical code examples to handle both scenarios.
For further exploration, refer to the Spire.Doc documentation.
Common Questions
Q1: Is Spire.Doc free to use?
A: For large-scale projects, you can request a free 30-day trial license to fully evaluate it. Alternatively, Spire.Doc offers a free community edition without any watermarks (but with certain page/functionality limits).
Q2: Does Spire.Doc preserve HTML hyperlinks, images, and tables in the RTF output?
A: Yes. Spire.Doc retains most HTML elements:
- Hyperlinks:
<a>tags are converted to clickable links in RTF. - Images: Local (
<img src="/path">) and remote (<img src="/URL">) images are embedded in the RTF. - Tables: HTML tables (with border, cellpadding, etc.) are converted to RTF tables with preserved structure.
Q3: Can I style the RTF output further after loading the HTML?
A: Absolutely. After loading the HTML content into the Document object, you can use the full Spire.Doc API to programmatically modify the document before saving it as RTF.
Q4: Can I convert HTML to other formats with Spire.Doc?
A: Yes. Apart from converting to RTF, the library also supports converting HTML to Word, HTML to XML, and HTML to images, etc.
Working with Data in C#: Exporting DataSet to Excel Made Easy
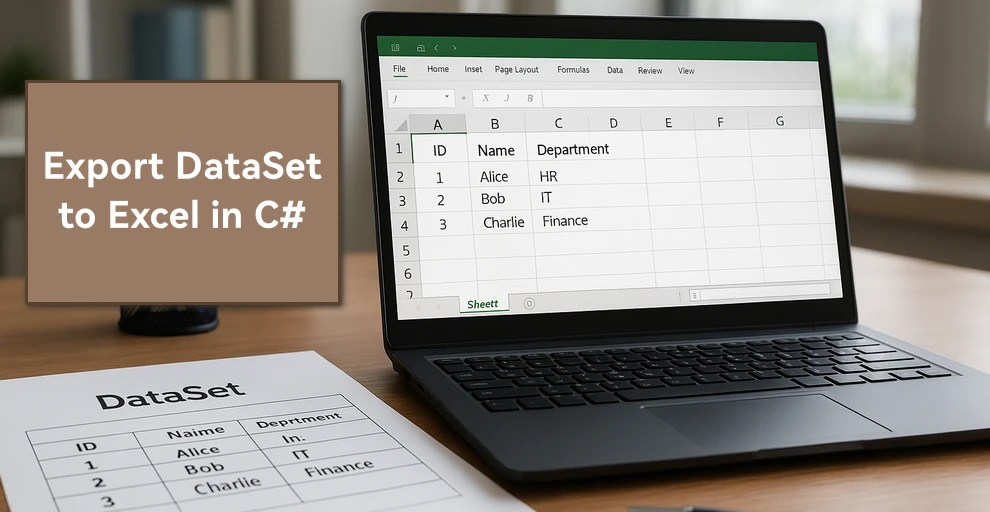
In C# development, DataSet is widely used to manage in-memory data, often as a result of database queries or integration processes. There are many scenarios where you may need to create Excel files from DataSet in C# — for example, generating reports, sharing structured data with non-developers, or archiving records for future reference.
In this guide, we’ll walk through different approaches to export DataSet to Excel in C# using Spire.XLS for .NET, including creating an Excel file, writing multiple DataTables into separate sheets, applying formatting, and handling large data volumes.
Here's what's covered in this guide:
- DataSet Basics and Environment Setup
- Creating an Excel File from DataSet in C#
- Adding Formatting to Excel Sheets Using C#
- Handling Large DataSet Exports
- Read Excel into DataSet in C#
- Conclusion
- FAQ
1. DataSet Basics and Environment Setup for Excel Export
What is a DataSet?
A DataSet in C# is an in-memory representation of structured data. It can hold multiple DataTables, including their rows, columns, and relationships, making it useful for working with relational-style data without direct database connections.
Why Export DataSet to Excel?
- Data exchange – Excel is widely supported and easy to share across teams.
- Data analysis – Analysts can manipulate Excel data directly using formulas, pivot tables, and charts.
- Archiving – Storing query results or processed data in a readable, portable format.
Compared to raw text or CSV, Excel supports rich formatting, multiple sheets, and better readability.
Environment Setup
To export a DataSet to an Excel file in C#, we will use Spire.XLS for .NET, which provides APIs for handling Excel files. Install Spire.XLS via NuGet:
Install-Package Spire.XLS
Add the required namespaces:
using Spire.Xls;
using System.Data;
using System.Drawing; // for Color
2. Creating an Excel File from DataSet in C#
Exporting a DataSet to Excel involves two key steps: preparing the data and writing it into a workbook. In practice, the DataSet may come from queries or APIs, but for clarity, we’ll demonstrate with a simple example. First, we’ll build a DataSet in memory, then show how to export it into an Excel file where each DataTable becomes its own worksheet.
2.1 Initialize a DataSet with Sample Data
First, we’ll build a DataSet using C#. The following sample DataSet contains multiple business-style tables and a variety of column types (int, string, DateTime, decimal).
using System;
using System.Data;

class Program
{
    static DataSet CreateSampleDataSet()
    {
        DataSet ds = new DataSet("CompanyData");

        // Employees
        DataTable employees = new DataTable("Employees");
        employees.Columns.Add("ID", typeof(int));
        employees.Columns.Add("Name", typeof(string));
        employees.Columns.Add("DepartmentID", typeof(int));
        employees.Columns.Add("HireDate", typeof(DateTime));
        employees.Columns.Add("Salary", typeof(decimal));

        employees.Rows.Add(1, "Alice", 101, new DateTime(2020, 5, 12), 5500.00m);
        employees.Rows.Add(2, "Bob", 102, new DateTime(2019, 3, 8), 7200.50m);
        employees.Rows.Add(3, "Charlie", 103, new DateTime(2021, 11, 20), 4800.75m);

        // Departments
        DataTable departments = new DataTable("Departments");
        departments.Columns.Add("DepartmentID", typeof(int));
        departments.Columns.Add("DepartmentName", typeof(string));
        departments.Rows.Add(101, "HR");
        departments.Rows.Add(102, "IT");
        departments.Rows.Add(103, "Finance");

        // Projects
        DataTable projects = new DataTable("Projects");
        projects.Columns.Add("ProjectID", typeof(int));
        projects.Columns.Add("ProjectName", typeof(string));
        projects.Columns.Add("OwnerID", typeof(int));
        projects.Columns.Add("StartDate", typeof(DateTime));
        projects.Rows.Add(1001, "Recruitment System", 1, new DateTime(2023, 1, 15));
        projects.Rows.Add(1002, "ERP Upgrade", 2, new DateTime(2023, 4, 10));
        projects.Rows.Add(1003, "Budget Planning", 3, new DateTime(2023, 7, 5));

        ds.Tables.Add(employees);
        ds.Tables.Add(departments);
        ds.Tables.Add(projects);

        return ds;
    }
}
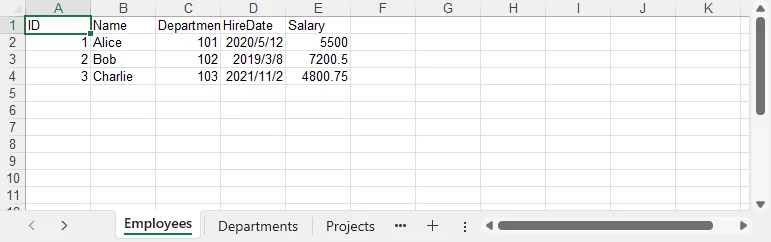
2.2 Export DataSet to Excel File
With the DataSet prepared, the next step is generating the Excel file. This involves creating a Workbook, iterating through the DataTables, inserting them into worksheets, and saving the workbook to an Excel file.
using Spire.Xls;
using System.Data;

class Program
{
    static void Main()
    {
        DataSet ds = CreateSampleDataSet();

        Workbook workbook = new Workbook();

        // Export each DataTable as a separate worksheet
        for (int i = 0; i < ds.Tables.Count; i++)
        {
            Worksheet sheet = (i == 0)
                ? workbook.Worksheets[0]
                : workbook.Worksheets.Add(ds.Tables[i].TableName);

            sheet.InsertDataTable(ds.Tables[i], true, 1, 1);
            sheet.Name = ds.Tables[i].TableName; // ensure sheet is named after the table
        }

        workbook.SaveToFile("DatasetToExcel.xlsx", ExcelVersion.Version2016);
    }
}
About the Exporting Process
- Each DataTable is written into a separate worksheet.
- InsertDataTable(DataTable table, bool columnHeaders, int row, int column) inserts data starting from a specific cell.
- SaveToFile() writes the workbook to disk in the specified format.
In addition to creating separate worksheets for each DataTable, you can also insert multiple DataTables into the same worksheet by adjusting the starting row and column parameters of the InsertDataTable method.
Result preview
Below is a quick preview of the output workbook showing three sheets populated from the DataSet.
For a practical example of exporting data directly from a database to Excel, see our guide on Export Database to Excel in C#.
3. Adding Formatting to Excel Sheets Using C#
Raw data often isn’t enough for reporting. Formatting improves readability and makes the Excel file more professional. With Spire.XLS, you can style fonts, apply background colors, add borders, and format numbers and dates.
using System.Drawing;
using Spire.Xls;

// Get the first sheet
Worksheet sheet1 = workbook.Worksheets["Employees"];

// 1) Header styling (A1:E1)
CellRange header = sheet1.AllocatedRange.Rows[0];
header.Style.Font.IsBold = true;
header.Style.Font.Size = 12;
header.Style.Font.Color = Color.White;
header.Style.Color = Color.SteelBlue;

// Borders around the header row
header.BorderAround(LineStyleType.Thin);

// 2) Number formats for entire columns (D: HireDate, E: Salary)
sheet1.AllocatedRange.Columns[3].Style.NumberFormat = "yyyy-mm-dd";
sheet1.AllocatedRange.Columns[4].Style.NumberFormat = "$#,##0.00";

// 3) Optional: zebra stripes for data area (A2:E4 here as example)
CellRange data = sheet1.Range["A2:E4"];
// CellRange data = sheet1.Range[2, 1, 4, 5];
data.Style.Color = Color.FromArgb(245, 247, 250);
data.BorderAround(LineStyleType.Thin);

// Auto-fit after formatting
sheet1.AllocatedRange.AutoFitColumns();
sheet1.AllocatedRange.AutoFitRows();
How Formatting Works
- Style.Font — font properties such as IsBold, Size, Color.
- Style.Color — background fill color for the selected range.
- Borders / BorderAround — draw borders on edges/around ranges with LineStyleType.
- NumberFormat — Excel-native formats (e.g., dates, currency, percentages).
- AutoFitColumns() / AutoFitRows() — adjust column widths / row heights to fit content.
For more formatting options, refer to the API reference for CellRange and CellStyle.
Formatting preview
The following image shows styled headers, borders, and proper date/currency formats applied.

4. Handling Large DataSet Exports
When exporting large datasets, performance and memory become critical. Consider:
- Split across sheets — When rows approach Excel/version limits or for logical separation.
- Batch writing — Insert data in segments (e.g., table-by-table or range-by-range).
- Lightweight formatting — Minimize heavy styling to reduce file size and processing time.
- Streaming (where applicable) — Prefer APIs that avoid loading everything into memory at once.
5. Bonus: Read Excel into DataSet in C#
In addition to exporting, the reverse workflow is equally important: reading Excel data back into a DataSet for processing or migration. This is useful when importing data from external reports, integrating spreadsheets with applications, or performing preprocessing before database insertion.
using System.Data;
using Spire.Xls;

class Program
{
    static DataSet ReadExcelIntoDataSet(string filePath)
    {
        DataSet ds = new DataSet();
        Workbook workbook = new Workbook();
        workbook.LoadFromFile(filePath);

        foreach (Worksheet sheet in workbook.Worksheets)
        {
            DataTable dt = sheet.ExportDataTable();
            dt.TableName = sheet.Name;
            ds.Tables.Add(dt);
        }

        return ds;
    }
}
The ExportDataTable method allows each worksheet to be converted into a DataTable object, preserving both the structure and the cell values. By assigning the sheet name to TableName and adding it into a DataSet, you can combine multiple sheets into a single in-memory data container that is ready for further processing.
For a complete workflow on persisting Excel data into a database, see our guide on Import Excel into Database in C#.
Conclusion
Exporting a DataSet to Excel in C# allows you to generate reports, share data, and make information easier to analyze or present. With Spire.XLS for .NET, you can create Excel files directly from DataSet objects, apply formatting, manage multiple sheets, and handle large datasets efficiently. You can also import Excel data back into a DataSet for integration with applications or databases.
To explore more advanced features, you may request a free temporary license or use Free Spire.XLS for .NET for smaller projects.
FAQ: C# DataSet and Excel Integration
Q1: How can I export multiple DataTables from a DataSet into different Excel sheets?
Loop through ds.Tables and call InsertDataTable for each one, creating a new worksheet per DataTable.
Q2: Can I export a DataSet to a specific worksheet in an existing Excel file?
Yes. Load the file using Workbook.LoadFromFile(), then choose the worksheet and use InsertDataTable.
Q3: Does exporting DataSet to Excel preserve column formatting and data types?
Values are exported with the same data types as in the DataSet. You can also apply formatting (date, currency, alignment, etc.) after inserting.
Q4: How do I handle very large DataSet exports (over 100,000 rows)?
Split into multiple sheets, use batch inserts, and reduce complex formatting to improve performance.
Read CSV Files in C#: Basic Parsing & DataTable Conversion
CSV (Comma-Separated Values) files remain one of the most widely used formats for data exchange between applications. Whether you’re processing financial data, user records, or analytics reports, efficiently reading CSV files in C# is a common task in .NET development.
In this comprehensive guide, we'll explore how to parse CSV files in C# using Spire.XLS for .NET, covering both direct reading and converting CSV to DataTable.
- Install the C# CSV File Reader Library
- Read a CSV File in C#
- Read CSV into a DataTable in C#
- When to Use Each Method
- Conclusion
- FAQs
Install the C# CSV File Reader Library
While primarily designed for Excel files, Spire.XLS can also be used as a .NET CSV reader. It provides excellent support for CSV files, offering a range of features that make CSV processing efficient and straightforward.
The first step is to install the Spire.XLS package in your project. Here's how:
- Open your project in Visual Studio
- Right-click on your project in the Solution Explorer
- Select "Manage NuGet Packages"
- In the NuGet Package Manager, search for "Spire.XLS"
- Click "Install" to add the package to your project
Alternatively, you can install it using the Package Manager Console:
PM> Install-Package Spire.XLS
This will add the necessary dependencies to your project, allowing you to use Spire.XLS classes.
Read a CSV File in C#
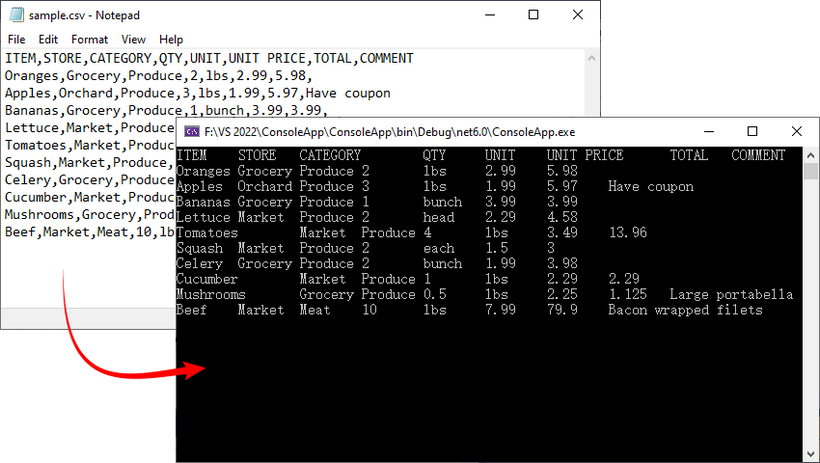
Let's start with the fundamentals: reading a simple CSV file and extracting its data. The C# code example below loads a CSV file, accesses its data, and prints the contents to the console in a tabular format.
using Spire.Xls;

namespace ReadCSV
{
    class Program
    {
        static void Main(string[] args)
        {
            // Create a workbook instance
            Workbook workbook = new Workbook();

            // Load the CSV file
            workbook.LoadFromFile("sample.csv", ",");

            // Get the first worksheet
            Worksheet sheet = workbook.Worksheets[0];

            // Get the used range
            CellRange range = sheet.AllocatedRange;

            // Iterate through rows and columns
            for (int row = 1; row <= range.RowCount; row++)
            {
                for (int col = 1; col <= range.ColumnCount; col++)
                {
                    // Get cell value
                    string cellValue = range[row, col].Value;
                    Console.Write(cellValue + "\t");
                }
                Console.WriteLine();
            }

            Console.ReadLine();
        }
    }
}
Explanation:
- Workbook class: Acts as a "container" for your CSV file in memory. Even though CSV isn’t a full Excel file, Spire.Xls treats it as a single-sheet workbook for consistency.
- Workbook.LoadFromFile(): Loads the CSV file. The parameters are:
- File path: "sample.csv".
- Delimiter: "," (comma, default for CSV).
- Worksheet.AllocatedRange: Retrieves only the cells that contain data.
- CellRange[row, col].Value: Retrieves the value of a specific cell.
Result: CSV data printed in a clean, tab-separated format.
If you need a demo for reading CSV files in VB.NET, convert the code directly using the C# to VB.NET converter.
Read CSV into a DataTable in C#
A DataTable is a versatile in-memory data structure in .NET that simplifies data manipulation (e.g., filtering, sorting, or binding to UI components). Here’s how to load CSV data into a DataTable using Spire.XLS:
using Spire.Xls;
using System.Data;

namespace ReadCSV
{
    class Program
    {
        static void Main(string[] args)
        {
            // Create a workbook instance
            Workbook workbook = new Workbook();

            // Load the CSV file
            workbook.LoadFromFile("sample.csv", ",");

            // Get the first worksheet
            Worksheet worksheet = workbook.Worksheets[0];

            // Export data from the worksheet to a DataTable
            DataTable dataTable = worksheet.ExportDataTable();

            // Get row and column count
            Console.WriteLine("\nConversion complete! DataTable information:");
            Console.WriteLine($"Number of columns: {dataTable.Columns.Count}");
            Console.WriteLine($"Number of rows: {dataTable.Rows.Count}");
            Console.WriteLine();

            // Print column names
            for (int i = 0; i < dataTable.Columns.Count; i++)
            {
                Console.Write(dataTable.Columns[i].ColumnName + "  | ");
            }
            Console.WriteLine();
            Console.WriteLine("----------------------------------------------------------");

            // Print row data
            for (int i = 0; i < dataTable.Rows.Count; i++)
            {
                for (int j = 0; j < dataTable.Columns.Count; j++)
                {
                    string value = dataTable.Rows[i][j].ToString();

                    Console.Write(value + "\t");
                }
                Console.WriteLine();
            }
        }
    }
}
Explanation:
- Worksheet.ExportDataTable(): Converts the entire CSV worksheet into a DataTable.
- Metadata Access: DataTable.Columns.Count and DataTable.Rows.Count shows the size of your dataset, helping you verify that the import was successful.
- Column Headers and Data Output: Iterates through to display column names and row data.
Result: Structured output with metadata, headers, and rows:
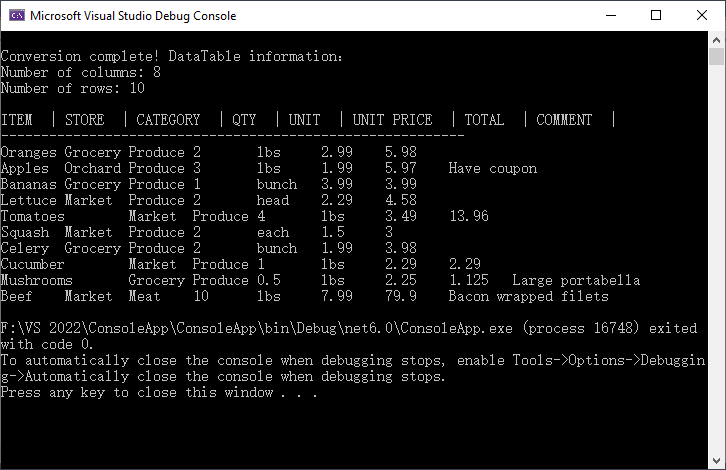
To analyze, calculate, or format the data, you can convert CSV to Excel in C#.
When to Use Each Method
Choose the right approach based on your goal:
| Method | Best For | Use Case Example |
|---|---|---|
| Direct CSV Reading | Quick data verification | Checking if a CSV is loaded correctly. |
| Convert to DataTable | Advanced data processing | Filtering rows, sorting, or saving to SQL Server. |
Conclusion
Reading CSV files in C# is streamlined with Spire.XLS for .NET, and converting CSV data to a DataTable adds flexibility for data manipulation. Whether you’re working with small datasets or large files, Spire.XLS offers flexible options to meet your requirements.
The code examples in this guide are ready to use - just copy, paste, and adjust for your CSV file path. For more advanced features, refer to Spire.XLS’s official documentation.
FAQs (Common Questions)
Q1: Why choose Spire.XLS for CSV reading?
A: While the .NET Framework offers built-in StreamReader for CSV handling, Spire.XLS provides several distinct advantages:
- No dependencies: Doesn't require Microsoft Excel or Office to be installed
- High performance: Optimized for handling large CSV files efficiently
- Flexibility: Multiple ways to read CSV data based on your needs
- Cross-platform: Works with .NET Framework, .NET Core, .NET Standard, and Mono
Q2: Can I use a different delimiter (e.g., semicolon or tab)?
A: Yes. Replace the second parameter of LoadFromFile() method with your delimiter:
// For tab-delimited files
workbook.LoadFromFile("data.txt", "\t");

// For semicolon-delimited files
workbook.LoadFromFile("data.csv", ";");

// For pipe-delimited files
workbook.LoadFromFile("data.csv", "|");
Q3: Can I read specified rows or columns from a CSV file?
A: Yes. You can target a precise subset of your data by defining exact row and column boundaries. This is useful for extracting specific information (e.g., skipping headers, focusing on relevant columns) without processing the entire file.
For example:
// Define the specific range
int startRow = 2;   // Start from row 2 (skip header)
int endRow = 4;     // End at row 4
int startCol = 2;   // Start from column 2
int endCol = 6;     // End at column 6


// Loop through rows and columns
for (int row = startRow; row <= endRow; row++)
{
   for (int col = startCol; col <= endCol; col++)
   {
      // Get cell value
      string cellValue = worksheet.Range[row, col].Value;
      Console.Write(cellValue + "\t");
Note: Spire.Xls uses 1-based indexing (like Excel), so the first row/column is numbered 1 (not 0).
XLS to XLSX Conversion: Manual, Online, and Batch Methods
Table of Contents
Install with Maven
pip install Spire.Xls
Related Links
XLS is an older spreadsheet file format developed by Microsoft Excel, and it is still used by some users today. Since Excel 2007, Microsoft has adopted the newer XLSX format. Due to differences between these formats, opening an XLS file in a newer version of Excel can sometimes cause compatibility issues, affecting editing and data processing. As a result, performing an XLS to XLSX conversion has become a common task in spreadsheet management. Fortunately, this article introduces three simple and effective methods to help you convert XLS files to XLSX quickly and easily.
- XLS to XLSX Conversion: Manually
- Convert XLS to XLSX Online
- Batch Convert XLS to XLSX Automatically
- FAQs
Perform XLS-to-XLSX Conversion Manually
The first and most straightforward way to convert XLS to XLSX is manual conversion, which works best when you only have a small number of files. This method does not require any special software or programming knowledge, making it ideal for users who need a quick solution. There are two common approaches for manual conversion:
- Change the file extension
Locate the XLS file you want to convert, right-click it, and select Rename. Replace the file extension from .xls to .xlsx.
- Save As
Open the source file in Excel, click the File tab in the top menu, then select Save As from the left panel. In the Save as type dropdown, choose XLSX, and finally click Save.

Convert XLS to XLSX Online
If you find manual operations too time-consuming, since they require repeated clicks, you can use an online XLS to XLSX converter instead. One example is CloudConvert, a free online file conversion tool. It not only converts spreadsheet files but also supports text documents, images, audio, and video formats. Using it is straightforward—just follow these steps:
-
Navigate to the website and click the red Select File button to choose the file you want to convert, or simply drag and drop it onto the button.
-
Once the file is uploaded, click the red button on the right to start the conversion.
-
Wait a few seconds. When you see the Finished status, click the green Download button to save the converted XLSX file to your computer.
This method is ideal when you only need to convert a few XLS files to XLSX quickly without installing any software.
Batch Convert XLS to XLSX Safely
If you need to convert hundreds or even thousands of files, manual or online conversion methods are no longer practical. Similarly, if data security is a top priority, the best option is to perform batch conversions locally with code. This approach ensures that your file data remains completely safe, as it does not rely on any online service.
For this purpose, we recommend using Spire.XLS, a professional third-party Excel library that can be integrated into enterprise systems or automated workflows, enabling large-scale XLS to XLSX conversions.

The following example demonstrates how this can be achieved in Python:
from spire.xls import *
from spire.xls.common import *
import os

# Specify the input and output folders
inputFolder = "/input/XLS SAMPLES/"
outputFolder = "/output/TO XLSX/"

# Loop through all .xls files in the input folder
for file in os.listdir(inputFolder):
    if file.endswith(".xls"):
        # Build full file paths
        inputFile = os.path.join(inputFolder, file)
        outputFile = os.path.join(outputFolder, os.path.splitext(file)[0] + ".xlsx")

        # Create a Workbook object
        workbook = Workbook()
        # Load the XLS file
        workbook.LoadFromFile(inputFile)

        # Save as XLSX format
        workbook.SaveToFile(outputFile, ExcelVersion.Version2016)
        workbook.Dispose()

print("Batch conversion completed successfully!")
Here is a preview comparing the source files with the converted ones:
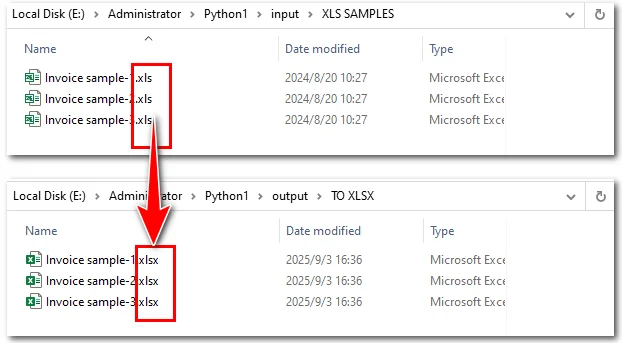
Steps explained:
- Import Spire.XLS and Python modules.
- Loop through all .xls files in the input folder.
- Load each file into a Workbook object.
- Convert XLS to XLSX by saving it in .xlsx format through the Workbook.saveToFile() method.
If you want to convert an XLSX file back to XLS, you can also use the Workbook.saveToFile() method. Spire.XLS also supports using this method to convert Excel files into PDF, images, and more.
FAQs about XLS to XLSX Conversion
- How do I save my Excel file as XLSX?
You can save an Excel file as XLSX by using the Save As feature in Excel or by using online or programmatic conversion tools, depending on the number of files and your needs.
- When did Excel switch from XLS to XLSX?
Microsoft introduced the XLSX format starting with Excel 2007 to replace the older XLS format. XLSX offers better performance, reduced file size, and improved compatibility with modern Excel features.
- Is XLS the same as XLSX?
No. XLS is the older binary file format used in Excel 97-2003, while XLSX is the newer XML-based format introduced in Excel 2007. They differ in structure, compatibility, and supported features.
- Can online tools convert XLS to XLSX?
Yes, many online tools allow you to convert XLS files to XLSX. They are convenient for small numbers of files but may not be suitable for large batches or sensitive data.
- What’s the best way to convert a large number of XLS files to XLSX safely?
For hundreds or thousands of files, or when data security is important, using code with a library like Spire.XLS for batch conversion on your local machine is the most efficient and secure method.
The Conclusion
In summary, XLS to XLSX conversion can be handled in different ways depending on your needs. For a handful of files, Excel or online tools may be sufficient. But for large-scale or sensitive files, automation with code is the best choice. By leveraging Spire.XLS, you can integrate bulk conversions directly into your workflow, ensuring both speed and safety. Whether you need to upgrade legacy files, streamline internal processes, or prepare data for modern systems, Spire.XLS offers a professional and flexible solution.
ALSO READ
Convert Excel (XLSX/XLS) to CSV in Python
Python: Convert Excel to PDF Easily and Quickly
How to Convert PDF to CSV in Java (Easily Extract PDF Tables)

When working with reports, invoices, or datasets stored in PDF format, developers often need a way to reuse the tabular data in spreadsheets, databases, or analytical tools. A common solution is to convert PDF to CSV using Java, since CSV is lightweight, structured, and compatible with almost every platform.
Unlike text or image export, a PDF-to-CSV conversion is mainly about extracting tables from PDF and saving them as CSV. With the help of Spire.PDF for Java, you can detect table structures in PDFs and export them programmatically with just a few lines of code.
In this article, you’ll learn step by step how to perform a PDF to CSV conversion in Java—from setting up the environment, to extracting tables, and even handling more complex scenarios like multi-page documents or multiple tables per page.
Overview of This Tutorial
Environment Setup for PDF to CSV Conversion in Java
Before extracting tables and converting PDF to CSV using Java, you need to set up the development environment. This involves choosing a suitable library and adding it to your project.
Why Choose Spire.PDF for Java
Since PDF files do not provide a built-in export to CSV, extracting tables programmatically is the practical approach. Spire.PDF for Java offers APIs to detect table structures in PDF documents and save them directly as CSV files, making the conversion process simple and efficient.
Install Spire.PDF for Java
Add Spire.PDF for Java to your project using Maven:
<repositories>
    <repository>
        <id>com.e-iceblue</id>
        <name>e-iceblue</name>
        <url>https://repo.e-iceblue.com/nexus/content/groups/public/</url>
    </repository>
</repositories>
<dependencies>
    <dependency>
        <groupId>e-iceblue</groupId>
        <artifactId>spire.pdf</artifactId>
        <version>12.6.4</version>
    </dependency>
</dependencies>
If you are not using Maven, you can download the Spire.PDF for Java package and add the JAR files to your project’s classpath.
Extract Tables from PDF and Save as CSV
The most practical way to perform PDF to CSV conversion is by extracting tables. With Spire.PDF for Java, this can be done with just a few steps:
- Load the PDF document.
- Use PdfTableExtractor to find tables on each page.
- Collect cell values row by row.
- Write the output into a CSV file.
Here is a Java example that shows the process from start to finish:
Java Code Example for PDF to CSV Conversion
import com.spire.pdf.*;
import com.spire.pdf.utilities.*;

import java.io.*;

public class PdfToCsvExample {
    public static void main(String[] args) throws Exception {
        // Load the PDF document
        PdfDocument pdf = new PdfDocument();
        pdf.loadFromFile("Sample.pdf");

        // Create a StringBuilder to store extracted text
        StringBuilder sb = new StringBuilder();

        // Iterate through each page
        for (int i = 0; i < pdf.getPages().getCount(); i++) {
            PdfTableExtractor extractor = new PdfTableExtractor(pdf);
            PdfTable[] tableLists = extractor.extractTable(i);

            if (tableLists != null) {
                for (PdfTable table : tableLists) {
                    for (int row = 0; row < table.getRowCount(); row++) {
                        for (int col = 0; col < table.getColumnCount(); col++) {
                            // Escape the cell text safely
                            String cellText = escapeCsvField(table.getText(row, col));
                            sb.append(cellText);

                            if (col < table.getColumnCount() - 1) {
                                sb.append(",");
                            }
                        }
                        sb.append("\n");
                    }
                }
            }
        }

        // Write the output to a CSV file
        FileWriter writer = new FileWriter("output/PDFTable.csv");
        writer.write(sb.toString());
        writer.close();

        pdf.close();
        System.out.println("PDF tables successfully exported to CSV.");
    }

    // Utility method to escape CSV fields
    private static String escapeCsvField(String text) {
        if (text == null) return "";

        // Remove line breaks
        text = text.replaceAll("[\\n\\r]", "");

        // Escape if contains special characters
        if (text.contains(",") || text.contains(";") || text.contains("\"") || text.contains("\n")) {
            text = text.replace("\"", "\"\"");  // Escape double quotes
            text = "\"" + text + "\"";          // Wrap with quotes
        }

        return text;
    }
}
Code Walkthrough
- PdfDocument loads the PDF file into memory.
- PdfTableExtractor checks each page for tables.
- PdfTable provides access to rows and columns.
- escapeCsvField() removes line breaks and safely quotes/escapes text if needed.
- StringBuilder accumulates cell text, separated by commas.
- The result is written into Output.csv, which you can open in Excel or any editor.
CSV file generated from a PDF table after running the Java code.
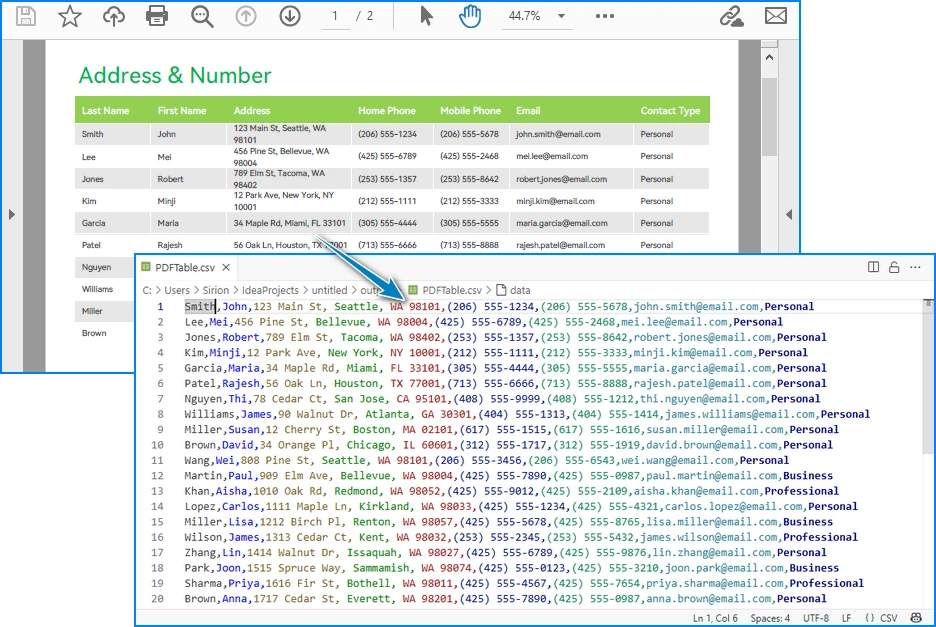
Handling Complex PDF-to-CSV Conversion Cases
In practice, PDFs often contain multiple tables, span multiple pages, or have irregular structures. Let’s see how to extend the solution to handle these scenarios.
1. Multiple Tables per Page
The PdfTable[] returned by extractTable(i) contains all tables detected on a page. You can process each one separately. For example, to save each table as a different CSV file:
for (int i = 0; i < pdf.getPages().getCount(); i++) {
    PdfTableExtractor extractor = new PdfTableExtractor(pdf);
    PdfTable[] tableLists = extractor.extractTable(i);

    if (tableLists != null) {
        for (int t = 0; t < tableLists.length; t++) {
            PdfTable table = tableLists[t];
            StringBuilder tableContent = new StringBuilder();

            for (int row = 0; row < table.getRowCount(); row++) {
                for (int col = 0; col < table.getColumnCount(); col++) {
                    tableContent.append(escapeCsvField(table.getText(row, col)));
                    if (col < table.getColumnCount() - 1) {
                        tableContent.append(",");
                    }
                }
                tableContent.append("\n");
            }

            FileWriter writer = new FileWriter("Table_Page" + i + "_Index" + t + ".csv");
            writer.write(tableContent.toString());
            writer.close();
        }
    }
}
Example of multiple tables in one PDF page exported into separate CSV files.

This way, every table is saved as an independent CSV file for better organization.
2. Multi-page or Large Tables
If a table spans across multiple pages, iterating page by page ensures that all data is collected. The key is to append data instead of overwriting:
StringBuilder sb = new StringBuilder();

for (int i = 0; i < pdf.getPages().getCount(); i++) {
    PdfTableExtractor extractor = new PdfTableExtractor(pdf);
    PdfTable[] tables = extractor.extractTable(i);

    if (tables != null) {
        for (PdfTable table : tables) {
            for (int row = 0; row < table.getRowCount(); row++) {
                for (int col = 0; col < table.getColumnCount(); col++) {
                    sb.append(escapeCsvField(table.getText(row, col)));
                    if (col < table.getColumnCount() - 1) sb.append(",");
                }
                sb.append("\n");
            }
        }
    }
}

FileWriter writer = new FileWriter("MergedTables.csv");
writer.write(sb.toString());
writer.close();
Example of a large table across multiple PDF pages merged into one CSV file.
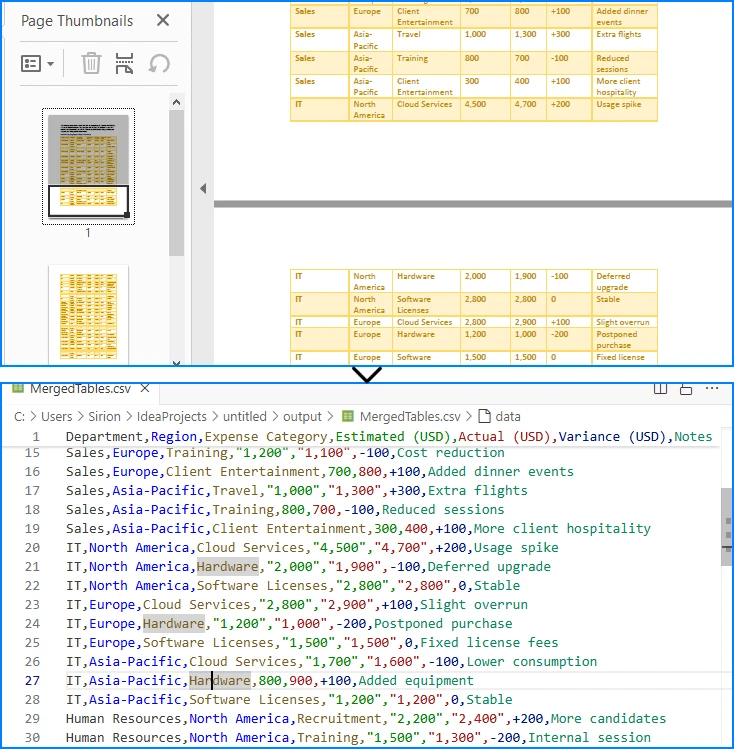
Here, all tables across pages are merged into one CSV file, useful when dealing with continuous reports.
3. Limitations with Formatting
CSV only stores plain text values. Elements like merged cells, fonts, or images are discarded. If preserving styling is critical, exporting to Excel (.xlsx) is a better alternative, which the same library also supports. See How to Export PDF Table to Excel in Java for more details.
4. CSV Special Characters Handling
When writing tables to CSV, certain characters like commas, semicolons, double quotes, or line breaks can break the file structure if not handled properly.
In the Java examples above, the escapeCsvField method removes line breaks and safely quotes or escapes text when needed.
For more advanced scenarios, you can also use Spire.XLS for Java to write data into worksheets and then save as CSV, which automatically handles special characters and ensures correct CSV formatting without manual processing.
Alternatively, for open-source options, libraries like OpenCSV or Apache Commons CSV also automatically handle special characters and CSV formatting, reducing potential issues and simplifying code.
Conclusion
Converting PDF to CSV in Java essentially means extracting tables and saving them in a structured format. CSV is widely supported, lightweight, and ideal for storing and analyzing tabular data. By setting up Spire.PDF for Java and following the code example, you can automate this process, saving time and reducing manual effort.
If you want to explore more advanced features of Spire.PDF for Java, please apply for a free trial license. You can also use Free Spire.PDF for Java for small projects.
FAQ
Q: Can I turn a PDF into a CSV file? A: Yes. While images and styled text cannot be exported, you can extract tables and save them as CSV files using Java.
Q: How to extract data from a PDF file in Java? A: Use a PDF library like Spire.PDF for Java to parse the document, detect tables, and export them to CSV or Excel.
Q: What is the best PDF to CSV converter? A: For Java developers, programmatic solutions such as Spire.PDF for Java offer more flexibility and automation than manual converters.
Q: How to convert PDF to Excel using Java code? A: The process is similar to CSV export. Instead of writing data as comma-separated text, you can export tables into Excel format for richer features.