Base64 в PDF и PDF в Base64 на Java (только JDK + Pro)
Оглавление
- Преобразование Base64 в PDF на Java (только JDK)
- Преобразование PDF в Base64 на Java (только JDK)
- Советы по проверке и безопасности
- Сохранение изображений Base64 в формате PDF на Java
- Загрузка PDF в Base64, изменение и сохранение обратно в Base64
- Вопросы производительности и памяти
- Часто задаваемые вопросы
Установка с помощью Maven
<dependency>
    <groupId>e-iceblue</groupId>
    <artifactId>spire.pdf</artifactId>
    <version>11.8.3</version>
</dependency>
Похожие ссылки

При работе с PDF-файлами на Java часто необходимо преобразовывать двоичные данные в текстовые форматы. Кодирование Base64 позволяет представлять содержимое PDF в виде простого текста, что полезно при передаче документов в JSON, отправке через формы или хранении в текстовых системах. Стандартная библиотека Java предоставляет java.util.Base64, что упрощает реализацию преобразований как из Base64 в PDF, так и из PDF в Base64 без дополнительных зависимостей.
В этом руководстве мы рассмотрим, как выполнять эти преобразования, используя только JDK, а также как работать с изображениями в формате Base64 и встраивать их в PDF. Для более сложных операций, таких как редактирование PDF, полученного в виде Base64, и экспорт его обратно, мы продемонстрируем использование Free Spire.PDF for Java.
Оглавление
- Преобразование Base64 в PDF на Java (только JDK)
- Преобразование PDF в Base64 на Java (только JDK)
- Советы по проверке и безопасности
- Сохранение изображений Base64 в формате PDF на Java
- Загрузка PDF в Base64, изменение и сохранение обратно в Base64
- Вопросы производительности и памяти
- Часто задаваемые вопросы
Преобразование Base64 в PDF на Java (только JDK)
Самый простой подход — прочитать строку Base64 в память, удалить необязательные префиксы (например, data:application/pdf;base64,), а затем декодировать ее в PDF. Это хорошо работает для файлов малого и среднего размера.
import java.nio.file.*;
import java.nio.charset.StandardCharsets;
import java.util.Base64;

public class Base64ToPdf {
    public static void main(String[] args) throws Exception {
        // Чтение текста Base64 из файла (или любого другого источника)
        String base64 = Files.readString(Paths.get("sample.pdf.b64"), StandardCharsets.UTF_8);

        // Удаление общих префиксов Data URI, если они есть
        base64 = stripDataPrefix(base64);

        // Декодирование Base64 в необработанные байты PDF
        // MIME-декодер допускает разрывы строк и перенос текста
        byte[] pdfBytes = Base64.getMimeDecoder().decode(base64);

        // Запись декодированных байтов в файл PDF
        Files.write(Paths.get("output.pdf"), pdfBytes);
    }

    /** Утилита для удаления "data:application/pdf;base64,", если он включен */
    private static String stripDataPrefix(String src) {
        String s = src.trim();
        int comma = s.indexOf(',');
        if (comma > 0 && s.substring(0, comma).toLowerCase().contains("base64")) {
            return s.substring(comma + 1).trim();
        }
        return s;
    }
}
Объяснение Этот пример прост и надежен для содержимого Base64, которое удобно помещается в памяти. Base64.getMimeDecoder() выбран потому, что он корректно обрабатывает разрывы строк, которые часто встречаются в тексте Base64, экспортированном из почтовых систем или API. Если вы знаете, что ваша строка Base64 не содержит новых строк, вы также можете использовать Base64.getDecoder().
Перед декодированием обязательно удалите любой префикс Data URI (data:application/pdf;base64,), так как он не является частью полезной нагрузки Base64. Вспомогательный метод stripDataPrefix() делает это автоматически.
Потоковый вариант (без полной строки в памяти)
Для больших PDF-файлов лучше обрабатывать Base64 в потоковом режиме. Это позволяет избежать загрузки всей строки Base64 в память за один раз.
import java.io.*;
import java.nio.file.*;
import java.util.Base64;

public class Base64ToPdfStreamed {
    public static void main(String[] args) throws Exception {
        // Вход: текстовый файл, содержащий PDF в кодировке Base64
        Path in = Paths.get("sample.pdf.b64");

        // Выход: декодированный PDF-файл
        Path out = Paths.get("output.pdf");

        // Обернуть декодер Base64 вокруг входного потока
        try (InputStream b64In = Base64.getMimeDecoder().wrap(Files.newInputStream(in));
             OutputStream pdfOut = Files.newOutputStream(out)) {

            // Потоковая передача декодированных байтов непосредственно в выходной файл PDF
            b64In.transferTo(pdfOut);
        }
    }
}
Объяснение Этот потоковый подход более эффективен с точки зрения использования памяти, так как он декодирует данные на лету, а не буферизует всю строку. Это рекомендуемый метод для больших файлов или непрерывных потоков (например, сетевых сокетов).
- Base64.getMimeDecoder() используется для обработки разрывов строк во входных данных.
- Метод transferTo() эффективно копирует декодированные байты из входа в выход без ручной обработки буфера.
- В реальных условиях рекомендуется добавить обработку исключений для управления ошибками доступа к файлам или частичной записи.
Преобразование PDF в Base64 на Java (только JDK)
Кодирование PDF в Base64 так же просто. Для небольших файлов достаточно прочитать весь PDF в память:
import java.nio.file.*;
import java.util.Base64;

public class PdfToBase64 {
    public static void main(String[] args) throws Exception {
        // Чтение PDF-файла в массив байтов
        byte[] pdfBytes = Files.readAllBytes(Paths.get("input.pdf"));

        // Кодирование байтов PDF в строку Base64
        String base64 = Base64.getEncoder().encodeToString(pdfBytes);

        // Запись строки Base64 в текстовый файл
        Files.writeString(Paths.get("output.pdf.b64"), base64);
    }
}
Объяснение Этот подход прост и хорошо работает для файлов малого и среднего размера. Весь PDF считывается в массив байтов и кодируется в одну строку Base64. Эту строку можно хранить, передавать в JSON или встраивать в Data URI.
Потоковый кодировщик (эффективно обрабатывает большие файлы)
Для больших PDF-файлов можно избежать излишней нагрузки на память, кодируя непосредственно в виде потока:
import java.io.*;
import java.nio.file.*;
import java.util.Base64;

public class PdfToBase64Streamed {
    public static void main(String[] args) throws Exception {
        // Вход: двоичный PDF-файл
        try (InputStream pdfIn = Files.newInputStream(Paths.get("input.pdf"));
             // Необработанный выходной поток для текстового файла Base64
             OutputStream rawOut = Files.newOutputStream(Paths.get("output.pdf.b64"));
             // Обернуть выходной поток кодировщиком Base64
             OutputStream b64Out = Base64.getEncoder().wrap(rawOut)) {

            // Потоковая передача байтов PDF непосредственно в закодированный вывод Base64
            pdfIn.transferTo(b64Out);
        }
    }
}
Объяснение Потоковый кодировщик эффективно обрабатывает большие файлы, кодируя данные по частям, а не загружая все в память. Метод Base64.getEncoder().wrap() превращает обычный выходной поток в поток, который автоматически записывает текст в формате Base64.
Такая конструкция лучше масштабируется для больших PDF-файлов, сетевых потоков или сервисов, которые должны обрабатывать много документов одновременно, не испытывая проблем с памятью.
Советы по проверке и безопасности
- Обнаружение Data URI: пользователи могут отправлять префиксы data:application/pdf;base64,. Удаляйте их перед декодированием.
- Разрывы строк: при декодировании текста, который может содержать перенесенные строки (электронные письма, журналы), используйте Base64.getMimeDecoder().
- Быстрая проверка на вшивость: после декодирования первые байты действительного PDF обычно начинаются с %PDF-. Вы можете проверить это для раннего обнаружения сбоев.
- Кодировка символов: рассматривайте текст Base64 как UTF-8 (или US-ASCII) при чтении/записи файлов .b64.
- Обработка ошибок: оберните декодирование/кодирование в блоки try/catch и выводите информативные сообщения (например, о размере, несоответствии заголовка).
Сохранение изображений Base64 в формате PDF на Java
Иногда вы получаете изображения (например, PNG или JPEG) в виде строк Base64 и вам нужно встроить их в PDF. Хотя стандартная библиотека Java не имеет API для работы с PDF, Free Spire.PDF for Java делает это простым.
Вы можете скачать Free Spire.PDF for Java и добавить его в свой проект или установить Free Spire.PDF for Java из репозитория Maven.
Ключевые концепции Spire.PDF
- PdfDocument — контейнер для одной или нескольких страниц PDF.
- PdfPageBase — представляет страницу, на которой можно рисовать.
- PdfImage.fromImage() — загрузка BufferedImage или потока в рисуемое изображение PDF.
- drawImage() — размещение изображения в указанных координатах и с указанным размером.
- Система координат — Spire.PDF использует систему координат, где (0,0) — это верхний левый угол.
Пример: Преобразование изображения Base64 в PDF с помощью Java
import com.spire.pdf.PdfDocument;
import com.spire.pdf.PdfPageBase;
import com.spire.pdf.graphics.PdfImage;

import java.io.*;
import java.nio.charset.StandardCharsets;
import java.nio.file.*;
import java.util.Base64;

public class Base64ImageToPdf {
    public static void main(String[] args) throws Exception {
        // 1) Прочитать файл Base64 и декодировать (удалить префикс data URI, если есть)
        String base64Image = Files.readString(Paths.get("G:/Document/image.b64"), StandardCharsets.UTF_8).trim();
        int comma = base64Image.indexOf(',');
        if (comma > 0 && base64Image.substring(0, comma).toLowerCase().contains("base64")) {
            base64Image = base64Image.substring(comma + 1).trim();
        }
        byte[] imageBytes = Base64.getMimeDecoder().decode(base64Image);

        // 2) Создать PDF и вставить изображение
        PdfDocument pdf = new PdfDocument();
        try (ByteArrayInputStream in = new ByteArrayInputStream(imageBytes)) {
            PdfImage img = PdfImage.fromStream(in);
            pdf.getPageSettings().setWidth(img.getWidth());
            pdf.getPageSettings().setHeight(img.getHeight());
            pdf.getPageSettings().setMargins(0, 0, 0, 0);
            PdfPageBase page = pdf.getPages().add();
            page.getCanvas().drawImage(img, 0, 0);
        }

        // 3) Сохранить PDF-файл
        pdf.saveToFile("output/image.pdf");
    }
}
Следующий пример декодирует изображение Base64 и встраивает его на страницу PDF. Вывод выглядит так:

Этот рабочий процесс идеально подходит для встраивания отсканированных документов или подписей, которые поступают в формате Base64.
Для векторной графики вы также можете ознакомиться с нашим руководством по преобразованию SVG в PDF на Java.
Загрузка PDF в Base64, изменение и сохранение обратно в Base64
Во многих API PDF-файл поступает в формате Base64. С помощью Spire.PDF вы можете загрузить его, рисовать на страницах (текст/водяные знаки) и снова вернуть Base64 — идеально для бессерверных функций или микросервисов.
Ключевые концепции Spire.PDF, используемые здесь
- PdfDocument.loadFromBytes(byte[]) — создание документа непосредственно из декодированных байтов.
- PdfPageBase#getCanvas() — получение поверхности для рисования для размещения текста, фигур или изображений.
- Шрифты и кисти — например, PdfTrueTypeFont или встроенные шрифты через PdfFont, с PdfSolidBrush для раскрашивания.
- Сохранение в память — pdf.saveToStream(ByteArrayOutputStream) дает необработанные байты, которые можно повторно закодировать с помощью Base64.
Пример: Загрузка, изменение и сохранение PDF в Base64 на Java
import com.spire.pdf.*;
import com.spire.pdf.graphics.*;

import java.awt.*;
import java.io.*;
import java.util.Base64;

public class EditBase64Pdf {
    public static void main(String[] args) throws Exception {
        String base64Pdf = "..."; // входящая строка PDF в Base64

        // Декодирование в байты
        byte[] pdfBytes = Base64.getDecoder().decode(base64Pdf);

        // Загрузка PDF
        PdfDocument pdf = new PdfDocument();
        pdf.loadFromBytes(pdfBytes);

        // Добавление штампа на каждую страницу
        for (PdfPageBase page : (Iterable<PdfPageBase>) pdf.getPages()) {
            PdfTrueTypeFont font = new PdfTrueTypeFont(new Font("Arial", Font.BOLD, 36));
            PdfSolidBrush brush = new PdfSolidBrush(new PdfRGBColor(Color.BLUE));
            page.getCanvas().drawString("Processed", font, brush, 100, 100);
        }

        // Сохранение в память и кодирование обратно в Base64
        ByteArrayOutputStream output = new ByteArrayOutputStream();
        pdf.saveToStream(output);
        pdf.close();

        String resultBase64 = Base64.getEncoder().encodeToString(output.toByteArray());
        System.out.println(resultBase64);
    }
}
В этом примере на каждую страницу PDF добавляется синий водяной знак «Processed» перед повторным кодированием в Base64. Результат выглядит так:
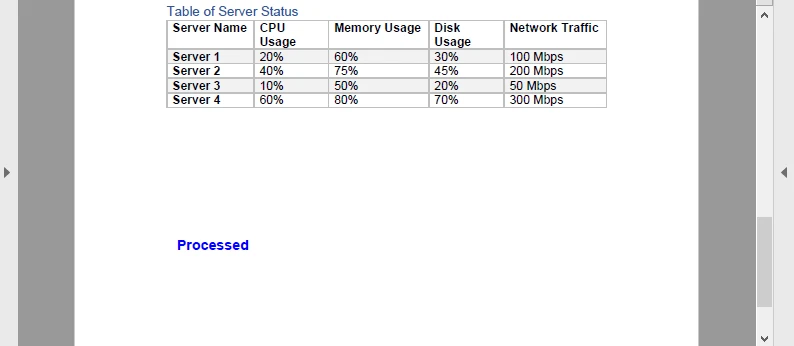
Этот круговой процесс (Base64 → PDF → Base64) полезен для конвейеров обработки документов, таких как проставление штампов на счетах-фактурах или добавление динамических подписей в облачном сервисе.
Связанные руководства:
Извлечение текста из PDF на Java | Создание PDF-документов на Java
Вопросы производительности и памяти
- Потоковая обработка против файлового ввода-вывода — при работе с Base64 предпочитайте ByteArrayInputStream и ByteArrayOutputStream, чтобы избежать ненужных временных файлов.
- PDF-файлы с большим количеством изображений — декодирование изображений Base64 может резко увеличить использование памяти; рассмотрите возможность масштабирования или сжатия перед встраиванием.
- Большие PDF-файлы — Spire.PDF обрабатывает PDF-файлы размером в несколько мегабайт, но для очень больших документов рассмотрите возможность постраничной обработки.
- Бессерверные функции — рабочие процессы с Base64 хорошо подходят, потому что вы избегаете зависимости от файловой системы и возвращаете результаты напрямую через ответы API.
Часто задаваемые вопросы
В: Могу ли я преобразовать Base64 в PDF, используя только JDK?
Да. Java SE предоставляет утилиты для работы с Base64 и файловым вводом-выводом, так что вы можете выполнять преобразование без дополнительных библиотек.
В: Могу ли я редактировать PDF с помощью стандартной библиотеки Java?
Нет. Java SE не поддерживает разбор структуры или рендеринг PDF. для редактирования используйте специальную библиотеку, такую как Spire.PDF for Java.
В: Достаточно ли Free Spire.PDF for Java?
Да. Free Spire.PDF for Java имеет ограничения по размеру документа, но достаточен для тестирования или небольших проектов.
В: Нужно ли мне сохранять PDF-файлы на диск?
Не всегда. Преобразование также может выполняться в памяти с использованием потоков, что часто предпочтительнее для API и облачных приложений.
Смотрите также
Base64 to PDF and PDF to Base64 in Java (JDK-Only + Pro)
Table of Contents
Install with Maven
<dependency>
    <groupId>e-iceblue</groupId>
    <artifactId>spire.pdf</artifactId>
    <version>11.8.3</version>
</dependency>
Related Links
When working with PDF files in Java, it is often necessary to convert between binary data and text-based formats. Base64 encoding allows PDF content to be represented as plain text, which is useful when transmitting documents in JSON, sending them through form submissions, or storing them in text-based systems. Java’s standard library provides java.util.Base64, making it straightforward to implement both Base64 to PDF and PDF to Base64 conversions without additional dependencies.
In this tutorial, we will explore how to handle these conversions using only the JDK, as well as how to work with Base64 images and embed them into PDFs. For more advanced operations, such as editing a PDF received as Base64 and exporting it back, we will demonstrate the use of Free Spire.PDF for Java.
Table of Contents
- Convert Base64 to PDF in Java (JDK only)
- Convert PDF to Base64 in Java (JDK only)
- Validation & Safety Tips
- Save Base64 Images as PDF in Java
- Load Base64 PDF, Modify, and Save Back as Base64
- Performance & Memory Considerations
- FAQ
Convert Base64 to PDF in Java (JDK only)
The simplest approach is to read a Base64 string into memory, remove any optional prefixes (such as data:application/pdf;base64,), and then decode it into a PDF. This works well for small to medium files.
import java.nio.file.*;
import java.nio.charset.StandardCharsets;
import java.util.Base64;

public class Base64ToPdf {
    public static void main(String[] args) throws Exception {
        // Read Base64 text from a file (or any other source)
        String base64 = Files.readString(Paths.get("sample.pdf.b64"), StandardCharsets.UTF_8);

        // Remove common Data URI prefixes if present
        base64 = stripDataPrefix(base64);

        // Decode Base64 into raw PDF bytes
        // MIME decoder tolerates line breaks and wrapped text
        byte[] pdfBytes = Base64.getMimeDecoder().decode(base64);

        // Write decoded bytes to a PDF file
        Files.write(Paths.get("output.pdf"), pdfBytes);
    }

    /** Utility to strip "data:application/pdf;base64," if included */
    private static String stripDataPrefix(String src) {
        String s = src.trim();
        int comma = s.indexOf(',');
        if (comma > 0 && s.substring(0, comma).toLowerCase().contains("base64")) {
            return s.substring(comma + 1).trim();
        }
        return s;
    }
}
Explanation This example is straightforward and reliable for Base64 content that fits comfortably in memory. The Base64.getMimeDecoder() is chosen because it gracefully handles line breaks, which are common in Base64 text exported from email systems or APIs. If you know your Base64 string contains no newlines, you could also use Base64.getDecoder().
Make sure to strip out any Data URI prefix (data:application/pdf;base64,) before decoding, as it is not part of the Base64 payload. The helper method stripDataPrefix() does this automatically.
Streaming variant (no full string in memory)
For large PDFs, it’s better to process Base64 in a streaming fashion. This avoids loading the entire Base64 string into memory at once.
import java.io.*;
import java.nio.file.*;
import java.util.Base64;

public class Base64ToPdfStreamed {
    public static void main(String[] args) throws Exception {
        // Input: text file containing Base64-encoded PDF
        Path in = Paths.get("sample.pdf.b64");

        // Output: decoded PDF file
        Path out = Paths.get("output.pdf");

        // Wrap the Base64 decoder around the input stream
        try (InputStream b64In = Base64.getMimeDecoder().wrap(Files.newInputStream(in));
             OutputStream pdfOut = Files.newOutputStream(out)) {

            // Stream decoded bytes directly to the PDF output
            b64In.transferTo(pdfOut);
        }
    }
}
Explanation This streaming-based approach is more memory-efficient, as it decodes data on-the-fly rather than buffering the entire string. It is the recommended method for large files or continuous streams (e.g., network sockets).
- Base64.getMimeDecoder() is used to tolerate line breaks in the input.
- The transferTo() method efficiently copies decoded bytes from input to output without manual buffer handling.
- In real-world use, consider adding exception handling to manage file access errors or partial writes.
Convert PDF to Base64 in Java (JDK only)
Encoding a PDF into Base64 is just as simple. For smaller files, reading the entire PDF into memory is fine:
import java.nio.file.*;
import java.util.Base64;

public class PdfToBase64 {
    public static void main(String[] args) throws Exception {
        // Read the PDF file into a byte array
        byte[] pdfBytes = Files.readAllBytes(Paths.get("input.pdf"));

        // Encode the PDF bytes as a Base64 string
        String base64 = Base64.getEncoder().encodeToString(pdfBytes);

        // Write the Base64 string to a text file
        Files.writeString(Paths.get("output.pdf.b64"), base64);
    }
}
Explanation This approach is simple and works well for small or medium-sized files. The entire PDF is read into a byte array and encoded as a single Base64 string. This string can be stored, transmitted in JSON, or embedded in a Data URI.
Streaming encoder (handles large files efficiently)
For large PDFs, you can avoid memory overhead by encoding directly as a stream:
import java.io.*;
import java.nio.file.*;
import java.util.Base64;

public class PdfToBase64Streamed {
    public static void main(String[] args) throws Exception {
        // Input: binary PDF file
        try (InputStream pdfIn = Files.newInputStream(Paths.get("input.pdf"));
             // Raw output stream for Base64 text file
             OutputStream rawOut = Files.newOutputStream(Paths.get("output.pdf.b64"));
             // Wrap output stream with Base64 encoder
             OutputStream b64Out = Base64.getEncoder().wrap(rawOut)) {

            // Stream PDF bytes directly into Base64-encoded output
            pdfIn.transferTo(b64Out);
        }
    }
}
Explanation The streaming encoder efficiently handles large files by encoding data incrementally instead of loading everything into memory. The Base64.getEncoder().wrap() method turns a regular output stream into one that writes Base64 text automatically.
This design scales better for large PDFs, network streams, or services that must handle many documents concurrently without running into memory pressure.
Validation & Safety Tips
- Detect Data URIs: Users may send data:application/pdf;base64, prefixes. Strip them before decoding.
- Line breaks: When decoding text that may contain wrapped lines (emails, logs), use Base64.getMimeDecoder().
- Quick sanity check: After decoding, the first bytes of a valid PDF usually start with %PDF-. You can assert this for early failure detection.
- Character encoding: Treat Base64 text as UTF-8 (or US-ASCII) when reading/writing .b64 files.
- Error handling: Wrap decode/encode in try/catch and surface actionable messages (e.g., size, header mismatch).
Save Base64 Images as PDF in Java
Sometimes you receive images (e.g., PNG or JPEG) as Base64 strings and need to wrap them into a PDF. While Java’s standard library doesn’t have PDF APIs, Free Spire.PDF for Java makes this straightforward.
You can download Free Spire.PDF for Java and add it to your project or install Free Spire.PDF for Java from Maven repository.
Key Spire.PDF concepts
- PdfDocument — the container for one or more PDF pages.
- PdfPageBase — represents a page you can draw on.
- PdfImage.fromImage() — load a BufferedImage or stream into a drawable PDF image.
- drawImage() — place the image at specified coordinates and size.
- Coordinate System — Spire.PDF uses a coordinate system where (0,0) is the top left corner.
Example: Convert Base64 image to PDF Using Java
import com.spire.pdf.PdfDocument;
import com.spire.pdf.PdfPageBase;
import com.spire.pdf.graphics.PdfImage;

import java.io.*;
import java.nio.charset.StandardCharsets;
import java.nio.file.*;
import java.util.Base64;

public class Base64ImageToPdf {
    public static void main(String[] args) throws Exception {
        // 1) Read Base64 file and decode (strip data URI prefix if exists)
        String base64Image = Files.readString(Paths.get("G:/Document/image.b64"), StandardCharsets.UTF_8).trim();
        int comma = base64Image.indexOf(',');
        if (comma > 0 && base64Image.substring(0, comma).toLowerCase().contains("base64")) {
            base64Image = base64Image.substring(comma + 1).trim();
        }
        byte[] imageBytes = Base64.getMimeDecoder().decode(base64Image);

        // 2) Create PDF and insert the image
        PdfDocument pdf = new PdfDocument();
        try (ByteArrayInputStream in = new ByteArrayInputStream(imageBytes)) {
            PdfImage img = PdfImage.fromStream(in);
            pdf.getPageSettings().setWidth(img.getWidth());
            pdf.getPageSettings().setHeight(img.getHeight());
            pdf.getPageSettings().setMargins(0, 0, 0, 0);
            PdfPageBase page = pdf.getPages().add();
            page.getCanvas().drawImage(img, 0, 0);
        }

        // 3) Save PDF file
        pdf.saveToFile("output/image.pdf");
    }
}
The following example decodes a Base64 image and embeds it into a PDF page. The output looks like this:
This workflow is ideal for embedding scanned documents or signatures that arrive as Base64.
For vector graphics, you may also check out our guide on Converting SVG to PDF in Java.
Load Base64 PDF, Modify, and Save Back as Base64
In many APIs, a PDF arrives as Base64. With Spire.PDF you can load it, draw on pages (text/watermarks), and return Base64 again—ideal for serverless functions or microservices.
Key Spire.PDF concepts used here
- PdfDocument.loadFromBytes(byte[]) — construct a document directly from decoded bytes.
- PdfPageBase#getCanvas() — obtain a drawing surface to place text, shapes, or images.
- Fonts & brushes — e.g., PdfTrueTypeFont or built-in fonts via PdfFont, with PdfSolidBrush for coloring.
- Saving to memory — pdf.saveToStream(ByteArrayOutputStream) yields raw bytes, which you can re-encode with Base64.
Example: Load, Modify, and Save Base64 PDF in Java
import com.spire.pdf.*;
import com.spire.pdf.graphics.*;

import java.awt.*;
import java.io.*;
import java.util.Base64;

public class EditBase64Pdf {
    public static void main(String[] args) throws Exception {
        String base64Pdf = "..."; // incoming Base64 PDF string

        // Decode to bytes
        byte[] pdfBytes = Base64.getDecoder().decode(base64Pdf);

        // Load PDF
        PdfDocument pdf = new PdfDocument();
        pdf.loadFromBytes(pdfBytes);

        // Add stamp on each page
        for (PdfPageBase page : (Iterable<PdfPageBase>) pdf.getPages()) {
            PdfTrueTypeFont font = new PdfTrueTypeFont(new Font("Arial", Font.BOLD, 36));
            PdfSolidBrush brush = new PdfSolidBrush(new PdfRGBColor(Color.BLUE));
            page.getCanvas().drawString("Processed", font, brush, 100, 100);
        }

        // Save to memory and encode back to Base64
        ByteArrayOutputStream output = new ByteArrayOutputStream();
        pdf.saveToStream(output);
        pdf.close();

        String resultBase64 = Base64.getEncoder().encodeToString(output.toByteArray());
        System.out.println(resultBase64);
    }
}
In this example, a blue ‘Processed’ watermark is added to each page of the PDF before re-encoding it back to Base64. The result looks like this:
This round-trip (Base64 → PDF → Base64) is useful for document pipelines, such as stamping invoices or adding dynamic signatures in a cloud service.
Related tutorials:
Extract Text from PDF in Java | Create PDF Documents in Java
Performance & Memory Considerations
- Streaming vs. file I/O — when dealing with Base64, prefer ByteArrayInputStream and ByteArrayOutputStream to avoid unnecessary temp files.
- Image-heavy PDFs — decoding Base64 images can spike memory usage; consider scaling or compressing before embedding.
- Large PDFs — Spire.PDF handles multi-MB PDFs, but for very large documents consider page-by-page processing.
- Serverless functions — Base64 workflows fit well because you avoid filesystem dependency and return results directly via API responses.
FAQ
Q: Can I convert Base64 to PDF using only JDK?
Yes. Java SE provides Base64 and file I/O utilities, so you can handle conversion without extra libraries.
Q: Can I edit PDF with standard Java library?
No. Java SE doesn’t support PDF structure parsing or rendering. For editing, use a dedicated library such as Spire.PDF for Java.
Q: Is Free Spire.PDF for Java enough?
Yes. The Free Spire.PDF for Java is limited in document size, but sufficient for testing or small-scale projects.
Q: Do I need to save PDFs to disk?
Not always. Conversion can also run in-memory using streams, which is often preferred for APIs and cloud apps.
See Also
Java Convert Byte Array to PDF: Load & Create with Spire.PDF

In modern Java applications, PDF data is not always stored as files on disk. Instead, it may be transmitted over a network, returned by a REST API, or stored as a byte array in a database. In such cases, you’ll often need to convert a byte array back into a PDF file or even generate a new PDF from plain text bytes.
This tutorial will walk you through both scenarios using Spire.PDF for Java, a powerful library for working with PDF documents.
Table of Contents:
- Getting Started with Spire.PDF for Java
- Understanding PDF Bytes vs. Text Bytes
- Loading PDF from Byte Array
- Creating PDF from Text Bytes
- Common Pitfalls to Avoid
- Frequently Asked Questions
- Conclusion
Getting Started with Spire.PDF for Java
Spire.PDF is a powerful and feature-rich API that allows Java developers to create, read, edit, convert, and print PDF documents without any dependencies on Adobe Acrobat.
Key Features:
- Create PDFs with text, images, tables, and shapes.
- Edit existing PDFs and extract text and images.
- Convert PDFs to formats like HTML, Word, Excel, and images.
- Encrypt PDFs with password protection.
- Add watermarks, annotations, and digital signatures.
To get started, download Spire.PDF for Java from our website and add the JAR files to your project's build path. If you’re using Maven, include the following dependency in your pom.xml.
<repositories>
    <repository>
        <id>com.e-iceblue</id>
        <name>e-iceblue</name>
        <url>https://repo.e-iceblue.com/nexus/content/groups/public/</url>
    </repository>
</repositories>
<dependencies>
    <dependency>
        <groupId>e-iceblue</groupId>
        <artifactId>spire.pdf</artifactId>
        <version>12.6.4</version>
    </dependency>
</dependencies>
Once set up, you can now proceed to convert byte arrays to PDFs and perform other PDF-related operations.
Understanding PDF Bytes vs. Text Bytes
Before coding, it’s important to distinguish between two very different kinds of byte arrays :
- PDF File Bytes : These represent the actual binary structure of a valid PDF document. They always start with %PDF-1.x and contain objects, cross-reference tables, and streams. Such byte arrays can be loaded directly into a PdfDocument.
- Text Bytes : These are simply ASCII or UTF-8 encodings of characters. For example,
byte[] bytes = {84, 104, 105, 115};
System.out.println(new String(bytes)); // Output: "This"
Such arrays are not valid PDFs, but you can create a new PDF and write the text into it.
Loading PDF from Byte Array in Java
Suppose you want to download a PDF from a URL and work with it in memory as a byte array. With Spire.PDF for Java, you can easily load and save it back as a PDF document.
import com.spire.pdf.PdfDocument;

import java.io.ByteArrayInputStream;
import java.io.ByteArrayOutputStream;
import java.io.InputStream;
import java.net.HttpURLConnection;
import java.net.URL;

public class LoadPdfFromByteArray throws Exception{

    public static void main(String[] args) {

        // The PDF URL
        String fileUrl = "https://www.e-iceblue.com/resource/sample.pdf";

        // Download PDF into a byte array
        byte[] pdfBytes = downloadPdfAsBytes(fileUrl);

        // Create a PdfDocument object
        PdfDocument doc = new PdfDocument();

        // Load PDF from byte array
        doc.loadFromStream(new ByteArrayInputStream(pdfBytes));

        // Save the document locally
        doc.saveToFile("downloaded.pdf");
        doc.close();
    }

    // Helper method: download file as byte[]
    private static byte[] downloadPdfAsBytes(String fileUrl) throws Exception {
        URL url = new URL(fileUrl);
        HttpURLConnection conn = (HttpURLConnection) url.openConnection();
        conn.setRequestMethod("GET");

        InputStream inputStream = conn.getInputStream();
        ByteArrayOutputStream buffer = new ByteArrayOutputStream();

        byte[] data = new byte[4096];
        int nRead;
        while ((nRead = inputStream.read(data, 0, data.length)) != -1) {
            buffer.write(data, 0, nRead);
        }

        buffer.flush();
        inputStream.close();
        conn.disconnect();

        return buffer.toByteArray();
    }
}
How this works
- Make an HTTP request to fetch the PDF file.
- Convert the InputStream into a byte array using ByteArrayOutputStream .
- Pass the byte array into Spire.PDF via loadFromStream .
- Save or manipulate the document as needed.
Output:

Creating PDF from Text Bytes in Java
If you only have plain text bytes (e.g., This document is created from text bytes.), you can decode them into a string and then draw the text onto a new PDF document.
import com.spire.pdf.*;
import com.spire.pdf.graphics.*;
import java.awt.*;

public class TextFromBytesToPdf {
    public static void main(String[] args) {

        // Your text bytes
        byte[] byteArray = {
                84, 104, 105, 115, 32,
                100, 111, 99, 117, 109, 101, 110, 116, 32,
                105, 115, 32,
                99, 114, 101, 97, 116, 101, 100, 32,
                102, 114, 111, 109, 32,
                116, 101, 120, 116, 32,
                98, 121, 116, 101, 115, 46
        };
        String text = new String(byteArray);

        // Create a PDF document
        PdfDocument doc = new PdfDocument();

        // Configure the page settings
        doc.getPageSettings().setSize(PdfPageSize.A4);
        doc.getPageSettings().setMargins(40f);

        // Add a page
        PdfPageBase page = doc.getPages().add();

        // Draw the string onto PDF
        PdfFont font = new PdfFont(PdfFontFamily.Helvetica, 20f);
        PdfSolidBrush brush = new PdfSolidBrush(new PdfRGBColor(Color.black));
        page.getCanvas().drawString(text, font, brush, 20, 40);

        // Save the document to a PDF file
        doc.saveToFile("TextBytes.pdf");
        doc.close();
    }
}
This will produce a new PDF named TextBytes.pdf (shown below) containing the sentence represented by your byte array.

You might be interested in: How to Generate PDF Documents in Java
Common Pitfalls to Avoid
When converting byte arrays to PDFs, watch out for these issues:
- Confusing plain text with PDF bytes
Not every byte array is a valid PDF. Unless the array starts with %PDF-1.x and contains the proper structure, you can’t load it directly with PdfDocument.loadFromStream .
- Incorrect encoding
If your text bytes are in UTF-16, ISO-8859-1, or another encoding, you need to specify the charset when creating a string:
String text = new String(byteArray, StandardCharsets.UTF_8);
- Large byte arrays
When dealing with large PDFs, consider streaming instead of holding everything in memory to avoid OutOfMemoryError .
- Forgetting to close documents
Always call doc.close() to release resources after saving or processing a PDF.
Frequently Asked Questions
Q1. Can I store a PDF as a byte array in a database?
Yes. You can store a PDF as a BLOB in a relational database. Later, you can retrieve it, load it into a PdfDocument , and save or manipulate it.
Q2. How do I check if a byte array is a valid PDF?
Check if the array begins with the %PDF- header. You can do:
String header = new String(Arrays.copyOfRange(bytes, 0, 5));
if (header.startsWith("%PDF-")) {
    // valid PDF
}
Q3. Can Spire.PDF load a PDF directly from an InputStream?
Yes. Instead of converting to a byte array, you can pass the InputStream directly to loadFromStream() .
Q4. Can I convert a PdfDocument back into a byte array?
You can save the document into a ByteArrayOutputStream instead of a file:
ByteArrayOutputStream baos = new ByteArrayOutputStream();
doc.saveToStream(baos);
byte[] pdfBytes = baos.toByteArray();
Q5. What if my byte array contains images instead of text or PDF?
In that case, you’ll need to create a new PDF and insert the image using Spire.PDF’s drawing APIs.
Conclusion
In this article, we explored how to efficiently convert byte arrays to PDF documents using Spire.PDF for Java. Whether you're loading existing PDF files from byte arrays retrieved via APIs or creating new PDFs from plain text bytes, Spire.PDF provides a robust solution to meet your needs.
We covered essential concepts, including the distinction between PDF file bytes and text bytes, and highlighted common pitfalls to avoid during the conversion process. With the right understanding and tools, you can seamlessly integrate PDF functionalities into your Java applications, enhancing your ability to manage and manipulate document data.
For further exploration, consider experimenting with additional features of Spire.PDF, such as editing, encrypting, and converting PDFs to other formats. The possibilities are extensive, and mastering these techniques will undoubtedly improve your development skills and project outcomes.
4 metodi efficaci per estrarre tabelle HTML in Excel (manuale e automatizzato)
Indice
Installa con Pypi
pip install Spire.XLS
Link correlati

Panoramica
L'estrazione di tabelle HTML in Excel è un requisito comune per analisti di dati, ricercatori, sviluppatori e professionisti aziendali che lavorano frequentemente con dati web strutturati. Le tabelle HTML contengono spesso informazioni preziose come rapporti finanziari, cataloghi di prodotti, risultati di ricerche o statistiche sulle prestazioni. Tuttavia, trasferire tali dati in Excel in un formato pulito e utilizzabile può essere complicato, specialmente quando si ha a che fare con tabelle complesse che includono celle unite (rowspan, colspan), intestazioni nidificate o grandi set di dati.
Fortunatamente, esistono diversi approcci per convertire le tabelle HTML in file Excel. Questi metodi vanno da rapide azioni manuali di copia-incolla, adatte a piccoli compiti, a script completamente automatizzati che utilizzano VBA o Python per lavori su larga scala o ricorrenti.
In questo articolo, esploreremo quattro metodi efficaci per estrarre tabelle HTML in Excel:
- Copia-Incolla manuale (metodo più semplice)
- Funzionalità integrata di Excel "Da Web"
- Macro VBA (Automazione di Excel)
- Python (BeautifulSoup + Spire.XLS)
Infine, confronteremo questi approcci in una tabella riassuntiva per aiutarti a scegliere il metodo migliore in base al tuo caso d'uso.
Copia-Incolla manuale (Metodo più semplice)
Per piccole estrazioni una tantum, l'opzione più semplice è utilizzare il copia e incolla direttamente dal browser in Excel.

Passaggi:
- Apri la pagina HTML in un browser (es. Chrome, Edge o Firefox).
- Evidenzia la tabella che desideri estrarre.
- Copiala con Ctrl+C (o clic destro → Copia).
- Apri Excel e incolla con Ctrl+V.
Vantaggi:
- Estremamente semplice — non è richiesta alcuna configurazione o codifica.
- Funziona istantaneamente per tabelle piccole e pulite.
Svantaggi:
- Processo manuale — noioso e inefficiente per set di dati frequenti o di grandi dimensioni.
- Non sempre conserva le celle unite o la formattazione.
- Non è in grado di gestire in modo affidabile tabelle dinamiche (renderizzate con JavaScript).
Quando usarlo: Ideale per piccole tabelle, raccolta di dati ad-hoc o test rapidi.
Funzionalità integrata di Excel "Da Web"
Excel include un potente strumento "Recupera e trasforma dati" (precedentemente Power Query) che consente agli utenti di estrarre tabelle direttamente da una pagina web.
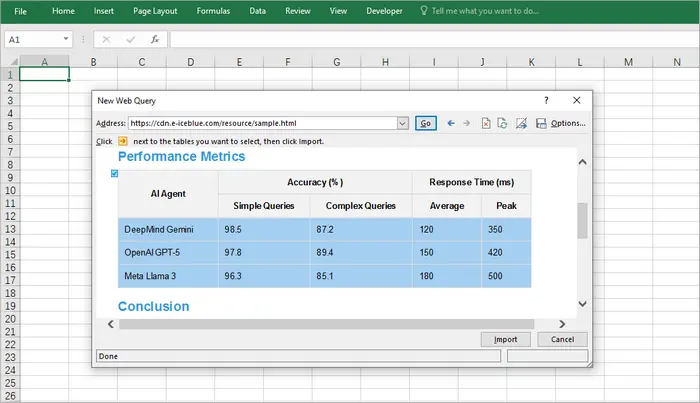
Passaggi:
- Apri Excel.
- Vai su Dati → Da Web.
- Inserisci l'URL della pagina web contenente la tabella.
- Excel visualizzerà le tabelle rilevate; seleziona quella che desideri.
- Carica i dati nel tuo foglio di lavoro.
Vantaggi:
- Integrazione diretta in Excel — non sono necessari strumenti esterni.
- Funziona bene per tabelle HTML strutturate.
- Supporta l'aggiornamento — può recuperare nuovamente i dati aggiornati dalla stessa fonte.
Svantaggi:
- Supporto limitato per contenuti dinamici o renderizzati con JavaScript.
- A volte non riesce a rilevare tabelle complesse.
- Richiede l'accesso a Internet e un URL valido (non per file HTML locali a meno che non vengano importati manualmente).
Quando usarlo: Ideale per gli analisti che estraggono dati strutturati in tempo reale da siti web che vengono aggiornati regolarmente.
Macro VBA (Automazione di Excel)
Per gli utenti che estraggono frequentemente tabelle HTML e desiderano un maggiore controllo, VBA (Visual Basic for Applications) offre un'eccellente soluzione. VBA consente di recuperare tabelle da un URL e di elaborare correttamente le celle unite, cosa che il semplice copia-incolla non può fare.
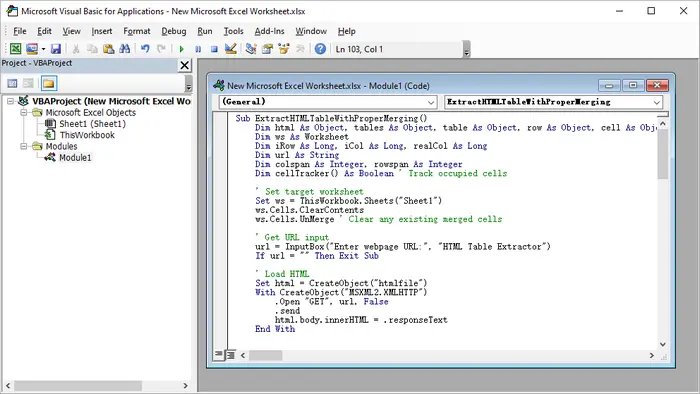
Passaggi:
- Avvia Microsoft Excel.
- Premi Alt + F11 per aprire l'editor VBA.
- Fai clic con il pulsante destro del mouse sull'esploratore del progetto → Inserisci → Modulo.
- Incolla il codice VBA fornito.
- Chiudi l'editor VBA.
- Premi Alt + F8, seleziona il nome della macro e fai clic su Esegui.
Codice VBA di esempio:
Sub ExtractHTMLTableWithProperMerging()
    Dim html As Object, tables As Object, table As Object, row As Object, cell As Object
    Dim ws As Worksheet
    Dim iRow As Long, iCol As Long, realCol As Long
    Dim url As String
    Dim colspan As Integer, rowspan As Integer
    Dim cellTracker() As Boolean ' Tieni traccia delle celle occupate

    ' Imposta il foglio di lavoro di destinazione
    Set ws = ThisWorkbook.Sheets("Sheet1")
    ws.Cells.ClearContents
    ws.Cells.UnMerge ' Rimuovi eventuali celle unite esistenti

    ' Ottieni l'URL di input
    url = InputBox("Inserisci l'URL della pagina web:", "Estrattore di tabelle HTML")
    If url = "" Then Exit Sub

    ' Carica l'HTML
    Set html = CreateObject("htmlfile")
    With CreateObject("MSXML2.XMLHTTP")
        .Open "GET", url, False
        .send
        html.body.innerHTML = .responseText
    End With

    ' Ottieni la prima tabella (modifica l'indice se necessario)
    Set tables = html.getElementsByTagName("table")
    If tables.Length = 0 Then
        MsgBox "Nessuna tabella trovata!", vbExclamation
        Exit Sub
    End If
    Set table = tables(0)

    ' Inizializza la matrice di tracciamento delle celle
    Dim maxRows As Long, maxCols As Long
    maxRows = table.Rows.Length
    maxCols = 0
    For Each row In table.Rows
        If row.Cells.Length > maxCols Then maxCols = row.Cells.Length
    Next
    ReDim cellTracker(1 To maxRows, 1 To maxCols)

    ' Elabora la tabella
    iRow = 1
    For Each row In table.Rows
        realCol = 1 ' Tieni traccia della posizione effettiva della colonna tenendo conto dei rowspan

        ' Trova la prima colonna disponibile in questa riga
        While realCol <= maxCols And cellTracker(iRow, realCol)
            realCol = realCol + 1
        Wend

        iCol = 1 ' Tieni traccia della posizione logica della colonna
        For Each cell In row.Cells
            ' Ottieni gli attributi di unione
            colspan = 1
            rowspan = 1
            On Error Resume Next ' Nel caso in cui gli attributi non esistano
            colspan = cell.colspan
            rowspan = cell.rowspan
            On Error GoTo 0

            ' Salta le celle già occupate (da rowspan sopra)
            While realCol <= maxCols And cellTracker(iRow, realCol)
                realCol = realCol + 1
            Wend

            If realCol > maxCols Then Exit For

            ' Scrivi il valore
            ws.Cells(iRow, realCol).Value = cell.innerText

            ' Contrassegna tutte le celle che saranno occupate da questa cella
            Dim r As Long, c As Long
            For r = iRow To iRow + rowspan - 1
                For c = realCol To realCol + colspan - 1
                    If r <= maxRows And c <= maxCols Then
                        cellTracker(r, c) = True
                    End If
                Next c
            Next r

            ' Unisci le celle se necessario
            If colspan > 1 Or rowspan > 1 Then
                With ws.Range(ws.Cells(iRow, realCol), ws.Cells(iRow + rowspan - 1, realCol + colspan - 1))
                    .Merge
                    .HorizontalAlignment = xlCenter
                    .VerticalAlignment = xlCenter
                End With
            End If

            realCol = realCol + colspan
            iCol = iCol + 1
        Next cell
        iRow = iRow + 1
    Next row

    ' Formattazione
    ws.UsedRange.Columns.AutoFit
    ws.UsedRange.Borders.Weight = xlThin
    MsgBox "Tabella estratta con unione corretta!", vbInformation
End Sub
Vantaggi:
- Funziona interamente all'interno di Excel — non sono necessari strumenti esterni.
- Gestisce tabelle complesse con celle unite.
- Può essere personalizzato per più tabelle o per l'esecuzione pianificata.
Svantaggi:
- La configurazione richiede conoscenze di VBA.
- Non può gestire dati renderizzati con JavaScript senza passaggi aggiuntivi.
- Funziona solo in Excel desktop (non in Excel Online).
Quando usarlo: Perfetto per gli utenti che estraggono regolarmente tabelle simili e desiderano una soluzione con un solo clic.
Python (BeautifulSoup & Spire.XLS)
Per sviluppatori o utenti esperti, Python offre la soluzione più flessibile, scalabile e automatizzata. Con librerie come BeautifulSoup per l'analisi di HTML e Spire.XLS for Python per la manipolazione di Excel, è possibile recuperare, pulire ed esportare tabelle a livello di codice con un controllo totale.
Passaggi:
- Installa Python (consigliato 3.8+).
- Crea un nuovo progetto nel tuo IDE (es. VS Code, PyCharm).
- Installa le dipendenze:
pip install requests beautifulsoup4 spire.xls
- Copia ed esegui il seguente script.
Codice Python:
import requests

from bs4 import BeautifulSoup
from spire.xls import Workbook, ExcelVersion

# Ottieni la stringa HTML dall'URL
response = requests.get("https://cdn.e-iceblue.com/resource/sample.html")
html = response.text

# Analizza l'HTML
soup = BeautifulSoup(html, "html.parser")
table = soup.find("table")  # Ottieni la prima tabella

# Inizializza Excel
workbook = Workbook()
sheet = workbook.Worksheets[0]

# Tieni traccia delle celle unite per saltarle in seguito
skip_cells = set()

# Itera attraverso le righe e le celle HTML
for row_idx, row in enumerate(table.find_all("tr")):
    col_idx = 1  # Le colonne di Excel iniziano da 1
    for cell in row.find_all(["th", "td"]):
        # Salta le celle già unite
        while (row_idx + 1, col_idx) in skip_cells:
            col_idx += 1

        # Ottieni i valori di colspan/rowspan (predefinito 1 se non presenti)
        colspan = int(cell.get("colspan", 1))
        rowspan = int(cell.get("rowspan", 1))

        # Scrivi il valore della cella in Excel
        sheet.Range[row_idx + 1, col_idx].Text = cell.get_text(strip=True)

        # Unisci le celle se colspan/rowspan > 1
        if colspan > 1 or rowspan > 1:
            end_row = row_idx + rowspan
            end_col = col_idx + colspan - 1
            sheet.Range[row_idx + 1, col_idx, end_row, end_col].Merge()

            # Contrassegna le celle unite da saltare
            for r in range(row_idx + 1, end_row + 1):
                for c in range(col_idx, end_col + 1):
                    if r != row_idx + 1 or c != col_idx:  # Salta la cella principale
                        skip_cells.add((r, c))

        col_idx += colspan

# Adatta automaticamente la larghezza delle colonne nell'intervallo utilizzato
sheet.AllocatedRange.AutoFitColumns()

# Salva in Excel
workbook.SaveToFile("TableToExcel.xlsx", ExcelVersion.Version2016)
workbook.Dispose()
Vantaggi:
- Controllo completo — può analizzare, pulire e trasformare i dati.
- Gestisce correttamente le celle unite.
- Facilmente scalabile per più tabelle o siti web.
- Automatizzabile per attività pianificate o lavori in batch.
Svantaggi:
- Richiede l'installazione di Python e conoscenze di base di programmazione.
- Maggiore configurazione rispetto alle soluzioni integrate di Excel.
- Dipendenze esterne (BeautifulSoup, Spire.XLS).
Quando usarlo: Ideale per sviluppatori o utenti avanzati che estraggono regolarmente tabelle grandi o complesse.
Output:
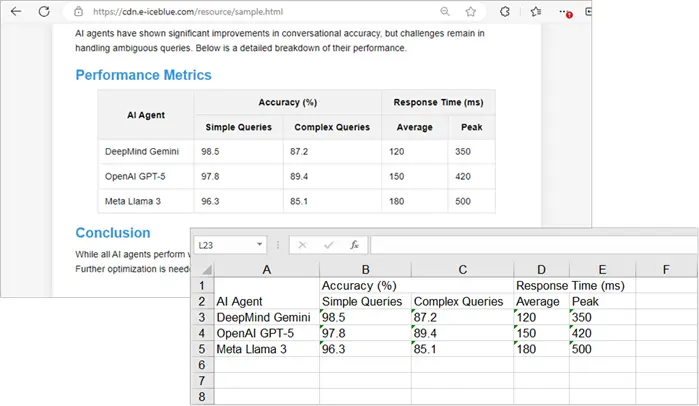
Per migliorare l'aspetto visivo del foglio di lavoro di Excel generato in Python, è possibile applicare stili a celle o fogli di lavoro in Excel.
Tabella riassuntiva: Metodo migliore per caso d'uso
| Metodo | Ideale per | Vantaggi | Svantaggi | Automazione? |
|---|---|---|---|---|
| Copia-Incolla manuale | Uso rapido e una tantum | Veloce, nessuna configurazione | Nessuna automazione, problemi di formattazione | ❌No |
| Excel Da Web | Dati strutturati in tempo reale | Integrato, supporta l'aggiornamento | Limitato per tabelle dinamiche | ❌No |
| Macro VBA | Attività ripetute in Excel | Automatizza l'estrazione, gestisce le unioni | Richiede conoscenze di VBA | ✅Sì |
| Python (BeautifulSoup + Spire.XLS) | Sviluppatori, tabelle grandi/complesse | Controllo totale, scalabile, automatizzabile | Richiede programmazione e dipendenze | ✅Sì |
Considerazioni finali
Il metodo che scegli dipende in gran parte dal tuo caso d'uso:
- Se hai solo bisogno di prendere una piccola tabella occasionalmente, il copia-incolla manuale è il più veloce.
- Se vuoi estrarre dati strutturati da una pagina web che si aggiorna frequentemente, la funzione Da Web di Excel è comoda.
- Per gli utenti aziendali che lavorano quotidianamente in Excel e desiderano l'automazione, una macro VBA è l'ideale.
- Per gli sviluppatori che gestiscono più set di dati o strutture HTML complesse, Python con BeautifulSoup e Spire.XLS offre la massima flessibilità e scalabilità.
Combinando questi metodi con il tuo flusso di lavoro, puoi risparmiare ore di lavoro manuale e garantire un'estrazione di dati più pulita e affidabile in Excel.
Vedi anche
4 métodos eficazes para extrair tabelas HTML para Excel (manual e automatizado)
Índice
Instalar com Pypi
pip install Spire.XLS
Links Relacionados
Visão Geral
Extrair tabelas HTML para o Excel é um requisito comum para analistas de dados, pesquisadores, desenvolvedores e profissionais de negócios que trabalham frequentemente com dados estruturados da web. As tabelas HTML geralmente contêm informações valiosas, como relatórios financeiros, catálogos de produtos, resultados de pesquisas ou estatísticas de desempenho. No entanto, transferir esses dados para o Excel em um formato limpo e utilizável pode ser complicado, especialmente ao lidar com tabelas complexas que incluem células mescladas (rowspan, colspan), cabeçalhos aninhados ou grandes conjuntos de dados.
Felizmente, existem várias abordagens para converter tabelas HTML em arquivos do Excel. Esses métodos variam de ações rápidas e manuais de copiar e colar, adequadas para pequenas tarefas, a scripts totalmente automatizados usando VBA ou Python para trabalhos em grande escala ou recorrentes.
Neste artigo, exploraremos quatro métodos eficazes para extrair tabelas HTML para o Excel:
- Copiar e Colar Manual (método mais simples)
- Recurso Embutido do Excel "Da Web"
- Macro VBA (Automação do Excel)
- Python (BeautifulSoup + Spire.XLS)
Finalmente, compararemos essas abordagens em uma tabela resumo para ajudá-lo a escolher o melhor método com base no seu caso de uso.
Copiar e Colar Manual (Método mais simples)
Para extrações pequenas e pontuais, a opção mais simples é usar o copiar e colar diretamente do seu navegador para o Excel.
Passos:
- Abra a página HTML em um navegador (por exemplo, Chrome, Edge ou Firefox).
- Destaque a tabela que deseja extrair.
- Copie-a com Ctrl+C (ou clique com o botão direito → Copiar).
- Abra o Excel e cole com Ctrl+V.
Prós:
- Extremamente simples — não é necessária configuração ou codificação.
- Funciona instantaneamente para tabelas pequenas e limpas.
Contras:
- Processo manual — tedioso e ineficiente para conjuntos de dados frequentes ou grandes.
- Nem sempre preserva células mescladas ou formatação.
- Não consegue lidar de forma confiável com tabelas dinâmicas (renderizadas por JavaScript).
Quando usar: Melhor para tabelas pequenas, coleta de dados ad-hoc ou testes rápidos.
Recurso Embutido do Excel "Da Web"
O Excel inclui uma poderosa ferramenta “Obter e Transformar Dados” (anteriormente Power Query) que permite aos usuários extrair tabelas diretamente de uma página da web.
Passos:
- Abra o Excel.
- Vá para Dados → Da Web.
- Insira a URL da página da web que contém a tabela.
- O Excel exibirá as tabelas detectadas; selecione a que você deseja.
- Carregue os dados em sua planilha.
Prós:
- Integração direta no Excel — não são necessárias ferramentas externas.
- Funciona bem para tabelas HTML estruturadas.
- Suporta atualização — pode extrair novamente dados atualizados da mesma fonte.
Contras:
- Suporte limitado para conteúdo dinâmico ou renderizado por JavaScript.
- Às vezes, falha em detectar tabelas complexas.
- Requer acesso à Internet e URL válida (não para arquivos HTML locais, a menos que importados manualmente).
Quando usar: Melhor para analistas que extraem dados estruturados ao vivo de sites que são atualizados regularmente.
Macro VBA (Automação do Excel)
Para usuários que extraem tabelas HTML com frequência e desejam mais controle, o VBA (Visual Basic for Applications) oferece uma excelente solução. O VBA permite buscar tabelas de uma URL e processar corretamente as células mescladas, algo que o simples copiar e colar não consegue fazer.
Passos:
- Inicie o Microsoft Excel.
- Pressione Alt + F11 para abrir o editor do VBA.
- Clique com o botão direito no explorador de projetos → Inserir → Módulo.
- Cole o código VBA fornecido.
- Feche o editor do VBA.
- Pressione Alt + F8, selecione o nome da macro e clique em Executar.
Exemplo de Código VBA:
Sub ExtractHTMLTableWithProperMerging()
    Dim html As Object, tables As Object, table As Object, row As Object, cell As Object
    Dim ws As Worksheet
    Dim iRow As Long, iCol As Long, realCol As Long
    Dim url As String
    Dim colspan As Integer, rowspan As Integer
    Dim cellTracker() As Boolean ' Rastrear células ocupadas

    ' Definir planilha de destino
    Set ws = ThisWorkbook.Sheets("Sheet1")
    ws.Cells.ClearContents
    ws.Cells.UnMerge ' Limpar quaisquer células mescladas existentes

    ' Obter URL de entrada
    url = InputBox("Digite a URL da página da web:", "Extrator de Tabela HTML")
    If url = "" Then Exit Sub

    ' Carregar HTML
    Set html = CreateObject("htmlfile")
    With CreateObject("MSXML2.XMLHTTP")
        .Open "GET", url, False
        .send
        html.body.innerHTML = .responseText
    End With

    ' Obter a primeira tabela (alterar o índice, se necessário)
    Set tables = html.getElementsByTagName("table")
    If tables.Length = 0 Then
        MsgBox "Nenhuma tabela encontrada!", vbExclamation
        Exit Sub
    End If
    Set table = tables(0)

    ' Inicializar a matriz de rastreamento de células
    Dim maxRows As Long, maxCols As Long
    maxRows = table.Rows.Length
    maxCols = 0
    For Each row In table.Rows
        If row.Cells.Length > maxCols Then maxCols = row.Cells.Length
    Next
    ReDim cellTracker(1 To maxRows, 1 To maxCols)

    ' Processar a tabela
    iRow = 1
    For Each row In table.Rows
        realCol = 1 ' Rastrear a posição real da coluna considerando os rowspans

        ' Encontrar a primeira coluna disponível nesta linha
        While realCol <= maxCols And cellTracker(iRow, realCol)
            realCol = realCol + 1
        Wend

        iCol = 1 ' Rastrear a posição lógica da coluna
        For Each cell In row.Cells
            ' Obter atributos de mesclagem
            colspan = 1
            rowspan = 1
            On Error Resume Next ' Caso os atributos não existam
            colspan = cell.colspan
            rowspan = cell.rowspan
            On Error GoTo 0

            ' Pular células já ocupadas (de rowspan acima)
            While realCol <= maxCols And cellTracker(iRow, realCol)
                realCol = realCol + 1
            Wend

            If realCol > maxCols Then Exit For

            ' Escrever o valor
            ws.Cells(iRow, realCol).Value = cell.innerText

            ' Marcar todas as células que serão ocupadas por esta célula
            Dim r As Long, c As Long
            For r = iRow To iRow + rowspan - 1
                For c = realCol To realCol + colspan - 1
                    If r <= maxRows And c <= maxCols Then
                        cellTracker(r, c) = True
                    End If
                Next c
            Next r

            ' Mesclar células, se necessário
            If colspan > 1 Or rowspan > 1 Then
                With ws.Range(ws.Cells(iRow, realCol), ws.Cells(iRow + rowspan - 1, realCol + colspan - 1))
                    .Merge
                    .HorizontalAlignment = xlCenter
                    .VerticalAlignment = xlCenter
                End With
            End If

            realCol = realCol + colspan
            iCol = iCol + 1
        Next cell
        iRow = iRow + 1
    Next row

    ' Formatação
    ws.UsedRange.Columns.AutoFit
    ws.UsedRange.Borders.Weight = xlThin
    MsgBox "Tabela extraída com a mesclagem correta!", vbInformation
End Sub
Prós:
- Executa inteiramente dentro do Excel — não são necessárias ferramentas externas.
- Lida com tabelas complexas com células mescladas.
- Pode ser personalizado para várias tabelas ou execução agendada.
Contras:
- A configuração requer conhecimento de VBA.
- Não consegue lidar com dados renderizados por JavaScript sem etapas extras.
- Funciona apenas no Excel para desktop (não no Excel Online).
Quando usar: Perfeito para usuários que extraem regularmente tabelas semelhantes e desejam uma solução de um clique.
Python (BeautifulSoup & Spire.XLS)
Para desenvolvedores ou usuários avançados, o Python oferece a solução mais flexível, escalável e automatizada. Com bibliotecas como BeautifulSoup para análise de HTML e Spire.XLS for Python para manipulação do Excel, você pode buscar, limpar e exportar tabelas programaticamente com controle total.
Passos:
- Instale o Python (3.8+ recomendado).
- Crie um novo projeto em seu IDE (por exemplo, VS Code, PyCharm).
- Instale as dependências:
pip install requests beautifulsoup4 spire.xls
- Copie e execute o seguinte script.
Código Python:
import requests

from bs4 import BeautifulSoup
from spire.xls import Workbook, ExcelVersion

# Obter a string HTML da url
response = requests.get("https://cdn.e-iceblue.com/resource/sample.html")
html = response.text

# Analisar o HTML
soup = BeautifulSoup(html, "html.parser")
table = soup.find("table")  # Obter a primeira tabela

# Inicializar o Excel
workbook = Workbook()
sheet = workbook.Worksheets[0]

# Rastrear células mescladas para pulá-las mais tarde
skip_cells = set()

# Iterar sobre as linhas e células HTML
for row_idx, row in enumerate(table.find_all("tr")):
    col_idx = 1  # As colunas do Excel começam em 1
    for cell in row.find_all(["th", "td"]):
        # Pular células já mescladas
        while (row_idx + 1, col_idx) in skip_cells:
            col_idx += 1

        # Obter valores de colspan/rowspan (padrão para 1 se não estiverem presentes)
        colspan = int(cell.get("colspan", 1))
        rowspan = int(cell.get("rowspan", 1))

        # Escrever o valor da célula no Excel
        sheet.Range[row_idx + 1, col_idx].Text = cell.get_text(strip=True)

        # Mesclar células se colspan/rowspan > 1
        if colspan > 1 or rowspan > 1:
            end_row = row_idx + rowspan
            end_col = col_idx + colspan - 1
            sheet.Range[row_idx + 1, col_idx, end_row, end_col].Merge()

            # Marcar células mescladas para pular
            for r in range(row_idx + 1, end_row + 1):
                for c in range(col_idx, end_col + 1):
                    if r != row_idx + 1 or c != col_idx:  # Pular a célula principal
                        skip_cells.add((r, c))

        col_idx += colspan

# Ajustar automaticamente a largura da coluna em todo o intervalo usado
sheet.AllocatedRange.AutoFitColumns()

# Salvar no Excel
workbook.SaveToFile("TableToExcel.xlsx", ExcelVersion.Version2016)
workbook.Dispose()
Prós:
- Controle total — pode analisar, limpar e transformar dados.
- Lida corretamente com células mescladas.
- Facilmente escalável para várias tabelas ou sites.
- Automatizável para tarefas agendadas ou trabalhos em lote.
Contras:
- Requer instalação do Python e conhecimentos básicos de programação.
- Mais configuração do que as soluções integradas do Excel.
- Dependências externas (BeautifulSoup, Spire.XLS).
Quando usar: Melhor para desenvolvedores ou usuários avançados que extraem regularmente tabelas grandes ou complexas.
Saída:
Para melhorar o apelo visual da planilha do Excel gerada em Python, você pode aplicar estilos a células ou planilhas no Excel.
Tabela Resumo: Melhor Método por Caso de Uso
| Método | Melhor Para | Prós | Contras | Automação? |
|---|---|---|---|---|
| Copiar e Colar Manual | Uso rápido e único | Rápido, sem configuração | Sem automação, problemas de formatação | ❌Não |
| Excel Da Web | Dados estruturados ao vivo | Integrado, suporta atualização | Limitado para tabelas dinâmicas | ❌Não |
| Macro VBA | Tarefas repetidas no Excel | Automatiza a extração, lida com mesclagens | Requer conhecimento de VBA | ✅Sim |
| Python (BeautifulSoup + Spire.XLS) | Desenvolvedores, tabelas grandes/complexas | Controle total, escalável, automatizável | Requer codificação e dependências | ✅Sim |
Considerações Finais
O método que você escolhe depende muito do seu caso de uso:
- Se você só precisa pegar uma pequena tabela ocasionalmente, o copiar e colar manual é o mais rápido.
- Se você deseja extrair dados estruturados de uma página da web que é atualizada com frequência, o recurso Da Web do Excel é conveniente.
- Para usuários de negócios que trabalham no Excel diariamente e desejam automação, uma macro VBA é ideal.
- Para desenvolvedores que lidam com vários conjuntos de dados ou estruturas HTML complexas, o Python com BeautifulSoup e Spire.XLS oferece a maior flexibilidade e escalabilidade.
Ao combinar esses métodos com seu fluxo de trabalho, você pode economizar horas de esforço manual e garantir uma extração de dados mais limpa e confiável para o Excel.
Veja Também
HTML 테이블을 Excel로 추출하는 4가지 효과적인 방법 (수동 & 자동화)
목차
Pypi로 설치
pip install Spire.XLS
관련 링크
개요
HTML 표를 Excel로 추출하는 것은 구조화된 웹 데이터를 자주 다루는 데이터 분석가, 연구원, 개발자 및 비즈니스 전문가에게 일반적인 요구 사항입니다. HTML 표에는 재무 보고서, 제품 카탈로그, 연구 결과 또는 성과 통계와 같은 귀중한 정보가 포함되어 있는 경우가 많습니다. 그러나 해당 데이터를 깨끗하고 사용 가능한 형식으로 Excel로 전송하는 것은 까다로울 수 있으며, 특히 병합된 셀(rowspan, colspan), 중첩된 헤더 또는 대규모 데이터 세트가 포함된 복잡한 표를 처리할 때 그렇습니다.
다행히도 HTML 표를 Excel 파일로 변환하는 여러 가지 방법이 있습니다. 이러한 방법은 작은 작업에 적합한 빠른 수동 복사-붙여넣기 작업부터 대규모 또는 반복적인 작업을 위한 VBA 또는 Python을 사용한 완전 자동화된 스크립트에 이르기까지 다양합니다.
이 기사에서는 HTML 표를 Excel로 추출하는 네 가지 효과적인 방법을 살펴보겠습니다.
마지막으로, 사용 사례에 따라 최상의 방법을 선택하는 데 도움이 되도록 이러한 접근 방식을 요약 표에서 비교할 것입니다.
수동 복사-붙여넣기 (가장 간단한 방법)
작고 일회성인 추출의 경우 가장 간단한 옵션은 브라우저에서 Excel로 직접 복사하여 붙여넣는 것입니다.
단계:
- 브라우저(예: Chrome, Edge 또는 Firefox)에서 HTML 페이지를 엽니다.
- 추출하려는 표를 강조 표시합니다.
- Ctrl+C(또는 마우스 오른쪽 버튼 클릭 → 복사)로 복사합니다.
- Excel을 열고 Ctrl+V로 붙여넣습니다.
장점:
- 매우 간단함—설정이나 코딩이 필요 없음.
- 작고 깔끔한 표에 즉시 작동함.
단점:
- 수동 프로세스—잦거나 큰 데이터 세트에는 지루하고 비효율적임.
- 병합된 셀이나 서식을 항상 유지하지는 않음.
- 동적(JavaScript 렌더링) 표를 안정적으로 처리할 수 없음.
사용 시기: 작은 표, 임시 데이터 수집 또는 빠른 테스트에 가장 적합합니다.
Excel의 내장된 "웹에서" 기능
Excel에는 사용자가 웹 페이지에서 직접 표를 가져올 수 있는 강력한 "데이터 가져오기 및 변환" 도구(이전의 파워 쿼리)가 포함되어 있습니다.
단계:
- Excel을 엽니다.
- 데이터 → 웹에서로 이동합니다.
- 표가 포함된 웹 페이지의 URL을 입력합니다.
- Excel이 감지된 표를 표시합니다. 원하는 표를 선택합니다.
- 워크시트에 데이터를 로드합니다.
장점:
- Excel에 직접 통합—외부 도구 필요 없음.
- 구조화된 HTML 표에 잘 작동함.
- 새로 고침 지원—동일한 소스에서 업데이트된 데이터를 다시 가져올 수 있음.
단점:
- 동적 또는 JavaScript 렌더링 콘텐츠에 대한 지원 제한.
- 때때로 복잡한 표를 감지하지 못함.
- 인터넷 액세스 및 유효한 URL 필요(수동으로 가져오지 않는 한 로컬 HTML 파일에는 해당되지 않음).
사용 시기: 정기적으로 업데이트되는 웹사이트에서 실시간 구조화된 데이터를 가져오는 분석가에게 가장 적합합니다.
VBA 매크로 (Excel 자동화)
HTML 표를 자주 추출하고 더 많은 제어를 원하는 사용자에게 VBA(Visual Basic for Applications)는 훌륭한 솔루션을 제공합니다. VBA를 사용하면 URL에서 표를 가져와 병합된 셀을 올바르게 처리할 수 있으며, 이는 기본 복사-붙여넣기로는 처리할 수 없습니다.
단계:
- Microsoft Excel을 시작합니다.
- Alt + F11을 눌러 VBA 편집기를 엽니다.
- 프로젝트 탐색기에서 마우스 오른쪽 버튼 클릭 → 삽입 → 모듈.
- 제공된 VBA 코드를 붙여넣습니다.
- VBA 편집기를 닫습니다.
- Alt + F8을 누르고 매크로 이름을 선택한 다음 실행을 클릭합니다.
샘플 VBA 코드:
Sub ExtractHTMLTableWithProperMerging()
    Dim html As Object, tables As Object, table As Object, row As Object, cell As Object
    Dim ws As Worksheet
    Dim iRow As Long, iCol As Long, realCol As Long
    Dim url As String
    Dim colspan As Integer, rowspan As Integer
    Dim cellTracker() As Boolean ' 차지된 셀 추적

    ' 대상 워크시트 설정
    Set ws = ThisWorkbook.Sheets("Sheet1")
    ws.Cells.ClearContents
    ws.Cells.UnMerge ' 기존 병합된 셀 모두 지우기

    ' URL 입력 받기
    url = InputBox("웹 페이지 URL 입력:", "HTML 표 추출기")
    If url = "" Then Exit Sub

    ' HTML 로드
    Set html = CreateObject("htmlfile")
    With CreateObject("MSXML2.XMLHTTP")
        .Open "GET", url, False
        .send
        html.body.innerHTML = .responseText
    End With

    ' 첫 번째 표 가져오기 (필요시 인덱스 변경)
    Set tables = html.getElementsByTagName("table")
    If tables.Length = 0 Then
        MsgBox "표를 찾을 수 없습니다!", vbExclamation
        Exit Sub
    End If
    Set table = tables(0)

    ' 셀 추적기 배열 초기화
    Dim maxRows As Long, maxCols As Long
    maxRows = table.Rows.Length
    maxCols = 0
    For Each row In table.Rows
        If row.Cells.Length > maxCols Then maxCols = row.Cells.Length
    Next
    ReDim cellTracker(1 To maxRows, 1 To maxCols)

    ' 표 처리
    iRow = 1
    For Each row In table.Rows
        realCol = 1 ' rowspan을 고려한 실제 열 위치 추적

        ' 이 행에서 첫 번째 사용 가능한 열 찾기
        While realCol <= maxCols And cellTracker(iRow, realCol)
            realCol = realCol + 1
        Wend

        iCol = 1 ' 논리적 열 위치 추적
        For Each cell In row.Cells
            ' 병합 속성 가져오기
            colspan = 1
            rowspan = 1
            On Error Resume Next ' 속성이 없는 경우 대비
            colspan = cell.colspan
            rowspan = cell.rowspan
            On Error GoTo 0

            ' 이미 차지된 셀 건너뛰기 (위의 rowspan으로 인해)
            While realCol <= maxCols And cellTracker(iRow, realCol)
                realCol = realCol + 1
            Wend

            If realCol > maxCols Then Exit For

            ' 값 쓰기
            ws.Cells(iRow, realCol).Value = cell.innerText

            ' 이 셀이 차지할 모든 셀 표시
            Dim r As Long, c As Long
            For r = iRow To iRow + rowspan - 1
                For c = realCol To realCol + colspan - 1
                    If r <= maxRows And c <= maxCols Then
                        cellTracker(r, c) = True
                    End If
                Next c
            Next r

            ' 필요시 셀 병합
            If colspan > 1 Or rowspan > 1 Then
                With ws.Range(ws.Cells(iRow, realCol), ws.Cells(iRow + rowspan - 1, realCol + colspan - 1))
                    .Merge
                    .HorizontalAlignment = xlCenter
                    .VerticalAlignment = xlCenter
                End With
            End If

            realCol = realCol + colspan
            iCol = iCol + 1
        Next cell
        iRow = iRow + 1
    Next row

    ' 서식 지정
    ws.UsedRange.Columns.AutoFit
    ws.UsedRange.Borders.Weight = xlThin
    MsgBox "표가 올바른 병합으로 추출되었습니다!", vbInformation
End Sub
장점:
- 전적으로 Excel 내에서 실행—외부 도구 필요 없음.
- 병합된 셀이 있는 복잡한 표 처리.
- 여러 표 또는 예약된 실행에 맞게 사용자 지정 가능.
단점:
- 설정에 VBA 지식 필요.
- 추가 단계 없이 JavaScript 렌더링 데이터 처리 불가.
- Excel 데스크톱에서만 작동(Excel 온라인에서는 작동 안 함).
사용 시기: 유사한 표를 정기적으로 추출하고 원클릭 솔루션을 원하는 사용자에게 적합합니다.
Python (BeautifulSoup & Spire.XLS)
개발자나 고급 사용자에게 Python은 가장 유연하고 확장 가능하며 자동화된 솔루션을 제공합니다. HTML 파싱을 위한 BeautifulSoup 및 Excel 조작을 위한 Spire.XLS for Python과 같은 라이브러리를 사용하여 프로그래밍 방식으로 표를 가져오고, 정리하고, 완전한 제어로 내보낼 수 있습니다.
단계:
- Python 설치(3.8+ 권장).
- IDE(예: VS Code, PyCharm)에서 새 프로젝트 생성.
- 의존성 설치:
pip install requests beautifulsoup4 spire.xls
- 다음 스크립트를 복사하여 실행합니다.
Python 코드:
import requests

from bs4 import BeautifulSoup
from spire.xls import Workbook, ExcelVersion

# URL에서 HTML 문자열 가져오기
response = requests.get("https://cdn.e-iceblue.com/resource/sample.html")
html = response.text

# HTML 파싱
soup = BeautifulSoup(html, "html.parser")
table = soup.find("table")  # 첫 번째 표 가져오기

# Excel 초기화
workbook = Workbook()
sheet = workbook.Worksheets[0]

# 나중에 건너뛸 병합된 셀 추적
skip_cells = set()

# HTML 행 및 셀 반복
for row_idx, row in enumerate(table.find_all("tr")):
    col_idx = 1  # Excel 열은 1부터 시작
    for cell in row.find_all(["th", "td"]):
        # 이미 병합된 셀 건너뛰기
        while (row_idx + 1, col_idx) in skip_cells:
            col_idx += 1

        # colspan/rowspan 값 가져오기 (없는 경우 기본값 1)
        colspan = int(cell.get("colspan", 1))
        rowspan = int(cell.get("rowspan", 1))

        # Excel에 셀 값 쓰기
        sheet.Range[row_idx + 1, col_idx].Text = cell.get_text(strip=True)

        # colspan/rowspan > 1인 경우 셀 병합
        if colspan > 1 or rowspan > 1:
            end_row = row_idx + rowspan
            end_col = col_idx + colspan - 1
            sheet.Range[row_idx + 1, col_idx, end_row, end_col].Merge()

            # 건너뛸 병합된 셀 표시
            for r in range(row_idx + 1, end_row + 1):
                for c in range(col_idx, end_col + 1):
                    if r != row_idx + 1 or c != col_idx:  # 주 셀 건너뛰기
                        skip_cells.add((r, c))

        col_idx += colspan

# 사용된 모든 범위의 열 너비 자동 맞춤
sheet.AllocatedRange.AutoFitColumns()

# Excel에 저장
workbook.SaveToFile("TableToExcel.xlsx", ExcelVersion.Version2016)
workbook.Dispose()
장점:
- 완전한 제어—데이터를 파싱, 정리 및 변환할 수 있음.
- 병합된 셀을 올바르게 처리함.
- 여러 표나 웹사이트로 쉽게 확장 가능.
- 예약된 작업이나 일괄 작업에 대해 자동화 가능.
단점:
- Python 설치 및 기본 프로그래밍 지식 필요.
- 내장된 Excel 솔루션보다 설정이 더 많음.
- 외부 의존성(BeautifulSoup, Spire.XLS).
사용 시기: 크거나 복잡한 표를 정기적으로 추출하는 개발자나 고급 사용자에게 가장 적합합니다.
출력:
Python에서 생성된 Excel 워크시트의 시각적 매력을 향상시키려면 Excel의 셀 또는 워크시트에 스타일을 적용할 수 있습니다.
요약 표: 사용 사례별 최적의 방법
| 방법 | 가장 적합한 경우 | 장점 | 단점 | 자동화? |
|---|---|---|---|---|
| 수동 복사-붙여넣기 | 빠른, 일회성 사용 | 빠르고 설정 없음 | 자동화 불가, 서식 문제 | ❌아니요 |
| Excel 웹에서 | 실시간 구조화된 데이터 | 통합, 새로 고침 지원 | 동적 표에 제한적 | ❌아니요 |
| VBA 매크로 | Excel에서 반복 작업 | 추출 자동화, 병합 처리 | VBA 지식 필요 | ✅예 |
| Python (BeautifulSoup + Spire.XLS) | 개발자, 크거나 복잡한 표 | 완전한 제어, 확장 가능, 자동화 가능 | 코딩 및 의존성 필요 | ✅예 |
마지막 생각
선택하는 방법은 주로 사용 사례에 따라 다릅니다.
- 가끔 작은 표만 가져오면 되는 경우 수동 복사-붙여넣기가 가장 빠릅니다.
- 자주 업데이트되는 웹 페이지에서 구조화된 데이터를 가져오려면 Excel의 웹에서 기능이 편리합니다.
- 매일 Excel에서 작업하고 자동화를 원하는 비즈니스 사용자의 경우 VBA 매크로가 이상적입니다.
- 여러 데이터 세트나 복잡한 HTML 구조를 처리하는 개발자의 경우 BeautifulSoup와 Spire.XLS를 사용하는 Python이 가장 큰 유연성과 확장성을 제공합니다.
이러한 방법을 워크플로와 결합하면 수동 작업 시간을 절약하고 Excel로 더 깨끗하고 신뢰할 수 있는 데이터를 추출할 수 있습니다.
참고 항목
4 méthodes efficaces pour extraire des tableaux HTML vers Excel (manuel et automatisé)
Table des matières
Installer avec Pypi
pip install Spire.XLS
Liens connexes
Aperçu
L'extraction de tableaux HTML dans Excel est une exigence courante pour les analystes de données, les chercheurs, les développeurs et les professionnels qui travaillent fréquemment avec des données Web structurées. Les tableaux HTML contiennent souvent des informations précieuses telles que des rapports financiers, des catalogues de produits, des résultats de recherche ou des statistiques de performance. Cependant, transférer ces données dans Excel dans un format propre et utilisable peut être délicat, en particulier lorsqu'il s'agit de tableaux complexes comprenant des cellules fusionnées (rowspan, colspan), des en-têtes imbriqués ou de grands ensembles de données.
Heureusement, il existe plusieurs approches pour convertir des tableaux HTML en fichiers Excel. Ces méthodes vont des actions rapides et manuelles de copier-coller, adaptées aux petites tâches, aux scripts entièrement automatisés utilisant VBA ou Python pour des travaux à grande échelle ou récurrents.
Dans cet article, nous explorerons quatre méthodes efficaces pour extraire des tableaux HTML vers Excel :
- Copier-coller manuel (méthode la plus simple)
- Fonctionnalité intégrée « À partir du Web » d'Excel
- Macro VBA (Automatisation d'Excel)
- Python (BeautifulSoup + Spire.XLS)
Enfin, nous comparerons ces approches dans un tableau récapitulatif pour vous aider à choisir la meilleure méthode en fonction de votre cas d'utilisation.
Copier-coller manuel (Méthode la plus simple)
Pour les extractions ponctuelles et de petite taille, l'option la plus simple est d'utiliser le copier-coller directement depuis votre navigateur vers Excel.
Étapes :
- Ouvrez la page HTML dans un navigateur (par ex., Chrome, Edge ou Firefox).
- Surlignez le tableau que vous souhaitez extraire.
- Copiez-le avec Ctrl+C (ou clic droit → Copier).
- Ouvrez Excel et collez avec Ctrl+V.
Avantages :
- Extrêmement simple — aucune configuration ni codage requis.
- Fonctionne instantanément pour les petits tableaux propres.
Inconvénients :
- Processus manuel — fastidieux et inefficace pour les ensembles de données fréquents ou volumineux.
- Ne préserve pas toujours les cellules fusionnées ou la mise en forme.
- Ne peut pas gérer de manière fiable les tableaux dynamiques (rendus par JavaScript).
Quand l'utiliser : Idéal pour les petits tableaux, la collecte de données ad hoc ou des tests rapides.
Fonctionnalité intégrée « À partir du Web » d'Excel
Excel comprend un puissant outil « Obtenir et transformer des données » (anciennement Power Query) qui permet aux utilisateurs d'extraire des tableaux directement d'une page Web.
Étapes :
- Ouvrez Excel.
- Allez dans Données → À partir du Web.
- Entrez l'URL de la page Web contenant le tableau.
- Excel affichera les tableaux détectés ; sélectionnez celui que vous voulez.
- Chargez les données dans votre feuille de calcul.
Avantages :
- Intégration directe dans Excel — aucun outil externe requis.
- Fonctionne bien pour les tableaux HTML structurés.
- Prend en charge l'actualisation — peut extraire à nouveau les données mises à jour de la même source.
Inconvénients :
- Prise en charge limitée du contenu dynamique ou rendu par JavaScript.
- Échoue parfois à détecter les tableaux complexes.
- Nécessite un accès Internet et une URL valide (pas pour les fichiers HTML locaux, sauf s'ils sont importés manuellement).
Quand l'utiliser : Idéal pour les analystes qui extraient des données structurées en direct de sites Web régulièrement mis à jour.
Macro VBA (Automatisation d'Excel)
Pour les utilisateurs qui extraient fréquemment des tableaux HTML et souhaitent plus de contrôle, VBA (Visual Basic for Applications) offre une excellente solution. VBA vous permet de récupérer des tableaux à partir d'une URL et de traiter correctement les cellules fusionnées, ce que le simple copier-coller ne peut pas gérer.
Étapes :
- Lancez Microsoft Excel.
- Appuyez sur Alt + F11 pour ouvrir l'éditeur VBA.
- Cliquez avec le bouton droit sur l'explorateur de projets → Insérer → Module.
- Collez le code VBA fourni.
- Fermez l'éditeur VBA.
- Appuyez sur Alt + F8, sélectionnez le nom de la macro et cliquez sur Exécuter.
Exemple de code VBA :
Sub ExtractHTMLTableWithProperMerging()
    Dim html As Object, tables As Object, table As Object, row As Object, cell As Object
    Dim ws As Worksheet
    Dim iRow As Long, iCol As Long, realCol As Long
    Dim url As String
    Dim colspan As Integer, rowspan As Integer
    Dim cellTracker() As Boolean ' Suivre les cellules occupées

    ' Définir la feuille de calcul cible
    Set ws = ThisWorkbook.Sheets("Sheet1")
    ws.Cells.ClearContents
    ws.Cells.UnMerge ' Effacer toutes les cellules fusionnées existantes

    ' Obtenir l'URL d'entrée
    url = InputBox("Entrez l'URL de la page Web :", "Extracteur de tableau HTML")
    If url = "" Then Exit Sub

    ' Charger le HTML
    Set html = CreateObject("htmlfile")
    With CreateObject("MSXML2.XMLHTTP")
        .Open "GET", url, False
        .send
        html.body.innerHTML = .responseText
    End With

    ' Obtenir le premier tableau (changer l'index si nécessaire)
    Set tables = html.getElementsByTagName("table")
    If tables.Length = 0 Then
        MsgBox "Aucun tableau trouvé !", vbExclamation
        Exit Sub
    End If
    Set table = tables(0)

    ' Initialiser le tableau de suivi des cellules
    Dim maxRows As Long, maxCols As Long
    maxRows = table.Rows.Length
    maxCols = 0
    For Each row In table.Rows
        If row.Cells.Length > maxCols Then maxCols = row.Cells.Length
    Next
    ReDim cellTracker(1 To maxRows, 1 To maxCols)

    ' Traiter le tableau
    iRow = 1
    For Each row In table.Rows
        realCol = 1 ' Suivre la position réelle de la colonne en tenant compte des rowspans

        ' Trouver la première colonne disponible dans cette ligne
        While realCol <= maxCols And cellTracker(iRow, realCol)
            realCol = realCol + 1
        Wend

        iCol = 1 ' Suivre la position logique de la colonne
        For Each cell In row.Cells
            ' Obtenir les attributs de fusion
            colspan = 1
            rowspan = 1
            On Error Resume Next ' Au cas où les attributs n'existeraient pas
            colspan = cell.colspan
            rowspan = cell.rowspan
            On Error GoTo 0

            ' Sauter les cellules déjà occupées (par un rowspan ci-dessus)
            While realCol <= maxCols And cellTracker(iRow, realCol)
                realCol = realCol + 1
            Wend

            If realCol > maxCols Then Exit For

            ' Écrire la valeur
            ws.Cells(iRow, realCol).Value = cell.innerText

            ' Marquer toutes les cellules qui seront occupées par cette cellule
            Dim r As Long, c As Long
            For r = iRow To iRow + rowspan - 1
                For c = realCol To realCol + colspan - 1
                    If r <= maxRows And c <= maxCols Then
                        cellTracker(r, c) = True
                    End If
                Next c
            Next r

            ' Fusionner les cellules si nécessaire
            If colspan > 1 Or rowspan > 1 Then
                With ws.Range(ws.Cells(iRow, realCol), ws.Cells(iRow + rowspan - 1, realCol + colspan - 1))
                    .Merge
                    .HorizontalAlignment = xlCenter
                    .VerticalAlignment = xlCenter
                End With
            End If

            realCol = realCol + colspan
            iCol = iCol + 1
        Next cell
        iRow = iRow + 1
    Next row

    ' Mise en forme
    ws.UsedRange.Columns.AutoFit
    ws.UsedRange.Borders.Weight = xlThin
    MsgBox "Tableau extrait avec fusion correcte !", vbInformation
End Sub
Avantages :
- S'exécute entièrement dans Excel — aucun outil externe requis.
- Gère les tableaux complexes avec des cellules fusionnées.
- Peut être personnalisé pour plusieurs tableaux ou une exécution planifiée.
Inconvénients :
- La configuration nécessite des connaissances en VBA.
- Ne peut pas gérer les données rendues par JavaScript sans étapes supplémentaires.
- Ne fonctionne que dans la version de bureau d'Excel (pas dans Excel Online).
Quand l'utiliser : Parfait pour les utilisateurs qui extraient régulièrement des tableaux similaires et souhaitent une solution en un clic.
Python (BeautifulSoup & Spire.XLS)
Pour les développeurs ou les utilisateurs expérimentés, Python offre la solution la plus flexible, évolutive et automatisée. Avec des bibliothèques comme BeautifulSoup pour l'analyse HTML et Spire.XLS for Python pour la manipulation d'Excel, vous pouvez récupérer, nettoyer et exporter des tableaux par programmation avec un contrôle total.
Étapes :
- Installez Python (3.8+ recommandé).
- Créez un nouveau projet dans votre IDE (par ex., VS Code, PyCharm).
- Installez les dépendances :
pip install requests beautifulsoup4 spire.xls
- Copiez et exécutez le script suivant.
Code Python :
import requests

from bs4 import BeautifulSoup
from spire.xls import Workbook, ExcelVersion

# Obtenir la chaîne HTML de l'URL
response = requests.get("https://cdn.e-iceblue.com/resource/sample.html")
html = response.text

# Analyser le HTML
soup = BeautifulSoup(html, "html.parser")
table = soup.find("table")  # Obtenir le premier tableau

# Initialiser Excel
workbook = Workbook()
sheet = workbook.Worksheets[0]

# Suivre les cellules fusionnées pour les ignorer plus tard
skip_cells = set()

# Parcourir les lignes et les cellules HTML
for row_idx, row in enumerate(table.find_all("tr")):
    col_idx = 1  # Les colonnes d'Excel commencent à 1
    for cell in row.find_all(["th", "td"]):
        # Ignorer les cellules déjà fusionnées
        while (row_idx + 1, col_idx) in skip_cells:
            col_idx += 1

        # Obtenir les valeurs de colspan/rowspan (par défaut 1 si absentes)
        colspan = int(cell.get("colspan", 1))
        rowspan = int(cell.get("rowspan", 1))

        # Écrire la valeur de la cellule dans Excel
        sheet.Range[row_idx + 1, col_idx].Text = cell.get_text(strip=True)

        # Fusionner les cellules si colspan/rowspan > 1
        if colspan > 1 or rowspan > 1:
            end_row = row_idx + rowspan
            end_col = col_idx + colspan - 1
            sheet.Range[row_idx + 1, col_idx, end_row, end_col].Merge()

            # Marquer les cellules fusionnées pour les ignorer
            for r in range(row_idx + 1, end_row + 1):
                for c in range(col_idx, end_col + 1):
                    if r != row_idx + 1 or c != col_idx:  # Ignorer la cellule principale
                        skip_cells.add((r, c))

        col_idx += colspan

# Ajuster automatiquement la largeur des colonnes dans toute la plage utilisée
sheet.AllocatedRange.AutoFitColumns()

# Enregistrer dans Excel
workbook.SaveToFile("TableToExcel.xlsx", ExcelVersion.Version2016)
workbook.Dispose()
Avantages :
- Contrôle total — peut analyser, nettoyer et transformer les données.
- Gère correctement les cellules fusionnées.
- Facilement adaptable à plusieurs tableaux ou sites web.
- Automatisable pour des tâches planifiées ou des travaux par lots.
Inconvénients :
- Nécessite l'installation de Python et des connaissances de base en programmation.
- Plus de configuration que les solutions intégrées d'Excel.
- Dépendances externes (BeautifulSoup, Spire.XLS).
Quand l'utiliser : Idéal pour les développeurs ou les utilisateurs avancés qui extraient régulièrement des tableaux volumineux ou complexes.
Sortie :
Pour améliorer l'attrait visuel de la feuille de calcul Excel générée en Python, vous pouvez appliquer des styles aux cellules ou aux feuilles de calcul dans Excel.
Tableau récapitulatif : Meilleure méthode par cas d'utilisation
| Méthode | Idéal pour | Avantages | Inconvénients | Automatisation ? |
|---|---|---|---|---|
| Copier-coller manuel | Utilisation rapide et ponctuelle | Rapide, sans configuration | Pas d'automatisation, problèmes de formatage | ❌Non |
| Excel À partir du Web | Données structurées en direct | Intégré, prend en charge l'actualisation | Limité pour les tableaux dynamiques | ❌Non |
| Macro VBA | Tâches répétées dans Excel | Automatise l'extraction, gère les fusions | Nécessite des connaissances en VBA | ✅Oui |
| Python (BeautifulSoup + Spire.XLS) | Développeurs, tableaux volumineux/complexes | Contrôle total, évolutif, automatisable | Nécessite du codage et des dépendances | ✅Oui |
Réflexions finales
La méthode que vous choisissez dépend en grande partie de votre cas d'utilisation :
- Si vous n'avez besoin de récupérer qu'un petit tableau occasionnellement, le copier-coller manuel est le plus rapide.
- Si vous souhaitez extraire des données structurées d'une page Web qui se met à jour fréquemment, la fonction À partir du Web d'Excel est pratique.
- Pour les utilisateurs professionnels qui travaillent quotidiennement dans Excel et souhaitent une automatisation, une macro VBA est idéale.
- Pour les développeurs qui gèrent plusieurs ensembles de données ou des structures HTML complexes, Python avec BeautifulSoup et Spire.XLS offre la plus grande flexibilité et évolutivité.
En combinant ces méthodes avec votre flux de travail, vous pouvez économiser des heures d'efforts manuels et garantir une extraction de données plus propre et plus fiable dans Excel.
Voir aussi
4 métodos efectivos para extraer tablas HTML a Excel (manuales y automatizados)
Tabla de contenidos
Instalar con Pypi
pip install Spire.XLS
Enlaces relacionados
Descripción general
Extraer tablas HTML a Excel es un requisito común para analistas de datos, investigadores, desarrolladores y profesionales de negocios que trabajan frecuentemente con datos web estructurados. Las tablas HTML a menudo contienen información valiosa como informes financieros, catálogos de productos, resultados de investigación o estadísticas de rendimiento. Sin embargo, transferir esos datos a Excel en un formato limpio y utilizable puede ser complicado, especialmente cuando se trata de tablas complejas que incluyen celdas combinadas (rowspan, colspan), encabezados anidados o grandes conjuntos de datos.
Afortunadamente, existen múltiples enfoques para convertir tablas HTML en archivos de Excel. Estos métodos van desde acciones rápidas y manuales de copiar y pegar, adecuadas para tareas pequeñas, hasta scripts totalmente automatizados que utilizan VBA o Python para trabajos a gran escala o recurrentes.
En este artículo, exploraremos cuatro métodos efectivos para extraer tablas HTML a Excel:
- Copiar y pegar manualmente (método más simple)
- Función incorporada de Excel "Desde la Web"
- Macro de VBA (Automatización de Excel)
- Python (BeautifulSoup + Spire.XLS)
Finalmente, compararemos estos enfoques en una tabla de resumen para ayudarlo a elegir el mejor método según su caso de uso.
Copiar y pegar manualmente (Método más simple)
Para extracciones pequeñas y puntuales, la opción más sencilla es usar copiar y pegar directamente desde su navegador a Excel.
Pasos:
- Abra la página HTML en un navegador (por ejemplo, Chrome, Edge o Firefox).
- Resalte la tabla que desea extraer.
- Cópiela con Ctrl+C (o haga clic derecho → Copiar).
- Abra Excel y pegue con Ctrl+V.
Ventajas:
- Extremadamente simple: no se requiere configuración ni codificación.
- Funciona instantáneamente para tablas pequeñas и limpias.
Desventajas:
- Proceso manual: tedioso e ineficiente para conjuntos de datos frecuentes o grandes.
- No siempre conserva las celdas combinadas o el formato.
- No puede manejar tablas dinámicas (renderizadas con JavaScript) de manera confiable.
Cuándo usarlo: Ideal para tablas pequeñas, recopilación de datos ad-hoc o pruebas rápidas.
Función incorporada de Excel "Desde la Web"
Excel incluye una potente herramienta "Obtener y transformar datos" (anteriormente Power Query) que permite a los usuarios extraer tablas directamente de una página web.
Pasos:
- Abra Excel.
- Vaya a Datos → Desde la Web.
- Ingrese la URL de la página web que contiene la tabla.
- Excel mostrará las tablas detectadas; seleccione la que desee.
- Cargue los datos en su hoja de trabajo.
Ventajas:
- Integración directa en Excel: no se requieren herramientas externas.
- Funciona bien para tablas HTML estructuradas.
- Admite la actualización: puede volver a extraer datos actualizados de la misma fuente.
Desventajas:
- Soporte limitado para contenido dinámico o renderizado con JavaScript.
- A veces no detecta tablas complejas.
- Requiere acceso a Internet y una URL válida (no para archivos HTML locales a menos que se importen manualmente).
Cuándo usarlo: Ideal para analistas que extraen datos estructurados en vivo de sitios web que se actualizan regularmente.
Macro de VBA (Automatización de Excel)
Para los usuarios que extraen tablas HTML con frecuencia y desean más control, VBA (Visual Basic for Applications) ofrece una excelente solución. VBA le permite obtener tablas de una URL y procesar correctamente las celdas combinadas, algo que el simple copiar y pegar no puede manejar.
Pasos:
- Inicie Microsoft Excel.
- Presione Alt + F11 para abrir el editor de VBA.
- Haga clic derecho en el explorador de proyectos → Insertar → Módulo.
- Pegue el código VBA proporcionado.
- Cierre el editor de VBA.
- Presione Alt + F8, seleccione el nombre de la macro y haga clic en Ejecutar.
Código de muestra de VBA:
Sub ExtractHTMLTableWithProperMerging()
    Dim html As Object, tables As Object, table As Object, row As Object, cell As Object
    Dim ws As Worksheet
    Dim iRow As Long, iCol As Long, realCol As Long
    Dim url As String
    Dim colspan As Integer, rowspan As Integer
    Dim cellTracker() As Boolean ' Rastrear celdas ocupadas

    ' Establecer hoja de trabajo de destino
    Set ws = ThisWorkbook.Sheets("Sheet1")
    ws.Cells.ClearContents
    ws.Cells.UnMerge ' Limpiar cualquier celda combinada existente

    ' Obtener la URL de entrada
    url = InputBox("Ingrese la URL de la página web:", "Extractor de tablas HTML")
    If url = "" Then Exit Sub

    ' Cargar HTML
    Set html = CreateObject("htmlfile")
    With CreateObject("MSXML2.XMLHTTP")
        .Open "GET", url, False
        .send
        html.body.innerHTML = .responseText
    End With

    ' Obtener la primera tabla (cambiar el índice si es necesario)
    Set tables = html.getElementsByTagName("table")
    If tables.Length = 0 Then
        MsgBox "No se encontraron tablas!", vbExclamation
        Exit Sub
    End If
    Set table = tables(0)

    ' Inicializar la matriz de seguimiento de celdas
    Dim maxRows As Long, maxCols As Long
    maxRows = table.Rows.Length
    maxCols = 0
    For Each row In table.Rows
        If row.Cells.Length > maxCols Then maxCols = row.Cells.Length
    Next
    ReDim cellTracker(1 To maxRows, 1 To maxCols)

    ' Procesar la tabla
    iRow = 1
    For Each row In table.Rows
        realCol = 1 ' Rastrear la posición real de la columna teniendo en cuenta los rowspans

        ' Encontrar la primera columna disponible en esta fila
        While realCol <= maxCols And cellTracker(iRow, realCol)
            realCol = realCol + 1
        Wend

        iCol = 1 ' Rastrear la posición lógica de la columna
        For Each cell In row.Cells
            ' Obtener atributos de combinación
            colspan = 1
            rowspan = 1
            On Error Resume Next ' En caso de que los atributos no existan
            colspan = cell.colspan
            rowspan = cell.rowspan
            On Error GoTo 0

            ' Omitir celdas ya ocupadas (desde rowspan anterior)
            While realCol <= maxCols And cellTracker(iRow, realCol)
                realCol = realCol + 1
            Wend

            If realCol > maxCols Then Exit For

            ' Escribir valor
            ws.Cells(iRow, realCol).Value = cell.innerText

            ' Marcar todas las celdas que serán ocupadas por esta celda
            Dim r As Long, c As Long
            For r = iRow To iRow + rowspan - 1
                For c = realCol To realCol + colspan - 1
                    If r <= maxRows And c <= maxCols Then
                        cellTracker(r, c) = True
                    End If
                Next c
            Next r

            ' Combinar celdas si es necesario
            If colspan > 1 Or rowspan > 1 Then
                With ws.Range(ws.Cells(iRow, realCol), ws.Cells(iRow + rowspan - 1, realCol + colspan - 1))
                    .Merge
                    .HorizontalAlignment = xlCenter
                    .VerticalAlignment = xlCenter
                End With
            End If

            realCol = realCol + colspan
            iCol = iCol + 1
        Next cell
        iRow = iRow + 1
    Next row

    ' Formato
    ws.UsedRange.Columns.AutoFit
    ws.UsedRange.Borders.Weight = xlThin
    MsgBox "¡Tabla extraída con la combinación correcta!", vbInformation
End Sub
Ventajas:
- Se ejecuta completamente dentro de Excel, sin necesidad de herramientas externas.
- Maneja tablas complejas con celdas combinadas.
- Se puede personalizar para múltiples tablas o ejecución programada.
Desventajas:
- La configuración requiere conocimientos de VBA.
- No puede manejar datos renderizados con JavaScript sin pasos adicionales.
- Solo funciona en el escritorio de Excel (no en Excel Online).
Cuándo usarlo: Perfecto para usuarios que extraen tablas similares regularmente y desean una solución de un solo clic.
Python (BeautifulSoup & Spire.XLS)
Para desarrolladores o usuarios avanzados, Python proporciona la solución más flexible, escalable y automatizada. Con bibliotecas como BeautifulSoup para analizar HTML y Spire.XLS for Python para la manipulación de Excel, puede obtener, limpiar y exportar tablas mediante programación con un control total.
Pasos:
- Instale Python (se recomienda 3.8+).
- Cree un nuevo proyecto en su IDE (por ejemplo, VS Code, PyCharm).
- Instale las dependencias:
pip install requests beautifulsoup4 spire.xls
- Copie y ejecute el siguiente script.
Código de Python:
import requests

from bs4 import BeautifulSoup
from spire.xls import Workbook, ExcelVersion

# Obtener la cadena HTML de la URL
response = requests.get("https://cdn.e-iceblue.com/resource/sample.html")
html = response.text

# Analizar HTML
soup = BeautifulSoup(html, "html.parser")
table = soup.find("table")  # Obtener la primera tabla

# Inicializar Excel
workbook = Workbook()
sheet = workbook.Worksheets[0]

# Rastrear celdas combinadas para omitirlas más tarde
skip_cells = set()

# Recorrer filas y celdas HTML
for row_idx, row in enumerate(table.find_all("tr")):
    col_idx = 1  # Las columnas de Excel comienzan en 1
    for cell in row.find_all(["th", "td"]):
        # Omitir celdas ya combinadas
        while (row_idx + 1, col_idx) in skip_cells:
            col_idx += 1

        # Obtener valores de colspan/rowspan (por defecto 1 si no están presentes)
        colspan = int(cell.get("colspan", 1))
        rowspan = int(cell.get("rowspan", 1))

        # Escribir el valor de la celda en Excel
        sheet.Range[row_idx + 1, col_idx].Text = cell.get_text(strip=True)

        # Combinar celdas si colspan/rowspan > 1
        if colspan > 1 or rowspan > 1:
            end_row = row_idx + rowspan
            end_col = col_idx + colspan - 1
            sheet.Range[row_idx + 1, col_idx, end_row, end_col].Merge()

            # Marcar las celdas combinadas para omitirlas
            for r in range(row_idx + 1, end_row + 1):
                for c in range(col_idx, end_col + 1):
                    if r != row_idx + 1 or c != col_idx:  # Omitir la celda principal
                        skip_cells.add((r, c))

        col_idx += colspan

# Autoajustar el ancho de las columnas en todo el rango utilizado
sheet.AllocatedRange.AutoFitColumns()

# Guardar en Excel
workbook.SaveToFile("TableToExcel.xlsx", ExcelVersion.Version2016)
workbook.Dispose()
Ventajas:
- Control total: puede analizar, limpiar y transformar datos.
- Maneja correctamente las celdas combinadas.
- Fácilmente escalable a múltiples tablas o sitios web.
- Automatizable para tareas programadas o trabajos por lotes.
Desventajas:
- Requiere instalación de Python y conocimientos básicos de programación.
- Más configuración que las soluciones integradas de Excel.
- Dependencias externas (BeautifulSoup, Spire.XLS).
Cuándo usarlo: Ideal para desarrolladores o usuarios avanzados que extraen tablas grandes o complejas con regularidad.
Salida:
Para mejorar el atractivo visual de la hoja de trabajo de Excel generada en Python, puede aplicar estilos a celdas u hojas de trabajo en Excel.
Tabla de resumen: Mejor método por caso de uso
| Método | Ideal para | Ventajas | Desventajas | ¿Automatización? |
|---|---|---|---|---|
| Copiar y pegar manualmente | Uso rápido y puntual | Rápido, sin configuración | Sin automatización, problemas de formato | ❌No |
| Excel Desde la Web | Datos estructurados en vivo | Integrado, admite actualización | Limitado para tablas dinámicas | ❌No |
| Macro de VBA | Tareas repetidas en Excel | Automatiza la extracción, maneja combinaciones | Requiere conocimientos de VBA | ✅Sí |
| Python (BeautifulSoup + Spire.XLS) | Desarrolladores, tablas grandes/complejas | Control total, escalable, automatizable | Requiere codificación y dependencias | ✅Sí |
Consideraciones finales
El método que elija depende en gran medida de su caso de uso:
- Si solo necesita tomar una pequeña tabla ocasionalmente, copiar y pegar manualmente es lo más rápido.
- Si desea extraer datos estructurados de una página web que se actualiza con frecuencia, Excel Desde la Web es conveniente.
- Para los usuarios de negocios que trabajan en Excel a diario y desean automatización, una macro de VBA es ideal.
- Para los desarrolladores que manejan múltiples conjuntos de datos o estructuras HTML complejas, Python con BeautifulSoup y Spire.XLS proporciona la mayor flexibilidad y escalabilidad.
Al combinar estos métodos con su flujo de trabajo, puede ahorrar horas de esfuerzo manual y garantizar una extracción de datos más limpia y confiable en Excel.
Véase también
4 effektive Methoden, um HTML-Tabellen nach Excel zu extrahieren (manuell & automatisiert)
Inhaltsverzeichnis
Installation mit Pypi
pip install Spire.XLS
Verwandte Links
Überblick
Das Extrahieren von HTML-Tabellen in Excel ist eine häufige Anforderung für Datenanalysten, Forscher, Entwickler und Geschäftsleute, die häufig mit strukturierten Webdaten arbeiten. HTML-Tabellen enthalten oft wertvolle Informationen wie Finanzberichte, Produktkataloge, Forschungsergebnisse oder Leistungsstatistiken. Die Übertragung dieser Daten in ein sauberes und nutzbares Format in Excel kann jedoch knifflig sein – insbesondere bei komplexen Tabellen mit verbundenen Zellen (rowspan, colspan), verschachtelten Kopfzeilen oder großen Datenmengen.
Glücklicherweise gibt es mehrere Ansätze, um HTML-Tabellen in Excel-Dateien zu konvertieren. Diese Methoden reichen von schnellen, manuellen Kopier- und Einfügeaktionen, die für kleine Aufgaben geeignet sind, bis hin zu vollständig automatisierten Skripten mit VBA oder Python für große oder wiederkehrende Aufgaben.
In diesem Artikel werden wir vier effektive Methoden zur Extraktion von HTML-Tabellen nach Excel untersuchen:
- Manuelles Kopieren und Einfügen (einfachste Methode)
- Excel’s integrierte „Aus dem Web“-Funktion
- VBA-Makro (Excel-Automatisierung)
- Python (BeautifulSoup + Spire.XLS)
Schließlich vergleichen wir diese Ansätze in einer Zusammenfassungstabelle, um Ihnen bei der Auswahl der besten Methode für Ihren Anwendungsfall zu helfen.
Manuelles Kopieren und Einfügen (einfachste Methode)
Für kleine, einmalige Extraktionen ist die einfachste Option, direkt aus Ihrem Browser in Excel zu kopieren und einzufügen.
Schritte:
- Öffnen Sie die HTML-Seite in einem Browser (z. B. Chrome, Edge oder Firefox).
- Markieren Sie die Tabelle, die Sie extrahieren möchten.
- Kopieren Sie sie mit Strg+C (oder Rechtsklick → Kopieren).
- Öffnen Sie Excel und fügen Sie sie mit Strg+V ein.
Vorteile:
- Extrem einfach – keine Einrichtung oder Programmierung erforderlich.
- Funktioniert sofort für kleine, saubere Tabellen.
Nachteile:
- Manueller Prozess – mühsam und ineffizient bei häufigen oder großen Datenmengen.
- Behält nicht immer verbundene Zellen oder Formatierungen bei.
- Kann dynamische (JavaScript-gerenderte) Tabellen nicht zuverlässig handhaben.
Wann verwenden: Am besten geeignet für kleine Tabellen, Ad-hoc-Datenerfassung oder schnelle Tests.
Excel’s integrierte „Aus dem Web“-Funktion
Excel enthält ein leistungsstarkes „Daten abrufen und transformieren“-Tool (früher Power Query), mit dem Benutzer Tabellen direkt von einer Webseite abrufen können.
Schritte:
- Öffnen Sie Excel.
- Gehen Sie zu Daten → Aus dem Web.
- Geben Sie die URL der Webseite ein, die die Tabelle enthält.
- Excel zeigt die erkannten Tabellen an; wählen Sie die gewünschte aus.
- Laden Sie die Daten in Ihr Arbeitsblatt.
Vorteile:
- Direkte Integration in Excel – keine externen Tools erforderlich.
- Funktioniert gut für strukturierte HTML-Tabellen.
- Unterstützt die Aktualisierung – kann aktualisierte Daten aus derselben Quelle erneut abrufen.
Nachteile:
- Begrenzte Unterstützung für dynamische oder JavaScript-gerenderte Inhalte.
- Erkennt manchmal komplexe Tabellen nicht.
- Erfordert Internetzugang und eine gültige URL (nicht für lokale HTML-Dateien, es sei denn, sie werden manuell importiert).
Wann verwenden: Am besten für Analysten, die live strukturierte Daten von Websites abrufen, die regelmäßig aktualisiert werden.
VBA-Makro (Excel-Automatisierung)
Für Benutzer, die häufig HTML-Tabellen extrahieren und mehr Kontrolle wünschen, bietet VBA (Visual Basic for Applications) eine hervorragende Lösung. Mit VBA können Sie Tabellen von einer URL abrufen und verbundene Zellen korrekt verarbeiten, was mit einfachem Kopieren und Einfügen nicht möglich ist.
Schritte:
- Starten Sie Microsoft Excel.
- Drücken Sie Alt + F11, um den VBA-Editor zu öffnen.
- Klicken Sie mit der rechten Maustaste auf den Projektexplorer → Einfügen → Modul.
- Fügen Sie den bereitgestellten VBA-Code ein.
- Schließen Sie den VBA-Editor.
- Drücken Sie Alt + F8, wählen Sie den Makronamen aus und klicken Sie auf Ausführen.
Beispiel-VBA-Code:
Sub ExtractHTMLTableWithProperMerging()
    Dim html As Object, tables As Object, table As Object, row As Object, cell As Object
    Dim ws As Worksheet
    Dim iRow As Long, iCol As Long, realCol As Long
    Dim url As String
    Dim colspan As Integer, rowspan As Integer
    Dim cellTracker() As Boolean ' Belegte Zellen verfolgen

    ' Zielarbeitsblatt festlegen
    Set ws = ThisWorkbook.Sheets("Sheet1")
    ws.Cells.ClearContents
    ws.Cells.UnMerge ' Alle vorhandenen verbundenen Zellen löschen

    ' URL-Eingabe abrufen
    url = InputBox("Geben Sie die Webseiten-URL ein:", "HTML-Tabellen-Extraktor")
    If url = "" Then Exit Sub

    ' HTML laden
    Set html = CreateObject("htmlfile")
    With CreateObject("MSXML2.XMLHTTP")
        .Open "GET", url, False
        .send
        html.body.innerHTML = .responseText
    End With

    ' Erste Tabelle abrufen (Index bei Bedarf ändern)
    Set tables = html.getElementsByTagName("table")
    If tables.Length = 0 Then
        MsgBox "Keine Tabellen gefunden!", vbExclamation
        Exit Sub
    End If
    Set table = tables(0)

    ' Zell-Tracker-Array initialisieren
    Dim maxRows As Long, maxCols As Long
    maxRows = table.Rows.Length
    maxCols = 0
    For Each row In table.Rows
        If row.Cells.Length > maxCols Then maxCols = row.Cells.Length
    Next
    ReDim cellTracker(1 To maxRows, 1 To maxCols)

    ' Tabelle verarbeiten
    iRow = 1
    For Each row In table.Rows
        realCol = 1 ' Tatsächliche Spaltenposition unter Berücksichtigung von Rowspans verfolgen

        ' Erste verfügbare Spalte in dieser Zeile finden
        While realCol <= maxCols And cellTracker(iRow, realCol)
            realCol = realCol + 1
        Wend

        iCol = 1 ' Logische Spaltenposition verfolgen
        For Each cell In row.Cells
            ' Zusammenführungsattribute abrufen
            colspan = 1
            rowspan = 1
            On Error Resume Next ' Falls Attribute nicht existieren
            colspan = cell.colspan
            rowspan = cell.rowspan
            On Error GoTo 0

            ' Bereits belegte Zellen überspringen (durch Rowspan von oben)
            While realCol <= maxCols And cellTracker(iRow, realCol)
                realCol = realCol + 1
            Wend

            If realCol > maxCols Then Exit For

            ' Wert schreiben
            ws.Cells(iRow, realCol).Value = cell.innerText

            ' Alle Zellen markieren, die von dieser Zelle belegt werden
            Dim r As Long, c As Long
            For r = iRow To iRow + rowspan - 1
                For c = realCol To realCol + colspan - 1
                    If r <= maxRows And c <= maxCols Then
                        cellTracker(r, c) = True
                    End If
                Next c
            Next r

            ' Zellen bei Bedarf verbinden
            If colspan > 1 Or rowspan > 1 Then
                With ws.Range(ws.Cells(iRow, realCol), ws.Cells(iRow + rowspan - 1, realCol + colspan - 1))
                    .Merge
                    .HorizontalAlignment = xlCenter
                    .VerticalAlignment = xlCenter
                End With
            End If

            realCol = realCol + colspan
            iCol = iCol + 1
        Next cell
        iRow = iRow + 1
    Next row

    ' Formatierung
    ws.UsedRange.Columns.AutoFit
    ws.UsedRange.Borders.Weight = xlThin
    MsgBox "Tabelle mit korrekter Zusammenführung extrahiert!", vbInformation
End Sub
Vorteile:
- Läuft vollständig in Excel – keine externen Tools erforderlich.
- Behandelt komplexe Tabellen mit verbundenen Zellen.
- Kann für mehrere Tabellen oder geplante Ausführungen angepasst werden.
Nachteile:
- Einrichtung erfordert Kenntnisse in VBA.
- Kann JavaScript-gerenderte Daten nicht ohne zusätzliche Schritte verarbeiten.
- Funktioniert nur in der Desktop-Version von Excel (nicht in Excel Online).
Wann verwenden: Perfekt für Benutzer, die regelmäßig ähnliche Tabellen extrahieren und eine Ein-Klick-Lösung wünschen.
Python (BeautifulSoup & Spire.XLS)
Für Entwickler oder Power-User bietet Python die flexibelste, skalierbarste und automatisierteste Lösung. Mit Bibliotheken wie BeautifulSoup zum Parsen von HTML und Spire.XLS for Python für die Excel-Bearbeitung können Sie Tabellen programmgesteuert abrufen, bereinigen und mit voller Kontrolle exportieren.
Schritte:
- Installieren Sie Python (3.8+ empfohlen).
- Erstellen Sie ein neues Projekt in Ihrer IDE (z. B. VS Code, PyCharm).
- Installieren Sie die Abhängigkeiten:
pip install requests beautifulsoup4 spire.xls
- Kopieren und führen Sie das folgende Skript aus.
Python-Code:
import requests

from bs4 import BeautifulSoup
from spire.xls import Workbook, ExcelVersion

# HTML-String von der URL abrufen
response = requests.get("https://cdn.e-iceblue.com/resource/sample.html")
html = response.text

# HTML parsen
soup = BeautifulSoup(html, "html.parser")
table = soup.find("table")  # Die erste Tabelle abrufen

# Excel initialisieren
workbook = Workbook()
sheet = workbook.Worksheets[0]

# Verbundene Zellen verfolgen, um sie später zu überspringen
skip_cells = set()

# Durch HTML-Zeilen und -Zellen iterieren
for row_idx, row in enumerate(table.find_all("tr")):
    col_idx = 1  # Excel-Spalten beginnen bei 1
    for cell in row.find_all(["th", "td"]):
        # Bereits verbundene Zellen überspringen
        while (row_idx + 1, col_idx) in skip_cells:
            col_idx += 1

        # Colspan/Rowspan-Werte abrufen (Standardwert 1, falls nicht vorhanden)
        colspan = int(cell.get("colspan", 1))
        rowspan = int(cell.get("rowspan", 1))

        # Zellenwert in Excel schreiben
        sheet.Range[row_idx + 1, col_idx].Text = cell.get_text(strip=True)

        # Zellen verbinden, wenn Colspan/Rowspan > 1
        if colspan > 1 or rowspan > 1:
            end_row = row_idx + rowspan
            end_col = col_idx + colspan - 1
            sheet.Range[row_idx + 1, col_idx, end_row, end_col].Merge()

            # Verbundene Zellen zum Überspringen markieren
            for r in range(row_idx + 1, end_row + 1):
                for c in range(col_idx, end_col + 1):
                    if r != row_idx + 1 or c != col_idx:  # Die Hauptzelle überspringen
                        skip_cells.add((r, c))

        col_idx += colspan

# Spaltenbreite im gesamten genutzten Bereich automatisch anpassen
sheet.AllocatedRange.AutoFitColumns()

# In Excel speichern
workbook.SaveToFile("TableToExcel.xlsx", ExcelVersion.Version2016)
workbook.Dispose()
Vorteile:
- Volle Kontrolle – kann Daten parsen, bereinigen und transformieren.
- Behandelt verbundene Zellen korrekt.
- Leicht skalierbar für mehrere Tabellen oder Websites.
- Automatisierbar für geplante Aufgaben oder Stapelverarbeitungen.
Nachteile:
- Erfordert Python-Installation und grundlegende Programmierkenntnisse.
- Mehr Einrichtungsaufwand als bei integrierten Excel-Lösungen.
- Externe Abhängigkeiten (BeautifulSoup, Spire.XLS).
Wann verwenden: Am besten für Entwickler oder fortgeschrittene Benutzer, die regelmäßig große oder komplexe Tabellen extrahieren.
Ausgabe:
Um die visuelle Attraktivität des generierten Excel-Arbeitsblatts in Python zu verbessern, können Sie Stile auf Zellen oder Arbeitsblätter in Excel anwenden.
Zusammenfassungstabelle: Beste Methode nach Anwendungsfall
| Methode | Am besten geeignet für | Vorteile | Nachteile | Automatisierung? |
|---|---|---|---|---|
| Manuelles Kopieren & Einfügen | Schnelle, einmalige Verwendung | Schnell, keine Einrichtung | Keine Automatisierung, Formatierungsprobleme | ❌Nein |
| Excel aus dem Web | Live strukturierte Daten | Integriert, unterstützt Aktualisierung | Begrenzt für dynamische Tabellen | ❌Nein |
| VBA-Makro | Wiederholte Aufgaben in Excel | Automatisiert die Extraktion, behandelt Zusammenführungen | Erfordert VBA-Kenntnisse | ✅Ja |
| Python (BeautifulSoup + Spire.XLS) | Entwickler, große/komplexe Tabellen | Volle Kontrolle, skalierbar, automatisierbar | Erfordert Programmierung & Abhängigkeiten | ✅Ja |
Abschließende Gedanken
Die Methode, die Sie wählen, hängt stark von Ihrem Anwendungsfall ab:
- Wenn Sie nur gelegentlich eine kleine Tabelle benötigen, ist das manuelle Kopieren und Einfügen am schnellsten.
- Wenn Sie strukturierte Daten von einer Webseite abrufen möchten, die häufig aktualisiert wird, ist Excel aus dem Web praktisch.
- Für Geschäftsanwender, die täglich in Excel arbeiten und eine Automatisierung wünschen, ist ein VBA-Makro ideal.
- Für Entwickler, die mehrere Datensätze oder komplexe HTML-Strukturen verarbeiten, bietet Python mit BeautifulSoup und Spire.XLS die größte Flexibilität und Skalierbarkeit.
Durch die Kombination dieser Methoden mit Ihrem Arbeitsablauf können Sie Stunden manueller Arbeit sparen und eine sauberere, zuverlässigere Datenextraktion nach Excel gewährleisten.
Siehe auch
4 эффективных метода извлечения HTML-таблиц в Excel (вручную и автоматически)
Оглавление
Установка через Pypi
pip install Spire.XLS
Похожие ссылки
Обзор
Извлечение HTML-таблиц в Excel является частым требованием для аналитиков данных, исследователей, разработчиков и бизнес-профессионалов, которые часто работают со структурированными веб-данными. HTML-таблицы часто содержат ценную информацию, такую как финансовые отчеты, каталоги продуктов, результаты исследований или статистику производительности. Однако перенос этих данных в Excel в чистом и удобном для использования формате может быть сложной задачей, особенно при работе со сложными таблицами, которые включают объединенные ячейки (rowspan, colspan), вложенные заголовки или большие наборы данных.
К счастью, существует несколько подходов к преобразованию HTML-таблиц в файлы Excel. Эти методы варьируются от быстрых ручных действий копирования-вставки, подходящих для небольших задач, до полностью автоматизированных скриптов с использованием VBA или Python для крупномасштабных или повторяющихся задач.
В этой статье мы рассмотрим четыре эффективных метода извлечения HTML-таблиц в Excel:
- Ручное копирование и вставка (самый простой метод)
- Встроенная функция Excel «Из Интернета»
- Макрос VBA (автоматизация Excel)
- Python (BeautifulSoup + Spire.XLS)
Наконец, мы сравним эти подходы в сводной таблице, чтобы помочь вам выбрать лучший метод в зависимости от вашего варианта использования.
Ручное копирование и вставка (самый простой метод)
Для небольших, одноразовых извлечений самым простым вариантом является использование копирования и вставки непосредственно из браузера в Excel.
Шаги:
- Откройте HTML-страницу в браузере (например, Chrome, Edge или Firefox).
- Выделите таблицу, которую хотите извлечь.
- Скопируйте ее с помощью Ctrl+C (или щелкните правой кнопкой мыши → Копировать).
- Откройте Excel и вставьте с помощью Ctrl+V.
Плюсы:
- Чрезвычайно просто — не требуется настройка или программирование.
- Мгновенно работает для небольших, чистых таблиц.
Минусы:
- Ручной процесс — утомительный и неэффективный для частых или больших наборов данных.
- Не всегда сохраняет объединенные ячейки или форматирование.
- Не может надежно обрабатывать динамические (отрисованные с помощью JavaScript) таблицы.
Когда использовать: лучше всего подходит для небольших таблиц, сбора данных по запросу или быстрого тестирования.
Встроенная функция Excel «Из Интернета»
Excel включает мощный инструмент «Получить и преобразовать данные» (ранее Power Query), который позволяет пользователям извлекать таблицы непосредственно с веб-страницы.
Шаги:
- Откройте Excel.
- Перейдите в Данные → Из Интернета.
- Введите URL-адрес веб-страницы, содержащей таблицу.
- Excel отобразит обнаруженные таблицы; выберите ту, которая вам нужна.
- Загрузите данные на свой рабочий лист.
Плюсы:
- Прямая интеграция в Excel — не требуются внешние инструменты.
- Хорошо работает со структурированными HTML-таблицами.
- Поддерживает обновление — может повторно извлекать обновленные данные из того же источника.
Минусы:
- Ограниченная поддержка динамического или отрисованного с помощью JavaScript контента.
- Иногда не удается обнаружить сложные таблицы.
- Требуется доступ в Интернет и действительный URL-адрес (не для локальных HTML-файлов, если они не импортированы вручную).
Когда использовать: лучше всего для аналитиков, извлекающих живые, структурированные данные с веб-сайтов, которые регулярно обновляются.
Макрос VBA (автоматизация Excel)
Для пользователей, которые часто извлекают HTML-таблицы и хотят большего контроля, VBA (Visual Basic for Applications) предоставляет отличное решение. VBA позволяет извлекать таблицы с URL-адреса и правильно обрабатывать объединенные ячейки, с чем не справляется простое копирование-вставка.
Шаги:
- Запустите Microsoft Excel.
- Нажмите Alt + F11, чтобы открыть редактор VBA.
- Щелкните правой кнопкой мыши в проводнике проекта → Вставить → Модуль.
- Вставьте предоставленный код VBA.
- Закройте редактор VBA.
- Нажмите Alt + F8, выберите имя макроса и нажмите Выполнить.
Пример кода VBA:
Sub ExtractHTMLTableWithProperMerging()
    Dim html As Object, tables As Object, table As Object, row As Object, cell As Object
    Dim ws As Worksheet
    Dim iRow As Long, iCol As Long, realCol As Long
    Dim url As String
    Dim colspan As Integer, rowspan As Integer
    Dim cellTracker() As Boolean ' Отслеживание занятых ячеек

    ' Установить целевой рабочий лист
    Set ws = ThisWorkbook.Sheets("Sheet1")
    ws.Cells.ClearContents
    ws.Cells.UnMerge ' Очистить все существующие объединенные ячейки

    ' Получить ввод URL
    url = InputBox("Введите URL веб-страницы:", "Извлечение HTML-таблицы")
    If url = "" Then Exit Sub

    ' Загрузить HTML
    Set html = CreateObject("htmlfile")
    With CreateObject("MSXML2.XMLHTTP")
        .Open "GET", url, False
        .send
        html.body.innerHTML = .responseText
    End With

    ' Получить первую таблицу (измените индекс при необходимости)
    Set tables = html.getElementsByTagName("table")
    If tables.Length = 0 Then
        MsgBox "Таблицы не найдены!", vbExclamation
        Exit Sub
    End If
    Set table = tables(0)

    ' Инициализировать массив отслеживания ячеек
    Dim maxRows As Long, maxCols As Long
    maxRows = table.Rows.Length
    maxCols = 0
    For Each row In table.Rows
        If row.Cells.Length > maxCols Then maxCols = row.Cells.Length
    Next
    ReDim cellTracker(1 To maxRows, 1 To maxCols)

    ' Обработать таблицу
    iRow = 1
    For Each row In table.Rows
        realCol = 1 ' Отслеживать фактическую позицию столбца с учетом rowspan

        ' Найти первый доступный столбец в этой строке
        While realCol <= maxCols And cellTracker(iRow, realCol)
            realCol = realCol + 1
        Wend

        iCol = 1 ' Отслеживать логическую позицию столбца
        For Each cell In row.Cells
            ' Получить атрибуты объединения
            colspan = 1
            rowspan = 1
            On Error Resume Next ' В случае, если атрибуты не существуют
            colspan = cell.colspan
            rowspan = cell.rowspan
            On Error GoTo 0

            ' Пропустить уже занятые ячейки (из rowspan выше)
            While realCol <= maxCols And cellTracker(iRow, realCol)
                realCol = realCol + 1
            Wend

            If realCol > maxCols Then Exit For

            ' Записать значение
            ws.Cells(iRow, realCol).Value = cell.innerText

            ' Отметить все ячейки, которые будут заняты этой ячейкой
            Dim r As Long, c As Long
            For r = iRow To iRow + rowspan - 1
                For c = realCol To realCol + colspan - 1
                    If r <= maxRows And c <= maxCols Then
                        cellTracker(r, c) = True
                    End If
                Next c
            Next r

            ' Объединить ячейки при необходимости
            If colspan > 1 Or rowspan > 1 Then
                With ws.Range(ws.Cells(iRow, realCol), ws.Cells(iRow + rowspan - 1, realCol + colspan - 1))
                    .Merge
                    .HorizontalAlignment = xlCenter
                    .VerticalAlignment = xlCenter
                End With
            End If

            realCol = realCol + colspan
            iCol = iCol + 1
        Next cell
        iRow = iRow + 1
    Next row

    ' Форматирование
    ws.UsedRange.Columns.AutoFit
    ws.UsedRange.Borders.Weight = xlThin
    MsgBox "Таблица извлечена с правильным объединением!", vbInformation
End Sub
Плюсы:
- Работает полностью в Excel — не требуются внешние инструменты.
- Обрабатывает сложные таблицы с объединенными ячейками.
- Может быть настроен для нескольких таблиц или запланированного выполнения.
Минусы:
- Настройка требует знания VBA.
- Не может обрабатывать данные, отрисованные с помощью JavaScript, без дополнительных шагов.
- Работает только в настольной версии Excel (не в Excel Online).
Когда использовать: идеально подходит для пользователей, которые регулярно извлекают похожие таблицы и хотят получить решение в один клик.
Python (BeautifulSoup и Spire.XLS)
Для разработчиков или опытных пользователей Python предоставляет наиболее гибкое, масштабируемое и автоматизированное решение. С помощью таких библиотек, как BeautifulSoup для парсинга HTML и Spire.XLS for Python для работы с Excel, вы можете программно извлекать, очищать и экспортировать таблицы с полным контролем.
Шаги:
- Установите Python (рекомендуется 3.8+).
- Создайте новый проект в вашей IDE (например, VS Code, PyCharm).
- Установите зависимости:
pip install requests beautifulsoup4 spire.xls
- Скопируйте и запустите следующий скрипт.
Код на Python:
import requests

from bs4 import BeautifulSoup
from spire.xls import Workbook, ExcelVersion

# Получить строку HTML с URL-адреса
response = requests.get("https://cdn.e-iceblue.com/resource/sample.html")
html = response.text

# Разобрать HTML
soup = BeautifulSoup(html, "html.parser")
table = soup.find("table")  # Получить первую таблицу

# Инициализировать Excel
workbook = Workbook()
sheet = workbook.Worksheets[0]

# Отслеживать объединенные ячейки, чтобы пропустить их позже
skip_cells = set()

# Перебрать строки и ячейки HTML
for row_idx, row in enumerate(table.find_all("tr")):
    col_idx = 1  # Столбцы Excel начинаются с 1
    for cell in row.find_all(["th", "td"]):
        # Пропустить уже объединенные ячейки
        while (row_idx + 1, col_idx) in skip_cells:
            col_idx += 1

        # Получить значения colspan/rowspan (по умолчанию 1, если отсутствуют)
        colspan = int(cell.get("colspan", 1))
        rowspan = int(cell.get("rowspan", 1))

        # Записать значение ячейки в Excel
        sheet.Range[row_idx + 1, col_idx].Text = cell.get_text(strip=True)

        # Объединить ячейки, если colspan/rowspan > 1
        if colspan > 1 or rowspan > 1:
            end_row = row_idx + rowspan
            end_col = col_idx + colspan - 1
            sheet.Range[row_idx + 1, col_idx, end_row, end_col].Merge()

            # Отметить объединенные ячейки для пропуска
            for r in range(row_idx + 1, end_row + 1):
                for c in range(col_idx, end_col + 1):
                    if r != row_idx + 1 or c != col_idx:  # Пропустить основную ячейку
                        skip_cells.add((r, c))

        col_idx += colspan

# Автоматически подогнать ширину столбцов во всем используемом диапазоне
sheet.AllocatedRange.AutoFitColumns()

# Сохранить в Excel
workbook.SaveToFile("TableToExcel.xlsx", ExcelVersion.Version2016)
workbook.Dispose()
Плюсы:
- Полный контроль — можно анализировать, очищать и преобразовывать данные.
- Правильно обрабатывает объединенные ячейки.
- Легко масштабируется на несколько таблиц или веб-сайтов.
- Автоматизируется для запланированных задач или пакетных заданий.
Минусы:
- Требуется установка Python и базовые знания программирования.
- Больше настроек, чем у встроенных решений Excel.
- Внешние зависимости (BeautifulSoup, Spire.XLS).
Когда использовать: лучше всего для разработчиков или продвинутых пользователей, регулярно извлекающих большие или сложные таблицы.
Вывод:
Чтобы улучшить визуальную привлекательность созданного листа Excel на Python, вы можете применять стили к ячейкам или рабочим листам в Excel.
Сводная таблица: лучший метод в зависимости от варианта использования
| Метод | Лучше всего подходит для | Плюсы | Минусы | Автоматизация? |
|---|---|---|---|---|
| Ручное копирование и вставка | Быстрое, одноразовое использование | Быстро, без настроек | Нет автоматизации, проблемы с форматированием | ❌Нет |
| Excel из Интернета | Живые структурированные данные | Интегрировано, поддерживает обновление | Ограничено для динамических таблиц | ❌Нет |
| Макрос VBA | Повторяющиеся задачи в Excel | Автоматизирует извлечение, обрабатывает объединения | Требует знания VBA | ✅Да |
| Python (BeautifulSoup + Spire.XLS) | Разработчики, большие/сложные таблицы | Полный контроль, масштабируемость, автоматизация | Требует программирования и зависимостей | ✅Да |
Заключительные мысли
Метод, который вы выберете, во многом зависит от вашего варианта использования:
- Если вам нужно лишь изредка скопировать небольшую таблицу, ручное копирование и вставка — самый быстрый способ.
- Если вы хотите извлекать структурированные данные с веб-страницы, которая часто обновляется, удобен Excel из Интернета.
- Для бизнес-пользователей, которые ежедневно работают в Excel и хотят автоматизации, идеальным является макрос VBA.
- Для разработчиков, работающих с несколькими наборами данных или сложными структурами HTML, Python с BeautifulSoup и Spire.XLS обеспечивает наибольшую гибкость и масштабируемость.
Комбинируя эти методы с вашим рабочим процессом, вы можете сэкономить часы ручной работы и обеспечить более чистое и надежное извлечение данных в Excel.