
Knowledgebase (2417)
Children categories
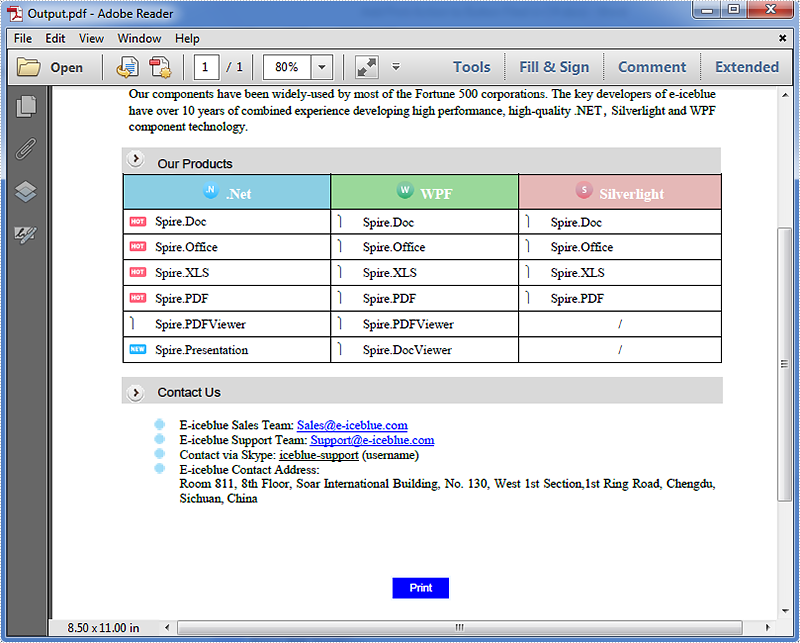
Adding print button to PDF document is possible in Spire.PDF, when the button is clicked, the print dialog will be opened. In this tutorial, I'm going to show you how to add a print button to an existing pdf document using Spire.PDF.
To accomplish the task, first you need to create an instance of the PdfButtonField class. This class also allows you to define the appearance of the button. For instance, you can set text, color of text, background color, border color etc. of the button. Second you need to add the print action to the button by calling the AddPrintAction() method. At last, add the button to the document and save the document to file. The following code example explains the same.
Code snippets:
Step 1: Load the PDF document and enable form creation.
PdfDocument doc = new PdfDocument("Input.pdf");
doc.AllowCreateForm = true;
Step 2: Get the first page.
PdfPageBase page = doc.Pages[0];
Step 3: Create a PdfButtonField instance and set properties for the button.
PdfButtonField button = new PdfButtonField(page, "Print");
button.Bounds = new RectangleF(280, 600, 50, 20);
button.BorderColor = new PdfRGBColor(Color.AliceBlue);
button.BorderStyle = PdfBorderStyle.Solid;
button.ForeColor = new PdfRGBColor(Color.White);
button.BackColor = new PdfRGBColor(Color.Blue);
button.ToolTip = "Print";
button.Font = new PdfFont(PdfFontFamily.Helvetica, 9f);
Step 4: Add print action to the button.
button.AddPrintAction();
Step 5: Add the button to the document.
doc.Form.Fields.Add(button);
Step 6: Save the document.
doc.SaveToFile("Output.pdf");
The resultant document looks as follows:
Full code:
using System.Drawing;
using Spire.Pdf;
using Spire.Pdf.Fields;
using Spire.Pdf.Graphics;

namespace Add_print_button
{
    class Program
    {
        static void Main(string[] args)
        {
            //Load the PDF document
            PdfDocument doc = new PdfDocument("Input.pdf");
            //Enable form creation
            doc.AllowCreateForm = true;
            //Get the first page
            PdfPageBase page = doc.Pages[0];

            //Create a PdfButtonField instance
            PdfButtonField button = new PdfButtonField(page, "Print");
            //Set button properties
            button.Bounds = new RectangleF(280, 600, 50, 20);
            button.BorderColor = new PdfRGBColor(Color.AliceBlue);
            button.BorderStyle = PdfBorderStyle.Solid;
            button.ForeColor = new PdfRGBColor(Color.White);
            button.BackColor = new PdfRGBColor(Color.Blue);
            button.ToolTip = "Print";
            button.Font = new PdfFont(PdfFontFamily.Helvetica, 9f);

            //Add print action to the button
            button.AddPrintAction();

            //Add the button to document
            doc.Form.Fields.Add(button);

            //Save the document
            doc.SaveToFile("Output.pdf");
        }
    }
}
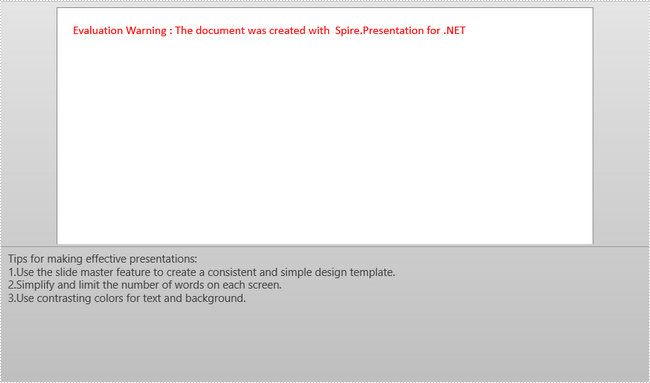
When creating a speaker notes in a presentation slide, you can add more than one item or paragraph in notes and display them within a numbered list. In this tutorial, we’ll show you how to add a numbered list to notes using Spire.Presentation in C#.
Step 1: Initialize an instance of Presentation and get the first slide.
Presentation ppt = new Presentation();
ISlide slide = ppt.Slides[0];
Step 2: Add a new notes slide in the specified slide.
NotesSlide notesSlide = slide.AddNotesSlide();
Step 3: Add a new paragraph with the text to speaker notes.
TextParagraph paragraph = new TextParagraph();
paragraph.Text = "Tips for making effective presentations:";
notesSlide.NotesTextFrame.Paragraphs.Append(paragraph);
Step 4: Add another paragraph with the text to notes, set the bullet type of the paragraph as numbered, and set the numbered style as Arabic number following by period.
paragraph = new TextParagraph();
paragraph.Text = "Use the slide master feature to create a consistent and simple design template.";
notesSlide.NotesTextFrame.Paragraphs.Append(paragraph);
notesSlide.NotesTextFrame.Paragraphs[1].BulletType = TextBulletType.Numbered;
notesSlide.NotesTextFrame.Paragraphs[1].BulletStyle = NumberedBulletStyle.BulletArabicPeriod;
Step 5: Repeat step 4 to add many more numbered paragraphs to notes.
paragraph = new TextParagraph();
paragraph.Text = "Simplify and limit the number of words on each screen.";
notesSlide.NotesTextFrame.Paragraphs.Append(paragraph);
notesSlide.NotesTextFrame.Paragraphs[2].BulletType = TextBulletType.Numbered;
notesSlide.NotesTextFrame.Paragraphs[2].BulletStyle = NumberedBulletStyle.BulletArabicPeriod;

paragraph = new TextParagraph();
paragraph.Text = "Use contrasting colors for text and background.";
notesSlide.NotesTextFrame.Paragraphs.Append(paragraph);
notesSlide.NotesTextFrame.Paragraphs[3].BulletType = TextBulletType.Numbered;
notesSlide.NotesTextFrame.Paragraphs[3].BulletStyle = NumberedBulletStyle.BulletArabicPeriod;
Step 6: Save the file.
ppt.SaveToFile("Output.pptx", FileFormat.Pptx2013);
Output:
Full Code:
using Spire.Presentation;
namespace AddNumberedList
{

    class Program
    {

        static void Main(string[] args)
        {
            Presentation ppt = new Presentation();
            ISlide slide = ppt.Slides[0];

            NotesSlide notesSlide = slide.AddNotesSlide();

            TextParagraph paragraph = new TextParagraph();
            paragraph.Text = "Tips for making effective presentations:";
            notesSlide.NotesTextFrame.Paragraphs.Append(paragraph);

            paragraph = new TextParagraph();
            paragraph.Text = "Use the slide master feature to create a consistent and simple design template.";
            notesSlide.NotesTextFrame.Paragraphs.Append(paragraph);
            notesSlide.NotesTextFrame.Paragraphs[1].BulletType = TextBulletType.Numbered;
            notesSlide.NotesTextFrame.Paragraphs[1].BulletStyle = NumberedBulletStyle.BulletArabicPeriod;

            paragraph = new TextParagraph();
            paragraph.Text = "Simplify and limit the number of words on each screen.";
            notesSlide.NotesTextFrame.Paragraphs.Append(paragraph);
            notesSlide.NotesTextFrame.Paragraphs[2].BulletType = TextBulletType.Numbered;
            notesSlide.NotesTextFrame.Paragraphs[2].BulletStyle = NumberedBulletStyle.BulletArabicPeriod;

            paragraph = new TextParagraph();
            paragraph.Text = "Use contrasting colors for text and background.";
            notesSlide.NotesTextFrame.Paragraphs.Append(paragraph);
            notesSlide.NotesTextFrame.Paragraphs[3].BulletType = TextBulletType.Numbered;
            notesSlide.NotesTextFrame.Paragraphs[3].BulletStyle = NumberedBulletStyle.BulletArabicPeriod;

            ppt.SaveToFile("Output.pptx", FileFormat.Pptx2013);

        }

    }
}
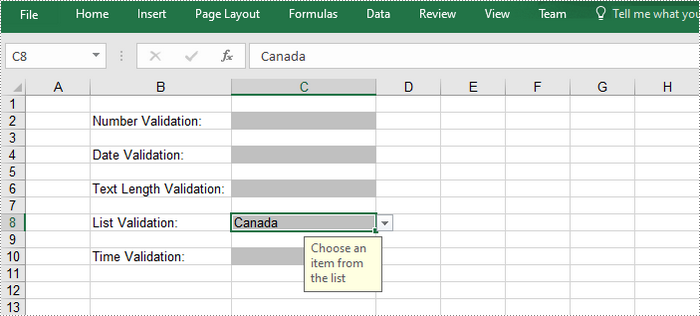
The data validation feature in Excel allows the user to control what data can be entered into a cell. For example, you could use data validation to make sure a numeric entry is between 1 and 5, make sure a text entry is less than 20 characters, or make sure the value entered in a cell is from a predefined list. In this article, you will learn how to apply or remove data validation in Excel in C# and VB.NET using Spire.XLS for .NET.
Install Spire.XLS for .NET
To begin with, you need to add the DLL files included in the Spire.XLS for .NET package as references in your .NET project. The DLL files can be either downloaded from this link or installed via NuGet.
PM> Install-Package Spire.XLS
Apply Data Validation to Excel Cells
The following are the steps to add various types of data validation to cells using Spire.XLS for .NET.
- Create a Workbook object
- Get the first worksheet through Workbook.Worksheets[index] property.
- Get a specific cell through Worksheet.Range property.
- Set the data type allowed in the cell through CellRange.DataValidation.AllowType property. You can select Integer, Time, Date, TextLength, Decimal, etc. as the data type.
- Set the comparison operator through CellRange.DataValiation.CompareOperator property. The comparison operators include Between, NotBetween, Less, Greater, and Equal.
- Set one or two formulas for the data validation through CellRange.DataValidation.Formula1 and CellRange.DataValidation.Formula2 properties.
- Set the input prompt through CellRange.DataValidation.InputMessage property.
- Save the workbook to an Excel file using Workbook.SaveToFile() method.
- C#
- VB.NET
using System;
using Spire.Xls;

namespace ApplyDataValidation
{
    class Program
    {
        static void Main(string[] args)
        {
            //Create a Workbook object
            Workbook workbook = new Workbook();

            //Get the first worksheet
            Worksheet sheet = workbook.Worksheets[0];

            //Insert text in cells
            sheet.Range["B2"].Text = "Number Validation:";
            sheet.Range["B4"].Text = "Date Validation:";
            sheet.Range["B6"].Text = "Text Length Validation:";
            sheet.Range["B8"].Text = "List Validation:";
            sheet.Range["B10"].Text = "Time Validation:";

            //Add a number validation to C2
            CellRange rangeNumber = sheet.Range["C2"];
            rangeNumber.DataValidation.AllowType = CellDataType.Integer;
            rangeNumber.DataValidation.CompareOperator = ValidationComparisonOperator.Between;
            rangeNumber.DataValidation.Formula1 = "1";
            rangeNumber.DataValidation.Formula2 = "10";
            rangeNumber.DataValidation.InputMessage = "Enter a number between 1 and 10";
            rangeNumber.Style.KnownColor = ExcelColors.Gray25Percent;

            //Add a date validation to C4
            CellRange rangeDate = sheet.Range["C4"];
            rangeDate.DataValidation.AllowType = CellDataType.Date;
            rangeDate.DataValidation.CompareOperator = ValidationComparisonOperator.Between;
            rangeDate.DataValidation.Formula1 = "1/1/2010";
            rangeDate.DataValidation.Formula2 = "12/31/2020";
            rangeDate.DataValidation.InputMessage = "Enter a date between 1/1/2010 and 12/31/2020";
            rangeDate.Style.KnownColor = ExcelColors.Gray25Percent;

            //Add a text length validation to C6
            CellRange rangeTextLength = sheet.Range["C6"];
            rangeTextLength.DataValidation.AllowType = CellDataType.TextLength;
            rangeTextLength.DataValidation.CompareOperator = ValidationComparisonOperator.LessOrEqual;
            rangeTextLength.DataValidation.Formula1 ="5";
            rangeTextLength.DataValidation.InputMessage = "Enter text lesser than 5 characters";
            rangeTextLength.Style.KnownColor = ExcelColors.Gray25Percent;

            //Apply a list validation to C8
            CellRange rangeList = sheet.Range["C8"];
            rangeList.DataValidation.Values = new String[] { "United States", "Canada", "United Kingdom", "Germany" };
            rangeList.DataValidation.IsSuppressDropDownArrow = false;
            rangeList.DataValidation.InputMessage ="Choose an item from the list";
            rangeList.Style.KnownColor =ExcelColors.Gray25Percent;

            //Apply a time validation to C10
            CellRange rangeTime = sheet.Range["C10"];
            rangeTime.DataValidation.AllowType = CellDataType.Time;
            rangeTime.DataValidation.CompareOperator = ValidationComparisonOperator.Between;
            rangeTime.DataValidation.Formula1 = "9:00";
            rangeTime.DataValidation.Formula2 = "12:00";
            rangeTime.DataValidation.InputMessage = "Enter a time between 9:00 and 12:00";
            rangeTime.Style.KnownColor = ExcelColors.Gray25Percent;

            //Auto fit width of column 2
            sheet.AutoFitColumn(2);

            //Set the width of column 3
            sheet.Columns[2].ColumnWidth = 20;

            //Save to file
            workbook.SaveToFile("ApplyDataValidation.xlsx", ExcelVersion.Version2016);
        }
    }
}
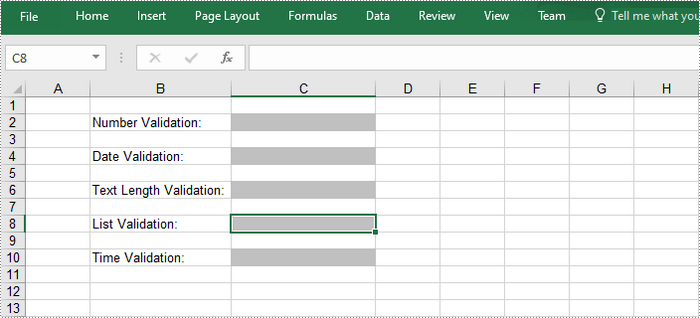
Remove Data Validation from Excel Cells
Below are the steps to remove data validation from the specified cell using Spire.XLS for .NET.
- Create a Workbook object.
- Load the Excel file containing data validation using Workbook.LoadFromFile() method.
- Get the first worksheet though Workbook.Worksheets[index] property.
- Create an array of rectangles, which is used to locate the cells where the validation will be removed.
- Remove the data validation from the selected cells using Worksheet.DVTable.Remove() method.
- Save the workbook to another Excel file using Workbook.SaveToFile() method.
- C#
- VB.NET
using Spire.Xls;
using System.Drawing;

namespace RemoveDataValidation
{
    class Program
    {
        static void Main(string[] args)
        {
            //Create a Workbook object
            Workbook workbook = new Workbook();

            //Load a sample Excel file
            workbook.LoadFromFile("C:\\Users\\Administrator\\Desktop\\ApplyDataValidation.xlsx");

            //Get the first worksheet
            Worksheet worksheet = workbook.Worksheets[0];

            //Create an array of rectangles, which is used to locate the ranges in worksheet
            Rectangle[] rectangles = new Rectangle[]{

                //one Rectangle(startColumnIndex, startRowIndex, endColumnIndex, endRowIndex) specifies a  cell range to remove data validation
                //the column or row index starts at 0
                new Rectangle(0, 0, 2, 9)
            };

            //Remove the data validation from the selected cells
            worksheet.DVTable.Remove(rectangles);

            //Save the workbook to an Excel file
            workbook.SaveToFile("RemoveDataValidation.xlsx");
        }
    }
}
Apply for a Temporary License
If you'd like to remove the evaluation message from the generated documents, or to get rid of the function limitations, please request a 30-day trial license for yourself.
