
Knowledgebase (2417)
Children categories
Spire.PDF allows getting and verifying a specific signature in a PDF file, now starts from version 3.8.82, Spire.PDF supports to get all certificates in a PDF signature. In this article, we will show you the steps of how to achieve this task by using Spire.PDF.
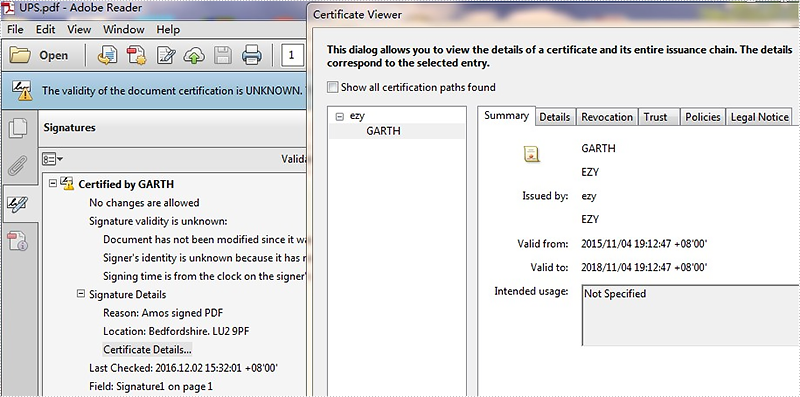
For demonstration, we used a template PDF file which contains two certificates:
Code snippets:
Step 1: Instantiate a PdfDocument object and load the PDF file.
PdfDocument doc = new PdfDocument();
doc.LoadFromFile("UPS.pdf");
Step 2: Create a List object.
List<PdfSignature> signatures = new List<PdfSignature>();
Step 3: Get all signatures from the PDF file and add them into the list object.
var form = (PdfFormWidget)doc.Form;
for (int i = 0; i < form.FieldsWidget.Count; ++i)
{
    var field = form.FieldsWidget[i] as PdfSignatureFieldWidget;
    if (field != null && field.Signature != null)
    {
        PdfSignature signature = field.Signature;
        signatures.Add(signature);
    }
}
Step 4: Get the first signature from the list, and then get all the certificates from the signature.
PdfSignature signatureOne = signatures[0];
X509Certificate2Collection collection = signatureOne.Certificates;
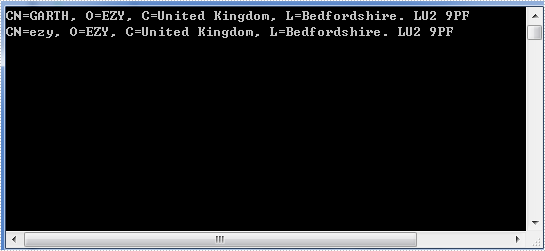
Effective screenshot:
Full code:
using System;
using System.Collections.Generic;
using System.Security.Cryptography.X509Certificates;
using Spire.Pdf;
using Spire.Pdf.Security;
using Spire.Pdf.Widget;

namespace Get_all_certificates_in_PDF_signature
{
    class Program
    {
        static void Main(string[] args)
        {
            PdfDocument doc = new PdfDocument();
            doc.LoadFromFile("UPS.pdf");
            List<PdfSignature> signatures = new List<PdfSignature>();
            var form = (PdfFormWidget)doc.Form;
            for (int i = 0; i < form.FieldsWidget.Count; ++i)
            {
                var field = form.FieldsWidget[i] as PdfSignatureFieldWidget;

                if (field != null && field.Signature != null)
                {
                    PdfSignature signature = field.Signature;
                    signatures.Add(signature);
                }
            }
            PdfSignature signatureOne = signatures[0];
            X509Certificate2Collection collection = signatureOne.Certificates;
            foreach (var certificate in collection)
            {
                Console.WriteLine(certificate.Subject);
            }
            Console.ReadKey();
        }
    }
}
How to set horizontal alignment for the text in table on presentation slides
2016-11-30 01:21:13 Written by KoohjiWith the help of Spire.Presentation, developers can set the horizontal alignment for the text on presentation slides easily. This article will focus on show you how to set the horizontal alignment for the text on the table of the presentation slides in C#. There are five options for the text alignment on the Spire.Presentation: Left, Right, Center, Justify and None.
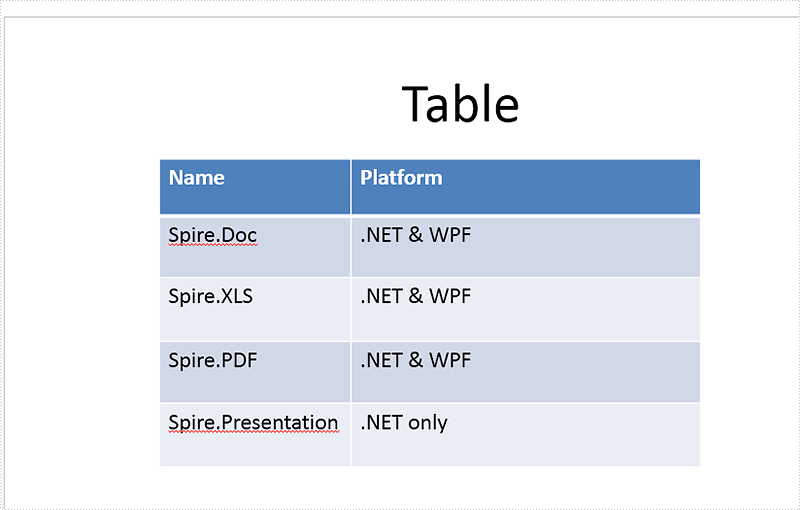
At first, please check a document with default alignment (Left) prepared. Then, different alignment styles will be applied for the different rows on the table.
Step 1: Create a presentation document and load the sample document from file.
Presentation presentation = new Presentation();
presentation.LoadFromFile("Sample.pptx",FileFormat.Pptx2010);
Step 2: Get the table from the sample document.
ITable table = null;

foreach (IShape shape in presentation.Slides[0].Shapes)
{
    if (shape is ITable)
    {
        table = (ITable)shape;
Step 3: Align text horizontally.
for (int i = 0; i < table.ColumnsList.Count; i++)
{

    table[i, 0].TextFrame.Paragraphs[0].Alignment = TextAlignmentType.Right;
    table[i, 1].TextFrame.Paragraphs[0].Alignment = TextAlignmentType.Center;
    table[i, 2].TextFrame.Paragraphs[0].Alignment = TextAlignmentType.Left;
    table[i, 3].TextFrame.Paragraphs[0].Alignment = TextAlignmentType.None;
    table[i, 4].TextFrame.Paragraphs[0].Alignment = TextAlignmentType.Justify;

}
Step 4: Save the document to file.
presentation.SaveToFile("tableresult.pptx", FileFormat.Pptx2010);
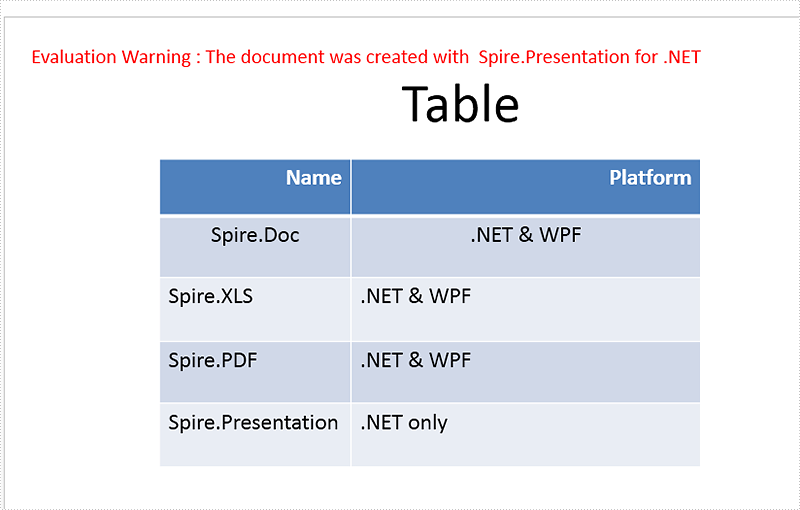
Effective screenshot after apply the horizontal alignment for the text on table:
Full codes of how to set horizontal alignment for the text on the presentation slide's table:
using Spire.Presentation;

namespace set_horizontal_alignment
{

    class Program
    {
        static void Main(string[] args)
        {

            Presentation presentation = new Presentation();
            presentation.LoadFromFile("Sample.pptx", FileFormat.Pptx2010);

            ITable table = null;

            foreach (IShape shape in presentation.Slides[0].Shapes)
            {
                if (shape is ITable)
                {
                    table = (ITable)shape;

                    for (int i = 0; i < table.ColumnsList.Count; i++)
                    {

                        table[i, 0].TextFrame.Paragraphs[0].Alignment = TextAlignmentType.Right;
                        table[i, 1].TextFrame.Paragraphs[0].Alignment = TextAlignmentType.Center;
                        table[i, 2].TextFrame.Paragraphs[0].Alignment = TextAlignmentType.Left;
                        table[i, 3].TextFrame.Paragraphs[0].Alignment = TextAlignmentType.None;
                        table[i, 4].TextFrame.Paragraphs[0].Alignment = TextAlignmentType.Justify;


                    }
                }
            }
            presentation.SaveToFile("tableresult.pptx", FileFormat.Pptx2010);
        }

    }
}
How to keep high quality image when convert XPS to PDF in C#
2016-11-24 08:27:52 Written by AdministratorWe have already had an article of showing how to convert the XPS files into PDF file. Starts from Spire.PDF V3.8.68, it newly supports to keep the high quality image on the resulted PDF file from the XPS document. Spire.PDF offers a property of pdf.UseHighQualityImage to set the image quality before loading the original XPS file. This article will focus on demonstrate how to save image with high quality for the conversion from XPS to PDF.
Here comes to the code snippets:
Step 1: Create a PDF instance.
PdfDocument pdf = new PdfDocument();
Step 2: Set the value of UseHighQualityImage as true to use the high quality image when convert XPS to PDF.
pdf.ConvertOptions.SetXpsToPdfOptions(true);
Step 3: Load the XPS document by use either the method of pdf.LoadFromFile() or pdf.LoadFromXPS().
pdf.LoadFromFile("Sample.xps",FileFormat.XPS);
Step 4: Save the document to file.
pdf.SaveToFile("result.pdf");
Effective screenshot of the high quality image after saving XPS as PDF file format:

Full codes:
using Spire.Pdf;

namespace ConvertXPStoPDF
{
    class Program
    {
        static void Main(string[] args)
        {
            PdfDocument pdf = new PdfDocument();

            pdf.ConvertOptions.SetXpsToPdfOptions(true);

            pdf.LoadFromFile("Sample.xps", FileFormat.XPS);
            //pdf.LoadFromXPS("Sample.xps");

            pdf.SaveToFile("result.pdf", FileFormat.PDF);
        }
    }
}
