
Knowledgebase (2417)
Children categories
With the help of Spire.XLS, developers can easily set the font for the text for Excel chart. We have already demonstrate how to set the font for TextBox in Excel Chart, this article will focus on demonstrating how to set the font for legend and datalable in Excel chart by using the SetFont() method to change the font for the legend and datalable easily in C#.
Firstly, please view the Excel worksheet with chart which the font will be changed later:

Note: Before Start, please download the latest version of Spire.XLS and add Spire.Xls.dll in the bin folder as the reference of Visual Studio.
Step 1: Create a new Excel workbook and load from file.
Workbook workbook = new Workbook();
workbook.LoadFromFile("Sample.xlsx");
Step 2: Get the first worksheet from workbook.
Worksheet ws = workbook.Worksheets[0];
Spire.Xls.Chart chart = ws.Charts[0];
Step 3: Create a font with specified size and color.
ExcelFont font = workbook.CreateFont();
font.Size =12.0;
font.Color = Color.Red;
Step 4: Apply the font to chart Legend.
chart.Legend.TextArea.SetFont(font);
Step 5: Apply the font to chart DataLabel.
foreach (ChartSerie cs in chart.Series)
   {
     cs.DataPoints.DefaultDataPoint.DataLabels.TextArea.SetFont(font);
   }
Step 6: Save the document to file.
workbook.SaveToFile("result.xlsx", ExcelVersion.Version2010);
Effective screenshot after changing the text font.

Full codes:
using Spire.Xls;
using Spire.Xls.Charts;
using System.Drawing;
namespace SetFont
{

    class Program
    {

        static void Main(string[] args)
        {
            {
                Workbook workbook = new Workbook();
                workbook.LoadFromFile("Sample.xlsx");

                Worksheet ws = workbook.Worksheets[0];
                Spire.Xls.Chart chart = ws.Charts[0];

                ExcelFont font = workbook.CreateFont();
                font.Size = 12.0;
                font.Color = Color.Red;

                chart.Legend.TextArea.SetFont(font);

                foreach (ChartSerie cs in chart.Series)
                {
                    cs.DataPoints.DefaultDataPoint.DataLabels.TextArea.SetFont(font);
                }

                workbook.SaveToFile("result.xlsx", ExcelVersion.Version2010);


            }
        }
    }
}
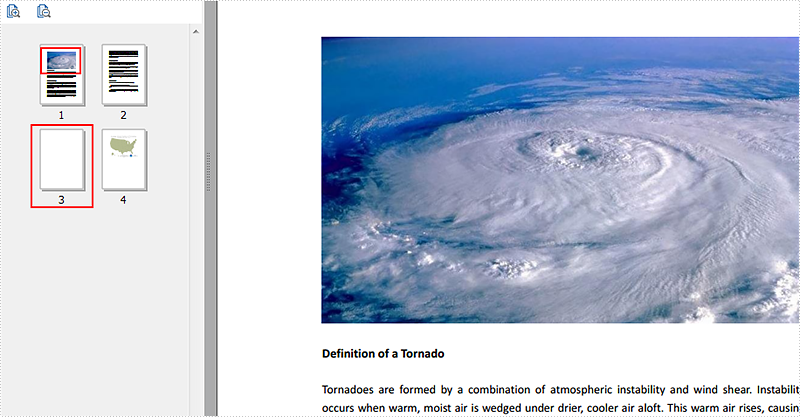
Everyone knows how to open and save a PDF file. Sometimes you run into the situation that your PDF file has one or more blank pages. You want to get rid of the blank page to make you PDF file look more neat. Many people don't know how to do this.
In the following sections, I will demonstrate how to remove blank page from PDF file in WPF very easily and effortlessly.
Here is the original PDF document:
The code snippets are as followed:
Step 1: Initialize a new instance of PdfDocument class and load the PDF document from the file.
PdfDocument document = new PdfDocument();
document.LoadFromFile("Tornado.pdf");
Step 2: Traverse the PDF file and detect the content. If the page is blank, then remove it.
for (int i = 0; i < document.Pages.Count; i++)
{
    PdfPageBase originalPage = document.Pages[i];
    if (originalPage.IsBlank())
    {
       document.Pages.Remove(originalPage);
       i--;
     }
}
Step 3: Save the PDF and launch the file.
document.SaveToFile("Tornadowithoutblankpage.pdf", FileFormat.PDF);
System.Diagnostics.Process.Start("Tornadowithoutblankpage.pdf");
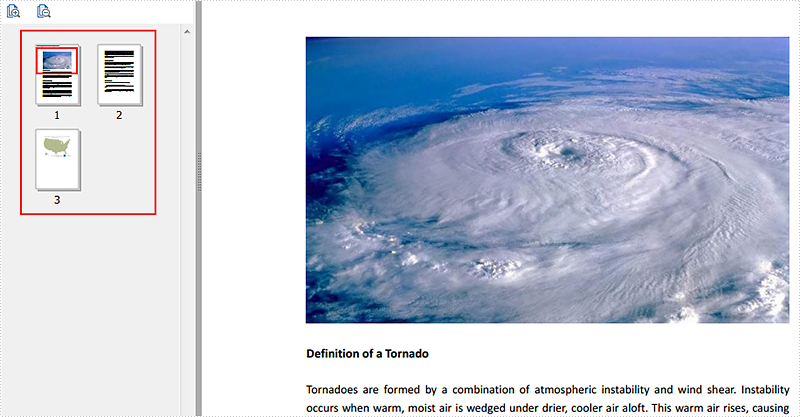
Effective screenshot:
Full Codes:
using System.Windows;
using Spire.Pdf;
using System.Drawing;

namespace Tornadoes
{
    ///
    /// Interaction logic for MainWindow.xaml
    ///
    public partial class MainWindow : Window
    {
        public MainWindow()
        {
            InitializeComponent();
        }

        private void button1_Click(object sender, RoutedEventArgs e)
        {
            PdfDocument document = new PdfDocument();
            document.LoadFromFile("Tornado.pdf");
            for (int i = 0; i < document.Pages.Count; i++)
            {
                PdfPageBase originalPage = document.Pages[i];
                if (originalPage.IsBlank())
                {
                    document.Pages.Remove(originalPage);
                    i--;
                }
            }
            document.SaveToFile("Tornadoeswithtidypage.pdf", FileFormat.PDF);
            System.Diagnostics.Process.Start("Tornadoeswithtidypage.pdf");

        }
    }
}
Imports System.Windows
Imports Spire.Pdf
Imports System.Drawing

Namespace Tornadoes
	'''
	''' Interaction logic for MainWindow.xaml
	'''
	Public Partial Class MainWindow
		Inherits Window
		Public Sub New()
			InitializeComponent()
		End Sub

		Private Sub button1_Click(sender As Object, e As RoutedEventArgs)
			Dim document As New PdfDocument()
			document.LoadFromFile("Tornado.pdf")
			For i As Integer = 0 To document.Pages.Count - 1
				Dim originalPage As PdfPageBase = document.Pages(i)
				If originalPage.IsBlank() Then
					document.Pages.Remove(originalPage)
					i -= 1
				End If
			Next
			document.SaveToFile("Tornadoeswithtidypage.pdf", FileFormat.PDF)
			System.Diagnostics.Process.Start("Tornadoeswithtidypage.pdf")

		End Sub
	End Class
End Namespace
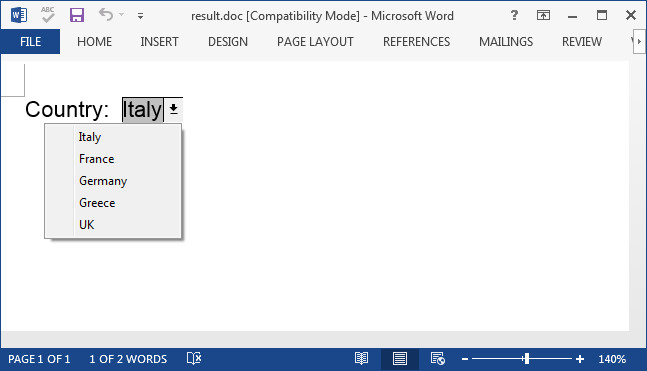
Dropdown list in Word is one type of forms that restricts the data entry to an item in the predefined list. Spire.Doc supports to add old dropdown list form field (Legacy Forms) to Word document. This dropdown list is limited to 25 items and requires forms protection. The following section will demonstrate how to create a dropdown form filed in Word in a WPF application.
Code Snippet:
Step 1: Initialize a new instance of Document class, add a section to it.
Document doc = new Document();
Spire.Doc.Section s = doc.AddSection();
Step 2: Add a paragraph to the section and append text.
Spire.Doc.Documents.Paragraph p = s.AddParagraph();
p.AppendText("Country:  ");
Step 3: Call Paragraph.AppendField() method to insert a dropdown list and call DropDownItems.Add() method to add items.
string fieldName = "DropDownList";
DropDownFormField list = p.AppendField(fieldName, FieldType.FieldFormDropDown) as DropDownFormField;
list.DropDownItems.Add("Italy");
list.DropDownItems.Add("France");
list.DropDownItems.Add("Germany");
list.DropDownItems.Add("Greece");
list.DropDownItems.Add("UK");
Step 4: Add protection to the document by setting the protection type as AllowOnlyFormFields and also setting a password. Note: If you choose not to use a password, anyone can change your editing restrictions.
doc.Protect(ProtectionType.AllowOnlyFormFields,"e-iceblue");
Step 5: Save and launch the file.
doc.SaveToFile("result.doc", FileFormat.Doc);
System.Diagnostics.Process.Start("result.doc");
Output:
Full Code:
using Spire.Doc;
using Spire.Doc.Documents;
using Spire.Doc.Fields;
using System.Windows;

namespace WpfApplication1
{
    public partial class MainWindow : Window
    {
        public MainWindow()
        {
            InitializeComponent();
        }
        private void button1_Click(object sender, RoutedEventArgs e)
        {
            Document doc = new Document();
            Spire.Doc.Section s = doc.AddSection();
            Spire.Doc.Documents.Paragraph p = s.AddParagraph();
            p.AppendText("Country:  ");

            ParagraphStyle style = new ParagraphStyle(doc);
            style.Name = "FontStyle";
            style.CharacterFormat.FontName = "Arial";
            style.CharacterFormat.FontSize = 12;
            doc.Styles.Add(style);
            p.ApplyStyle(style.Name);

            string fieldName = "DropDownList";
            DropDownFormField list = p.AppendField(fieldName, FieldType.FieldFormDropDown) as DropDownFormField;
            list.DropDownItems.Add("Italy");
            list.DropDownItems.Add("France");
            list.DropDownItems.Add("Germany");
            list.DropDownItems.Add("Greece");
            list.DropDownItems.Add("UK");

            doc.Protect(ProtectionType.AllowOnlyFormFields, "e-iceblue");
            doc.SaveToFile("result.doc", FileFormat.Doc);
            System.Diagnostics.Process.Start("result.doc");

        }
    }
}
