
Knowledgebase (2417)
Children categories
By default, the font color of a word document is black. To achieve a more distinctive visual effect, we can change it to red, green or any other colors we like.
This article describes how to change word font color with Spire.Doc for WPF in C#, VB.NET.
At first, please download Spire.Doc and install it correctly, then add Spire.Doc. Wpf.dll and Spire.License.dll from the installation folder as reference.
Below is the screenshot of the original word document:

Detail steps:
Use namespace:
using System.Drawing;
using System.Windows;
using Spire.Doc;
using Spire.Doc.Documents;
Step 1: Initialize a new instance of Document class and load the sample document from file.
Document document = new Document();
document.LoadFromFile("Story.docx");
Step 2: Get its first section and first paragraph (the Title), then set text color for paragraph 1.
Section section = document.Sections[0];
Paragraph p1 = section.Paragraphs[0];
ParagraphStyle s1 = new ParagraphStyle(document);
s1.Name = "TitleTextColor";
s1.CharacterFormat.TextColor = Color.RosyBrown;
document.Styles.Add(s1);
p1.ApplyStyle(s1.Name);
Step 3: Get the second paragraph and set text color for paragraph 2.
Paragraph p2 = section.Paragraphs[1];
ParagraphStyle s2 = new ParagraphStyle(document);
s2.Name = "BodyTextColor";
s2.CharacterFormat.TextColor = Color.DarkBlue;
document.Styles.Add(s2);
p2.ApplyStyle(s2.Name);
Step 4: Save and launch the file.
document.SaveToFile("FontColor.docx", FileFormat.Docx);
System.Diagnostics.Process.Start("FontColor.docx");
Output:

Full codes:
using Spire.Doc;
using Spire.Doc.Documents;
using System.Drawing;
using System.Windows;

namespace WpfApplication1
{
    public partial class MainWindow : Window
    {
        public MainWindow()
        {
            InitializeComponent();
        }
        private void button1_Click(object sender, RoutedEventArgs e)
        {
            //Load Document
            Document document = new Document();
            document.LoadFromFile("Story.docx");

            //Set Text Color for Paragraph 1(the Title)
            Section section = document.Sections[0];
            Paragraph p1 = section.Paragraphs[0];
            ParagraphStyle s1 = new ParagraphStyle(document);
            s1.Name = "TitleTextColor";
            s1.CharacterFormat.TextColor = Color.RosyBrown;
            document.Styles.Add(s1);
            p1.ApplyStyle(s1.Name);

            //Set Text Color for Paragraph 2
            Paragraph p2 = section.Paragraphs[1];
            ParagraphStyle s2 = new ParagraphStyle(document);
            s2.Name = "BodyTextColor";
            s2.CharacterFormat.TextColor = Color.DarkBlue;
            document.Styles.Add(s2);
            p2.ApplyStyle(s2.Name);

            //Save and Launch
            document.SaveToFile("FontColor.docx", FileFormat.Docx);
            System.Diagnostics.Process.Start("FontColor.docx");
        }


    }
}
Imports Spire.Doc
Imports Spire.Doc.Documents
Imports System.Drawing
Imports System.Windows

Namespace WpfApplication1
	Public Partial Class MainWindow
		Inherits Window
		Public Sub New()
			InitializeComponent()
		End Sub
		Private Sub button1_Click(sender As Object, e As RoutedEventArgs)
			'Load Document
			Dim document As New Document()
			document.LoadFromFile("Story.docx")

			'Set Text Color for Paragraph 1(the Title)
			Dim section As Section = document.Sections(0)
			Dim p1 As Paragraph = section.Paragraphs(0)
			Dim s1 As New ParagraphStyle(document)
			s1.Name = "TitleTextColor"
			s1.CharacterFormat.TextColor = Color.RosyBrown
			document.Styles.Add(s1)
			p1.ApplyStyle(s1.Name)

			'Set Text Color for Paragraph 2
			Dim p2 As Paragraph = section.Paragraphs(1)
			Dim s2 As New ParagraphStyle(document)
			s2.Name = "BodyTextColor"
			s2.CharacterFormat.TextColor = Color.DarkBlue
			document.Styles.Add(s2)
			p2.ApplyStyle(s2.Name)

			'Save and Launch
			document.SaveToFile("FontColor.docx", FileFormat.Docx)
			System.Diagnostics.Process.Start("FontColor.docx")
		End Sub


	End Class
End Namespace
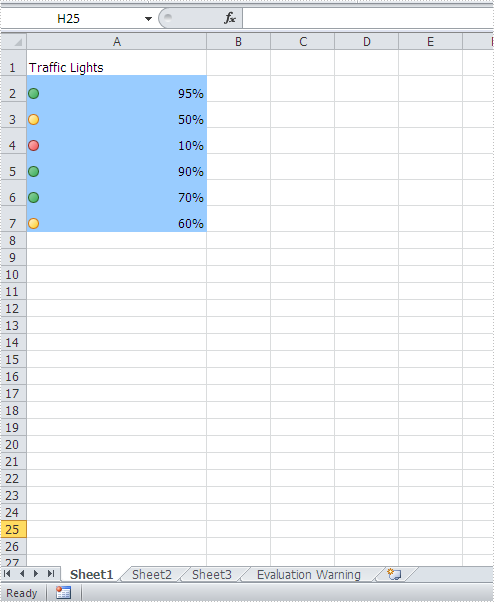
By using Spire.XLS, developers can easily set the IconSetType of conditional formatting. This article will demonstrate how to set the traffic lights icons in C# with the help of Spire.XLS.
Note: Before Start, please download the latest version of Spire.XLS and add Spire.xls.dll in the bin folder as the reference of Visual Studio.
Here comes to the code snippets:
Step 1: Create a new excel document instance and get the first worksheet.
Workbook wb = new Workbook();
Worksheet sheet = wb.Worksheets[0];
Step 2: Add some data to the Excel sheet cell range and set the format for them.
sheet.Range["A1"].Text = "Traffic Lights";
sheet.Range["A2"].NumberValue = 0.95;
sheet.Range["A2"].NumberFormat = "0%";
sheet.Range["A3"].NumberValue = 0.5;
sheet.Range["A3"].NumberFormat = "0%";
sheet.Range["A4"].NumberValue = 0.1;
sheet.Range["A4"].NumberFormat = "0%";
sheet.Range["A5"].NumberValue = 0.9;
sheet.Range["A5"].NumberFormat = "0%";
sheet.Range["A6"].NumberValue = 0.7;
sheet.Range["A6"].NumberFormat = "0%";
sheet.Range["A7"].NumberValue = 0.6;
sheet.Range["A7"].NumberFormat = "0%";
Step 3: Set the height of row and width of column for Excel cell range.
sheet.AllocatedRange.RowHeight = 20;
sheet.AllocatedRange.ColumnWidth = 25;
Step 4: Add a conditional formatting of cell range and set its type to CellValue.
XlsConditionalFormats xcfs1 = sheet.ConditionalFormats.Add();
xcfs1.AddRange(sheet.AllocatedRange);
IConditionalFormat cf1 = xcfs1.AddCondition();
cf1.FormatType= ConditionalFormatType.CellValue;
cf1.FirstFormula = "300";
cf1.Operator = ComparisonOperatorType.Less;
cf1.FontColor = Color.Black;
cf1.BackColor = Color.LightSkyBlue;
Step 5: Add a conditional formatting of cell range and set its type to IconSet.
IConditionalFormat cf2 = xcfs1.AddCondition();
cf2.FormatType = ConditionalFormatType.IconSet;
cf2.IconSet.IconSetType = IconSetType.ThreeTrafficLights1;
Step 6: Save the document to file.
wb.SaveToFile("Light.xlsx", ExcelVersion.Version2010);"
Effective screenshots of the traffic lights icons set by Spire.XLS.
XMP is a file labeling technology that lets you embed metadata into files themselves during the content creation process. With an XMP enabled application, your workgroup can capture meaningful information about a project (such as titles and descriptions, searchable keywords, and up-to-date author and copyright information) in a format that is easily understood by your team as well as by software applications, hardware devices, and even file formats.
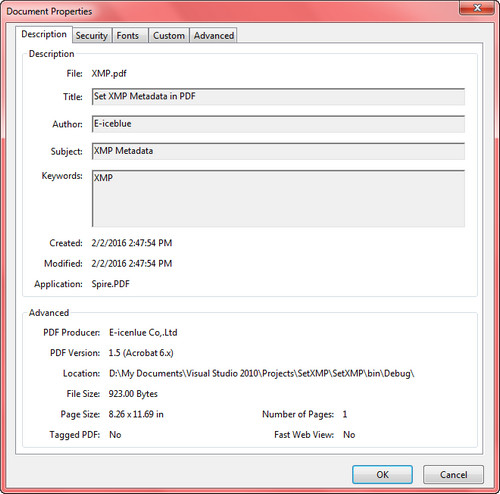
In the Spire.PDF Version 3.6.135 and above, we add a new feature to read, set and load an existing XMP data from XML documents. This article presents how to set XMP Metadata while creating a PDF document.
Code Snippet:
Step 1: Initialize a new instance of PdfDocument class.
string input = "..\\..\\..\\..\\..\\..\\Data\\SetXMPMetadata.pdf";

// Open a PDF document.
PdfDocument doc = new PdfDocument();
doc.LoadFromFile(input);

// Set XMP metadata for the document.
doc.DocumentInformation.Author = "E-iceblue";
doc.DocumentInformation.Creator = "Spire.PDF";
doc.DocumentInformation.Keywords = "XMP";
doc.DocumentInformation.Producer = "E-icenlue Co,.Ltd";
doc.DocumentInformation.Subject = "XMP Metadata";
doc.DocumentInformation.Title = "Set XMP Metadata in PDF";

// Specify the output file name for the modified PDF.
string output = "SetXMPMetadata.pdf";

// Save the PDF document with the updated XMP metadata.
doc.SaveToFile(output);
Output:
To view metadata in a PDF document, open it with Acrobat or Acrobat Reader and select ‘Document Properties’ in the File menu.
Full Code:
using Spire.Pdf;
using Spire.Pdf.Xmp;
using System;

namespace SetXMPMetadata
{
    class Program
    {
        static void Main(string[] args)
        {
            string input = "..\\..\\..\\..\\..\\..\\Data\\SetXMPMetadata.pdf";

            // Open a PDF document.
            PdfDocument doc = new PdfDocument();
            doc.LoadFromFile(input);

            // Set XMP metadata for the document.
            doc.DocumentInformation.Author = "E-iceblue";
            doc.DocumentInformation.Creator = "Spire.PDF";
            doc.DocumentInformation.Keywords = "XMP";
            doc.DocumentInformation.Producer = "E-icenlue Co,.Ltd";
            doc.DocumentInformation.Subject = "XMP Metadata";
            doc.DocumentInformation.Title = "Set XMP Metadata in PDF";

            // Specify the output file name for the modified PDF.
            string output = "SetXMPMetadata.pdf";

            // Save the PDF document with the updated XMP metadata.
            doc.SaveToFile(output);
        }
    }
}
Imports Spire.Pdf
Imports Spire.Pdf.Xmp

Namespace SetXMPMetadata
	Class Program
		Private Shared Sub Main(args As String())
            Load the input PDF file
            Dim input As String = "..\..\..\..\..\..\Data\SetXMPMetadata.pdf"

            ' Create a new PdfDocument object
            Dim doc As New PdfDocument()

            ' Load the PDF document from the input file
            doc.LoadFromFile(input)

            ' Set the author information in the document properties
            doc.DocumentInformation.Author = "E-iceblue"

            ' Set the creator information in the document properties
            doc.DocumentInformation.Creator = "Spire.PDF"

            ' Set the keywords information in the document properties
            doc.DocumentInformation.Keywords = "XMP"

            ' Set the producer information in the document properties
            doc.DocumentInformation.Producer = "E-icenlue Co,.Ltd"

            ' Set the subject information in the document properties
            doc.DocumentInformation.Subject = "XMP Metadata"

            ' Set the title information in the document properties
            doc.DocumentInformation.Title = "Set XMP Metadata in PDF"

            ' Specify the output file name
            Dim output As String = "SetXMPMetadata.pdf"

            ' Save the modified document to the output file
            doc.SaveToFile(output)
	   End Sub
	End Class
End Namespace
