
Knowledgebase (2345)
Children categories
When dealing with an Excel worksheet containing a large amount of data, splitting it into several separate Excel files based on specific criteria can be beneficial. By dividing the worksheet into smaller, more manageable files, you can improve your work efficiency and make data analysis easier. This article will demonstrate how to programmatically split an Excel worksheet into multiple Excel files using Spire.XLS for .NET.
Install Spire.XLS for .NET
To begin with, you need to add the DLL files included in the Spire.XLS for .NET package as references in your .NET project. The DLL files can be either downloaded from this link or installed via NuGet.
PM> Install-Package Spire.XLS
Split an Excel Sheet into Multiple Files in C# and VB.NET
The Worksheet.Copy(CellRange sourceRange, CellRange destRange) method provided by Spire.XLS for .NET allows you to split a worksheet by copying a specified cell range from the original Excel file to a new Excel file. The following are the detailed steps.
- Create a Workbook instance.
- Load a sample Excel file using Workbook.LoadFromFile() method.
- Get a specific worksheet using Workbook.Worksheets[] property.
- Get the header row and the specified cell ranges using Worksheet.Range property.
- Create a new workbook and get its first worksheet.
- Copy the header row and specified cell range to the first worksheet of the new workbook using Worksheet.Copy(CellRange sourceRange, CellRange destRange) method.
- Copy the column width from the original workbook to the new workbook, and then save the new workbook to an Excel file using Workbook.SaveToFile() method.
- Create another new workbook, and then repeat the above steps to copy the header row and specified cell range into the new workbook.
- Save the new workbook to another Excel file.
- C#
- VB.NET
using Spire.Xls;

namespace splitworksheet
{
    class Program
    {
        static void Main(string[] args)
        {
            //Create a Workbook instance
            Workbook originalBook= new Workbook();

            //Load the original Excel document from file
            originalBook.LoadFromFile("Info.xlsx");

            //Get the first worksheet
            Worksheet sheet = originalBook.Worksheets[0];

            //Get the header row
            CellRange headerRow = sheet.Range[1, 1, 1,5];

            //Get two cell ranges
            CellRange range1 = sheet.Range[2, 1, 6, sheet.LastColumn];
            CellRange range2 = sheet.Range[7, 1, sheet.LastRow, sheet.LastColumn];

            //Create a new workbook
            Workbook newBook1 = new Workbook();

            //Get the first worksheet of new workbook
            Worksheet newSheet1 = newBook1.Worksheets[0];

            //Copy the header row and range 1 to the first worksheet of the new workbook
            sheet.Copy(headerRow, newSheet1.Range[1, 1]);
            sheet.Copy(range1, newSheet1.Range[2, 1]);

            //Copy the column width from the original workbook to the new workbook
            for (int i = 0; (i < sheet.LastColumn); i++)
            {
                newBook1.Worksheets[0].SetColumnWidth(i + 1, sheet.GetColumnWidth(i + 1));
            }

            //Save the new workbook to an Excel file
            newBook1.SaveToFile("Sales Depart.xlsx", ExcelVersion.Version2016);

            //Create another new workbook
            Workbook newBook2 = new Workbook();

            //Get the first worksheet of new workbook
            Worksheet newSheet2 = newBook2.Worksheets[0];

            //Copy the header row and range 2 to the first worksheet of the new workbook
            sheet.Copy(headerRow, newSheet2.Range[1, 1]);
            sheet.Copy(range2, newSheet2.Range[2, 1]);

            //Copy the column width from the original workbook to the new workbook
            for (int i = 0; (i < sheet.LastColumn); i++)
            {
                newBook2.Worksheets[0].SetColumnWidth(i + 1, sheet.GetColumnWidth(i + 1));
            }

            //Save the new workbook to another Excel file
            newBook2.SaveToFile("Development Depart.xlsx", ExcelVersion.Version2016);

        }
    }
}

Apply for a Temporary License
If you'd like to remove the evaluation message from the generated documents, or to get rid of the function limitations, please request a 30-day trial license for yourself.
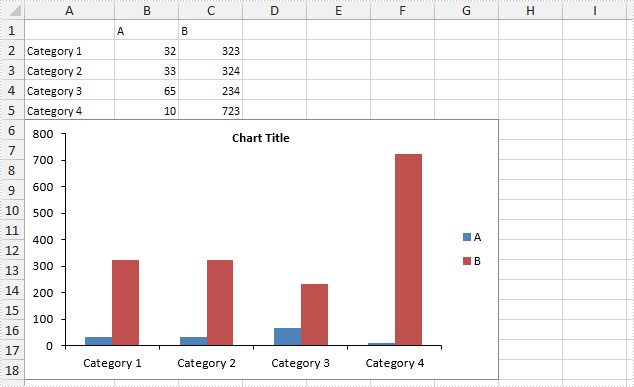
Gridlines are often added to charts to help improve the readability of the chart itself, but it is not a necessary to display the gridlines in every chart especially when we do not need to know the exact value of each data point from graphic. This article will present how to hide gridlines in Excel chart using Spire.XLS.
Code Snippet:
Step 1: Initialize a new instance of Workbook class and load a sample Excel file that contains some data in A1 to C5.
Workbook workbook = new Workbook();
workbook.LoadFromFile("data.xlsx");
Step 2: Create a Column chart based on the data in cell range A1 to C5.
Worksheet sheet = workbook.Worksheets[0];
Chart chart = sheet.Charts.Add(ExcelChartType.ColumnClustered);
chart.DataRange = sheet.Range["A1:C5"];
chart.SeriesDataFromRange = false;
Step 3: Set chart position.
chart.LeftColumn = 1;
chart.TopRow = 6;
chart.RightColumn = 8
chart.BottomRow = 19;
Step 4: Set the PrimaryValueAxis.HasMajorGridLines property to false.
chart.PrimaryValueAxis.HasMajorGridLines = false;
Step 5: Save and launch the file.
workbook.SaveToFile("result.xlsx", ExcelVersion.Version2010);
System.Diagnostics.Process.Start("result.xlsx");
Output:
Full Code:
using Spire.Xls;
namespace HideGridLine
{

    class Program
    {

        static void Main(string[] args)
        {
            Workbook workbook = new Workbook();
            workbook.LoadFromFile("data.xlsx");

            Worksheet sheet = workbook.Worksheets[0];
            Chart chart = sheet.Charts.Add(ExcelChartType.ColumnClustered);
            chart.DataRange = sheet.Range["A1:C5"];
            chart.SeriesDataFromRange = false;
            chart.LeftColumn = 1;
            chart.TopRow = 6;
            chart.RightColumn = 8;
            chart.BottomRow = 19;

            chart.PrimaryValueAxis.HasMajorGridLines = false;

            workbook.SaveToFile("result.xlsx", ExcelVersion.Version2010);
            System.Diagnostics.Process.Start("result.xlsx");
        }

    }
}
Imports Spire.Xls
Namespace HideGridLine

	Class Program

		Private Shared Sub Main(args As String())
			Dim workbook As New Workbook()
			workbook.LoadFromFile("data.xlsx")

			Dim sheet As Worksheet = workbook.Worksheets(0)
			Dim chart As Chart = sheet.Charts.Add(ExcelChartType.ColumnClustered)
			chart.DataRange = sheet.Range("A1:C5")
			chart.SeriesDataFromRange = False
			chart.LeftColumn = 1
			chart.TopRow = 6
			chart.RightColumn = 8
			chart.BottomRow = 19

			chart.PrimaryValueAxis.HasMajorGridLines = False

			workbook.SaveToFile("result.xlsx", ExcelVersion.Version2010)
			System.Diagnostics.Process.Start("result.xlsx")
		End Sub

	End Class
End Namespace
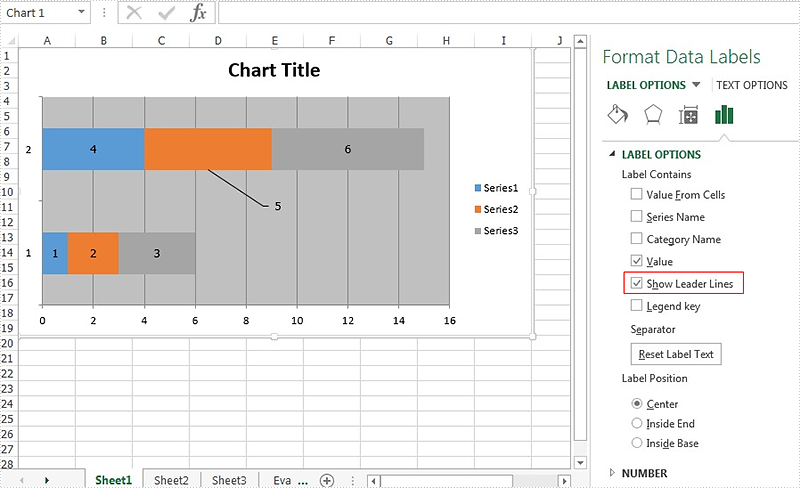
The leader line on Excel chart is very helpful since it gives a visual connection between a data label and its corresponding data point. Spire.XLS offers a property of DataLabels.ShowLeaderLines to enable developers to show or hide the leader lines easily. This article will focus on demonstrating how to show the leader line on Excel stacked bar chart in C#.
Note: Before Start, please ensure that you have download the latest version of Spire.XLS (V7.8.64 or above) and add Spire.xls.dll in the bin folder as the reference of Visual Studio.
Here comes to the code snippet of how to show the leader line on Excel stacked bar chart in C#.
Step 1: Create a new excel document instance and get the first worksheet.
Workbook book = new Workbook();
Worksheet sheet = book.Worksheets[0];
Step 2: Add some data to the Excel sheet cell range.
sheet.Range["A1"].Value = "1";
sheet.Range["A2"].Value = "2";
sheet.Range["A3"].Value = "3";
sheet.Range["B1"].Value = "4";
sheet.Range["B2"].Value = "5";
sheet.Range["B3"].Value = "6";
Step 3: Create a bar chart and define the data for it.
Chart chart = sheet.Charts.Add(ExcelChartType.BarStacked);
chart.DataRange = sheet.Range["A1:B3"];
Step 4: Set the property of HasValue and ShowLeaderLines for DataLabels.
foreach (ChartSerie cs in chart.Series)
  {
    cs.DataPoints.DefaultDataPoint.DataLabels.HasValue = true;
    cs.DataPoints.DefaultDataPoint.DataLabels.ShowLeaderLines = true;
  }
Step 5: Save the document to file and set the excel version.
book.Version = ExcelVersion.Version2013;
book.SaveToFile("result.xlsx", FileFormat.Version2013);
Effective screenshots:
Full codes:
using Spire.Xls;
using Spire.Xls.Charts;
using Spire.Xls.Core.Spreadsheet.Charts;
using System.Drawing;
namespace ShowLeaderLine
{
    class Program
    {

        static void Main(string[] args)
        {
            Workbook book = new Workbook();
            Worksheet sheet = book.Worksheets[0];

            sheet.Range["A1"].Value = "1";
            sheet.Range["A2"].Value = "2";
            sheet.Range["A3"].Value = "3";
            sheet.Range["B1"].Value = "4";
            sheet.Range["B2"].Value = "5";
            sheet.Range["B3"].Value = "6";

            Chart chart = sheet.Charts.Add(ExcelChartType.BarStacked);
            chart.DataRange = sheet.Range["A1:B3"];

            foreach (ChartSerie cs in chart.Series)
            {
                cs.DataPoints.DefaultDataPoint.DataLabels.HasValue = true;
                cs.DataPoints.DefaultDataPoint.DataLabels.ShowLeaderLines = true;
            }

            book.Version = ExcelVersion.Version2013;
            book.SaveToFile("result.xlsx", FileFormat.Version2013);
        }

    }
}
