
Knowledgebase (2417)
Children categories
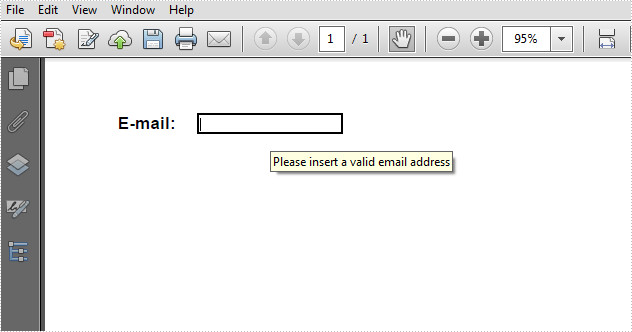
Tooltip is a message box that appears when users hover the pointer over the form field, providing users with instructions about the field, for instance, some extra information that users may find helpful in filling in the form field. This article presents how to add a tooltip to PDF form field using Spire.PDF in C# and VB.NET.
Code Snippet
Step 1: Initialize a new object of PdfDcoument class, add a page to it.
PdfDocument doc = new PdfDocument();
PdfPageBase page = doc.Pages.Add(PdfPageSize.A4, new PdfMargins(0));
Step 2: Add some text and a textbox on the PDF page.
PdfFont font = new PdfFont(PdfFontFamily.Helvetica, 12f,PdfFontStyle.Bold);
PdfBrush brush = PdfBrushes.Black;
float x = 50;
float y = 50;
float tempX = 0;
string text = "E-mail: ";
page.Canvas.DrawString(text, font, brush, x, y);
tempX = font.MeasureString(text).Width + x+15;
PdfTextBoxField textbox = new PdfTextBoxField(page, "TextBox");
textbox.Bounds = new RectangleF(tempX, y, 100, 15);
textbox.BorderWidth = 0.75f;
textbox.BorderStyle = PdfBorderStyle.Solid;
doc.Form.Fields.Add(textbox);
Step 3: The PdfDocument class provides a Fields collection which represents all form fields in the PDF document. You can get the specific field by its index or name, then set the value of ToolTip property to add a tooltip.
doc.Form.Fields["TextBox"].ToolTip = "Please insert a valid email address";
Step 4: Save and launch the file.
doc.SaveToFile("sample.pdf", FileFormat.PDF);
System.Diagnostics.Process.Start("sample.pdf");
Output:
Full Code:
using Spire.Pdf;
using Spire.Pdf.Fields;
using Spire.Pdf.Graphics;
using System.Drawing;


namespace AddTooltip
{
    class Program
    {
        static void Main(string []args)
        {
            PdfDocument doc = new PdfDocument();
            PdfPageBase page = doc.Pages.Add(PdfPageSize.A4, new PdfMargins(0));

            PdfFont font = new PdfFont(PdfFontFamily.Helvetica, 12f, PdfFontStyle.Bold);
            PdfBrush brush = PdfBrushes.Black;
            float x = 50;
            float y = 50;
            float tempX = 0;
            string text = "E-mail: ";
            page.Canvas.DrawString(text, font, brush, x, y);
            tempX = font.MeasureString(text).Width + x + 15;
            PdfTextBoxField textbox = new PdfTextBoxField(page, "TextBox");
            textbox.Bounds = new RectangleF(tempX, y, 100, 15);
            textbox.BorderWidth = 0.75f;
            textbox.BorderStyle = PdfBorderStyle.Solid;
            doc.Form.Fields.Add(textbox);

            doc.Form.Fields["TextBox"].ToolTip = "Please insert a valid email address";

            doc.SaveToFile("sample.pdf", FileFormat.PDF);
            System.Diagnostics.Process.Start("sample.pdf");
        }
    }
}
Imports Spire.Pdf
Imports Spire.Pdf.Fields
Imports Spire.Pdf.Graphics
Imports System.Drawing


Namespace AddTooltip
	Class Program
		Private Shared Sub Main(args As String())
			Dim doc As New PdfDocument()
			Dim page As PdfPageBase = doc.Pages.Add(PdfPageSize.A4, New PdfMargins(0))

			Dim font As New PdfFont(PdfFontFamily.Helvetica, 12F, PdfFontStyle.Bold)
			Dim brush As PdfBrush = PdfBrushes.Black
			Dim x As Single = 50
			Dim y As Single = 50
			Dim tempX As Single = 0
			Dim text As String = "E-mail: "
			page.Canvas.DrawString(text, font, brush, x, y)
			tempX = font.MeasureString(text).Width + x + 15
			Dim textbox As New PdfTextBoxField(page, "TextBox")
			textbox.Bounds = New RectangleF(tempX, y, 100, 15)
			textbox.BorderWidth = 0.75F
			textbox.BorderStyle = PdfBorderStyle.Solid
			doc.Form.Fields.Add(textbox)

			doc.Form.Fields("TextBox").ToolTip = "Please insert a valid email address"

			doc.SaveToFile("sample.pdf", FileFormat.PDF)
			System.Diagnostics.Process.Start("sample.pdf")
		End Sub
	End Class
End Namespace
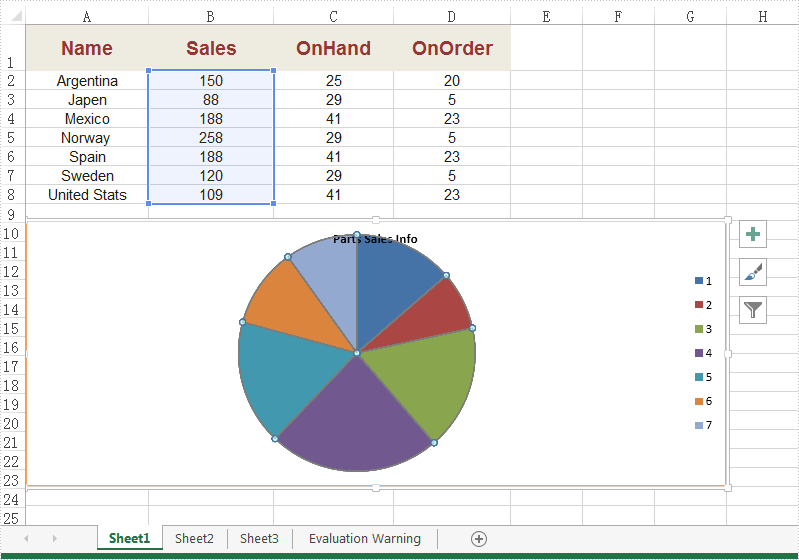
We always use chart in Excel documents to make the data more clear and visible. With the help of Spire.XLS, developers can easily create different kinds of charts, such as Pie chart, column chart, bar chart, radar chart and so on. This article will focus on demonstrate how to create Excel pie chart on WPF applications.
Note: Before Start, please download the latest version of Spire.XLS and add Spire.Xls.Wpf.dll in the bin folder as the reference of Visual Studio.
Here comes to the code snippets of how to create Excel pie chart:
Step 1: Create a new Excel workbook and load from file.
Workbook workbook = new Workbook();
workbook.LoadFromFile("Sample.xlsx");
Step 2: Get the first worksheet from workbook.
Worksheet sheet = workbook.Worksheets[0];
Step 3: Add Chart and set chart type.
Chart chart = sheet.Charts.Add(ExcelChartType.Pie);
Step 4: Set chart data range.
chart.DataRange = sheet.Range["B2:B8"];
chart.SeriesDataFromRange = false;
Step 5: Set the position, border, title and legend for the chart.
//Chart Position
chart.LeftColumn = 1;
chart.TopRow =12;
chart.RightColumn = 8;
chart.BottomRow = 26;

//Chart Border
chart.ChartArea.Border.Weight = ChartLineWeightType.Medium;
chart.ChartArea.Border.Color = System.Drawing.Color.SandyBrown;

//Chart Title
chart.ChartTitle = "Parts Sales Info";
chart.ChartTitleArea.Font.FontName = "Calibri";
chart.ChartTitleArea.Font.Size = 10;
chart.ChartTitleArea.Font.IsBold = true;

//Chart Legend
chart.Legend.Position = LegendPositionType.Right;
Step 6: Save the document to file and launch to preview it.
workbook.SaveToFile("ExcelPieChart.xlsx", ExcelVersion.Version2010);
System.Diagnostics.Process.Start("ExcelPieChart.xlsx");
Effective screenshot of the generated pie chart by Spire.XLS for WPF:
Full codes:
using Spire.Xls;
using System.Windows;

namespace WpfApplication1
{
    public partial class MainWindow : Window
    {
        public MainWindow()
        {
            InitializeComponent();
        }
        private void button2_Click(object sender, RoutedEventArgs e)
        {
            Workbook workbook = new Workbook();
            workbook.LoadFromFile("Sample.xlsx");
            Worksheet sheet = workbook.Worksheets[0];

            Chart chart = sheet.Charts.Add(ExcelChartType.Pie);

            chart.DataRange = sheet.Range["B2:B8"];
            chart.SeriesDataFromRange = false;

            chart.LeftColumn = 1;
            chart.TopRow = 12;
            chart.RightColumn = 8;
            chart.BottomRow = 26;

            chart.ChartArea.Border.Weight = ChartLineWeightType.Medium;
            chart.ChartArea.Border.Color = System.Drawing.Color.SandyBrown;

            chart.ChartTitle = "Parts Sales Info";
            chart.ChartTitleArea.Font.FontName = "Calibri";
            chart.ChartTitleArea.Font.Size = 10;
            chart.ChartTitleArea.Font.IsBold = true;

            chart.Legend.Position = LegendPositionType.Right;

            workbook.SaveToFile("ExcelPieChart.xlsx", ExcelVersion.Version2010);
            System.Diagnostics.Process.Start("ExcelPieChart.xlsx");
        }
    }
}
An annotation is a note or comment added to a pdf file, it can be an explanation or a reference to the specific part of the original data. Add annotations can make the file becomes easier to understand for readers.
Spire.PDF enables us to add, edit and delete annotation from a PDF document. This section will demonstrate how to add text annotation and edit annotation in pdf from WPF Applications using Spire.PDF for WPF.
This is the effective screenshot after adding and editing annotation:
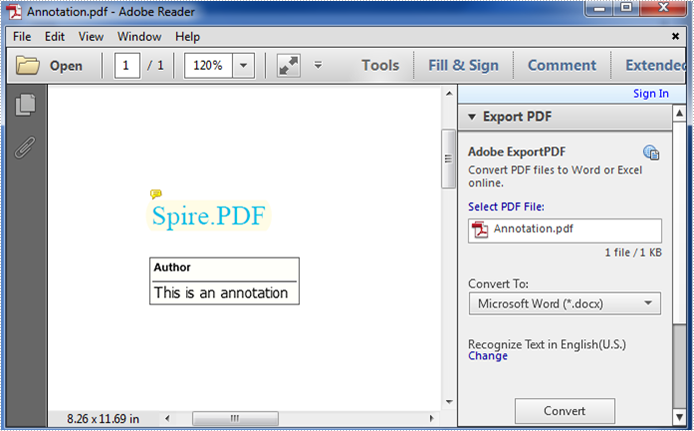
After editing, the text content of the annotation changed from “Demo” to “This is an annotation”.
At first, use the following namespace:
using System.Drawing;
using System.Windows;
using Spire.Pdf;
using Spire.Pdf.Annotations;
using Spire.Pdf.Graphics;
Then refer to the detail steps below:
Step 1: Create a new PDF document and add a new page to it.
PdfDocument doc = new PdfDocument();
PdfPageBase page = doc.Pages.Add();
Step 2: Draw text in the page and set text font, font size, color and location.
PdfFont font = new PdfFont(PdfFontFamily.TimesRoman, 15);
string text = "Spire.PDF";
PdfSolidBrush brush = new PdfSolidBrush(Color.DeepSkyBlue);
PointF point = new PointF(50, 100);
page.Canvas.DrawString(text, font, brush, point);
Step 3: Add annotation.
First, create a text annotation using the PdfTextMarkupAnnotation class:
PdfTextMarkupAnnotation annotation = new PdfTextMarkupAnnotation("Author", "Demo", text, new PointF(0, 0), font);
There are four parameters of the annotation:
“Author”: the author of annotation.
“Demo”: text content of annotation.
text: the text which will be marked.
new PointF(0, 0): not supported at present.
font: the font of the text which will be marked.
Second, Set Border, TextMarkupColor and location of the annotation:
annotation.Border = new PdfAnnotationBorder(0.50f);
annotation.TextMarkupColor = Color.LemonChiffon;
annotation.Location = new PointF(point.X + doc.PageSettings.Margins.Left, point.Y + doc.PageSettings.Margins.Left);
Third, add the annotation to the specified page:
(page as PdfNewPage).Annotations.Add(annotation);
If you need to edit the text of the annotation, then you can use following code:
(page as PdfNewPage).Annotations[0].Text = "This is an annotation";
Step 4: Save and launch the file.
doc.SaveToFile("Annotation.pdf");
System.Diagnostics.Process.Start("Annotation.pdf");
Full codes:
private void button1_Click(object sender, RoutedEventArgs e)
{
    PdfDocument doc = new PdfDocument();
    PdfPageBase page = doc.Pages.Add();
    PdfFont font = new PdfFont(PdfFontFamily.TimesRoman, 15);
    string text = "Spire.PDF";
    PdfSolidBrush brush = new PdfSolidBrush(Color.DeepSkyBlue);
    PointF point = new PointF(50, 100);
    page.Canvas.DrawString(text, font, brush, point);

    //Add annotation
    PdfTextMarkupAnnotation annotation = new PdfTextMarkupAnnotation("Author", "Demo", text, new PointF(0, 0), font);
    annotation.Border = new PdfAnnotationBorder(0.50f);
    annotation.TextMarkupColor = Color.LemonChiffon;

    annotation.Location = new PointF(point.X + doc.PageSettings.Margins.Left, point.Y + doc.PageSettings.Margins.Left);
(page as PdfNewPage).Annotations.Add(annotation);

    //Edit the text of the annotation
    (page as PdfNewPage).Annotations[0].Text = "This is an annotation";

    doc.SaveToFile("Annotation.pdf");
System.Diagnostics.Process.Start("Annotation.pdf");
}
