
Knowledgebase (2345)
Children categories
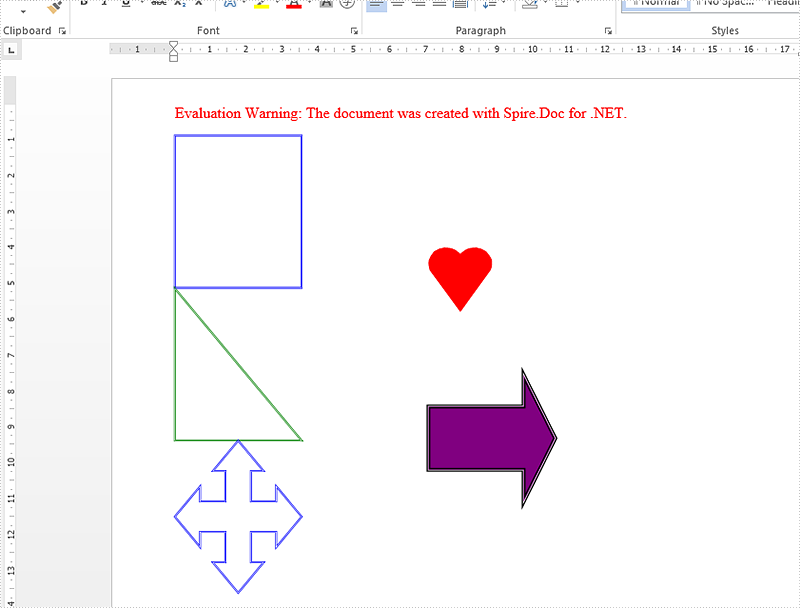
MS Word allows users to select a shape from shapes menu, drag and place it to any desired location on the page. From Spire.Doc Version 6.0 or above, we added a new feature to work with shape using code. The following section will present how to insert shapes and shape group in a Word document at the specified locations using Spire.Doc.
Code Snippets:
Step 1: Initialize a new instance of Document class.
Document doc = new Document();
Step 2: Add a new section to Word document, and add a paragraph to the section.
Section sec = doc.AddSection();
Paragraph para1 =sec.AddParagraph();
Step 3: Add shapes to the paragraph by calling AppendShape() method. In order to locate where the shape will be placed, you can just set the HorizontalPosition and VerticalPosition properties of ShapeObject class. We can also format the shape by set the FillColor,StrokeColor and LineStyle properties.
ShapeObject shape1 = para1.AppendShape(50, 50, ShapeType.Heart);

shape1.FillColor = Color.Red;
shape1.StrokeColor = Color.Red;
shape1.HorizontalPosition = 200;
shape1.VerticalPosition = 100;

ShapeObject shape2 = para1.AppendShape(100, 100, ShapeType.Arrow);

shape2.FillColor = Color.Purple;
shape2.StrokeColor = Color.Black;
shape2.LineStyle = ShapeLineStyle.Double;
shape2.StrokeWeight = 3;
shape2.HorizontalPosition = 200;
shape2.VerticalPosition = 200;
Step 4: Add a new paragraph and insert a shape group to the paragraph by calling AppendShapeGroup() method.
Paragraph para2 = sec.AddParagraph();
ShapeGroup shapegr = para2.AppendShapeGroup(200, 400);

shapegr.ChildObjects.Add(new ShapeObject(doc, ShapeType.Rectangle)
{
    Width = 500,
    Height = 300,
    LineStyle = ShapeLineStyle.ThickThin,
    StrokeColor = System.Drawing.Color.Blue,

    StrokeWeight = 1.5,
});
shapegr.ChildObjects.Add(new ShapeObject(doc, ShapeType.RightTriangle)
{
    Width = 500,
    Height = 300,
    VerticalPosition = 301,
    LineStyle = ShapeLineStyle.ThickThin,
    StrokeColor = System.Drawing.Color.Green,
    StrokeWeight = 1.5,
});
shapegr.ChildObjects.Add(new ShapeObject(doc, ShapeType.QuadArrow)
{
    Width = 500,
    Height = 300,
    VerticalPosition = 601,
    LineStyle = ShapeLineStyle.ThickThin,
    StrokeColor = System.Drawing.Color.Blue,
    StrokeWeight = 1.5,
});
Step 5: Save the document to file.
doc.SaveToFile("InsertShapes.docx", FileFormat.Docx2010);
Result:
Full code:
using Spire.Doc;
using Spire.Doc.Documents;
using Spire.Doc.Fields;
using System.Drawing;
namespace InsertShape
{
    class Program
    {
        static void Main(string[] args)
        {
            Document doc = new Document();
            Section sec = doc.AddSection();
            Paragraph para1 = sec.AddParagraph();

            ShapeObject shape1 = para1.AppendShape(50, 50, ShapeType.Heart);

            shape1.FillColor = Color.Red;
            shape1.StrokeColor = Color.Red;
            shape1.HorizontalPosition = 200;
            shape1.VerticalPosition = 100;

            ShapeObject shape2 = para1.AppendShape(100, 100, ShapeType.Arrow);

            shape2.FillColor = Color.Purple;
            shape2.StrokeColor = Color.Black;
            shape2.LineStyle = ShapeLineStyle.Double;
            shape2.StrokeWeight = 3;
            shape2.HorizontalPosition = 200;
            shape2.VerticalPosition = 200;

            Paragraph para2 = sec.AddParagraph();
            ShapeGroup shapegr = para2.AppendShapeGroup(200, 400);

            shapegr.ChildObjects.Add(new ShapeObject(doc, ShapeType.Rectangle)
            {
                Width = 500,
                Height = 300,
                LineStyle = ShapeLineStyle.ThickThin,
                StrokeColor = System.Drawing.Color.Blue,

                StrokeWeight = 1.5,
            });
            shapegr.ChildObjects.Add(new ShapeObject(doc, ShapeType.RightTriangle)
            {
                Width = 500,
                Height = 300,
                VerticalPosition = 301,
                LineStyle = ShapeLineStyle.ThickThin,
                StrokeColor = System.Drawing.Color.Green,
                StrokeWeight = 1.5,
            });
            shapegr.ChildObjects.Add(new ShapeObject(doc, ShapeType.QuadArrow)
            {
                Width = 500,
                Height = 300,
                VerticalPosition = 601,
                LineStyle = ShapeLineStyle.ThickThin,
                StrokeColor = System.Drawing.Color.Blue,
                StrokeWeight = 1.5,
            });

            doc.SaveToFile("InsertShapes.docx", FileFormat.Docx2010);
        }
    }
}
Imports Spire.Doc
Imports Spire.Doc.Documents
Imports Spire.Doc.Fields
Imports System.Drawing
Namespace InsertShape
	Class Program
		Private Shared Sub Main(args As String())
			Dim doc As New Document()
			Dim sec As Section = doc.AddSection()
			Dim para1 As Paragraph = sec.AddParagraph()

			Dim shape1 As ShapeObject = para1.AppendShape(50, 50, ShapeType.Heart)

			shape1.FillColor = Color.Red
			shape1.StrokeColor = Color.Red
			shape1.HorizontalPosition = 200
			shape1.VerticalPosition = 100

			Dim shape2 As ShapeObject = para1.AppendShape(100, 100, ShapeType.Arrow)

			shape2.FillColor = Color.Purple
			shape2.StrokeColor = Color.Black
			shape2.LineStyle = ShapeLineStyle.[Double]
			shape2.StrokeWeight = 3
			shape2.HorizontalPosition = 200
			shape2.VerticalPosition = 200

			Dim para2 As Paragraph = sec.AddParagraph()
			Dim shapegr As ShapeGroup = para2.AppendShapeGroup(200, 400)


			shapegr.ChildObjects.Add(New ShapeObject(doc, ShapeType.Rectangle) With { _
				Key .Width = 500, _
				Key .Height = 300, _
				Key .LineStyle = ShapeLineStyle.ThickThin, _
				Key .StrokeColor = System.Drawing.Color.Blue, _
				Key .StrokeWeight = 1.5 _
			})
			shapegr.ChildObjects.Add(New ShapeObject(doc, ShapeType.RightTriangle) With { _
				Key .Width = 500, _
				Key .Height = 300, _
				Key .VerticalPosition = 301, _
				Key .LineStyle = ShapeLineStyle.ThickThin, _
				Key .StrokeColor = System.Drawing.Color.Green, _
				Key .StrokeWeight = 1.5 _
			})
			shapegr.ChildObjects.Add(New ShapeObject(doc, ShapeType.QuadArrow) With { _
				Key .Width = 500, _
				Key .Height = 300, _
				Key .VerticalPosition = 601, _
				Key .LineStyle = ShapeLineStyle.ThickThin, _
				Key .StrokeColor = System.Drawing.Color.Blue, _
				Key .StrokeWeight = 1.5 _
			})

			doc.SaveToFile("InsertShapes.docx", FileFormat.Docx2010)
		End Sub
	End Class
End Namespace
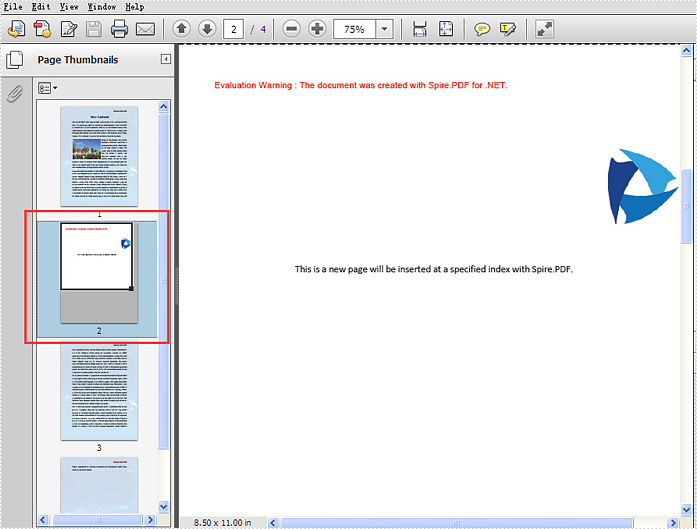
Spire.PDF offers a method of PdfDocument.MergeFiles(); to enable developers to merge PDF files easily and conveniently. This article will show you how to insert a new page from the first PDF into the second PDF file at a specified index by using the method of Pages.Insert(); offered by Spire.PDF.
Note: Before Start, please download the latest version of Spire.PDF and add Spire.PDF.dll in the bin folder as the reference of Visual Studio.
Here comes to the steps of how to insert the page from the first PDF (sample.pdf) into the second PDF (test.pdf) at a specified index:
Step 1: Create the first PDF document and load file.
PdfDocument doc1 = new PdfDocument();
doc1.LoadFromFile("sample.pdf");
Step 2: Create the second PDF document and load file.
PdfDocument doc2 = new PdfDocument();
doc2.LoadFromFile("test.pdf");
Step 3: Get the first page and its size from the first PDF document.
PdfPageBase page = doc1.Pages[0];
SizeF size = page.Size;
Step 4: Inserts a new blank page with the specified size at the specified index into the second PDF.
PdfPageBase newPage = doc2.Pages.Insert(1, size);
Step 5: Copy the contents on the page into the second PDF.
newPage.Canvas.DrawTemplate(page.CreateTemplate(), new PointF(0, 0));
Step 6: Save the document to file.
doc2.SaveToFile("result.pdf");
Effective screenshot of insert a new PDF page to an existing PDF at a specified index:
Full codes:
using Spire.Pdf;
using System.Drawing;

namespace InsertNewPage
{
    class Program
    {
        static void Main(string[] args)
        {
            PdfDocument doc1 = new PdfDocument();
            doc1.LoadFromFile("sample.pdf");
            PdfDocument doc2 = new PdfDocument();
            doc2.LoadFromFile("test.pdf");

            PdfPageBase page = doc1.Pages[0];
            SizeF size = page.Size;

            PdfPageBase newPage = doc2.Pages.Insert(1, size);
            newPage.Canvas.DrawTemplate(page.CreateTemplate(), new PointF(0, 0));

            doc2.SaveToFile("result.pdf");
        }
    }
}
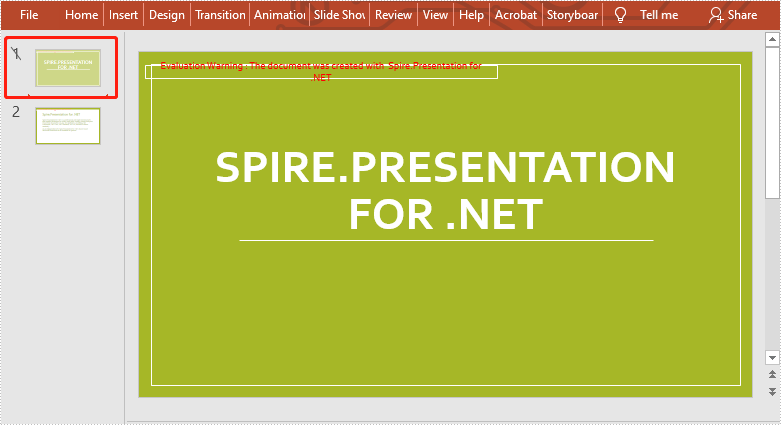
Microsoft PowerPoint lets you hide specific slides so they won’t appear during the slide show. You can also unhide the hidden slides at any time if you wish them to be visible in future presentations. In this article, you will learn how to hide or unhide slides in PowerPoint in C# and VB.NET using Spire.Presentation for .NET library.
Install Spire.Presentation for .NET
To begin with, you need to add the DLL files included in the Spire.Presentation for.NET package as references in your .NET project. The DLL files can be either downloaded from this link or installed via NuGet.
PM> Install-Package Spire.Presentation
Hide or Unhide Slides in PowerPoint in C# and VB.NET
The following are the steps to hide or unhide a slide in PowerPoint:
- Create an instance of Presentation class.
- Load a PowerPoint document using Presentation.LoadFromFile() method.
- Get the slide that you want to hide or unhide by its index using Presentation.Slides[index] property.
- Hide or unhide the slide by setting the ISlide.Hidden property as true or false.
- Save the result document using Presentation.SaveToFile() method.
- C#
- VB.NET
using Spire.Presentation;

namespace HideOrUnhideSlides
{
    class Program
    {
        static void Main(string[] args)
        {
            //Create a Presentation instance
            Presentation ppt = new Presentation();
            //Load a PowerPoint document
            ppt.LoadFromFile("Sample.pptx");

            //Get the first slide
            ISlide slide = ppt.Slides[0];

            //Hide the slide
            slide.Hidden = true;
            //Unhide the slide
            //slide.Hidden = false;

            //Save the result document
            ppt.SaveToFile("Result.pptx", FileFormat.Pptx2013);
        }
    }
}
The following is the result document after hiding the first slide:
Apply for a Temporary License
If you'd like to remove the evaluation message from the generated documents, or to get rid of the function limitations, please request a 30-day trial license for yourself.
