
Knowledgebase (2417)
Children categories
How to set word bullet style by appending the HTML code in C#
2015-01-21 07:02:29 Written by hayes LiuWith the help of Spire.Doc for .NET, developers can easily set bullet style for the existing word documents via invoke p.ListFormat.ApplyBulletStyle() method to format. This article will show you how to convert HTML list into word and set the bullet style for the word list in C#.
Firstly, please view the effective screenshot for the result word document:
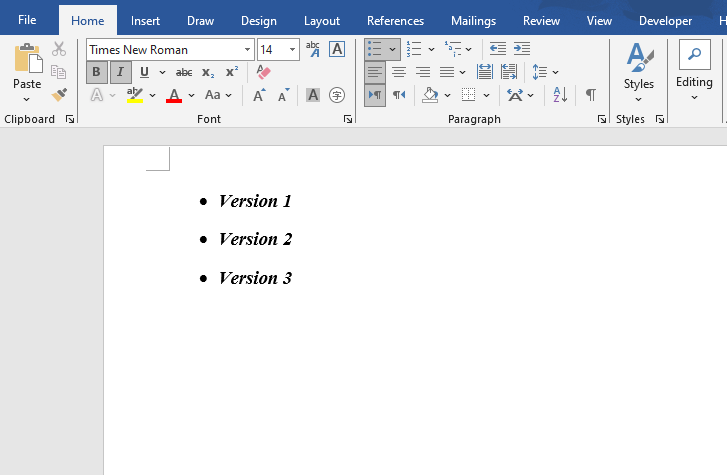
Here comes to the steps:
Step 1: Create a new document and add a section to the document.
Document document = new Document();
Section section=document.AddSection();
Step 2: Add word list to the paragraph by appending HTML.
Paragraph paragraph = section.AddParagraph();
paragraph.AppendHTML("<ol><li>Version 1</li><li>Version 2</li><li>Version 3</li></ol>");
Step 3: Set the bullet style for the paragraph.
foreach (Paragraph p in section.Paragraphs)
{
    p.ApplyStyle(BuiltinStyle.Heading2);

    if (p.ListFormat.CurrentListLevel != null)
    {
        p.ListFormat.ApplyBulletStyle();
    }
}
Step 4: Save the document to file
document.SaveToFile("result.docx",FileFormat.Docx);
Full codes:
// Create a new Word document object
Document document = new Document();
// Add a section to the document
Section section = document.AddSection();
// Add a paragraph to the section
Paragraph paragraph = section.AddParagraph();
// Append HTML content to the paragraph
paragraph.AppendHTML("- Version 1
- Version 2
- Version 3
");
// Loop through all paragraphs in the section
foreach (Paragraph p in section.Paragraphs)
{
// Apply "Heading 2" built-in style to the paragraph
p.ApplyStyle(BuiltinStyle.Heading2);
// Check if the paragraph has listformat
if (p.ListFormat.CurrentListLevel != null)
{
// Apply bullet style
p.ListFormat.ApplyBulletStyle();
}
}
// Save the document to a file in DOCX format
document.SaveToFile("result.docx", FileFormat.Docx);
// Dispose
document.Dispose();
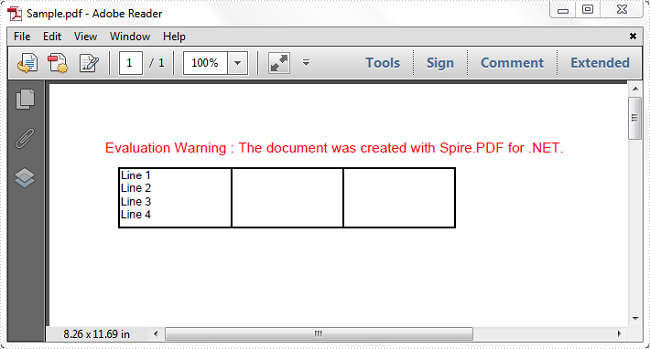
In some cases, you have several items that you want them displayed on multiple lines within a PDF grid cell. However if you don't enter a line break at a specific point in a cell, these items will appear as a whole sentence. In the article, you can learn how to insert line breaks in PDF grid cell via Spire.PDF in C#, VB.NET.
Here come the detailed steps:
Step 1: Initialize a new instance of PdfDocument and add a new page to PDF document.
PdfDocument doc = new PdfDocument();
PdfPageBase page = doc.Pages.Add();
Step 2: Create a PDF gird with one row and three columns.
PdfGrid grid = new PdfGrid();
grid.Style.CellPadding = new PdfPaddings(1, 1, 1, 1);
PdfGridRow row = grid.Rows.Add();
grid.Columns.Add(3);
grid.Columns[0].Width = 80;
grid.Columns[1].Width = 80;
grid.Columns[2].Width = 80;
Step 3: Initialize a new instance of PdfGridCellTextAndStyleList class and PdfGridCellTextAndStyle class. Set parameters of the variable textAndStyle such as text, font and brush. Add textAndStlye into PdfGridCellTextAndStyleList.
PdfGridCellTextAndStyleList lst = new PdfGridCellTextAndStyleList();
PdfGridCellTextAndStyle textAndStyle = new PdfGridCellTextAndStyle();
textAndStyle.Text = "Line 1";
textAndStyle.Font = new PdfTrueTypeFont(new System.Drawing.Font("Airal", 8f, FontStyle.Regular), true);
textAndStyle.Brush = PdfBrushes.Black;
lst.List.Add(textAndStyle);
Step 4: Repeat step 3 to add three other lines. Here you should insert '\n' to where you want this line break appears.
textAndStyle = new PdfGridCellTextAndStyle();
textAndStyle.Text = "\nLine 2";
textAndStyle.Font = new PdfTrueTypeFont(new System.Drawing.Font("Arial", 8f, FontStyle.Regular), true);
textAndStyle.Brush = PdfBrushes.Black;
lst.List.Add(textAndStyle);
textAndStyle = new PdfGridCellTextAndStyle();
textAndStyle.Text = "\nLine 3";
textAndStyle.Font = new PdfTrueTypeFont(new System.Drawing.Font("Arial", 8f, FontStyle.Regular), true);
textAndStyle.Brush = PdfBrushes.Black;
lst.List.Add(textAndStyle);
textAndStyle = new PdfGridCellTextAndStyle();
textAndStyle.Text = "\nLine 4";
textAndStyle.Font = new PdfTrueTypeFont(new System.Drawing.Font("Arial",8f, FontStyle.Regular), true);
textAndStyle.Brush = PdfBrushes.Black;
lst.List.Add(textAndStyle);
row.Cells[0].Value = lst;
Step 5: Draw the gird on PDF page and save the file.
grid.Draw(page, new PointF(10, 20));
String outputFile = "..\\..\\Sample.pdf";
doc.SaveToFile(outputFile, FileFormat.PDF);
System.Diagnostics.Process.Start(outputFile);
Result:
Full Code:
using Spire.Pdf;
using Spire.Pdf.Graphics;
using Spire.Pdf.Grid;
using System;
using System.Drawing;


namespace LineBreak
{
    class Program
    {
        static void Main(string[] args)
        {
            PdfDocument doc = new PdfDocument();
            PdfPageBase page = doc.Pages.Add();

            PdfGrid grid = new PdfGrid();
            grid.Style.CellPadding = new PdfPaddings(1, 1, 1, 1);
            PdfGridRow row = grid.Rows.Add();
            grid.Columns.Add(3);
            grid.Columns[0].Width = 80;
            grid.Columns[1].Width = 80;
            grid.Columns[2].Width = 80;

            PdfGridCellContentList lst = new PdfGridCellContentList();
            PdfGridCellContent textAndStyle = new PdfGridCellContent();
            textAndStyle.Text = "Line 1";
            textAndStyle.Font = new PdfTrueTypeFont(new System.Drawing.Font("Airal", 8f, FontStyle.Regular), true);
            textAndStyle.Brush = PdfBrushes.Black;
            lst.List.Add(textAndStyle);
            textAndStyle = new PdfGridCellContent();
            textAndStyle.Text = "\nLine 2";
            textAndStyle.Font = new PdfTrueTypeFont(new System.Drawing.Font("Arial", 8f, FontStyle.Regular), true);
            textAndStyle.Brush = PdfBrushes.Black;
            lst.List.Add(textAndStyle);
            textAndStyle = new PdfGridCellContent();
            textAndStyle.Text = "\nLine 3";
            textAndStyle.Font = new PdfTrueTypeFont(new System.Drawing.Font("Arial", 8f, FontStyle.Regular), true);
            textAndStyle.Brush = PdfBrushes.Black;
            lst.List.Add(textAndStyle);
            textAndStyle = new PdfGridCellContent();
            textAndStyle.Text = "\nLine 4";
            textAndStyle.Font = new PdfTrueTypeFont(new System.Drawing.Font("Arial", 8f, FontStyle.Regular), true);
            textAndStyle.Brush = PdfBrushes.Black;
            lst.List.Add(textAndStyle);
            row.Cells[0].Value = lst;

            grid.Draw(page, new PointF(10, 20));
            String outputFile = "..\\..\\Sample.pdf";
            doc.SaveToFile(outputFile, FileFormat.PDF);
            System.Diagnostics.Process.Start(outputFile);
        }
    }
}
Imports Spire.Pdf
Imports Spire.Pdf.Graphics
Imports Spire.Pdf.Grid
Imports System.Drawing


Namespace LineBreak
	Class Program
		Private Shared Sub Main(args As String())
			Dim doc As New PdfDocument()
			Dim page As PdfPageBase = doc.Pages.Add()

			Dim grid As New PdfGrid()
			grid.Style.CellPadding = New PdfPaddings(1, 1, 1, 1)
			Dim row As PdfGridRow = grid.Rows.Add()
			grid.Columns.Add(3)
			grid.Columns(0).Width = 80
			grid.Columns(1).Width = 80
			grid.Columns(2).Width = 80

			Dim lst As New PdfGridCellContentList()
			Dim textAndStyle As New PdfGridCellContent()
			textAndStyle.Text = "Line 1"
			textAndStyle.Font = New PdfTrueTypeFont(New System.Drawing.Font("Airal", 8F, FontStyle.Regular), True)
			textAndStyle.Brush = PdfBrushes.Black
			lst.List.Add(textAndStyle)
			textAndStyle = New PdfGridCellContent()
			textAndStyle.Text = vbLf & "Line 2"
			textAndStyle.Font = New PdfTrueTypeFont(New System.Drawing.Font("Arial", 8F, FontStyle.Regular), True)
			textAndStyle.Brush = PdfBrushes.Black
			lst.List.Add(textAndStyle)
			textAndStyle = New PdfGridCellContent()
			textAndStyle.Text = vbLf & "Line 3"
			textAndStyle.Font = New PdfTrueTypeFont(New System.Drawing.Font("Arial", 8F, FontStyle.Regular), True)
			textAndStyle.Brush = PdfBrushes.Black
			lst.List.Add(textAndStyle)
			textAndStyle = New PdfGridCellContent()
			textAndStyle.Text = vbLf & "Line 4"
			textAndStyle.Font = New PdfTrueTypeFont(New System.Drawing.Font("Arial", 8F, FontStyle.Regular), True)
			textAndStyle.Brush = PdfBrushes.Black
			lst.List.Add(textAndStyle)
			row.Cells(0).Value = lst

			grid.Draw(page, New PointF(10, 20))
			Dim outputFile As [String] = "..\..\Sample.pdf"
			doc.SaveToFile(outputFile, FileFormat.PDF)
			System.Diagnostics.Process.Start(outputFile)
		End Sub
	End Class
End Namespace
How to create vertical table at one side of the word document
2015-01-13 08:46:41 Written by AdministratorSpire.Doc can help developers to create word table with data and format cells easily and it also supports to add text watermark into the word documents. This article will show you how to create a vertical table at one side of the word document, which looks like the vertical watermark in the word document.
Firstly, please check the effective screenshot of the vertical table at the right of the word document added by Spire.Doc:
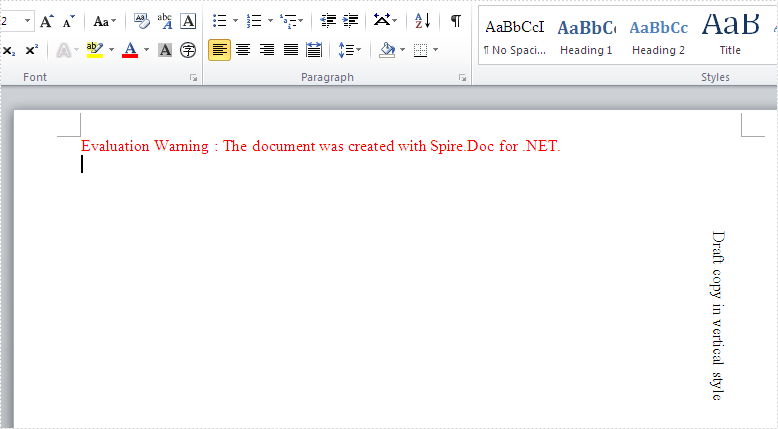
Here comes to the steps of how to create vertical table in C#.
Step 1: Create a new document and add a section to the document.
Document document = new Document();
Section section=document.AddSection();
Step 2: Add a table with rows and columns and set the text for the table.
Table table = section.AddTable();
table.ResetCells(1, 1);
TableCell cell = table.Rows[0].Cells[0];
table.Rows[0].Height = 150;
cell.AddParagraph().AppendText("Draft copy in vertical style");
Step 3: Set the TextDirection for the table to RightToLeftRotated.
cell.CellFormat.TextDirection = TextDirection.RightToLeftRotated;
Step 4: Set the table format.
table.TableFormat.WrapTextAround = true;
table.TableFormat.Positioning.VertRelationTo = VerticalRelation.Page;
table.TableFormat.Positioning.HorizRelationTo = HorizontalRelation.Page;
table.TableFormat.Positioning.HorizPosition = section.PageSetup.PageSize.Width- table.Width;
table.TableFormat.Positioning.VertPosition = 200;
Step 5: Save the document to file.
document.SaveToFile("result.docx",FileFormat.docx2013);
Full codes in C#:
using Spire.Doc;
using Spire.Doc.Documents;

namespace CreateVerticalTable
{
    class Program
    {
        static void Main(string[] args)
        {

            Document document = new Document();
            Section section=document.AddSection();
            Table table = section.AddTable();
            table.ResetCells(1, 1);
            TableCell cell = table.Rows[0].Cells[0];
            table.Rows[0].Height = 150;
            cell.AddParagraph().AppendText("Draft copy in vertical style");
            cell.CellFormat.TextDirection = TextDirection.RightToLeftRotated;
            table.Format.WrapTextAround = true;
            table.Format.Positioning.VertRelationTo = VerticalRelation.Page;
            table.Format.Positioning.HorizRelationTo = HorizontalRelation.Page;
            table.Format.Positioning.HorizPosition = section.PageSetup.PageSize.Width - table.Width;
            table.Format.Positioning.VertPosition = 200;

            document.SaveToFile(""result.docx"", FileFormat.Docx2013);

        }
    }
}
