Knowledgebase (2417)
Children categories
Text annotation is frequently used in PDF for creating a comment or explaining more about an item. Using Spire.PDF you can create a text mark-up annotation, edit an existing annotation and delete specified or all annotations. This article is aimed to demonstrate how to modify and format an existing text annotation in a PDF document.
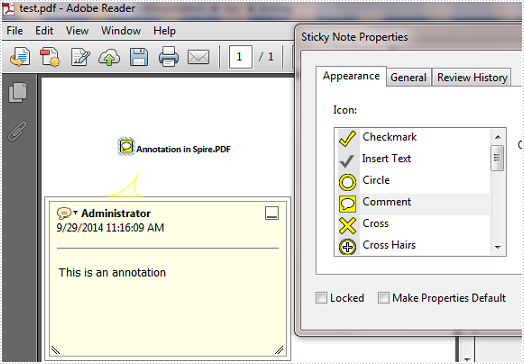
Test File:
Changes we want to make:
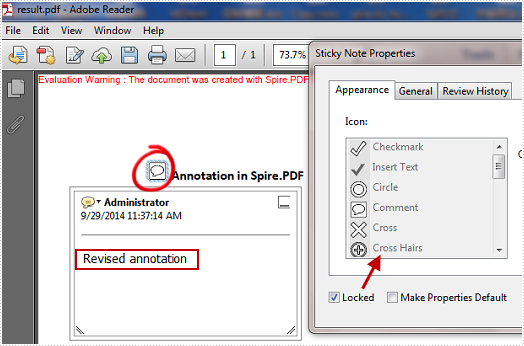
- Modify the annotation text.
- Change the color of the annotation icon.
- Fix the annotation flag including its position, color, and type.
Code Snippet
Step 1: Create a new PDF document and load the test file.
PdfDocument pdf = new PdfDocument("test.pdf");
Step 2: Get the annotation from the document.
PdfAnnotation annotation = pdf.Pages[0].AnnotationsV2[0];
Step 3: Set the text, border, color of the annotation and lock the annotation flag.
annotation.Contents = "Revised annotation";
annotation.Border.Width = 0.75f;
annotation.Color = new PdfRGBColor(Color.White);
annotation.Flags = PdfAnnotationFlags.Locked;
Step 4: Save and launch the file.
pdf.SaveToFile("result.pdf");
Process.Start("result.pdf");
Target Effect:
Full Code:
using Spire.Pdf;
using Spire.Pdf.Interactive.Annotations;
using Spire.Pdf.Graphics;
using System.Diagnostics;
using System.Drawing;

namespace ModifyAndFormatAnnotation
{
    class Program
    {
        static void Main(string[] args)
        {
            PdfDocument pdf = new PdfDocument("test.pdf");

            //Get the first annotation on the first page
            PdfPageBase page = pdf.Pages[0];
            PdfAnnotation annotation = page.AnnotationsV2[0];

            //Modify the contents, the border width, the color of the annotation and lock the annotation flag
            annotation.Contents = "Revised annotation";
            annotation.Border.Width = 0.75f;
            annotation.Color = new PdfRGBColor(Color.White);
            annotation.Flags = PdfAnnotationFlags.Locked;

            pdf.SaveToFile("result.pdf");
            Process.Start("result.pdf");
        }
    }
}
Imports Spire.Pdf
Imports Spire.Pdf.Interactive.Annotations
Imports Spire.Pdf.Graphics
Imports System.Diagnostics
Imports System.Drawing

Namespace ModifyAndFormatAnnotation
    Class Program
        Private Shared Sub Main(args As String())
            Dim pdf As New PdfDocument("test.pdf")

            'Get the first annotation on the first page
            Dim page As PdfPageBase = pdf.Pages(0)
            Dim annotation As PdfAnnotation = page.AnnotationsV2(0)

            'Modify the contents, the border width, the color of the annotation and lock the annotation flag
            annotation.Contents = "Revised annotation"
            annotation.Border.Width = 0.75F
            annotation.Color = New PdfRGBColor(Color.White)
            annotation.Flags = PdfAnnotationFlags.Locked

            pdf.SaveToFile("result.pdf")
            Process.Start("result.pdf")
        End Sub
    End Class
End Namespace
When you need to print many PDF documents, surely you don't want to see the print dialog every time. This article will show you clearly how to print PDF documents in WPF without invoking Print Dialog by using Spire.PDFViewer for WPF.
Here comes to the steps of how to print PDF files in WPF.
Step 1: First you need to create a new project by choosing "WPF Application".
Step 2: Set the Target Framework to be .NET Framework 4 in Properties.
Step 3: Right-click on the blank part of the Toolbox → "Add Tab" → "Choose Items" → "WPF Components" → "Browse" to the "Bin" folder → find the file "Spire.PdfViewer.Wpf.dll" → "OK".
Step4: Spire.PDFViewer offers PdfViewer and PdfDocumentViewer to print the PDF files in C#. Please check the code snippet as below:
Print via PdfViewer without invoking PrintDialog with the following method.
PrintDialog dialog = new PrintDialog();
this.pdfViewer1.PrintDialog = dialog;
dialog.PrintDocument(pdfViewer1.PrintDocument.DocumentPaginator, "Print Document");
Print via PdfDocumentViewer without invoking PrintDialog with the following method.
PrintDialog dialog = new PrintDialog();
this.pdfDocumentViewer1.PrintDialog = dialog;
dialog.PrintDocument(pdfDocumentViewer1.PrintDocument.DocumentPaginator, "Print Document");
Then your PDF document will be printed directly without showing the print dialog.
Full codes of how to print PDF file in WPF.
namespace PrintPDFinWPF
{
    public partial class MainWindow : Window
    {
        public MainWindow()
        {
            InitializeComponent();
            this.pdfViewer1.LoadFromFile("sample.pdf");
            ////Print the PDF file directly with PrintDialog
            //this.pdfViewer1.Print();

            //Print without Print Dialog
            PrintDialog dialog = new PrintDialog();
            this.pdfViewer1.PrintDialog = dialog;
            dialog.PrintDocument(pdfViewer1.PrintDocument.DocumentPaginator, "Print Document");
        }
    }
}
A file with the XLSM extension is an Excel Macro-Enabled Workbook file. For security reasons, XLS file or XLSX file does not enable macros by default. Thus, if you want to execute macros in Excel file, you need to convert XLS or XLSX to XLSM at the first place. In this article, I’ll introduce you how to convert XLS to XLSM with the macro maintained using Spire.XLS.
Here is the method:
Step 1: Create a new instance of Spire.Xls.Workbook class.
Workbook workbook = new Workbook();
Step 2: Load the test file and imports its data to workbook.
workbook.LoadFromFile("test.xls", ExcelVersion.Version97to2003);
Step 3: Save the workbook as a new XLSM file.
workbook.SaveToFile("result.xlsm", FileFormat.Version2007);
Full Code:
using Spire.Xls;
namespace Convert
{
    class Program
    {
        static void Main(string[] args)
        {
            Workbook workbook = new Workbook();
            workbook.LoadFromFile("test.xls", ExcelVersion.Version97to2003);
            workbook.SaveToFile("result.xlsm", FileFormat.Version2007);
        }
    }
}
Imports Spire.Xls
Namespace Convert
	Class Program
		Private Shared Sub Main(args As String())
			Dim workbook As New Workbook()
			workbook.LoadFromFile("test.xls", ExcelVersion.Version97to2003)
			workbook.SaveToFile("result.xlsm", FileFormat.Version2007)
		End Sub

	End Class
End Namespace
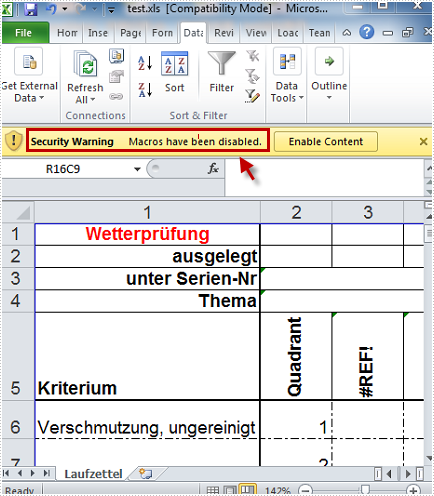
Test File:
As is shown in the picture, Excel automatically disables macro in XLS file.
Result:
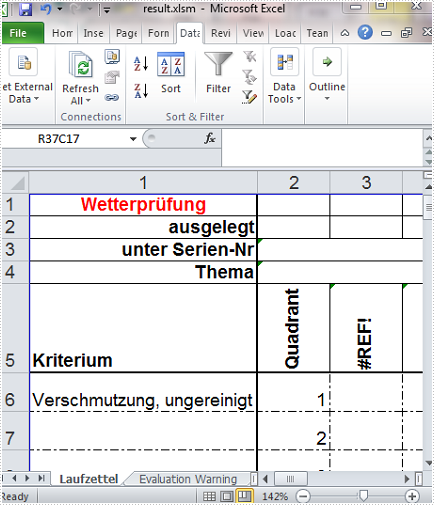
No security warning in the converted XLSM file.