
Knowledgebase (2345)
Children categories
Shading is a powerful feature in MS Word that adds a background color to specified text or paragraphs in a document. This not only enhances the visual appeal of the document, but also helps to differentiate between different sections and makes the content more readable. In this article, you will learn how to apply shading to a paragraph or text in Word in C# using Spire.Doc for .NET.
Install Spire.Doc for .NET
To begin with, you need to add the DLL files included in the Spire.Doc for.NET package as references in your .NET project. The DLL files can be either downloaded from this link or installed via NuGet.
PM> Install-Package Spire.Doc
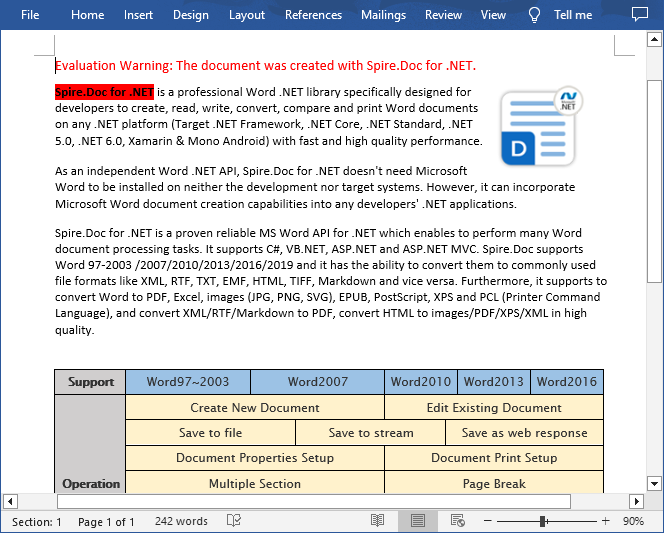
Apply Paragraph Shading in Word in C#
Spire.Doc for .NET provides developers with the Paragraph.Format.BackColor property to apply a background color to a specified paragraph in Word. The following are the detailed steps:
- Create a Document instance.
- Load a Word document using Document.LoadFromFile() method.
- Get a specified section using Document.Sections[] property.
- Get a specified paragraph using Section.Paragraphs[] property.
- Set a background color for the paragraph using Paragraph.Format.BackColor property.
- Save the result document using Document.SaveToFile() method.
- C#
using Spire.Doc;
using Spire.Doc.Documents;
using System.Drawing;

namespace WordParagrahShade
{
    class Program
    {
        static void Main(string[] args)
        {
            // Create a Document instance
            Document document = new Document();

            // Load a Word document
            document.LoadFromFile("Sample.docx");

            // Get the first section
            Section section = document.Sections[0];

            // Get the second paragraph
            Paragraph paragaph = section.Paragraphs[1];

            // Set a background color for the paragraph
            paragaph.Format.BackColor = Color.Yellow;

            // Save the result document
            document.SaveToFile("ParagraphBackground.docx", FileFormat.Docx);
        }
    }
}
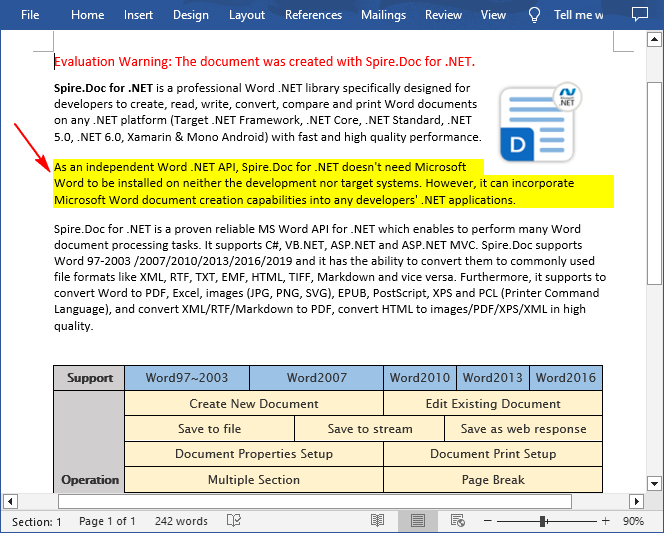
Apply Shading to Specified Text in Word in C#
If you only need to apply shading to specified text, you can first find the specific text through the Paragraph.Find() method, get its text range and then set a background color for the text range through the TextRange.CharacterFormat.TextBackgroundColor property. The following are the detailed steps:
- Create a Document instance.
- Load a Word document using Document.LoadFromFile() method.
- Get a specified section using Document.Sections[] property.
- Get a specified paragraph using Section.Paragraphs[] property.
- Find a specified text in the paragraph Paragraph.Find() method.
- Get the text range of the found text using TextSelection.GetAsOneRange() method.
- Set a background color for the text range using TextRange.CharacterFormat.TextBackgroundColor property.
- Save the document using Document.SaveToFile() method.
- C#
using Spire.Doc;
using Spire.Doc.Documents;
using Spire.Doc.Fields;
using System.Drawing;

namespace ShadeText
{
    class Program
    {
        static void Main(string[] args)
        {
            // Create a Document instance
            Document document = new Document();

            // Load a Word document
            document.LoadFromFile("Sample.docx");

            // Get the first section
            Section section = document.Sections[0];

            // Get the first paragraph
            Paragraph paragaph = section.Paragraphs[0];

            // Find a specified text in the paragraph
            TextSelection selection = paragaph.Find("Spire.Doc for .NET", true, false);

            // Get the text range of the found text
            TextRange range = selection.GetAsOneRange();

            // Set a background color for the text range
            range.CharacterFormat.TextBackgroundColor = Color.Red;

            // Save the result document
            document.SaveToFile("TextBackground.docx", FileFormat.Docx);
        }
    }
}
Apply for a Temporary License
If you'd like to remove the evaluation message from the generated documents, or to get rid of the function limitations, please request a 30-day trial license for yourself.
Group the Excel cells is to tie a range of cells together so that they can be collapsed or expanded. But usually, we also need to ungroup the Excel cells. Consequently, the articles aims at introducing how to ungroup Excel cells in C#, through a professional Excel .NET Component Spire.Xls.
Just as its name implies, ungroup Excel cells is to ungroup a range of cells that were previously grouped. Before ungroup Excel cells, we should complete the preparatory work:
- Download the Spire.XLS and install it on your machine.
- Add the Spire.XLS.dll files as reference.
- Open bin folder and select the three dll files under .NET 4.0.
- Right click property and select properties in its menu.
- Set the target framework as .NET 4.
- Add Spire.XLS as namespace.
Then here comes to the explanation of the code:
Step 1: Create an instance of Spire.XLS.Workbook.
Workbook workbook = new Workbook();
Step 2: Load the file base on a specified file path.
workbook.LoadFromFile(@"group.xlsx");
Step 3: Get the first worksheet.
Worksheet sheet = workbook.Worksheets[0];
Step 4: Ungroup the first 5 row cells.
sheet.UngroupByRows(1, 5);
Step 5: Save as the generated file.
workbook.SaveToFile(@"result.xlsx", ExcelVersion.Version2010);
Full code:
using Spire.Xls;
namespace UngroupCell
{
    class Program
    {

        static void Main(string[] args)
        {

            Workbook workbook = new Workbook();
            workbook.LoadFromFile(@"group.xlsx");
            Worksheet sheet = workbook.Worksheets[0];
            sheet.UngroupByRows(1, 5);
            workbook.SaveToFile(@"..\..\result.xlsx", ExcelVersion.Version2010);

        }
    }
}
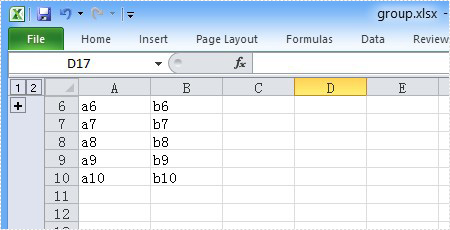
Please preview the original group effect screenshot:
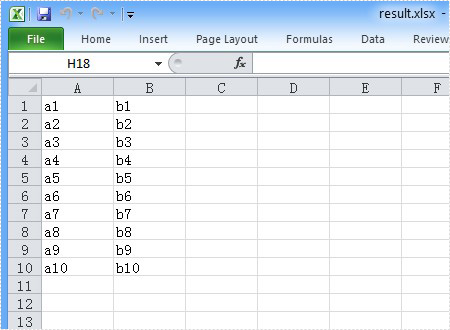
And the generated ungroup effect screenshot:
Page transitions display a decorative effect such as a dissolve or wipe when you’re turning pages in a document that is exported to PDF format. Page transitions are especially useful when you create a slideshow in PDF format. And Spire.PDF, a powerful .NET component specially designed for developers enables you to apply page transitions to PDF file.
A solution is introduced here to show how to apply page transitions to PDF using Spire.PDF. Spire.PDF provides you a class called PdfSection. PdfSection has a property called PageSettings. And PageSettings has a property called Transition. You can use this property to apply page transitions.
Step 1: Create a new section.
PdfSection section = doc.Sections.Add();
section.PageSettings.Size = PdfPageSize.A4;
Step 2: Create a new PdfPageTransition instance.
section.PageSettings.Transition = new PdfPageTransition();
Step 3: Set the style of page transition.
section.PageSettings.Transition.Style = PdfTransitionStyle.Fade;
You can assign any value that is defined in PdfTransitionStyle to Style.
Step 4: Set the duration of transition effect in seconds.
section.PageSettings.Transition.Duration = 3;
Step 5: Set the page's display duration.
section.PageSettings.Transition.PageDuration = 2;
Step 6: Add more sections and apply more page transitions.
section = doc.Sections.Add();
section.PageSettings.Size = PdfPageSize.A4;
section.PageSettings.Transition = new PdfPageTransition();
section.PageSettings.Transition.Style = PdfTransitionStyle.Box;
section.PageSettings.Transition.Motion = PdfTransitionMotion.Outward;
section.PageSettings.Transition.Duration = 3;
section.PageSettings.Transition.PageDuration = 2;
You can combine the type of PdfPageTransition with the property Direction and the property Dimension of PdfPageTransition to create new and flexible page transition. For example, in this step, the Style of page transition is PdfTransitionStyle.Box and the Motion of page transition is PdfTransitionMotion.Outward.
At last, save the file.
doc.SaveToFile("result.pdf");
To see page transitions in the PDF, open the PDF file in Full Screen.


Here comes to the full code:
using Spire.Pdf;
using Spire.Pdf.Graphics;
using System.Drawing;


namespace PageTransitions
{
    class Program
    {
        static void Main(string[] args)
        {
            PdfDocument doc = new PdfDocument();

            PdfSection section = doc.Sections.Add();
            section.PageSettings.Size = PdfPageSize.A4;
            section.PageSettings.Transition = new PdfPageTransition();
            section.PageSettings.Transition.Style = PdfTransitionStyle.Fade;
            section.PageSettings.Transition.Duration = 3;
            section.PageSettings.Transition.PageDuration = 2;

            PdfNewPage page = section.Pages.Add();
            page.BackgroundColor = Color.Blue;
            page.Canvas.DrawString("This is Page One.", new PdfFont(PdfFontFamily.Helvetica, 20f), new PdfSolidBrush(Color.Black), 10, 10);

            page = section.Pages.Add();
            page.BackgroundColor = Color.Green;
            page.Canvas.DrawString("This is Page Two.", new PdfFont(PdfFontFamily.Helvetica, 20f), new PdfSolidBrush(Color.Black), 10, 10);

            section = doc.Sections.Add();
            section.PageSettings.Size = PdfPageSize.A4;
            section.PageSettings.Transition = new PdfPageTransition();
            section.PageSettings.Transition.Style = PdfTransitionStyle.Box;
            section.PageSettings.Transition.Motion = PdfTransitionMotion.Outward;
            section.PageSettings.Transition.Duration = 3;
            section.PageSettings.Transition.PageDuration = 2;

            page = section.Pages.Add();
            page.BackgroundColor = Color.Orange;
            page.Canvas.DrawString("This is Page Three.", new PdfFont(PdfFontFamily.Helvetica, 20f), new PdfSolidBrush(Color.Black), 10, 10);

            page = section.Pages.Add();
            page.BackgroundColor = Color.Brown;
            page.Canvas.DrawString("This is Page Four.", new PdfFont(PdfFontFamily.Helvetica, 20f), new PdfSolidBrush(Color.Black), 10, 10);

            section = doc.Sections.Add();
            section.PageSettings.Size = PdfPageSize.A4;
            section.PageSettings.Transition = new PdfPageTransition();
            section.PageSettings.Transition.Duration = 3;
            section.PageSettings.Transition.Style = PdfTransitionStyle.Dissolve;
            section.PageSettings.Transition.PageDuration = 2;

            page = section.Pages.Add();
            page.BackgroundColor = Color.Orange;
            page.Canvas.DrawString("This is Page Five.", new PdfFont(PdfFontFamily.Helvetica, 20f), new PdfSolidBrush(Color.Black), 10, 10);

            page = section.Pages.Add();
            page.BackgroundColor = Color.Navy;
            page.Canvas.DrawString("This is Page Six.", new PdfFont(PdfFontFamily.Helvetica, 20f), new PdfSolidBrush(Color.Black), 10, 10);

            doc.SaveToFile("result.pdf");
            doc.Close();
        }
    }
}
