
Knowledgebase (2345)
Children categories
Tables in Word documents allow users to organize data in a structured, readable format. However, at times you may find that some tables are outdated or no longer serve their intended purpose, making it necessary to remove them. In this article, you will learn how to remove tables from a Word document in C# using Spire.Doc for .NET.
Install Spire.Doc for .NET
To begin with, you need to add the DLL files included in the Spire.Doc for.NET package as references in your .NET project. The DLL files can be either downloaded from this link or installed via NuGet.
PM> Install-Package Spire.Doc
Remove a Specified Table in Word in C#
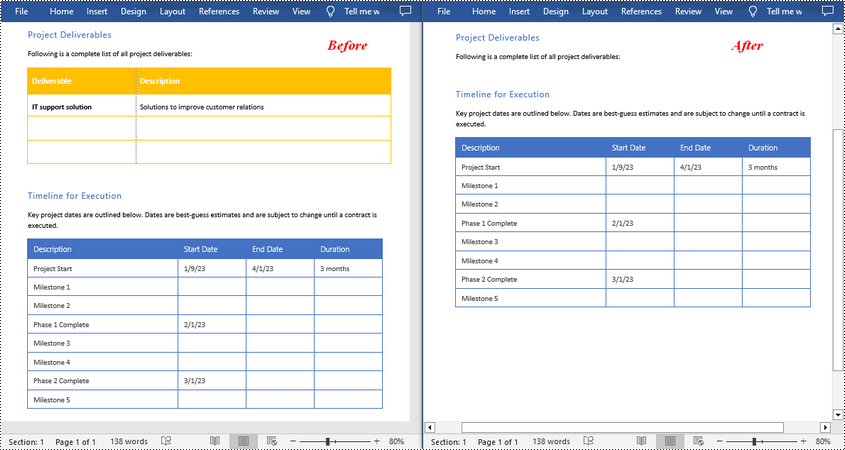
Spire.Doc for .NET provides the Section.Tables.RemoveAt(int index) method to delete a specified table in a Word document by index. The following are the detailed steps.
- Create a Document instance.
- Load a Word document using Document.LoadFromFile() method.
- Get a specified section using Document.Sections[] property.
- Delete a specified table by index using Section.Tables.RemoveAt() method.
- Save the result document using Document.SaveToFile() method.
- C#
using Spire.Doc;

namespace RemoveTable
{
    class Program
    {
        static void Main(string[] args)
        {
            //Create a Document instance
            Document doc = new Document();

            //Load a Word document
            doc.LoadFromFile("tables.docx");

            //Get the first section in the document
            Section sec = doc.Sections[0];

            //Remove the first table in the section
            sec.Tables.RemoveAt(0);

            //Save the result document
            doc.SaveToFile("RemoveATable.docx", FileFormat.Docx);
        }
    }
}
Remove All Tables in Word in C#
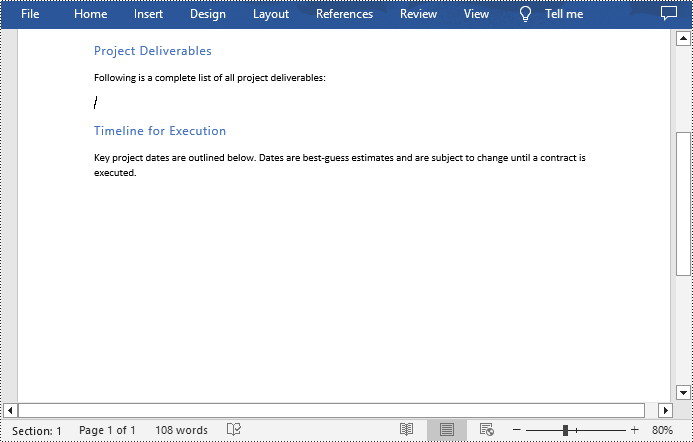
To delete all tables from a Word document, you need to iterate through all sections in the document, then iterate through all tables in each section and remove them through the Section.Tables.Remove() method. The following are the detailed steps.
- Create a Document instance.
- Load a Word document using Document.LoadFromFile() method.
- Iterate through all sections in the document.
- Iterate through all tables in each section.
- Delete the tables using Section.Tables.Remove() method.
- Save the result document using Document.SaveToFile() method.
- C#
using Spire.Doc;

namespace RemoveAllTable
{
    class Program
    {
        static void Main(string[] args)
        {
            //Create a Document instance
            Document doc = new Document();

            //Load a Word document
            doc.LoadFromFile("tables.docx");

            //Iterate through all sections in the document
            foreach (Section section in doc.Sections)
            {
                //Iterate through all tables in each section
                foreach (Table table in section.Tables)
                {
                    //Remove the tables
                    section.Tables.Remove(table);
                }
            }

            //Save the result document
            doc.SaveToFile("RemoveTables.docx", FileFormat.Docx);
        }
    }
}
Apply for a Temporary License
If you'd like to remove the evaluation message from the generated documents, or to get rid of the function limitations, please request a 30-day trial license for yourself.
When the data in specific rows or columns are no longer needed, you can delete those rows or columns from your worksheet. In this article, you will learn how to delete rows and columns from Excel in C# and VB.NET using Spire.XLS for .NET library.
Install Spire.XLS for.NET
To begin with, you need to add the DLL files included in the Spire.XLS for.NET package as references in your .NET project. The DLLs files can be either downloaded from this link or installed via NuGet.
PM> Install-Package Spire.XLS
Delete a Specific Row and Column from Excel in C# and VB.NET
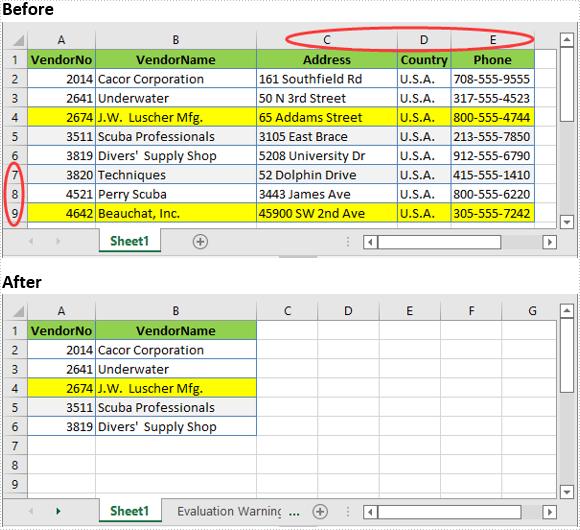
The following are the steps to delete a specific row and column from an Excel worksheet:
- Create a Workbook instance.
- Load an Excel file using Workbook.LoadFromFile() method.
- Get the desired worksheet using Workbook.Worksheets[sheetIndex] property.
- Delete the desired row from the worksheet by its index (1-based) using Worksheet.DeleteRow(rowIndex) method.
- Delete the desired column from the worksheet by its index (1-based) using Worksheet.DeleteColumn(columnIndex) method.
- Save the result file using Workbook.SaveToFile() method.
- C#
- VB.NET
using Spire.Xls;

namespace DeleteRowAndColumn
{
    class Program
    {
        static void Main(string[] args)
        {
            //Create a Workbook instance
            Workbook workbook = new Workbook();
            //Load an Excel file
            workbook.LoadFromFile("Sample.xlsx");

            //Get the first worksheet
            Worksheet sheet = workbook.Worksheets[0];
            //Delete the 9th row
            sheet.DeleteRow(9);
            //Delete the 3rd column
            sheet.DeleteColumn(3);

            //Save the result file
            workbook.SaveToFile("DeleteRowAndColumn.xlsx", ExcelVersion.Version2016);
        }
    }
}

Delete Multiple Rows and Columns from Excel in C# and VB.NET
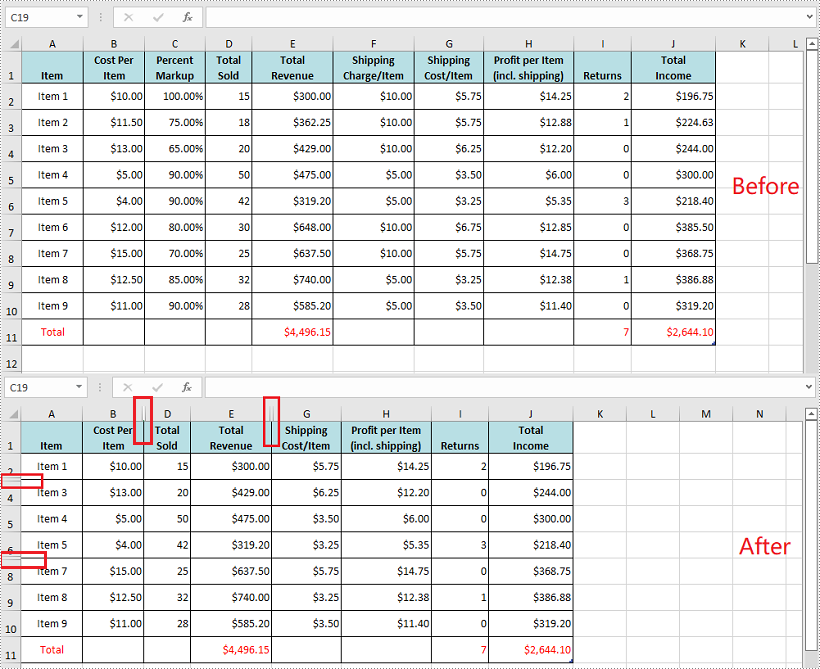
The following are the steps to delete multiple rows and columns from an Excel worksheet:
- Create a Workbook instance.
- Load an Excel file using Workbook.LoadFromFile() method.
- Get the desired worksheet using Workbook.Worksheets[sheetIndex] property.
- Delete the desired rows from the worksheet using Worksheet.DeleteRow(startRowIndex, rowCount) method.
- Delete the desired columns from the worksheet using Worksheet.DeleteColumn(startColumnIndex, columnCount) method.
- Save the result file using Workbook.SaveToFile() method.
- C#
- VB.NET
using Spire.Xls;

namespace DeleteMultipleRowsAndColumns
{
    class Program
    {
        static void Main(string[] args)
        {
            //Create a Workbook instance
            Workbook workbook = new Workbook();
            //Load an Excel file
            workbook.LoadFromFile(@"Sample.xlsx");

            //Get the first worksheet
            Worksheet sheet = workbook.Worksheets[0];
            //Delete 3 rows from the worksheet starting from the 7th row
            sheet.DeleteRow(7, 3);
            //Delete 3 columns from the worksheet starting from the 3rd column
            sheet.DeleteColumn(3, 3);

            //Save the result file
            workbook.SaveToFile("DeleteMultipleRowsAndColumns.xlsx", ExcelVersion.Version2016);
        }
    }
}
Apply for a Temporary License
If you'd like to remove the evaluation message from the generated documents, or to get rid of the function limitations, please request a 30-day trial license for yourself.
When dealing with Excel files containing large amounts of data, you may sometimes need to hide certain rows and columns to conceal useless data so that you can focus on the information you need to analyze. In this article, you will learn how to hide or show rows and columns in Excel in C# and VB.NET using Spire.XLS for .NET.
- Hide Specific Rows and Columns in Excel
- Show Specific Hidden Rows and Columns in Excel
- Hide Multiple Rows and Columns at Once in Excel
- Show All Hidden Rows and Columns in Excel
Install Spire.XLS for .NET
To begin with, you need to add the DLL files included in the Spire.XLS for .NET package as references in your .NET project. The DLL files can be either downloaded from this link or installed via NuGet.
PM> Install-Package Spire.XLS
Hide Specific Rows and Columns in Excel in C# and VB.NET
The following steps demonstrate how to hide specific rows and columns in Excel in C# and VB.NET:
- Initialize an instance of the Workbook class.
- Load an Excel file using Workbook.LoadFromFile() method.
- Get a specific worksheet through Workbook.Worksheets[int sheetIndex] property.
- Hide specific rows in the worksheet using Worksheet.HideRow(int rowIndex) method.
- Hide Specific columns in the worksheet using Worksheet.HideColumn(int columnIndex) method.
- Save the result file using Workbook.SaveToFile() method.
- C#
- VB.NET
using Spire.Xls;

namespace HideExcelRowsAndColumns
{
    class Program
    {
        static void Main(string[] args)
        {
            //Create a Workbook instance
            Workbook workbook = new Workbook();
            //Load an Excel file
            workbook.LoadFromFile("Input.xlsx");

            //Get the first worksheet
            Worksheet sheet = workbook.Worksheets[0];

            //Hide the 3rd and the 7th rows
            sheet.HideRow(3);
            sheet.HideRow(7);

            //Hide the 3rd and the 6th columns
            sheet.HideColumn(3);
            sheet.HideColumn(6);

            //Save the result file
            workbook.SaveToFile("HideRowsAndColumns.xlsx", ExcelVersion.Version2013);
        }
    }
}
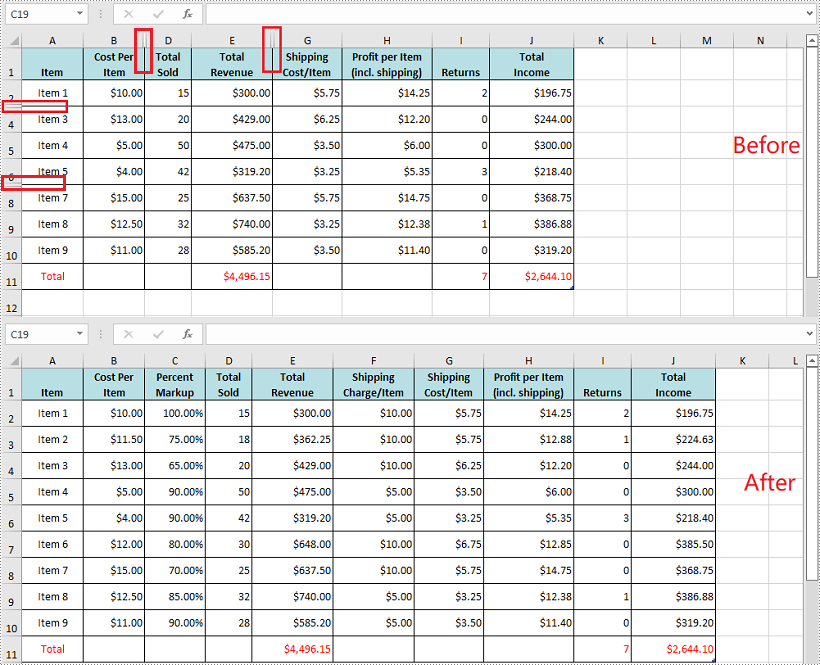
Show Specific Hidden Rows and Columns in Excel in C# and VB.NET
The following steps demonstrate how to show specific hidden rows and columns in Excel in C# and VB.NET:
- Initialize an instance of the Workbook class.
- Load an Excel file using Workbook.LoadFromFile() method.
- Get a specific worksheet through Workbook.Worksheets[int sheetIndex] property.
- Show specific hidden rows in the worksheet using Worksheet.ShowRow(int rowIndex) method.
- Show specific hidden columns in the worksheet using Worksheet.ShowColumn(int columnIndex) method.
- Save the result file using Workbook.SaveToFile() method.
- C#
- VB.NET
using Spire.Xls;

namespace ShowExcelRowsAndColumns
{
    class Program
    {
        static void Main(string[] args)
        {
            //Create a Workbook instance
            Workbook workbook = new Workbook();
            //Load an Excel file
            workbook.LoadFromFile("HideRowsAndColumns.xlsx");

            //Get the first worksheet
            Worksheet sheet = workbook.Worksheets[0];

            //Show the 3rd and the 7th rows
            sheet.ShowRow(3);
            sheet.ShowRow(7);

            //Show the 3rd and the 6th columns
            sheet.ShowColumn(3);
            sheet.ShowColumn(6);

            //Save the result file
            workbook.SaveToFile("ShowRowsAndColumns.xlsx", ExcelVersion.Version2013);
        }
    }
}
Hide Multiple Rows and Columns at Once in Excel in C# and VB.NET
The following steps demonstrate how to hide multiple rows and columns at once in Excel in C# and VB.NET:
- Initialize an instance of the Workbook class.
- Load an Excel file using Workbook.LoadFromFile() method.
- Get a specific worksheet through Workbook.Worksheets[int sheetIndex] property.
- Hide multiple rows in the worksheet using Worksheet.HideRows(int rowIndex, int rowCount) method.
- Hide multiple columns in the worksheet using Worksheet.HideColumns(int columnIndex, int columnCount) method.
- Save the result file using Workbook.SaveToFile() method.
- C#
- VB.NET
using Spire.Xls;

namespace HideMultipleExcelRowsAndColumns
{
    class Program
    {
        static void Main(string[] args)
        {
            //Create a Workbook instance
            Workbook workbook = new Workbook();
            //Load an Excel file
            workbook.LoadFromFile("Input.xlsx");

            //Get the first worksheet
            Worksheet sheet = workbook.Worksheets[0];

            //Hide 3, 4 and 5 rows
            sheet.HideRows(3, 3);

            //Hide 5, 6 and 7 columns
            sheet.HideColumns(5, 3);

            //Save the result file
            workbook.SaveToFile("HideMultipleRowsAndColumns.xlsx", ExcelVersion.Version2013);
        }
    }
}

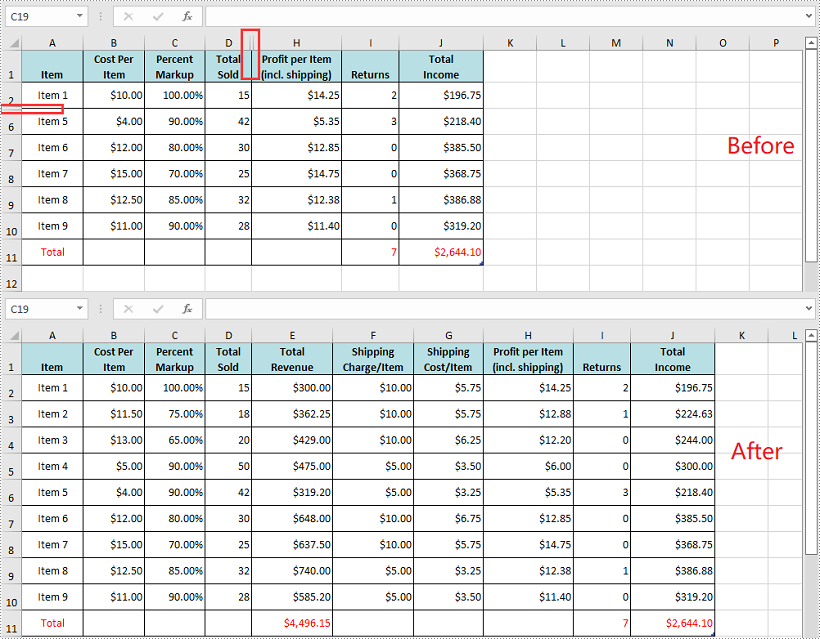
Show All Hidden Rows and Columns in Excel in C# and VB.NET
The following steps demonstrate how to show all hidden rows and columns in Excel in C# and VB.NET:
- Initialize an instance of the Workbook class.
- Load an Excel file using Workbook.LoadFromFile() method.
- Get a specific worksheet through Workbook.Worksheets[int sheetIndex] property.
- Iterate through the rows in the worksheet and find the hidden rows using Worksheet.GetRowIsHide(int rowIndex) method.
- Show all hidden rows using Worksheet.ShowRow(int rowIndex) method.
- Iterate through the columns in the worksheet and find the hidden columns using Worksheet.GetColumnIsHide(int columnIndex) method.
- Show all hidden columns using Worksheet.ShowColumn(int columnIndex) method.
- Save the result file using Workbook.SaveToFile() method.
- C#
- VB.NET
using Spire.Xls;

namespace ShowAllHiddenRowsAndColumns
{
    class Program
    {
        static void Main(string[] args)
        {
            //Create a Workbook instance
            Workbook workbook = new Workbook();
            //Load an Excel file
            workbook.LoadFromFile("HideRowsAndColumns.xlsx");

            //Get the first worksheet
            Worksheet sheet = workbook.Worksheets[0];

            //Iterate through the rows in the worksheet
            for (int i = 1; i <= sheet.LastRow; i++)
            {
                //Check if the current row is hidden
                if (sheet.GetRowIsHide(i))
                {
                    //Show the hidden row
                    sheet.ShowRow(i);
                }
            }

            //Iterate through the columns in the worksheet
            for (int j = 1; j <= sheet.LastRow; j++)
            {
                //Check if the current column is hidden
                if (sheet.GetColumnIsHide(j))
                {
                    //Show the hidden column
                    sheet.ShowColumn(j);
                }
            }

            //Save the result file
            workbook.SaveToFile("ShowAllHiddenRowsAndColumns.xlsx", ExcelVersion.Version2013);
        }
    }
}
Apply for a Temporary License
If you'd like to remove the evaluation message from the generated documents, or to get rid of the function limitations, please request a 30-day trial license for yourself.
