
Knowledgebase (2344)
Children categories
The Find and Replace feature in Excel allows you to quickly find specific values and perform targeted replacements based on specific requirements. With it, all occurrences of a specific value can be updated at once, which can significantly improve productivity when working with large data sets. In this article, you will learn how to programmatically find and replace data in Excel in Python using Spire.XLS for Python.
- Find and Replace Data in a Worksheet in Excel
- Find and Replace Data in a Specific Cell Range in Excel
Install Spire.XLS for Python
This scenario requires Spire.XLS for Python and plum-dispatch v1.7.4. They can be easily installed in your Windows through the following pip command.
pip install Spire.XLS
If you are unsure how to install, please refer to this tutorial: How to Install Spire.XLS for Python on Windows
Find and Replace Data in an Excel Worksheet in Python
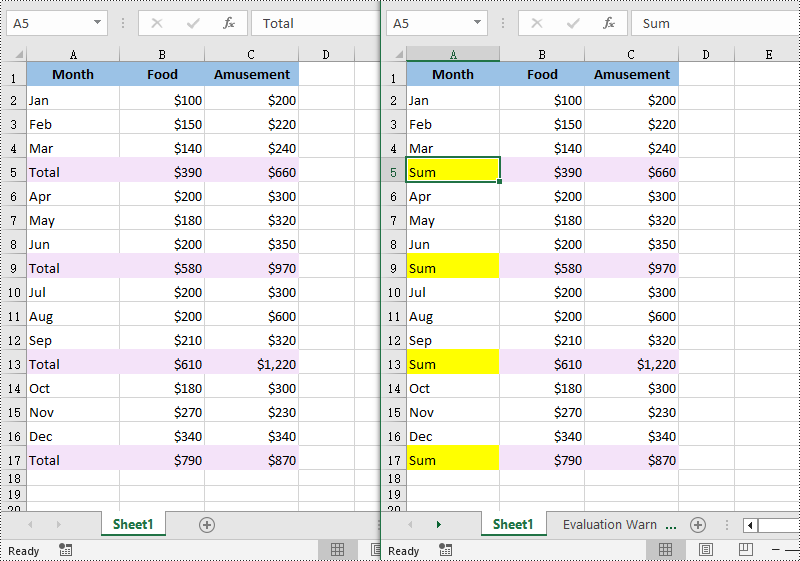
Spire.XLS for Python offers the Worksheet.FindAllString() method to find the cells containing specific data values in an Excel worksheet. Once the cells are found, you can use the CellRange.Text property to update their values with new values. The detailed steps are as follows:
- Create a Workbook object.
- Load an Excel file using Workbook.LoadFromFile() method.
- Get a specific worksheet using Workbook.Worksheets[] property.
- Find the cells containing a specific value in the worksheet using Worksheet.FindAllString() method.
- Iterate through the found cells.
- Replace the value of each found cell with another value using CellRange.Text property.
- Set a background color to highlight the cell using CellRange.Style.Color property.
- Save the result file using Workbook.SaveToFile() method.
- Python
from spire.xls import *
from spire.xls.common import *

# Create a Workbook object
workbook = Workbook()

# Load an Excel document from disk
workbook.LoadFromFile("input.xlsx")

# Get the first worksheet
worksheet = workbook.Worksheets[0]

# Find the cells with the specific string value “Total” in the worksheet
ranges = worksheet.FindAllString("Total", False, False)

# Iterate through the found cells
for range in ranges:
    # Replace the value of the cell with another value
    range.Text = "Sum"

    # Set a background color for the cell
    range.Style.Color = Color.get_Yellow()

# Save the result file
workbook.SaveToFile("FindAndReplaceData.xlsx", ExcelVersion.Version2016)
workbook.Dispose()
Find and Replace Data in a Specific Cell Range in Excel in Python
Spire.XLS for Python also allows you to find the cells containing a specific value in a cell range through the CellRange.FindAllString() method. Then you can update the value of each found cell with another value using the CellRange.Text property. The detailed steps are as follows:
- Create a Workbook object.
- Load an Excel file using Workbook.LoadFromFile() method.
- Get a specific worksheet using Workbook.Worksheets[] property.
- Get a specific cell range of the worksheet using Worksheet.Range[] property.
- Find the cells with a specific value in the cell range using CellRange.FindAllString() method.
- Iterate through the found cells.
- Replace the value of each found cell with another value using CellRange.Text property.
- Set a background color to highlight the cell using CellRange.Style.Color property.
- Save the result file using Workbook.SaveToFile() method.
- Python
from spire.xls import *
from spire.xls.common import *

# Create a Workbook object
workbook = Workbook()

# Load an Excel document from disk
workbook.LoadFromFile("input.xlsx")

# Get the first worksheet
sheet = workbook.Worksheets[0]

# Get a specific cell range
range = sheet.Range["A6:C13"]

# Find the cells with the specific value "Total" in the cell range
cells = range.FindAllString("Total", False, False)

# Iterate through the found cells
for cell in cells:

    # Replace the value of the cell with another value
    cell.Text = "Sum"

    # Set a background color for the cell
    cell.Style.Color = Color.get_Yellow()

# Save the result file
workbook.SaveToFile("ReplaceDataInCellRange.xlsx", ExcelVersion.Version2016)
workbook.Dispose()

Apply for a Temporary License
If you'd like to remove the evaluation message from the generated documents, or to get rid of the function limitations, please request a 30-day trial license for yourself.
Deleting rows and columns from Excel is crucial for maintaining clean and organized data. For example, when a worksheet accumulates blank rows or columns that serve no purpose and clutter the data, removing them becomes necessary. By deleting these blank rows and columns, you can effectively reduce the file size and enhance the spreadsheet's readability. In this article, we will explain how to delete rows and columns from Excel in Python using Spire.XLS for Python.
- Delete a Specific Row and Column from Excel in Python
- Delete Multiple Rows and Columns from Excel in Python
- Delete Blank Rows and Columns from Excel in Python
Install Spire.XLS for Python
This scenario requires Spire.XLS for Python and plum-dispatch v1.7.4. They can be easily installed in your Windows through the following pip command.
pip install Spire.XLS
If you are unsure how to install, please refer to this tutorial: How to Install Spire.XLS for Python on Windows
Delete a Specific Row and Column from Excel in Python
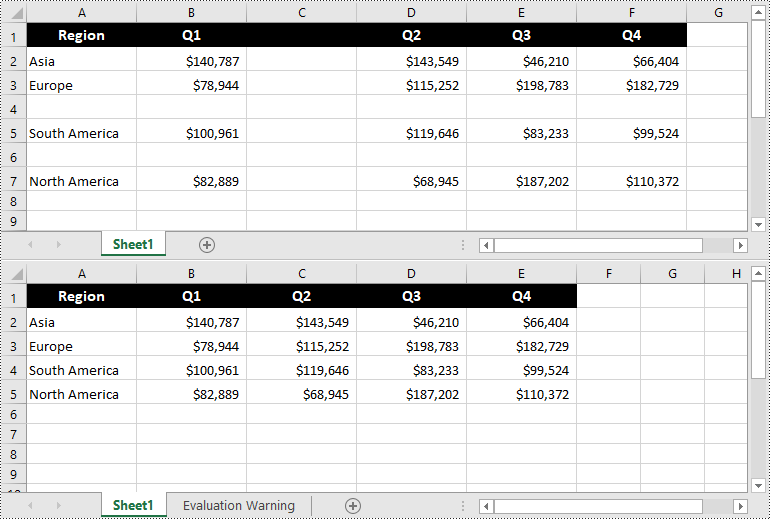
The Worksheet.DeleteRow(rowIndex) and Worksheet.DeleteColumn(columnIndex) methods provided by Spire.XLS for Python enable you to delete a specific row and column from an Excel worksheet. The detailed steps are as follows.
- Create an object of the Workbook class.
- Load an Excel file using Workbook.LoadFromFile() method.
- Get the desired worksheet using Workbook.Worksheets[sheetIndex] property.
- Delete the desired row from the worksheet by its index (1-based) using Worksheet.DeleteRow(rowIndex) method.
- Delete the desired column from the worksheet by its index (1-based) using Worksheet.DeleteColumn(columnIndex) method.
- Save the result file using Workbook.SaveToFile() method.
- Python
from spire.xls import *
from spire.xls.common import *

# Create a Workbook object
workbook = Workbook()
# Load an Excel file
workbook.LoadFromFile("Input.xlsx")

# Get the first worksheet
sheet = workbook.Worksheets[0]

# Delete the 9th row
sheet.DeleteRow(9)
# Delete the 3rd column
sheet.DeleteColumn(3)

# Save the result file
workbook.SaveToFile("DeleteSpecificRowAndColumn.xlsx", ExcelVersion.Version2016)
workbook.Dispose()

Delete Multiple Rows and Columns from Excel in Python
Spire.XLS for Python enables you to delete multiple adjacent rows and columns from an Excel worksheet at once by using the Worksheet.DeleteRow(startRowIndex, rowCount) and Worksheet.DeleteColumn(startColumnIndex, columnCount) methods. The detailed steps are as follows.
- Create an object of the Workbook class.
- Load an Excel file using Workbook.LoadFromFile() method.
- Get the desired worksheet using Workbook.Worksheets[sheetIndex] property.
- Delete the desired rows from the worksheet using Worksheet.DeleteRow(startRowIndex, rowCount) method.
- Delete the desired columns from the worksheet using Worksheet.DeleteColumn(startColumnIndex, columnCount) method.
- Save the result file using Workbook.SaveToFile() method.
- Python
from spire.xls import *
from spire.xls.common import *

# Create a Workbook object
workbook = Workbook()
# Load an Excel file
workbook.LoadFromFile("Input.xlsx")

# Get the first worksheet
sheet = workbook.Worksheets[0]

# Delete the 5th, 6th and 7th rows
sheet.DeleteRow(5, 3)
# Delete the 3rd and 4th columns
sheet.DeleteColumn(3, 2)

# Save the result file
workbook.SaveToFile("DeleteMultipleRowsAndColumns.xlsx", ExcelVersion.Version2016)
workbook.Dispose()

Delete Blank Rows and Columns from Excel in Python
You can use the Worksheet.Row[rowIndex].IsBlank and Worksheet.Column[columnIndex].IsBlank properties to detect whether a specific row and column are blank or not. If the result is True, you can remove them from your woeksheet using the Worksheet.DeleteRow(rowIndex) and Worksheet.DeleteColumn(columnIndex) methods.
The following steps show how to delete the blank rows and columns from an Excel worksheet.
- Create an object of the Workbook class.
- Load an Excel file using Workbook.LoadFromFile() method.
- Get the desired worksheet using Workbook.Worksheets[sheetIndex] property.
- Loop through the used rows in the worksheet.
- Find the blank rows using Worksheet.Row[rowIndex].IsBlank property and then delete them from the worksheet using Worksheet.DeleteRow(rowIndex) method.
- Loop through the used columns in the worksheet.
- Find the blank columns using Worksheet.Column[columnIndex].IsBlank property and then delete them from the worksheet using Worksheet.DeleteColumn(columnIndex) method.
- Save the result file using Workbook.SaveToFile() method.
- Python
from spire.xls import *
from spire.xls.common import *

# Create a Workbook object
workbook = Workbook()
# Load an Excel file
workbook.LoadFromFile("Input1.xlsx")

# Get the first worksheet
sheet = workbook.Worksheets[0]

# Delete blank rows from the worksheet
for i in range(sheet.Rows.Length - 1, -1, -1):
    if sheet.Rows[i].IsBlank:
        sheet.DeleteRow(i + 1)

# Delete blank columns from the worksheet
for j in range(sheet.Columns.Length - 1, -1, -1):
    if sheet.Columns[j].IsBlank:
        sheet.DeleteColumn(j + 1)

# Save the result file
workbook.SaveToFile("DeleteBlankRowsAndColumns.xlsx", ExcelVersion.Version2016)
workbook.Dispose()
Apply for a Temporary License
If you'd like to remove the evaluation message from the generated documents, or to get rid of the function limitations, please request a 30-day trial license for yourself.
If you need to display or interact with the contents of an Excel spreadsheet on a web page, converting Excel to HTML is a good choice. This conversion allows users to view and manipulate the table data directly on the web page without having to download the Excel file, providing a more convenient way to share and display the data. When needed, you can also convert the HTML file back to Excel format for better data editing. In this article, we will show you how to convert Excel to HTML and HTML to Excel in Python by using Spire.XLS for Python.
- Convert Excel to HTML in Python
- Convert Excel to HTML with Images Embedded in Python
- Convert HTML to Excel in Python
Install Spire.XLS for Python
This scenario requires Spire.XLS for Python and plum-dispatch v1.7.4. They can be easily installed in your Windows through the following pip commands.
pip install Spire.XLS
If you are unsure how to install, please refer to this tutorial: How to Install Spire.XLS for Python on Windows
Convert Excel to HTML in Python
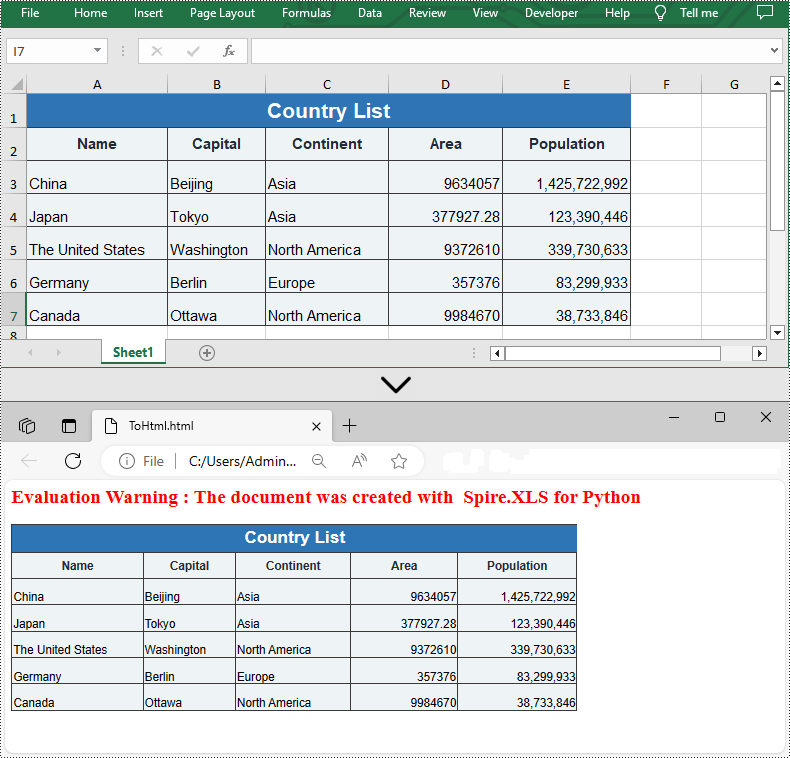
Spire.XLS for Python supports converting a specific Excel worksheet to HTML using Worksheet.SaveToHtml() method. Detailed steps are listed below.
- Create a Workbook instance.
- Load a sample Excel file using Workbook.LoadFromFile() method.
- Get a specific worksheet using Workbook.Worksheets[] property.
- Save the worksheet as an HTML file using Worksheet.SaveToHtml() method.
- Python
from spire.xls import *
from spire.xls.common import *

inputFile = "C:/Users/Administrator/Desktop/Sample_1.xlsx"
outputFile = "C:/Users/Administrator/Desktop/ToHtml.html"

# Create a Workbook instance
workbook = Workbook()

# Load a sample Excel file
workbook.LoadFromFile(inputFile)

# Get the first sheet of this file
sheet = workbook.Worksheets[0]

# Save the worksheet to HTML
sheet.SaveToHtml(outputFile)
workbook.Dispose()
Convert Excel to HTML with Images Embedded in Python
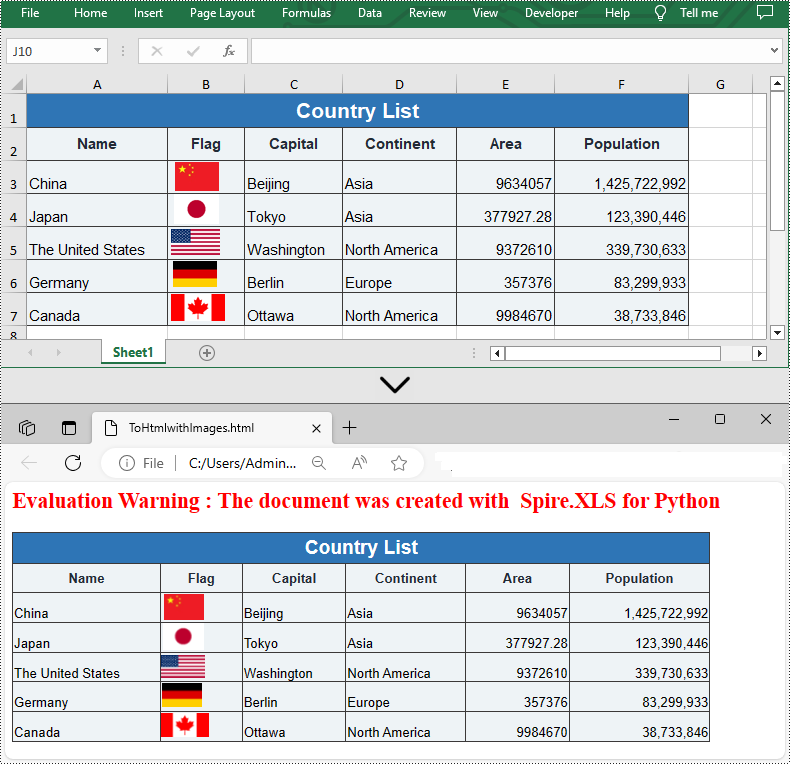
If the Excel file you want to convert contains images, you can embed the images into the HTML file by setting the ImageEmbedded property to "True". Detailed steps are listed below.
- Create a Workbook instance.
- Load a sample Excel file using Workbook.LoadFromFile() method.
- Get a specific worksheet using Workbook.Worksheets[] property.
- Create an HTMLOptions instance.
- Set the ImageEmbedded as “True” to embed images to HTML.
- Save the worksheet as an HTML file using Worksheet.SaveToHtml() method.
- Python
from spire.xls import *
from spire.xls.common import *

inputFile = "C:/Users/Administrator/Desktop/Sample_2.xlsx"
outputFile = "C:/Users/Administrator/Desktop/ToHtmlwithImages.html"

# Create a Workbook instance
workbook = Workbook()

# Load a sample Excel file
workbook.LoadFromFile(inputFile)

# Get the first sheet of this file
sheet = workbook.Worksheets[0]

# Create an HTMLOptions instance
options = HTMLOptions()

# Embed images to HTML
options.ImageEmbedded = True

# Save the worksheet to HTML
sheet.SaveToHtml(outputFile, options)
workbook.Dispose()
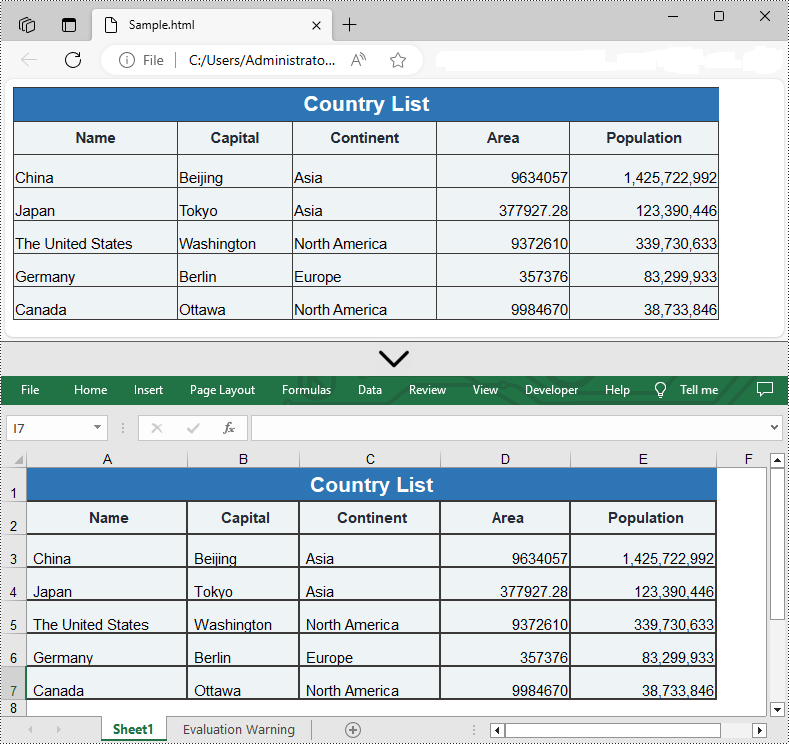
Convert HTML to Excel in Python
You are also allowed to convert an HTML back to an Excel file by calling the Workbook.SaveToFile() method provided by Spire.XLS for Python. Detailed steps are listed below.
- Create a Workbook instance.
- Load an HTML file from disk using Workbook.LoadFromFile() method.
- Save the HTML file to an Excel file by using Workbook.SaveToFile() method.
- Python
from spire.xls import *
from spire.xls.common import *

inputFile = "C:/Users/Administrator/Desktop/Sample.html"
outputFile = "C:/Users/Administrator/Desktop/ToExcel.xlsx"

# Create a Workbook instance
workbook = Workbook()

# Load an HTML file from disk
workbook.LoadFromHtml(inputFile)

# Save the HTML file to an Excel file
workbook.SaveToFile(outputFile, ExcelVersion.Version2013)
workbook.Dispose()
Apply for a Temporary License
If you'd like to remove the evaluation message from the generated documents, or to get rid of the function limitations, please request a 30-day trial license for yourself.
