PowerPoint를 HTML로 변환하기: 모든 사용자를 위한 간단한 방법

PowerPoint는 시각적으로 매력적인 프레젠테이션을 만드는 가장 인기 있는 도구 중 하나로 널리 알려져 있습니다. 그러나 웹사이트, 학습 플랫폼 또는 내부 문서를 위해 프레젠테이션을 온라인으로 공유하려는 경우 PowerPoint나 추가 플러그인 없이 모든 브라우저에서 슬라이드를 직접 볼 수 있도록 PowerPoint를 HTML로 변환하는 것이 더 좋습니다.
PPT를 HTML로 또는 PPTX를 HTML로 변환하는 방법에는 여러 가지가 있습니다. 빠른 브라우저 기반 결과를 위해 온라인 도구를 사용하거나, 모든 Microsoft 오프라인 워크플로를 위해 Microsoft Office(Word를 통해)에 의존하거나, 대규모 또는 반복 가능한 변환을 위해 Python으로 프로세스를 자동화할 수 있습니다. 각 접근 방식에는 장점과 한계가 있습니다.
이 기사에서는 빠른 일회성 변환이 필요하든 확장 가능한 PowerPoint-HTML 워크플로가 필요하든 파일을 변환하는 가장 좋은 방법을 선택할 수 있도록 이러한 방법을 단계별로 살펴보겠습니다.
방법 개요:
- 방법 1 – 무료 온라인 도구를 사용하여 PowerPoint를 HTML로 변환
- 방법 2 – Microsoft Office를 사용하여 PowerPoint를 HTML로 변환
- 방법 3 – Python으로 PowerPoint를 HTML로 변환 자동화
PowerPoint를 HTML로 변환하는 이유는 무엇입니까?
PowerPoint를 HTML로 변환하면 개인과 조직 모두에게 여러 가지 이점을 제공합니다.
-
보편적인 접근성
HTML 파일은 PowerPoint나 Microsoft Office 없이 데스크톱, 태블릿, 스마트폰 등 모든 장치의 최신 웹 브라우저에서 열 수 있습니다. -
쉬운 포함 및 공유
HTML 프레젠테이션은 웹사이트, 블로그 및 인트라넷 포털에 포함될 수 있어 온라인 환경에 원활하게 통합할 수 있습니다. -
호환성 및 이식성
HTML을 공유하면 버전 충돌이 제거되고 플랫폼 전반에 걸쳐 일관된 레이아웃이 보장됩니다.
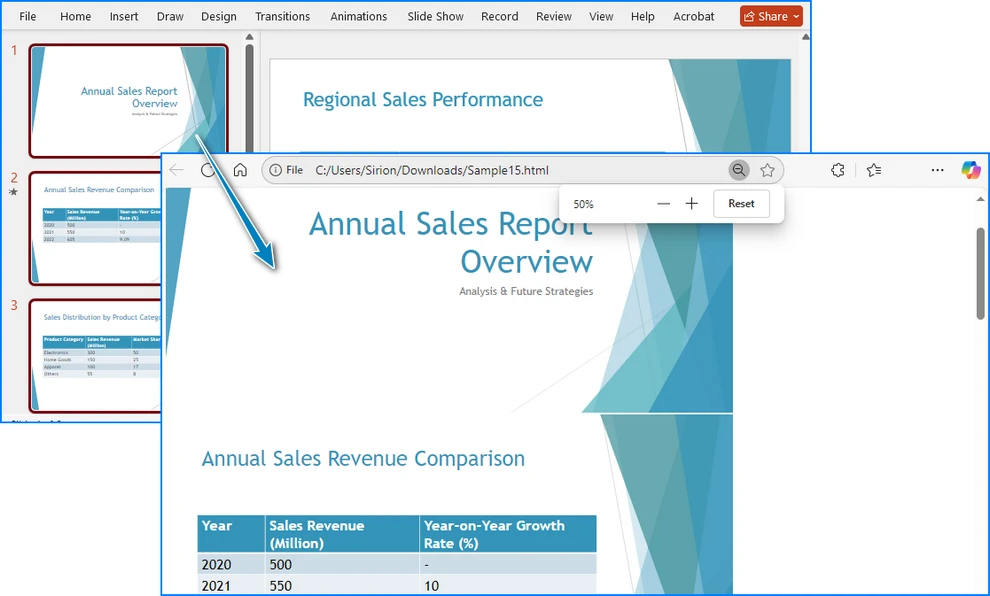
그러나 모든 PowerPoint 기능이 HTML로 완벽하게 변환되는 것은 아닙니다. 텍스트, 이미지 및 레이아웃은 일반적으로 유지되지만 복잡한 애니메이션, 포함된 비디오 및 전환은 원본 프레젠테이션과 똑같이 나타나지 않을 수 있습니다.
그럼에도 불구하고 대부분의 정적 또는 반 대화형 프레젠테이션의 경우 PowerPoint를 HTML로 내보내면 시각적 충실도와 웹 접근성 간의 탁월한 균형을 제공합니다.
방법 1 – 무료 온라인 도구를 사용하여 PowerPoint를 HTML로 변환(설치 필요 없음)
PowerPoint가 설치되어 있지 않거나 빠른 브라우저 기반 솔루션을 원하는 경우 온라인 PowerPoint to HTML 변환기가 편리한 선택입니다. 많은 무료 플랫폼을 사용하면 소프트웨어를 설치하지 않고도 .ppt 또는 .pptx 파일을 업로드하고 자동으로 HTML로 변환할 수 있습니다.
인기 있고 신뢰할 수 있는 몇 가지 옵션은 다음과 같습니다.
- CLOUDXDOCS
- Zamzar
- OnlineConvertFree
- Convertio
여기서는 CLOUDXDOCS PowerPoint to HTML 변환기를 예로 들어 보겠습니다.
일반적인 프로세스:
- CLOUDXDOCS PowerPoint to HTML 변환기 페이지를 방문하십시오.
- PowerPoint(.ppt 또는 .pptx) 파일을 업로드합니다.
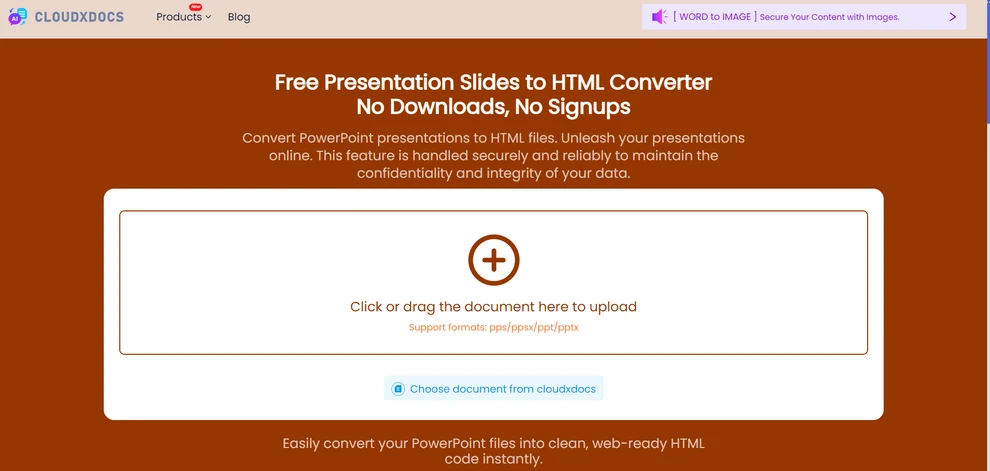
- 변환이 완료될 때까지 몇 초 정도 기다리십시오.
- 결과 HTML 패키지를 컴퓨터에 다운로드하거나 필요에 따라 추가 처리를 수행하십시오.
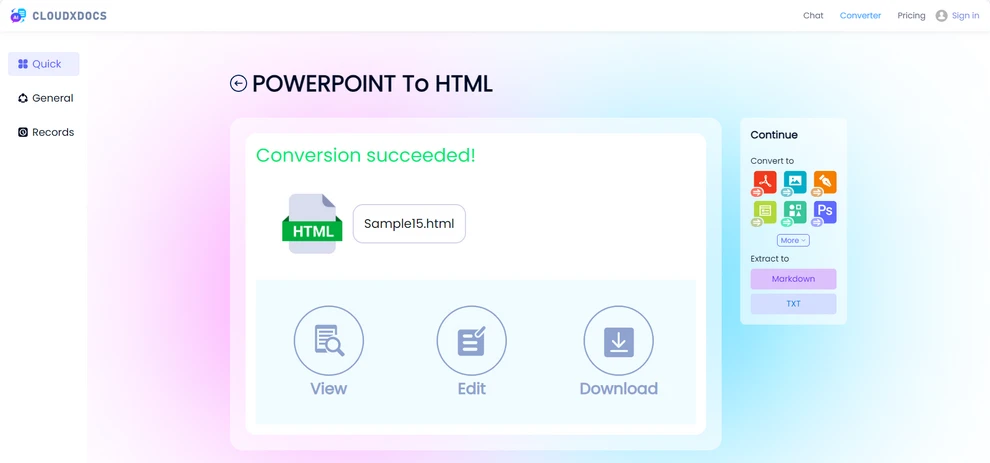
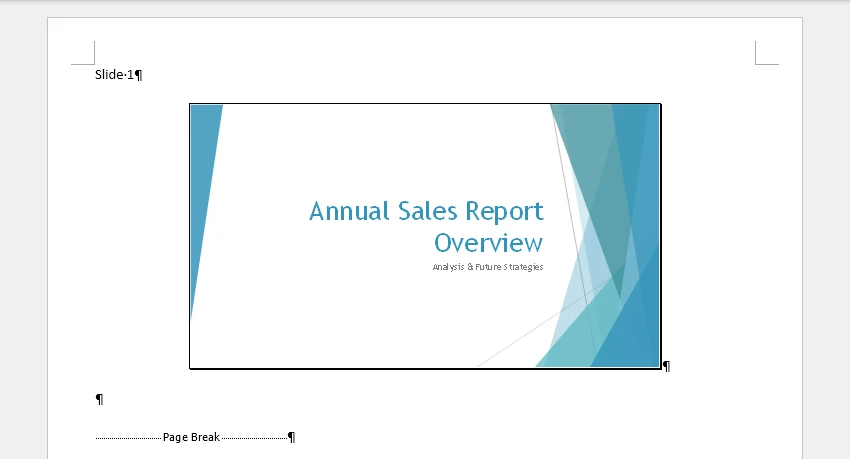
아래는 변환 결과 미리보기입니다.
장점:
- 소프트웨어 설치가 필요하지 않습니다.
- 인터넷에 연결된 모든 장치에서 작동합니다.
- 일회성 변환에 빠르고 간단합니다.
고려 사항:
- 일부 온라인 도구에는 무료 사용자를 위한 파일 크기 제한이 있을 수 있습니다.
- 변환 속도와 레이아웃 정확도는 플랫폼에 따라 다를 수 있습니다.
- 일부 사용자는 온라인 변환기에 파일을 업로드할 때 개인 정보 보호에 대한 우려를 가질 수 있습니다.
CLOUDXDOCS와 같은 온라인 변환기는 빠르고 번거롭지 않은 PPT to HTML 또는 PPTX to HTML 변환에 이상적입니다.
방법 2 – Microsoft Office를 사용하여 PowerPoint를 HTML로 변환
최신 버전의 Microsoft PowerPoint에는 더 이상 PowerPoint 2007 및 이전 버전에 있었던 이전 “웹 페이지로 저장(.htm; .html)” 옵션이 포함되어 있지 않습니다.
Microsoft Office 내에서 PowerPoint를 HTML로 변환하는 것을 선호하는 경우 PowerPoint를 Word와 함께 사용하여 동일한 결과를 얻을 수 있습니다.
이 방법은 더 수동적이지만 Office 생태계 내에 머물고 외부 도구나 코드에 의존하고 싶지 않은 사용자에게 유용합니다.
Microsoft Office를 사용하여 PowerPoint를 HTML로 변환하는 단계:
- PowerPoint 프레젠테이션을 엽니다.
- 파일 > 내보내기로 이동하여 유인물 만들기를 선택합니다.
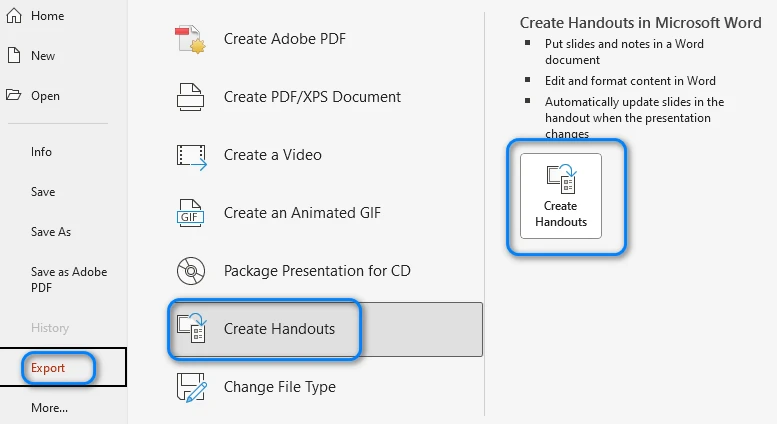
- 팝업 메뉴에서 레이아웃을 선택하고 확인을 클릭합니다. PowerPoint는 슬라이드를 내보내고 새 Word 문서로 보냅니다.
- Word에서 파일 > 다른 이름으로 저장으로 이동하여 위치를 선택합니다. 저장하기 전에 페이지 크기, 여백을 조정하거나 불필요한 콘텐츠를 제거하여 슬라이드 레이아웃을 필요에 맞게 더 잘 맞출 수도 있습니다.
- “파일 형식” 드롭다운에서 *웹 페이지 (.htm; .html)*를 선택하고 저장을 클릭합니다.

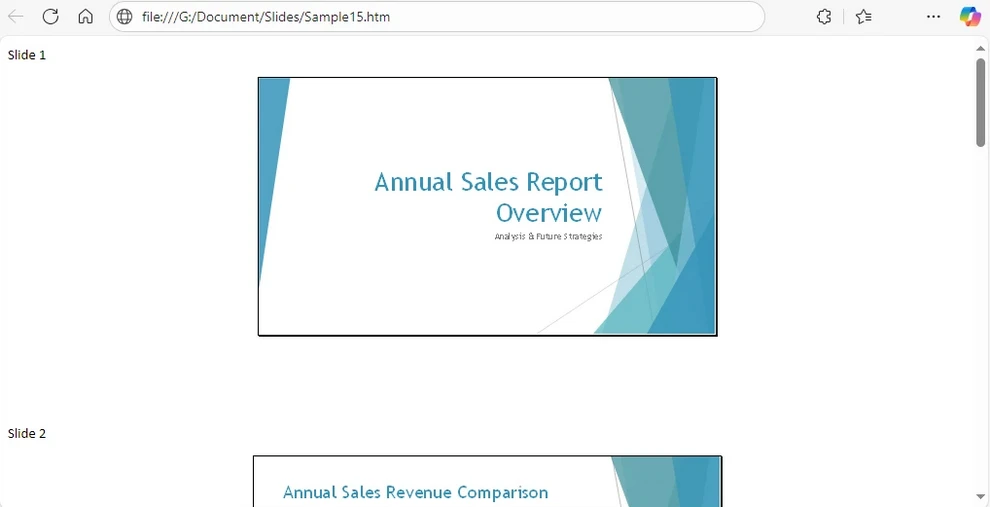
Word는 관련 리소스(이미지, 스타일 등)가 포함된 폴더와 함께 HTML 파일을 생성합니다. 각 슬라이드는 선택한 레이아웃에 따라 선택적 텍스트나 메모가 있는 이미지로 표시됩니다. 다음은 생성된 HTML 파일의 미리보기입니다.
원하는 경우 PowerPoint에서 슬라이드를 수동으로 복사하여 Word에 붙여넣고, 필요에 따라 서식을 조정한 다음 문서를 HTML로 저장할 수도 있습니다.
장점:
- 100% Microsoft Office 솔루션 — 외부 도구가 필요하지 않습니다.
- 슬라이드 내용, 메모 및 레이아웃을 이미지와 텍스트로 보존합니다.
- 내보내기 전에 Word에서 수동 조정 및 서식을 허용합니다.
제한 사항:
- 이 프로세스는 대규모 프레젠테이션의 경우 수동적이고 시간이 많이 걸립니다.
- HTML 출력에 불필요한 마크업이 포함될 수 있습니다.
- 애니메이션과 전환은 보존되지 않습니다.
이 접근 방식은 Office 제품군 내에 완전히 머물고 싶을 때 적합하지만 대규모 또는 반복 변환의 경우 자동화된 방법이 훨씬 더 효율적입니다.
정적 표시 옵션의 경우 슬라이드를 이미지로 변환하여 HTML에 포함할 수도 있습니다. PowerPoint 슬라이드를 이미지로 내보내기에 대한 가이드에서 자세히 알아보십시오.
방법 3 – 프로그래밍 방식으로 PowerPoint를 HTML로 변환(Python 자동화)
자동화되거나 대규모 변환이 필요한 개발자나 팀의 경우 Python을 사용하면 강력하고 유연한 옵션을 제공합니다. 짧은 스크립트를 작성하여 수동 작업 없이 여러 PowerPoint 파일을 HTML로 일괄 변환할 수 있습니다.
다음은 다양한 형식의 PowerPoint 파일을 읽고, 편집하고, 내보내는 것을 지원하는 라이브러리인 Spire.Presentation for Python을 사용한 예입니다.
pip를 사용하여 라이브러리 설치:
pip install Spire.Presentation
Python 예제-PowerPoint를 HTML로 변환:
from spire.presentation import Presentation, FileFormat

# PowerPoint 파일 로드
presentation = Presentation()
presentation.LoadFromFile("Sample.pptx")

# HTML로 저장
presentation.SaveToFile("output/PowerPointHTML.html", FileFormat.Html)
presentation.Dispose()
작동 방식: 코드는 Presentation 클래스를 사용하여 PowerPoint 파일을 로드한 다음 SaveToFile 메서드를 사용하여 HTML 파일로 내보냅니다.
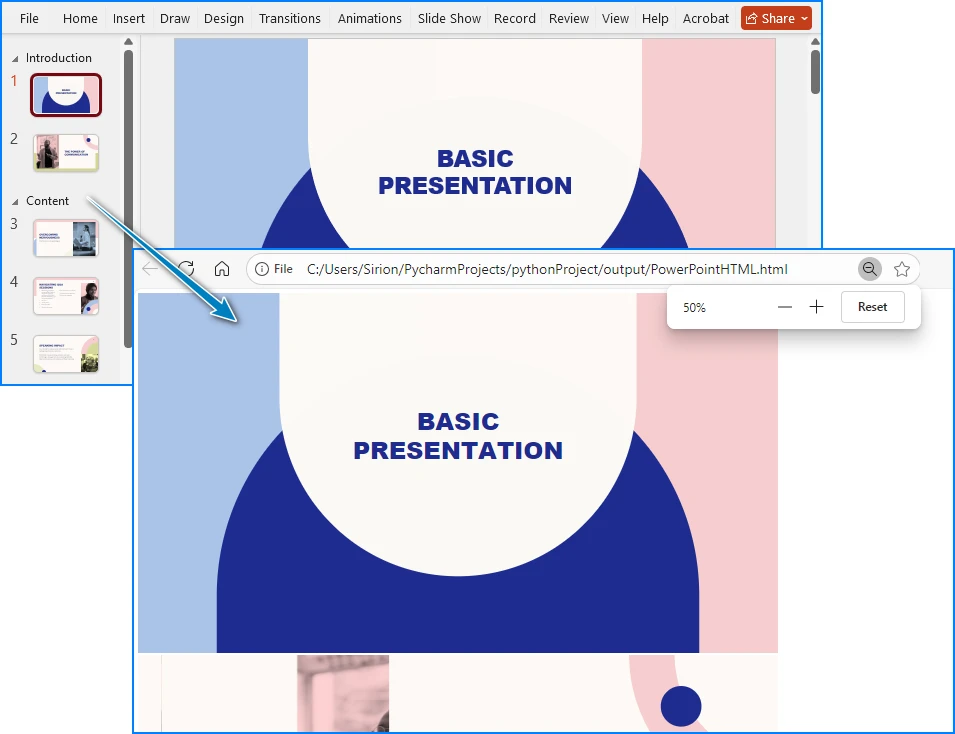
아래 스크린샷에서 결과 HTML 출력의 예를 볼 수 있습니다.
장점:
- 완전 자동화—일괄 또는 예약된 변환에 이상적입니다.
- 웹 서비스 또는 문서 처리 시스템에 통합할 수 있습니다.
- 텍스트, 이미지 및 기본 슬라이드 구조를 유지합니다.
제한 사항:
- 기본적인 Python 지식이 필요합니다.
- 애니메이션 및 포함된 멀티미디어는 내보내지지 않을 수 있습니다.
문서 자동화 파이프라인을 관리하거나 PowerPoint 프레젠테이션을 정기적으로 HTML로 변환해야 하는 경우 Python 접근 방식은 타의 추종을 불허하는 유연성과 확장성을 제공합니다.
Python을 사용하여 PowerPoint 파일을 HTML로 변환하는 방법에 대한 자세한 내용은 단계별 Python 변환 가이드를 참조하십시오.
최상의 결과를 얻기 위한 팁
어떤 방법을 선택하든 다음 최적화 팁을 따라 출력 품질과 성능을 향상시키십시오.
-
이미지 최적화 내보내기 전에 큰 이미지를 압축하여 파일 크기를 줄이고 로딩 시간을 개선하십시오.
-
웹 친화적인 글꼴 사용 브라우저에서 일관된 표시를 보장하려면 표준 글꼴(예: Arial, Verdana, Roboto)을 사용하십시오.
-
파일 경로를 그대로 유지 HTML 파일과 해당 리소스 폴더(예: /images 또는 /media) 간의 올바른 구조를 유지하십시오.
-
브라우저 호환성 확인 일관된 결과를 위해 내보낸 HTML을 여러 브라우저(Chrome, Edge, Firefox, Safari)에서 테스트하십시오.
-
복잡한 애니메이션 피하기 전환을 단순화하거나 제대로 변환되지 않을 수 있는 무거운 효과를 제거하십시오.
이러한 모범 사례를 따르면 HTML 프레젠테이션을 가볍고 시각적으로 일관되며 쉽게 공유할 수 있습니다.
결론
PowerPoint PPT/PPTX 파일을 HTML로 변환하면 여러 장치와 플랫폼에서 쉽게 보고 공유할 수 있습니다. 빠른 일회성 내보내기, 오프라인 솔루션 또는 자동화할 수 있는 워크플로가 필요한 경우 모든 요구에 맞는 접근 방식이 있습니다.
목표와 워크플로를 이해하면 가장 적합한 방법을 선택하고 변환 프로세스를 원활하고 효율적으로 만드는 데 도움이 됩니다.
PowerPoint to HTML 변환에 대해 자주 묻는 질문
다음은 사용자가 PowerPoint 프레젠테이션을 HTML로 변환할 때 가장 일반적으로 묻는 몇 가지 질문입니다.
Q1: PowerPoint는 여전히 HTML로 직접 저장할 수 있습니까?
최신 버전에서는 그렇지 않습니다. “웹 페이지로 저장” 옵션은 PowerPoint 2007 이후에 제거되었습니다. 슬라이드를 Word로 내보내고 Word 문서를 HTML로 저장하거나 온라인 변환기를 사용하거나 Python으로 프로세스를 자동화할 수 있습니다.
Q2: PowerPoint를 HTML이나 웹 페이지로 어떻게 바꾸나요?
온라인 도구, Microsoft Office(Word를 통해), 타사 변환기 소프트웨어 또는 Python 스크립팅을 사용할 수 있습니다. 올바른 방법은 워크플로, 파일 크기, 수동 제어 또는 자동화를 원하는지 여부에 따라 다릅니다.
Q3: HTML 페이지에 PPT를 표시하는 가장 좋은 방법은 무엇입니까?
HTML로 변환되면 슬라이드를 웹 페이지에 직접 포함할 수 있습니다. 대화형 프레젠테이션의 경우 일부 변환기는 탐색 컨트롤을 유지하는 반면 정적 내보내기는 슬라이드를 함께 제공되는 텍스트와 함께 이미지로 표시합니다.
Q4: 최고의 PowerPoint to HTML 변환기는 무엇입니까?
최고의 도구는 필요에 따라 다릅니다. 온라인 도구는 일회성 변환에 빠르고 편리하며, Office 기반 방법은 완전히 오프라인이며, Spire.Presentation을 사용한 Python 자동화는 대규모 또는 반복 변환에 이상적입니다.
참고 항목:
Convertir PowerPoint en HTML : Méthodes simples pour chaque utilisateur
PowerPoint est largement reconnu comme l'un des outils les plus populaires pour créer des présentations visuellement attrayantes. Cependant, lorsque vous souhaitez partager une présentation en ligne, que ce soit pour des sites web, des plateformes d'apprentissage ou de la documentation interne, il est souvent préférable de convertir PowerPoint en HTML, afin que les diapositives puissent être visualisées directement dans n'importe quel navigateur sans nécessiter PowerPoint ou des plugins supplémentaires.
Il existe plusieurs façons d'effectuer la conversion de PPT en HTML ou de PPTX en HTML. Vous pouvez utiliser des outils en ligne pour des résultats rapides basés sur le navigateur, vous fier à Microsoft Office (via Word) pour un flux de travail hors ligne entièrement Microsoft, ou automatiser le processus avec Python pour des conversions à grande échelle ou répétables. Chaque approche a ses avantages et ses limites.
Dans cet article, nous explorerons ces méthodes étape par étape afin que vous puissiez choisir la meilleure façon de convertir vos fichiers, que vous ayez besoin d'une conversion unique rapide ou d'un flux de travail PowerPoint-vers-HTML évolutif.
Aperçu des méthodes :
- Méthode 1 – Convertir PowerPoint en HTML en utilisant des outils en ligne gratuits
- Méthode 2 – Convertir PowerPoint en HTML en utilisant Microsoft Office
- Méthode 3 – Automatiser la conversion de PowerPoint en HTML avec Python
Pourquoi convertir PowerPoint en HTML ?
La conversion de PowerPoint en HTML offre plusieurs avantages tant pour les particuliers que pour les organisations :
-
Accessibilité universelle
Les fichiers HTML peuvent être ouverts dans n'importe quel navigateur web moderne, sur n'importe quel appareil — ordinateur de bureau, tablette ou smartphone — sans nécessiter PowerPoint ou Microsoft Office. -
Intégration et partage faciles
Les présentations HTML peuvent être intégrées dans des sites web, des blogs et des portails intranet, permettant une intégration fluide dans les environnements en ligne. -
Compatibilité et portabilité
Le partage de HTML élimine les conflits de version et assure une mise en page cohérente sur toutes les plateformes.
Cependant, toutes les fonctionnalités de PowerPoint ne se traduisent pas parfaitement en HTML. Bien que le texte, les images et les mises en page soient généralement préservés, les animations complexes, les vidéos intégrées et les transitions peuvent ne pas apparaître exactement comme dans la présentation originale.
Néanmoins, pour la plupart des présentations statiques ou semi-interactives, l'exportation de PowerPoint en HTML offre un excellent équilibre entre fidélité visuelle et accessibilité web.
Méthode 1 – Convertir PowerPoint en HTML en utilisant des outils en ligne gratuits (aucune installation requise)
Si vous n'avez pas PowerPoint d'installé ou si vous souhaitez une solution rapide basée sur un navigateur, les convertisseurs en ligne de PowerPoint en HTML sont un choix pratique. De nombreuses plateformes gratuites vous permettent de télécharger votre fichier .ppt ou .pptx et de le convertir automatiquement en HTML sans installer de logiciel.
Parmi les options populaires et fiables, on trouve :
- CLOUDXDOCS
- Zamzar
- OnlineConvertFree
- Convertio
Ici, nous prendrons comme exemple le convertisseur PowerPoint en HTML de CLOUDXDOCS.
Processus typique :
- Visitez la page du convertisseur PowerPoint en HTML de CLOUDXDOCS.
- Téléchargez votre fichier PowerPoint (.ppt ou .pptx).
- Attendez quelques secondes que la conversion se termine.
- Téléchargez le package HTML résultant sur votre ordinateur ou effectuez un traitement supplémentaire si nécessaire.
Voici un aperçu du résultat de la conversion.
Avantages :
- Aucune installation de logiciel requise.
- Fonctionne sur n'importe quel appareil avec une connexion Internet.
- Rapide et simple pour les conversions uniques.
Considérations :
- Certains outils en ligne peuvent avoir des limites de taille de fichier pour les utilisateurs gratuits.
- La vitesse de conversion et la précision de la mise en page peuvent varier en fonction de la plateforme.
- Certains utilisateurs peuvent avoir des préoccupations concernant la confidentialité lors du téléchargement de fichiers sur des convertisseurs en ligne.
Les convertisseurs en ligne comme CLOUDXDOCS sont idéaux pour des conversions rapides et sans tracas de PPT en HTML ou de PPTX en HTML.
Convertir PowerPoint a HTML: métodos sencillos para cada usuario
Tabla de Contenidos
PowerPoint es ampliamente reconocido como una de las herramientas más populares para crear presentaciones visualmente atractivas. Sin embargo, cuando deseas compartir una presentación en línea, ya sea para sitios web, plataformas de aprendizaje o documentación interna, a menudo es mejor convertir PowerPoint a HTML, para que las diapositivas se puedan ver directamente en cualquier navegador sin necesidad de PowerPoint o complementos adicionales.
Existen varias formas de realizar la conversión de PPT a HTML o PPTX a HTML. Puedes usar herramientas en línea para obtener resultados rápidos basados en el navegador, confiar en Microsoft Office (a través de Word) para un flujo de trabajo sin conexión totalmente de Microsoft, o automatizar el proceso con Python para conversiones a gran escala o repetibles. Cada enfoque tiene sus ventajas y limitaciones.
En este artículo, exploraremos estos métodos paso a paso para que puedas elegir la mejor manera de convertir tus archivos, ya sea que necesites una conversión rápida y única o un flujo de trabajo escalable de PowerPoint a HTML.
Resumen de Métodos:
- Método 1 – Convertir PowerPoint a HTML Usando Herramientas Gratuitas en Línea
- Método 2 – Convertir PowerPoint a HTML Usando Microsoft Office
- Método 3 – Automatizar la Conversión de PowerPoint a HTML con Python
¿Por Qué Convertir PowerPoint a HTML?
Convertir PowerPoint a HTML ofrece varias ventajas tanto para individuos como para organizaciones:
-
Accesibilidad Universal
Los archivos HTML se pueden abrir en cualquier navegador web moderno, en cualquier dispositivo (computadora de escritorio, tableta o teléfono inteligente) sin necesidad de PowerPoint o Microsoft Office. -
Fácil Inserción y Uso Compartido
Las presentaciones HTML se pueden incrustar en sitios web, blogs y portales de intranet, lo que permite una integración fluida en entornos en línea. -
Compatibilidad y Portabilidad
Compartir HTML elimina conflictos de versión y garantiza un diseño coherente en todas las plataformas.
Sin embargo, no todas las características de PowerPoint se traducen perfectamente a HTML. Aunque el texto, las imágenes y los diseños generalmente se conservan, las animaciones complejas, los videos incrustados y las transiciones pueden no aparecer exactamente como en la presentación original.
Aun así, para la mayoría de las presentaciones estáticas o semi-interactivas, exportar PowerPoint a HTML proporciona un excelente equilibrio entre fidelidad visual y accesibilidad web.
Método 1 – Convertir PowerPoint a HTML Usando Herramientas Gratuitas en Línea (No se necesita instalación)
Si no tienes PowerPoint instalado o deseas una solución rápida basada en el navegador, los convertidores de PowerPoint a HTML en línea son una opción conveniente. Muchas plataformas gratuitas te permiten cargar tu archivo .ppt o .pptx y convertirlo a HTML automáticamente sin instalar ningún software.
Algunas opciones populares y confiables incluyen:
- CLOUDXDOCS
- Zamzar
- OnlineConvertFree
- Convertio
Aquí, tomaremos como ejemplo el Convertidor de PowerPoint a HTML de CLOUDXDOCS.
Proceso típico:
- Visita la página del Convertidor de PowerPoint a HTML de CLOUDXDOCS.
- Sube tu archivo de PowerPoint (.ppt o .pptx).
- Espera unos segundos a que se complete la conversión.
- Descarga el paquete HTML resultante a tu computadora o realiza un procesamiento adicional según sea necesario.
A continuación se muestra una vista previa del resultado de la conversión.
Ventajas:
- No se requiere instalación de software.
- Funciona en cualquier dispositivo con conexión a internet.
- Rápido y sencillo para conversiones únicas.
Consideraciones:
- Algunas herramientas en línea pueden tener límites de tamaño de archivo para usuarios gratuitos.
- La velocidad de conversión y la precisión del diseño pueden variar según la plataforma.
- Algunos usuarios pueden tener preocupaciones de privacidad al cargar archivos en convertidores en línea.
Los convertidores en línea como CLOUDXDOCS son ideales para conversiones rápidas y sin complicaciones de PPT a HTML o PPTX a HTML.
Método 2 – Convertir PowerPoint a HTML Usando Microsoft Office
Las versiones modernas de Microsoft PowerPoint ya no incluyen la antigua opción “Guardar como página web (.htm; .html)” que existía en PowerPoint 2007 y versiones anteriores.
Si aún prefieres completar la conversión de PowerPoint a HTML dentro de Microsoft Office, puedes usar PowerPoint junto con Word para lograr el mismo resultado.
Este método es más manual pero útil para los usuarios que prefieren permanecer dentro del ecosistema de Office y no quieren depender de herramientas o código externos.
Pasos para convertir PowerPoint a HTML usando Microsoft Office:
- Abre tu presentación de PowerPoint.
- Ve a Archivo > Exportar y elige Crear Documentos.
- Selecciona un diseño en el menú emergente y haz clic en Aceptar. PowerPoint exportará tus diapositivas y las enviará a un nuevo documento de Word.
- En Word, ve a Archivo > Guardar como y elige una ubicación. También puedes ajustar el tamaño de la página, los márgenes o eliminar contenido innecesario para que el diseño de la diapositiva se ajuste mejor a tus necesidades antes de guardar.
- En el menú desplegable “Guardar como tipo”, elige *Página web (.htm; .html)* y haz clic en Guardar.
Word generará un archivo HTML junto con una carpeta que contiene recursos relacionados (imágenes, estilos, etc.). Cada diapositiva se mostrará como una imagen con texto o notas opcionales, según el diseño elegido. A continuación se muestra una vista previa del archivo HTML generado:
Si lo prefieres, también puedes copiar manualmente tus diapositivas de PowerPoint, pegarlas en Word, ajustar el formato según sea necesario y luego guardar el documento como HTML.
Ventajas:
- Solución 100% de Microsoft Office — no se requieren herramientas externas.
- Conserva el contenido de las diapositivas, las notas y el diseño como imágenes y texto.
- Permite ajustes manuales y formato en Word antes de exportar.
Limitaciones:
- El proceso es manual y requiere mucho tiempo para presentaciones grandes.
- La salida HTML puede incluir marcado innecesario.
- Las animaciones y transiciones no se conservan.
Este enfoque es adecuado cuando deseas permanecer completamente dentro de la suite de Office, pero para conversiones a mayor escala o repetidas, los métodos automatizados son mucho más eficientes.
Para una opción de visualización estática, las diapositivas también se pueden convertir a imágenes e incrustar en HTML. Obtén más información en nuestra guía sobre exportar diapositivas de PowerPoint como imágenes.
Método 3 – Convertir PowerPoint a HTML Programáticamente (Automatización con Python)
Para desarrolladores o equipos que requieren conversión automatizada o a gran escala, usar Python proporciona una opción potente y flexible. Al escribir un script corto, puedes convertir por lotes múltiples archivos de PowerPoint a HTML sin trabajo manual.
Aquí hay un ejemplo usando Spire.Presentation para Python, una biblioteca que admite la lectura, edición y exportación de archivos de PowerPoint en varios formatos:
Instala la biblioteca usando pip:
pip install Spire.Presentation
Ejemplo de Python-Convertir PowerPoint a HTML:
from spire.presentation import Presentation, FileFormat

# Load the PowerPoint file
presentation = Presentation()
presentation.LoadFromFile("Sample.pptx")

# Save as HTML
presentation.SaveToFile("output/PowerPointHTML.html", FileFormat.Html)
presentation.Dispose()
Cómo funciona: El código carga un archivo de PowerPoint usando la clase Presentation, luego lo exporta a un archivo HTML usando el método SaveToFile.
Puedes ver un ejemplo de la salida HTML resultante en la captura de pantalla a continuación:
Ventajas:
- Totalmente automatizado—ideal para conversiones por lotes o programadas.
- Se puede integrar en servicios web o sistemas de procesamiento de documentos.
- Mantiene el texto, las imágenes y la estructura básica de las diapositivas.
Limitaciones:
- Requiere conocimientos básicos de Python.
- La animación y los multimedia incrustados pueden no exportarse.
Si gestionas una canalización de automatización de documentos o necesitas convertir regularmente presentaciones de PowerPoint a HTML, el enfoque de Python ofrece una flexibilidad y escalabilidad inigualables.
Para obtener más detalles sobre el uso de Python para convertir archivos de PowerPoint a HTML, consulta nuestra guía de conversión paso a paso de Python.
Consejos para Obtener los Mejores Resultados
No importa qué método elijas, sigue estos consejos de optimización para mejorar la calidad y el rendimiento de la salida:
-
Optimizar Imágenes Comprime las imágenes grandes antes de exportar para reducir el tamaño del archivo y mejorar los tiempos de carga.
-
Usar Fuentes Aptas para la Web Utiliza fuentes estándar (por ejemplo, Arial, Verdana, Roboto) para garantizar una visualización coherente en todos los navegadores.
-
Mantener Intactas las Rutas de los Archivos Mantén la estructura correcta entre tu archivo HTML y sus carpetas de recursos (como /images o /media).
-
Verificar la Compatibilidad del Navegador Prueba tu HTML exportado en múltiples navegadores (Chrome, Edge, Firefox, Safari) para obtener resultados consistentes.
-
Evitar Animaciones Complejas Simplifica las transiciones o elimina los efectos pesados que pueden no convertirse correctamente.
Seguir estas mejores prácticas garantiza que tus presentaciones HTML sigan siendo ligeras, visualmente consistentes y fáciles de compartir.
Conclusión
Convertir archivos PPT/PPTX de PowerPoint a HTML facilita su visualización y uso compartido en diferentes dispositivos y plataformas. Ya sea que necesites una exportación rápida y única, una solución sin conexión o un flujo de trabajo que se pueda automatizar, existen enfoques que se adaptan a cada necesidad.
Comprender tus objetivos y flujo de trabajo te ayudará a elegir el método más adecuado y a hacer que el proceso de conversión sea fluido y eficiente.
Preguntas Frecuentes sobre la Conversión de PowerPoint a HTML
Aquí están algunas de las preguntas más comunes que los usuarios tienen al convertir presentaciones de PowerPoint a HTML.
P1: ¿Puede PowerPoint todavía guardar directamente como HTML?
No en las versiones recientes. La opción “Guardar como página web” se eliminó después de PowerPoint 2007. Puedes exportar diapositivas a Word y guardar el documento de Word como HTML, usar convertidores en línea o automatizar el proceso con Python.
P2: ¿Cómo convierto un PowerPoint en HTML o en una página web?
Puedes usar herramientas en línea, Microsoft Office (a través de Word), software de conversión de terceros o scripting de Python. El método correcto depende de tu flujo de trabajo, el tamaño del archivo y si deseas control manual o automatización.
P3: ¿Cuál es la mejor manera de mostrar un PPT en una página HTML?
Una vez convertido a HTML, tus diapositivas se pueden incrustar directamente en una página web. Para presentaciones interactivas, algunos convertidores conservan los controles de navegación, mientras que las exportaciones estáticas muestran las diapositivas como imágenes con texto de acompañamiento.
P4: ¿Cuál es el mejor convertidor de PowerPoint a HTML?
La mejor herramienta depende de tus necesidades. Las herramientas en línea son rápidas y convenientes para conversiones únicas, los métodos basados en Office son completamente sin conexión, y la automatización con Python con Spire.Presentation es ideal para conversiones a gran escala o repetidas.
Ver También:
PowerPoint in HTML umwandeln: Einfache Methoden für jeden Benutzer
PowerPoint ist weithin als eines der beliebtesten Werkzeuge zur Erstellung visuell ansprechender Präsentationen bekannt. Wenn Sie jedoch eine Präsentation online teilen möchten – sei es für Websites, Lernplattformen oder interne Dokumentationen – ist es oft besser, PowerPoint in HTML zu konvertieren, damit die Folien direkt in jedem Browser angezeigt werden können, ohne dass PowerPoint oder zusätzliche Plugins erforderlich sind.
Es gibt mehrere Möglichkeiten, die Konvertierung von PPT in HTML oder PPTX in HTML durchzuführen. Sie können Online-Tools für schnelle browserbasierte Ergebnisse verwenden, sich auf Microsoft Office (über Word) für einen reinen Microsoft-Offline-Workflow verlassen oder den Prozess mit Python für groß angelegte oder wiederholbare Konvertierungen automatisieren. Jeder Ansatz hat seine Vor- und Nachteile.
In diesem Artikel werden wir diese Methoden Schritt für Schritt untersuchen, damit Sie den besten Weg zur Konvertierung Ihrer Dateien wählen können – egal, ob Sie eine schnelle einmalige Konvertierung oder einen skalierbaren PowerPoint-zu-HTML-Workflow benötigen.
Methodenübersicht:
- Methode 1 – PowerPoint mit kostenlosen Online-Tools in HTML konvertieren
- Methode 2 – PowerPoint mit Microsoft Office in HTML konvertieren
- Methode 3 – PowerPoint-zu-HTML-Konvertierung mit Python automatisieren
Warum PowerPoint in HTML konvertieren?
Die Konvertierung von PowerPoint in HTML bietet sowohl für Einzelpersonen als auch für Organisationen mehrere Vorteile:
-
Universelle Zugänglichkeit
HTML-Dateien können in jedem modernen Webbrowser auf jedem Gerät – Desktop, Tablet oder Smartphone – geöffnet werden, ohne dass PowerPoint oder Microsoft Office erforderlich ist. -
Einfaches Einbetten und Teilen
HTML-Präsentationen können in Websites, Blogs und Intranet-Portale eingebettet werden, was eine reibungslose Integration in Online-Umgebungen ermöglicht. -
Kompatibilität und Portabilität
Das Teilen von HTML eliminiert Versionskonflikte und gewährleistet ein einheitliches Layout auf allen Plattformen.
Allerdings lassen sich nicht alle PowerPoint-Funktionen perfekt in HTML übersetzen. Während Text, Bilder und Layouts in der Regel erhalten bleiben, werden komplexe Animationen, eingebettete Videos und Übergänge möglicherweise nicht genau wie in der ursprünglichen Präsentation angezeigt.
Dennoch bietet der Export von PowerPoint nach HTML für die meisten statischen oder semi-interaktiven Präsentationen eine hervorragende Balance zwischen visueller Wiedergabetreue und Web-Zugänglichkeit.
Methode 1 – PowerPoint mit kostenlosen Online-Tools in HTML konvertieren (keine Installation erforderlich)
Wenn Sie PowerPoint nicht installiert haben oder eine schnelle browserbasierte Lösung wünschen, sind Online-Konverter von PowerPoint zu HTML eine praktische Wahl. Viele kostenlose Plattformen ermöglichen es Ihnen, Ihre .ppt- oder .pptx-Datei hochzuladen und sie automatisch in HTML zu konvertieren, ohne Software installieren zu müssen.
Einige beliebte und zuverlässige Optionen sind:
- CLOUDXDOCS
- Zamzar
- OnlineConvertFree
- Convertio
Hier nehmen wir den CLOUDXDOCS PowerPoint to HTML Converter als Beispiel.
Typischer Prozess:
- Besuchen Sie die Seite des CLOUDXDOCS PowerPoint to HTML Converter.
- Laden Sie Ihre PowerPoint-Datei (.ppt oder .pptx) hoch.
- Warten Sie einige Sekunden, bis die Konvertierung abgeschlossen ist.
- Laden Sie das resultierende HTML-Paket auf Ihren Computer herunter oder führen Sie bei Bedarf weitere Bearbeitungen durch.
Unten sehen Sie eine Vorschau des Konvertierungsergebnisses.
Vorteile:
- Keine Softwareinstallation erforderlich.
- Funktioniert auf jedem Gerät mit Internetverbindung.
- Schnell und einfach für einmalige Konvertierungen.
Überlegungen:
- Einige Online-Tools haben möglicherweise Dateigrößenbeschränkungen für kostenlose Benutzer.
- Die Konvertierungsgeschwindigkeit und die Layoutgenauigkeit können je nach Plattform variieren.
- Einige Benutzer haben möglicherweise Datenschutzbedenken beim Hochladen von Dateien auf Online-Konverter.
Online-Konverter wie CLOUDXDOCS sind ideal für schnelle und problemlose Konvertierungen von PPT in HTML oder PPTX in HTML.
Methode 2 – PowerPoint mit Microsoft Office in HTML konvertieren
Moderne Versionen von Microsoft PowerPoint enthalten nicht mehr die alte Option „Als Webseite speichern (.htm; .html)“, die in PowerPoint 2007 und früher existierte.
Wenn Sie die Konvertierung von PowerPoint in HTML dennoch innerhalb von Microsoft Office durchführen möchten, können Sie PowerPoint zusammen mit Word verwenden, um dasselbe Ergebnis zu erzielen.
Diese Methode ist manueller, aber nützlich für Benutzer, die lieber im Office-Ökosystem bleiben und sich nicht auf externe Tools oder Code verlassen möchten.
Schritte zur Konvertierung von PowerPoint in HTML mit Microsoft Office:
- Öffnen Sie Ihre PowerPoint-Präsentation.
- Gehen Sie zu Datei > Exportieren und wählen Sie Handzettel erstellen.
- Wählen Sie ein Layout im Popup-Menü und klicken Sie auf OK. PowerPoint exportiert Ihre Folien und sendet sie an ein neues Word-Dokument.
- Gehen Sie in Word zu Datei > Speichern unter und wählen Sie einen Speicherort. Sie können auch die Seitengröße und die Ränder anpassen oder unnötige Inhalte entfernen, damit das Folienlayout vor dem Speichern besser Ihren Bedürfnissen entspricht.
- Wählen Sie im Dropdown-Menü „Dateityp“ die Option *Webseite (.htm; .html)* und klicken Sie auf Speichern.
Word generiert eine HTML-Datei zusammen mit einem Ordner, der zugehörige Ressourcen (Bilder, Stile usw.) enthält. Jede Folie wird als Bild mit optionalem Text oder Notizen angezeigt, abhängig vom gewählten Layout. Unten sehen Sie eine Vorschau der generierten HTML-Datei:
Wenn Sie es vorziehen, können Sie Ihre Folien auch manuell aus PowerPoint kopieren, in Word einfügen, die Formatierung nach Bedarf anpassen und das Dokument dann als HTML speichern.
Vorteile:
- 100% Microsoft Office-Lösung – keine externen Tools erforderlich.
- Behält Folieninhalte, Notizen und Layout als Bilder und Text bei.
- Ermöglicht manuelle Anpassungen und Formatierungen in Word vor dem Exportieren.
Einschränkungen:
- Der Prozess ist manuell und zeitaufwändig für große Präsentationen.
- Die HTML-Ausgabe kann unnötiges Markup enthalten.
- Animationen und Übergänge bleiben nicht erhalten.
Dieser Ansatz eignet sich, wenn Sie vollständig in der Office-Suite bleiben möchten, aber für größere oder wiederholte Konvertierungen sind automatisierte Methoden weitaus effizienter.
Für eine statische Anzeigeoption können Folien auch in Bilder konvertiert und in HTML eingebettet werden. Erfahren Sie mehr in unserer Anleitung zum Exportieren von PowerPoint-Folien als Bilder.
Methode 3 – PowerPoint programmgesteuert in HTML konvertieren (Python-Automatisierung)
Für Entwickler oder Teams, die eine automatisierte oder groß angelegte Konvertierung benötigen, bietet die Verwendung von Python eine leistungsstarke und flexible Option. Durch das Schreiben eines kurzen Skripts können Sie mehrere PowerPoint-Dateien stapelweise in HTML konvertieren, ohne manuelle Arbeit.
Hier ist ein Beispiel mit Spire.Presentation for Python, einer Bibliothek, die das Lesen, Bearbeiten und Exportieren von PowerPoint-Dateien in verschiedenen Formaten unterstützt:
Installieren Sie die Bibliothek mit pip:
pip install Spire.Presentation
Python-Beispiel – PowerPoint in HTML konvertieren:
from spire.presentation import Presentation, FileFormat

# Load the PowerPoint file
presentation = Presentation()
presentation.LoadFromFile("Sample.pptx")

# Save as HTML
presentation.SaveToFile("output/PowerPointHTML.html", FileFormat.Html)
presentation.Dispose()
So funktioniert es: Der Code lädt eine PowerPoint-Datei mit der Presentation-Klasse und exportiert sie dann mit der SaveToFile-Methode in eine HTML-Datei.
Ein Beispiel für die resultierende HTML-Ausgabe sehen Sie im folgenden Screenshot:
Vorteile:
- Vollautomatisch – ideal für Stapel- oder geplante Konvertierungen.
- Kann in Webdienste oder Dokumentenverarbeitungssysteme integriert werden.
- Behält Text, Bilder und grundlegende Folienstruktur bei.
Einschränkungen:
- Erfordert grundlegende Python-Kenntnisse.
- Animationen und eingebettete Multimedia-Inhalte werden möglicherweise nicht exportiert.
Wenn Sie eine Pipeline zur Dokumentenautomatisierung verwalten oder regelmäßig PowerPoint-Präsentationen in HTML konvertieren müssen, bietet der Python-Ansatz unübertroffene Flexibilität und Skalierbarkeit.
Weitere Details zur Verwendung von Python zum Konvertieren von PowerPoint-Dateien in HTML finden Sie in unserer Schritt-für-Schritt-Anleitung zur Python-Konvertierung.
Tipps für die besten Ergebnisse
Unabhängig davon, für welche Methode Sie sich entscheiden, befolgen Sie diese Optimierungstipps, um die Ausgabequalität und -leistung zu verbessern:
-
Bilder optimieren Komprimieren Sie große Bilder vor dem Export, um die Dateigröße zu reduzieren und die Ladezeiten zu verbessern.
-
Web-freundliche Schriftarten verwenden Halten Sie sich an Standardschriftarten (z. B. Arial, Verdana, Roboto), um eine konsistente Anzeige in allen Browsern zu gewährleisten.
-
Dateipfade intakt lassen Behalten Sie die korrekte Struktur zwischen Ihrer HTML-Datei und ihren Ressourcenordnern (wie /images oder /media) bei.
-
Browserkompatibilität prüfen Testen Sie Ihr exportiertes HTML in mehreren Browsern (Chrome, Edge, Firefox, Safari), um konsistente Ergebnisse zu erzielen.
-
Komplexe Animationen vermeiden Vereinfachen Sie Übergänge oder entfernen Sie aufwändige Effekte, die möglicherweise nicht richtig konvertiert werden.
Die Befolgung dieser Best Practices stellt sicher, dass Ihre HTML-Präsentationen leichtgewichtig, visuell konsistent und einfach zu teilen bleiben.
Fazit
Die Konvertierung von PowerPoint-PPT/PPTX-Dateien in HTML erleichtert das Anzeigen und Teilen auf verschiedenen Geräten und Plattformen. Ob Sie einen schnellen einmaligen Export, eine Offline-Lösung oder einen automatisierbaren Workflow benötigen, es gibt Ansätze für jeden Bedarf.
Das Verständnis Ihrer Ziele und Ihres Workflows hilft Ihnen bei der Auswahl der am besten geeigneten Methode und gestaltet den Konvertierungsprozess reibungslos und effizient.
Häufig gestellte Fragen zur Konvertierung von PowerPoint in HTML
Hier sind einige der häufigsten Fragen, die Benutzer bei der Konvertierung von PowerPoint-Präsentationen in HTML haben.
F1: Kann PowerPoint immer noch direkt als HTML speichern?
Nicht in den neueren Versionen. Die Option „Als Webseite speichern“ wurde nach PowerPoint 2007 entfernt. Sie können Folien nach Word exportieren und das Word-Dokument als HTML speichern, Online-Konverter verwenden oder den Prozess mit Python automatisieren.
F2: Wie verwandle ich ein PowerPoint in HTML oder eine Webseite?
Sie können Online-Tools, Microsoft Office (über Word), Konverter-Software von Drittanbietern oder Python-Skripting verwenden. Die richtige Methode hängt von Ihrem Workflow, der Dateigröße und davon ab, ob Sie manuelle Kontrolle oder Automatisierung wünschen.
F3: Was ist der beste Weg, um eine PPT auf einer HTML-Seite anzuzeigen?
Nach der Konvertierung in HTML können Ihre Folien direkt in eine Webseite eingebettet werden. Bei interaktiven Präsentationen behalten einige Konverter die Navigationssteuerelemente bei, während statische Exporte die Folien als Bilder mit Begleittext anzeigen.
F4: Welcher ist der beste PowerPoint-zu-HTML-Konverter?
Das beste Werkzeug hängt von Ihren Bedürfnissen ab. Online-Tools sind schnell und praktisch für einmalige Konvertierungen, Office-basierte Methoden sind vollständig offline, und die Python-Automatisierung mit Spire.Presentation ist ideal für groß angelegte oder wiederholte Konvertierungen.
Siehe auch:
Конвертировать PowerPoint в HTML: простые методы для каждого пользователя
PowerPoint широко известен как один из самых популярных инструментов для создания визуально привлекательных презентаций. Однако, когда вы хотите поделиться презентацией в Интернете — будь то для веб-сайтов, учебных платформ или внутренней документации — часто лучше преобразовать PowerPoint в HTML, чтобы слайды можно было просматривать прямо в любом браузере без необходимости в PowerPoint или дополнительных плагинах.
Существует несколько способов выполнить преобразование PPT в HTML или PPTX в HTML. Вы можете использовать онлайн-инструменты для быстрых результатов в браузere, положиться на Microsoft Office (через Word) для полностью автономного рабочего процесса Microsoft или автоматизировать процесс с помощью Python для крупномасштабных или повторяемых преобразований. У каждого подхода есть свои преимущества и ограничения.
В этой статье мы подробно рассмотрим эти методы, чтобы вы могли выбрать лучший способ преобразования ваших файлов — будь то быстрое одноразовое преобразование или масштабируемый рабочий процесс преобразования PowerPoint в HTML.
Обзор методов:
- Метод 1 – Преобразование PowerPoint в HTML с использованием бесплатных онлайн-инструментов
- Метод 2 – Преобразование PowerPoint в HTML с использованием Microsoft Office
- Метод 3 – Автоматизация преобразования PowerPoint в HTML с помощью Python
Зачем конвертировать PowerPoint в HTML?
Преобразование PowerPoint в HTML дает несколько преимуществ как для отдельных лиц, так и для организаций:
-
Универсальная доступность
HTML-файлы можно открывать в любом современном веб-браузере на любом устройстве — настольном компьютере, планшете или смартфоне — без необходимости установки PowerPoint или Microsoft Office. -
Простота встраивания и обмена
HTML-презентации можно встраивать в веб-сайты, блоги и внутренние порталы, что обеспечивает плавную интеграцию в онлайн-среду. -
Совместимость и переносимость
Обмен HTML устраняет конфликты версий и обеспечивает единообразный макет на разных платформах.
Однако не все функции PowerPoint идеально переносятся в HTML. Хотя текст, изображения и макеты обычно сохраняются, сложные анимации, встроенные видео и переходы могут выглядеть не совсем так, как в исходной презентации.
Тем не менее, для большинства статических или полуинтерактивных презентаций экспорт PowerPoint в HTML обеспечивает отличный баланс визуальной точности и веб-доступности.
Метод 1 – Преобразование PowerPoint в HTML с использованием бесплатных онлайн-инструментов (установка не требуется)
Если у вас не установлен PowerPoint или вам нужно быстрое решение на основе браузера, онлайн-конвертеры PowerPoint в HTML — удобный выбор. Многие бесплатные платформы позволяют загружать файлы .ppt или .pptx и автоматически преобразовывать их в HTML без установки какого-либо программного обеспечения.
Некоторые популярные и надежные варианты включают:
- CLOUDXDOCS
- Zamzar
- OnlineConvertFree
- Convertio
Здесь мы возьмем в качестве примера CLOUDXDOCS PowerPoint to HTML Converter.
Типичный процесс:
- Посетите страницу CLOUDXDOCS PowerPoint to HTML Converter.
- Загрузите свой файл PowerPoint (.ppt или .pptx).
- Подождите несколько секунд, пока завершится преобразование.
- Загрузите полученный HTML-пакет на свой компьютер или выполните дальнейшую обработку по мере необходимости.
Ниже приведен предварительный просмотр результата преобразования.
Преимущества:
- Не требуется установка программного обеспечения.
- Работает на любом устройстве с подключением к Интернету.
- Быстро и просто для одноразовых преобразований.
Соображения:
- Некоторые онлайн-инструменты могут иметь ограничения на размер файла для бесплатных пользователей.
- Скорость преобразования и точность макета могут различаться в зависимости от платформы.
- У некоторых пользователей могут возникнуть проблемы с конфиденциальностью при загрузке файлов в онлайн-конвертеры.
Онлайн-конвертеры, такие как CLOUDXDOCS, идеально подходят для быстрого и простого преобразования PPT в HTML или PPTX в HTML.
Метод 2 – Преобразование PowerPoint в HTML с использованием Microsoft Office
Современные версии Microsoft PowerPoint больше не включают старую опцию “Сохранить как веб-страницу (.htm; .html)”, которая существовала в PowerPoint 2007 и более ранних версиях.
Если вы все же предпочитаете выполнять преобразование PowerPoint в HTML в Microsoft Office, вы можете использовать PowerPoint вместе с Word для достижения того же результата.
Этот метод более ручной, но полезен для пользователей, которые предпочитают оставаться в экосистеме Office и не хотят полагаться на внешние инструменты или код.
Шаги по преобразованию PowerPoint в HTML с помощью Microsoft Office:
- Откройте свою презентацию PowerPoint.
- Перейдите в Файл > Экспорт и выберите Создать раздаточные материалы.
- Выберите макет во всплывающем меню и нажмите ОК. PowerPoint экспортирует ваши слайды и отправит их в новый документ Word.
- В Word перейдите в Файл > Сохранить как и выберите местоположение. Вы также можете настроить размер страницы, поля или удалить ненужное содержимое, чтобы макет слайда лучше соответствовал вашим потребностям перед сохранением.
- В раскрывающемся списке “Тип файла” выберите *Веб-страница (*.htm; *.html)* и нажмите Сохранить.
Word создаст HTML-файл вместе с папкой, содержащей связанные ресурсы (изображения, стили и т. д.). Каждый слайд будет отображаться как изображение с необязательным текстом или примечаниями, в зависимости от выбранного макета. Ниже приведен предварительный просмотр созданного HTML-файла:
При желании вы также можете вручную скопировать слайды из PowerPoint, вставить их в Word, при необходимости настроить форматирование, а затем сохранить документ как HTML.
Преимущества:
- 100% решение Microsoft Office — не требуются внешние инструменты.
- Сохраняет содержимое слайдов, примечания и макет в виде изображений и текста.
- Позволяет выполнять ручные настройки и форматирование в Word перед экспортом.
Ограничения:
- Процесс является ручным и трудоемким для больших презентаций.
- Вывод HTML может содержать ненужную разметку.
- Анимации и переходы не сохраняются.
Этот подход подходит, когда вы хотите полностью оставаться в пакете Office, но для крупномасштабных или повторных преобразований автоматизированные методы гораздо эффективнее.
Для статического отображения слайды также можно преобразовать в изображения и встроить в HTML. Узнайте больше в нашем руководстве по экспорту слайдов PowerPoint в виде изображений.
Метод 3 – Программное преобразование PowerPoint в HTML (автоматизация с помощью Python)
Для разработчиков или команд, которым требуется автоматизированное или крупномасштабное преобразование, использование Python предоставляет мощный и гибкий вариант. Написав короткий скрипт, вы можете пакетно преобразовывать несколько файлов PowerPoint в HTML без ручной работы.
Вот пример использования Spire.Presentation для Python, библиотеки, которая поддерживает чтение, редактирование и экспорт файлов PowerPoint в различных форматах:
Установите библиотеку с помощью pip:
pip install Spire.Presentation
Пример на Python — преобразование PowerPoint в HTML:
from spire.presentation import Presentation, FileFormat

# Загрузить файл PowerPoint
presentation = Presentation()
presentation.LoadFromFile("Sample.pptx")

# Сохранить как HTML
presentation.SaveToFile("output/PowerPointHTML.html", FileFormat.Html)
presentation.Dispose()
Как это работает: Код загружает файл PowerPoint с помощью класса Presentation, а затем экспортирует его в HTML-файл с помощью метода SaveToFile.
Вы можете увидеть пример полученного HTML-вывода на скриншоте ниже:
Преимущества:
- Полностью автоматизирован — идеально подходит для пакетных или запланированных преобразований.
- Может быть интегрирован в веб-сервисы или системы обработки документов.
- Сохраняет текст, изображения и базовую структуру слайдов.
Ограничения:
- Требуются базовые знания Python.
- Анимация и встроенные мультимедиа могут не экспортироваться.
Если вы управляете конвейером автоматизации документов или вам необходимо регулярно преобразовывать презентации PowerPoint в HTML, подход с использованием Python предлагает непревзойденную гибкость и масштабируемость.
Для получения более подробной информации об использовании Python для преобразования файлов PowerPoint в HTML см. наше пошаговое руководство по преобразованию на Python.
Советы для получения наилучших результатов
Независимо от того, какой метод вы выберете, следуйте этим советам по оптимизации, чтобы улучшить качество и производительность вывода:
-
Оптимизируйте изображения Сжимайте большие изображения перед экспортом, чтобы уменьшить размер файла и сократить время загрузки.
-
Используйте веб-шрифты Придерживайтесь стандартных шрифтов (например, Arial, Verdana, Roboto), чтобы обеспечить единообразное отображение в разных браузерах.
-
Сохраняйте пути к файлам нетронутыми Поддерживайте правильную структуру между вашим HTML-файлом и его папками с ресурсами (например, /images или /media).
-
Проверьте совместимость с браузерами Протестируйте экспортированный HTML в нескольких браузерах (Chrome, Edge, Firefox, Safari) для получения согласованных результатов.
-
Избегайте сложных анимаций Упростите переходы или удалите тяжелые эффекты, которые могут неправильно конвертироваться.
Соблюдение этих рекомендаций гарантирует, что ваши HTML-презентации останутся легкими, визуально согласованными и простыми для обмена.
Заключение
Преобразование файлов PowerPoint PPT/PPTX в HTML упрощает их просмотр и обмен на разных устройствах и платформах. Независимо от того, нужен ли вам быстрый одноразовый экспорт, автономное решение или рабочий процесс, который можно автоматизировать, существуют подходы, которые подходят для любых нужд.
Понимание ваших целей и рабочего процесса поможет вам выбрать наиболее подходящий метод и сделать процесс преобразования плавным и эффективным.
Часто задаваемые вопросы о преобразовании PowerPoint в HTML
Вот некоторые из наиболее распространенных вопросов, которые возникают у пользователей при преобразовании презентаций PowerPoint в HTML.
В1: Может ли PowerPoint по-прежнему сохранять напрямую в HTML?
Не в последних версиях. Опция «Сохранить как веб-страницу» была удалена после PowerPoint 2007. Вы можете экспортировать слайды в Word и сохранить документ Word как HTML, использовать онлайн-конвертеры или автоматизировать процесс с помощью Python.
В2: Как превратить PowerPoint в HTML или веб-страницу?
Вы можете использовать онлайн-инструменты, Microsoft Office (через Word), стороннее программное обеспечение для конвертации или сценарии Python. Правильный метод зависит от вашего рабочего процесса, размера файла и того, хотите ли вы ручного управления или автоматизации.
В3: Как лучше всего отобразить PPT на HTML-странице?
После преобразования в HTML ваши слайды можно встроить прямо в веб-страницу. Для интерактивных презентаций некоторые конвертеры сохраняют элементы управления навигацией, в то время как статические экспорты отображают слайды в виде изображений с сопроводительным текстом.
В4: Какой конвертер PowerPoint в HTML лучший?
Лучший инструмент зависит от ваших потребностей. Онлайн-инструменты быстры и удобны для одноразовых преобразований, методы на основе Office полностью автономны, а автоматизация с помощью Python и Spire.Presentation идеально подходит для крупномасштабных или повторных преобразований.
Смотрите также:
Convert PowerPoint to HTML: Simple Methods for Every User
Table of Contents
PowerPoint is widely recognized as one of the most popular tools for creating visually appealing presentations. However, when you want to share a presentation online—whether for websites, learning platforms, or internal documentation—it’s often better to convert PowerPoint to HTML, so slides can be viewed directly in any browser without needing PowerPoint or additional plugins.
There are several ways to perform PPT to HTML or PPTX to HTML conversion. You can use online tools for quick browser-based results, rely on Microsoft Office (via Word) for an all-Microsoft offline workflow, or automate the process with Python for large-scale or repeatable conversions. Each approach has its advantages and limitations.
In this article, we’ll explore these methods step-by-step so you can choose the best way to convert your files—whether you need a fast one-off conversion or a scalable PowerPoint-to-HTML workflow.
Methods Overview:
- Method 1 – Convert PowerPoint to HTML Using Free Online Tools
- Method 2 – Convert PowerPoint to HTML Using Microsoft Office
- Method 3 – Automate PowerPoint to HTML Conversion with Python
Why Convert PowerPoint to HTML?
Converting PowerPoint to HTML offers several advantages for both individuals and organizations:
-
Universal Accessibility
HTML files can be opened in any modern web browser, on any device—desktop, tablet, or smartphone—without requiring PowerPoint or Microsoft Office. -
Easy Embedding and Sharing
HTML presentations can be embedded into websites, blogs, and intranet portals, allowing for smooth integration into online environments. -
Compatibility and Portability
Sharing HTML eliminates version conflicts and ensures a consistent layout across platforms.
However, not all PowerPoint features translate perfectly into HTML. While text, images, and layouts are typically preserved, complex animations, embedded videos, and transitions may not appear exactly as in the original presentation.
Still, for most static or semi-interactive presentations, exporting PowerPoint to HTML provides an excellent balance of visual fidelity and web accessibility.
Method 1 – Convert PowerPoint to HTML Using Free Online Tools (No Installation Needed)
If you don’t have PowerPoint installed or want a quick browser-based solution, online PowerPoint to HTML converters are a convenient choice. Many free platforms allow you to upload your .ppt or .pptx file and convert it to HTML automatically without installing any software.
Some popular and reliable options include:
- CLOUDXDOCS
- Zamzar
- OnlineConvertFree
- Convertio
Here, we’ll take CLOUDXDOCS PowerPoint to HTML Converter as an example.
Typical process:
- Visit the CLOUDXDOCS PowerPoint to HTML Converter page.
- Upload your PowerPoint (.ppt or .pptx) file.
- Wait a few seconds for the conversion to complete.
- Download the resulting HTML package to your computer or do further processing as needed.
Below is a preview of the conversion result.
Advantages:
- No software installation required.
- Works on any device with an internet connection.
- Fast and simple for one-time conversions.
Considerations:
- Some online tools may have file size limits for free users.
- Conversion speed and layout accuracy can vary depending on the platform.
- Some users may have privacy concerns when uploading files to online converters.
Online converters like CLOUDXDOCS are ideal for quick and hassle-free PPT to HTML or PPTX to HTML conversions.
Method 2 – Convert PowerPoint to HTML Using Microsoft Office
Modern versions of Microsoft PowerPoint no longer include the old “Save as Web Page (.htm; .html)” option that existed in PowerPoint 2007 and earlier.
If you still prefer to complete the PowerPoint to HTML conversion within Microsoft Office, you can use PowerPoint together with Word to achieve the same result.
This method is more manual but useful for users who prefer to stay within the Office ecosystem and don’t want to rely on external tools or code.
Steps to convert PowerPoint to HTML using Microsoft Office:
- Open your PowerPoint presentation.
- Go to File > Export, and choose Create Handouts.
- Select a layout in the pop-up menu and click OK. PowerPoint will export your slides and send them to a new Word document.
- In Word, go to File > Save As and choose a location. You can also adjust the page size, margins, or remove unnecessary content to make the slide layout better fit your needs before saving.
- In the “Save as type” dropdown, choose *Web Page (.htm; .html)* and click Save.
Word will generate an HTML file along with a folder containing related resources (images, styles, etc.). Each slide will be displayed as an image with optional text or notes, depending on the chosen layout. Below is a preview of the generated HTML file:
If you prefer, you can also manually copy your slides from PowerPoint, paste them into Word, adjust formatting as needed, and then save the document as HTML.
Advantages:
- 100% Microsoft Office solution — no external tools required.
- Preserves slide content, notes, and layout as images and text.
- Allows manual adjustments and formatting in Word before exporting.
Limitations:
- The process is manual and time-consuming for large presentations.
- The HTML output may include unnecessary markup.
- Animations and transitions are not preserved.
This approach is suitable when you want to stay fully within the Office suite, but for larger-scale or repeat conversions, automated methods are far more efficient.
For a static display option, slides can also be converted to images and embedded into HTML. Learn more in our guide on exporting PowerPoint slides as images.
Method 3 – Convert PowerPoint to HTML Programmatically (Python Automation)
For developers or teams that require automated or large-scale conversion, using Python provides a powerful and flexible option. By writing a short script, you can batch convert multiple PowerPoint files into HTML without manual work.
Here’s an example using Spire.Presentation for Python, a library that supports reading, editing, and exporting PowerPoint files in various formats:
Install the library using pip:
pip install Spire.Presentation
Python Example-Convert PowerPoint to HTML:
from spire.presentation import Presentation, FileFormat

# Load the PowerPoint file
presentation = Presentation()
presentation.LoadFromFile("Sample.pptx")

# Save as HTML
presentation.SaveToFile("output/PowerPointHTML.html", FileFormat.Html)
presentation.Dispose()
How it works: The code loads a PowerPoint file using the Presentation class, then exports it to an HTML file using the SaveToFile method.
You can see an example of the resulting HTML output in the screenshot below:
Advantages:
- Fully automated—ideal for batch or scheduled conversions.
- Can be integrated into web services or document processing systems.
- Maintains text, images, and basic slide structure.
Limitations:
- Requires basic Python knowledge.
- Animation and embedded multimedia may not be exported.
If you manage a document automation pipeline or need to regularly convert PowerPoint presentations into HTML, the Python approach offers unmatched flexibility and scalability.
For more details on using Python to convert PowerPoint files to HTML, see our step-by-step Python conversion guide.
Tips for Getting the Best Results
No matter which method you choose, follow these optimization tips to improve output quality and performance:
-
Optimize Images Compress large images before export to reduce file size and improve loading times.
-
Use Web-Friendly Fonts Stick to standard fonts (e.g., Arial, Verdana, Roboto) to ensure consistent display across browsers.
-
Keep File Paths Intact Maintain the correct structure between your HTML file and its resource folders (like /images or /media).
-
Check Browser Compatibility Test your exported HTML in multiple browsers (Chrome, Edge, Firefox, Safari) for consistent results.
-
Avoid Complex Animations Simplify transitions or remove heavy effects that may not convert properly.
Following these best practices ensures your HTML presentations remain lightweight, visually consistent, and easy to share.
Conclusion
Converting PowerPoint PPT/PPTX files to HTML makes them easy to view and share across different devices and platforms. Whether you need a quick one-time export, an offline solution, or a workflow that can be automated, there are approaches that fit every need.
Understanding your goals and workflow will help you choose the most suitable method and make the conversion process smooth and efficient.
Frequently Asked Questions about PowerPoint to HTML Conversion
Here are some of the most common questions users have when converting PowerPoint presentations to HTML.
Q1: Can PowerPoint still save directly as HTML?
Not in recent versions. The “Save as Web Page” option was removed after PowerPoint 2007. You can export slides to Word and save the Word document as HTML, use online converters, or automate the process with Python.
Q2: How do I turn a PowerPoint into HTML or a web page?
You can use online tools, Microsoft Office (via Word), third-party converter software, or Python scripting. The right method depends on your workflow, file size, and whether you want manual control or automation.
Q3: What is the best way to display a PPT on an HTML page?
Once converted to HTML, your slides can be embedded directly in a webpage. For interactive presentations, some converters preserve navigation controls, while static exports display slides as images with accompanying text.
Q4: Which is the best PowerPoint to HTML converter?
The best tool depends on your needs. Online tools are fast and convenient for one-time conversions, Office-based methods are fully offline, and Python automation with Spire.Presentation is ideal for large-scale or repeated conversions.
See Also:
Spire.PDF for C++ 11.10.0 fixes an error when extracting PDF page text
We're pleased to announce the release of Spire.PDF for C++ 11.10.0. The latest version fixes an issue where the program threw errors when extracting PDF page text. Details are shown below.
Here is a list of changes made in this release
| Category | ID | Description |
| Bug | SPIREPDF-7685 | Fixes an issue where the program threw errors when extracting PDF page text. |
Remover Hyperlinks no Excel – 4 Métodos Fáceis
Índice
Você quer remover hiperlinks em arquivos do Excel de forma rápida e fácil? Quer eles tenham aparecido automaticamente ao digitar URLs ou tenham sido copiados de outras fontes, hiperlinks indesejados podem poluir sua planilha, dificultar a formatação e retardar seu fluxo de trabalho.
Neste guia, você aprenderá 4 maneiras fáceis de remover hiperlinks no Excel - manualmente através do menu de clique com o botão direito ou da guia Página Inicial, e automaticamente usando macros VBA ou C# - para que você possa limpar suas planilhas eficientemente, manter seus dados organizados e manter uma pasta de trabalho com aparência profissional.
Índice
- Como Remover Hiperlinks Manualmente no Excel
- Como Remover Todos os Hiperlinks no Excel Automaticamente
- Melhores Práticas para Excluir Hiperlinks no Excel
- Conclusão
- Perguntas Frequentes
Como Remover Hiperlinks Manualmente no Excel?
Se você tiver apenas alguns hiperlinks para excluir, a remoção manual geralmente é a solução mais rápida. O Excel fornece ferramentas integradas para essa tarefa, e elas são fáceis de acessar. Abaixo estão três métodos manuais diferentes que você pode usar, dependendo de sua preferência e situação.
Remover Hiperlinks usando o Menu de Clique com o Botão Direito
Esta é a maneira mais direta e amigável para iniciantes de remover hiperlinks de uma planilha do Excel, especialmente ao lidar com um pequeno conjunto de dados.
Passos para Remover Hiperlinks no Excel usando o Menu de Clique com o Botão Direito:
- Abra seu arquivo do Excel no MS Excel e, em seguida, selecione a célula ou o intervalo que contém os hiperlinks que você deseja remover.
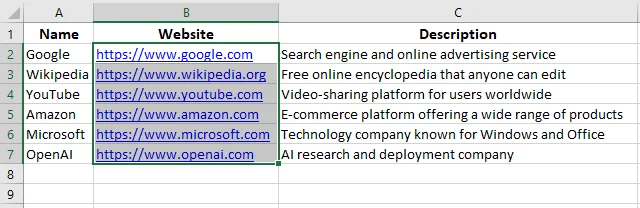
- Clique com o botão direito na célula ou intervalo selecionado.
- No menu de contexto, escolha Remover Hiperlinks.
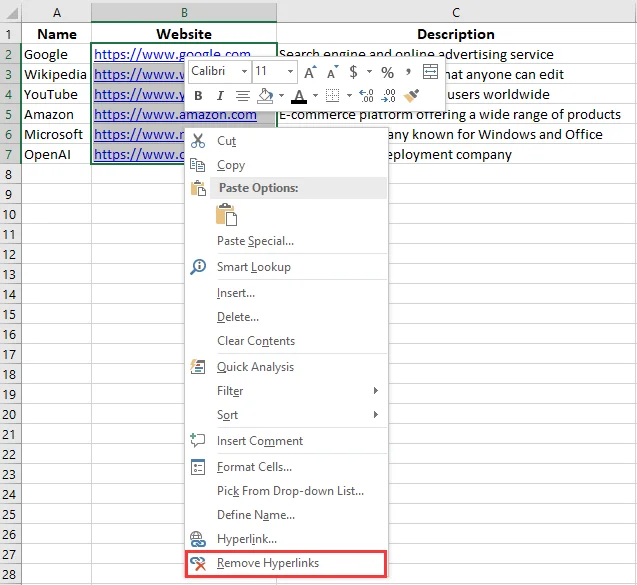
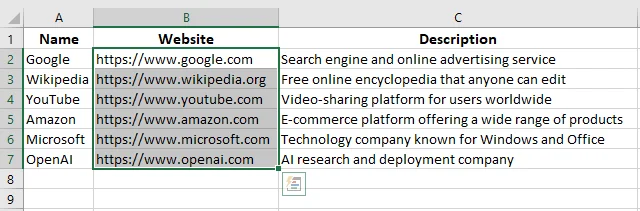
O Excel remove instantaneamente o hiperlink, mas mantém o texto de exibição intacto. O texto permanece visível na célula, apenas sem o link clicável.
Dica: Se você selecionar uma única célula, o menu mostrará Remover Hiperlink. Se você selecionar várias células, o Excel o altera para Remover Hiperlinks, permitindo que você exclua todos os hiperlinks de uma só vez.
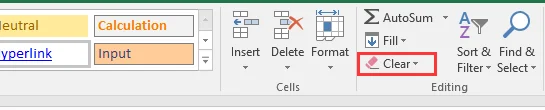
Remover Hiperlinks usando a Guia Página Inicial
Outra maneira rápida de remover hiperlinks no Excel é através da guia Página Inicial na faixa de opções. Este método funciona de forma semelhante à opção de clique com o botão direito, mas é melhor para quem prefere trabalhar com a barra de ferramentas do Excel em vez de menus de contexto.
Passos para Remover Hiperlinks do Excel usando a Guia Página Inicial:
- Selecione a célula ou o intervalo que contém os hiperlinks que você deseja excluir.

- Vá para a guia Página Inicial na barra de ferramentas superior, ao lado de Inserir.
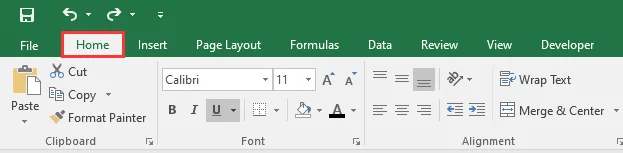
- No grupo Edição à direita, clique no botão Limpar (aquele com o ícone de borracha rosa). Uma lista suspensa aparecerá.
-
Na lista, escolha Limpar Hiperlinks ou Remover Hiperlinks com base em suas necessidades:
-
Limpar Hiperlinks - Remove apenas o hiperlink, mantendo a formatação original do texto intacta.
-
Remover Hiperlinks - Exclui o hiperlink e qualquer formatação (como cor da fonte ou sublinhado) aplicada a ele.
-
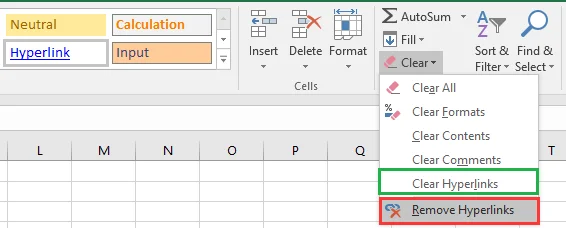
Suas células selecionadas agora estarão livres de hiperlinks clicáveis, com a formatação preservada ou removida, dependendo da opção que você escolheu.
Como Remover Todos os Hiperlinks no Excel Automaticamente?
Quando sua pasta de trabalho contém centenas ou milhares de hiperlinks, a remoção manual se torna impraticável. Nesses casos, a automação pode economizar um tempo significativo. Você pode remover todos os hiperlinks de uma vez usando VBA (Visual Basic for Applications) ou C# com a biblioteca Spire.XLS. Esses métodos permitem que você limpe suas planilhas eficientemente sem perder o texto.
Remover Hiperlinks usando VBA
O recurso de script VBA integrado do Excel permite que você execute pequenos trechos de código que realizam tarefas automaticamente. Remover hiperlinks através do VBA é uma das maneiras mais rápidas de limpar toda a sua pasta de trabalho.
Passos para Remover Todos os Hiperlinks do Excel usando Macros VBA:
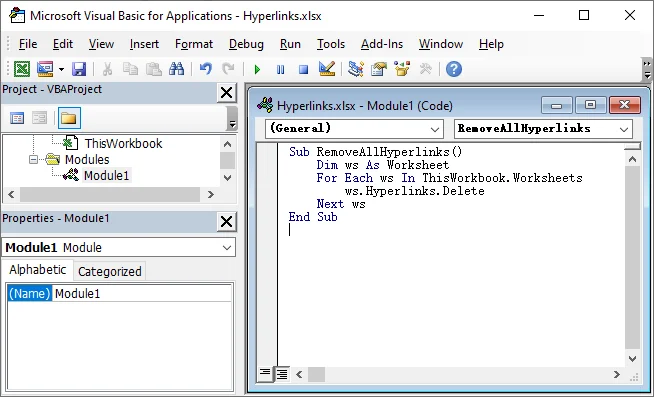
- Pressione Alt + F11 para abrir o Editor do VBA.
- Na janela do editor, vá para Inserir → Módulo.
- Copie e cole o seguinte código VBA:
Sub RemoveHyperlinks()
    Dim ws As Worksheet
    For Each ws In ThisWorkbook.Worksheets
        ws.Hyperlinks.Delete
    Next ws
End Sub
- Pressione F5 para executar o código VBA.
Isso removerá todos os hiperlinks da pasta de trabalho do Excel, mantendo o texto da célula intacto.

Dica: Você pode atribuir esta macro a um botão na sua Faixa de Opções para remoção de hiperlinks com um clique em fluxos de trabalho futuros.
Remover Hiperlinks Programaticamente com C#
Se você precisa remover hiperlinks no Excel usando C#, especialmente quando o VBA não é adequado ou o Excel não está instalado, a biblioteca Spire.XLS for .NET oferece uma solução eficiente e flexível. Ela permite que os desenvolvedores removam hiperlinks de uma ou mais planilhas inteiramente através de código, mantendo o texto e os dados da célula intactos.
Além da remoção de hiperlinks, o Spire.XLS suporta uma ampla gama de operações do Excel, como ler e escrever arquivos, formatar células, criar tabelas e muito mais. Isso o torna uma solução abrangente para desenvolvedores que desejam otimizar o processamento de dados e o gerenciamento de hiperlinks no Excel.
Passos para Remover Todos os Hiperlinks do Excel usando C# com Spire.XLS:
- Instale o Pacote NuGet Spire.XLS via Gerenciador de Pacotes NuGet:
PM> Install-Package Spire.XLS
- Adicione o seguinte código para excluir todos os hiperlinks de um arquivo do Excel de uma só vez usando C#.
using Spire.Xls;

namespace RemoveHyperlinks
{
    internal class Program
    {
        static void Main(string[] args)
        {
            // Load the Excel file
            Workbook workbook = new Workbook();
            workbook.LoadFromFile("Hyperlinks.xlsx");

            // Loop through all worksheets
            for (int s = 0; s < workbook.Worksheets.Count; s++)
            {
                Worksheet sheet = workbook.Worksheets[s];

                // Remove all hyperlinks from the worksheet
                for (int i = sheet.HyperLinks.Count - 1; i >= 0; i--)
                {
                    sheet.HyperLinks.RemoveAt(i);
                }
            }

            // Save the modified workbook
            workbook.SaveToFile("NoHyperlinks.xlsx", ExcelVersion.Version2016);
            workbook.Dispose();
        }
    }
}
- Pressione F5 para executar o código C#.
Após executar o código, todos os hiperlinks na pasta de trabalho são removidos, enquanto todo o texto da célula permanece inalterado.

Dica: Você pode personalizar o código para remover hiperlinks de uma planilha específica, visar um hiperlink particular ou processar vários arquivos do Excel em massa.
Melhores Práticas para Excluir Hiperlinks no Excel
Embora a remoção de hiperlinks no Excel seja simples, alguns passos extras podem ajudá-lo a evitar problemas comuns e manter sua planilha limpa e consistente. Aqui estão algumas melhores práticas a seguir:
- Verificar Hiperlinks que Reaparecem
Às vezes, os hiperlinks reaparecem quando você reinsere ou cola dados em uma célula. Para evitar isso, vá para
Arquivo > Opções > Revisão de Texto > Opções de AutoCorreção > AutoFormatação ao Digitar e desmarque Caminhos de Internet e de rede por hiperlinks. Isso impede que o Excel crie automaticamente novos hiperlinks. - Use VBA ou C# para Grandes Conjuntos de Dados
Ao lidar com planilhas grandes, excluir hiperlinks manualmente pode ser ineficiente. Em vez disso, use uma macro VBA ou automação em C# para remover todos os hiperlinks de uma vez. Isso economiza tempo e garante resultados consistentes em várias planilhas. - Sempre Faça Backup Antes de Executar o Código
Antes de executar qualquer script ou automação, salve um backup do seu arquivo. Mesmo macros simples às vezes podem remover mais do que o pretendido, especialmente se os hiperlinks estiverem incorporados em fórmulas ou comentários.
Conclusão
Em resumo, a remoção manual é perfeita para edições rápidas e únicas, enquanto a automação com VBA ou C# é ideal para grandes conjuntos de dados e tarefas repetitivas. Se você precisa remover apenas alguns hiperlinks, as opções integradas do Excel - menu de clique com o botão direito ou a guia Página Inicial - são rápidas e diretas. Para desenvolvedores ou usuários avançados que gerenciam várias pastas de trabalho, automatizar a limpeza com VBA ou C# economiza tempo e garante consistência. Escolha o método que melhor se adapta ao seu fluxo de trabalho e sinta-se à vontade para experimentar diferentes abordagens para ver o que funciona melhor para seus arquivos do Excel.
Perguntas Frequentes
P1: Como removo todos os hiperlinks no Excel de uma só vez?
R1: Você pode remover todos os hiperlinks de uma vez usando automação com VBA ou C#. No VBA, use ActiveSheet.Hyperlinks.Delete para uma única planilha ou percorra todas as planilhas para limpar toda a pasta de trabalho. Bibliotecas C# como Spire.XLS permitem a remoção programática de hiperlinks, mantendo o texto da célula intacto.
P2: Posso remover hiperlinks sem perder o texto da célula no Excel?
R2: Sim. As opções integradas do Excel - menu de clique com o botão direito ou guia Página Inicial - excluem os hiperlinks, mas mantêm o texto de exibição da célula. As soluções em VBA e C# alcançam o mesmo resultado.
P3: Como remover hiperlinks no Excel, mas manter a formatação?
R3: Para remover hiperlinks, mas manter a formatação, primeiro selecione a célula ou o intervalo que contém os hiperlinks. Em seguida, vá para a guia Página Inicial, clique em Limpar no grupo Edição e escolha Limpar Hiperlinks na lista suspensa.
P4: Como posso remover hiperlinks de várias planilhas de forma eficiente?
R4: Para várias planilhas, a automação com VBA ou C# é recomendada. Percorra cada planilha e exclua os hiperlinks programaticamente para economizar tempo, especialmente em pastas de trabalho grandes.
Leia Também
- Criar Lista Suspensa no Excel: Guia de Automação Manual e por Código
- Como AutoAjustar a Largura da Coluna no Excel (5 Maneiras)
- Pandas DataFrame para Excel em Python: Guia Passo a Passo
- Como Remover Fórmulas no Excel, mas Manter os Dados
- Converta Texto para PDF Facilmente: 4 Métodos Rápidos e Profissionais
Rimuovere i collegamenti ipertestuali in Excel – 4 metodi semplici
Vuoi rimuovere i collegamenti ipertestuali nei file Excel in modo rapido e semplice? Che siano apparsi automaticamente durante la digitazione di URL o siano stati copiati da altre fonti, i collegamenti ipertestuali indesiderati possono ingombrare il tuo foglio di calcolo, rendere difficile la formattazione e rallentare il tuo flusso di lavoro.
In questa guida, imparerai 4 modi semplici per rimuovere i collegamenti ipertestuali in Excel - manualmente tramite il menu contestuale o la scheda Home, e automaticamente utilizzando macro VBA o C# - così potrai pulire i tuoi fogli in modo efficiente, mantenere i tuoi dati organizzati e conservare una cartella di lavoro dall'aspetto professionale.
Indice
- Come Rimuovere i Collegamenti Ipertestuali Manualmente in Excel
- Come Rimuovere Automaticamente Tutti i Collegamenti Ipertestuali in Excel
- Migliori Pratiche per l'Eliminazione dei Collegamenti Ipertestuali in Excel
- Conclusione
- Domande Frequenti
Come Rimuovere i Collegamenti Ipertestuali Manualmente in Excel?
Se hai solo pochi collegamenti ipertestuali da eliminare, la rimozione manuale è solitamente la soluzione più rapida. Excel fornisce strumenti integrati per questo compito, e sono facili da accedere. Di seguito sono riportati tre diversi metodi manuali che puoi utilizzare, a seconda delle tue preferenze e della situazione.
Rimuovere i Collegamenti Ipertestuali utilizzando il Menu Contestuale
Questo è il modo più diretto e adatto ai principianti per rimuovere i collegamenti ipertestuali da un foglio Excel, specialmente quando si ha a che fare con un piccolo set di dati.
Passaggi per Rimuovere i Collegamenti Ipertestuali in Excel utilizzando il Menu Contestuale:
- Apri il tuo file Excel in MS Excel, quindi seleziona la cella o l'intervallo che contiene i collegamenti ipertestuali che desideri rimuovere.
- Fai clic con il pulsante destro del mouse sulla cella o sull'intervallo selezionato.
- Dal menu contestuale, scegli Rimuovi collegamenti ipertestuali.
Excel rimuove istantaneamente il collegamento ipertestuale ma mantiene intatto il testo visualizzato. Il testo rimane visibile nella cella, solo senza il link cliccabile.
Suggerimento: Se selezioni una singola cella, il menu mostrerà Rimuovi collegamento ipertestuale. Se selezioni più celle, Excel lo cambia in Rimuovi collegamenti ipertestuali, permettendoti di eliminare tutti i collegamenti ipertestuali in una sola volta.
Rimuovere i Collegamenti Ipertestuali utilizzando la Scheda Home
Un altro modo rapido per rimuovere i collegamenti ipertestuali in Excel è attraverso la scheda Home sulla barra multifunzione. Questo metodo funziona in modo simile all'opzione del clic destro, ma è migliore per coloro che preferiscono lavorare con la barra degli strumenti di Excel piuttosto che con i menu contestuali.
Passaggi per Rimuovere i Collegamenti Ipertestuali da Excel utilizzando la Scheda Home:
- Seleziona la cella o l'intervallo che contiene i collegamenti ipertestuali che desideri eliminare.
- Vai alla scheda Home sulla barra degli strumenti in alto, accanto a Inserisci.
- Nel gruppo Modifica a destra, fai clic sul pulsante Cancella (quello con l'icona della gomma rosa). Apparirà un elenco a discesa.
-
Dall'elenco, scegli Cancella collegamenti ipertestuali o Rimuovi collegamenti ipertestuali in base alle tue esigenze:
-
Cancella collegamenti ipertestuali - Rimuove solo il collegamento ipertestuale, mantenendo intatta la formattazione del testo originale.
-
Rimuovi collegamenti ipertestuali - Elimina sia il collegamento ipertestuale che qualsiasi formattazione (come il colore del carattere o la sottolineatura) ad esso applicata.
-
Le celle selezionate saranno ora prive di collegamenti ipertestuali cliccabili, con la formattazione conservata o rimossa a seconda dell'opzione scelta.
Come Rimuovere Automaticamente Tutti i Collegamenti Ipertestuali in Excel?
Quando la tua cartella di lavoro contiene centinaia o migliaia di collegamenti ipertestuali, la rimozione manuale diventa impraticabile. In tali casi, l'automazione può far risparmiare molto tempo. Puoi rimuovere tutti i collegamenti ipertestuali in una volta sola utilizzando VBA (Visual Basic for Applications) o C# con la libreria Spire.XLS. Questi metodi ti consentono di pulire i tuoi fogli in modo efficiente senza perdere il testo.
Rimuovere i Collegamenti Ipertestuali utilizzando VBA
La funzione di scripting VBA integrata di Excel consente di eseguire piccoli frammenti di codice che eseguono attività automaticamente. La rimozione dei collegamenti ipertestuali tramite VBA è uno dei modi più veloci per ripulire l'intera cartella di lavoro.
Passaggi per Rimuovere Tutti i Collegamenti Ipertestuali da Excel utilizzando le Macro VBA:
- Premi Alt + F11 per aprire l'Editor VBA.
- Nella finestra dell'editor, vai su Inserisci → Modulo.
- Copia e incolla il seguente codice VBA:
Sub RemoveHyperlinks()
    Dim ws As Worksheet
    For Each ws In ThisWorkbook.Worksheets
        ws.Hyperlinks.Delete
    Next ws
End Sub
- Premi F5 per eseguire il codice VBA.
Questo rimuoverà tutti i collegamenti ipertestuali dalla cartella di lavoro di Excel mantenendo intatto il testo della cella.
Suggerimento: Puoi assegnare questa macro a un pulsante sulla barra multifunzione per la rimozione dei collegamenti ipertestuali con un solo clic nei flussi di lavoro futuri.
Rimuovere i Collegamenti Ipertestuali Programmaticamente con C#
Se hai bisogno di rimuovere i collegamenti ipertestuali in Excel usando C#, specialmente quando VBA non è adatto o Excel non è installato, la libreria Spire.XLS for .NET offre una soluzione efficiente e flessibile. Consente agli sviluppatori di rimuovere i collegamenti ipertestuali da uno o più fogli di lavoro interamente tramite codice, mantenendo intatti il testo e i dati delle celle.
Oltre alla rimozione dei collegamenti ipertestuali, Spire.XLS supporta una vasta gamma di operazioni di Excel, come la lettura e la scrittura di file, la formattazione delle celle, la creazione di tabelle e altro ancora. Questo lo rende una soluzione completa per gli sviluppatori che desiderano ottimizzare l'elaborazione dei dati e la gestione dei collegamenti ipertestuali in Excel.
Passaggi per Rimuovere Tutti i Collegamenti Ipertestuali da Excel utilizzando C# con Spire.XLS:
- Installa il Pacchetto NuGet di Spire.XLS tramite il Gestore Pacchetti NuGet:
PM> Install-Package Spire.XLS
- Aggiungi il seguente codice per eliminare tutti i collegamenti ipertestuali da un file Excel in una sola volta utilizzando C#.
using Spire.Xls;

namespace RemoveHyperlinks
{
    internal class Program
    {
        static void Main(string[] args)
        {
            // Load the Excel file
            Workbook workbook = new Workbook();
            workbook.LoadFromFile("Hyperlinks.xlsx");

            // Loop through all worksheets
            for (int s = 0; s < workbook.Worksheets.Count; s++)
            {
                Worksheet sheet = workbook.Worksheets[s];

                // Remove all hyperlinks from the worksheet
                for (int i = sheet.HyperLinks.Count - 1; i >= 0; i--)
                {
                    sheet.HyperLinks.RemoveAt(i);
                }
            }

            // Save the modified workbook
            workbook.SaveToFile("NoHyperlinks.xlsx", ExcelVersion.Version2016);
            workbook.Dispose();
        }
    }
}
- Premi F5 per eseguire il codice C#.
Dopo aver eseguito il codice, tutti i collegamenti ipertestuali nella cartella di lavoro vengono rimossi, mentre tutto il testo delle celle rimane invariato.
Suggerimento: Puoi personalizzare il codice per rimuovere i collegamenti ipertestuali da un foglio di lavoro specifico, mirare a un particolare collegamento ipertestuale o elaborare più file Excel in blocco.
Migliori Pratiche per l'Eliminazione dei Collegamenti Ipertestuali in Excel
Sebbene la rimozione dei collegamenti ipertestuali in Excel sia semplice, alcuni passaggi aggiuntivi possono aiutarti a evitare problemi comuni e a mantenere il tuo foglio di lavoro pulito e coerente. Ecco alcune migliori pratiche da seguire:
- Controlla la Ricomparsa dei Collegamenti Ipertestuali
A volte, i collegamenti ipertestuali ricompaiono quando reinserisci o incolli dati in una cella. Per evitare ciò, vai su
File > Opzioni > Strumenti di correzione > Opzioni correzione automatica > Formattazione automatica durante la digitazione e deseleziona Percorsi Internet e di rete con collegamenti ipertestuali. Ciò impedisce a Excel di creare automaticamente nuovi collegamenti ipertestuali. - Usa VBA o C# per Grandi Set di Dati
Quando si ha a che fare con fogli di calcolo di grandi dimensioni, l'eliminazione manuale dei collegamenti ipertestuali può essere inefficiente. Invece, usa una macro VBA o l'automazione C# per rimuovere tutti i collegamenti ipertestuali in una sola volta. Ciò consente di risparmiare tempo e garantisce risultati coerenti su più fogli. - Esegui Sempre il Backup Prima di Eseguire il Codice
Prima di eseguire qualsiasi script o automazione, salva una copia di backup del tuo file. Anche le macro semplici a volte possono rimuovere più del previsto, specialmente se i collegamenti ipertestuali sono incorporati in formule o commenti.
Conclusione
In sintesi, la rimozione manuale è perfetta per modifiche rapide e occasionali, mentre l'automazione con VBA o C# è ideale per grandi set di dati e attività ripetitive. Se hai solo bisogno di rimuovere alcuni collegamenti ipertestuali, le opzioni integrate di Excel - menu contestuale o scheda Home - sono veloci e dirette. Per gli sviluppatori o gli utenti esperti che gestiscono più cartelle di lavoro, l'automazione della pulizia con VBA o C# consente di risparmiare tempo e garantisce coerenza. Scegli il metodo che meglio si adatta al tuo flusso di lavoro e sentiti libero di sperimentare approcci diversi per vedere cosa funziona meglio per i tuoi file Excel.
Domande Frequenti
D1: Come posso rimuovere tutti i collegamenti ipertestuali in Excel in una sola volta?
R1: Puoi rimuovere tutti i collegamenti ipertestuali in una sola volta utilizzando l'automazione VBA o C#. In VBA, usa ActiveSheet.Hyperlinks.Delete per un singolo foglio di lavoro o esegui un ciclo su tutti i fogli di lavoro per pulire l'intera cartella di lavoro. Librerie C# come Spire.XLS consentono la rimozione programmatica dei collegamenti ipertestuali mantenendo intatto il testo della cella.
D2: Posso rimuovere i collegamenti ipertestuali senza perdere il testo della cella in Excel?
R2: Sì. Le opzioni integrate di Excel - menu contestuale o scheda Home - eliminano i collegamenti ipertestuali ma mantengono il testo visualizzato della cella. Le soluzioni VBA e C# ottengono lo stesso risultato.
D3: Come rimuovere i collegamenti ipertestuali in Excel ma mantenere la formattazione?
R3: Per rimuovere i collegamenti ipertestuali ma mantenere la formattazione, seleziona prima la cella o l'intervallo contenente i collegamenti ipertestuali. Quindi, vai alla scheda Home, fai clic su Cancella nel gruppo Modifica e scegli Cancella collegamenti ipertestuali dall'elenco a discesa.
D4: Come posso rimuovere i collegamenti ipertestuali da più fogli di lavoro in modo efficiente?
R4: Per più fogli di lavoro, si consiglia l'automazione con VBA o C#. Esegui un ciclo su ogni foglio ed elimina i collegamenti ipertestuali programmaticamente per risparmiare tempo, specialmente per cartelle di lavoro di grandi dimensioni.
Leggi Anche
- Creare un Elenco a Discesa in Excel: Guida all'Automazione Manuale e con Codice
- Come Adattare Automaticamente la Larghezza delle Colonne in Excel (5 Modi)
- Da DataFrame Pandas a Excel in Python: Guida Passo-Passo
- Come Rimuovere le Formule in Excel ma Mantenere i Dati
- Convertire Testo in PDF Facilmente: 4 Metodi Rapidi e Professionali
Excel에서 하이퍼링크 제거하기 — 4가지 쉬운 방법
Excel 파일의 하이퍼링크를 빠르고 쉽게 제거하고 싶으신가요? URL을 입력할 때 자동으로 나타났든 다른 소스에서 복사했든, 원치 않는 하이퍼링크는 스프레드시트를 복잡하게 만들고 서식을 어렵게 하며 작업 흐름을 느리게 할 수 있습니다.
이 가이드에서는 오른쪽 클릭 메뉴나 홈 탭을 통해 수동으로, 그리고 VBA 매크로나 C#을 사용하여 자동으로 Excel에서 하이퍼링크를 제거하는 4가지 쉬운 방법을 배웁니다. 이를 통해 시트를 효율적으로 정리하고, 데이터를 체계적으로 유지하며, 전문적인 통합 문서를 유지할 수 있습니다.
목차
Excel에서 수동으로 하이퍼링크를 제거하는 방법은 무엇인가요?
삭제할 하이퍼링크가 몇 개뿐이라면 수동 제거가 일반적으로 가장 빠른 해결책입니다. Excel은 이 작업을 위한 내장 도구를 제공하며 쉽게 접근할 수 있습니다. 선호도와 상황에 따라 사용할 수 있는 세 가지 다른 수동 방법이 아래에 있습니다.
오른쪽 클릭 메뉴를 사용하여 하이퍼링크 제거
이것은 특히 작은 데이터 세트를 다룰 때 Excel 시트에서 하이퍼링크를 제거하는 가장 직접적이고 초보자에게 친숙한 방법입니다.
오른쪽 클릭 메뉴를 사용하여 Excel에서 하이퍼링크를 제거하는 단계:
- MS Excel에서 Excel 파일을 연 다음 제거하려는 하이퍼링크가 포함된 셀 또는 범위를 선택합니다.
- 선택한 셀 또는 범위를 마우스 오른쪽 버튼으로 클릭합니다.
- 상황에 맞는 메뉴에서 하이퍼링크 제거를 선택합니다.
Excel은 하이퍼링크를 즉시 제거하지만 표시 텍스트는 그대로 유지합니다. 텍스트는 클릭 가능한 링크 없이 셀에 계속 표시됩니다.
팁: 단일 셀을 선택하면 메뉴에 하이퍼링크 제거가 표시됩니다. 여러 셀을 선택하면 Excel은 이를 하이퍼링크 제거로 변경하여 모든 하이퍼링크를 한 번에 삭제할 수 있습니다.
홈 탭을 사용하여 하이퍼링크 제거
Excel에서 하이퍼링크를 제거하는 또 다른 빠른 방법은 리본의 홈 탭을 이용하는 것입니다. 이 방법은 오른쪽 클릭 옵션과 유사하게 작동하지만 상황에 맞는 메뉴보다 Excel의 도구 모음으로 작업하는 것을 선호하는 사람들에게 더 좋습니다.
홈 탭을 사용하여 Excel에서 하이퍼링크를 제거하는 단계:
- 삭제하려는 하이퍼링크가 포함된 셀 또는 범위를 선택합니다.
- 상단 도구 모음에서 삽입 옆에 있는 홈 탭으로 이동합니다.
- 오른쪽의 편집 그룹에서 지우기 버튼(분홍색 지우개 아이콘이 있는 버튼)을 클릭합니다. 드롭다운 목록이 나타납니다.
-
목록에서 필요에 따라 하이퍼링크 지우기 또는 하이퍼링크 제거를 선택합니다.
-
하이퍼링크 지우기 - 원래 텍스트 서식은 그대로 유지하면서 하이퍼링크만 제거합니다.
-
하이퍼링크 제거 - 하이퍼링크와 여기에 적용된 모든 서식(예: 글꼴 색 또는 밑줄)을 모두 삭제합니다.
-
선택한 셀은 이제 클릭 가능한 하이퍼링크가 없으며, 선택한 옵션에 따라 서식이 유지되거나 제거됩니다.
Excel에서 모든 하이퍼링크를 자동으로 제거하는 방법은 무엇인가요?
통합 문서에 수백 또는 수천 개의 하이퍼링크가 포함되어 있으면 수동 제거가 비현실적입니다. 이러한 경우 자동화를 통해 상당한 시간을 절약할 수 있습니다. VBA(Visual Basic for Applications) 또는 Spire.XLS 라이브러리와 함께 C#을 사용하여 모든 하이퍼링크를 한 번에 제거할 수 있습니다. 이러한 방법을 사용하면 텍스트를 잃지 않고 시트를 효율적으로 정리할 수 있습니다.
VBA를 사용하여 하이퍼링크 제거
Excel의 내장 VBA 스크립팅 기능을 사용하면 작업을 자동으로 수행하는 작은 코드 조각을 실행할 수 있습니다. VBA를 통해 하이퍼링크를 제거하는 것은 전체 통합 문서를 정리하는 가장 빠른 방법 중 하나입니다.
VBA 매크로를 사용하여 Excel에서 모든 하이퍼링크를 제거하는 단계:
- Alt + F11을 눌러 VBA 편집기를 엽니다.
- 편집기 창에서 삽입 → 모듈로 이동합니다.
- 다음 VBA 코드를 복사하여 붙여넣습니다.
Sub RemoveHyperlinks()
    Dim ws As Worksheet
    For Each ws In ThisWorkbook.Worksheets
        ws.Hyperlinks.Delete
    Next ws
End Sub
- F5를 눌러 VBA 코드를 실행합니다.
이렇게 하면 셀 텍스트는 그대로 유지하면서 Excel 통합 문서에서 모든 하이퍼링크가 제거됩니다.
팁: 향후 워크플로에서 한 번의 클릭으로 하이퍼링크를 제거할 수 있도록 이 매크로를 리본의 버튼에 할당할 수 있습니다.
C#으로 프로그래밍 방식으로 하이퍼링크 제거
특히 VBA가 적합하지 않거나 Excel이 설치되지 않은 경우 C#을 사용하여 Excel에서 하이퍼링크를 제거해야 하는 경우 Spire.XLS for .NET 라이브러리는 효율적이고 유연한 솔루션을 제공합니다. 이를 통해 개발자는 셀 텍스트와 데이터를 그대로 유지하면서 코드를 통해 하나 이상의 워크시트에서 하이퍼링크를 완전히 제거할 수 있습니다.
하이퍼링크 제거 외에도 Spire.XLS는 파일 읽기 및 쓰기, 셀 서식 지정, 표 만들기 등과 같은 광범위한 Excel 작업을 지원합니다. 따라서 Excel에서 데이터 처리 및 하이퍼링크 관리를 간소화하려는 개발자에게 포괄적인 솔루션입니다.
Spire.XLS와 함께 C#을 사용하여 Excel에서 모든 하이퍼링크를 제거하는 단계:
- NuGet 패키지 관리자를 통해 Spire.XLS NuGet 패키지를 설치합니다.
PM> Install-Package Spire.XLS
- C#을 사용하여 Excel 파일에서 모든 하이퍼링크를 한 번에 삭제하려면 다음 코드를 추가하십시오.
using Spire.Xls;

namespace RemoveHyperlinks
{
    internal class Program
    {
        static void Main(string[] args)
        {
            // Load the Excel file
            Workbook workbook = new Workbook();
            workbook.LoadFromFile("Hyperlinks.xlsx");

            // Loop through all worksheets
            for (int s = 0; s < workbook.Worksheets.Count; s++)
            {
                Worksheet sheet = workbook.Worksheets[s];

                // Remove all hyperlinks from the worksheet
                for (int i = sheet.HyperLinks.Count - 1; i >= 0; i--)
                {
                    sheet.HyperLinks.RemoveAt(i);
                }
            }

            // Save the modified workbook
            workbook.SaveToFile("NoHyperlinks.xlsx", ExcelVersion.Version2016);
            workbook.Dispose();
        }
    }
}
- F5를 눌러 C# 코드를 실행합니다.
코드를 실행하면 통합 문서의 모든 하이퍼링크가 제거되고 모든 셀 텍스트는 변경되지 않은 상태로 유지됩니다.
팁: 특정 워크시트에서 하이퍼링크를 제거하거나, 특정 하이퍼링크를 대상으로 하거나, 여러 Excel 파일을 일괄 처리하도록 코드를 사용자 지정할 수 있습니다.
Excel에서 하이퍼링크 삭제를 위한 모범 사례
Excel에서 하이퍼링크를 제거하는 것은 간단하지만 몇 가지 추가 단계를 통해 일반적인 문제를 방지하고 워크시트를 깨끗하고 일관성 있게 유지할 수 있습니다. 다음은 따라야 할 몇 가지 모범 사례입니다.
- 다시 나타나는 하이퍼링크 확인
때로는 셀에 데이터를 다시 입력하거나 붙여넣을 때 하이퍼링크가 다시 나타납니다. 이를 방지하려면
파일 > 옵션 > 언어 교정 > 자동 고침 옵션 > 입력할 때 자동 서식으로 이동하여 인터넷과 네트워크 경로를 하이퍼링크로 설정을 선택 취소합니다. 이렇게 하면 Excel이 자동으로 새 하이퍼링크를 만드는 것을 중지합니다. - 대규모 데이터 세트에는 VBA 또는 C# 사용
대규모 스프레드시트를 다룰 때 수동으로 하이퍼링크를 삭제하는 것은 비효율적일 수 있습니다. 대신 VBA 매크로 또는 C# 자동화를 사용하여 모든 하이퍼링크를 한 번에 제거하십시오. 이렇게 하면 시간이 절약되고 여러 시트에서 일관된 결과를 보장할 수 있습니다. - 코드를 실행하기 전에 항상 백업
스크립트나 자동화를 실행하기 전에 파일의 백업을 저장하십시오. 간단한 매크로라도 특히 하이퍼링크가 수식이나 주석에 포함된 경우 의도한 것보다 더 많이 제거할 수 있습니다.
결론
요약하자면, 수동 제거는 빠른 일회성 편집에 적합하며, VBA 또는 C# 자동화는 대규모 데이터 세트 및 반복적인 작업에 이상적입니다. 몇 개의 하이퍼링크만 제거해야 하는 경우 Excel의 내장 옵션인 오른쪽 클릭 메뉴나 홈 탭이 빠르고 간단합니다. 여러 통합 문서를 관리하는 개발자나 고급 사용자의 경우 VBA 또는 C#으로 정리를 자동화하면 시간을 절약하고 일관성을 보장할 수 있습니다. 자신의 워크플로에 가장 적합한 방법을 선택하고 다양한 접근 방식을 자유롭게 실험하여 Excel 파일에 가장 적합한 방법을 찾아보십시오.
자주 묻는 질문
Q1: Excel에서 모든 하이퍼링크를 한 번에 제거하려면 어떻게 해야 하나요?
A1: VBA 또는 C# 자동화를 사용하여 모든 하이퍼링크를 한 번에 제거할 수 있습니다. VBA에서는 단일 워크시트에 대해 ActiveSheet.Hyperlinks.Delete를 사용하거나 모든 워크시트를 반복하여 전체 통합 문서를 정리합니다. Spire.XLS와 같은 C# 라이브러리를 사용하면 셀 텍스트를 그대로 유지하면서 프로그래밍 방식으로 하이퍼링크를 제거할 수 있습니다.
Q2: Excel에서 셀 텍스트를 잃지 않고 하이퍼링크를 제거할 수 있나요?
A2: 예. Excel의 내장 옵션인 오른쪽 클릭 메뉴 또는 홈 탭은 하이퍼링크를 삭제하지만 셀의 표시 텍스트는 유지합니다. VBA 및 C# 솔루션도 동일한 결과를 얻습니다.
Q3: Excel에서 서식은 유지하면서 하이퍼링크를 제거하는 방법은 무엇인가요?
A3: 서식은 유지하면서 하이퍼링크를 제거하려면 먼저 하이퍼링크가 포함된 셀 또는 범위를 선택합니다. 그런 다음 홈 탭으로 이동하여 편집 그룹에서 지우기를 클릭하고 드롭다운 목록에서 하이퍼링크 지우기를 선택합니다.
Q4: 여러 워크시트에서 하이퍼링크를 효율적으로 제거하려면 어떻게 해야 하나요?
A4: 여러 워크시트의 경우 VBA 또는 C#을 사용한 자동화를 권장합니다. 각 시트를 반복하고 프로그래밍 방식으로 하이퍼링크를 삭제하여 특히 대규모 통합 문서의 경우 시간을 절약할 수 있습니다.