5 Wege, eine Word-Datei schreibgeschützt zu machen
Inhaltsverzeichnis
- Ein Word-Dokument als final kennzeichnen (Alle Word-Versionen)
- Word-Dateien immer im schreibgeschützten Modus öffnen (Word 2019 oder neuer)
- Bearbeitung einschränken, um Word-Dokumente schreibgeschützt zu machen
- Word-Dateien als PDF speichern für vollständigen Schreibschutz
- Word-Dateischutz mit Python automatisieren (Passwort oder PDF)
- Welche Methode sollten Sie wählen?
- Schlussworte
- Häufig gestellte Fragen zum Schreibschutz von Word-Dateien

Wenn Sie ein Word-Dokument freigeben, möchten Sie möglicherweise nicht, dass andere Ihren Inhalt versehentlich ändern. Ob es sich um einen Vertrag, einen Bericht, ein Zertifikat oder einen endgültigen Vorschlag handelt, das Schreibschützen einer Word-Datei hilft, die Formatierung zu erhalten, die Dokumentintegrität zu wahren und sicherzustellen, dass die Empfänger Ihre Arbeit ansehen, aber nicht verändern.
Microsoft Word bietet mehrere Möglichkeiten, Ihre Dateien schreibgeschützt zu machen, abhängig von der von Ihnen verwendeten Version und dem benötigten Schutzniveau. In diesem Leitfaden werden wir fünf effektive Methoden untersuchen – von einfachen manuellen Einstellungen wie „Als final kennzeichnen“ bis hin zu automatisierten Lösungen mit Python. Am Ende werden Sie genau wissen, wie Sie Ihre Word-Dokumente schützen können, egal ob Sie Word 2016, Word 2019 oder neuere Microsoft 365-Editionen verwenden.
- Ein Word-Dokument als final kennzeichnen (Alle Word-Versionen)
- Word-Dateien immer im schreibgeschützten Modus öffnen (Word 2019 oder neuer)
- Bearbeitung einschränken, um Word-Dokumente schreibgeschützt zu machen
- Word-Dateien als PDF speichern für vollständigen Schreibschutz
- Word-Dateischutz mit Python automatisieren (Passwort oder PDF)
Ein Word-Dokument als final kennzeichnen (Alle Word-Versionen)
Wenn Sie Microsoft Word verwenden, ist eine der einfachsten Möglichkeiten, eine Datei schreibgeschützt zu machen, sie als final zu kennzeichnen. Diese Funktion ist in allen modernen Word-Versionen verfügbar und zeigt an, dass das Dokument fertiggestellt ist, was andere davon abhält, weitere Bearbeitungen vorzunehmen.
Schritte:
-
Öffnen Sie Ihr Word-Dokument.
-
Gehen Sie zu Datei → Informationen → Dokument schützen → Als final kennzeichnen.
-
Klicken Sie auf OK, wenn Sie dazu aufgefordert werden.
-
Speichern und schließen Sie das Dokument.
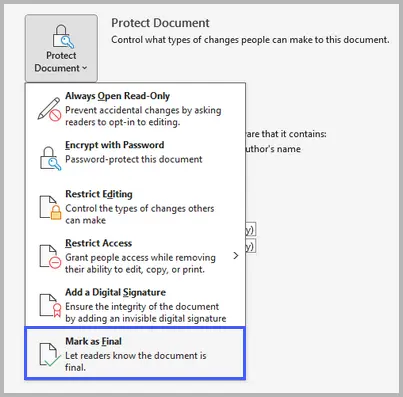
Dieser Ansatz versetzt das Dokument in einen schreibgeschützten Status und hält von der Bearbeitung ab, verhindert aber nicht, dass jemand das Kennzeichen „Als final kennzeichnen“ entfernt, um die Datei zu bearbeiten. Er wird am besten als Signal verwendet, dass das Dokument vollständig ist, nicht als strenge Sicherheitsmaßnahme.
Vor- und Nachteile
✔ Schnell und einfach; kein Passwort erforderlich.
✘ Benutzer können dies leicht umgehen, indem sie auf Trotzdem bearbeiten klicken.
Word-Dateien immer im schreibgeschützten Modus öffnen (Word 2019 oder neuer)
Ab Word 2019 und Microsoft 365 hat Microsoft eine modernere Möglichkeit eingeführt, Dokumente im schreibgeschützten Modus zu öffnen – die Funktion „Immer schreibgeschützt öffnen“.
Schritte:
-
Öffnen Sie Ihre Datei in Word.
-
Klicken Sie auf Datei → Informationen → Dokument schützen → Immer schreibgeschützt öffnen.
- Speichern Sie das Dokument.
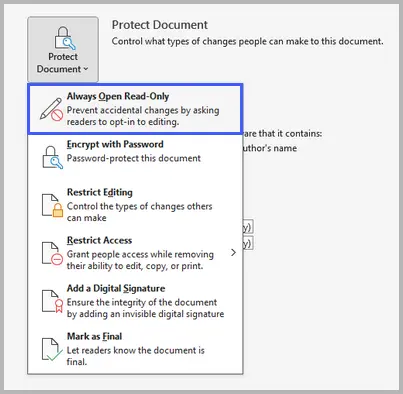
Diese Funktion weist Word an, die Datei standardmäßig immer im schreibgeschützten Modus zu öffnen. Sie sperrt die Bearbeitung nicht vollständig, aber Benutzer müssen die Bearbeitung manuell aktivieren, bevor sie Änderungen vornehmen können – was das Risiko versehentlicher Änderungen verringert.
Vor- und Nachteile
✔ Bequem und versionsbewusst; funktioniert nahtlos mit OneDrive und SharePoint.
✘ Nur in Word 2019 und neueren Versionen verfügbar.
Bearbeitung einschränken, um Word-Dokumente schreibgeschützt zu machen
Für eine stärkere Kontrolle verwenden Sie die Funktion Bearbeitung einschränken von Word. Sie ermöglicht es Ihnen, Änderungen zu verhindern und optional ein Passwort hinzuzufügen, um sicherzustellen, dass nur autorisierte Benutzer die Datei ändern können. Diese Methode ist in fast allen Word-Versionen verfügbar.
Schritte:
-
Öffnen Sie Ihr Dokument.
-
Gehen Sie zu Datei → Informationen → Dokument schützen → Bearbeitung einschränken.
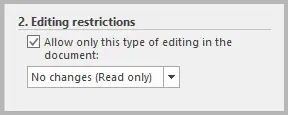
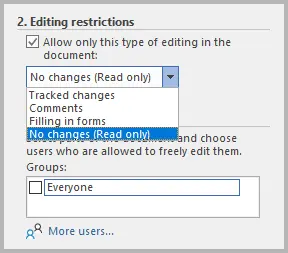
- Aktivieren Sie unter Bearbeitungseinschränkungen die Option Nur diese Art der Bearbeitung im Dokument zulassen.
- Wählen Sie aus dem Dropdown-Menü Keine Änderungen (Schreibgeschützt).
- Klicken Sie auf Ja, Schutz anwenden und legen Sie ein Passwort fest (optional).
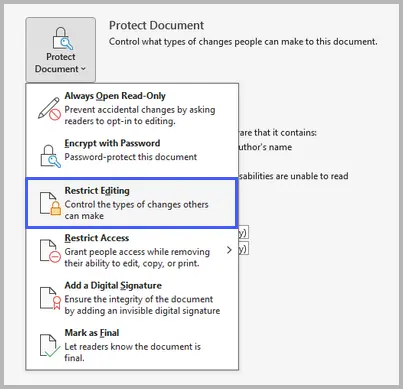
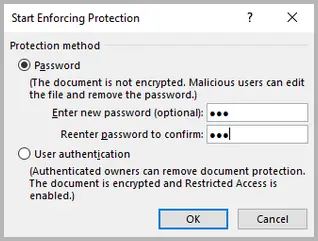
Diese Option bietet robusten Schutz. Sie erfordert ein Passwort, um den Schutz des Dokuments aufzuheben, und verhindert so, dass jemand ohne dieses Passwort Änderungen vornehmen kann. Sie ist ideal für vertrauliche Dateien, Verträge und offizielle Dokumente.
Vor- und Nachteile
✔ Stark und passwortgeschützt; verhindert sowohl absichtliche als auch versehentliche Bearbeitungen.
✘ Erfordert Einrichtungszeit und Passwortverwaltung.
Word-Dateien als PDF speichern für vollständigen Schreibschutz
Wenn Sie den Inhalt und die Formatierung vollständig sperren müssen, ist die Konvertierung des Word-Dokuments in ein PDF die beste Wahl. PDFs sind von Natur aus sicherer und schwieriger zu bearbeiten.
Schritte:
- Öffnen Sie Ihr Word-Dokument.
- Gehen Sie zu Datei → Speichern unter.
- Wählen Sie PDF als Dateiformat.
-
(Optional) Klicken Sie auf Optionen und aktivieren Sie ISO 19005-1-konform (PDF/A) für Archivierungsqualität.
-
Speichern Sie Ihre Datei.

Dieser Ansatz wandelt Ihre Word-Datei in ein schreibgeschütztes Format um, das Layout und Design beibehält. Sie können in einem PDF-Editor weitere Einschränkungen oder Passwörter hinzufügen, um das Drucken, Kopieren oder Bearbeiten zu steuern.
Vor- und Nachteile
✔ Gewährleistet eine konsistente Formatierung; hervorragend für die Verteilung von Endversionen.
✘ Kann nicht einfach wieder in ein bearbeitbares Word-Format konvertiert werden.
Word-Dateischutz mit Python automatisieren (Passwort oder PDF)
Wenn Sie regelmäßig viele Word-Dokumente bearbeiten, kann die Automatisierung des Schutzprozesses viel Zeit sparen. Mit Spire.Doc for Python können Sie programmgesteuert Passwörter hinzufügen oder Dateien stapelweise in PDF konvertieren.
Bevor Sie beginnen, müssen Sie die Bibliothek von PyPI mit dem folgenden Befehl installieren:
pip install spire.doc
Beispiel 1: Eine Word-Datei mit einem Passwort schützen
from spire.doc import *
from spire.doc.common import *

# Create a Document object
doc = Document()

# Load a Word file
doc.LoadFromFile("C:\\Users\\Administrator\\Desktop\\input.docx")

# Encrypt the document with an open password
doc.Encrypt("open-psd")

# Set the editing restriction type to allow read only
doc.Protect(ProtectionType.AllowOnlyReading, "permission-psd")

# Save the document
doc.SaveToFile("output/EditingRestrictions.docx")
doc.Close()
Hier ist die vollständige Anleitung zum Thema: Bearbeitungseinschränkungen für Word-Dokumente in Python festlegen oder entfernen
Beispiel 2: Word automatisch in PDF konvertieren
from spire.doc import *
from spire.doc.common import *

# Create a Document object
doc = Document()

# Load a Word file
doc.LoadFromFile("C:\\Users\\Administrator\\Desktop\\input.docx")

# Save the document to PDF
doc.SaveToFile("output/ToPDF.pdf", FileFormat.PDF)
doc.Close()
Lesen Sie weiter: Word mit Python in PDF konvertieren
Die Automatisierung des Schutzes ist perfekt für Organisationen oder Entwickler, die mehrere Dateien auf einmal schützen müssen. Sie gewährleistet Konsistenz, Effizienz und minimiert menschliche Fehler.
Vor- und Nachteile
✔ Hervorragend für den Stapelschutz und Dokumenten-Workflows.
✘ Erfordert grundlegende Programmierkenntnisse.
Welche Methode sollten Sie wählen?
Hier ist ein kurzer Vergleich, der Ihnen bei der Entscheidung hilft:
| Methode | Schutzstufe | Funktioniert in | Am besten für |
|---|---|---|---|
| Als final kennzeichnen | Grundlegend | Alle Versionen | Signalisieren, dass ein Dokument fertig ist |
| Immer schreibgeschützt öffnen | Mittel | Word 2019+ | Verhindern von gelegentlichen Bearbeitungen |
| Bearbeitung einschränken | Stark | Alle Versionen | Passwortbasierter Schutz |
| Als PDF speichern | Stark | Alle Versionen | Teilen von finalisierten Dokumenten |
| Python-Automatisierung | Fortgeschritten | Plattformübergreifend | Automatisierung der Dokumentsicherheit |
Wenn Sie nur von Bearbeitungen abhalten müssen, ist „Als final kennzeichnen“ oder „Immer schreibgeschützt öffnen“ ausreichend. Für den professionellen oder rechtlichen Gebrauch bieten „Bearbeitung einschränken“ oder „Als PDF speichern“ eine stärkere Kontrolle. Entwickler, die eine große Anzahl von Dateien verwalten, sollten die Automatisierung des Schutzes mit Python in Betracht ziehen.
Schlussworte
Ein Word-Dokument schreibgeschützt zu machen ist einfach – aber die richtige Methode hängt von Ihrem Zweck ab. Für einen grundlegenden Schutz funktioniert das Kennzeichnen als final oder das Aktivieren des schreibgeschützten Modus gut. Für eine stärkere Kontrolle verwenden Sie Bearbeitungseinschränkungen oder speichern Sie als PDF. Und für groß angelegte oder automatisierte Szenarien bieten Python-Skripte eine zuverlässige Lösung.
Indem Sie den richtigen Ansatz anwenden, können Sie Dokumente vertrauensvoll teilen, ohne sich über unerwünschte Bearbeitungen Gedanken machen zu müssen, und sicherstellen, dass Ihre Arbeit sicher und unverändert bleibt.
Häufig gestellte Fragen zum Schreibschutz von Word-Dateien
F1. Kann ich eine Word-Datei ohne Passwort schreibgeschützt machen?
Ja. Sie können Als final kennzeichnen oder Immer schreibgeschützt öffnen verwenden, um von Bearbeitungen abzuhalten, ohne ein Passwort zu benötigen.
F2. Kann jemand ein „schreibgeschütztes“ Word-Dokument trotzdem bearbeiten?
Das hängt von der Methode ab. „Als final kennzeichnen“ und „Immer schreibgeschützt öffnen“ können umgangen werden, aber „Bearbeitung einschränken“ mit einem Passwort verhindert unbefugte Bearbeitungen.
F3. Wie entferne ich den Schreibschutz von einer Word-Datei?
Öffnen Sie das Dokument, gehen Sie zu Datei → Informationen → Dokument schützen und deaktivieren oder entfernen Sie die angewendete Schutzmethode. Möglicherweise benötigen Sie ein Passwort, falls eines festgelegt wurde.
F4. Was ist der sicherste Weg, ein Dokument schreibgeschützt zu machen?
Das Speichern als PDF oder das Anwenden von Bearbeitung einschränken mit einem Passwort bietet das höchste Schutzniveau.
F5. Kann ich die Schreibschutzeinstellungen stapelweise automatisieren?
Ja. Sie können Python und Bibliotheken wie Spire.Doc for Python verwenden, um Passwörter anzuwenden oder mehrere Word-Dateien automatisch in PDF zu konvertieren.
Siehe auch
5 простых способов сделать файл Word только для чтения
Содержание
- Пометить документ Word как окончательный (все версии Word)
- Всегда открывать файлы Word в режиме только для просмотра (Word 2019 или новее)
- Ограничить редактирование, чтобы сделать документы Word доступными только для чтения
- Сохранять файлы Word как PDF для полной защиты от редактирования
- Автоматизировать защиту файлов Word с помощью Python (пароль или PDF)
- Какой метод выбрать?
- Заключение
- Часто задаваемые вопросы о том, как сделать файлы Word доступными только для чтения
При совместном использовании документа Word вы можете не захотеть, чтобы другие случайно изменили ваше содержимое. Будь то контракт, отчет, сертификат или окончательное предложение, установка для файла Word режима "только для чтения" помогает сохранить форматирование, обеспечить целостность документа и гарантировать, что получатели будут просматривать — но не изменять — вашу работу.
Microsoft Word предлагает несколько способов сделать ваши файлы доступными только для чтения, в зависимости от используемой вами версии и необходимого уровня защиты. В этом руководстве мы рассмотрим пять эффективных методов — от простых ручных настроек, таких как «Пометить как окончательный», до автоматизированных решений с использованием Python. К концу вы будете точно знать, как защитить свои документы Word, независимо от того, используете ли вы Word 2016, Word 2019 или более новые версии Microsoft 365.
- Пометить документ Word как окончательный (все версии Word)
- Всегда открывать файлы Word в режиме только для просмотра (Word 2019 или новее)
- Ограничить редактирование, чтобы сделать документы Word доступными только для чтения
- Сохранять файлы Word как PDF для полной защиты от редактирования
- Автоматизировать защиту файлов Word с помощью Python (пароль или PDF)
Пометить документ Word как окончательный (все версии Word)
Если вы используете Microsoft Word, один из самых простых способов сделать файл доступным только для чтения — это пометить его как окончательный . Эта функция доступна во всех современных версиях Word и указывает на то, что документ завершен, отговаривая других от дальнейшего редактирования.
Шаги:
-
Откройте ваш документ Word.
-
Перейдите в Файл → Сведения → Защитить документ → Пометить как окончательный .
-
Нажмите OK при появлении запроса.
-
Сохраните и закройте документ.
Этот подход устанавливает для документа статус "только для чтения" и препятствует редактированию, но не мешает кому-либо снять флажок "Пометить как окончательный", чтобы отредактировать файл. Его лучше всего использовать как сигнал о том, что документ завершен, а не как строгую меру безопасности.
Плюсы и минусы
Быстро и просто; пароль не требуется. Пользователи могут легко обойти это, нажав Редактировать все равно .
Всегда открывать файлы Word в режиме только для чтения (Word 2019 или новее)
Начиная с Word 2019 и Microsoft 365, Microsoft представила более современный способ открывать документы в режиме только для просмотра — функцию «Всегда открывать только для чтения».
Шаги:
-
Откройте ваш файл в Word.
-
Нажмите Файл → Сведения → Защитить документ → Всегда открывать только для чтения .
- Сохраните документ.
Эта функция указывает Word всегда открывать файл в режиме только для чтения по умолчанию. Она не блокирует редактирование полностью, но пользователи должны вручную включить редактирование перед внесением изменений, что снижает риск случайных модификаций.
Плюсы и минусы
Удобно и с учетом версии; без проблем работает с OneDrive и SharePoint. Доступно только в Word 2019 и более поздних версиях.
Ограничить редактирование, чтобы сделать документы Word доступными только для чтения
Для более строгого контроля используйте функцию Word Ограничить редактирование. Она позволяет предотвратить изменения и при желании добавить пароль , гарантируя, что только авторизованные пользователи смогут изменять файл. Этот метод доступен почти во всех версиях Word.
Шаги:
-
Откройте ваш документ.
-
Перейдите в Файл → Сведения → Защитить документ → Ограничить редактирование .
- В разделе Ограничения на редактирование , установите флажок Разрешить только указанный способ редактирования в документе .
- В выпадающем списке выберите Нет изменений (только чтение) .
- Нажмите Да, включить защиту и установите пароль (необязательно).
Этот вариант обеспечивает надежную защиту. Для снятия защиты с документа требуется пароль, что не позволяет вносить изменения никому, у кого его нет. Он идеально подходит для конфиденциальных файлов, контрактов и официальных документов.
Плюсы и минусы
Надежная защита паролем; предотвращает как преднамеренные, так и случайные правки. Требует времени на настройку и управление паролями.
Сохранять файлы Word как PDF для полной защиты от редактирования
Если вам нужно полностью заблокировать содержимое и форматирование, лучшим выбором будет преобразование документа Word в PDF. PDF-файлы по своей природе более безопасны и их сложнее редактировать.
Шаги:
- Откройте ваш документ Word.
- Перейдите в Файл → Сохранить как .
- Выберите PDF в качестве формата файла.
-
(Необязательно) Нажмите Параметры и включите Совместимый с ISO 19005-1 (PDF/A) для архивного качества.
-
Сохраните ваш файл.
Этот подход преобразует ваш файл Word в формат только для чтения, который сохраняет макет и дизайн. Вы можете добавить дополнительные ограничения или пароли в редакторе PDF для контроля печати, копирования или редактирования.
Плюсы и минусы
Обеспечивает единообразное форматирование; отлично подходит для распространения окончательных версий. Не может быть легко преобразован обратно в редактируемый формат Word.
Автоматизировать защиту файлов Word с помощью Python (пароль или PDF)
Если вы регулярно работаете с большим количеством документов Word, автоматизация процесса защиты может сэкономить много времени. Используя Spire.Doc for Python, вы можете программно добавлять пароли или массово конвертировать файлы в PDF.
Перед началом вам необходимо установить библиотеку из PyPI с помощью следующей команды:
pip install spire.doc
Пример 1: Защита файла Word паролем
from spire.doc import *
from spire.doc.common import *

# Create a Document object
doc = Document()

# Load a Word file
doc.LoadFromFile("C:\\Users\\Administrator\\Desktop\\input.docx")

# Encrypt the document with an open password
doc.Encrypt("open-psd")

# Set the editing restriction type to allow read only
doc.Protect(ProtectionType.AllowOnlyReading, "permission-psd")

# Save the document
doc.SaveToFile("output/EditingRestrictions.docx")
doc.Close()
Вот полное руководство о том, как: Установить или снять ограничения на редактирование документа Word в Python
Пример 2: Автоматическое преобразование Word в PDF
from spire.doc import *
from spire.doc.common import *

# Create a Document object
doc = Document()

# Load a Word file
doc.LoadFromFile("C:\\Users\\Administrator\\Desktop\\input.docx")

# Save the document to PDF
doc.SaveToFile("output/ToPDF.pdf", FileFormat.PDF)
doc.Close()
Читать далее: Преобразование Word в PDF с помощью Python
Автоматизация защиты идеально подходит для организаций или разработчиков, которым необходимо защитить несколько файлов одновременно. Это обеспечивает согласованность, эффективность и минимизирует человеческие ошибки.
Плюсы и минусы
Отлично подходит для пакетной защиты и документооборота. Требуются базовые знания в программировании.
Какой метод выбрать?
Вот краткое сравнение, которое поможет вам определиться:
| Метод | Уровень защиты | Работает в | Лучше всего для |
|---|---|---|---|
| Пометить как окончательный | Базовый | Все версии | Сигнализирования о завершении документа |
| Всегда открывать только для чтения | Умеренный | Word 2019+ | Предотвращения случайных правок |
| Ограничить редактирование | Сильный | Все версии | Защиты на основе пароля |
| Сохранить как PDF | Сильный | Все версии | Обмена окончательными документами |
| Автоматизация на Python | Продвинутый | Кроссплатформенный | Автоматизации безопасности документов |
Если вам нужно только воспрепятствовать редактированию, «Пометить как окончательный» или «Всегда открывать только для чтения» является достаточным. Для профессионального или юридического использования «Ограничить редактирование» или «Сохранить как PDF» предлагают более строгий контроль. Разработчикам, управляющим большим количеством файлов, следует рассмотреть возможность автоматизации защиты с помощью Python.
Заключение
Сделать документ Word доступным только для чтения просто — но правильный метод зависит от вашей цели. Для базовой защиты хорошо работает пометка как окончательного или включение режима только для чтения. Для более строгого контроля используйте ограничения на редактирование или сохраните как PDF. А для крупномасштабных или автоматизированных сценариев надежное решение предоставляют скрипты на Python.
Применяя правильный подход, вы можете уверенно делиться документами, не беспокоясь о нежелательных правках, гарантируя, что ваша работа останется в безопасности и без изменений.
Часто задаваемые вопросы о том, как сделать файлы Word доступными только для чтения
В1. Могу ли я сделать файл Word доступным только для чтения без пароля?
Да. Вы можете использовать Пометить как окончательный или Всегда открывать только для чтения, чтобы воспрепятствовать редактированию без необходимости ввода пароля.
В2. Может ли кто-нибудь все еще редактировать документ Word в режиме «только для чтения»?
Это зависит от метода. «Пометить как окончательный» и «Всегда открывать только для чтения» можно обойти, но «Ограничить редактирование» с паролем предотвращает несанкционированные правки.
В3. Как снять ограничения только для чтения с файла Word?
Откройте документ, перейдите в Файл → Сведения → Защитить документ и снимите флажок или отключите примененный метод защиты. Вам может понадобиться пароль, если он был установлен.
В4. Какой самый безопасный способ сделать документ доступным только для чтения?
Сохранение в формате PDF или применение функции Ограничить редактирование с паролем обеспечивает самый высокий уровень защиты.
В5. Могу ли я автоматизировать настройки только для чтения в массовом порядке?
Да. Вы можете использовать Python и библиотеки, такие как Spire.Doc for Python, для автоматического применения паролей или преобразования нескольких файлов Word в PDF.
Смотрите также
5 Easy Ways to Make a Word File Read-Only
Table of Contents
- Mark a Word Document as Final (All Word Versions)
- Always Open Word Files in View-Only Mode (Word 2019 or Later)
- Restrict Editing to Make Word Documents Read-Only
- Save Word Files as PDF for Complete Read-Only Protection
- Automate Word File Protection with Python (Password or PDF)
- Which Method Should You Choose?
- Final Words
- FAQs About Making Word Files Read-Only
When sharing a Word document, you may not want others to accidentally change your content. Whether it’s a contract, report, certificate, or finalized proposal, making a Word file read-only helps preserve formatting, maintain document integrity, and ensure recipients view — but don’t alter — your work.
Microsoft Word offers multiple ways to make your files read-only, depending on the version you’re using and the level of protection you need. In this guide, we’ll explore five effective methods — from simple manual settings like “Mark as Final” to automated solutions using Python. By the end, you’ll know exactly how to protect your Word documents, whether you’re using Word 2016, Word 2019, or newer Microsoft 365 editions.
- Mark a Word Document as Final (All Word Versions)
- Always Open Word Files in View-Only Mode (Word 2019 or Later)
- Restrict Editing to Make Word Documents Read-Only
- Save Word Files as PDF for Complete Read-Only Protection
- Automate Word File Protection with Python (Password or PDF)
Mark a Word Document as Final (All Word Versions)
If you’re using Microsoft Word, one of the simplest ways to make a file read-only is by marking it as final . This feature is available in all modern versions of Word and indicates that the document is complete, discouraging others from making further edits.
Steps:
-
Open your Word document.
-
Go to File → Info → Protect Document → Mark as Final .
-
Click OK when prompted.
-
Save and close the document.
This approach sets the document to a read-only status and discourages editing, but it doesn’t prevent someone from removing the “Mark as Final” flag to edit the file. It’s best used as a signal that the document is complete, not as a strict security measure.
Pros and Cons
✔ Quick and simple; no password needed.
✘ Users can easily bypass it by clicking Edit Anyway .
Always Open Word Files in Read-Only Mode (Word 2019 or Later)
Starting with Word 2019 and Microsoft 365, Microsoft introduced a more modern way to make documents open in view-only mode — the “Always Open Read-Only” feature.
Steps:
-
Open your file in Word.
-
Click File → Info → Protect Document → Always Open Read-Only .
- Save the document.
This feature tells Word to always open the file in read-only mode by default. It doesn’t lock editing entirely, but users must manually enable editing before making changes — reducing the risk of accidental modifications.
Pros and Cons
✔ Convenient and version-aware; works seamlessly with OneDrive and SharePoint.
✘ Only available in Word 2019 and later versions.
Restrict Editing to Make Word Documents Read-Only
For stronger control, use Word’s Restrict Editing feature. It lets you prevent changes and optionally add a password , ensuring only authorized users can modify the file. This method is available in nearly all Word versions.
Steps:
-
Open your document.
-
Go to File → Info → Protect Document → Restrict Editing .
- Under Editing restrictions , check Allow only this type of editing in the document .
- From the dropdown, select No changes (Read only) .
- Click Yes, Start Enforcing Protection , and set a password (optional).
This option provides robust protection. It requires a password to unprotect the document, preventing anyone without it from making changes. It’s ideal for confidential files, contracts, and official documents.
Pros and Cons
✔ Strong and password-protected; prevents both intentional and accidental edits.
✘ Requires setup time and password management.
Save Word Files as PDF for Complete Read-Only Protection
If you need to completely lock the content and formatting, converting the Word document to a PDF is the best choice. PDFs are naturally more secure and harder to edit.
Steps:
- Open your Word document.
- Go to File → Save As .
- Choose PDF as the file format.
-
(Optional) Click Options and enable ISO 19005-1 compliant (PDF/A) for archival quality.
-
Save your file.
This approach transforms your Word file into a read-only format that preserves layout and design. You can add further restrictions or passwords in a PDF editor to control printing, copying, or editing.
Pros and Cons
✔ Ensures consistent formatting; excellent for distributing final versions.
✘ Cannot be easily converted back to editable Word format.
Automate Word File Protection with Python (Password or PDF)
If you handle many Word documents regularly, automating the protection process can save a lot of time. Using Spire.Doc for Python, you can programmatically add passwords or convert files to PDF in bulk.
Before starting, you’ll need to install the library from PyPI using the following command:
pip install spire.doc
Example 1: Protect a Word file with a password
from spire.doc import *
from spire.doc.common import *

# Create a Document object
doc = Document()

# Load a Word file
doc.LoadFromFile("C:\\Users\\Administrator\\Desktop\\input.docx")

# Encrypt the document with an open password
doc.Encrypt("open-psd")

# Set the editing restriction type to allow read only
doc.Protect(ProtectionType.AllowOnlyReading, "permission-psd")

# Save the document
doc.SaveToFile("output/EditingRestrictions.docx")
doc.Close()
Here is the full guide on how to: Set or Remove Word Document Editing Resections in Python
Example 2: Convert Word to PDF automatically
from spire.doc import *
from spire.doc.common import *

# Create a Document object
doc = Document()

# Load a Word file
doc.LoadFromFile("C:\\Users\\Administrator\\Desktop\\input.docx")

# Save the document to PDF
doc.SaveToFile("output/ToPDF.pdf", FileFormat.PDF)
doc.Close()
Read further: Convert Word to PDF with Python
Automating protection is perfect for organizations or developers who need to safeguard multiple files at once. It ensures consistency, efficiency, and minimizes human error.
Pros and Cons
✔ Great for batch protection and document workflows.
✘ Requires basic programming knowledge.
Which Method Should You Choose?
Here’s a quick comparison to help you decide:
| Method | Protection Level | Works In | Best For |
|---|---|---|---|
| Mark as Final | Basic | All versions | Signaling a document is complete |
| Always Open Read-Only | Moderate | Word 2019+ | Preventing casual edits |
| Restrict Editing | Strong | All versions | Password-based protection |
| Save as PDF | Strong | All versions | Sharing finalized documents |
| Python Automation | Advanced | Cross platform | Automating document security |
If you only need to discourage edits, “Mark as Final” or “Always Open Read-Only” is sufficient. For professional or legal use, “Restrict Editing” or “Save as PDF” offers stronger control. Developers managing large numbers of files should consider automating protection with Python.
Final Words
Making a Word document read-only is simple — but the right method depends on your purpose. For basic protection, marking as final or enabling read-only mode works well. For stronger control, use editing restrictions or save as PDF. And for large-scale or automated scenarios, Python scripts provide a reliable solution.
By applying the right approach, you can confidently share documents without worrying about unwanted edits, ensuring your work remains secure and unchanged.
FAQs About Making Word Files Read-Only
Q1. Can I make a Word file read-only without a password?
Yes. You can use Mark as Final or Always Open Read-Only to discourage edits without requiring a password.
Q2. Can someone still edit a “read-only” Word document?
It depends on the method. “Mark as Final” and “Always Open Read-Only” can be bypassed, but “Restrict Editing” with a password prevents unauthorized edits.
Q3. How do I remove read-only restrictions from a Word file?
Open the document, go to File → Info → Protect Document , and uncheck or disable the applied protection method. You may need a password if one was set.
Q4. What’s the most secure way to make a document read-only?
Saving it as a PDF or applying Restrict Editing with a password offers the highest level of protection.
Q5. Can I automate read-only settings in bulk?
Yes. You can use Python and libraries like Spire.Doc for Python to apply passwords or convert multiple Word files to PDF automatically.
See Also
Come ritagliare PDF gratuitamente: 3 metodi semplici
Indice dei Contenuti
- Perché Potrebbe Essere Necessario Ritagliare un PDF?
- Metodo 1. Strumenti Gratuiti Online per Ritagliare PDF (Veloce e Senza Complicazioni)
- Metodo 2. Strumenti Desktop per Ritagliare PDF (Controllo Offline)
- Metodo 3. Ritagliare PDF Programmaticamente (Automazione con Python)
- Confronto dei Metodi di Ritaglio PDF
- Consigli Utili per un Ritaglio Efficace dei PDF
- Considerazioni Finali
Hai mai aperto un PDF solo per trovare margini extra, barre laterali indesiderate o un layout storto che ne rovina la leggibilità? Ritagliare un PDF ti permette di tagliare i bordi del tuo documento, rimuovendo contenuti indesiderati e concentrando l'attenzione del lettore su ciò che conta davvero. Che tu stia preparando un report per un cliente, pulendo un documento scannerizzato o creando una presentazione elegante, il ritaglio è un'abilità essenziale.
In questa guida completa, esploreremo diversi strumenti gratuiti per ritagliare file PDF, dai semplici ritagliatori online ai metodi di programmazione avanzati.
- Perché Potrebbe Essere Necessario Ritagliare un PDF?
- Metodo 1. Strumenti Gratuiti Online per Ritagliare PDF (Veloce e Senza Complicazioni)
- Metodo 2. Strumenti Desktop per Ritagliare PDF (Controllo Offline)
- Metodo 3. Ritagliare PDF Programmaticamente (Automazione con Python)
- Confronto dei Metodi di Ritaglio PDF
- Consigli Utili per un Ritaglio Efficace dei PDF
- Considerazioni Finali
Perché Potrebbe Essere Necessario Ritagliare un PDF?
Ritagliare un PDF non è solo una questione estetica; serve a diversi scopi pratici:
- Rimuovere Informazioni Sensibili: Nascondi rapidamente filigrane, intestazioni o piè di pagina confidenziali prima della condivisione.
- Migliorare la Leggibilità: Elimina lo spazio bianco eccessivo per rendere testo e immagini più evidenti.
- Preparare per la Stampa: Assicurati che il tuo documento si adatti perfettamente alla pagina senza margini indesiderati.
- Risparmiare spazio di archiviazione: Ritagliare immagini di grandi dimensioni nei PDF riduce la dimensione del file (ottimo per l'invio via email o il caricamento).
- Concentrarsi sul Contenuto: Isola un grafico, un diagramma o un'immagine specifica da una pagina più grande.
Metodo 1. Strumenti Gratuiti Online per Ritagliare PDF (Veloce e Senza Complicazioni)
Ritagliare PDF con strumenti online gratuiti è perfetto se non vuoi scaricare software. Basta caricare il tuo PDF, ritagliare e scaricare.
Scelta Migliore: Strumento di Ritaglio SmallPDF
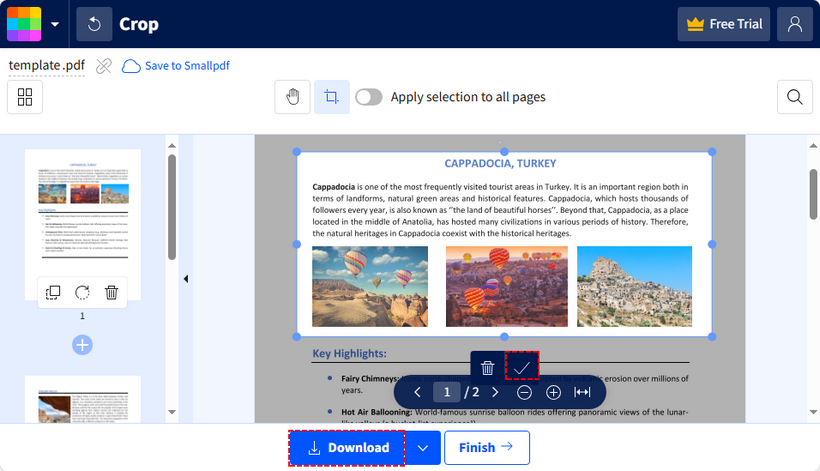
SmallPDF è facile da usare e funziona su qualsiasi browser. Ecco come usarlo:
- Vai allo strumento di ritaglio PDF di SmallPDF (non è richiesta la registrazione per l'uso gratuito).
- Fai clic su "SCEGLI FILE" per caricare il tuo PDF (o trascinalo).
- Usa le maniglie di trascinamento sull'anteprima per regolare l'area di ritaglio.
- Fai clic sul segno di spunta per confermare il ritaglio.
- Premi "Scarica" per salvare il tuo PDF ritagliato.
Alternativa: Ritaglio ILovePDF
ILovePDF è un'altra opzione gratuita per ritagliare le pagine di un PDF. Passaggi:
- Visita Ritaglio PDF di ILovePDF.
- Carica il tuo file PDF.
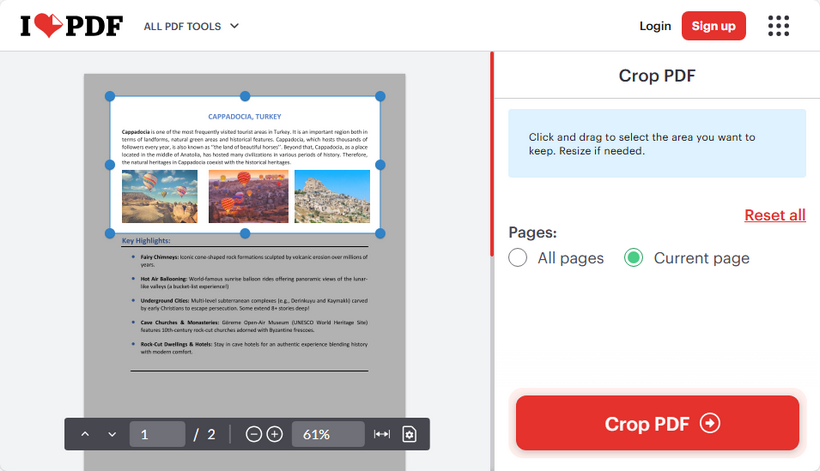
- Fai clic e trascina le maniglie blu degli angoli per ridimensionare l'area di ritaglio.
- Seleziona se ritagliare tutte le pagine o la pagina corrente.
- Fai clic su "Ritaglia PDF" e scarica il tuo file.
Considerazioni sulla Sicurezza degli Strumenti di Ritaglio PDF Online
La maggior parte degli strumenti online elaborerà il tuo file e lo eliminerà dai loro server dopo un breve periodo, ma per documenti altamente sensibili, considera:
- Evita di caricare documenti sensibili su strumenti online
- Controlla le politiche di conservazione dei dati del fornitore
- Considera alternative offline per i file confidenziali
Metodo 2. Strumenti Desktop per Ritagliare PDF (Controllo Offline)
Per file sensibili (ad es. documenti legali) o per un uso frequente, gli strumenti desktop sono più sicuri e potenti.
Strumento Gratuito: Strumento di Ritaglio di PDF24 Creator
PDF24 Creator offre una funzione di ritaglio che ti permette di ritagliare PDF o tagliare i margini dei PDF senza una connessione internet. Ecco come ritagliare:
- Scarica e installa PDF24 Creator.
- Apri lo strumento e seleziona la funzione "Ritaglia PDF".
- Carica il tuo file PDF e inserisci i valori numerici per i margini Superiore, Inferiore, Sinistro e Destro per tagliare la pagina.
- Fai clic su "Ritaglia" e poi salva il PDF ritagliato.

Limitazioni da Notare:
- Nessuno Strumento di Ritaglio Visivo: PDF24 Creator non permette di trascinare un rettangolo visibile per selezionare l'area di ritaglio. Devi inserire i margini numericamente.
- Funzionalità di Base: Sufficiente per la maggior parte degli utenti. Per gli utenti avanzati che preferiscono strumenti con un controllo più granulare, Adobe Acrobat rimane lo standard di riferimento nell'elaborazione dei PDF.
Metodo 3. Ritagliare PDF Programmaticamente (Automazione con Python)
Per sviluppatori, analisti di dati o chiunque abbia bisogno di automatizzare il ritaglio di PDF (ad es. elaborazione in batch di oltre 100 file), la programmazione è la strada da percorrere. Free Spire.PDF for Python è una libreria gratuita che semplifica la manipolazione dei PDF, incluso il ritaglio, con un codice minimo.
Passo dopo Passo: Ritagliare PDF in Python
Passo 1: Installa la Libreria
Esegui questo comando nel tuo terminale per installare Free Spire.PDF:
pip install Spire.Pdf.Free
Passo 2: Codice Python per Ritagliare una Pagina PDF
Questo script ritaglia una pagina specifica definendo una "casella di ritaglio" - l'area da conservare.
from spire.pdf.common import *
from spire.pdf import *

# Create a PdfDocument object
pdf = PdfDocument()

# Load a PDF file from disk
pdf.LoadFromFile("template.pdf")

# Get the first page
page = pdf.Pages[0]

# Crop the page by the specified area
page.CropBox = RectangleF(0.0, 50.0, 600.0, 260.0)

# Save the result file
pdf.SaveToFile("CropPDF.pdf")
pdf.Close()
Passo 3: Esegui lo Script
Esegui lo script nel tuo ambiente Python. Il risultato appare così:
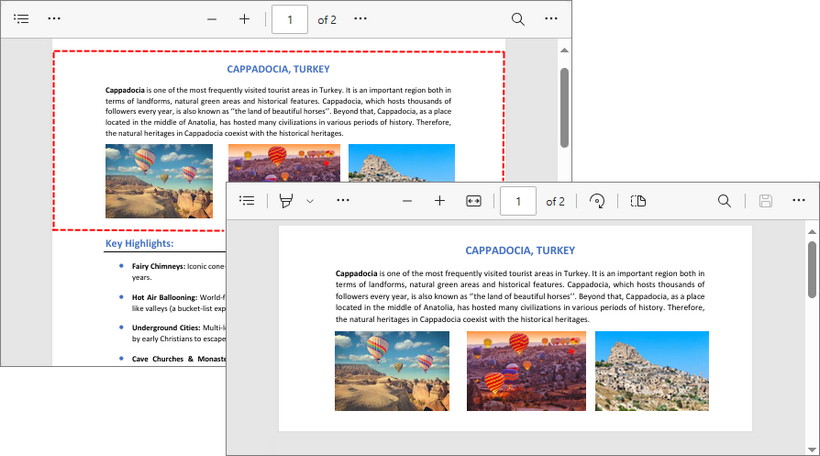
Oltre al ritaglio, questa libreria Python gratuita supporta una varietà di operazioni sulle pagine PDF. Ad esempio, puoi usarla per ruotare le pagine di un PDF, eliminare pagine da un PDF, o riordinare le pagine di un PDF.
Confronto dei Metodi di Ritaglio PDF
Scegliere il metodo giusto per ritagliare un PDF dipende dalle tue esigenze specifiche: sei un utente occasionale che ha bisogno di un ritaglio veloce? Un professionista che richiede precisione offline? O uno sviluppatore che automatizza attività in blocco? Di seguito è riportato un confronto dettagliato dei metodi trattati:
| Metodo | Ideale per | Pro | Contro |
|---|---|---|---|
| Strumenti Online | Attività veloci e occasionali | Nessuna installazione, facile da usare | Preoccupazioni per la privacy, limiti di dimensione del file |
| App Desktop | Utenti regolari, lavoro offline | Controllo completo, privato, nessun limite | Richiede installazione |
| Spire.PDF Python | Sviluppatori, elaborazione in batch | Automazione, personalizzabile | Richiede conoscenze di programmazione |
Consigli Utili per un Ritaglio Efficace dei PDF
Per evitare errori (come tagliare il testo), segui questi consigli:
- Salva un backup: Conserva sempre il PDF originale prima di ritagliare, nel caso in cui tu debba tornare indietro.
- Non ritagliare troppo: Lascia margini sufficienti per la stampa e la leggibilità.
- Usa la Programmazione per Lavori in Blocco: Automatizza il ritaglio per un gran numero di PDF.
- Visualizza l'anteprima: Controlla sempre l'anteprima ritagliata prima di scaricare per assicurarti di non aver perso nulla.
Considerazioni Finali
Ritagliare PDF gratuitamente è più facile che mai. Fornisce una soluzione semplice per layout disordinati, permettendoti di tagliare, mettere a fuoco e perfezionare i tuoi file PDF. Che tu preferisca semplici strumenti online per un uso occasionale, utilizzi software desktop per file sensibili o automatizzi l'elaborazione in batch con Python, i metodi descritti in questa guida offrono una copertura completa per tutte le esigenze.
Vedi Anche
Como cortar PDFs de graça: 3 métodos fáceis
Índice
- Por que você precisaria cortar um PDF?
- Método 1. Cortadores de PDF online gratuitos (Rápido e sem complicações)
- Método 2. Cortadores de PDF de desktop (Controle offline)
- Método 3. Cortar PDFs programaticamente (Automação com Python)
- Comparação dos métodos de corte de PDF
- Dicas profissionais para um corte de PDF eficaz
- Considerações finais
Já abriu um PDF e encontrou margens extras, barras laterais indesejadas ou um layout distorcido que prejudica a legibilidade? Cortar um PDF permite aparar as bordas do seu documento, removendo conteúdo indesejado e focando a atenção do leitor no que realmente importa. Seja preparando um relatório para um cliente, limpando um documento digitalizado ou criando uma apresentação elegante, cortar é uma habilidade essencial.
Neste guia completo, exploraremos várias ferramentas gratuitas para cortar arquivos PDF, desde cortadores online simples até métodos de programação avançados.
- Por que você precisaria cortar um PDF?
- Método 1. Cortadores de PDF online gratuitos (Rápido e sem complicações)
- Método 2. Cortadores de PDF de desktop (Controle offline)
- Método 3. Cortar PDFs programaticamente (Automação com Python)
- Comparação dos métodos de corte de PDF
- Dicas profissionais para um corte de PDF eficaz
- Considerações finais
Por que você precisaria cortar um PDF?
Cortar um PDF não é apenas uma questão de estética; serve a vários propósitos práticos:
- Remover informações confidenciais: Oculte rapidamente marcas d'água, timbres ou rodapés confidenciais antes de compartilhar.
- Melhorar a legibilidade: Elimine o excesso de espaço em branco para tornar o texto e as imagens mais proeminentes.
- Preparar para impressão: Garanta que seu documento se ajuste perfeitamente à página sem margens indesejadas.
- Economizar espaço de armazenamento: Cortar imagens grandes em PDFs reduz o tamanho do arquivo (ótimo para enviar por e-mail ou fazer upload).
- Focar no conteúdo: Isole um gráfico, diagrama ou imagem específica de uma página maior.
Método 1. Cortadores de PDF online gratuitos (Rápido e sem complicações)
Cortar PDF com ferramentas online gratuitas é perfeito se você não quiser baixar software. Basta fazer o upload do seu PDF, cortar e baixar.
Melhor escolha: Ferramenta de corte SmallPDF
O SmallPDF é fácil de usar e funciona em qualquer navegador. Veja como usá-lo:
- Acesse a ferramenta de corte de PDF do SmallPDF (não é necessário se inscrever para uso gratuito).
- Clique em "ESCOLHER ARQUIVOS" para fazer o upload do seu PDF (ou arraste e solte-o).
- Use as alças de arrastar na visualização para ajustar a área de corte.
- Clique na marca de seleção para confirmar o corte.
- Clique em "Baixar" para salvar seu PDF cortado.
Alternativa: Corte ILovePDF
O ILovePDF é outra opção gratuita para cortar páginas de PDF. Passos:
- Visite o Corte de PDF do ILovePDF.
- Faça o upload do seu arquivo PDF.
- Clique e arraste as alças de canto azuis para redimensionar a área de corte.
- Selecione cortar todas as páginas ou a página atual.
- Clique em "Cortar PDF" e baixe seu arquivo.
Considerações de segurança sobre ferramentas de corte de PDF online
A maioria das ferramentas online processará seu arquivo e o excluirá de seus servidores após um curto período, mas para documentos altamente confidenciais, considere:
- Evite fazer upload de documentos confidenciais para ferramentas online
- Verifique as políticas de retenção de dados do provedor
- Considere alternativas offline para arquivos confidenciais
Método 2. Cortadores de PDF de desktop (Controle offline)
Para arquivos confidenciais (por exemplo, documentos legais) ou uso frequente, as ferramentas de desktop são mais seguras e poderosas.
Ferramenta gratuita: Ferramenta de corte do PDF24 Creator
O PDF24 Creator oferece um recurso de corte que permite cortar PDFs ou aparar margens de PDF sem uma conexão com a internet. Veja como cortar:
- Baixe e instale o PDF24 Creator.
- Abra a ferramenta e selecione o recurso “Cortar PDF”.
- Carregue seu arquivo PDF e insira valores numéricos para as margens Superior, Inferior, Esquerda e Direita para aparar a página.
- Clique em "Cortar" e salve o PDF cortado.
Limitações a serem observadas:
- Sem ferramenta de corte visual: O PDF24 Creator não permite arrastar um retângulo visível para selecionar a área de corte. Você deve inserir as margens numericamente.
- Funcionalidade básica: Suficiente para a maioria dos usuários. Para usuários avançados que preferem ferramentas com controle mais granular, o Adobe Acrobat continua sendo o padrão ouro no processamento de PDF.
Método 3. Cortar PDFs programaticamente (Automação com Python)
Para desenvolvedores, analistas de dados ou qualquer pessoa que precise automatizar o corte de PDF (por exemplo, processamento em lote de mais de 100 arquivos), a programação é o caminho a seguir. O Free Spire.PDF for Python é uma biblioteca gratuita que simplifica a manipulação de PDF, incluindo o corte, com o mínimo de código.
Passo a passo: Cortar PDFs em Python
Passo 1: Instale a biblioteca
Execute isto em seu terminal para instalar o Free Spire.PDF:
pip install Spire.Pdf.Free
Passo 2: Código Python para cortar uma página de PDF
Este script corta uma página específica definindo uma “caixa de corte” - a área a ser mantida.
from spire.pdf.common import *
from spire.pdf import *

# Create a PdfDocument object
pdf = PdfDocument()

# Load a PDF file from disk
pdf.LoadFromFile("template.pdf")

# Get the first page
page = pdf.Pages[0]

# Crop the page by the specified area
page.CropBox = RectangleF(0.0, 50.0, 600.0, 260.0)

# Save the result file
pdf.SaveToFile("CropPDF.pdf")
pdf.Close()
Passo 3: Execute o script
Execute o script em seu ambiente Python. O resultado se parece com:
Além do corte, esta biblioteca Python gratuita suporta uma variedade de operações de página de PDF. Por exemplo, você pode usá-la para girar páginas de PDF, excluir páginas de PDF, ou reorganizar páginas de PDF.
Comparação dos métodos de corte de PDF
A escolha do método de corte de PDF certo depende de suas necessidades específicas: Você é um usuário casual que precisa de um corte rápido? Um profissional que requer precisão offline? Ou um desenvolvedor automatizando tarefas em massa? Abaixo está uma comparação detalhada dos métodos abordados:
| Método | Ideal para | Prós | Contras |
|---|---|---|---|
| Ferramentas online | Tarefas rápidas e únicas | Sem instalação, fácil de usar | Preocupações com privacidade, limites de tamanho de arquivo |
| Aplicativos de desktop | Usuários regulares, trabalho offline | Controle total, privado, sem limites | Requer instalação |
| Spire.PDF Python | Desenvolvedores, processamento em lote | Automação, personalizável | Requer conhecimento de programação |
Dicas profissionais para um corte de PDF eficaz
Para evitar erros (como cortar texto), siga estas dicas:
- Salve um backup: Sempre guarde o PDF original antes de cortar - caso precise reverter.
- Não corte demais: Deixe margens suficientes para impressão e legibilidade.
- Use programação para trabalhos em massa: Automatize o corte para um grande número de PDFs.
- Visualize primeiro: Sempre verifique a visualização cortada antes de baixar para garantir que você não perdeu nada.
Considerações finais
Cortar PDFs gratuitamente é mais fácil do que nunca. Ele fornece uma correção simples para layouts bagunçados, permitindo que você apare, foque e aperfeiçoe seus arquivos PDF. Se você prefere ferramentas online simples para uso ocasional, usa software de desktop para arquivos confidenciais ou automatiza o processamento em lote com Python, os métodos descritos neste guia fornecem cobertura abrangente para todas as necessidades.
Veja também
PDF 무료로 자르는 방법: 3가지 쉬운 방법
PDF를 열었을 때 추가 여백, 원치 않는 사이드바 또는 가독성을 해치는 비뚤어진 레이아웃을 발견한 적이 있나요? PDF 자르기를 사용하면 문서의 가장자리를 다듬어 원치 않는 콘텐츠를 제거하고 독자의 주의를 진정으로 중요한 것에 집중시킬 수 있습니다. 고객을 위한 보고서를 준비하든, 스캔한 문서를 정리하든, 세련된 프레젠테이션을 만들든, 자르기는 필수적인 기술입니다.
이 종합 가이드에서는 간단한 온라인 자르기 도구부터 고급 프로그래밍 방법에 이르기까지 PDF 파일을 자르기 위한 여러 무료 도구를 살펴보겠습니다.
- PDF를 잘라내야 하는 이유는 무엇인가요?
- 방법 1. 무료 온라인 PDF 자르기 도구 (빠르고 간편함)
- 방법 2. 데스크톱 PDF 자르기 도구 (오프라인 제어)
- 방법 3. 프로그래밍 방식으로 PDF 자르기 (Python 자동화)
- PDF 자르기 방법 비교
- 효과적인 PDF 자르기를 위한 전문가 팁
- 마지막 생각
PDF를 잘라내야 하는 이유는 무엇인가요?
PDF 자르기는 단순히 미학적인 것만이 아닙니다. 다음과 같은 몇 가지 실용적인 목적을 제공합니다.
- 민감한 정보 제거: 공유하기 전에 워터마크, 레터헤드 또는 기밀 바닥글을 빠르게 숨깁니다.
- 가독성 향상: 과도한 공백을 제거하여 텍스트와 이미지를 더 돋보이게 만듭니다.
- 인쇄 준비: 원치 않는 여백 없이 문서가 페이지에 완벽하게 맞도록 합니다.
- 저장 공간 절약: PDF의 큰 이미지를 자르면 파일 크기가 줄어듭니다 (이메일 전송 또는 업로드에 적합).
- 콘텐츠에 집중: 더 큰 페이지에서 특정 차트, 그래프 또는 이미지를 분리합니다.
방법 1. 무료 온라인 PDF 자르기 도구 (빠르고 간편함)
소프트웨어를 다운로드하고 싶지 않다면 온라인 무료 도구로 PDF를 자르는 것이 완벽합니다. PDF를 업로드하고, 자르고, 다운로드하기만 하면 됩니다.
최고의 선택: SmallPDF 자르기 도구
SmallPDF는 사용자 친화적이며 모든 브라우저에서 작동합니다. 사용 방법은 다음과 같습니다.
- SmallPDF PDF 자르기 도구로 이동합니다 (무료 사용을 위해 가입할 필요 없음).
- "파일 선택"을 클릭하여 PDF를 업로드하거나 드래그 앤 드롭하세요.
- 미리보기의 드래그 핸들을 사용하여 자르기 영역을 조정합니다.
- 확인 표시를 클릭하여 자르기를 확인합니다.
- "다운로드"를 눌러 잘라낸 PDF를 저장합니다.
대안: ILovePDF 자르기
ILovePDF는 PDF 페이지를 자를 수 있는 또 다른 무료 옵션입니다. 단계:
- ILovePDF PDF 자르기를 방문하세요.
- PDF 파일을 업로드하세요.
- 파란색 모서리 핸들을 클릭하고 드래그하여 자르기 영역의 크기를 조정합니다.
- 모든 페이지 또는 현재 페이지를 자르도록 선택합니다.
- "PDF 자르기"를 클릭하고 파일을 다운로드하세요.
온라인 PDF 자르기 도구의 보안 고려 사항
대부분의 온라인 도구는 파일을 처리하고 짧은 기간 후에 서버에서 삭제하지만, 매우 민감한 문서의 경우 다음을 고려하십시오.
- 온라인 도구에 민감한 문서를 업로드하지 마십시오
- 제공업체의 데이터 보존 정책을 확인하십시오
- 기밀 파일에 대한 오프라인 대안을 고려하십시오
방법 2. 데스크톱 PDF 자르기 도구 (오프라인 제어)
민감한 파일(예: 법률 문서)이나 자주 사용하는 경우 데스크톱 도구가 더 안전하고 강력합니다.
무료 도구: PDF24 Creator의 자르기 도구
PDF24 Creator는 인터넷 연결 없이 PDF를 자르거나 PDF 여백을 다듬을 수 있는 자르기 기능을 제공합니다. 자르는 방법은 다음과 같습니다.
- PDF24 Creator를 다운로드하여 설치합니다.
- 도구를 열고 "PDF 자르기" 기능을 선택합니다.
- PDF 파일을 로드하고 상, 하, 좌, 우 여백에 숫자 값을 입력하여 페이지를 다듬습니다.
- "자르기"를 클릭한 다음 잘라낸 PDF를 저장합니다.
참고할 제한 사항:
- 시각적 자르기 도구 없음: PDF24 Creator는 보이는 사각형을 드래그하여 자르기 영역을 선택하는 것을 허용하지 않습니다. 여백을 숫자로 입력해야 합니다.
- 기본 기능: 대부분의 사용자에게 충분합니다. 더 세분화된 제어 기능을 갖춘 도구를 선호하는 고급 사용자의 경우 Adobe Acrobat이 PDF 처리의 황금 표준으로 남아 있습니다.
방법 3. 프로그래밍 방식으로 PDF 자르기 (Python 자동화)
개발자, 데이터 분석가 또는 PDF 자르기를 자동화해야 하는 모든 사람(예: 100개 이상의 파일 일괄 처리)에게 프로그래밍은 최선의 방법입니다. Python용 무료 Spire.PDF는 최소한의 코드로 자르기를 포함한 PDF 조작을 단순화하는 무료 라이브러리입니다.
단계별: Python에서 PDF 자르기
1단계: 라이브러리 설치
터미널에서 다음을 실행하여 무료 Spire.PDF를 설치합니다.
pip install Spire.Pdf.Free
2단계: PDF 페이지를 자르는 Python 코드
이 스크립트는 "자르기 상자"(유지할 영역)를 정의하여 특정 페이지를 자릅니다.
from spire.pdf.common import *
from spire.pdf import *

# PdfDocument 객체 생성
pdf = PdfDocument()

# 디스크에서 PDF 파일 로드
pdf.LoadFromFile("template.pdf")

# 첫 페이지 가져오기
page = pdf.Pages[0]

# 지정된 영역으로 페이지 자르기
page.CropBox = RectangleF(0.0, 50.0, 600.0, 260.0)

# 결과 파일 저장
pdf.SaveToFile("CropPDF.pdf")
pdf.Close()
3단계: 스크립트 실행
Python 환경에서 스크립트를 실행합니다. 결과는 다음과 같습니다.
자르기 외에도 이 무료 Python 라이브러리는 다양한 PDF 페이지 작업을 지원합니다. 예를 들어, 이를 사용하여 PDF 페이지를 회전하거나, PDF 페이지를 삭제하거나, PDF 페이지를 재정렬할 수 있습니다.
PDF 자르기 방법 비교
올바른 PDF 자르기 방법을 선택하는 것은 특정 요구 사항에 따라 다릅니다. 빠른 다듬기가 필요한 일반 사용자입니까? 오프라인 정밀도가 필요한 전문가입니까? 아니면 대량 작업을 자동화하는 개발자입니까? 아래는 다루는 방법에 대한 자세한 비교입니다.
| 방법 | 최적 대상 | 장점 | 단점 |
|---|---|---|---|
| 온라인 도구 | 빠른 일회성 작업 | 설치 불필요, 사용 용이 | 개인 정보 보호 문제, 파일 크기 제한 |
| 데스크톱 앱 | 일반 사용자, 오프라인 작업 | 완전한 제어, 비공개, 제한 없음 | 설치 필요 |
| Spire.PDF Python | 개발자, 일괄 처리 | 자동화, 사용자 정의 가능 | 프로그래밍 지식 필요 |
효과적인 PDF 자르기를 위한 전문가 팁
실수(텍스트 잘림 등)를 피하려면 다음 팁을 따르십시오.
- 백업 저장: 되돌려야 할 경우를 대비하여 자르기 전에 항상 원본 PDF를 보관하십시오.
- 너무 많이 자르지 마십시오: 인쇄 및 가독성을 위해 충분한 여백을 남겨 두십시오.
- 대량 작업에 프로그래밍 사용: 많은 수의 PDF에 대한 자르기를 자동화합니다.
- 먼저 미리보기: 다운로드하기 전에 항상 잘라낸 미리보기를 확인하여 놓친 것이 없는지 확인하십시오.
마지막 생각
무료로 PDF 자르기는 그 어느 때보다 쉬워졌습니다. 지저분한 레이아웃에 대한 간단한 해결책을 제공하여 PDF 파일을 다듬고, 초점을 맞추고, 완벽하게 만들 수 있습니다. 가끔 사용하는 간단한 온라인 도구를 선호하든, 민감한 파일에 데스크톱 소프트웨어를 사용하든, Python으로 일괄 처리를 자동화하든, 이 가이드에 설명된 방법은 모든 요구 사항을 포괄적으로 다룹니다.
참고 항목
Comment rogner des PDF gratuitement : 3 méthodes faciles
Table des matières
- Pourquoi auriez-vous besoin de rogner un PDF ?
- Méthode 1. Outils de rognage de PDF en ligne gratuits (rapide et simple)
- Méthode 2. Outils de rognage de PDF de bureau (contrôle hors ligne)
- Méthode 3. Rogner les PDF par programmation (automatisation avec Python)
- Comparaison des méthodes de rognage de PDF
- Conseils de pro pour un rognage de PDF efficace
- Réflexions finales
Avez-vous déjà ouvert un PDF pour y trouver des marges supplémentaires, des barres latérales indésirables ou une mise en page de travers qui nuit à la lisibilité ? Le rognage d'un PDF vous permet de couper les bords de votre document, de supprimer le contenu non désiré et de concentrer l'attention du lecteur sur ce qui compte vraiment. Que vous prépariez un rapport pour un client, nettoyiez un document numérisé ou créiez une présentation élégante, le rognage est une compétence essentielle.
Dans ce guide complet, nous explorerons plusieurs outils gratuits pour rogner les fichiers PDF, des simples rogneurs en ligne aux méthodes de programmation avancées.
- Pourquoi auriez-vous besoin de rogner un PDF ?
- Méthode 1. Outils de rognage de PDF en ligne gratuits (rapide et simple)
- Méthode 2. Outils de rognage de PDF de bureau (contrôle hors ligne)
- Méthode 3. Rogner les PDF par programmation (automatisation avec Python)
- Comparaison des méthodes de rognage de PDF
- Conseils de pro pour un rognage de PDF efficace
- Réflexions finales
Pourquoi auriez-vous besoin de rogner un PDF ?
Le rognage d'un PDF n'est pas seulement une question d'esthétique ; il sert plusieurs objectifs pratiques :
- Supprimer les informations sensibles : Masquez rapidement les filigranes, les en-têtes ou les pieds de page confidentiels avant de partager.
- Améliorer la lisibilité : Éliminez les espaces blancs excessifs pour rendre le texte et les images plus visibles.
- Préparer pour l'impression : Assurez-vous que votre document s'adapte parfaitement à la page sans marges indésirables.
- Économiser de l'espace de stockage : Rogner de grandes images dans les PDF réduit la taille du fichier (idéal pour l'envoi par e-mail ou le téléchargement).
- Se concentrer sur le contenu : Isolez un graphique, un diagramme ou une image spécifique d'une page plus grande.
Méthode 1. Outils de rognage de PDF en ligne gratuits (rapide et simple)
Rogner un PDF avec des outils en ligne gratuits est parfait si vous ne voulez pas télécharger de logiciel. Il suffit de télécharger votre PDF, de le rogner et de le télécharger.
Meilleur choix : Outil de rognage SmallPDF
SmallPDF est convivial et fonctionne sur n'importe quel navigateur. Voici comment l'utiliser :
- Allez à l'outil de rognage de PDF de SmallPDF (aucune inscription requise pour une utilisation gratuite).
- Cliquez sur "CHOISIR LES FICHIERS" pour télécharger votre PDF (ou faites-le glisser-déposer).
- Utilisez les poignées de glissement sur l'aperçu pour ajuster la zone de rognage.
- Cliquez sur la coche pour confirmer le rognage.
- Cliquez sur "Télécharger" pour enregistrer votre PDF rogné.
Alternative : Rognage ILovePDF
ILovePDF est une autre option gratuite pour rogner les pages PDF. Étapes :
- Visitez ILovePDF Crop PDF.
- Téléchargez votre fichier PDF.
- Cliquez et faites glisser les poignées de coin bleues pour redimensionner la zone de rognage.
- Sélectionnez rogner toutes les pages ou la page actuelle.
- Cliquez sur "Rogner PDF" et téléchargez votre fichier.
Considérations de sécurité des outils de rognage de PDF en ligne
La plupart des outils en ligne traiteront votre fichier et le supprimeront de leurs serveurs après une courte période, mais pour les documents très sensibles, envisagez :
- Évitez de télécharger des documents sensibles sur des outils en ligne
- Vérifiez les politiques de conservation des données du fournisseur
- Envisagez des alternatives hors ligne pour les fichiers confidentiels
Méthode 2. Outils de rognage de PDF de bureau (contrôle hors ligne)
Pour les fichiers sensibles (par ex., documents juridiques) ou une utilisation fréquente, les outils de bureau sont plus sûrs et plus puissants.
Outil gratuit : Outil de rognage de PDF24 Creator
PDF24 Creator offre une fonctionnalité de rognage qui vous permet de rogner des PDF ou de couper les marges de PDF sans connexion Internet. Voici comment rogner :
- Téléchargez et installez PDF24 Creator.
- Ouvrez l'outil et sélectionnez la fonctionnalité “Rogner PDF”.
- Chargez votre fichier PDF et entrez des valeurs numériques pour les marges Haut, Bas, Gauche et Droite pour couper la page.
- Cliquez sur "Rogner" et puis enregistrez le PDF rogné.
Limitations à noter :
- Pas d'outil de rognage visuel : PDF24 Creator ne permet pas de faire glisser un rectangle visible pour sélectionner la zone de rognage. Vous devez entrer les marges numériquement.
- Fonctionnalité de base : Suffisante pour la plupart des utilisateurs. Pour les utilisateurs avancés qui préfèrent des outils avec un contrôle plus granulaire, Adobe Acrobat reste la référence en matière de traitement de PDF.
Méthode 3. Rogner les PDF par programmation (automatisation avec Python)
Pour les développeurs, les analystes de données ou toute personne ayant besoin d'automatiser le rognage de PDF (par ex., traitement par lots de plus de 100 fichiers), la programmation est la solution. Free Spire.PDF for Python est une bibliothèque gratuite qui simplifie la manipulation des PDF, y compris le rognage, avec un minimum de code.
Étape par étape : Rogner des PDF en Python
Étape 1 : Installer la bibliothèque
Exécutez ceci dans votre terminal pour installer Free Spire.PDF :
pip install Spire.Pdf.Free
Étape 2 : Code Python pour rogner une page PDF
Ce script rogne une page spécifique en définissant une “boîte de rognage” - la zone à conserver.
from spire.pdf.common import *
from spire.pdf import *

# Create a PdfDocument object
pdf = PdfDocument()

# Load a PDF file from disk
pdf.LoadFromFile("template.pdf")

# Get the first page
page = pdf.Pages[0]

# Crop the page by the specified area
page.CropBox = RectangleF(0.0, 50.0, 600.0, 260.0)

# Save the result file
pdf.SaveToFile("CropPDF.pdf")
pdf.Close()
Étape 3 : Exécuter le script
Exécutez le script dans votre environnement Python. Le résultat ressemble à ceci :
Au-delà du rognage, cette bibliothèque Python gratuite prend en charge diverses opérations sur les pages PDF. Par exemple, vous pouvez l'utiliser pour faire pivoter des pages PDF, supprimer des pages PDF, ou réorganiser des pages PDF.
Comparaison des méthodes de rognage de PDF
Le choix de la bonne méthode de rognage de PDF dépend de vos besoins spécifiques : êtes-vous un utilisateur occasionnel ayant besoin d'une coupe rapide ? Un professionnel nécessitant une précision hors ligne ? Ou un développeur automatisant des tâches en masse ? Vous trouverez ci-dessous une comparaison détaillée des méthodes abordées :
| Méthode | Idéal pour | Avantages | Inconvénients |
|---|---|---|---|
| Outils en ligne | Tâches rapides et ponctuelles | Pas d'installation, facile à utiliser | Problèmes de confidentialité, limites de taille de fichier |
| Applications de bureau | Utilisateurs réguliers, travail hors ligne | Contrôle total, privé, sans limites | Nécessite une installation |
| Spire.PDF Python | Développeurs, traitement par lots | Automatisation, personnalisable | Nécessite des connaissances en programmation |
Conseils de pro pour un rognage de PDF efficace
Pour éviter les erreurs (comme couper du texte), suivez ces conseils :
- Faites une sauvegarde : Conservez toujours le PDF original avant de le rogner—au cas où vous auriez besoin de revenir en arrière.
- Ne rognez pas trop : Laissez des marges suffisantes pour l'impression et la lisibilité.
- Utilisez la programmation pour les tâches en masse : Automatisez le rognage pour un grand nombre de PDF.
- Prévisualisez d'abord : Vérifiez toujours l'aperçu rogné avant de télécharger pour vous assurer de n’avoir rien manqué.
Réflexions finales
Rogner des PDF gratuitement est plus facile que jamais. Cela offre une solution simple pour les mises en page désordonnées, vous permettant de couper, de recentrer et de perfectionner vos fichiers PDF. Que vous préfériez des outils en ligne simples pour une utilisation occasionnelle, utilisiez un logiciel de bureau pour les fichiers sensibles ou automatisiez le traitement par lots avec Python, les méthodes décrites dans ce guide offrent une couverture complète pour tous les besoins.
Voir aussi
Cómo recortar PDFs gratis: 3 métodos fáciles
Tabla de Contenidos
- ¿Por Qué Necesitarías Recortar un PDF?
- Método 1. Recortadores de PDF en Línea Gratuitos (Rápido y Sin Complicaciones)
- Método 2. Recortadores de PDF de Escritorio (Control sin Conexión)
- Método 3. Recortar PDFs Programáticamente (Automatización con Python)
- Comparación de Métodos de Recorte de PDF
- Consejos Profesionales para un Recorte de PDF Efectivo
- Conclusiones Finales
¿Alguna vez has abierto un PDF solo para encontrar márgenes adicionales, barras laterales no deseadas o un diseño torcido que arruina la legibilidad? Recortar un PDF te permite ajustar los bordes de tu documento, eliminando contenido no deseado y centrando la atención del lector en lo que realmente importa. Ya sea que estés preparando un informe para un cliente, limpiando un documento escaneado o creando una presentación elegante, recortar es una habilidad esencial.
En esta guía completa, exploraremos varias herramientas gratuitas para recortar archivos PDF, desde simples recortadores en línea hasta métodos de programación avanzados.
- ¿Por Qué Necesitarías Recortar un PDF?
- Método 1. Recortadores de PDF en Línea Gratuitos (Rápido y Sin Complicaciones)
- Método 2. Recortadores de PDF de Escritorio (Control sin Conexión)
- Método 3. Recortar PDFs Programáticamente (Automatización con Python)
- Comparación de Métodos de Recorte de PDF
- Consejos Profesionales para un Recorte de PDF Efectivo
- Conclusiones Finales
¿Por Qué Necesitarías Recortar un PDF?
Recortar un PDF no es solo una cuestión de estética; tiene varios propósitos prácticos:
- Eliminar Información Sensible: Oculta rápidamente marcas de agua, membretes o pies de página confidenciales antes de compartir.
- Mejorar la Legibilidad: Elimina el exceso de espacio en blanco para que el texto y las imágenes sean más prominentes.
- Preparar para la Impresión: Asegúrate de que tu documento se ajuste perfectamente a la página sin márgenes no deseados.
- Ahorrar espacio de almacenamiento: Recortar imágenes grandes en PDFs reduce el tamaño del archivo (ideal para enviar por correo electrónico o subir).
- Enfocarse en el Contenido: Aísla un gráfico, diagrama o imagen específica de una página más grande.
Método 1. Recortadores de PDF en Línea Gratuitos (Rápido y Sin Complicaciones)
Recortar PDF con herramientas gratuitas en línea es perfecto si no quieres descargar software. Simplemente sube tu PDF, recórtalo y descárgalo.
Mejor Opción: Herramienta de Recorte de SmallPDF
SmallPDF es fácil de usar y funciona en cualquier navegador. Aquí te explicamos cómo usarlo:
- Ve a la herramienta de Recorte de PDF de SmallPDF (no es necesario registrarse para el uso gratuito).
- Haz clic en "ELEGIR ARCHIVOS" para subir tu PDF (o arrástralo y suéltalo).
- Usa los manejadores de arrastre en la vista previa para ajustar el área de recorte.
- Haz clic en la marca de verificación para confirmar el recorte.
- Presiona "Descargar" para guardar tu PDF recortado.
Alternativa: Recorte de ILovePDF
ILovePDF es otra opción gratuita para recortar páginas de PDF. Pasos:
- Visita Recortar PDF de ILovePDF.
- Sube tu archivo PDF.
- Haz clic y arrastra los manejadores de las esquinas azules para redimensionar el área de recorte.
- Selecciona recortar todas las páginas o la página actual.
- Haz clic en "Recortar PDF" y descarga tu archivo.
Consideraciones de Seguridad de las Herramientas de Recorte de PDF en Línea
La mayoría de las herramientas en línea procesarán tu archivo y lo eliminarán de sus servidores después de un corto período, pero para documentos muy sensibles, considera:
- Evita subir documentos sensibles a herramientas en línea
- Revisa las políticas de retención de datos del proveedor
- Considera alternativas sin conexión para archivos confidenciales
Método 2. Recortadores de PDF de Escritorio (Control sin Conexión)
Para archivos sensibles (por ejemplo, documentos legales) o uso frecuente, las herramientas de escritorio son más seguras y potentes.
Herramienta Gratuita: Herramienta de Recorte de PDF24 Creator
PDF24 Creator ofrece una función de recorte que te permite recortar PDFs o ajustar los márgenes de un PDF sin conexión a internet. Aquí te explicamos cómo recortar:
- Descarga e instala PDF24 Creator.
- Abre la herramienta y selecciona la función “Recortar PDF”.
- Carga tu archivo PDF e introduce valores numéricos para los márgenes Superior, Inferior, Izquierdo y Derecho para ajustar la página.
- Haz clic en "Recortar" y luego guarda el PDF recortado.
Limitaciones a Tener en Cuenta:
- Sin Herramienta de Recorte Visual: PDF24 Creator no permite arrastrar un rectángulo visible para seleccionar el área de recorte. Debes introducir los márgenes numéricamente.
- Funcionalidad Básica: Suficiente para la mayoría de los usuarios. Para usuarios avanzados que prefieren herramientas con un control más detallado, Adobe Acrobat sigue siendo el estándar de oro en el procesamiento de PDF.
Método 3. Recortar PDFs Programáticamente (Automatización con Python)
Para desarrolladores, analistas de datos o cualquiera que necesite automatizar el recorte de PDF (por ejemplo, procesar en lote más de 100 archivos), la programación es el camino a seguir. Free Spire.PDF for Python es una biblioteca gratuita que simplifica la manipulación de PDF, incluido el recorte, con un mínimo de código.
Paso a Paso: Recortar PDFs en Python
Paso 1: Instalar la Biblioteca
Ejecuta esto en tu terminal para instalar Free Spire.PDF:
pip install Spire.Pdf.Free
Paso 2: Código de Python para Recortar una Página de PDF
Este script recorta una página específica definiendo un “cuadro de recorte” (crop box), el área que se conservará.
from spire.pdf.common import *
from spire.pdf import *

# Create a PdfDocument object
pdf = PdfDocument()

# Load a PDF file from disk
pdf.LoadFromFile("template.pdf")

# Get the first page
page = pdf.Pages[0]

# Crop the page by the specified area
page.CropBox = RectangleF(0.0, 50.0, 600.0, 260.0)

# Save the result file
pdf.SaveToFile("CropPDF.pdf")
pdf.Close()
Paso 3: Ejecutar el Script
Ejecuta el script en tu entorno de Python. El resultado se ve así:
Más allá del recorte, esta biblioteca gratuita de Python admite una variedad de operaciones de página en PDF. Por ejemplo, puedes usarla para rotar páginas de PDF, eliminar páginas de PDF, o reorganizar páginas de PDF.
Comparación de Métodos de Recorte de PDF
Elegir el método de recorte de PDF adecuado depende de tus necesidades específicas: ¿Eres un usuario ocasional que necesita un recorte rápido? ¿Un profesional que requiere precisión sin conexión? ¿O un desarrollador que automatiza tareas en lote? A continuación se muestra una comparación detallada de los métodos cubiertos:
| Método | Ideal Para | Ventajas | Desventajas |
|---|---|---|---|
| Herramientas en Línea | Tareas rápidas y únicas | Sin instalación, fácil de usar | Preocupaciones de privacidad, límites de tamaño de archivo |
| Aplicaciones de Escritorio | Usuarios habituales, trabajo sin conexión | Control total, privado, sin límites | Requiere instalación |
| Spire.PDF Python | Desarrolladores, procesamiento por lotes | Automatización, personalizable | Requiere conocimientos de programación |
Consejos Profesionales para un Recorte de PDF Efectivo
Para evitar errores (como cortar texto), sigue estos consejos:
- Guarda una copia de seguridad: Conserva siempre el PDF original antes de recortar, por si necesitas revertir los cambios.
- No recortes demasiado: Deja márgenes suficientes para la impresión y la legibilidad.
- Usa la Programación para Trabajos en Lote: Automatiza el recorte para grandes cantidades de PDFs.
- Previsualiza primero: Revisa siempre la vista previa recortada antes de descargar para asegurarte de no haber omitido nada.
Conclusiones Finales
Recortar PDFs de forma gratuita es más fácil que nunca. Proporciona una solución sencilla para diseños desordenados, permitiéndote ajustar, enfocar y perfeccionar tus archivos PDF. Ya sea que prefieras herramientas en línea simples para uso ocasional, uses software de escritorio para archivos sensibles o automatices el procesamiento por lotes con Python, los métodos descritos en esta guía ofrecen una cobertura completa para todas las necesidades.
Ver También
Wie man PDFs kostenlos zuschneidet: 3 einfache Methoden
Inhaltsverzeichnis
- Warum müssen Sie ein PDF zuschneiden?
- Methode 1. Kostenlose Online-PDF-Cropper (Schnell & unkompliziert)
- Methode 2. Desktop-PDF-Cropper (Offline-Kontrolle)
- Methode 3. PDFs programmatisch zuschneiden (Python-Automatisierung)
- Vergleich der PDF-Zuschneidemethoden
- Profi-Tipps für effektives PDF-Zuschneiden
- Abschließende Gedanken
Haben Sie schon einmal ein PDF geöffnet und zusätzliche Ränder, unerwünschte Seitenleisten oder ein schiefes Layout gefunden, das die Lesbarkeit beeinträchtigt? Das Zuschneiden eines PDFs ermöglicht es Ihnen, die Ränder Ihres Dokuments zu beschneiden, unerwünschte Inhalte zu entfernen und die Aufmerksamkeit des Lesers auf das Wesentliche zu lenken. Ob Sie einen Bericht für einen Kunden vorbereiten, ein gescanntes Dokument bereinigen oder eine elegante Präsentation erstellen, das Zuschneiden ist eine wesentliche Fähigkeit.
In diesem umfassenden Leitfaden werden wir mehrere kostenlose Werkzeuge zum Zuschneiden von PDF-Dateien untersuchen, von einfachen Online-Croppern bis hin zu fortgeschrittenen Programmiermethoden.
- Warum müssen Sie ein PDF zuschneiden?
- Methode 1. Kostenlose Online-PDF-Cropper (Schnell & unkompliziert)
- Methode 2. Desktop-PDF-Cropper (Offline-Kontrolle)
- Methode 3. PDFs programmatisch zuschneiden (Python-Automatisierung)
- Vergleich der PDF-Zuschneidemethoden
- Profi-Tipps für effektives PDF-Zuschneiden
- Abschließende Gedanken
Warum müssen Sie ein PDF zuschneiden?
Das Zuschneiden eines PDFs dient nicht nur der Ästhetik; es hat mehrere praktische Zwecke:
- Sensible Informationen entfernen: Wasserzeichen, Briefköpfe oder vertrauliche Fußzeilen schnell ausblenden, bevor Sie sie weitergeben.
- Lesbarkeit verbessern: Übermäßigen Leerraum beseitigen, um Text und Bilder hervorzuheben.
- Für den Druck vorbereiten: Sicherstellen, dass Ihr Dokument perfekt auf die Seite passt, ohne unerwünschte Ränder.
- Speicherplatz sparen: Das Zuschneiden großer Bilder in PDFs reduziert die Dateigröße (ideal für den Versand per E-Mail oder zum Hochladen).
- Auf den Inhalt konzentrieren: Ein bestimmtes Diagramm, eine Grafik oder ein Bild von einer größeren Seite isolieren.
Methode 1. Kostenlose Online-PDF-Cropper (Schnell & unkompliziert)
Das Zuschneiden von PDFs mit kostenlosen Online-Tools ist perfekt, wenn Sie keine Software herunterladen möchten. Laden Sie einfach Ihr PDF hoch, schneiden Sie es zu und laden Sie es herunter.
Top-Auswahl: SmallPDF Crop Tool
SmallPDF ist benutzerfreundlich und funktioniert in jedem Browser. So verwenden Sie es:
- Gehen Sie zum SmallPDF Crop PDF-Tool (keine Anmeldung für die kostenlose Nutzung erforderlich).
- Klicken Sie auf „DATEIEN WÄHLEN“, um Ihr PDF hochzuladen (oder ziehen Sie es per Drag-and-Drop).
- Verwenden Sie die Ziehpunkte in der Vorschau, um den Zuschneidebereich anzupassen.
- Klicken Sie auf das Häkchen, um das Zuschneiden zu bestätigen.
- Klicken Sie auf „Herunterladen“, um Ihr zugeschnittenes PDF zu speichern.
Alternative: ILovePDF Crop
ILovePDF ist eine weitere kostenlose Option zum Zuschneiden von PDF-Seiten. Schritte:
- Besuchen Sie ILovePDF Crop PDF.
- Laden Sie Ihre PDF-Datei hoch.
- Klicken und ziehen Sie die blauen Eckgriffe, um die Größe des Zuschneidebereichs zu ändern.
- Wählen Sie, ob alle Seiten oder die aktuelle Seite zugeschnitten werden sollen.
- Klicken Sie auf „PDF zuschneiden“ und laden Sie Ihre Datei herunter.
Sicherheitsüberlegungen bei Online-PDF-Zuschneidewerkzeugen
Die meisten Online-Tools verarbeiten Ihre Datei und löschen sie nach kurzer Zeit von ihren Servern, aber bei hochsensiblen Dokumenten sollten Sie Folgendes beachten:
- Vermeiden Sie das Hochladen sensibler Dokumente auf Online-Tools
- Überprüfen Sie die Datenaufbewahrungsrichtlinien des Anbieters
- Ziehen Sie Offline-Alternativen für vertrauliche Dateien in Betracht
Methode 2. Desktop-PDF-Cropper (Offline-Kontrolle)
Für sensible Dateien (z. B. juristische Dokumente) oder bei häufiger Nutzung sind Desktop-Tools sicherer und leistungsfähiger.
Kostenloses Tool: Das Zuschneidewerkzeug von PDF24 Creator
PDF24 Creator bietet eine Zuschneidefunktion, mit der Sie PDFs zuschneiden oder PDF-Ränder ohne Internetverbindung trimmen können. So schneiden Sie zu:
- Laden Sie PDF24 Creator herunter und installieren Sie es.
- Öffnen Sie das Tool und wählen Sie die Funktion „PDF zuschneiden“.
- Laden Sie Ihre PDF-Datei und geben Sie numerische Werte für die oberen, unteren, linken und rechten Ränder ein, um die Seite zu trimmen.
- Klicken Sie auf „Zuschneiden“ und speichern Sie dann das zugeschnittene PDF.
Zu beachtende Einschränkungen:
- Kein visuelles Zuschneidewerkzeug: PDF24 Creator erlaubt es nicht, ein sichtbares Rechteck zu ziehen, um den Zuschneidebereich auszuwählen. Sie müssen die Ränder numerisch eingeben.
- Grundlegende Funktionalität: Ausreichend für die meisten Benutzer. Für fortgeschrittene Benutzer, die Werkzeuge mit feinerer Kontrolle bevorzugen, bleibt Adobe Acrobat der Goldstandard in der PDF-Verarbeitung.
Methode 3. PDFs programmatisch zuschneiden (Python-Automatisierung)
Für Entwickler, Datenanalysten oder jeden, der das Zuschneiden von PDFs automatisieren muss (z. B. die Stapelverarbeitung von über 100 Dateien), ist die Programmierung der richtige Weg. Kostenloses Spire.PDF für Python ist eine kostenlose Bibliothek, die die PDF-Bearbeitung, einschließlich des Zuschneidens, mit minimalem Code vereinfacht.
Schritt-für-Schritt: PDFs in Python zuschneiden
Schritt 1: Installieren Sie die Bibliothek
Führen Sie dies in Ihrem Terminal aus, um Free Spire.PDF zu installieren:
pip install Spire.Pdf.Free
Schritt 2: Python-Code zum Zuschneiden einer PDF-Seite
Dieses Skript schneidet eine bestimmte Seite zu, indem es eine „Crop Box“ definiert – den Bereich, der beibehalten werden soll.
from spire.pdf.common import *
from spire.pdf import *

# Erstellen Sie ein PdfDocument-Objekt
pdf = PdfDocument()

# Laden Sie eine PDF-Datei von der Festplatte
pdf.LoadFromFile("template.pdf")

# Holen Sie sich die erste Seite
page = pdf.Pages[0]

# Schneiden Sie die Seite auf den angegebenen Bereich zu
page.CropBox = RectangleF(0.0, 50.0, 600.0, 260.0)

# Speichern Sie die Ergebnisdatei
pdf.SaveToFile("CropPDF.pdf")
pdf.Close()
Schritt 3: Führen Sie das Skript aus
Führen Sie das Skript in Ihrer Python-Umgebung aus. Das Ergebnis sieht so aus:
Über das Zuschneiden hinaus unterstützt diese kostenlose Python-Bibliothek eine Vielzahl von PDF-Seitenoperationen. Sie können sie beispielsweise verwenden, um PDF-Seiten zu drehen, PDF-Seiten zu löschen, oder PDF-Seiten neu anzuordnen.
Vergleich der PDF-Zuschneidemethoden
Die Wahl der richtigen PDF-Zuschneidemethode hängt von Ihren spezifischen Bedürfnissen ab: Sind Sie ein gelegentlicher Benutzer, der einen schnellen Zuschnitt benötigt? Ein Profi, der Offline-Präzision benötigt? Oder ein Entwickler, der Massenaufgaben automatisiert? Unten finden Sie einen detaillierten Vergleich der behandelten Methoden:
| Methode | Am besten für | Vorteile | Nachteile |
|---|---|---|---|
| Online-Tools | Schnelle, einmalige Aufgaben | Keine Installation, einfach zu bedienen | Datenschutzbedenken, Dateigrößenbeschränkungen |
| Desktop-Apps | Regelmäßige Benutzer, Offline-Arbeit | Volle Kontrolle, privat, keine Limits | Erfordert Installation |
| Spire.PDF Python | Entwickler, Stapelverarbeitung | Automatisierung, anpassbar | Erfordert Programmierkenntnisse |
Profi-Tipps für effektives PDF-Zuschneiden
Um Fehler zu vermeiden (wie das Abschneiden von Text), befolgen Sie diese Tipps:
- Sicherungskopie speichern: Bewahren Sie immer das Original-PDF auf, bevor Sie es zuschneiden – nur für den Fall, dass Sie es wiederherstellen müssen.
- Nicht zu viel zuschneiden: Lassen Sie ausreichende Ränder für den Druck und die Lesbarkeit.
- Programmierung für Massenaufträge verwenden: Automatisieren Sie das Zuschneiden für eine große Anzahl von PDFs.
- Vorschau zuerst: Überprüfen Sie immer die zugeschnittene Vorschau vor dem Herunterladen, um sicherzustellen, dass Sie nichts übersehen haben.
Abschließende Gedanken
Das kostenlose Zuschneiden von PDFs ist einfacher als je zuvor. Es bietet eine einfache Lösung für unordentliche Layouts, mit der Sie Ihre PDF-Dateien zuschneiden, fokussieren und perfektionieren können. Ob Sie einfache Online-Tools für den gelegentlichen Gebrauch bevorzugen, Desktop-Software für sensible Dateien verwenden oder die Stapelverarbeitung mit Python automatisieren, die in diesem Leitfaden beschriebenen Methoden bieten eine umfassende Abdeckung für alle Bedürfnisse.
Siehe auch
```
Как бесплатно обрезать PDF: 3 простых способа
Содержание
- Зачем может понадобиться обрезать PDF?
- Метод 1. Бесплатные онлайн-инструменты для обрезки PDF (быстро и без проблем)
- Метод 2. Настольные программы для обрезки PDF (офлайн-контроль)
- Метод 3. Программная обрезка PDF (автоматизация с помощью Python)
- Сравнение методов обрезки PDF
- Профессиональные советы для эффективной обрезки PDF
- Заключение
Вы когда-нибудь открывали PDF и обнаруживали лишние поля, ненужные боковые панели или искаженную верстку, которая портит читаемость? Обрезка PDF позволяет вам подрезать края документа, удаляя нежелательное содержимое и концентрируя внимание читателя на том, что действительно важно. Готовите ли вы отчет для клиента, приводите в порядок отсканированный документ или создаете стильную презентацию, обрезка — это важный навык.
В этом подробном руководстве мы рассмотрим несколько бесплатных инструментов для обрезки PDF-файлов, от простых онлайн-инструментов до продвинутых методов программирования.
- Зачем может понадобиться обрезать PDF?
- Метод 1. Бесплатные онлайн-инструменты для обрезки PDF (быстро и без проблем)
- Метод 2. Настольные программы для обрезки PDF (офлайн-контроль)
- Метод 3. Программная обрезка PDF (автоматизация с помощью Python)
- Сравнение методов обрезки PDF
- Профессиональные советы для эффективной обрезки PDF
- Заключение
Зачем может понадобиться обрезать PDF?
Обрезка PDF — это не только вопрос эстетики; она служит нескольким практическим целям:
- Удаление конфиденциальной информации: Быстро скройте водяные знаки, фирменные бланки или конфиденциальные колонтитулы перед отправкой.
- Улучшение читаемости: Устраните избыточное белое пространство, чтобы сделать текст и изображения более заметными.
- Подготовка к печати: Убедитесь, что ваш документ идеально помещается на странице без нежелательных полей.
- Экономия места на диске: Обрезка больших изображений в PDF уменьшает размер файла (отлично подходит для отправки по электронной почте или загрузки).
- Фокус на содержимом: Выделите определенную диаграмму, график или изображение с большой страницы.
Метод 1. Бесплатные онлайн-инструменты для обрезки PDF (быстро и без проблем)
Обрезка PDF с помощью бесплатных онлайн-инструментов идеальна, если вы не хотите скачивать программное обеспечение. Просто загрузите свой PDF, обрежьте и скачайте.
Лучший выбор: Инструмент для обрезки SmallPDF
SmallPDF удобен в использовании и работает в любом браузере. Вот как им пользоваться:
- Перейдите к инструменту для обрезки PDF от SmallPDF (регистрация для бесплатного использования не требуется).
- Нажмите "ВЫБРАТЬ ФАЙЛЫ", чтобы загрузить ваш PDF (или перетащите его).
- Используйте маркеры перетаскивания на предварительном просмотре, чтобы настроить область обрезки.
- Нажмите на галочку, чтобы подтвердить обрезку.
- Нажмите "Скачать", чтобы сохранить обрезанный PDF.
Альтернатива: Обрезка в ILovePDF
ILovePDF — еще один бесплатный вариант для обрезки страниц PDF. Шаги:
- Посетите ILovePDF Crop PDF.
- Загрузите ваш PDF-файл.
- Нажмите и перетащите синие угловые маркеры, чтобы изменить размер области обрезки.
- Выберите обрезку всех страниц или текущей страницы.
- Нажмите "Обрезать PDF" и скачайте ваш файл.
Вопросы безопасности при использовании онлайн-инструментов для обрезки PDF
Большинство онлайн-инструментов обработают ваш файл и удалят его со своих серверов через короткий промежуток времени, но для особо конфиденциальных документов стоит учесть следующее:
- Избегайте загрузки конфиденциальных документов в онлайн-инструменты
- Проверяйте политику хранения данных провайдера
- Рассмотрите офлайн-альтернативы для конфиденциальных файлов
Метод 2. Настольные программы для обрезки PDF (офлайн-контроль)
Для конфиденциальных файлов (например, юридических документов) или частого использования настольные инструменты безопаснее и мощнее.
Бесплатный инструмент: Инструмент для обрезки от PDF24 Creator
PDF24 Creator предлагает функцию обрезки, которая позволяет обрезать PDF или подрезать поля PDF без подключения к интернету. Вот как обрезать:
- Скачайте и установите PDF24 Creator.
- Откройте инструмент и выберите функцию "Обрезать PDF".
- Загрузите ваш PDF-файл и введите числовые значения для верхнего, нижнего, левого и правого полей, чтобы подрезать страницу.
- Нажмите "Обрезать", а затем сохраните обрезанный PDF.
Ограничения, которые следует учесть:
- Отсутствие визуального инструмента обрезки: PDF24 Creator не позволяет перетаскивать видимый прямоугольник для выбора области обрезки. Вы должны вводить поля численно.
- Базовая функциональность: Достаточно для большинства пользователей. Для продвинутых пользователей, предпочитающих инструменты с более точным контролем, Adobe Acrobat остается золотым стандартом в обработке PDF.
Метод 3. Программная обрезка PDF (автоматизация с помощью Python)
Для разработчиков, аналитиков данных или всех, кому необходимо автоматизировать обрезку PDF (например, пакетная обработка 100+ файлов), программирование — это то, что нужно. Free Spire.PDF for Python — это бесплатная библиотека, которая упрощает манипуляции с PDF, включая обрезку, с минимальным количеством кода.
Пошаговое руководство: Обрезка PDF в Python
Шаг 1: Установите библиотеку
Выполните эту команду в вашем терминале, чтобы установить Free Spire.PDF:
pip install Spire.Pdf.Free
Шаг 2: Код на Python для обрезки страницы PDF
Этот скрипт обрезает определенную страницу, определяя "crop box" — область, которую нужно сохранить.
from spire.pdf.common import *
from spire.pdf import *

# Create a PdfDocument object
pdf = PdfDocument()

# Load a PDF file from disk
pdf.LoadFromFile("template.pdf")

# Get the first page
page = pdf.Pages[0]

# Crop the page by the specified area
page.CropBox = RectangleF(0.0, 50.0, 600.0, 260.0)

# Save the result file
pdf.SaveToFile("CropPDF.pdf")
pdf.Close()
Шаг 3: Запустите скрипт
Выполните скрипт в вашей среде Python. Результат выглядит так:
Помимо обрезки, эта бесплатная библиотека Python поддерживает различные операции со страницами PDF. Например, вы можете использовать ее для поворота страниц PDF, удаления страниц PDF или изменения порядка страниц PDF.
Сравнение методов обрезки PDF
Выбор правильного метода обрезки PDF зависит от ваших конкретных потребностей: вы случайный пользователь, которому нужна быстрая обрезка? Профессионал, которому требуется офлайн-точность? Или разработчик, автоматизирующий массовые задачи? Ниже приведено подробное сравнение рассмотренных методов:
| Метод | Лучше всего подходит для | Плюсы | Минусы |
|---|---|---|---|
| Онлайн-инструменты | Быстрые, одноразовые задачи | Нет необходимости в установке, простота использования | Проблемы с конфиденциальностью, ограничения на размер файла |
| Настольные приложения | Постоянные пользователи, работа в офлайне | Полный контроль, конфиденциальность, нет ограничений | Требуется установка |
| Spire.PDF Python | Разработчики, пакетная обработка | Автоматизация, настраиваемость | Требуются знания в программировании |
Профессиональные советы для эффективной обрезки PDF
Чтобы избежать ошибок (например, обрезки текста), следуйте этим советам:
- Сохраните резервную копию: Всегда сохраняйте исходный PDF перед обрезкой — на случай, если понадобится вернуться к нему.
- Не обрезайте слишком много: Оставляйте достаточные поля для печати и читаемости.
- Используйте программирование для массовых задач: Автоматизируйте обрезку для большого количества PDF-файлов.
- Сначала предпросмотр: Всегда проверяйте предварительный просмотр обрезанного файла перед скачиванием, чтобы убедиться, что вы ничего не упустили.
Заключение
Бесплатная обрезка PDF стала проще, чем когда-либо. Это простое решение для неаккуратной верстки, позволяющее вам подрезать, сфокусировать и усовершенствовать ваши PDF-файлы. Предпочитаете ли вы простые онлайн-инструменты для редкого использования, используете настольное программное обеспечение для конфиденциальных файлов или автоматизируете пакетную обработку с помощью Python, методы, изложенные в этом руководстве, обеспечивают всестороннее покрытие для всех потребностей.