Supprimer les liens hypertextes dans Excel – 4 méthodes faciles
Voulez-vous supprimer les hyperliens dans les fichiers Excel rapidement et facilement ? Qu'ils soient apparus automatiquement lors de la saisie d'URL ou qu'ils aient été copiés d'autres sources, les hyperliens indésirables peuvent encombrer votre feuille de calcul, rendre la mise en forme difficile et ralentir votre flux de travail.
Dans ce guide, vous apprendrez 4 façons simples de supprimer les hyperliens dans Excel - manuellement via le menu contextuel ou l'onglet Accueil, et automatiquement en utilisant des macros VBA ou C# - afin que vous puissiez nettoyer vos feuilles efficacement, garder vos données organisées et maintenir un classeur d'aspect professionnel.
Table des matières
- Comment supprimer manuellement les hyperliens dans Excel
- Comment supprimer automatiquement tous les hyperliens dans Excel
- Meilleures pratiques pour la suppression des hyperliens dans Excel
- Conclusion
- FAQ
Comment supprimer manuellement les hyperliens dans Excel ?
Si vous n'avez que quelques hyperliens à supprimer, la suppression manuelle est généralement la solution la plus rapide. Excel fournit des outils intégrés pour cette tâche, et ils sont faciles d'accès. Vous trouverez ci-dessous plusieurs méthodes manuelles que vous pouvez utiliser, en fonction de vos préférences et de votre situation.
Supprimer les hyperliens à l'aide du menu contextuel
C'est le moyen le plus direct et le plus convivial pour les débutants de supprimer les hyperliens d'une feuille Excel, en particulier lorsqu'il s'agit d'un petit ensemble de données.
Étapes pour supprimer les hyperliens dans Excel à l'aide du menu contextuel :
- Ouvrez votre fichier Excel dans MS Excel, puis sélectionnez la cellule ou la plage qui contient les hyperliens que vous souhaitez supprimer.
- Faites un clic droit sur la cellule ou la plage sélectionnée.
- Dans le menu contextuel, choisissez Supprimer les liens hypertexte.
Excel supprime instantanément l'hyperlien mais conserve le texte affiché intact. Le texte reste visible dans la cellule, mais sans le lien cliquable.
Astuce : Si vous sélectionnez une seule cellule, le menu affichera Supprimer le lien hypertexte. Si vous sélectionnez plusieurs cellules, Excel le changera en Supprimer les liens hypertexte, vous permettant de supprimer tous les hyperliens en une seule fois.
Supprimer les hyperliens à l'aide de l'onglet Accueil
Une autre façon rapide de supprimer les hyperliens dans Excel est via l'onglet Accueil du ruban. Cette méthode fonctionne de la même manière que l'option du clic droit mais est préférable pour ceux qui préfèrent travailler avec la barre d'outils d'Excel plutôt qu'avec les menus contextuels.
Étapes pour supprimer les hyperliens d'Excel à l'aide de l'onglet Accueil :
- Sélectionnez la cellule ou la plage qui contient les hyperliens que vous souhaitez supprimer.

- Allez dans l'onglet Accueil de la barre d'outils supérieure, à côté de Insertion.
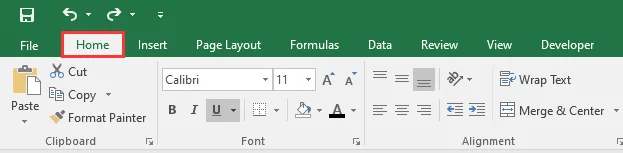
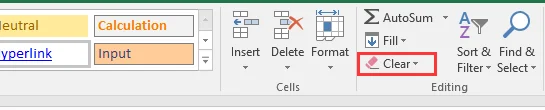
- Dans le groupe Édition à droite, cliquez sur le bouton Effacer (celui avec l'icône de la gomme rose). Une liste déroulante apparaîtra.
-
Dans la liste, choisissez Effacer les liens hypertexte ou Supprimer les liens hypertexte en fonction de vos besoins :
-
Effacer les liens hypertexte - Supprime uniquement l'hyperlien, tout en conservant la mise en forme du texte d'origine intacte.
-
Supprimer les liens hypertexte - Supprime à la fois l'hyperlien et toute mise en forme (telle que la couleur de la police ou le soulignement) qui lui est appliquée.
-
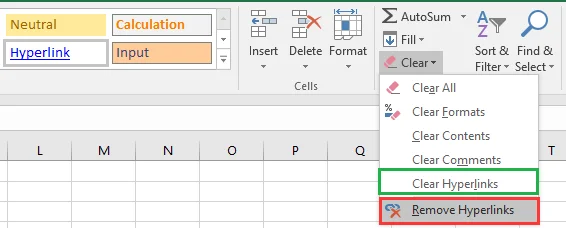
Vos cellules sélectionnées seront désormais exemptes d'hyperliens cliquables, avec la mise en forme préservée ou supprimée selon l'option que vous avez choisie.
Comment supprimer automatiquement tous les hyperliens dans Excel ?
Lorsque votre classeur contient des centaines ou des milliers d'hyperliens, la suppression manuelle devient peu pratique. Dans de tels cas, l'automatisation peut faire gagner un temps considérable. Vous pouvez supprimer tous les hyperliens en une seule fois en utilisant VBA (Visual Basic for Applications) ou C# avec la bibliothèque Spire.XLS. Ces méthodes vous permettent de nettoyer vos feuilles efficacement sans perdre de texte.
Supprimer les hyperliens avec VBA
La fonctionnalité de script VBA intégrée d'Excel vous permet d'exécuter de petits extraits de code qui effectuent des tâches automatically. La suppression des hyperliens via VBA est l'un des moyens les plus rapides de nettoyer l'ensemble de votre classeur.
Étapes pour supprimer tous les hyperliens d'Excel à l'aide de macros VBA :
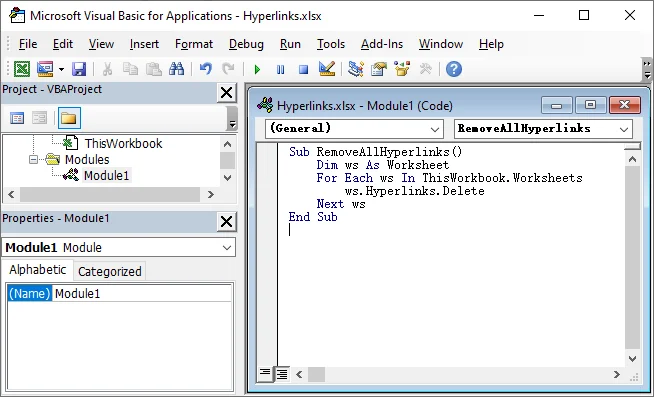
- Appuyez sur Alt + F11 pour ouvrir l'Éditeur VBA.
- Dans la fenêtre de l'éditeur, allez dans Insertion → Module.
- Copiez et collez le code VBA suivant :
Sub RemoveHyperlinks()
    Dim ws As Worksheet
    For Each ws In ThisWorkbook.Worksheets
        ws.Hyperlinks.Delete
    Next ws
End Sub
- Appuyez sur F5 pour exécuter le code VBA.
Cela supprimera tous les hyperliens du classeur Excel tout en conservant le texte de la cellule intact.

Astuce : Vous pouvez assigner cette macro à un bouton de votre ruban pour une suppression des hyperliens en un clic dans les futurs flux de travail.
Supprimer les hyperliens par programmation avec C#
Si vous devez supprimer des hyperliens dans Excel en utilisant C#, en particulier lorsque VBA n'est pas adapté ou qu'Excel n'est pas installé, la bibliothèque Spire.XLS for .NET offre une solution efficace et flexible. Elle permet aux développeurs de supprimer les hyperliens d'une ou plusieurs feuilles de calcul entièrement par le code, tout en conservant le texte et les données des cellules intacts.
En plus de la suppression des hyperliens, Spire.XLS prend en charge un large éventail d'opérations Excel, telles que la lecture et l'écriture de fichiers, la mise en forme des cellules, la création de tableaux, et plus encore. Cela en fait une solution complète pour les développeurs qui souhaitent rationaliser le traitement des données et la gestion des hyperliens dans Excel.
Étapes pour supprimer tous les hyperliens d'Excel en utilisant C# avec Spire.XLS :
- Installez le package NuGet Spire.XLS via le Gestionnaire de packages NuGet :
PM> Install-Package Spire.XLS
- Ajoutez le code suivant pour supprimer tous les hyperliens d'un fichier Excel en une seule fois à l'aide de C#.
using Spire.Xls;

namespace RemoveHyperlinks
{
    internal class Program
    {
        static void Main(string[] args)
        {
            // Load the Excel file
            Workbook workbook = new Workbook();
            workbook.LoadFromFile("Hyperlinks.xlsx");

            // Loop through all worksheets
            for (int s = 0; s < workbook.Worksheets.Count; s++)
            {
                Worksheet sheet = workbook.Worksheets[s];

                // Remove all hyperlinks from the worksheet
                for (int i = sheet.HyperLinks.Count - 1; i >= 0; i--)
                {
                    sheet.HyperLinks.RemoveAt(i);
                }
            }

            // Save the modified workbook
            workbook.SaveToFile("NoHyperlinks.xlsx", ExcelVersion.Version2016);
            workbook.Dispose();
        }
    }
}
- Appuyez sur F5 pour exécuter le code C#.
Après l'exécution du code, tous les hyperliens du classeur sont supprimés, tandis que tout le texte des cellules reste inchangé.

Astuce : Vous pouvez personnaliser le code pour supprimer les hyperliens d'une feuille de calcul spécifique, cibler un hyperlien particulier ou traiter plusieurs fichiers Excel en masse.
Meilleures pratiques pour la suppression des hyperliens dans Excel
Bien que la suppression des hyperliens dans Excel soit simple, quelques étapes supplémentaires peuvent vous aider à éviter les problèmes courants et à garder votre feuille de calcul propre et cohérente. Voici quelques meilleures pratiques à suivre :
- Vérifier les hyperliens qui réapparaissent
Parfois, les hyperliens réapparaissent lorsque vous saisissez à nouveau ou collez des données dans une cellule. Pour éviter cela, allez dans
Fichier > Options > Vérification > Options de correction automatique > Mise en forme automatique au cours de la frappe et décochez Chemins Internet et réseau par des liens hypertexte. Cela empêche Excel de créer automatiquement de nouveaux hyperliens. - Utiliser VBA ou C# pour les grands ensembles de données
Lorsque vous traitez de grandes feuilles de calcul, la suppression manuelle des hyperliens peut être inefficace. Utilisez plutôt une macro VBA ou une automatisation C# pour supprimer tous les hyperliens en une seule fois. Cela permet de gagner du temps et d'assurer des résultats cohérents sur plusieurs feuilles. - Toujours sauvegarder avant d'exécuter du code
Avant d'exécuter un script ou une automatisation, enregistrez une sauvegarde de votre fichier. Même des macros simples peuvent parfois supprimer plus que prévu, surtout si des hyperliens sont intégrés dans des formules ou des commentaires.
Conclusion
En résumé, la suppression manuelle est parfaite pour des modifications rapides et ponctuelles, tandis que l'automatisation VBA ou C# est idéale pour les grands ensembles de données et les tâches répétitives. Si vous n'avez besoin de supprimer que quelques hyperliens, les options intégrées d'Excel - menu contextuel ou onglet Accueil - sont rapides et simples. Pour les développeurs ou les utilisateurs expérimentés gérant plusieurs classeurs, l'automatisation du nettoyage avec VBA ou C# permet de gagner du temps et d'assurer la cohérence. Choisissez la méthode qui correspond le mieux à votre flux de travail et n'hésitez pas à expérimenter différentes approches pour voir ce qui fonctionne le mieux pour vos fichiers Excel.
FAQ
Q1 : Comment puis-je supprimer tous les hyperliens dans Excel en une seule fois ?
R1 : Vous pouvez supprimer tous les hyperliens en une seule fois en utilisant l'automatisation VBA ou C#. En VBA, utilisez ActiveSheet.Hyperlinks.Delete pour une seule feuille de calcul ou parcourez toutes les feuilles de calcul pour nettoyer l'ensemble du classeur. Les bibliothèques C# comme Spire.XLS permettent la suppression programmatique des hyperliens tout en conservant le texte de la cellule intact.
Q2 : Puis-je supprimer les hyperliens sans perdre le texte de la cellule dans Excel ?
R2 : Oui. Les options intégrées d'Excel - menu contextuel ou onglet Accueil - suppriment les hyperliens mais conservent le texte affiché de la cellule. Les solutions VBA et C# obtiennent le même résultat.
Q3 : Comment supprimer les hyperliens dans Excel tout en conservant la mise en forme ?
R3 : Pour supprimer les hyperliens mais conserver la mise en forme, sélectionnez d'abord la cellule ou la plage contenant les hyperliens. Ensuite, allez dans l'onglet Accueil, cliquez sur Effacer dans le groupe Édition, et choisissez Effacer les liens hypertexte dans la liste déroulante.
Q4 : Comment puis-je supprimer efficacement les hyperliens de plusieurs feuilles de calcul ?
R4 : Pour plusieurs feuilles de calcul, l'automatisation avec VBA ou C# est recommandée. Parcourez chaque feuille et supprimez les hyperliens par programmation pour gagner du temps, en particulier pour les grands classeurs.
À lire également
- Créer une liste déroulante dans Excel : Guide d'automatisation manuelle et par code
- Comment ajuster automatically la largeur des colonnes dans Excel (5 façons)
- Pandas DataFrame vers Excel en Python : Guide étape par étape
- Comment supprimer les formules dans Excel mais conserver les données
- Convertir du texte en PDF facilement : 4 méthodes rapides et professionnelles
Eliminar hipervínculos en Excel: 4 métodos fáciles
Tabla de Contenidos
¿Desea eliminar hipervínculos en archivos de Excel de forma rápida y sencilla? Ya sea que aparecieron automáticamente al escribir URLs o se copiaron de otras fuentes, los hipervínculos no deseados pueden saturar su hoja de cálculo, dificultar el formato y ralentizar su flujo de trabajo.
En esta guía, aprenderá 4 formas fáciles de eliminar hipervínculos en Excel: manualmente a través del menú del botón derecho o la pestaña de Inicio, y automáticamente usando macros de VBA o C#, para que pueda limpiar sus hojas de manera eficiente, mantener sus datos organizados y conservar un libro de trabajo con aspecto profesional.
Tabla de Contenidos
- Cómo Eliminar Hipervínculos Manualmente en Excel
- Cómo Eliminar Todos los Hipervínculos en Excel Automáticamente
- Mejores Prácticas para Eliminar Hipervínculos en Excel
- Conclusión
- Preguntas Frecuentes
¿Cómo Eliminar Hipervínculos Manualmente en Excel?
Si solo tiene unos pocos hipervínculos que eliminar, la eliminación manual suele ser la solución más rápida. Excel proporciona herramientas integradas para esta tarea y son de fácil acceso. A continuación, se presentan tres métodos manuales diferentes que puede utilizar, según su preferencia y situación.
Eliminar Hipervínculos usando el Menú del Botón Derecho
Esta es la forma más directa y amigable para principiantes de eliminar hipervínculos de una hoja de Excel, especialmente cuando se trata de un conjunto de datos pequeño.
Pasos para Eliminar Hipervínculos en Excel usando el Menú del Botón Derecho:
- Abra su archivo de Excel en MS Excel y luego seleccione la celda o el rango que contiene los hipervínculos que desea eliminar.
- Haga clic con el botón derecho en la celda o rango seleccionado.
- En el menú contextual, elija Quitar hipervínculos.
Excel elimina instantáneamente el hipervínculo pero mantiene intacto el texto de visualización. El texto permanece visible en la celda, solo que sin el enlace en el que se puede hacer clic.
Consejo: Si selecciona una sola celda, el menú mostrará Quitar hipervínculo. Si selecciona varias celdas, Excel lo cambia a Quitar hipervínculos, lo que le permite eliminar todos los hipervínculos de una sola vez.
Eliminar Hipervínculos usando la Pestaña de Inicio
Otra forma rápida de eliminar hipervínculos en Excel es a través de la pestaña Inicio en la cinta de opciones. Este método funciona de manera similar a la opción del botón derecho, pero es mejor para aquellos que prefieren trabajar con la barra de herramientas de Excel en lugar de los menús contextuales.
Pasos para Eliminar Hipervínculos de Excel usando la Pestaña de Inicio:
- Seleccione la celda o el rango que contiene los hipervínculos que desea eliminar.
- Vaya a la pestaña Inicio en la barra de herramientas superior, junto a Insertar.
- En el grupo Edición a la derecha, haga clic en el botón Borrar (el que tiene el icono de un borrador rosa). Aparecerá una lista desplegable.
-
De la lista, elija Borrar hipervínculos o Quitar hipervínculos según sus necesidades:
-
Borrar hipervínculos: elimina solo el hipervínculo, manteniendo intacto el formato de texto original.
-
Quitar hipervínculos: elimina tanto el hipervínculo como cualquier formato (como el color de fuente o el subrayado) que se le haya aplicado.
-
Sus celdas seleccionadas ahora estarán libres de hipervínculos en los que se puede hacer clic, con el formato conservado o eliminado según la opción que haya elegido.
¿Cómo Eliminar Todos los Hipervínculos en Excel Automáticamente?
Cuando su libro de trabajo contiene cientos o miles de hipervínculos, la eliminación manual se vuelve poco práctica. En tales casos, la automatización puede ahorrar un tiempo significativo. Puede eliminar todos los hipervínculos a la vez usando VBA (Visual Basic para Aplicaciones) o C# con la biblioteca Spire.XLS. Estos métodos le permiten limpiar sus hojas de manera eficiente sin perder texto.
Eliminar Hipervínculos usando VBA
La función de secuencias de comandos VBA integrada de Excel le permite ejecutar pequeños fragmentos de código que realizan tareas automáticamente. Eliminar hipervínculos a través de VBA es una de las formas más rápidas de limpiar todo su libro de trabajo.
Pasos para Eliminar Todos los Hipervínculos de Excel usando Macros de VBA:
- Presione Alt + F11 para abrir el Editor de VBA.
- En la ventana del editor, vaya a Insertar → Módulo.
- Copie y pegue el siguiente código VBA:
Sub RemoveHyperlinks()
    Dim ws As Worksheet
    For Each ws In ThisWorkbook.Worksheets
        ws.Hyperlinks.Delete
    Next ws
End Sub
- Presione F5 para ejecutar el código VBA.
Esto eliminará todos los hipervínculos del libro de trabajo de Excel mientras mantiene intacto el texto de la celda.
Consejo: Puede asignar esta macro a un botón en su Cinta de opciones para eliminar hipervínculos con un solo clic en futuros flujos de trabajo.
Eliminar Hipervínculos Programáticamente con C#
Si necesita eliminar hipervínculos en Excel usando C#, especialmente cuando VBA no es adecuado o Excel no está instalado, la biblioteca Spire.XLS for .NET ofrece una solución eficiente y flexible. Permite a los desarrolladores eliminar hipervínculos de una o más hojas de trabajo completamente a través de código, manteniendo intactos el texto y los datos de la celda.
Además de la eliminación de hipervínculos, Spire.XLS admite una amplia gama de operaciones de Excel, como leer y escribir archivos, formatear celdas, crear tablas y más. Esto la convierte en una solución integral para los desarrolladores que desean optimizar el procesamiento de datos y la gestión de hipervínculos in Excel.
Pasos para Eliminar Todos los Hipervínculos de Excel usando C# con Spire.XLS:
- Instale el Paquete NuGet de Spire.XLS a través del Administrador de Paquetes NuGet:
PM> Install-Package Spire.XLS
- Agregue el siguiente código para eliminar todos los hipervínculos de un archivo de Excel a la vez usando C#.
using Spire.Xls;

namespace RemoveHyperlinks
{
    internal class Program
    {
        static void Main(string[] args)
        {
            // Cargar el archivo de Excel
            Workbook workbook = new Workbook();
            workbook.LoadFromFile("Hyperlinks.xlsx");

            // Recorrer todas las hojas de trabajo
            for (int s = 0; s < workbook.Worksheets.Count; s++)
            {
                Worksheet sheet = workbook.Worksheets[s];

                // Eliminar todos los hipervínculos de la hoja de trabajo
                for (int i = sheet.HyperLinks.Count - 1; i >= 0; i--)
                {
                    sheet.HyperLinks.RemoveAt(i);
                }
            }

            // Guardar el libro de trabajo modificado
            workbook.SaveToFile("NoHyperlinks.xlsx", ExcelVersion.Version2016);
            workbook.Dispose();
        }
    }
}
- Presione F5 para ejecutar el código C#.
Después de ejecutar el código, se eliminan todos los hipervínculos del libro de trabajo, mientras que todo el texto de la celda permanece sin cambios.
Consejo: Puede personalizar el código para eliminar hipervínculos de una hoja de trabajo específica, apuntar a un hipervínculo en particular o procesar múltiples archivos de Excel en bloque.
Mejores Prácticas para Eliminar Hipervínculos en Excel
Si bien eliminar hipervínculos en Excel es simple, unos pocos pasos adicionales pueden ayudarlo a evitar problemas comunes y mantener su hoja de trabajo limpia y consistente. Aquí hay algunas de las mejores prácticas a seguir:
- Verificar si Reaparecen los Hipervínculos
A veces, los hipervínculos reaparecen cuando vuelve a ingresar o pegar datos en una celda. Para evitar esto, vaya a
Archivo > Opciones > Revisión > Opciones de Autocorrección > Autoformato mientras escribe y desmarque Rutas de red e Internet por hipervínculos. Esto evita que Excel cree automáticamente nuevos hipervínculos. - Usar VBA o C# para Grandes Conjuntos de Datos
Cuando se trata de hojas de cálculo grandes, eliminar hipervínculos manualmente puede ser ineficiente. En su lugar, use una macro de VBA o automatización de C# para eliminar todos los hipervínculos a la vez. Esto ahorra tiempo y garantiza resultados consistentes en múltiples hojas. - Siempre Haga una Copia de Seguridad Antes de Ejecutar el Código
Antes de ejecutar cualquier secuencia de comandos o automatización, guarde una copia de seguridad de su archivo. Incluso las macros simples a veces pueden eliminar más de lo previsto, especialmente si los hipervínculos están incrustados en fórmulas o comentarios.
Conclusión
En resumen, la eliminación manual es perfecta para ediciones rápidas y únicas, mientras que la automatización con VBA o C# es ideal para grandes conjuntos de datos y tareas repetitivas. Si solo necesita eliminar unos pocos hipervínculos, las opciones integradas de Excel (menú del botón derecho o la pestaña Inicio) son rápidas y sencillas. Para los desarrolladores o usuarios avanzados que administran múltiples libros de trabajo, automatizar la limpieza con VBA o C# ahorra tiempo y garantiza la coherencia. Elija el método que mejor se adapte a su flujo de trabajo y siéntase libre de experimentar con diferentes enfoques para ver qué funciona mejor para sus archivos de Excel.
Preguntas Frecuentes
P1: ¿Cómo elimino todos los hipervínculos en Excel a la vez?
R1: Puede eliminar todos los hipervínculos a la vez usando automatización con VBA o C#. En VBA, use ActiveSheet.Hyperlinks.Delete para una sola hoja de trabajo o recorra todas las hojas de trabajo para limpiar todo el libro de trabajo. Las bibliotecas de C# como Spire.XLS permiten la eliminación programática de hipervínculos manteniendo intacto el texto de la celda.
P2: ¿Puedo eliminar hipervínculos sin perder el texto de la celda en Excel?
R2: Sí. Las opciones integradas de Excel (menú del botón derecho o pestaña Inicio) eliminan los hipervínculos pero conservan el texto de visualización de la celda. Las soluciones de VBA y C# logran el mismo resultado.
P3: ¿Cómo eliminar hipervínculos en Excel pero mantener el formato?
R3: Para eliminar hipervínculos pero mantener el formato, primero seleccione la celda o el rango que contiene los hipervínculos. Luego, vaya a la pestaña Inicio, haga clic en Borrar en el grupo Edición y elija Borrar hipervínculos de la lista desplegable.
P4: ¿Cómo puedo eliminar hipervínculos de múltiples hojas de trabajo de manera eficiente?
R4: Para múltiples hojas de trabajo, se recomienda la automatización con VBA o C#. Recorra cada hoja y elimine los hipervínculos programáticamente para ahorrar tiempo, especialmente en libros de trabajo grandes.
También Leer
- Crear Lista Desplegable en Excel: Guía de Automatización Manual y con Código
- Cómo Autoajustar el Ancho de Columna en Excel (5 Maneras)
- DataFrame de Pandas a Excel en Python: Guía Paso a Paso
- Cómo Eliminar Fórmulas en Excel pero Mantener los Datos
- Convertir Texto a PDF Fácilmente: 4 Métodos Rápidos y Profesionales
Hyperlinks in Excel entfernen – 4 einfache Methoden
Inhaltsverzeichnis
Möchten Sie Hyperlinks in Excel-Dateien schnell und einfach entfernen? Ob sie automatisch beim Eingeben von URLs erschienen sind oder aus anderen Quellen kopiert wurden, unerwünschte Hyperlinks können Ihre Tabelle unübersichtlich machen, die Formatierung erschweren und Ihren Arbeitsablauf verlangsamen.
In diesem Leitfaden lernen Sie 4 einfache Möglichkeiten, Hyperlinks in Excel zu entfernen – manuell über das Kontextmenü oder die Registerkarte „Start“ und automatisch mit VBA-Makros oder C# – damit Sie Ihre Blätter effizient bereinigen, Ihre Daten organisiert halten und eine professionell aussehende Arbeitsmappe pflegen können.
Inhaltsverzeichnis
- So entfernen Sie Hyperlinks manuell in Excel
- So entfernen Sie alle Hyperlinks in Excel automatisch
- Bewährte Methoden zum Löschen von Hyperlinks in Excel
- Fazit
- Häufig gestellte Fragen
So entfernen Sie Hyperlinks manuell in Excel?
Wenn Sie nur wenige Hyperlinks löschen müssen, ist die manuelle Entfernung in der Regel die schnellste Lösung. Excel bietet integrierte Werkzeuge für diese Aufgabe, die leicht zugänglich sind. Im Folgenden finden Sie drei verschiedene manuelle Methoden, die Sie je nach Vorliebe und Situation anwenden können.
Hyperlinks über das Kontextmenü entfernen
Dies ist die direkteste und anfängerfreundlichste Methode, um Hyperlinks aus einem Excel-Blatt zu entfernen, insbesondere bei einem kleinen Datensatz.
Schritte zum Entfernen von Hyperlinks in Excel über das Kontextmenü:
- Öffnen Sie Ihre Excel-Datei in MS Excel und wählen Sie dann die Zelle oder den Bereich aus, der die zu entfernenden Hyperlinks enthält.
- Klicken Sie mit der rechten Maustaste auf die ausgewählte Zelle oder den Bereich.
- Wählen Sie aus dem Kontextmenü Hyperlinks entfernen.
Excel entfernt den Hyperlink sofort, behält aber den Anzeigetext bei. Der Text bleibt in der Zelle sichtbar, nur ohne den klickbaren Link.
Tipp: Wenn Sie eine einzelne Zelle auswählen, zeigt das Menü Hyperlink entfernen an. Wenn Sie mehrere Zellen auswählen, ändert Excel dies in Hyperlinks entfernen, sodass Sie alle Hyperlinks auf einmal löschen können.
Hyperlinks über die Registerkarte „Start“ entfernen
Eine weitere schnelle Möglichkeit, Hyperlinks in Excel zu entfernen, ist über die Registerkarte Start im Menüband. Diese Methode funktioniert ähnlich wie die Rechtsklick-Option, ist aber besser für diejenigen geeignet, die lieber mit der Excel-Symbolleiste als mit Kontextmenüs arbeiten.
Schritte zum Entfernen von Hyperlinks aus Excel über die Registerkarte „Start“:
- Wählen Sie die Zelle oder den Bereich aus, der die zu löschenden Hyperlinks enthält.
- Gehen Sie zur Registerkarte Start in der oberen Symbolleiste, neben Einfügen.
- Klicken Sie in der Gruppe Bearbeiten auf der rechten Seite auf die Schaltfläche Löschen (die mit dem rosa Radiergummi-Symbol). Eine Dropdown-Liste wird angezeigt.
-
Wählen Sie aus der Liste je nach Bedarf Hyperlinks löschen oder Hyperlinks entfernen:
-
Hyperlinks löschen - Entfernt nur den Hyperlink, während die ursprüngliche Textformatierung erhalten bleibt.
-
Hyperlinks entfernen - Löscht sowohl den Hyperlink als auch jegliche darauf angewendete Formatierung (wie Schriftfarbe oder Unterstreichung).
-
Ihre ausgewählten Zellen sind nun frei von klickbaren Hyperlinks, wobei die Formatierung je nach gewählter Option entweder erhalten bleibt oder entfernt wird.
So entfernen Sie alle Hyperlinks in Excel automatisch?
Wenn Ihre Arbeitsmappe Hunderte oder Tausende von Hyperlinks enthält, wird die manuelle Entfernung unpraktisch. In solchen Fällen kann die Automatisierung erheblich Zeit sparen. Sie können alle Hyperlinks auf einmal mit VBA (Visual Basic for Applications) oder C# mit der Spire.XLS-Bibliothek entfernen. Diese Methoden ermöglichen es Ihnen, Ihre Blätter effizient zu bereinigen, ohne Text zu verlieren.
Hyperlinks mit VBA entfernen
Die integrierte VBA-Skripting-Funktion von Excel ermöglicht es Ihnen, kleine Code-Schnipsel auszuführen, die Aufgaben automatisch erledigen. Das Entfernen von Hyperlinks durch VBA ist eine der schnellsten Möglichkeiten, Ihre gesamte Arbeitsmappe zu bereinigen.
Schritte zum Entfernen aller Hyperlinks aus Excel mit VBA-Makros:
- Drücken Sie Alt + F11, um den VBA-Editor zu öffnen.
- Gehen Sie im Editorfenster zu Einfügen → Modul.
- Kopieren Sie den folgenden VBA-Code und fügen Sie ihn ein:
Sub RemoveHyperlinks()
    Dim ws As Worksheet
    For Each ws In ThisWorkbook.Worksheets
        ws.Hyperlinks.Delete
    Next ws
End Sub
- Drücken Sie F5, um den VBA-Code auszuführen.
Dadurch werden alle Hyperlinks aus der Excel-Arbeitsmappe entfernt, während der Zelltext erhalten bleibt.
Tipp: Sie können dieses Makro einer Schaltfläche in Ihrem Menüband zuweisen, um Hyperlinks in zukünftigen Arbeitsabläufen mit einem Klick zu entfernen.
Hyperlinks programmgesteuert mit C# entfernen
Wenn Sie Hyperlinks in Excel mit C# entfernen müssen, insbesondere wenn VBA nicht geeignet ist oder Excel nicht installiert ist, bietet die Bibliothek Spire.XLS for .NET eine effiziente und flexible Lösung. Sie ermöglicht es Entwicklern, Hyperlinks aus einem oder mehreren Arbeitsblättern vollständig per Code zu entfernen, während der Zelltext und die Daten erhalten bleiben.
Zusätzlich zur Entfernung von Hyperlinks unterstützt Spire.XLS eine breite Palette von Excel-Operationen, wie das Lesen und Schreiben von Dateien, das Formatieren von Zellen, das Erstellen von Tabellen und mehr. Dies macht es zu einer umfassenden Lösung für Entwickler, die die Datenverarbeitung und das Hyperlink-Management in Excel optimieren möchten.
Schritte zum Entfernen aller Hyperlinks aus Excel mit C# und Spire.XLS:
- Installieren Sie das Spire.XLS NuGet-Paket über den NuGet-Paket-Manager:
PM> Install-Package Spire.XLS
- Fügen Sie den folgenden Code hinzu, um alle Hyperlinks aus einer Excel-Datei auf einmal mit C# zu löschen.
using Spire.Xls;

namespace RemoveHyperlinks
{
    internal class Program
    {
        static void Main(string[] args)
        {
            // Laden Sie die Excel-Datei
            Workbook workbook = new Workbook();
            workbook.LoadFromFile("Hyperlinks.xlsx");

            // Durchlaufen Sie alle Arbeitsblätter
            for (int s = 0; s < workbook.Worksheets.Count; s++)
            {
                Worksheet sheet = workbook.Worksheets[s];

                // Entfernen Sie alle Hyperlinks aus dem Arbeitsblatt
                for (int i = sheet.HyperLinks.Count - 1; i >= 0; i--)
                {
                    sheet.HyperLinks.RemoveAt(i);
                }
            }

            // Speichern Sie die geänderte Arbeitsmappe
            workbook.SaveToFile("NoHyperlinks.xlsx", ExcelVersion.Version2016);
            workbook.Dispose();
        }
    }
}
- Drücken Sie F5, um den C#-Code auszuführen.
Nach dem Ausführen des Codes werden alle Hyperlinks in der Arbeitsmappe entfernt, während der gesamte Zelltext unverändert bleibt.
Tipp: Sie können den Code anpassen, um Hyperlinks aus einem bestimmten Arbeitsblatt zu entfernen, einen bestimmten Hyperlink gezielt zu bearbeiten oder mehrere Excel-Dateien in großen Mengen zu verarbeiten.
Bewährte Methoden zum Löschen von Hyperlinks in Excel
Obwohl das Entfernen von Hyperlinks in Excel einfach ist, können ein paar zusätzliche Schritte helfen, häufige Probleme zu vermeiden und Ihr Arbeitsblatt sauber und konsistent zu halten. Hier sind einige bewährte Methoden, die Sie befolgen sollten:
- Auf wiederkehrende Hyperlinks prüfen
Manchmal erscheinen Hyperlinks wieder, wenn Sie Daten in eine Zelle erneut eingeben oder einfügen. Um dies zu verhindern, gehen Sie zu
Datei > Optionen > Dokumentprüfung > AutoKorrektur-Optionen > AutoFormat während der Eingabe und deaktivieren Sie Internet- und Netzwerkpfade durch Hyperlinks. Dadurch wird verhindert, dass Excel automatisch neue Hyperlinks erstellt. - VBA oder C# für große Datensätze verwenden
Bei der Arbeit mit großen Tabellen kann das manuelle Löschen von Hyperlinks ineffizient sein. Verwenden Sie stattdessen ein VBA-Makro oder eine C#-Automatisierung, um alle Hyperlinks auf einmal zu entfernen. Dies spart Zeit und gewährleistet konsistente Ergebnisse über mehrere Blätter hinweg. - Immer eine Sicherungskopie erstellen, bevor Sie Code ausführen
Bevor Sie ein Skript oder eine Automatisierung ausführen, speichern Sie eine Sicherungskopie Ihrer Datei. Selbst einfache Makros können manchmal mehr entfernen als beabsichtigt, insbesondere wenn Hyperlinks in Formeln oder Kommentaren eingebettet sind.
Fazit
Zusammenfassend lässt sich sagen, dass die manuelle Entfernung perfekt für schnelle, einmalige Bearbeitungen ist, während die Automatisierung mit VBA oder C# ideal für große Datensätze und sich wiederholende Aufgaben ist. Wenn Sie nur wenige Hyperlinks entfernen müssen, sind die integrierten Optionen von Excel – das Kontextmenü oder die Registerkarte „Start“ – schnell und unkompliziert. Für Entwickler oder Power-User, die mehrere Arbeitsmappen verwalten, spart die Automatisierung der Bereinigung mit VBA oder C# Zeit und sorgt für Konsistenz. Wählen Sie die Methode, die am besten zu Ihrem Arbeitsablauf passt, und experimentieren Sie ruhig mit verschiedenen Ansätzen, um zu sehen, was für Ihre Excel-Dateien am besten funktioniert.
Häufig gestellte Fragen
F1: Wie entferne ich alle Hyperlinks in Excel auf einmal?
A1: Sie können alle Hyperlinks auf einmal mit VBA- oder C#-Automatisierung entfernen. In VBA verwenden Sie ActiveSheet.Hyperlinks.Delete für ein einzelnes Arbeitsblatt oder durchlaufen alle Arbeitsblätter, um die gesamte Arbeitsmappe zu bereinigen. C#-Bibliotheken wie Spire.XLS ermöglichen die programmgesteuerte Entfernung von Hyperlinks, während der Zelltext erhalten bleibt.
F2: Kann ich Hyperlinks entfernen, ohne den Zelltext in Excel zu verlieren?
A2: Ja. Die integrierten Optionen von Excel – Kontextmenü oder Registerkarte „Start“ – löschen die Hyperlinks, behalten aber den Anzeigetext der Zelle bei. VBA- und C#-Lösungen erzielen das gleiche Ergebnis.
F3: Wie entferne ich Hyperlinks in Excel, behalte aber die Formatierung bei?
A3: Um Hyperlinks zu entfernen, aber die Formatierung beizubehalten, wählen Sie zuerst die Zelle oder den Bereich mit den Hyperlinks aus. Gehen Sie dann zur Registerkarte Start, klicken Sie in der Gruppe Bearbeiten auf Löschen und wählen Sie Hyperlinks löschen aus der Dropdown-Liste.
F4: Wie kann ich Hyperlinks aus mehreren Arbeitsblättern effizient entfernen?
A4: Für mehrere Arbeitsblätter wird die Automatisierung mit VBA oder C# empfohlen. Durchlaufen Sie jedes Blatt und löschen Sie Hyperlinks programmgesteuert, um Zeit zu sparen, insbesondere bei großen Arbeitsmappen.
Lesen Sie auch
- Dropdown-Liste in Excel erstellen: Anleitung für manuelle und Code-Automatisierung
- So passen Sie die Spaltenbreite in Excel automatisch an (5 Wege)
- Pandas DataFrame nach Excel in Python: Schritt-für-Schritt-Anleitung
- So entfernen Sie Formeln in Excel, aber behalten die Daten
- Text einfach in PDF konvertieren: 4 schnelle und professionelle Methoden
Удаление гиперссылок в Excel — 4 простых способа
Содержание
Хотите быстро и легко удалять гиперссылки в файлах Excel? Независимо от того, появились ли они автоматически при вводе URL-адресов или были скопированы из других источников, нежелательные гиперссылки могут загромождать вашу электронную таблицу, затруднять форматирование и замедлять рабочий процесс.
В этом руководстве вы узнаете 4 простых способа удаления гиперссылок в Excel — вручную через контекстное меню или вкладку «Главная», а также автоматически с помощью макросов VBA или C# — чтобы вы могли эффективно очищать свои листы, поддерживать порядок в данных и сохранять профессиональный вид рабочей книги.
Содержание
- Как удалить гиперссылки в Excel вручную
- Как автоматически удалить все гиперссылки в Excel
- Лучшие практики по удалению гиперссылок в Excel
- Заключение
- Часто задаваемые вопросы
Как удалить гиперссылки в Excel вручную?
Если вам нужно удалить всего несколько гиперссылок, ручное удаление обычно является самым быстрым решением. В Excel есть встроенные инструменты для этой задачи, и к ним легко получить доступ. Ниже приведены три различных ручных метода, которые вы можете использовать в зависимости от ваших предпочтений и ситуации.
Удаление гиперссылок с помощью контекстного меню
Это самый прямой и удобный для новичков способ удаления гиперссылок с листа Excel, особенно при работе с небольшим набором данных.
Шаги по удалению гиперссылок в Excel с помощью контекстного меню:
- Откройте файл Excel в MS Excel, а затем выберите ячейку или диапазон, содержащий гиперссылки, которые вы хотите удалить.
- Щелкните правой кнопкой мыши по выделенной ячейке или диапазону.
- В контекстном меню выберите Удалить гиперссылки.
Excel мгновенно удаляет гиперссылку, но сохраняет отображаемый текст без изменений. Текст остается видимым в ячейке, но без кликабельной ссылки.
Совет: Если вы выберете одну ячейку, в меню отобразится Удалить гиперссылку. Если вы выберете несколько ячеек, Excel изменит его на Удалить гиперссылки, что позволит вам удалить все гиперссылки за один раз.
Удаление гиперссылок с помощью вкладки "Главная"
Еще один быстрый способ удалить гиперссылки в Excel — через вкладку Главная на ленте. Этот метод работает аналогично опции с правым кликом, но лучше подходит для тех, кто предпочитает работать с панелью инструментов Excel, а не с контекстными меню.
Шаги по удалению гиперссылок из Excel с помощью вкладки "Главная":
- Выберите ячейку или диапазон, содержащий гиперссылки, которые вы хотите удалить.
- Перейдите на вкладку Главная на верхней панели инструментов, рядом с Вставка.
- В группе Редактирование справа нажмите кнопку Очистить (ту, что со значком розового ластика). Появится выпадающий список.
-
В списке выберите Очистить гиперссылки или Удалить гиперссылки в зависимости от ваших потребностей:
-
Очистить гиперссылки - Удаляет только гиперссылку, сохраняя при этом исходное форматирование текста.
-
Удалить гиперссылки - Удаляет как гиперссылку, так и любое примененное к ней форматирование (например, цвет шрифта или подчеркивание).
-
Выбранные вами ячейки теперь будут свободны от кликабельных гиперссылок, при этом форматирование будет либо сохранено, либо удалено в зависимости от выбранного вами варианта.
Как автоматически удалить все гиперссылки в Excel?
Когда ваша рабочая книга содержит сотни или тысячи гиперссылок, ручное удаление становится непрактичным. В таких случаях автоматизация может сэкономить значительное время. Вы можете удалить все гиперссылки сразу с помощью VBA (Visual Basic для приложений) или C# с библиотекой Spire.XLS. Эти методы позволяют эффективно очищать листы без потери текста.
Удаление гиперссылок с помощью VBA
Встроенная функция сценариев VBA в Excel позволяет выполнять небольшие фрагменты кода, которые автоматически выполняют задачи. Удаление гиперссылок с помощью VBA — один из самых быстрых способов очистить всю рабочую книгу.
Шаги по удалению всех гиперссылок из Excel с помощью макросов VBA:
- Нажмите Alt + F11, чтобы открыть редактор VBA.
- В окне редактора перейдите в Insert → Module.
- Скопируйте и вставьте следующий код VBA:
Sub RemoveHyperlinks()
    Dim ws As Worksheet
    For Each ws In ThisWorkbook.Worksheets
        ws.Hyperlinks.Delete
    Next ws
End Sub
- Нажмите F5, чтобы выполнить код VBA.
Это удалит все гиперссылки из рабочей книги Excel, сохранив при этом текст ячеек.
Совет: Вы можете назначить этот макрос кнопке на ленте для удаления гиперссылок одним щелчком в будущих рабочих процессах.
Программное удаление гиперссылок с помощью C#
Если вам нужно удалить гиперссылки в Excel с помощью C#, особенно когда VBA не подходит или Excel не установлен, библиотека Spire.XLS for .NET предлагает эффективное и гибкое решение. Она позволяет разработчикам полностью удалять гиперссылки с одного или нескольких листов с помощью кода, сохраняя при этом текст и данные ячеек.
Помимо удаления гиперссылок, Spire.XLS поддерживает широкий спектр операций с Excel, таких как чтение и запись файлов, форматирование ячеек, создание таблиц и многое другое. Это делает его комплексным решением для разработчиков, которые хотят оптимизировать обработку данных и управление гиперссылками в Excel.
Шаги по удалению всех гиперссылок из Excel с помощью C# и Spire.XLS:
- Установите пакет Spire.XLS NuGet через менеджер пакетов NuGet:
PM> Install-Package Spire.XLS
- Добавьте следующий код, чтобы удалить все гиперссылки из файла Excel за один раз с помощью C#.
using Spire.Xls;

namespace RemoveHyperlinks
{
    internal class Program
    {
        static void Main(string[] args)
        {
            // Load the Excel file
            Workbook workbook = new Workbook();
            workbook.LoadFromFile("Hyperlinks.xlsx");

            // Loop through all worksheets
            for (int s = 0; s < workbook.Worksheets.Count; s++)
            {
                Worksheet sheet = workbook.Worksheets[s];

                // Remove all hyperlinks from the worksheet
                for (int i = sheet.HyperLinks.Count - 1; i >= 0; i--)
                {
                    sheet.HyperLinks.RemoveAt(i);
                }
            }

            // Save the modified workbook
            workbook.SaveToFile("NoHyperlinks.xlsx", ExcelVersion.Version2016);
            workbook.Dispose();
        }
    }
}
- Нажмите F5, чтобы запустить код C#.
После запуска кода все гиперссылки в рабочей книге удаляются, а весь текст ячеек остается без изменений.
Совет: Вы можете настроить код для удаления гиперссылок с определенного листа, нацеливания на конкретную гиперссылку или массовой обработки нескольких файлов Excel.
Лучшие практики по удалению гиперссылок в Excel
Хотя удаление гиперссылок в Excel является простой задачей, несколько дополнительных шагов помогут вам избежать распространенных проблем и поддерживать чистоту и согласованность вашего листа. Вот несколько лучших практик, которым следует следовать:
- Проверяйте повторное появление гиперссылок
Иногда гиперссылки появляются снова, когда вы повторно вводите или вставляете данные в ячейку. Чтобы предотвратить это, перейдите в
Файл > Параметры > Правописание > Параметры автозамены > Автоформат при вводе и снимите флажок Интернет и сетевые пути гиперссылками. Это остановит автоматическое создание новых гиперссылок в Excel. - Используйте VBA или C# для больших наборов данных
При работе с большими электронными таблицами ручное удаление гиперссылок может быть неэффективным. Вместо этого используйте макрос VBA или автоматизацию на C# для одновременного удаления всех гиперссылок. Это экономит время и обеспечивает согласованные результаты на нескольких листах. - Всегда делайте резервную копию перед запуском кода
Перед запуском любого скрипта или автоматизации сохраните резервную копию вашего файла. Даже простые макросы иногда могут удалить больше, чем предполагалось, особенно если гиперссылки встроены в формулы или комментарии.
Заключение
В заключение, ручное удаление идеально подходит для быстрых, одноразовых правок, в то время как автоматизация с помощью VBA или C# идеальна для больших наборов данных и повторяющихся задач. Если вам нужно удалить всего несколько гиперссылок, встроенные опции Excel — контекстное меню или вкладка «Главная» — быстры и просты. Для разработчиков или опытных пользователей, управляющих несколькими рабочими книгами, автоматизация очистки с помощью VBA или C# экономит время и обеспечивает согласованность. Выберите метод, который лучше всего подходит для вашего рабочего процесса, и не стесняйтесь экспериментировать с различными подходами, чтобы увидеть, что лучше всего работает для ваших файлов Excel.
Часто задаваемые вопросы
В1: Как удалить все гиперссылки в Excel сразу?
О1: Вы можете удалить все гиперссылки сразу с помощью автоматизации VBA или C#. В VBA используйте ActiveSheet.Hyperlinks.Delete для одного листа или пройдитесь циклом по всем листам, чтобы очистить всю рабочую книгу. Библиотеки C#, такие как Spire.XLS, позволяют программно удалять гиперссылки, сохраняя при этом текст ячеек.
В2: Могу ли я удалить гиперссылки, не теряя текст ячейки в Excel?
О2: Да. Встроенные опции Excel — контекстное меню или вкладка «Главная» — удаляют гиперссылки, но сохраняют отображаемый текст ячейки. Решения на VBA и C# достигают того же результата.
В3: Как удалить гиперссылки в Excel, но сохранить форматирование?
О3: Чтобы удалить гиперссылки, но сохранить форматирование, сначала выберите ячейку или диапазон, содержащий гиперссылки. Затем перейдите на вкладку Главная, нажмите Очистить в группе Редактирование и выберите Очистить гиперссылки из выпадающего списка.
В4: Как эффективно удалить гиперссылки с нескольких листов?
О4: Для нескольких листов рекомендуется автоматизация с помощью VBA или C#. Пройдитесь циклом по каждому листу и удалите гиперссылки программно, чтобы сэкономить время, особенно для больших рабочих книг.
Также читайте
- Создание выпадающего списка в Excel: руководство по ручной и программной автоматизации
- Как автоматически подогнать ширину столбца в Excel (5 способов)
- Pandas DataFrame в Excel на Python: пошаговое руководство
- Как удалить формулы в Excel, но сохранить данные
- Легкое преобразование текста в PDF: 4 быстрых и профессиональных метода
Generate PDF from HTML Template in C# – Full Tutorial
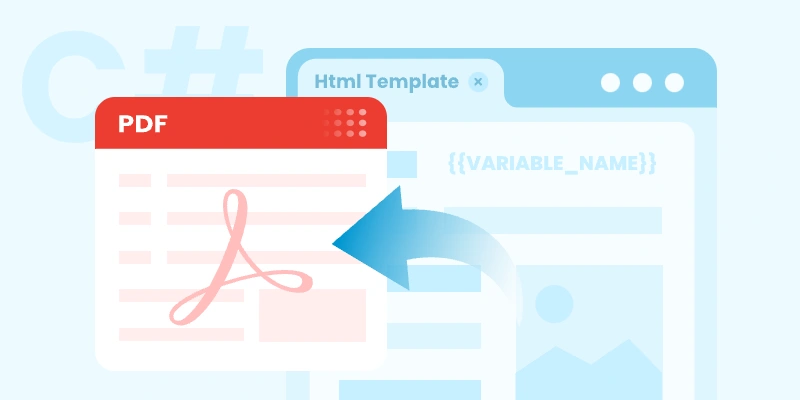
In many modern .NET applications, generating professional-looking PDF documents is a common requirement — especially for invoices, reports, certificates, and forms. Instead of creating PDFs manually, a smarter approach is to use HTML templates . HTML makes it easy to design layouts using CSS, include company branding, and reuse the same structure across multiple documents.
By dynamically inserting data into HTML and converting it to PDF programmatically, you can automate document generation while maintaining design consistency.
In this tutorial, you’ll learn how to generate a PDF from an HTML template in C# .NET using Spire.PDF for .NET. We’ll guide you step-by-step — from setting up your development environment (including the required HTML-to-PDF plugin), preparing the HTML template, inserting dynamic data, and generating the final PDF file.
On this page:
- Why Generate PDFs from HTML Templates in C#?
- Set Up Your .NET Environment
- Prepare an HTML Template
- Insert Dynamic Data into HTML Before Conversion
- Convert Updated HTML Template to PDF in C#
- Best Practices for Generating PDF from HTML in C#
- Final Words
- FAQs About C# HTML Template to PDF Conversion
Why Generate PDFs from HTML Templates in C#?
Using HTML templates for PDF generation offers several advantages:
- Reusability: Design once, reuse anywhere — perfect for reports, receipts, and forms.
- Styling flexibility: HTML + CSS allow rich formatting without complex PDF drawing code.
- Dynamic content: Easily inject runtime data such as customer names, order totals, or timestamps.
- Consistency: Ensure all generated documents follow the same layout and style guidelines.
- Ease of maintenance: You can update the HTML template without changing your C# logic.
Set Up Your .NET Environment
Before you begin coding, make sure your project is properly configured to handle HTML-to-PDF conversion.
1. Install Spire.PDF for .NET
Spire.PDF for .NET is a professional library designed for creating, reading, editing, and converting PDF documents in C# and VB.NET applications—without relying on Adobe Acrobat. It provides powerful APIs for handling text, images, annotations, forms, and HTML-to-PDF conversion.
You can install it via NuGet:
Install-Package Spire.PDF
Or download it directly from the official website and reference the DLL in your project.
2. Install the HTML Rendering Plugin
Spire.PDF relies on an external rendering engine (Qt WebEngine or Chrome) to accurately convert HTML content into PDF. This plugin must be installed separately.
Steps:
- Download the plugin package for your platform.
- Extract the contents to a local folder, such as: C:\plugins-windows-x64\plugins
- In your C# code, register the plugin path before performing the conversion.
HtmlConverter.PluginPath = @"C:\plugins-windows-x64\plugins";
Prepare an HTML Template
Create an HTML file with placeholders for your dynamic data. For example, name it invoice_template.html :
<!DOCTYPE html>
<html>
<head>
  <meta charset="UTF-8">
  <title>Invoice</title>
  <style>
    body { font-family: Arial; margin: 40px; }
    .header { font-size: 24px; font-weight: bold; margin-bottom: 20px; }
    table { width: 100%; border-collapse: collapse; margin-top: 20px; }
    th, td { border: 1px solid #999; padding: 8px; text-align: left; }
  </style>
</head>
<body>
  <div class="header">Invoice for {CustomerName}</div>
  <p>Date: {InvoiceDate}</p>
  <table>
    <tr><th>Item</th><th>Price</th></tr>
    <tr><td>{Item}</td><td>{Price}</td></tr>
  </table>
</body>
</html>
Tips:
- Keep CSS inline or embedded within the HTML file.
- Avoid JavaScript or complex animations.
- Use placeholders like {CustomerName} and {InvoiceDate} for data replacement.
Insert Dynamic Data into HTML Before Conversion
You can read your HTML file as text, replace placeholders with real values, and then save it as a new temporary file.
using System;
using System.IO;

string template = File.ReadAllText("invoice_template.html");

template = template.Replace("{CustomerName}", "John Doe");
template = template.Replace("{InvoiceDate}", DateTime.Now.ToShortDateString());
template = template.Replace("{Item}", "Wireless Mouse");
template = template.Replace("{Price}", "$25.99");

File.WriteAllText("invoice_ready.html", template);
This approach lets you generate customized PDFs for each user or transaction dynamically.
Convert Updated HTML Template to PDF in C#
Now that your HTML content is ready, you can use the HtmlConverter.Convert() method to directly convert the HTML string into a PDF file.
Below is a full code example to create PDF from HTML template file in C#:
using System;
using System.Collections.Generic;
using System.Drawing;
using System.IO;
using Spire.Additions.Qt;
using Spire.Pdf.Graphics;
using Spire.Pdf.HtmlConverter;

namespace CreatePdfFromHtmlTemplate
{
    class Program
    {
        static void Main(string[] args)
        {
            // Path to the HTML template file
            string htmlFilePath = "invoice_template.html";

            // Step 1: Read the HTML template from file
            if (!File.Exists(htmlFilePath))
            {
                Console.WriteLine("Error: HTML template file not found.");
                return;
            }

            string htmlTemplate = File.ReadAllText(htmlFilePath);

            // Step 2: Define dynamic data for invoice placeholders
            Dictionary<string, string> invoiceData = new Dictionary<string, string>()
            {
                { "INVOICE_NUMBER", "INV-2025-001" },
                { "INVOICE_DATE", DateTime.Now.ToString("yyyy-MM-dd") },
                { "BILLER_NAME", "John Doe" },
                { "BILLER_ADDRESS", "123 Main Street, New York, USA" },
                { "BILLER_EMAIL", "john.doe@example.com" },
                { "ITEM_DESCRIPTION", "Consulting Services" },
                { "ITEM_QUANTITY", "10" },
                { "ITEM_UNIT_PRICE", "$100" },
                { "ITEM_TOTAL", "$1000" },
                { "SUBTOTAL", "$1000" },
                { "TAX_RATE", "5" },
                { "TAX", "$50" },
                { "TOTAL", "$1050" }
            };

            // Step 3: Replace placeholders in the HTML template with real values
            string populatedInvoice = PopulateInvoice(htmlTemplate, invoiceData);

            // Optional: Save the populated HTML for debugging or review
            File.WriteAllText("invoice_ready.html", populatedInvoice);

            // Step 4: Specify the plugin path for the HTML to PDF conversion
            string pluginPath = @"C:\plugins-windows-x64\plugins";
            HtmlConverter.PluginPath = pluginPath;

            // Step 5: Define output PDF file path
            string outputFile = "InvoiceOutput.pdf";

            try
            {
                // Step 6: Convert the HTML string to PDF
                HtmlConverter.Convert(
                    populatedInvoice,
                    outputFile,
                    enableJavaScript: true,
                    timeout: 100000,                // 100 seconds
                    pageSize: new SizeF(595, 842),  // A4 size in points
                    margins: new PdfMargins(20),    // 20-point margins
                    loadHtmlType: LoadHtmlType.SourceCode
                );

                Console.WriteLine($"PDF generated successfully: {outputFile}");
            }
            catch (Exception ex)
            {
                Console.WriteLine($"Error during PDF generation: {ex.Message}");
            }
        }

        /// <summary>
        /// Helper method: Replaces placeholders in the HTML with actual data values.
        /// </summary>
        private static string PopulateInvoice(string template, Dictionary<string, string> data)
        {
            string result = template;
            foreach (var entry in data)
            {
                result = result.Replace("{" + entry.Key + "}", entry.Value);
            }
            return result;
        }
    }
}
How it works :
- Create an invoice template with placeholder variables in {VARIABLE_NAME} format.
- Set up a dictionary with key-value pairs containing actual invoice data that matches the template placeholders.
- Replace all placeholders in the HTML template with actual values from the data dictionary.
- Use Spire.PDF with the Qt plugin to render the HTML content as a PDF file.
Result:

Best Practices for Generating PDF from HTML in C#
- Use fixed-width layouts: Avoid fluid or responsive designs to maintain consistent rendering.
- Embed or inline CSS: Ensure your styles are self-contained.
- Use standard fonts: Arial, Times New Roman, or other supported fonts convert reliably.
- Keep images lightweight: Compress large images to improve performance.
- Test with different page sizes: A4 and Letter are the most common formats.
- Avoid unsupported tags: Elements relying on JavaScript (like <canvas>) won’t render.
Final Words
Generating PDFs from HTML templates in C# .NET is a powerful way to automate document creation while preserving visual consistency. By combining Spire.PDF for .NET with the HTML rendering plugin , you can easily transform styled HTML layouts into print-ready PDF files that integrate seamlessly with your applications.
Whether you’re building a reporting system, an invoicing tool, or a document automation service, this approach saves time, reduces complexity, and produces professional results with minimal code.
FAQs About C# HTML Template to PDF Conversion
Q1: Can I use Google Chrome for HTML rendering instead of Qt WebEngine?
Absolutely. For advanced HTML, CSS, or modern JavaScript, we recommend using the Google Chrome engine via the ChromeHtmlConverter class for more precise and reliable PDF results.
For a complete guide, see our article: Convert HTML to PDF using ChromeHtmlConverter
Q2: Do I need to install a plugin for every machine running my application?
Yes, each environment must have access to the HTML rendering plugin (Qt or Chrome engine) for successful HTML-to-PDF conversion.
Q3: Does Spire.PDF support external CSS files or online resources?
Yes, but inline or embedded CSS is recommended for better rendering accuracy.
Q4: Can I use this approach in ASP.NET or web APIs?
Absolutely. You can generate PDFs server-side and return them as downloadable files or streams.
Q5: Is JavaScript supported during HTML rendering?
Limited support. Static elements are rendered correctly, but scripts and dynamic DOM manipulations are not executed.
Get a Free License
To fully experience the capabilities of Spire.PDF for .NET without any evaluation limitations, you can request a free 30-day trial license.
5 modi per rendere un file Word di sola lettura
Indice
- Contrassegna un documento Word come finale (tutte le versioni di Word)
- Apri sempre i file di Word in modalità di sola visualizzazione (Word 2019 o versioni successive)
- Limita la modifica per rendere i documenti di Word di sola lettura
- Salva i file di Word come PDF per una protezione completa in sola lettura
- Automatizza la protezione dei file di Word con Python (password o PDF)
- Quale metodo dovresti scegliere?
- Parole finali
- Domande frequenti sulla creazione di file Word di sola lettura

Quando condividi un documento di Word, potresti non volere che altri modifichino accidentalmente il tuo contenuto. Che si tratti di un contratto, un rapporto, un certificato o una proposta finalizzata, rendere un file di Word di sola lettura aiuta a preservare la formattazione, a mantenere l'integrità del documento e a garantire che i destinatari visualizzino, ma non alterino, il tuo lavoro.
Microsoft Word offre diversi modi per rendere i tuoi file di sola lettura, a seconda della versione che stai utilizzando e del livello di protezione di cui hai bisogno. In questa guida, esploreremo cinque metodi efficaci, dalle semplici impostazioni manuali come "Contrassegna come finale" alle soluzioni automatizzate che utilizzano Python. Alla fine, saprai exactly come proteggere i tuoi documenti di Word, sia che tu stia utilizzando Word 2016, Word 2019 o le più recenti edizioni di Microsoft 365.
- Contrassegna un documento Word come finale (tutte le versioni di Word)
- Apri sempre i file di Word in modalità di sola visualizzazione (Word 2019 o versioni successive)
- Limita la modifica per rendere i documenti di Word di sola lettura
- Salva i file di Word come PDF per una protezione completa in sola lettura
- Automatizza la protezione dei file di Word con Python (password o PDF)
Contrassegna un documento Word come finale (tutte le versioni di Word)
Se stai usando Microsoft Word, uno dei modi più semplici per rendere un file di sola lettura è contrassegnarlo come finale. Questa funzione è disponibile in tutte le versioni moderne di Word e indica che il documento è completo, scoraggiando gli altri dall'apportare ulteriori modifiche.
Passaggi:
-
Apri il tuo documento Word.
-
Vai a File → Informazioni → Proteggi documento → Contrassegna come finale.
-
Fai clic su OK quando richiesto.
-
Salva e chiudi il documento.
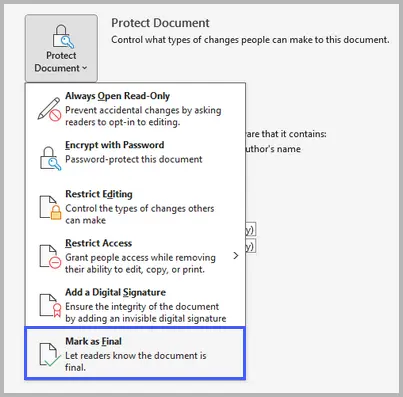
Questo approccio imposta il documento su uno stato di sola lettura e scoraggia la modifica, ma non impedisce a qualcuno di rimuovere il contrassegno "Contrassegna come finale" per modificare il file. È meglio usarlo come segnale che il documento è completo, non come una misura di sicurezza rigorosa.
Pro e contro
✔ Veloce e semplice; nessuna password richiesta.
✘ Gli utenti possono facilmente aggirarlo facendo clic su Modifica comunque.
Apri sempre i file di Word in modalità di sola lettura (Word 2019 o versioni successive)
A partire da Word 2019 e Microsoft 365, Microsoft ha introdotto un modo più moderno per fare in modo che i documenti si aprano in modalità di sola visualizzazione: la funzione "Apri sempre in sola lettura".
Passaggi:
-
Apri il tuo file in Word.
-
Fai clic su File → Informazioni → Proteggi documento → Apri sempre in sola lettura.
- Salva il documento.
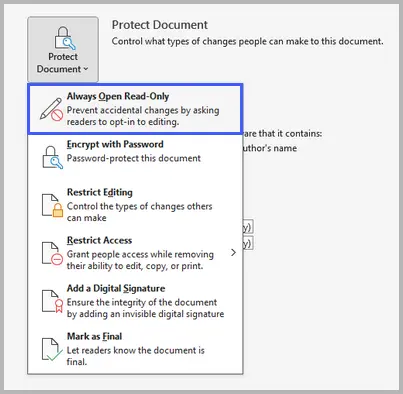
Questa funzione indica a Word di aprire sempre il file in modalità di sola lettura per impostazione predefinita. Non blocca completamente la modifica, ma gli utenti devono abilitare manualmente la modifica prima di apportare modifiche, riducendo il rischio di modifiche accidentali.
Pro e contro
✔ Comodo e compatibile con le versioni; funziona perfettamente con OneDrive e SharePoint.
✘ Disponibile solo in Word 2019 e versioni successive.
Limita la modifica per rendere i documenti di Word di sola lettura
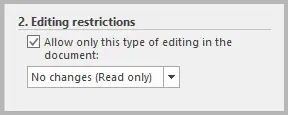
Per un controllo più forte, utilizza la funzione Limita modifica di Word. Ti consente di impedire le modifiche e, facoltativamente, di aggiungere una password, garantendo che solo gli utenti autorizzati possano modificare il file. Questo metodo è disponibile in quasi tutte le versioni di Word.
Passaggi:
-
Apri il tuo documento.
-
Vai a File → Informazioni → Proteggi documento → Limita modifica.
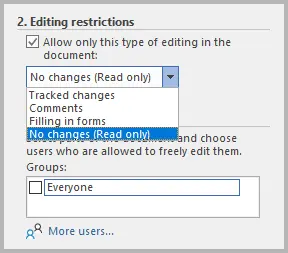
- In Restrizioni di modifica, seleziona Consenti solo questo tipo di modifica nel documento.
- Dal menu a discesa, seleziona Nessuna modifica (sola lettura).
- Fai clic su Sì, avvia applicazione protezione e imposta una password (facoltativo).
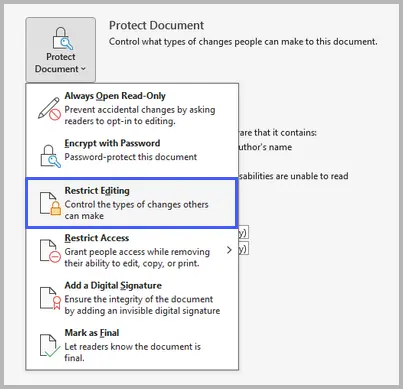
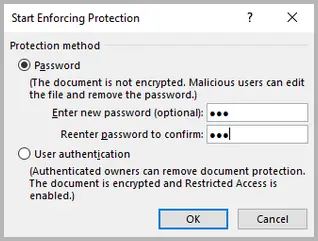
Questa opzione fornisce una protezione solida. Richiede una password per sbloccare il documento, impedendo a chiunque non la possieda di apportare modifiche. È ideale per file riservati, contratti e documenti ufficiali.
Pro e contro
✔ Forte e protetto da password; previene modifiche sia intenzionali che accidentali.
✘ Richiede tempo di configurazione e gestione della password.
Salva i file di Word come PDF per una protezione completa in sola lettura
Se hai bisogno di bloccare completamente il contenuto e la formattazione, convertire il documento Word in un PDF è la scelta migliore. I PDF sono naturalmente più sicuri e più difficili da modificare.
Passaggi:
- Apri il tuo documento Word.
- Vai a File → Salva con nome.
- Scegli PDF come formato del file.
-
(Facoltativo) Fai clic su Opzioni e abilita Conforme a ISO 19005-1 (PDF/A) per la qualità di archiviazione.
-
Salva il tuo file.

Questo approccio trasforma il tuo file Word in un formato di sola lettura che preserva layout e design. Puoi aggiungere ulteriori restrizioni o password in un editor PDF per controllare la stampa, la copia o la modifica.
Pro e contro
✔ Garantisce una formattazione coerente; eccellente per la distribuzione delle versioni finali.
✘ Non può essere easily riconvertito in formato Word modificabile.
Automatizza la protezione dei file di Word con Python (password o PDF)
Se gestisci regolarmente molti documenti di Word, l'automazione del processo di protezione può farti risparmiare molto tempo. Usando Spire.Doc for Python, puoi aggiungere programmaticamente password o convertire file in PDF in blocco.
Prima di iniziare, dovrai installare la libreria da PyPI usando il seguente comando:
pip install spire.doc
Esempio 1: proteggere un file Word con una password
from spire.doc import *
from spire.doc.common import *

# Create a Document object
doc = Document()

# Load a Word file
doc.LoadFromFile("C:\\Users\\Administrator\\Desktop\\input.docx")

# Encrypt the document with an open password
doc.Encrypt("open-psd")

# Set the editing restriction type to allow read only
doc.Protect(ProtectionType.AllowOnlyReading, "permission-psd")

# Save the document
doc.SaveToFile("output/EditingRestrictions.docx")
doc.Close()
Ecco la guida completa su come: Impostare o rimuovere le restrizioni di modifica dei documenti di Word in Python
Esempio 2: convertire automaticamente Word in PDF
from spire.doc import *
from spire.doc.common import *

# Create a Document object
doc = Document()

# Load a Word file
doc.LoadFromFile("C:\\Users\\Administrator\\Desktop\\input.docx")

# Save the document to PDF
doc.SaveToFile("output/ToPDF.pdf", FileFormat.PDF)
doc.Close()
Leggi oltre: Converti Word in PDF con Python
L'automazione della protezione è perfetta per le organizzazioni o gli sviluppatori che devono proteggere più file contemporaneamente. Garantisce coerenza, efficienza e riduce al minimo l'errore umano.
Pro e contro
✔ Ottimo per la protezione in batch e i flussi di lavoro dei documenti.
✘ Richiede conoscenze di programmazione di base.
Quale metodo dovresti scegliere?
Ecco un rapido confronto per aiutarti a decidere:
| Metodo | Livello di protezione | Funziona in | Ideale per |
|---|---|---|---|
| Contrassegna come finale | Base | Tutte le versioni | Segnalare che un documento è completo |
| Apri sempre in sola lettura | Moderato | Word 2019+ | Prevenire modifiche casuali |
| Limita modifica | Forte | Tutte le versioni | Protezione basata su password |
| Salva come PDF | Forte | Tutte le versioni | Condivisione di documenti finalizzati |
| Automazione Python | Avanzato | Multipiattaforma | Automazione della sicurezza dei documenti |
Se hai solo bisogno di scoraggiare le modifiche, è sufficiente "Contrassegna come finale" o "Apri sempre in sola lettura". Per un uso professionale o legale, "Limita modifica" o "Salva come PDF" offrono un controllo più forte. Gli sviluppatori che gestiscono un gran numero di file dovrebbero considerare l'automazione della protezione with Python.
Parole finali
Rendere un documento di Word di sola lettura è semplice, ma il metodo giusto dipende dal tuo scopo. Per una protezione di base, contrassegnare come finale o abilitare la modalità di sola lettura funziona bene. Per un controllo più forte, utilizza le restrizioni di modifica o salva come PDF. E per scenari su larga scala o automatizzati, gli script Python forniscono una soluzione affidabile.
Applicando l'approccio giusto, puoi condividere con sicurezza i documenti senza preoccuparti di modifiche indesiderate, assicurandoti che il tuo lavoro rimanga sicuro e invariato.
Domande frequenti sulla creazione di file Word di sola lettura
Q1. Posso rendere un file di Word di sola lettura senza password?
Sì. Puoi usare Contrassegna come finale o Apri sempre in sola lettura per scoraggiare le modifiche senza richiedere una password.
Q2. Qualcuno può ancora modificare un documento di Word "di sola lettura"?
Dipende dal metodo. "Contrassegna come finale" e "Apri sempre in sola lettura" possono essere aggirati, ma "Limita modifica" con una password impedisce modifiche non autorizzate.
Q3. Come posso rimuovere le restrizioni di sola lettura da un file di Word?
Apri il documento, vai a File → Informazioni → Proteggi documento e deseleziona o disabilita il metodo di protezione applicato. Potrebbe essere necessaria una password se ne è stata impostata una.
Q4. Qual è il modo più sicuro per rendere un documento di sola lettura?
Salvarlo come PDF o applicare Limita modifica con una password offre il massimo livello di protezione.
Q5. Posso automatizzare le impostazioni di sola lettura in blocco?
Sì. Puoi usare Python e librerie come Spire.Doc for Python per applicare password o convertire più file di Word in PDF automatically.
Vedi anche
5 maneiras de tornar um arquivo do Word somente leitura
Índice
- Marcar um documento do Word como final (todas as versões do Word)
- Sempre abrir arquivos do Word no modo somente leitura (Word 2019 ou posterior)
- Restringir edição para tornar documentos do Word somente leitura
- Salvar arquivos do Word como PDF para proteção completa somente leitura
- Automatizar a proteção de arquivos do Word com Python (senha ou PDF)
- Qual método você deve escolher?
- Palavras Finais
- Perguntas frequentes sobre como tornar arquivos do Word somente leitura
Ao compartilhar um documento do Word, talvez você não queira que outras pessoas alterem acidentalmente seu conteúdo. Seja um contrato, relatório, certificado ou proposta finalizada, tornar um arquivo do Word somente leitura ajuda a preservar a formatação, manter a integridade do documento e garantir que os destinatários visualizem — mas não alterem — seu trabalho.
O Microsoft Word oferece várias maneiras de tornar seus arquivos somente leitura, dependendo da versão que você está usando e do nível de proteção de que precisa. Neste guia, exploraremos cinco métodos eficazes — desde configurações manuais simples como “Marcar como Final” até soluções automatizadas usando Python. Ao final, você saberá exatamente como proteger seus documentos do Word, esteja usando o Word 2016, Word 2019 ou edições mais recentes do Microsoft 365.
- Marcar um documento do Word como final (todas as versões do Word)
- Sempre abrir arquivos do Word no modo somente leitura (Word 2019 ou posterior)
- Restringir edição para tornar documentos do Word somente leitura
- Salvar arquivos do Word como PDF para proteção completa somente leitura
- Automatizar a proteção de arquivos do Word com Python (senha ou PDF)
Marcar um documento do Word como final (todas as versões do Word)
Se você está usando o Microsoft Word, uma das maneiras mais simples de tornar um arquivo somente leitura é marcá-lo como final. Este recurso está disponível em todas as versões modernas do Word e indica que o documento está completo, desencorajando outras pessoas de fazerem mais edições.
Passos:
-
Abra seu documento do Word.
-
Vá para Arquivo → Informações → Proteger Documento → Marcar como Final.
-
Clique em OK quando solicitado.
-
Salve e feche o documento.
Esta abordagem define o documento para um status de somente leitura e desencoraja a edição, mas não impede que alguém remova a marca “Marcar como Final” para editar o arquivo. É melhor usado como um sinal de que o documento está completo, não como uma medida de segurança estrita.
Prós e Contras
✔ Rápido e simples; nenhuma senha necessária.
✘ Os usuários podem contorná-lo facilmente clicando em Editar Mesmo Assim.
Sempre abrir arquivos do Word no modo somente leitura (Word 2019 ou posterior)
A partir do Word 2019 e do Microsoft 365, a Microsoft introduziu uma maneira mais moderna de fazer com que os documentos abram no modo somente visualização — o recurso “Sempre Abrir Somente Leitura”.
Passos:
-
Abra seu arquivo no Word.
-
Clique em Arquivo → Informações → Proteger Documento → Sempre Abrir Somente Leitura.
- Salve o documento.
Este recurso diz ao Word para sempre abrir o arquivo no modo somente leitura por padrão. Ele não bloqueia a edição completamente, mas os usuários devem habilitar a edição manualmente antes de fazer alterações — reduzindo o risco de modificações acidentais.
Prós e Contras
✔ Conveniente e ciente da versão; funciona perfeitamente com o OneDrive e o SharePoint.
✘ Disponível apenas no Word 2019 e versões posteriores.
Restringir edição para tornar documentos do Word somente leitura
Para um controle mais forte, use o recurso Restringir Edição do Word. Ele permite que você impeça alterações e, opcionalmente, adicione uma senha, garantindo que apenas usuários autorizados possam modificar o arquivo. Este método está disponível em quase todas as versões do Word.
Passos:
-
Abra seu documento.
-
Vá para Arquivo → Informações → Proteger Documento → Restringir Edição.
- Em Restrições de edição, marque Permitir apenas este tipo de edição no documento.
- No menu suspenso, selecione Sem alterações (Somente leitura).
- Clique em Sim, Iniciar Aplicação da Proteção, e defina uma senha (opcional).
Esta opção oferece proteção robusta. Requer uma senha para desproteger o documento, impedindo que qualquer pessoa sem ela faça alterações. É ideal para arquivos confidenciais, contratos e documentos oficiais.
Prós e Contras
✔ Forte e protegido por senha; impede edições intencionais e acidentais.
✘ Requer tempo de configuração e gerenciamento de senhas.
Salvar arquivos do Word como PDF para proteção completa somente leitura
Se você precisa bloquear completamente o conteúdo e a formatação, converter o documento do Word para um PDF é a melhor escolha. Os PDFs são naturalmente mais seguros e mais difíceis de editar.
Passos:
- Abra seu documento do Word.
- Vá para Arquivo → Salvar Como.
- Escolha PDF como o formato do arquivo.
-
(Opcional) Clique em Opções e habilite Compatível com ISO 19005-1 (PDF/A) para qualidade de arquivamento.
-
Salve seu arquivo.
Esta abordagem transforma seu arquivo do Word em um formato somente leitura que preserva o layout e o design. Você pode adicionar mais restrições ou senhas em um editor de PDF para controlar a impressão, cópia ou edição.
Prós e Contras
✔ Garante formatação consistente; excelente para distribuir versões finais.
✘ Não pode ser facilmente convertido de volta para o formato editável do Word.
Automatizar a proteção de arquivos do Word com Python (senha ou PDF)
Se você lida com muitos documentos do Word regularmente, automatizar o processo de proteção pode economizar muito tempo. Usando Spire.Doc for Python, você pode adicionar senhas programaticamente ou converter arquivos para PDF em massa.
Antes de começar, você precisará instalar a biblioteca do PyPI usando o seguinte comando:
pip install spire.doc
Exemplo 1: Proteger um arquivo do Word com uma senha
from spire.doc import *
from spire.doc.common import *

# Create a Document object
doc = Document()

# Load a Word file
doc.LoadFromFile("C:\\Users\\Administrator\\Desktop\\input.docx")

# Encrypt the document with an open password
doc.Encrypt("open-psd")

# Set the editing restriction type to allow read only
doc.Protect(ProtectionType.AllowOnlyReading, "permission-psd")

# Save the document
doc.SaveToFile("output/EditingRestrictions.docx")
doc.Close()
Aqui está o guia completo sobre como: Definir ou Remover Restrições de Edição de Documentos do Word em Python
Exemplo 2: Converter Word para PDF automaticamente
from spire.doc import *
from spire.doc.common import *

# Create a Document object
doc = Document()

# Load a Word file
doc.LoadFromFile("C:\\Users\\Administrator\\Desktop\\input.docx")

# Save the document to PDF
doc.SaveToFile("output/ToPDF.pdf", FileFormat.PDF)
doc.Close()
Leia mais: Converter Word para PDF com Python
A automação da proteção é perfeita para organizações ou desenvolvedores que precisam proteger vários arquivos de uma vez. Garante consistência, eficiência e minimiza o erro humano.
Prós e Contras
✔ Ótimo para proteção em lote e fluxos de trabalho de documentos.
✘ Requer conhecimento básico de programação.
Qual método você deve escolher?
Aqui está uma comparação rápida para ajudá-lo a decidir:
| Método | Nível de Proteção | Funciona Em | Melhor Para |
|---|---|---|---|
| Marcar como Final | Básico | Todas as versões | Sinalizar que um documento está completo |
| Sempre Abrir Somente Leitura | Moderado | Word 2019+ | Prevenir edições casuais |
| Restringir Edição | Forte | Todas as versões | Proteção baseada em senha |
| Salvar como PDF | Forte | Todas as versões | Compartilhar documentos finalizados |
| Automação com Python | Avançado | Multiplataforma | Automatizar a segurança de documentos |
Se você só precisa desencorajar edições, “Marcar como Final” ou “Sempre Abrir Somente Leitura” é suficiente. Para uso profissional ou legal, “Restringir Edição” ou “Salvar como PDF” oferece um controle mais forte. Desenvolvedores que gerenciam um grande número de arquivos devem considerar a automação da proteção com Python.
Palavras Finais
Tornar um documento do Word somente leitura é simples — mas o método certo depende do seu propósito. Para proteção básica, marcar como final ou habilitar o modo somente leitura funciona bem. Para um controle mais forte, use restrições de edição ou salve como PDF. E para cenários em grande escala ou automatizados, os scripts Python fornecem uma solução confiável.
Ao aplicar a abordagem correta, você pode compartilhar documentos com confiança, sem se preocupar com edições indesejadas, garantindo que seu trabalho permaneça seguro e inalterado.
Perguntas frequentes sobre como tornar arquivos do Word somente leitura
Q1. Posso tornar um arquivo do Word somente leitura sem uma senha?
Sim. Você pode usar Marcar como Final ou Sempre Abrir Somente Leitura para desencorajar edições sem exigir uma senha.
Q2. Alguém ainda pode editar um documento do Word “somente leitura”?
Depende do método. “Marcar como Final” e “Sempre Abrir Somente Leitura” podem ser contornados, mas “Restringir Edição” com uma senha impede edições não autorizadas.
Q3. Como removo as restrições de somente leitura de um arquivo do Word?
Abra o documento, vá para Arquivo → Informações → Proteger Documento, e desmarque ou desative o método de proteção aplicado. Você pode precisar de uma senha se uma foi definida.
Q4. Qual é a maneira mais segura de tornar um documento somente leitura?
Salvá-lo como PDF ou aplicar Restringir Edição com uma senha oferece o mais alto nível de proteção.
Q5. Posso automatizar as configurações de somente leitura em massa?
Sim. Você pode usar Python e bibliotecas como Spire.Doc for Python para aplicar senhas ou converter vários arquivos do Word para PDF automaticamente.
Veja Também
Word 파일을 읽기 전용으로 만드는 5가지 방법
Word 문서를 공유할 때 다른 사람이 실수로 내용을 변경하는 것을 원하지 않을 수 있습니다. 계약서, 보고서, 인증서 또는 최종 제안서이든 Word 파일을 읽기 전용으로 만들면 서식을 보존하고 문서 무결성을 유지하며 수신자가 작업을 변경하지 않고 볼 수 있도록 보장합니다.
Microsoft Word는 사용 중인 버전과 필요한 보호 수준에 따라 파일을 읽기 전용으로 만드는 여러 가지 방법을 제공합니다. 이 가이드에서는 "최종본으로 표시"와 같은 간단한 수동 설정부터 Python을 사용한 자동화된 솔루션에 이르기까지 다섯 가지 효과적인 방법을 살펴봅니다. 이 가이드를 마치면 Word 2016, Word 2019 또는 최신 Microsoft 365 버전을 사용하든 Word 문서를 보호하는 방법을 정확히 알게 될 것입니다.
- Word 문서를 최종본으로 표시 (모든 Word 버전)
- 항상 읽기 전용 모드로 Word 파일 열기 (Word 2019 이상)
- 편집을 제한하여 Word 문서를 읽기 전용으로 만들기
- 완벽한 읽기 전용 보호를 위해 Word 파일을 PDF로 저장
- Python으로 Word 파일 보호 자동화 (비밀번호 또는 PDF)
Word 문서를 최종본으로 표시 (모든 Word 버전)
Microsoft Word를 사용하는 경우 파일을 읽기 전용으로 만드는 가장 간단한 방법 중 하나는 최종본으로 표시하는 것입니다. 이 기능은 모든 최신 버전의 Word에서 사용할 수 있으며 문서가 완료되었음을 나타내어 다른 사람이 추가 편집을 하지 못하도록 합니다.
단계:
-
Word 문서를 엽니다.
-
파일 → 정보 → 문서 보호 → 최종본으로 표시로 이동합니다.
-
메시지가 표시되면 확인을 클릭합니다.
-
문서를 저장하고 닫습니다.
이 접근 방식은 문서를 읽기 전용 상태로 설정하고 편집을 권장하지 않지만, 다른 사람이 "최종본으로 표시" 플래그를 제거하여 파일을 편집하는 것을 막지는 못합니다. 엄격한 보안 조치가 아닌 문서가 완료되었다는 신호로 사용하는 것이 가장 좋습니다.
장단점
✔ 빠르고 간단하며 암호가 필요 없습니다.
✘ 사용자는 계속 편집을 클릭하여 쉽게 우회할 수 있습니다.
항상 읽기 전용 모드로 Word 파일 열기 (Word 2019 이상)
Word 2019 및 Microsoft 365부터 Microsoft는 문서를 보기 전용 모드로 열 수 있는 보다 현대적인 방법인 "항상 읽기 전용으로 열기" 기능을 도입했습니다.
단계:
-
Word에서 파일을 엽니다.
-
파일 → 정보 → 문서 보호 → 항상 읽기 전용으로 열기를 클릭합니다.
- 문서를 저장합니다.
이 기능은 Word에 항상 기본적으로 읽기 전용 모드로 파일을 열도록 지시합니다. 편집을 완전히 잠그지는 않지만 사용자는 변경하기 전에 수동으로 편집을 활성화해야 하므로 우발적인 수정 위험을 줄일 수 있습니다.
장단점
✔ 편리하고 버전을 인식하며 OneDrive 및 SharePoint와 원활하게 작동합니다.
✘ Word 2019 이상 버전에서만 사용할 수 있습니다.
편집을 제한하여 Word 문서를 읽기 전용으로 만들기
더 강력한 제어를 위해 Word의 편집 제한 기능을 사용하십시오. 변경을 방지하고 선택적으로 암호를 추가하여 권한 있는 사용자만 파일을 수정할 수 있도록 합니다. 이 방법은 거의 모든 Word 버전에서 사용할 수 있습니다.
단계:
-
문서를 엽니다.
-
파일 → 정보 → 문서 보호 → 편집 제한으로 이동합니다.
- 편집 제한에서 문서에서 이 유형의 편집만 허용을 선택합니다.
- 드롭다운에서 변경 없음(읽기 전용)을 선택합니다.
- 예, 보호 적용 시작을 클릭하고 암호를 설정합니다(선택 사항).
이 옵션은 강력한 보호 기능을 제공합니다. 문서를 보호 해제하려면 암호가 필요하며, 암호가 없는 사람은 변경할 수 없습니다. 기밀 파일, 계약서 및 공식 문서에 이상적입니다.
장단점
✔ 강력하고 암호로 보호되며 의도적이거나 우발적인 편집을 모두 방지합니다.
✘ 설정 시간과 암호 관리가 필요합니다.
완벽한 읽기 전용 보호를 위해 Word 파일을 PDF로 저장
내용과 서식을 완전히 잠가야 하는 경우 Word 문서를 PDF로 변환하는 것이 가장 좋습니다. PDF는 기본적으로 더 안전하고 편집하기가 더 어렵습니다.
단계:
- Word 문서를 엽니다.
- 파일 → 다른 이름으로 저장으로 이동합니다.
- 파일 형식으로 PDF를 선택합니다.
-
(선택 사항) 옵션을 클릭하고 보관 품질을 위해 ISO 19005-1 호환(PDF/A)을 활성화합니다.
-
파일을 저장합니다.
이 접근 방식은 Word 파일을 레이아웃과 디자인을 보존하는 읽기 전용 형식으로 변환합니다. PDF 편집기에서 추가 제한이나 암호를 추가하여 인쇄, 복사 또는 편집을 제어할 수 있습니다.
장단점
✔ 일관된 서식을 보장하며 최종 버전을 배포하는 데 탁월합니다.
✘ 편집 가능한 Word 형식으로 쉽게 다시 변환할 수 없습니다.
Python으로 Word 파일 보호 자동화 (비밀번호 또는 PDF)
정기적으로 많은 Word 문서를 처리하는 경우 보호 프로세스를 자동화하면 많은 시간을 절약할 수 있습니다. Spire.Doc for Python을 사용하면 프로그래밍 방식으로 암호를 추가하거나 파일을 PDF로 대량 변환할 수 있습니다.
시작하기 전에 다음 명령을 사용하여 PyPI에서 라이브러리를 설치해야 합니다.
pip install spire.doc
예제 1: 암호로 Word 파일 보호
from spire.doc import *
from spire.doc.common import *

# Document 객체 생성
doc = Document()

# Word 파일 로드
doc.LoadFromFile("C:\\Users\\Administrator\\Desktop\\input.docx")

# 열기 암호로 문서 암호화
doc.Encrypt("open-psd")

# 편집 제한 유형을 읽기 전용으로 설정
doc.Protect(ProtectionType.AllowOnlyReading, "permission-psd")

# 문서 저장
doc.SaveToFile("output/EditingRestrictions.docx")
doc.Close()
방법에 대한 전체 가이드는 다음과 같습니다. Python에서 Word 문서 편집 제한 설정 또는 제거
예제 2: Word를 PDF로 자동 변환
from spire.doc import *
from spire.doc.common import *

# Document 객체 생성
doc = Document()

# Word 파일 로드
doc.LoadFromFile("C:\\Users\\Administrator\\Desktop\\input.docx")

# 문서를 PDF로 저장
doc.SaveToFile("output/ToPDF.pdf", FileFormat.PDF)
doc.Close()
더 읽어보기: Python으로 Word를 PDF로 변환
보호 자동화는 한 번에 여러 파일을 보호해야 하는 조직이나 개발자에게 적합합니다. 일관성, 효율성을 보장하고 인적 오류를 최소화합니다.
장단점
✔ 일괄 보호 및 문서 워크플로에 적합합니다.
✘ 기본적인 프로그래밍 지식이 필요합니다.
어떤 방법을 선택해야 할까요?
결정에 도움이 되는 빠른 비교는 다음과 같습니다.
| 방법 | 보호 수준 | 작동 환경 | 최적 대상 |
|---|---|---|---|
| 최종본으로 표시 | 기본 | 모든 버전 | 문서가 완료되었음을 알림 |
| 항상 읽기 전용으로 열기 | 중간 | Word 2019+ | 일상적인 편집 방지 |
| 편집 제한 | 강력 | 모든 버전 | 암호 기반 보호 |
| PDF로 저장 | 강력 | 모든 버전 | 최종 문서 공유 |
| Python 자동화 | 고급 | 크로스 플랫폼 | 문서 보안 자동화 |
편집을 막기만 하면 되는 경우 "최종본으로 표시" 또는 "항상 읽기 전용으로 열기"로 충분합니다. 전문적이거나 법적인 용도로는 "편집 제한" 또는 "PDF로 저장"이 더 강력한 제어를 제공합니다. 많은 수의 파일을 관리하는 개발자는 Python으로 보호를 자동화하는 것을 고려해야 합니다.
마지막 말
Word 문서를 읽기 전용으로 만드는 것은 간단하지만 올바른 방법은 목적에 따라 다릅니다. 기본 보호를 위해서는 최종본으로 표시하거나 읽기 전용 모드를 활성화하는 것이 좋습니다. 더 강력한 제어를 위해서는 편집 제한을 사용하거나 PDF로 저장하십시오. 그리고 대규모 또는 자동화된 시나리오의 경우 Python 스크립트가 신뢰할 수 있는 솔루션을 제공합니다.
올바른 접근 방식을 적용하면 원치 않는 편집에 대한 걱정 없이 문서를 자신 있게 공유하여 작업이 안전하고 변경되지 않도록 할 수 있습니다.
Word 파일을 읽기 전용으로 만드는 것에 대한 자주 묻는 질문
Q1. 암호 없이 Word 파일을 읽기 전용으로 만들 수 있나요?
예. 최종본으로 표시 또는 항상 읽기 전용으로 열기를 사용하여 암호 없이 편집을 막을 수 있습니다.
Q2. "읽기 전용" Word 문서를 다른 사람이 여전히 편집할 수 있나요?
방법에 따라 다릅니다. "최종본으로 표시" 및 "항상 읽기 전용으로 열기"는 우회할 수 있지만 암호가 있는 "편집 제한"은 무단 편집을 방지합니다.
Q3. Word 파일에서 읽기 전용 제한을 어떻게 제거하나요?
문서를 열고 파일 → 정보 → 문서 보호로 이동하여 적용된 보호 방법을 선택 취소하거나 비활성화합니다. 암호가 설정된 경우 암호가 필요할 수 있습니다.
Q4. 문서를 읽기 전용으로 만드는 가장 안전한 방법은 무엇인가요?
PDF로 저장하거나 암호로 편집 제한을 적용하는 것이 가장 높은 수준의 보호를 제공합니다.
Q5. 읽기 전용 설정을 대량으로 자동화할 수 있나요?
예. Python 및 Spire.Doc for Python과 같은 라이브러리를 사용하여 암호를 적용하거나 여러 Word 파일을 PDF로 자동 변환할 수 있습니다.
참고 항목
5 façons de rendre un fichier Word en lecture seule
Table des matières
- Marquer un document Word comme final (toutes les versions de Word)
- Toujours ouvrir les fichiers Word en mode lecture seule (Word 2019 ou version ultérieure)
- Restreindre la modification pour rendre les documents Word en lecture seule
- Enregistrer les fichiers Word au format PDF pour une protection complète en lecture seule
- Automatiser la protection des fichiers Word avec Python (mot de passe ou PDF)
- Quelle méthode devriez-vous choisir ?
- Mots de la fin
- FAQ sur la mise en lecture seule des fichiers Word
Lorsque vous partagez un document Word, vous ne souhaitez peut-être pas que d'autres personnes modifient accidentellement votre contenu. Qu'il s'agisse d'un contrat, d'un rapport, d'un certificat ou d'une proposition finalisée, rendre un fichier Word en lecture seule permet de préserver la mise en forme, de maintenir l'intégrité du document et de garantir que les destinataires consultent — mais ne modifient pas — votre travail.
Microsoft Word propose plusieurs façons de rendre vos fichiers en lecture seule, en fonction de la version que vous utilisez et du niveau de protection dont vous avez besoin. Dans ce guide, nous explorerons cinq méthodes efficaces — des paramètres manuels simples comme « Marquer comme final » aux solutions automatisées utilisant Python. À la fin, vous saurez exactement comment protéger vos documents Word, que vous utilisiez Word 2016, Word 2019 ou les éditions plus récentes de Microsoft 365.
- Marquer un document Word comme final (toutes les versions de Word)
- Toujours ouvrir les fichiers Word en mode lecture seule (Word 2019 ou version ultérieure)
- Restreindre la modification pour rendre les documents Word en lecture seule
- Enregistrer les fichiers Word au format PDF pour une protection complète en lecture seule
- Automatiser la protection des fichiers Word avec Python (mot de passe ou PDF)
Marquer un document Word comme final (toutes les versions de Word)
Si vous utilisez Microsoft Word, l'une des façons les plus simples de rendre un fichier en lecture seule est de le marquer comme final. Cette fonctionnalité est disponible dans toutes les versions modernes de Word et indique que le document est terminé, décourageant les autres d'apporter d'autres modifications.
Étapes :
-
Ouvrez votre document Word.
-
Allez dans Fichier → Informations → Protéger le document → Marquer comme final.
-
Cliquez sur OK lorsque vous y êtes invité.
-
Enregistrez et fermez le document.
Cette approche définit le document en lecture seule et décourage la modification, mais elle n'empêche pas quelqu'un de supprimer l'indicateur « Marquer comme final » pour modifier le fichier. Il est préférable de l'utiliser comme un signal que le document est terminé, et non comme une mesure de sécurité stricte.
Avantages et inconvénients
✔ Rapide et simple ; aucun mot de passe requis.
✘ Les utilisateurs peuvent facilement le contourner en cliquant sur Modifier quand même.
Toujours ouvrir les fichiers Word en mode lecture seule (Word 2019 ou version ultérieure)
À partir de Word 2019 et de Microsoft 365, Microsoft a introduit une manière plus moderne d'ouvrir les documents en mode affichage seul — la fonctionnalité « Toujours ouvrir en lecture seule ».
Étapes :
-
Ouvrez votre fichier dans Word.
-
Cliquez sur Fichier → Informations → Protéger le document → Toujours ouvrir en lecture seule.
- Enregistrez le document.
Cette fonctionnalité indique à Word d'ouvrir toujours le fichier en mode lecture seule par défaut. Elle ne verrouille pas entièrement la modification, mais les utilisateurs doivent activer manuellement la modification avant d'apporter des changements — réduisant ainsi le risque de modifications accidentelles.
Avantages et inconvénients
✔ Pratique et conscient de la version ; fonctionne de manière transparente avec OneDrive et SharePoint.
✘ Uniquement disponible dans Word 2019 et les versions ultérieures.
Restreindre la modification pour rendre les documents Word en lecture seule
Pour un contrôle plus strict, utilisez la fonctionnalité Restreindre la modification de Word. Elle vous permet d'empêcher les modifications et d'ajouter éventuellement un mot de passe, garantissant que seuls les utilisateurs autorisés peuvent modifier le fichier. Cette méthode est disponible dans presque toutes les versions de Word.
Étapes :
-
Ouvrez votre document.
-
Allez dans Fichier → Informations → Protéger le document → Restreindre la modification.
- Sous Restrictions de modification, cochez Autoriser uniquement ce type de modification dans le document.
- Dans le menu déroulant, sélectionnez Aucune modification (Lecture seule).
- Cliquez sur Oui, activer la protection, et définissez un mot de passe (facultatif).
Cette option offre une protection robuste. Elle nécessite un mot de passe pour déprotéger le document, empêchant quiconque sans celui-ci d'apporter des modifications. C'est idéal pour les fichiers confidentiels, les contrats et les documents officiels.
Avantages et inconvénients
✔ Robuste et protégé par mot de passe ; empêche les modifications intentionnelles et accidentelles.
✘ Nécessite un temps de configuration et une gestion des mots de passe.
Enregistrer les fichiers Word au format PDF pour une protection complète en lecture seule
Si vous avez besoin de verrouiller complètement le contenu et la mise en forme, la conversion du document Word en PDF est le meilleur choix. Les PDF sont naturellement plus sécurisés et plus difficiles à modifier.
Étapes :
- Ouvrez votre document Word.
- Allez dans Fichier → Enregistrer sous.
- Choisissez PDF comme format de fichier.
-
(Facultatif) Cliquez sur Options et activez Conforme à la norme ISO 19005-1 (PDF/A) pour une qualité d'archivage.
-
Enregistrez votre fichier.
Cette approche transforme votre fichier Word en un format en lecture seule qui préserve la mise en page et le design. Vous pouvez ajouter d'autres restrictions ou mots de passe dans un éditeur PDF pour contrôler l'impression, la copie ou la modification.
Avantages et inconvénients
✔ Assure une mise en forme cohérente ; excellent pour la distribution des versions finales.
✘ Ne peut pas être facilement reconverti au format Word modifiable.
Automatiser la protection des fichiers Word avec Python (mot de passe ou PDF)
Si vous manipulez régulièrement de nombreux documents Word, l'automatisation du processus de protection peut vous faire gagner beaucoup de temps. En utilisant Spire.Doc for Python, vous pouvez ajouter des mots de passe par programme ou convertir des fichiers en PDF en masse.
Avant de commencer, vous devrez installer la bibliothèque depuis PyPI à l'aide de la commande suivante :
pip install spire.doc
Exemple 1 : Protéger un fichier Word avec un mot de passe
from spire.doc import *
from spire.doc.common import *

# Créer un objet Document
doc = Document()

# Charger un fichier Word
doc.LoadFromFile("C:\\Users\\Administrator\\Desktop\\input.docx")

# Chiffrer le document avec un mot de passe d'ouverture
doc.Encrypt("open-psd")

# Définir le type de restriction de modification pour autoriser la lecture seule
doc.Protect(ProtectionType.AllowOnlyReading, "permission-psd")

# Enregistrer le document
doc.SaveToFile("output/EditingRestrictions.docx")
doc.Close()
Voici le guide complet sur comment : Définir ou supprimer les restrictions de modification de document Word en Python
Exemple 2 : Convertir Word en PDF automatiquement
from spire.doc import *
from spire.doc.common import *

# Créer un objet Document
doc = Document()

# Charger un fichier Word
doc.LoadFromFile("C:\\Users\\Administrator\\Desktop\\input.docx")

# Enregistrer le document au format PDF
doc.SaveToFile("output/ToPDF.pdf", FileFormat.PDF)
doc.Close()
Lire la suite : Convertir Word en PDF avec Python
L'automatisation de la protection est parfaite pour les organisations ou les développeurs qui ont besoin de protéger plusieurs fichiers à la fois. Elle garantit la cohérence, l'efficacité et minimise les erreurs humaines.
Avantages et inconvénients
✔ Idéal pour la protection par lots et les flux de travail documentaires.
✘ Nécessite des connaissances de base en programmation.
Quelle méthode devriez-vous choisir ?
Voici une comparaison rapide pour vous aider à décider :
| Méthode | Niveau de protection | Fonctionne dans | Idéal pour |
|---|---|---|---|
| Marquer comme final | Basique | Toutes les versions | Signaler qu'un document est terminé |
| Toujours ouvrir en lecture seule | Modéré | Word 2019+ | Empêcher les modifications occasionnelles |
| Restreindre la modification | Fort | Toutes les versions | Protection par mot de passe |
| Enregistrer en PDF | Fort | Toutes les versions | Partager des documents finalisés |
| Automatisation Python | Avancé | Multiplateforme | Automatiser la sécurité des documents |
Si vous avez seulement besoin de décourager les modifications, « Marquer comme final » ou « Toujours ouvrir en lecture seule » est suffisant. Pour un usage professionnel ou légal, « Restreindre la modification » ou « Enregistrer en PDF » offre un contrôle plus strict. Les développeurs gérant un grand nombre de fichiers devraient envisager d'automatiser la protection avec Python.
Mots de la fin
Rendre un document Word en lecture seule est simple — mais la bonne méthode dépend de votre objectif. Pour une protection de base, marquer comme final ou activer le mode lecture seule fonctionne bien. Pour un contrôle plus strict, utilisez les restrictions de modification ou enregistrez en PDF. Et pour les scénarios à grande échelle ou automatisés, les scripts Python fournissent une solution fiable.
En appliquant la bonne approche, vous pouvez partager des documents en toute confiance sans vous soucier des modifications indésirables, garantissant que votre travail reste sécurisé et inchangé.
FAQ sur la mise en lecture seule des fichiers Word
Q1. Puis-je rendre un fichier Word en lecture seule sans mot de passe ?
Oui. Vous pouvez utiliser Marquer comme final ou Toujours ouvrir en lecture seule pour décourager les modifications sans nécessiter de mot de passe.
Q2. Quelqu'un peut-il encore modifier un document Word en « lecture seule » ?
Cela dépend de la méthode. « Marquer comme final » et « Toujours ouvrir en lecture seule » peuvent être contournés, mais « Restreindre la modification » avec un mot de passe empêche les modifications non autorisées.
Q3. Comment supprimer les restrictions de lecture seule d'un fichier Word ?
Ouvrez le document, allez dans Fichier → Informations → Protéger le document, et décochez ou désactivez la méthode de protection appliquée. Vous pourriez avoir besoin d'un mot de passe s'il en a été défini un.
Q4. Quelle est la manière la plus sécurisée de rendre un document en lecture seule ?
L'enregistrer en tant que PDF ou appliquer la Restriction de modification avec un mot de passe offre le plus haut niveau de protection.
Q5. Puis-je automatiser les paramètres de lecture seule en masse ?
Oui. Vous pouvez utiliser Python et des bibliothèques comme Spire.Doc for Python pour appliquer des mots de passe ou convertir plusieurs fichiers Word en PDF automatiquement.
Voir aussi
5 maneras de hacer un archivo de Word de solo lectura
Tabla de Contenidos
- Marcar un Documento de Word como Final (Todas las Versiones de Word)
- Abrir Siempre los Archivos de Word en Modo de Solo Vista (Word 2019 o Posterior)
- Restringir la Edición para Hacer los Documentos de Word de Solo Lectura
- Guardar Archivos de Word como PDF para una Protección Completa de Solo Lectura
- Automatizar la Protección de Archivos de Word con Python (Contraseña o PDF)
- ¿Qué Método Deberías Elegir?
- Palabras Finales
- Preguntas Frecuentes Sobre Cómo Hacer Archivos de Word de Solo Lectura
Al compartir un documento de Word, es posible que no desees que otros cambien accidentalmente tu contenido. Ya sea un contrato, un informe, un certificado o una propuesta finalizada, hacer que un archivo de Word sea de solo lectura ayuda a preservar el formato, mantener la integridad del documento y garantizar que los destinatarios vean, pero no alteren, tu trabajo.
Microsoft Word ofrece múltiples formas de hacer que tus archivos sean de solo lectura, dependiendo de la versión que estés utilizando y el nivel de protección que necesites. En esta guía, exploraremos cinco métodos efectivos, desde configuraciones manuales simples como “Marcar como Final” hasta soluciones automatizadas usando Python. Al final, sabrás exactly cómo proteger tus documentos de Word, ya sea que estés usando Word 2016, Word 2019 o las ediciones más nuevas de Microsoft 365.
- Marcar un Documento de Word como Final (Todas las Versiones de Word)
- Abrir Siempre los Archivos de Word en Modo de Solo Vista (Word 2019 o Posterior)
- Restringir la Edición para Hacer los Documentos de Word de Solo Lectura
- Guardar Archivos de Word como PDF para una Protección Completa de Solo Lectura
- Automatizar la Protección de Archivos de Word con Python (Contraseña o PDF)
Marcar un Documento de Word como Final (Todas las Versiones de Word)
Si estás usando Microsoft Word, una de las formas más sencillas de hacer que un archivo sea de solo lectura es marcándolo como final. Esta característica está disponible en todas las versiones modernas de Word e indica que el documento está completo, disuadiendo a otros de realizar más ediciones.
Pasos:
-
Abre tu documento de Word.
-
Ve a Archivo → Información → Proteger Documento → Marcar como Final.
-
Haz clic en Aceptar cuando se te solicite.
-
Guarda y cierra el documento.
Este enfoque establece el documento en un estado de solo lectura y desalienta la edición, pero no impide que alguien elimine la marca de “Marcar como Final” para editar el archivo. Es mejor usarlo como una señal de que el documento está completo, no como una medida de seguridad estricta.
Pros y Contras
✔ Rápido y sencillo; no se necesita contraseña.
✘ Los usuarios pueden omitirlo fácilmente haciendo clic en Editar de todos modos.
Abrir Siempre los Archivos de Word en Modo de Solo Lectura (Word 2019 o Posterior)
A partir de Word 2019 y Microsoft 365, Microsoft introdujo una forma más moderna de hacer que los documentos se abran en modo de solo vista: la función “Abrir siempre en solo lectura”.
Pasos:
-
Abre tu archivo en Word.
-
Haz clic en Archivo → Información → Proteger documento → Abrir siempre en solo lectura.
- Guarda el documento.
Esta función le dice a Word que siempre abra el archivo en modo de solo lectura de forma predeterminada. No bloquea la edición por completo, pero los usuarios deben habilitar manualmente la edición antes de realizar cambios, lo que reduce el riesgo de modificaciones accidentales.
Pros y Contras
✔ Conveniente y consciente de la versión; funciona sin problemas con OneDrive y SharePoint.
✘ Solo disponible en Word 2019 y versiones posteriores.
Restringir la Edición para Hacer los Documentos de Word de Solo Lectura
Para un control más fuerte, utiliza la función Restringir edición de Word. Te permite evitar cambios y, opcionalmente, agregar una contraseña, asegurando que solo los usuarios autorizados puedan modificar el archivo. Este método está disponible en casi allas las versiones de Word.
Pasos:
-
Abre tu documento.
-
Ve a Archivo → Información → Proteger documento → Restringir edición.
- En Restricciones de edición, marca Permitir solo este tipo de edición en el documento.
- En el menú desplegable, selecciona Sin cambios (Solo lectura).
- Haz clic en Sí, comenzar a aplicar la protección y establece una contraseña (opcional).
Esta opción proporciona una protección sólida. Requiere una contraseña para desproteger el documento, lo que impide que cualquiera sin ella realice cambios. Es ideal para archivos confidenciales, contratos y documentos oficiales.
Pros y Contras
✔ Fuerte y protegido con contraseña; evita tanto las ediciones intencionadas como las accidentales.
✘ Requiere tiempo de configuración y gestión de contraseñas.
Guardar Archivos de Word como PDF para una Protección Completa de Solo Lectura
Si necesitas bloquear completamente el contenido y el formato, convertir el documento de Word a un PDF es la mejor opción. Los PDF son naturalmente más seguros y más difíciles de editar.
Pasos:
- Abre tu documento de Word.
- Ve a Archivo → Guardar como.
- Elige PDF como formato de archivo.
-
(Opcional) Haz clic en Opciones y habilita Compatible con ISO 19005-1 (PDF/A) para calidad de archivo.
-
Guarda tu archivo.
Este enfoque transforma tu archivo de Word en un formato de solo lectura que conserva el diseño. Puedes agregar más restricciones o contraseñas en un editor de PDF para controlar la impresión, la copia o la edición.
Pros y Contras
✔ Garantiza un formato coherente; excelente para distribuir versiones finales.
✘ No se puede convertir fácilmente de nuevo a un formato de Word editable.
Automatizar la Protección de Archivos de Word con Python (Contraseña o PDF)
Si manejas muchos documentos de Word con regularidad, automatizar el proceso de protección puede ahorrar mucho tiempo. Usando Spire.Doc for Python, puedes agregar contraseñas mediante programación o convertir archivos a PDF en masa.
Antes de comenzar, deberás instalar la biblioteca desde PyPI usando el siguiente comando:
pip install spire.doc
Ejemplo 1: Proteger un archivo de Word con una contraseña
from spire.doc import *
from spire.doc.common import *

# Create a Document object
doc = Document()

# Load a Word file
doc.LoadFromFile("C:\\Users\\Administrator\\Desktop\\input.docx")

# Encrypt the document with an open password
doc.Encrypt("open-psd")

# Set the editing restriction type to allow read only
doc.Protect(ProtectionType.AllowOnlyReading, "permission-psd")

# Save the document
doc.SaveToFile("output/EditingRestrictions.docx")
doc.Close()
Aquí está la guía completa sobre cómo: Establecer o Eliminar las Restricciones de Edición de Documentos de Word en Python
Ejemplo 2: Convertir Word a PDF automáticamente
from spire.doc import *
from spire.doc.common import *

# Create a Document object
doc = Document()

# Load a Word file
doc.LoadFromFile("C:\\Users\\Administrator\\Desktop\\input.docx")

# Save the document to PDF
doc.SaveToFile("output/ToPDF.pdf", FileFormat.PDF)
doc.Close()
Leer más: Convertir Word a PDF con Python
La protección automatizada es perfecta para organizaciones o desarrolladores que necesitan proteger varios archivos a la vez. Garantiza la coherencia, la eficiencia y minimiza el error humano.
Pros y Contras
✔ Ideal para la protección por lotes y los flujos de trabajo de documentos.
✘ Requiere conocimientos básicos de programación.
¿Qué Método Deberías Elegir?
Aquí tienes una comparación rápida para ayudarte a decidir:
| Método | Nivel de protección | Funciona en | Mejor para |
|---|---|---|---|
| Marcar como Final | Básico | Todas las versiones | Señalar que un documento está completo |
| Abrir siempre en solo lectura | Moderado | Word 2019+ | Prevenir ediciones casuales |
| Restringir edición | Fuerte | Todas las versiones | Protección basada en contraseña |
| Guardar como PDF | Fuerte | Todas las versiones | Compartir documentos finalizados |
| Automatización con Python | Avanzado | Multiplataforma | Automatizar la seguridad de los documentos |
Si solo necesitas disuadir las ediciones, “Marcar como Final” o “Abrir siempre en solo lectura” es suficiente. Para uso profesional o legal, “Restringir edición” o “Guardar como PDF” ofrece un control más fuerte. Los desarrolladores que gestionan grandes cantidades de archivos deberían considerar la posibilidad de automatizar la protección con Python.
Palabras Finales
Hacer que un documento de Word sea de solo lectura es simple, pero el método correcto depende de tu propósito. Para una protección básica, marcar como final o habilitar el modo de solo lectura funciona bien. Para un control más fuerte, utiliza las restricciones de edición o guarda como PDF. Y para escenarios a gran escala o automatizados, los scripts de Python proporcionan una solución fiable.
Al aplicar el enfoque correcto, puedes compartir documentos con confianza sin preocuparte por ediciones no deseadas, asegurando que tu trabajo permanezca seguro y sin cambios.
Preguntas Frecuentes Sobre Cómo Hacer Archivos de Word de Solo Lectura
P1. ¿Puedo hacer que un archivo de Word sea de solo lectura sin contraseña?
Sí. Puedes usar Marcar como Final o Abrir siempre en solo lectura para disuadir las ediciones sin necesidad de una contraseña.
P2. ¿Alguien puede editar un documento de Word de “solo lectura”?
Depende del método. “Marcar como Final” y “Abrir siempre en solo lectura” se pueden omitir, pero “Restringir edición” con una contraseña evita las ediciones no autorizadas.
P3. ¿Cómo elimino las restricciones de solo lectura de un archivo de Word?
Abre el documento, ve a Archivo → Información → Proteger documento y desmarca o deshabilita el método de protección aplicado. Es posible que necesites una contraseña si se estableció una.
P4. ¿Cuál es la forma más segura de hacer que un documento sea de solo lectura?
Guardarlo como PDF o aplicar Restringir edición con una contraseña ofrece el nivel más alto de protección.
P5. ¿Puedo automatizar la configuración de solo lectura en masa?
Sí. Puedes usar Python y bibliotecas como Spire.Doc for Python para aplicar contraseñas o convertir varios archivos de Word a PDF automáticamente.