
Knowledgebase (2417)
Children categories
Footnotes are a valuable tool in Microsoft Word that allows you to enhance the content of your documents by providing additional information, references, or citations at the bottom of a page. For example, you can use footnotes to provide in-depth explanations of complex concepts, cite sources to support your arguments, or offer tangential information that might be interesting to your readers. Whether you're working on an academic paper, a book, or any document that requires citations or explanations, footnotes offer a convenient way to maintain a clean and organized layout while presenting supplementary details. In this article, we will explain how to insert or remove footnotes in a Word document in Python using Spire.Doc for Python.
- Insert a Footnote for a Specific Paragraph in Word in Python
- Insert a Footnote for a Specific Text in Word in Python
- Remove Footnotes in a Word Document in Python
Install Spire.Doc for Python
This scenario requires Spire.Doc for Python and plum-dispatch v1.7.4. They can be easily installed in your Windows through the following pip command.
pip install Spire.Doc
If you are unsure how to install, please refer to this tutorial: How to Install Spire.Doc for Python on Windows
Insert a Footnote for a Specific Paragraph in Word in Python
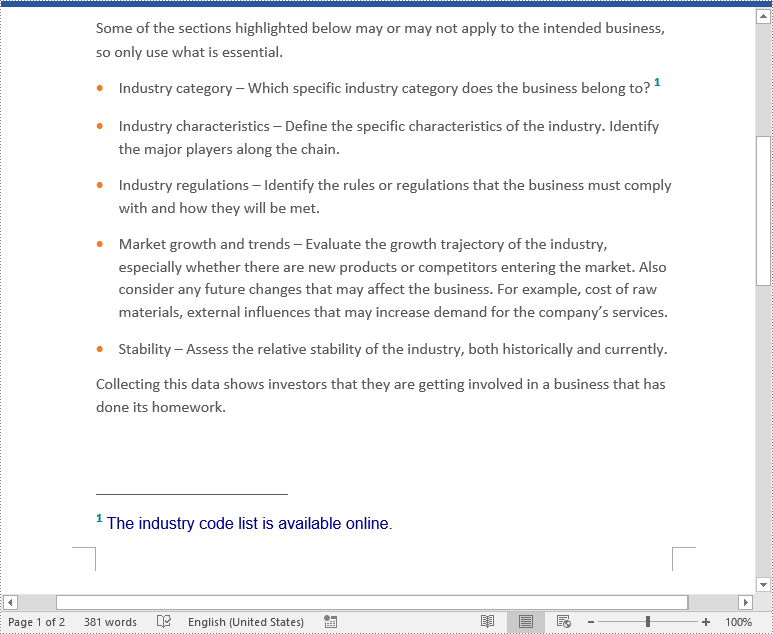
You can use the Paragraph.AppendFootnote(FootnoteType.Footnote) method provided by Spire.Doc for Python to easily add a footnote for a specific paragraph. The detailed steps are as follows.
- Create an object of the Document class.
- Load a Word document using Document.LoadFromFile() method.
- Get a specific section in the document using Document.Section[int] property and then get a specific paragraph of the section using Section.Paragraphs[int] property.
- Add a footnote at the end of the paragraph using Paragraph.AppendFootnote(FootnoteType.Footnote) method.
- Set the text content of the footnote, and then set the font and color for the footnote text and the footnote reference mark.
- Save the result document using Document.SaveToFile() method.
- Python
from spire.doc import *
from spire.doc.common import *

# Create a Document instance
document = Document()
# Load a sample Word document
document.LoadFromFile("Sample.docx")

# Get a specific section
section = document.Sections.get_Item(0)

# Get a specific paragraph
paragraph = section.Paragraphs.get_Item(3)

# Add a footnote at the end of the paragraph
footnote = paragraph.AppendFootnote(FootnoteType.Footnote)

# Set the text content of the footnote
text = footnote.TextBody.AddParagraph().AppendText("The industry code list is available online.")

# Set the text font and color
text.CharacterFormat.FontName = "Arial"
text.CharacterFormat.FontSize = 12
text.CharacterFormat.TextColor = Color.get_DarkBlue()

# Set the font and color of the footnote reference mark
footnote.MarkerCharacterFormat.FontName = "Calibri"
footnote.MarkerCharacterFormat.FontSize = 15
footnote.MarkerCharacterFormat.Bold = True
footnote.MarkerCharacterFormat.TextColor = Color.get_DarkCyan()

# Save the result document
document.SaveToFile("AddFootnoteForParagraph.docx", FileFormat.Docx2016)
document.Close()
Insert a Footnote for a Specific Text in Word in Python
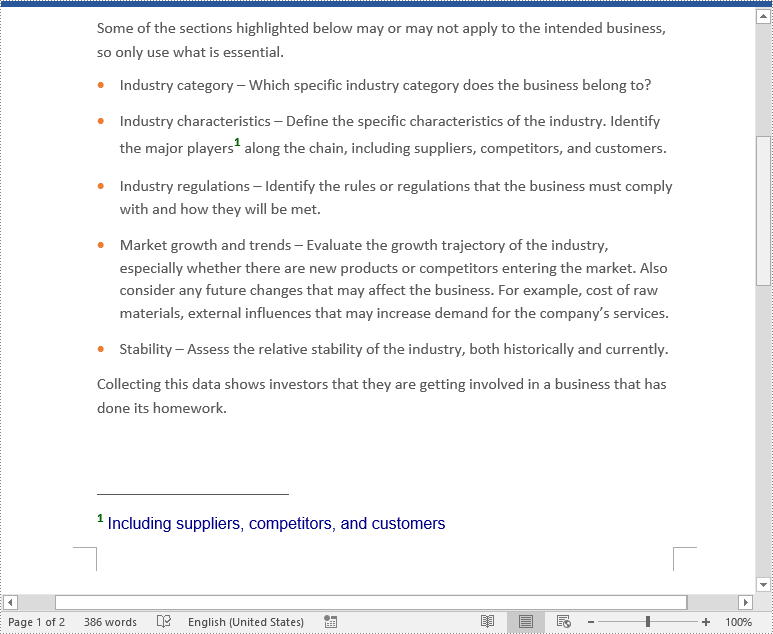
To add a footnote for a specific text, you need to find the text in the document, get the location of the text in its owner paragraph, and then insert the footnote after the text. The detailed steps are as follows.
- Create an object of the Document class.
- Load a Word document using Document.LoadFromFile() method.
- Find a specific text using Document.FindString() method.
- Get the found text as a single text range using TextSelection.GetAsOneRange() method.
- Get the paragraph where the text range is located using TextRange.OwnerParagraph property.
- Get the index position of the text range in the paragraph using Paragraph.ChildObjects.IndexOf() method.
- Add a footnote to the paragraph using Paragraph.AppendFootnote(FootnoteType.Footnote) method, and then insert the footnote after the specific text using Paragraph.ChildObjects.Insert() method.
- Set the text content of the footnote, and then set the font and color for the footnote text and the footnote reference mark.
- Save the result document using Document.SaveToFile() method.
- Python
from spire.doc import *
from spire.doc.common import *

# Create a Document instance
document = Document()
# Load a sample Word document
document.LoadFromFile("Sample.docx")

# Find a specific text
selection = document.FindString("major players", False, True)

# Get the found text as a single text range
textRange = selection.GetAsOneRange()

# Get the paragraph where the text range is located
paragraph = textRange.OwnerParagraph

# Get the index position of the text range in the paragraph
index = paragraph.ChildObjects.IndexOf(textRange)

# Add a footnote to the paragraph
footnote = paragraph.AppendFootnote(FootnoteType.Footnote)

# Insert the footnote after the text range
paragraph.ChildObjects.Insert(index + 1, footnote)

# Set the text content of the footnote
text = footnote.TextBody.AddParagraph().AppendText("Including suppliers, competitors, and customers")

# Set the text font and color
text.CharacterFormat.FontName = "Arial"
text.CharacterFormat.FontSize = 12
text.CharacterFormat.TextColor = Color.get_DarkBlue()

# Set the font and color of the footnote reference mark
footnote.MarkerCharacterFormat.FontName = "Calibri"
footnote.MarkerCharacterFormat.FontSize = 15
footnote.MarkerCharacterFormat.Bold = True
footnote.MarkerCharacterFormat.TextColor = Color.get_DarkGreen()

# Save the result document
document.SaveToFile("AddFootnoteForText.docx", FileFormat.Docx2016)
document.Close()
Remove Footnotes in a Word Document in Python
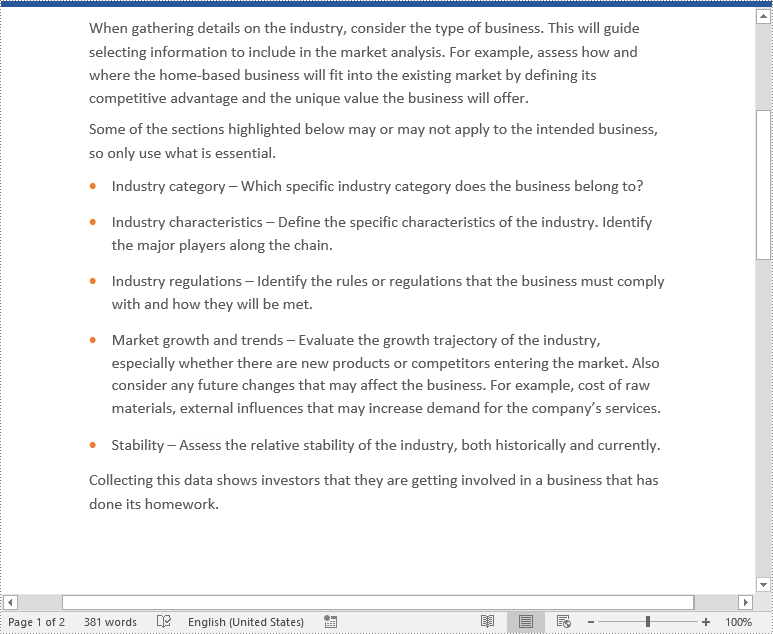
When the footnotes of a Word document are no longer needed, you can remove them to make the document neater. The detailed steps are as follows.
- Create an object of the Document class.
- Load a Word document using Document.LoadFromFile() method.
- Get a specific section using Document.Sections[int] property.
- Loop through each paragraph in the section to find the footnotes.
- Remove the footnotes using Paragraph.ChildObjects.RemoveAt() method.
- Save the result document using Document.SaveToFile() method.
- Python
from spire.doc import *
from spire.doc.common import *

# Create a Document instance
document = Document()
# Load a sample Word document
document.LoadFromFile("AddFootnoteForParagraph.docx")

# Get the first section of the document
section = document.Sections[0]

# Loop through the paragraphs in the section
for y in range(section.Paragraphs.Count):
    para = section.Paragraphs.get_Item(y)
    index = -1
    i = 0
    cnt = para.ChildObjects.Count
    while i < cnt:
        pBase = para.ChildObjects[i] if isinstance(para.ChildObjects[i], ParagraphBase) else None
        if isinstance(pBase, Footnote):
            index = i
            break
        i += 1
    if index > -1:
        # Remove the footnotes from the paragraph
        para.ChildObjects.RemoveAt(index)

# Save the result document
document.SaveToFile("RemoveFootnotes.docx", FileFormat.Docx)
document.Close()
Apply for a Temporary License
If you'd like to remove the evaluation message from the generated documents, or to get rid of the function limitations, please request a 30-day trial license for yourself.
PDF properties refer to the information embedded within the document that provides detailed information about the documents, such as author, creation date, last modification date, etc. Users can check the properties of a PDF document in PDF viewers to quickly grasp the key information of the document. Apart from the built-in properties, PDF documents also offer the feature of customizing properties to help provide additional information about the document. Understanding how to specify and access this document information facilitates the creation of user-friendly documents and the processing of documents in large quantities. In this article, we will explore how to set and retrieve PDF properties through Python programs using Spire.PDF for Python.
Install Spire.PDF for Python
This scenario requires Spire.PDF for Python and plum-dispatch v1.7.4. They can be easily installed in your Windows through the following pip commands.
pip install Spire.PDF
If you are unsure how to install, please refer to this tutorial: How to Install Spire.PDF for Python on Windows
Set PDF Properties with Python
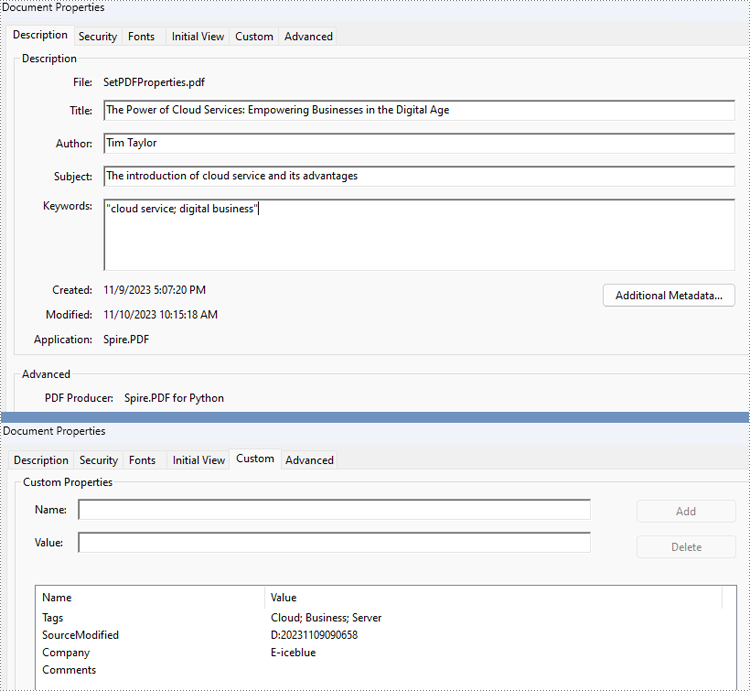
Spire.PDF for Python provides several properties under the PdfDocumentInformation class for setting built-in document properties, such as author, subject, keywords. Besides, it also provides the PdfDocumentInformation.SetCustomProperty() method to set custom properties. The following are the detailed steps to set PDF properties:
- Create an object of PdfDocument class and load a PDF document using PdfDocument.LoadFromFile() method.
- Get the properties of the document through PdfDocument.DocumentInformation property.
- Set the built-in properties through properties under PdfDocumentInformation class.
- Set custom properties using PdfDocumentInformation.SetCustomProperty() method.
- Save the document using PdfDocument.SaveToFile() method.
- Python
from spire.pdf import *
from spire.pdf.common import *

# Create an object of PdfDocument class and load a PDF document
pdf = PdfDocument()
pdf.LoadFromFile("Sample.pdf")

# Get the properties of the document
properties = pdf.DocumentInformation

# Set built-in properties
properties.Author = "Tim Taylor"
properties.Creator = "Spire.PDF"
properties.Keywords = "cloud service; digital business"
properties.Subject = "The introduction of cloud service and its advantages"
properties.Title = "The Power of Cloud Services: Empowering Businesses in the Digital Age"
properties.Producer = "Spire.PDF for Python"

# Set custom properties
properties.SetCustomProperty("Company", "E-iceblue")
properties.SetCustomProperty("Tags", "Cloud; Business; Server")

# Save the document
pdf.SaveToFile("output/SetPDFProperties.pdf")
pdf.Close()
Retrieve PDF Properties with Python
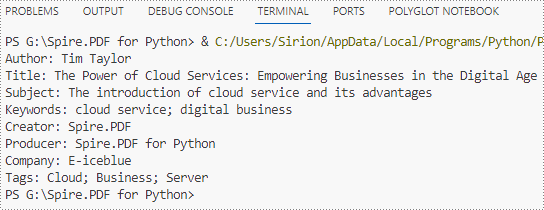
Information in built-in PDF properties can be obtained using the properties under the PdfDocumentInformation class, while that in custom PDF properties can be obtained using PdfDocumentInformation.GetCustomProperty() method. The detailed steps are as follows:
- Create an object of PdfDocument class and load a PDF document using PdfDocument.LoadFromFile() method.
- Get the properties of the document through PdfDocument.DocumentInformation property.
- Retrieve the built-in properties through properties under PdfDocumentInformation class and custom properties using PdfDocumentInformation.GetCustomProperty() method and print them.
- Python
from spire.pdf import *
from spire.pdf.common import *

# Create an object of PdfDocument class and load a PDF document
pdf = PdfDocument()
pdf.LoadFromFile("output\SetPDFProperties.pdf")

# Get the properties of the document
properties = pdf.DocumentInformation

# Create a StringBuilder object
information = ""

# Retrieve the built-in properties
information += "Author: " + properties.Author
information += "\nTitle: " + properties.Title
information += "\nSubject: " + properties.Subject
information += "\nKeywords: " + properties.Keywords
information += "\nCreator: " + properties.Creator
information += "\nProducer: " + properties.Producer

# Retrieve the custom properties
information += "\nCompany: " + properties.GetCustomProperty("Company")
information += "\nTags: " + properties.GetCustomProperty("Tags")

# Print the document properties
print(information)
pdf.Close()
Apply for a Temporary License
If you'd like to remove the evaluation message from the generated documents, or to get rid of the function limitations, please request a 30-day trial license for yourself.
A table is a powerful tool in a Word document that allows you to organize and present information in a structured manner. It consists of rows and columns, forming a grid-like structure. Tables are commonly used for various purposes, such as creating schedules, comparing data, or displaying data in a neat and organized format. In this article, you will learn how to programmatically create tables in a Word document in Python using Spire.Doc for Python.
- Create a Simple Table in Word in Python
- Create a Table from an HTML String in Python
- Merge and Split Cells in a Table in Python
- Fill a Table with Data in Word in Python
Install Spire.Doc for Python
This scenario requires Spire.Doc for Python and plum-dispatch v1.7.4. They can be easily installed in your Windows through the following pip command.
pip install Spire.Doc
If you are unsure how to install, please refer to this tutorial: How to Install Spire.Doc for Python on Windows
Prerequisite Knowledge
Spire.Doc for Python offers the Table class to represent a table in a Word document. You can create table objects either through the constructor or the Section.AddTable() method. After the table object is created, you can use the Table.AddRow() method to dynamically add rows to the table, or specify the number of rows and columns of the table, and then populate it with data in a single pass.
Also, Spire.Doc for Python supports creating tables from an HTML string. This method does not return an object of Table. Therefore, you cannot use the properties or methods under the Table class to deal with the table created from an HTML string. You need to set up the content and style of the table in the HTML string.
Create a Simple Table in Word in Python
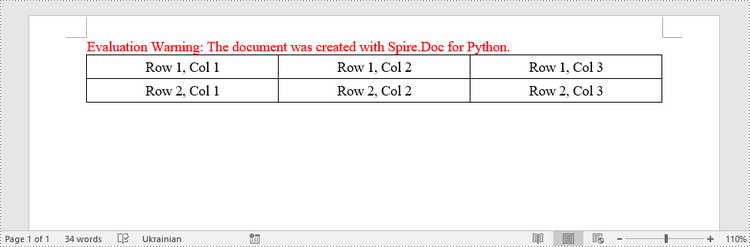
This example demonstrates how to create a simple plain table using the Table class and how to add rows one by one. Here are the main steps.
- Create a Document object.
- Add a section to it using Document.AddSection() method.
- Create a Table object.
- Add a row to it using Table.AddRow() method.
- Get a specific cell of the row through Row.Cells[index] property.
- Add text to the cell using TableCell.AddParagraph().AppendText() method.
- Add the table to the document using Section.AddTable() method.
- Save the document to a .docx file using Document.SaveToFile() method.
- Python
from spire.doc import *
from spire.doc.common import *

# Create a Document object
doc = Document()

# Add a section
section = doc.AddSection()

# Create a table
table = Table(doc, True)

# Set the width of table
table.PreferredWidth = PreferredWidth(WidthType.Percentage, int(100))

# Set the border of table
table.TableFormat.Borders.BorderType = BorderStyle.Single
table.TableFormat.Borders.Color = Color.get_Black()

# Add a row
row = table.AddRow(False, 3)
row.Height = 20.0

# Add data to the cells
cell = row.Cells[0]
cell.CellFormat.VerticalAlignment = VerticalAlignment.Middle
paragraph = cell.AddParagraph()
paragraph.Format.HorizontalAlignment = HorizontalAlignment.Center
paragraph.AppendText("Row 1, Col 1")
cell = row.Cells[1]
cell.CellFormat.VerticalAlignment = VerticalAlignment.Middle
paragraph = cell.AddParagraph()
paragraph.Format.HorizontalAlignment = HorizontalAlignment.Center
paragraph.AppendText("Row 1, Col 2")
cell = row.Cells[2]
cell.CellFormat.VerticalAlignment = VerticalAlignment.Middle
paragraph = cell.AddParagraph()
paragraph.Format.HorizontalAlignment = HorizontalAlignment.Center
paragraph.AppendText("Row 1, Col 3")

# Add the second row
row = table.AddRow(False, 3)
row.Height = 20.0
cell = row.Cells[0]
cell.CellFormat.VerticalAlignment = VerticalAlignment.Middle
paragraph = cell.AddParagraph()
paragraph.Format.HorizontalAlignment = HorizontalAlignment.Center
paragraph.AppendText("Row 2, Col 1")
cell = row.Cells[1]
cell.CellFormat.VerticalAlignment = VerticalAlignment.Middle
paragraph = cell.AddParagraph()
paragraph.Format.HorizontalAlignment = HorizontalAlignment.Center
paragraph.AppendText("Row 2, Col 2")
cell = row.Cells[2]
cell.CellFormat.VerticalAlignment = VerticalAlignment.Middle
paragraph = cell.AddParagraph()
paragraph.Format.HorizontalAlignment = HorizontalAlignment.Center
paragraph.AppendText("Row 2, Col 3")

# Add the table to the section
section.Tables.Add(table)

# Save the document
doc.SaveToFile("output/CreateTable.docx", FileFormat.Docx2013)
doc.Close()
Create a Table from an HTML String in Python
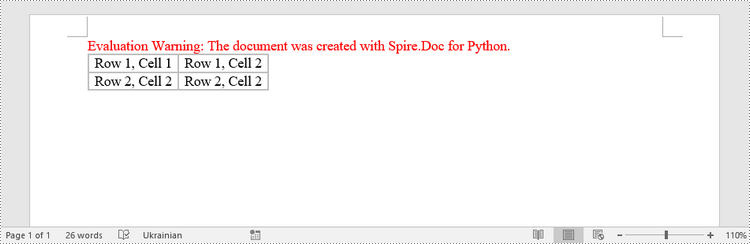
To create a table from an HTML string, use the Paragraph.AppendHTML() method. The following are the steps.
- Create a Document object.
- Add a section to it using Document.AddSection() method.
- Specify the HTML string for generating the table.
- Add a paragraph using Section.AddParagraph() method.
- Add the HTML table to the paragraph using Paragraph.AppendHTML() method.
- Save the document to a .docx file using Document.SaveToFile() method.
- Python
from spire.doc import *
from spire.doc.common import *

# Create a Document object
document = Document()

# Add a section
section = document.AddSection()

# Specify HTML string
HTML = "<table border='2px'>" + "<tr>" + "<td>Row 1, Cell 1</td>" + "<td>Row 1, Cell 2</td>" + \
    "</tr>" + "<tr>" + "<td>Row 2, Cell 2</td>" + \
    "<td>Row 2, Cell 2</td>" + "</tr>" + "</table>"

# Add a paragraph
paragraph = section.AddParagraph()

# Append HTML string to the paragraph
paragraph.AppendHTML(HTML)

# Save to Word document
document.SaveToFile("output/HtmlTable.docx", FileFormat.Docx2013)
document.Close()
Merge and Split Cells in a Table in Python
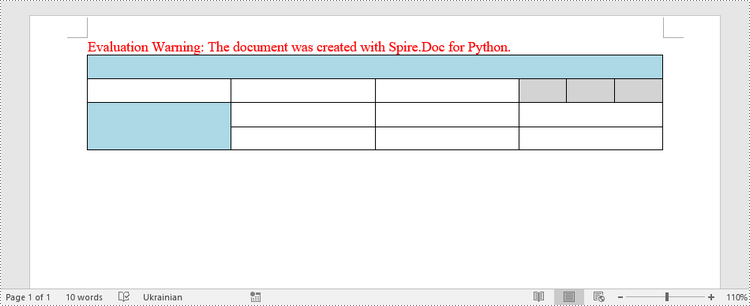
When working with tables, the ability to merge or split cells provides a powerful way to customize and format data. This example shows you how to combine adjacent cells into a single cell and how to divide a single cell into multiple smaller cells using Spire.Doc for Python.
- Create a Document object.
- Add a section using Document.AddSection() method.
- Add a table using Section.AddTable() method.
- Set the column number and row number of the table using Table.ResetCells() method.
- Horizontally merge cells using Table.ApplyHorizontalMerge() method.
- Vertically merge cells using Table.ApplyVerticalMerge() method.
- Split a cell into multiple smaller cells using TableCell.SplitCell() method.
- Save the document to a .docx file using Document.SaveToFile() method.
- Python
from spire.doc import *
from spire.doc.common import *

# Create a Document object
document = Document()

# Add a section
section = document.AddSection()

# Create a table
table = section.AddTable(True)

# Set the row number and column number of table
table.ResetCells(4, 4)

# Set the width of table
table.PreferredWidth = PreferredWidth(WidthType.Percentage, int(100))

# Set row height
for i in range(0, table.Rows.Count):
    table.Rows[i].Height = 20.0

# Horizontally merge cells
table.ApplyHorizontalMerge(0, 0, 3)

# Vertically merge cells
table.ApplyVerticalMerge(0, 2, 3)

# Get a cell
cell = table.Rows.get_Item(1).Cells.get_Item(3)

# Split the cell into 3 smaller cells
cell.SplitCell(3, 0)

# Fill specified cells with color
table.Rows[0].Cells[0].CellFormat.BackColor = Color.get_LightBlue()
table.Rows[2].Cells[0].CellFormat.BackColor = Color.get_LightBlue()
table.Rows[1].Cells[3].CellFormat.BackColor = Color.get_LightGray()
table.Rows[1].Cells[4].CellFormat.BackColor = Color.get_LightGray()
table.Rows[1].Cells[5].CellFormat.BackColor = Color.get_LightGray()

# Save to Word document
document.SaveToFile("output/MergeAndSplit.docx", FileFormat.Docx2013)
document.Close()
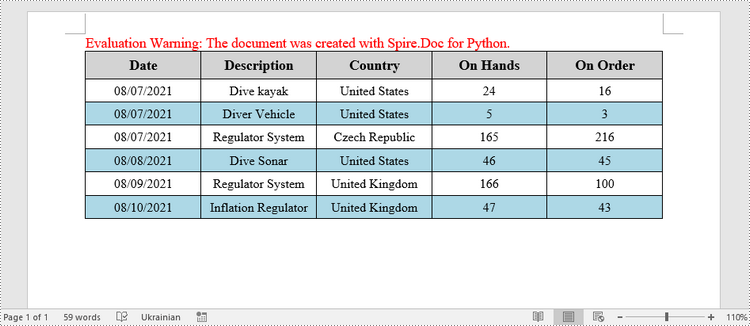
Fill a Table with Data in Word in Python
This example creates a 5x7 table, writes the data from lists into the cells, and applies different formatting to the header row and other rows. The following are the main steps.
- Create a Document object.
- Add a section using Document.AddSection() method.
- Add a table using Section.AddTable() method.
- Specify the data for filling the table in two lists.
- Reset the row number and column number of the table depending on the height and width of the data using Table.ResetCells() method.
- Write data into the corresponding cells using TableCell.AddParagraph().AppendText() method.
- Apply different colors to different rows through TableCell.CellFormat.BackColor property.
- Save the document to a .docx file using Document.SaveToFile() method.
- Python
import math
from spire.doc import *
from spire.doc.common import *

# Create a Document object
doc = Document()

# Add a section
section = doc.AddSection()

# Create a table
table = section.AddTable(True)

# Specify table data
header_data = ["Date", "Description", "Country", "On Hands", "On Order"]
row_data = [ ["08/07/2021","Dive kayak","United States","24","16"],
                ["08/07/2021","Diver Vehicle","United States","5","3"],
                ["08/07/2021","Regulator System","Czech Republic","165","216"],
                ["08/08/2021","Dive Sonar","United States","46","45"],
                ["08/09/2021","Regulator System","United Kingdom","166","100"],
                ["08/10/2021","Inflation Regulator","United Kingdom","47","43"]]

# Set the row number and column number of table
table.ResetCells(len(row_data) + 1, len(header_data))

# Set the width of table
table.PreferredWidth = PreferredWidth(WidthType.Percentage, int(100))

# Get header row
headerRow = table.Rows[0]
headerRow.IsHeader = True
headerRow.Height = 23
headerRow.RowFormat.BackColor = Color.get_LightGray()

# Fill the header row with data and set the text formatting
i = 0
while i < len(header_data):
    headerRow.Cells[i].CellFormat.VerticalAlignment = VerticalAlignment.Middle
    paragraph = headerRow.Cells[i].AddParagraph()
    paragraph.Format.HorizontalAlignment = HorizontalAlignment.Center
    txtRange = paragraph.AppendText(header_data[i])
    txtRange.CharacterFormat.Bold = True
    txtRange.CharacterFormat.FontSize = 12
    i += 1

# Fill the rest rows with data and set the text formatting
r = 0
while r < len(row_data):
    dataRow = table.Rows[r + 1]
    dataRow.Height = 20
    dataRow.HeightType = TableRowHeightType.Exactly
    c = 0
    while c < len(row_data[r]):
        dataRow.Cells[c].CellFormat.VerticalAlignment = VerticalAlignment.Middle
        paragraph = dataRow.Cells[c].AddParagraph()
        paragraph.Format.HorizontalAlignment = HorizontalAlignment.Center
        txtRange =  paragraph.AppendText(row_data[r][c])
        txtRange.CharacterFormat.FontSize = 11
        c += 1
    r += 1

# Alternate row color
for j in range(1, table.Rows.Count):
    if math.fmod(j, 2) == 0:
        row2 = table.Rows[j]
        for f in range(row2.Cells.Count):
            row2.Cells[f].CellFormat.BackColor = Color.get_LightBlue()

# Set the border of table
table.TableFormat.Borders.BorderType = BorderStyle.Single
table.TableFormat.Borders.LineWidth = 1.0
table.TableFormat.Borders.Color = Color.get_Black()

# Save the document
doc.SaveToFile("output/Table.docx", FileFormat.Docx2013)
Apply for a Temporary License
If you'd like to remove the evaluation message from the generated documents, or to get rid of the function limitations, please request a 30-day trial license for yourself.
