Knowledgebase (2345)
Children categories
Nowadays, digital documents play a significant role in our daily lives, both in personal and professional settings. One such common format is Microsoft Word - used for creating and editing textual documents. However, there may come a time when you need to convert your Word files into a more universally accessible format, such as PDF. PDFs offer advantages like preserving formatting, ensuring compatibility, and maintaining document integrity across different devices and operating systems. In this article, you will learn how to convert Word to PDF in Python using Spire.Doc for Python.
- Convert Doc or Docx to PDF in Python
- Convert Word to Password-Protected PDF in Python
- Convert Word to PDF with Bookmarks in Python
- Convert Word to PDF with Fonts Embedded in Python
- Set Image Quality When Converting Word to PDF in Python
Install Spire.Doc for Python
This scenario requires Spire.Doc for Python and plum-dispatch v1.7.4. They can be easily installed in your Windows through the following pip command.
pip install Spire.Doc
If you are unsure how to install, please refer to this tutorial: How to Install Spire.Doc for Python on Windows
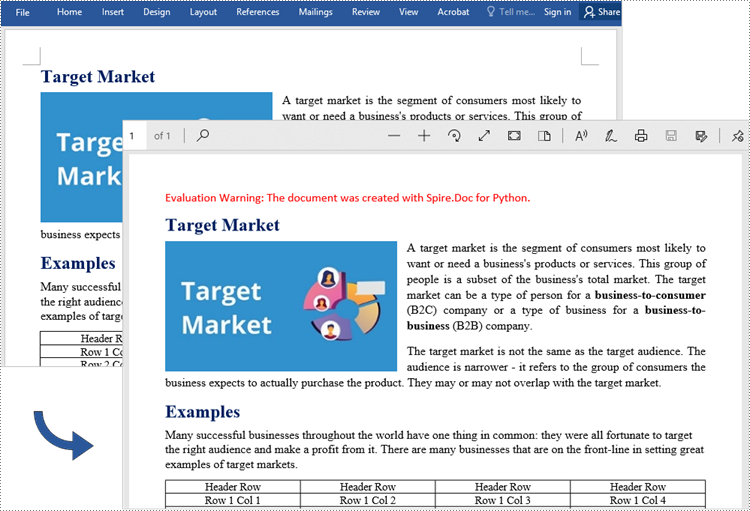
Convert Doc or Docx to PDF in Python
Spire.Doc for Python offers the Document.SaveToFile(string fileName, FileFormat fileFormat) method that allows to save Word as PDF, XPS, HTML, RTF, etc. If you just want to save your Word documents as regular PDFs without additional settings, follow the steps below.
- Create a Document object.
- Load a sample Word document using Document.LoadFromFile() method.
- Save the document to PDF using Doucment.SaveToFile() method.
- Python
from spire.doc import *
from spire.doc.common import *

# Create word document
document = Document()

# Load a doc or docx file
document.LoadFromFile("C:\\Users\\Administrator\\Desktop\\input.docx")

#Save the document to PDF
document.SaveToFile("output/ToPDF.pdf", FileFormat.PDF)
document.Close()
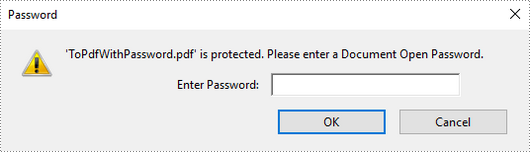
Convert Word to Password-Protected PDF in Python
To convert Word to a Password-Protected PDF, you can utilize the Document.SaveToFile(string fileName, ToPdfParameterList paramList) method, where the ToPdfParameterList parameter allows you to control the conversion process of a Word document into a PDF format. This includes options such as encrypting the document during the conversion. Here are the specific steps to accomplish this task.
- Create a Document object.
- Load a sample Word document using Document.LoadFromFile() method.
- Create a ToPdfParameterList object, which is used to set conversion options.
- Specify the open password and permission password and then set both passwords for the generated PDF using ToPdfParameterList.PdfSecurity.Encrypt() method.
- Save the Word document to PDF with password using Doucment.SaveToFile(string fileName, ToPdfParameterList paramList) method.
- Python
from spire.doc import *
from spire.doc.common import *

# Create a Document object
document = Document()

# Load a Word file
document.LoadFromFile("C:\\Users\\Administrator\\Desktop\\input.docx")

# Create a ToPdfParameterList object
parameter = ToPdfParameterList()

# Specify open password and permission password
openPsd = "abc-123"
permissionPsd = "permission"

# Protect the PDF to be generated with open password and permission password
parameter.PdfSecurity.Encrypt(openPsd, permissionPsd, PdfPermissionsFlags.Default, PdfEncryptionKeySize.Key128Bit)

# Save the Word document to PDF
document.SaveToFile("output/ToPdfWithPassword.pdf", parameter)
document.Close()
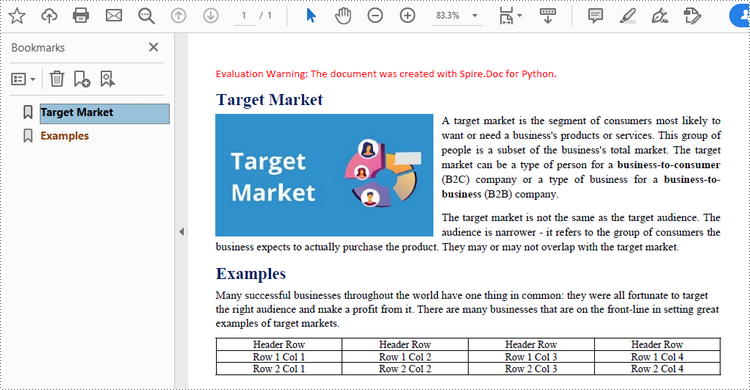
Convert Word to PDF with Bookmarks in Python
Adding bookmarks to a document can improve its readability. When creating PDF from Word, you may want to keep the existing bookmarks or create new ones based on the headings. Here are the steps to convert Word to PDF while maintaining bookmarks.
- Create a Document object.
- Load a Word file using Document.LoadFromFile() method.
- Create a ToPdfParameterList object, which is used to set conversion options.
- Create bookmarks in PDF from the headings in Word by setting ToPdfParameterList.CreateWordBookmarksUsingHeadings to true.
- Save the document to PDF with bookmarks using Doucment.SaveToFile(string fileName, ToPdfParameterList paramList) method.
- Python
from spire.doc import *
from spire.doc.common import *

# Create a Document object
document = Document()

# Load a Word file
document.LoadFromFile("C:\\Users\\Administrator\\Desktop\\input.docx")

# Create a ToPdfParameterList object
parames = ToPdfParameterList()

# Create bookmarks from Word headings
parames.CreateWordBookmarksUsingHeadings = True

# Create bookmarks in PDF from existing bookmarks in Word
# parames.CreateWordBookmarks = True

# Save the document to PDF
document.SaveToFile("output/ToPdfWithBookmarks.pdf", FileFormat.PDF)
document.Close()
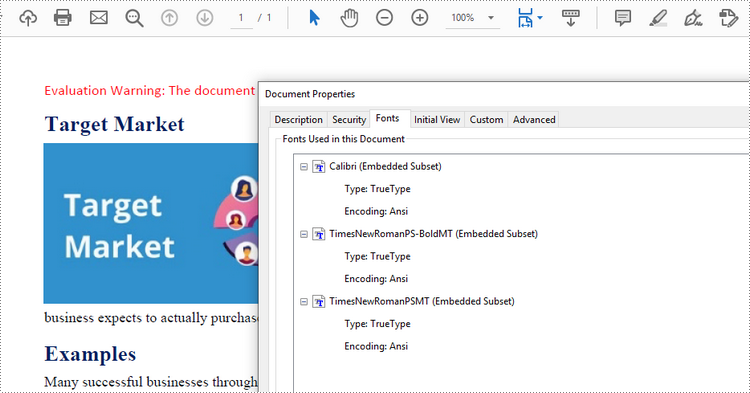
Convert Word to PDF with Fonts Embedded in Python
To ensure consistent appearance of a PDF document on any device, you probably need to embed fonts in the generated PDF document. The following are the steps to embed the fonts used in a Word document into the resulting PDF.
- Create a Document object.
- Load a sample Word file using Document.LoadFromFile() method.
- Create a ToPdfParameterList object, which is used to set conversion options.
- Embed fonts in generated PDF through ToPdfParameterList.IsEmbeddedAllFonts property.
- Save the document to PDF using Doucment.SaveToFile(string fileName, ToPdfParameterList paramList) method.
- Python
from spire.doc import *
from spire.doc.common import *

# Create a Document object
document = Document()

# Load a Word file
document.LoadFromFile("C:\\Users\\Administrator\\Desktop\\input.docx")

# Create a ToPdfParameterList object
parameter = ToPdfParameterList()

# Embed fonts in PDF
parameter.IsEmbeddedAllFonts = True

# Save the Word document to PDF
document.SaveToFile("output/EmbedFonts.pdf", parameter)
document.Close()
Set Image Quality When Converting Word to PDF in Python
When converting a Word document to PDF, it is important to consider the size of the resulting file, especially if it contains numerous high-quality images. You have the option to compress the image quality during the conversion process. To do this, follow the steps below.
- Create a Document object.
- Load a sample Word file using Document.LoadFromFile() method.
- Set the image quality through Document.JPEGQuality property.
- Save the document to PDF using Doucment.SaveToFile() method.
- Python
from spire.doc import *
from spire.doc.common import *

# Create a Document object
document = Document()

# Load a Word file
document.LoadFromFile("C:\\Users\\Administrator\\Desktop\\input.docx")

# Compress image to 40% of its original quality
document.JPEGQuality = 40

# Preserve original image quality
# document.JPEGQuality = 100

# Save the Word document to PDF
document.SaveToFile("output/SetImageQuality.pdf", FileFormat.PDF)
document.Close()
Get a Free License
To fully experience the capabilities of Spire.Doc for Python without any evaluation limitations, you can request a free 30-day trial license.
A clustered column chart and a stacked column chart are two variants of column chart. The clustered column chart enables straightforward comparison of values across different categories, while the stacked column chart displays both the total for each category and the proportion of its individual components. In this article, you will learn how to create clustered or stacked column charts in Excel in Python using Spire.XLS for Python.
Install Spire.XLS for Python
This scenario requires Spire.XLS for Python and plum-dispatch v1.7.4. They can be easily installed in your Windows through the following pip command.
pip install Spire.XLS
If you are unsure how to install, please refer to this tutorial: How to Install Spire.XLS for Python on Windows
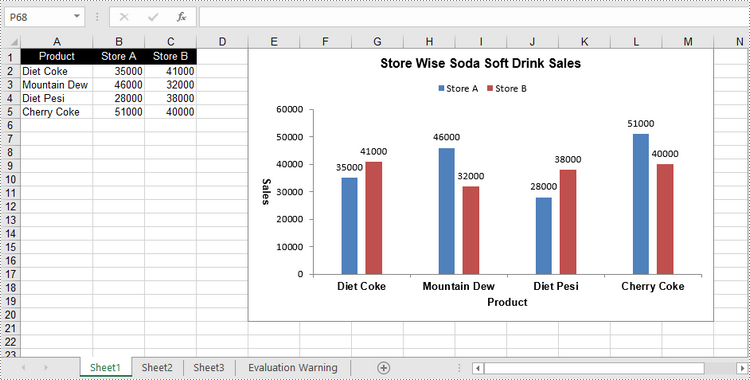
Create a Clustered Column Chart in Excel in Python
To add a chart to a worksheet, use Worksheet.Chart.Add(ExcelChartType chartType) method. The ExcelChartType enumeration includes various chart types predefined in MS Excel. The following are the steps to add a clustered column chart in Excel using Spire.XLS for Python.
- Create a Workbook object.
- Get a specific worksheet through Workbook.Worksheets[index] property.
- Write data into the specified cells.
- Add a clustered column char to the worksheet using Worksheet.Chart.Add(ExcelChartType.ColumnClustered) method.
- Set the chart data through Chart.DataRange property.
- Set the position, title, and other attributes of the chart through the properties under the Chart object.
- Save the workbook to an Excel file using Workbook.SaveToFile() method.
- Python
from spire.xls import *
from spire.xls.common import *

# Create a Workbook object
workbook = Workbook()

# Get the first sheet
sheet = workbook.Worksheets[0]

# Set chart data
sheet.Range["A1"].Value = "Product"
sheet.Range["A2"].Value = "Diet Coke"
sheet.Range["A3"].Value = "Mountain Dew"
sheet.Range["A4"].Value = "Diet Pesi"
sheet.Range["A5"].Value = "Cherry Coke"

sheet.Range["B1"].Value = "Store A"
sheet.Range["B2"].NumberValue = 35000
sheet.Range["B3"].NumberValue = 46000
sheet.Range["B4"].NumberValue = 28000
sheet.Range["B5"].NumberValue = 51000
sheet.Range["C1"].Value = "Store B"
sheet.Range["C2"].NumberValue = 41000
sheet.Range["C3"].NumberValue = 32000
sheet.Range["C4"].NumberValue = 38000
sheet.Range["C5"].NumberValue = 40000

# Set cell style
sheet.Range["A1:C1"].RowHeight = 15
sheet.Range["A1:C1"].Style.Color = Color.get_Black()
sheet.Range["A1:C1"].Style.Font.Color = Color.get_White()
sheet.Range["A1:C1"].Style.VerticalAlignment = VerticalAlignType.Center
sheet.Range["A1:C1"].Style.HorizontalAlignment = HorizontalAlignType.Center
sheet.AutoFitColumn(1)

# Add a chart to the sheet
chart = sheet.Charts.Add(ExcelChartType.ColumnClustered)

# Set data range of chart
chart.DataRange = sheet.Range["A1:C5"]
chart.SeriesDataFromRange = False

# Set position of the chart
chart.LeftColumn = 5
chart.TopRow = 1
chart.RightColumn = 14
chart.BottomRow = 21

# Set chart title
chart.ChartTitle = "Store Wise Soda Soft Drink Sales"
chart.ChartTitleArea.IsBold = True
chart.ChartTitleArea.Size = 12

# Set axis title
chart.PrimaryCategoryAxis.Title = "Product"
chart.PrimaryCategoryAxis.Font.IsBold = True
chart.PrimaryCategoryAxis.TitleArea.IsBold = True
chart.PrimaryValueAxis.Title = "Sales"
chart.PrimaryValueAxis.HasMajorGridLines = False
chart.PrimaryValueAxis.TitleArea.IsBold = True
chart.PrimaryValueAxis.TitleArea.TextRotationAngle = 90

# Set series color, overlap, gap width and data labels
series = chart.Series
for i in range(len(series)):
    cs = series[i]
    cs.Format.Options.IsVaryColor = True
    cs.Format.Options.Overlap = -50
    cs.Format.Options.GapWidth = 350
    cs.DataPoints.DefaultDataPoint.DataLabels.HasValue = True

# Set legend position
chart.Legend.Position = LegendPositionType.Top

# Save the document
workbook.SaveToFile("ClusteredColumnChart.xlsx", ExcelVersion.Version2016)
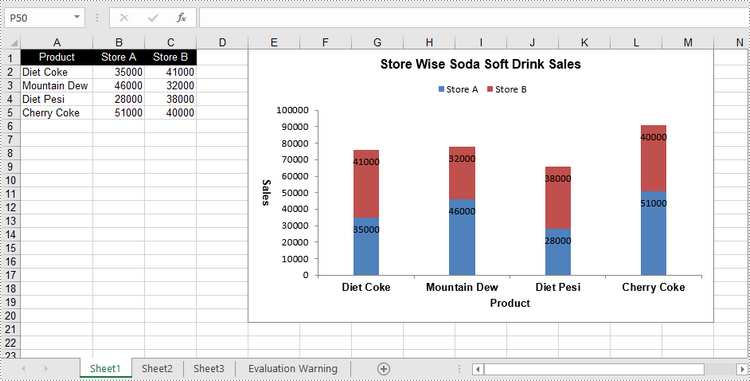
Create a Stacked Column Chart in Excel in Python
The process of creating a stacked column chart is similar to that of creating a clustered column chart. The only difference is that you must change the Excel chart type from ColumnClustered to ColumnStacked.
- Create a Workbook object.
- Get a specific worksheet through Workbook.Worksheets[index] property.
- Write data into the specified cells.
- Add a clustered column char to the worksheet using Worksheet.Chart.Add(ExcelChartType.ColumnStacked) method.
- Set the chart data through Chart.DataRange property.
- Set the position, title, and other attributes of the chart through the properties under the Chart object.
- Save the workbook to an Excel file using Workbook.SaveToFile() method.
- Python
from spire.xls import *
from spire.xls.common import *

# Create a Workbook object
workbook = Workbook()

# Get the first sheet
sheet = workbook.Worksheets[0]

# Set chart data
sheet.Range["A1"].Value = "Product"
sheet.Range["A2"].Value = "Diet Coke"
sheet.Range["A3"].Value = "Mountain Dew"
sheet.Range["A4"].Value = "Diet Pesi"
sheet.Range["A5"].Value = "Cherry Coke"
sheet.Range["B1"].Value = "Store A"
sheet.Range["B2"].NumberValue = 35000
sheet.Range["B3"].NumberValue = 46000
sheet.Range["B4"].NumberValue = 28000
sheet.Range["B5"].NumberValue = 51000
sheet.Range["C1"].Value = "Store B"
sheet.Range["C2"].NumberValue = 41000
sheet.Range["C3"].NumberValue = 32000
sheet.Range["C4"].NumberValue = 38000
sheet.Range["C5"].NumberValue = 40000

# Set cell style
sheet.Range["A1:C1"].RowHeight = 15
sheet.Range["A1:C1"].Style.Color = Color.get_Black()
sheet.Range["A1:C1"].Style.Font.Color = Color.get_White()
sheet.Range["A1:C1"].Style.VerticalAlignment = VerticalAlignType.Center
sheet.Range["A1:C1"].Style.HorizontalAlignment = HorizontalAlignType.Center
sheet.AutoFitColumn(1)

# Add a chart to the sheet
chart = sheet.Charts.Add(ExcelChartType.ColumnStacked)

# Set data range of chart
chart.DataRange = sheet.Range["A1:C5"]
chart.SeriesDataFromRange = False

# Set position of the chart
chart.LeftColumn = 5
chart.TopRow = 1
chart.RightColumn = 14
chart.BottomRow = 21

# Set chart title
chart.ChartTitle = "Store Wise Soda Soft Drink Sales"
chart.ChartTitleArea.IsBold = True
chart.ChartTitleArea.Size = 12

# Set axis title
chart.PrimaryCategoryAxis.Title = "Product"
chart.PrimaryCategoryAxis.Font.IsBold = True
chart.PrimaryCategoryAxis.TitleArea.IsBold = True
chart.PrimaryValueAxis.Title = "Sales"
chart.PrimaryValueAxis.HasMajorGridLines = False
chart.PrimaryValueAxis.TitleArea.IsBold = True
chart.PrimaryValueAxis.TitleArea.TextRotationAngle = 90

# Set series color, gap width and data labels
series = chart.Series
for i in range(len(series)):
    cs = series[i]
    cs.Format.Options.IsVaryColor = True
    cs.Format.Options.GapWidth = 270
    cs.DataPoints.DefaultDataPoint.DataLabels.HasValue = True
    cs.DataPoints.DefaultDataPoint.DataLabels.Position = DataLabelPositionType.Inside

# Set legend position
chart.Legend.Position = LegendPositionType.Top

# Save the document
workbook.SaveToFile("StackedColumnChart.xlsx", ExcelVersion.Version2016)
Apply for a Temporary License
If you'd like to remove the evaluation message from the generated documents, or to get rid of the function limitations, please request a 30-day trial license for yourself.
Spire.Doc for Python is a Python library for reading, creating, editing and converting Word (.doc & .docx) files in any Python application. This article shows you how to install Spire.Doc for Python on Windows.
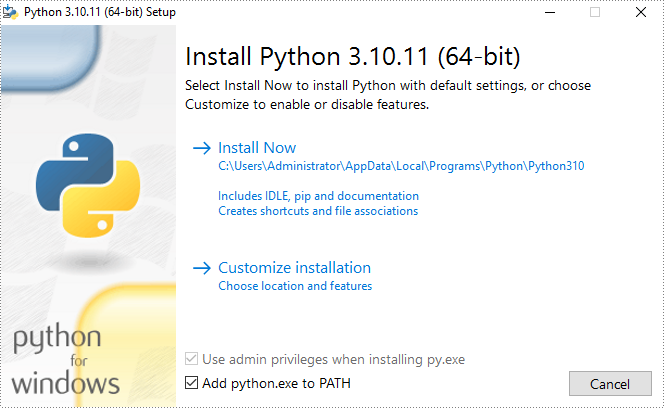
Step 1
Download the latest version of Python and install it on your computer. If you have already installed it, skip to step 2.
Step 2
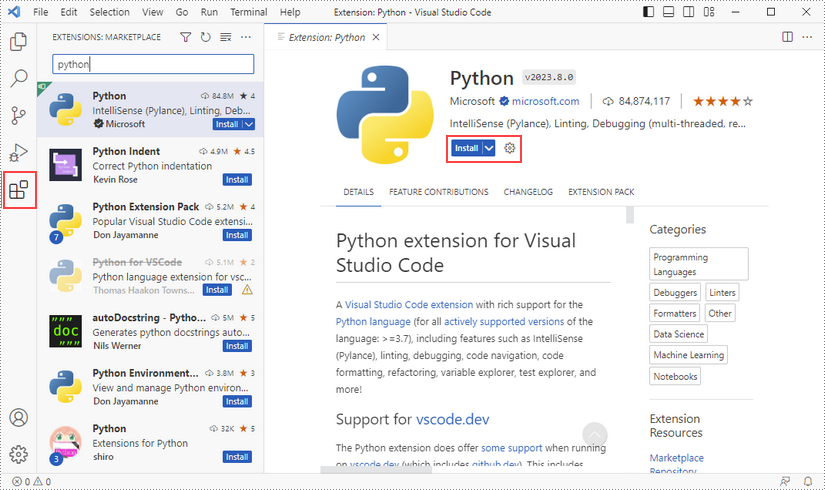
Click "Extensions" in VS Code, search for "Python" and then install it.
Step 3
Click "Explorer" - "NO FOLRDER OPENED" - "Open Folder".
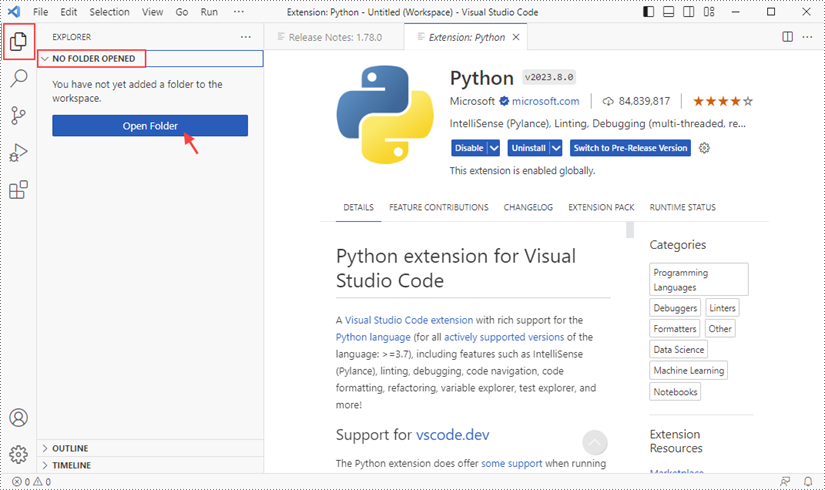
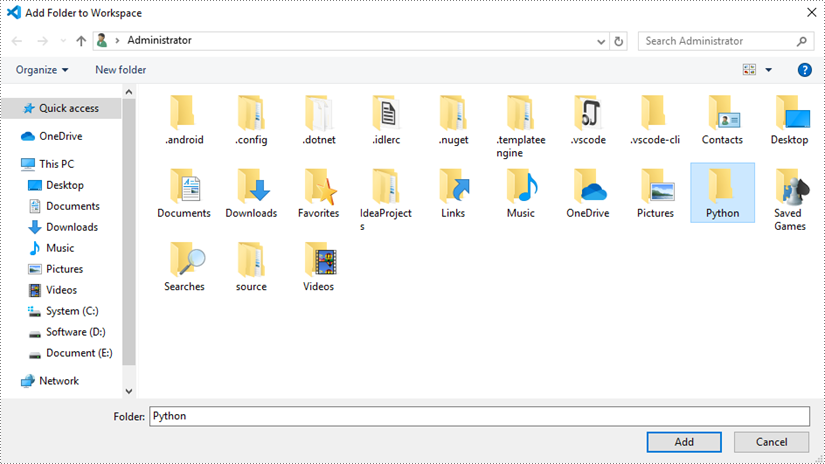
Choose an existing folder as the workspace, or you can create a new folder and then select it.
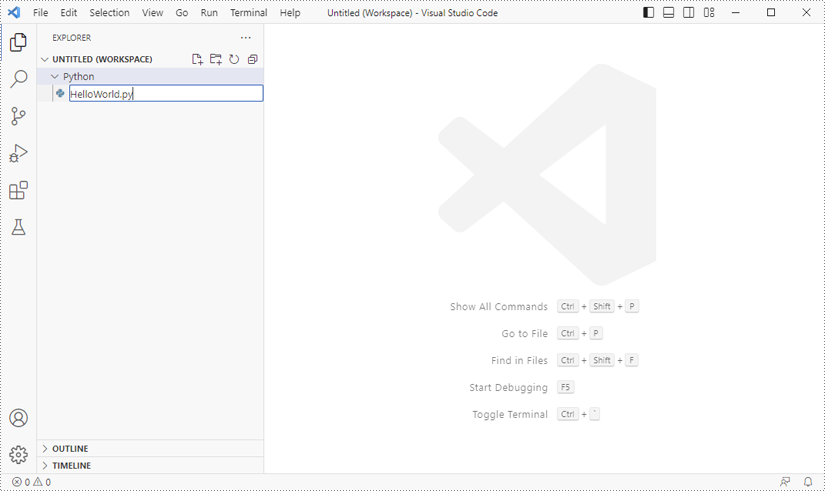
Add a .py file to the folder you just added (Python folder in this case), and name it whatever you like.
Step 4
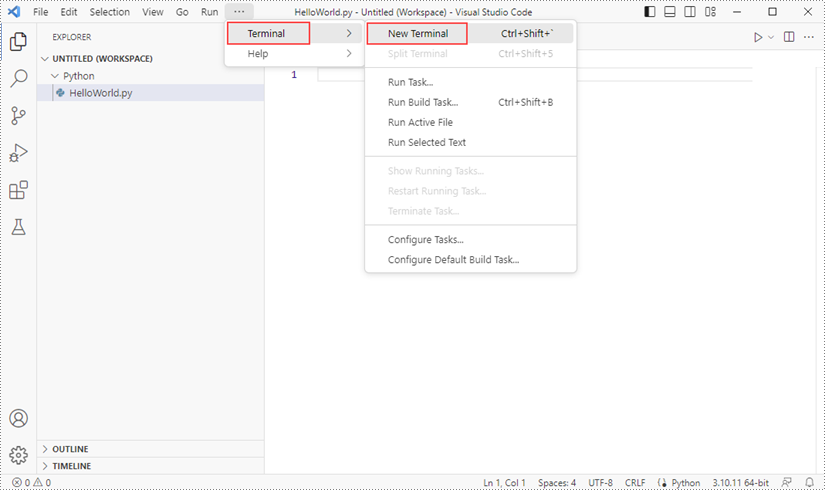
Click "Terminal" and then "New Terminal".
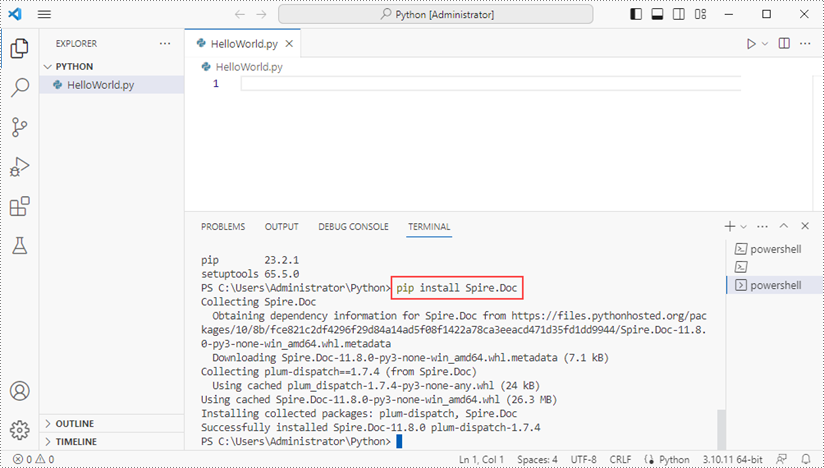
Input the following pip command to install Spire.Doc for Python and plum-dispatch v1.7.4.
pip install Spire.Doc
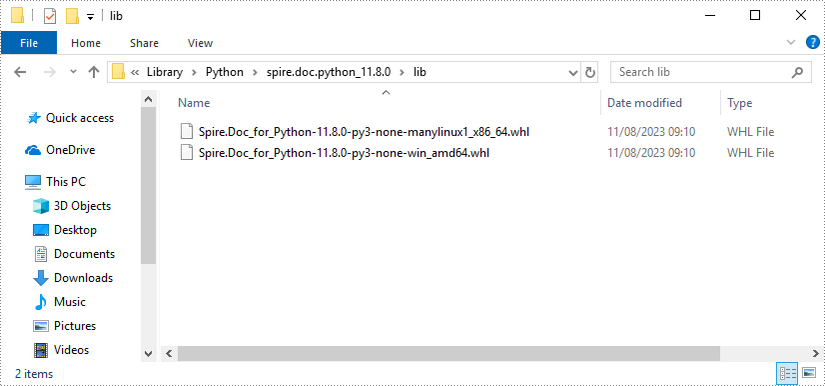
Alternatively, you can download Spire.Doc for Python from our website, and unzip it to get two .whl files from the "lib" folder. They're for Linux and Windows systems, respectively.
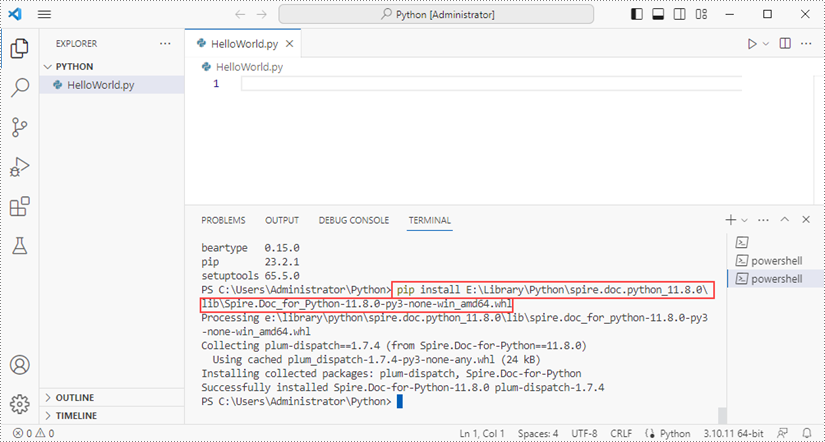
Then, install Spire.Doc for Python and plum-dispatch v1.7.4 by running the following commands.
pip install E:\Library\Python\spire.doc.python_11.8.0\lib\Spire.Doc_for_Python-11.8.0-py3-none-win_amd64.whl
Step 5
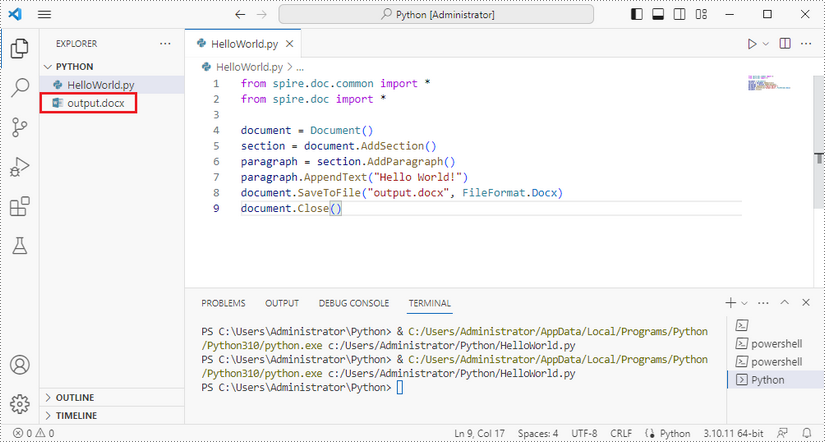
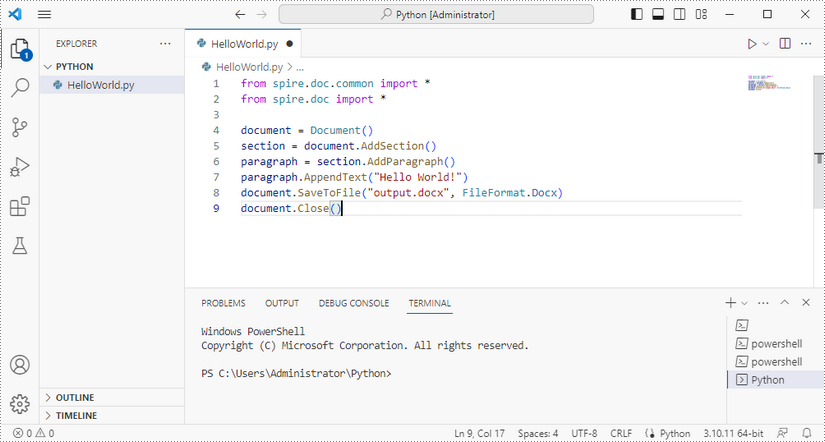
Add the following code snippet to the "HelloWorld.py" file.
- Python
from spire.doc.common import *
from spire.doc import *

document = Document()
section = document.AddSection()
paragraph = section.AddParagraph()
paragraph.AppendText("Hello World!")
document.SaveToFile("output.docx", FileFormat.Docx)
document.Close()
Once you run the Python file, you'll see the result Word document in the "EXPORER" panel.