
Knowledgebase (2345)
Children categories
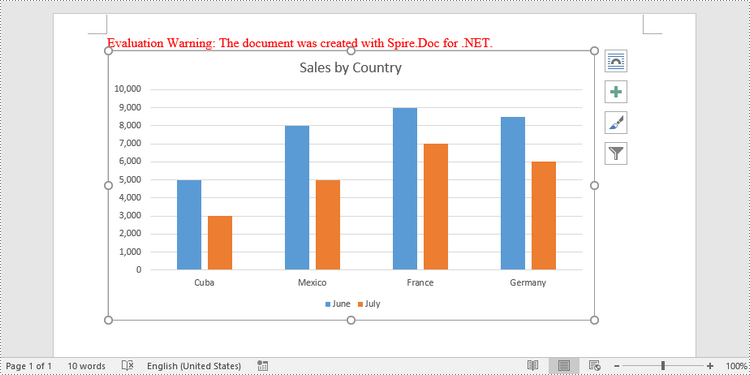
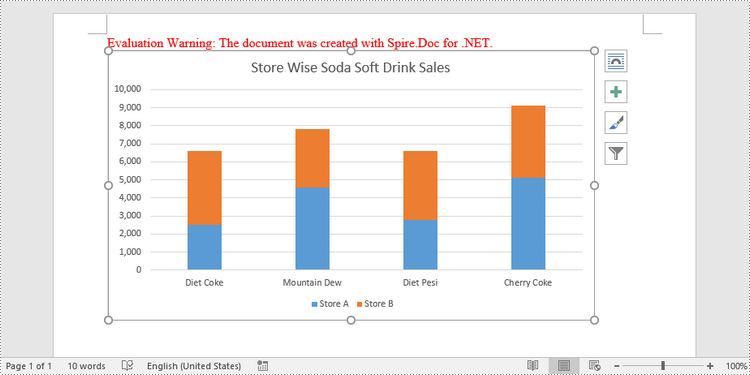
A clustered column chart and a stacked column chart are two variations of the column chart. The clustered column chart enables simple comparison of values across different categories, whereas the stacked column chart displays both the total value of different categories and the proportion of each individual component. In this article, you will learn how to create clustered or stacked column charts in Word in C# and VB.NET using Spire.Doc for .NET.
- Create a Clustered Column Chart in Word in C#, VB.NET
- Create a Stacked Column Chart in Word in C#, VB.NET
Install Spire.Doc for .NET
To begin with, you need to add the DLL files included in the Spire.Doc for.NET package as references in your .NET project. The DLL files can be either downloaded from this link or installed via NuGet.
PM> Install-Package Spire.Doc
Create a Clustered Column Chart in Word in C#, VB.NET
To add a chart to a Word document, use Paragraph.AppenChart(ChartType chartType, float width, float height) method. The ChartType enumeration includes various chart types predefined in MS Word. The following are the steps to add a clustered column chart in Word using Spire.Doc for .NET.
- Create a Document object.
- Add a section and a paragraph.
- Add a column chart to the paragraph using Paragraph.AppendChart() method.
- Add series to the chart using Chart.Series.Add() method.
- Set the chart title through Chart.Tilte.Text property.
- Save the document to a Word file using Document.SaveToFile() method.
- C#
- VB.NET
using Spire.Doc;
using Spire.Doc.Documents;
using Spire.Doc.Fields.Shapes.Charts;
using Spire.Doc.Fields;

namespace CreateColumnChart
{
    class Program
    {
        static void Main(string[] args)
        {
            //Create a Document object
            Document document = new Document();

            //Add a section
            Section section = document.AddSection();

            //Add a paragraph
            Paragraph paragraph = section.AddParagraph();

            //Add a column chart
            ShapeObject shape = paragraph.AppendChart(ChartType.Column, 450, 250);

            //Get the chart
            Chart chart = shape.Chart;

            //Clear the default data
            chart.Series.Clear();

            //Add a series including series name, category names, and series values to chart
            chart.Series.Add("June",
                new[] { "Cuba", "Mexico", "France", "Germany" },
                new double[] { 5000, 8000, 9000, 8500 });

            //Add another series
            chart.Series.Add("July",
            new[] { "Cuba", "Mexico", "France", "Germany" },
            new double[] { 3000, 5000, 7000, 6000 });

            //Set the chart title
            chart.Title.Text = "Sales by Country";

            //Set the number format of the Y-axis
            chart.AxisY.NumberFormat.FormatCode = "#,##0";

            //Set the legend position
            chart.Legend.Position = LegendPosition.Bottom;

            //Save to file
            document.SaveToFile("ClusteredColumnChart.docx", FileFormat.Docx2019);
        }
    }
}
Create a Stacked Column Chart in Word in C#, VB.NET
A stacked column chart can be created pretty much in the same way as a clustered column chart. The only difference is you have to change the chart type from Column to ColumnStacked.
- Create a Document object.
- Add a section and a paragraph.
- Add a stacked column chart to the paragraph using Paragraph.AppendChart() method.
- Add series to the chart using Chart.Series.Add() method.
- Set the chart title through Chart.Tilte.Text property.
- Save the document to a Word file using Document.SaveToFile() method.
- C#
- VB.NET
using Spire.Doc;
using Spire.Doc.Documents;
using Spire.Doc.Fields.Shapes.Charts;
using Spire.Doc.Fields;

namespace StackedColumnChart
{
    class Program
    {
        static void Main(string[] args)
        {
            //Create a Document object
            Document document = new Document();

            //Add a section
            Section section = document.AddSection();

            //Add a paragraph
            Paragraph paragraph = section.AddParagraph();

            //Add a stacked column chart
            ShapeObject shape = paragraph.AppendChart(ChartType.ColumnStacked, 450, 250);

            //Get the chart
            Chart chart = shape.Chart;

            //Clear the default data
            chart.Series.Clear();

            //Add a series including series name, category names, and series values to chart
            chart.Series.Add("Store A",
                new[] { "Diet Coke", "Mountain Dew", "Diet Pesi", "Cherry Coke" },
                new double[] { 2500, 4600, 2800, 5100 });

            //Add another series
            chart.Series.Add("Store B",
            new[] { "Diet Coke", "Mountain Dew", "Diet Pesi", "Cherry Coke" },
            new double[] { 4100, 3200, 3800, 4000 });

            //Set the chart title
            chart.Title.Text = "Store Wise Soda Soft Drink Sales";

            //Set the number format of the Y-axis
            chart.AxisY.NumberFormat.FormatCode = "#,##0";

            //Set the legend position
            chart.Legend.Position = LegendPosition.Bottom;

            //Save to file
            document.SaveToFile("StackedColumnChart.docx", FileFormat.Docx2019);
        }
    }
}
Apply for a Temporary License
If you'd like to remove the evaluation message from the generated documents, or to get rid of the function limitations, please request a 30-day trial license for yourself.
Named ranges in Excel are valuable tools that empower you to assign meaningful names to specific cells or ranges within your spreadsheets. Instead of relying on traditional cell references like A1:B10, named ranges allow you to reference data by their logical names, making your formulas more intelligible and easier to understand and maintain. This article will demonstrate how to create, edit or delete named ranges in Excel in Java using Spire.XLS for Java.
- Create a Named Range in Excel in Java
- Edit an Existing Named Range in Excel in Java
- Delete a Named Range from Excel in Java
Install Spire.XLS for Java
First of all, you're required to add the Spire.Xls.jar file as a dependency in your Java program. The JAR file can be downloaded from this link. If you use Maven, you can easily import the JAR file in your application by adding the following code to your project's pom.xml file.
<repositories>
    <repository>
        <id>com.e-iceblue</id>
        <name>e-iceblue</name>
        <url>https://repo.e-iceblue.com/nexus/content/groups/public/</url>
    </repository>
</repositories>
<dependencies>
    <dependency>
        <groupId>e-iceblue</groupId>
        <artifactId>spire.xls</artifactId>
        <version>16.6.5</version>
    </dependency>
</dependencies>
Create a Named Range in Excel in Java
You can use the Workbook.getNameRanges().add(String name) method provided by Spire.XLS for Java to add a named range to an Excel workbook. Once the named range is added, you can define the cell or range of cells it refers to using the INamedRange.setRefersToRange(IXLSRange range) method. The detailed steps are as follows:
- Initialize an instance of the Workbook class.
- Load an Excel workbook using the Workbook.loadFromFile() method.
- Add a named range to the workbook using the Workbook.getNameRanges().add(String name) method.
- Get a specific worksheet in the workbook using the Workbook.getWorksheets().get(int index) method.
- Set the cell range that the named range refers to using the INamedRange.setRefersToRange(IXLSRange range) method.
- Save the result file using the Workbook.saveToFile() method.
- Java
import com.spire.xls.ExcelVersion;
import com.spire.xls.Workbook;
import com.spire.xls.Worksheet;
import com.spire.xls.core.INamedRange;

public class CreateNamedRange {
    public static void main(String[] args) {
        //Initialize an instance of the Workbook class
        Workbook workbook = new Workbook();
        //Load an Excel workbook
        workbook.loadFromFile("Sample.xlsx");

        //Add a named range to the workbook
        INamedRange namedRange = workbook.getNameRanges().add("Amount");

        //Get a specific worksheet in the workbook
        Worksheet sheet = workbook.getWorksheets().get(0);

        //Set the cell range that the named range references
        namedRange.setRefersToRange(sheet.getCellRange("D2:D5"));

        //Save the result file to a specific location
        String result = "CreateNamedRange.xlsx";
        workbook.saveToFile(result, ExcelVersion.Version2013);
        workbook.dispose();
    }
}

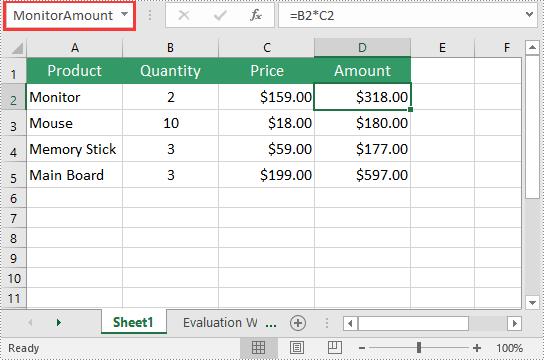
Edit an Existing Named Range in Excel in Java
After you've created a named range, you may want to modify its name or adjust the cells it refers to. The following are the detailed steps:
- Initialize an instance of the Workbook class.
- Load an Excel workbook using the Workbook.loadFromFile() method.
- Get a specific named range in the workbook using the Workbook.getNameRanges().get(int index) method.
- Modify the name of the named range using the INamedRange.setName(String name) method.
- Modify the cells that the named range refers to using the INamedRange.setRefersToRange(IXLSRange range) method.
- Save the result file using the Workbook.saveToFile() method.
- Java
import com.spire.xls.ExcelVersion;
import com.spire.xls.Workbook;
import com.spire.xls.core.INamedRange;

public class ModifyNamedRange {
    public static void main(String[] args) {
        //Initialize an instance of the Workbook class
        Workbook workbook = new Workbook();
        //Load an Excel workbook
        workbook.loadFromFile("CreateNamedRange.xlsx");

        //Get a specific named range in the workbook
        INamedRange namedRange = workbook.getNameRanges().get(0);

        //Change the name of the named range
        namedRange.setName("MonitorAmount");

        //Set the cell range that the named range references
        namedRange.setRefersToRange(workbook.getWorksheets().get(0).getCellRange("D2"));

        //Save the result file to a specific location
        String result = "ModifyNamedRange.xlsx";
        workbook.saveToFile(result, ExcelVersion.Version2013);
        workbook.dispose();
    }
}
Delete a Named Range from Excel in Java
If you have made significant changes to the structure or layout of your spreadsheet, it might be necessary to delete a named range that is no longer relevant or accurate. The detailed steps are as follows:
- Initialize an instance of the Workbook class.
- Load an Excel workbook using the Workbook.loadFromFile() method.
- Remove a specific named range by its index or name using the Workbook.getNameRanges().removeAt(int index) or Workbook.getNameRanges().remove(string name) method.
- Save the result file using the Workbook.saveToFile() method.
- Java
import com.spire.xls.ExcelVersion;
import com.spire.xls.Workbook;

public class DeleteNamedRange {
    public static void main(String[] args) {
        //Initialize an instance of the Workbook class
        Workbook workbook = new Workbook();
        //Load an Excel workbook
        workbook.loadFromFile("CreateNamedRange.xlsx");

        //Remove a specific named range by its index
        workbook.getNameRanges().removeAt(0);

        //Remove a specific named range by its name
        //workbook.getNameRanges().remove("Amount");

        //Save the result file to a specific location
        String result = "RemoveNamedRange.xlsx";
        workbook.saveToFile(result, ExcelVersion.Version2013);
        workbook.dispose();
    }
}

Apply for a Temporary License
If you'd like to remove the evaluation message from the generated documents, or to get rid of the function limitations, please request a 30-day trial license for yourself.
Printing Word documents programmatically in C# can streamline business workflows, automate reporting, and enhance document management systems. This comprehensive guide explores how to print Word documents in C# using Spire.Doc for .NET, covering everything from basic printing to advanced customization techniques. We'll walk through practical code examples for each scenario, ensuring you can implement these solutions in real-world applications.
- .NET Library for Printing Word Documents
- Print Word Documents in C#
- Customize Printing Options
- Silently Print Word Documents
- Print Multiple Pages on One Sheet
- Conclusion
- FAQs
.NET Library for Printing Word Documents
Spire.Doc for .NET is a robust, standalone library that supports comprehensive Word document processing without requiring Microsoft Office to be installed. It provides intuitive APIs for loading, editing, and printing Word files (DOC/DOCX) while maintaining perfect formatting fidelity.
To get started, install the library via NuGet Package Manager:
Install-Package Spire.DocAlternatively, you can download Spire.Doc for .NET from our official website and reference the DLL file manually.
Print Word Documents in C#
The foundation of Word document printing in C# involves three key steps demonstrated in the following code. First, we create a Document object to represent our Word file, then load the actual document, and finally access the printing functionality through the PrintDocument class.
- C#
using Spire.Doc;
using System.Drawing.Printing;

namespace PrintWordDocument
{
    internal class Program
    {
        static void Main(string[] args)
        {
            // Initialize a new Document instance
            Document doc = new Document();

            // Load the Word file from specified path
            doc.LoadFromFile("Input.docx");

            // Access the PrintDocument object for printing operations
            PrintDocument printDoc = doc.PrintDocument;

            // Send document to default printer
            printDoc.Print();
        }
    }
}
This basic implementation handles the entire printing process, from document loading to physical printing, with just a few lines of code. The PrintDocument object abstracts all the underlying printing operations, making the process straightforward for developers.
Customize Printing Options
Beyond basic printing, Spire.Doc offers extensive customization via the PrinterSettings class, providing developers with granular control over the printing process. These settings allow you to tailor the output to specific needs, such as selecting particular pages or configuring advanced printer features.
To obtain the PrinterSettings object associated with the current document, use the following line of code:
- C#
PrinterSettings settings = printDoc.PrinterSettings;Now, let’s explore the specific settings.
1. Specify the Printer Name
- C#
settings.PrinterName = "Your Printer Name";This code snippet demonstrates how to target a specific printer in environments with multiple installed printers. The PrinterName property accepts the exact name of the printer as it appears in the system's printer list.
2. Specify Pages to Print
- C#
settings.FromPage = 1;
settings.ToPage = 5;
These settings are particularly useful when dealing with large documents, allowing you to print only the relevant sections and conserve resources.
3. Specify Number of Copies to Print
- C#
settings.Copies = 2;The Copies property controls how many duplicates of the document will be printed, with the printer handling the duplication process efficiently.
4. Enable Duplex Printing
- C#
if (settings.CanDuplex)
{
    settings.Duplex = Duplex.Default;
}
This example first checks for duplex printing support before enabling two-sided printing, ensuring compatibility across different printer hardware.
5. Print on a Custom Paper Size
- C#
settings.DefaultPageSettings.PaperSize = new PaperSize("custom", 800, 500);Here we create a custom paper size (800x500 units) for specialized printing requirements, demonstrating Spire.Doc's flexibility in handling non-standard document formats.
6. Print Word to File
- C#
settings.PrintToFile = true;
settings.PrinterName = "Microsoft Print to PDF";
settings.PrintFileName = @"C:\Output.pdf";
This configuration uses the system's PDF virtual printer to create a PDF file instead of physical printing, showcasing how Spire.Doc can be used for document conversion as well.
Silently Print Word Documents
In automated environments, you may need to print documents without any user interaction or visible dialogs. The following implementation achieves silent printing by using the StandardPrintController.
- C#
using Spire.Doc;
using System.Drawing.Printing;

namespace SilentlyPrintWord
{
    class Program
    {
        static void Main(string[] args)
        {
            // Initialize a new Document instance
            Document doc = new Document();

            // Load the Word file from specified path
            doc.LoadFromFile("Input.docx");

            // Access the PrintDocument object for printing operations
            PrintDocument printDoc = doc.PrintDocument;

            // Disable the print dialog
            printDoc.PrintController = new StandardPrintController();

            // Exexute printing
            printDoc.Print();
        }
    }
}
The key to silent printing lies in assigning the StandardPrintController to the PrintController property, which suppresses all printing-related dialogs and progress indicators. This approach is ideal for server-side applications or batch processing scenarios where user interaction is not possible or desired.
Print Multiple Pages on One Sheet
For economizing paper usage or creating compact document versions, Spire.Doc supports printing multiple document pages on a single physical sheet. The PrintMultipageToOneSheet method simplifies this process with predefined layout options.
- C#
using Spire.Doc;
using Spire.Doc.Printing;
using System.Drawing.Printing;

namespace PrintMultiplePagesOnOneSheet
{
    internal class Program
    {
        static void Main(string[] args)
        {
            // Initialize a new Document instance
            Document doc = new Document();

            // Load the Word file from specified path
            doc.LoadFromFile("Input.docx");

            // Configure 2-page-per-sheet printing and execute printing
            doc.PrintMultipageToOneSheet(PagesPerSheet.TwoPages, false);
        }
    }
}
The PagesPreSheet enumeration offers several layout options (OnePage, TwoPages, FourPages, etc.), while the boolean parameter determines whether to include a page border on the printed sheet. This feature is particularly valuable for creating booklet layouts or draft versions of documents.
P.S. This scenario works only with .NET Framework versions earlier than 5.0.
Conclusion
This guide has demonstrated how Spire.Doc for .NET provides a comprehensive solution for Word document printing in C#. It simplifies the process with features such as:
- Basic & silent printing.
- Customizable print settings (printer selection, duplex, copies).
- Multi-page per sheet printing to reduce paper usage.
By integrating these techniques, developers can efficiently automate document printing in enterprise applications, enhancing productivity and reducing manual effort. Overall, Spire.Doc empowers developers to create robust printing solutions that meet diverse business requirements.
FAQs
Q1. Can I print encrypted or password-protected Word files?
A: Yes, Spire.Doc supports printing password-protected documents after loading them with the correct password:
- C#
doc.LoadFromFile("Protected.docx", FileFormat.Docx, "password");After successful loading, you can print it like any other document, with all the same customization options available.
Q2. How can I print only selected text from a Word document?
A: You can extract specific content by accessing document sections and paragraphs:
- C#
Section section = doc.Sections[0];
Paragraph paragraph = section.Paragraphs[0];
// Create new document with selected content
Document newDoc = new Document();
newDoc.Sections.Add(section.Clone());
newDoc.Print();
This approach gives you precise control over which document portions get printed.
Q3. Can I print documents in landscape mode or adjust margins programmatically?
A: Yes! Modify the DefaultPageSettings properties:
- C#
printDoc.DefaultPageSettings.Landscape = true;
printDoc.DefaultPageSettings.Margins = new Margins(50, 50, 50, 50);
Q4. Can I print other file formats (e.g., PDF, Excel) using Spire.Doc?
A: Spire.Doc is designed for Word files (DOC/DOCX). For PDFs, use Spire.PDF; for Excel, use Spire.XLS.
Get a Free License
To fully experience the capabilities of Spire.Doc for Python without any evaluation limitations, you can request a free 30-day trial license.
