
Knowledgebase (2417)
Children categories
Textboxes in Excel provide a flexible way to add textual information or annotations to worksheets, charts, or other objects. They allow users to display explanatory text, labels, or comments that are not directly related to the data itself. In this guide, we will explore how to add, update, and delete textboxes in Excel in Python using Spire.XLS for Python.
- Add a Textbox to Excel in Python
- Update a Textbox in Excel in Python
- Delete a Textbox in Excel in Python
Install Spire.XLS for Python
This scenario requires Spire.XLS for Python and plum-dispatch v1.7.4. They can be easily installed in your Windows through the following pip command.
pip install Spire.XLS
If you are unsure how to install, please refer to this tutorial: How to Install Spire.XLS for Python on Windows
Add a Textbox to Excel in Python
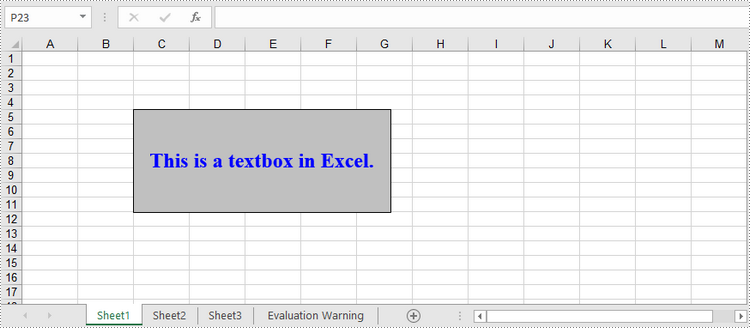
A textbox can be added to the specified location of a worksheet using Worksheet.TextBoxes.AddTextBox() method. The TextBox object has a set of properties that allow you to set the text and formatting of the textbox. The detailed steps to create a textbox using Spire.XLS for Python are as follows.
- Create a Workbook object.
- Get a specific worksheet through Workbook.Worksheets[index] property.
- Add a textbox to the worksheet at the specified location using Worksheet.TextBoxes.AddTextBox() method.
- Set text of the textbox through TextBox.Text property.
- Set formatting of the text through other properties under the TextBox object.
- Save the workbook to an Excel file using Workbook.SaveToFile() method.
- Python
from spire.xls import *
from spire.xls.common import *

# Create a Workbook object
workbook = Workbook()

# Get the first worksheet
sheet = workbook.Worksheets[0]

# Add a textbox to the worksheet, specifying location and size
textBox = sheet.TextBoxes.AddTextBox(5, 3, 120, 300)

# Set fill color of the textbox
textBox.Fill.FillType = ShapeFillType.SolidColor
textBox.Fill.ForeKnownColor = ExcelColors.Gray25Percent

# Add text to the textbox and set the text alignment
textBox.Text = "This is a textbox in Excel."
textBox.HAlignment = CommentHAlignType.Center
textBox.VAlignment = CommentVAlignType.Center

# Set font for the text
font = workbook.CreateFont()
font.FontName = "Times New Roman"
font.Size = 18
font.IsBold = True
font.Color = Color.get_Blue()
richText = textBox.RichText
rt = RichText(richText)
rt.SetFont(0, len(textBox.Text) - 1, font)

# Save the workbook to an Excel file
workbook.SaveToFile('output/InsertTextbox.xlsx', ExcelVersion.Version2016)
workbook.Dispose()
Update a Textbox in Excel in Python
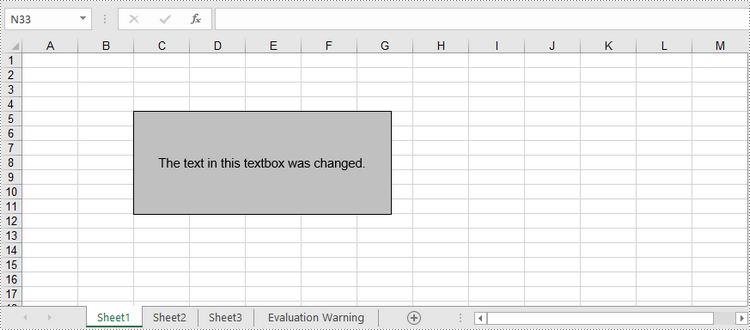
A certain textbox can be accessed through Worksheet.TextBoxes[index] property and the text inside the box can be obtained or modified through TextBox.Text property. The following are the steps to update a textbox using Spire.XLS for Python.
- Create a Workbook object.
- Load an Excel file using Workbook.LoadFromFile() method.
- Get a specific worksheet through Workbook.Worksheets[index] property.
- Add a textbox to the worksheet at the specified location using Worksheet.TextBoxes.AddTextBox() method.
- Reset text of the textbox through TextBox.Text property.
- Save the workbook to a different Excel file using Workbook.SaveToFile() method.
- Python
from spire.xls import *
from spire.xls.common import *

# Create a Workbook object
workbook = Workbook()

# Load an Excel file
workbook.LoadFromFile('C:\\Users\\Administrator\\Desktop\\Textbox.xlsx')

# Get the first worksheet
sheet = workbook.Worksheets[0]

# Get the first textbox
tb = sheet.TextBoxes[0]

# Change the text of textbox
tb.Text = "The text in this textbox was changed."

# Save the workbook to a different Excel file
workbook.SaveToFile('output/UpdateTextbox.xlsx', ExcelVersion.Version2016)
workbook.Dispose()
Delete a Textbox in Excel in Python
To remove a specific textbox, you use Worksheet.TextBox[index].Remove() method. The detailed steps are as follows.
- Create a Workbook object.
- Load an Excel file using Workbook.LoadFromFile() method.
- Get a specific sheet through Workbook.Worksheets[index] property.
- Remove a specific textbox by using Worksheet.TextBoxes[index].Remove() method.
- Save the workbook to a different Excel file using Workbook.SaveToFile() method.
- Python
from spire.xls import *
from spire.xls.common import *

# Create a Workbook object
workbook = Workbook()

# Load an Excel file
workbook.LoadFromFile('C:\\Users\\Administrator\\Desktop\\Textbox.xlsx')

# Get the first worksheet
sheet = workbook.Worksheets[0]

# Remove the first textbox
sheet.TextBoxes[0].Remove()

# Save the workbook to a different Excel file
workbook.SaveToFile('output/RemoveTextbox.xlsx', ExcelVersion.Version2016)
workbook.Dispose()
Apply for a Temporary License
If you'd like to remove the evaluation message from the generated documents, or to get rid of the function limitations, please request a 30-day trial license for yourself.
Extracting images from a PowerPoint presentation is necessary when you need to reuse them elsewhere. By doing so, you gain the flexibility to use these images outside the confines of the original presentation, thus maximizing their value in different projects. This article will demonstrate how to extract images from a PowerPoint document in Python using Spire.Presentation for Python.
Install Spire.Presentation for Python
This scenario requires Spire.Presentation for Python and plum-dispatch v1.7.4. They can be easily installed in your Windows through the following pip command.
pip install Spire.Presentation
If you are unsure how to install, please refer to this tutorial: How to Install Spire.Presentation for Python on Windows
Extract Images from a PowerPoint Document in Python
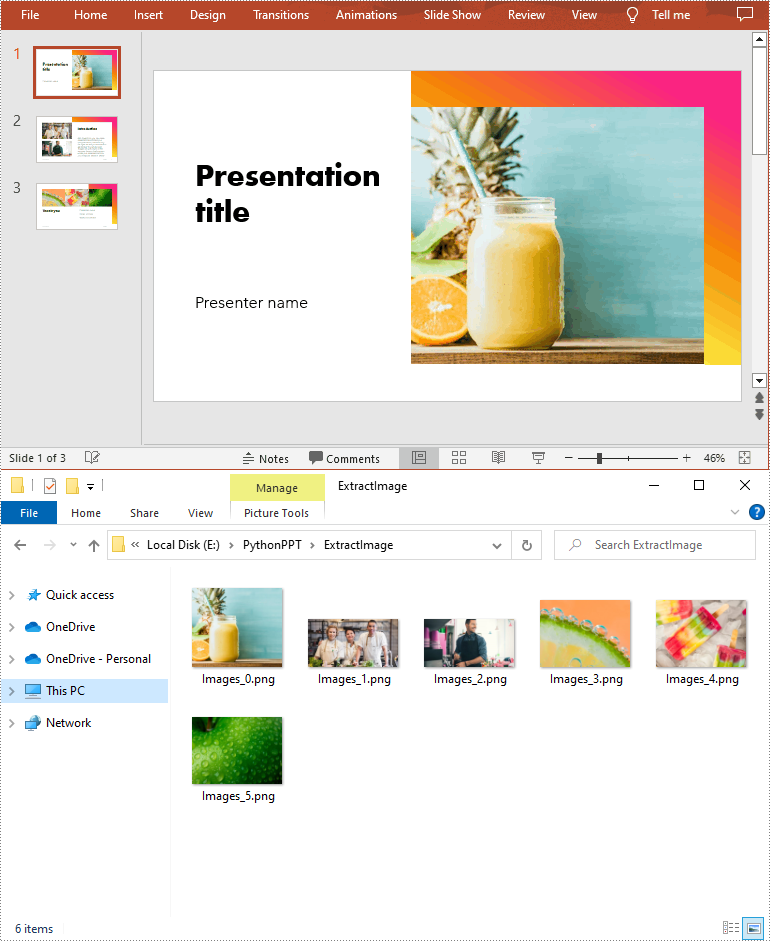
To extract images from an entire PowerPoint presentation, you need to use the Presentation.Images property to get the collection of all the images in the presentation, then iterate through the elements in the collection and call IImageData.Image.Save() method to save each element to an image file. The following are the detailed steps:
- Create a Presentation instance.
- Load a PowerPoint document using Presentation.LoadFromFile() method.
- Get the collection of all the images in the document using Presentation.Images property.
- Iterate through the elements in the collection, and save each element as an image file using the IImageData.Image.Save() method.
- Python
from spire.presentation.common import *
from spire.presentation import *

# Create a Presentation instance
ppt = Presentation()

# Load a PowerPoint document
ppt.LoadFromFile("sample.pptx")

# Iterate through all images in the document
for i, image in enumerate(ppt.Images):

    # Extract the images
    ImageName = "ExtractImage/Images_"+str(i)+".png"
    image.Image.Save(ImageName)

ppt.Dispose()
Extract Images from a Presentation Slide in Python
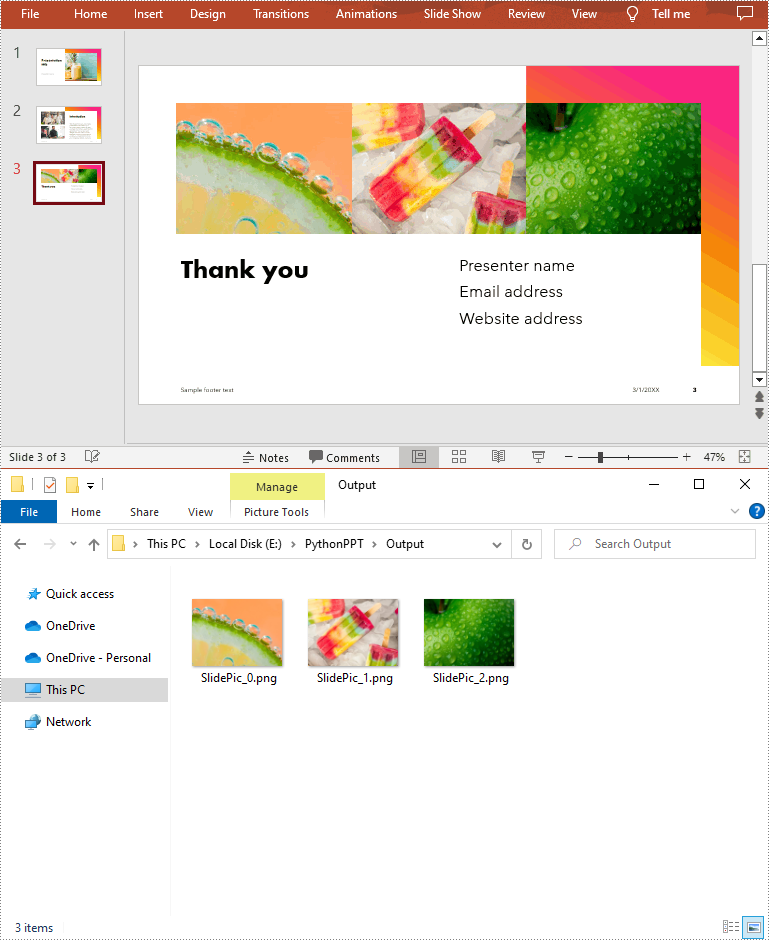
To extract images from a specific slide, you need to iterate through all shapes on the slide and find the shapes that are of SlidePicture or PictureShape type, then use the SlidePicture.PictureFill.Picture.EmbedImage.Image.Save() or PictureShape.EmbedImage.Image.Save() method to save the images to image files. The following are the detailed steps:
- Create a Presentation instance.
- Load a PowerPoint document using Presentation.LoadFromFile() method.
- Get a specified slide using Presentation.Slides[int] property.
- Iterate through all shapes on the slide.
- Determine whether the shapes are of SlidePicture or PictureShape type. If so, save the images to image files using SlidePicture.PictureFill.Picture.EmbedImage.Image.Save() or PictureShape.EmbedImage.Image.Save() method.
- Python
from spire.presentation.common import *
from spire.presentation import *

# Create a Presentation instance
ppt = Presentation()

# Load a PowerPoint document
ppt.LoadFromFile("sample.pptx")

# Get a specified slide
slide = ppt.Slides[2]

i = 0
#Traverse all shapes in the slide
for s in slide.Shapes:

    # Determine if the shape is of SlidePicture type
    if isinstance(s, SlidePicture):

        # If yes, then extract the image
        ps = s if isinstance(s, SlidePicture) else None
        ps.PictureFill.Picture.EmbedImage.Image.Save("Output/SlidePic_"+str(i)+".png")
        i += 1

    # Determine if the shape is of PictureShape type
    if isinstance(s, PictureShape):

        # If yes, then extract the image
        ps = s if isinstance(s, PictureShape) else None
        ps.EmbedImage.Image.Save("Output/SlidePic_"+str(i)+".png")
        i += 1

ppt.Dispose()
Apply for a Temporary License
If you'd like to remove the evaluation message from the generated documents, or to get rid of the function limitations, please request a 30-day trial license for yourself.
Proper row height and column width are essential for optimizing data readability and ensuring that all content is fully visible in Excel. While the default row height and column width settings may be suitable in some cases, they may not be sufficient when dealing with lengthy text, large numbers, or complex formulas. In such cases, it becomes necessary to set appropriate row heights and column widths. In this article, we will explain how to set row height and column width in Excel in Python using Spire.XLS for Python.
Install Spire.XLS for Python
This scenario requires Spire.XLS for Python and plum-dispatch v1.7.4. They can be easily installed in your Windows through the following pip command.
pip install Spire.XLS
If you are unsure how to install, please refer to this tutorial: How to Install Spire.XLS for Python on Windows
Set Row Height in Excel in Python
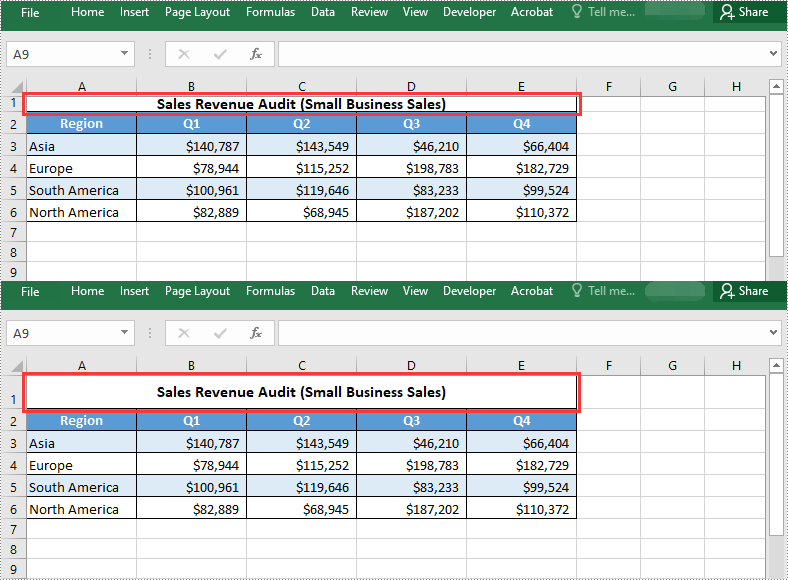
Spire.XLS for Python provides the Worksheet.SetRowHeight() method to set the height for a specific row. The detailed steps are as follows:
- Create a Workbook object.
- Load an Excel file using Workbook.LoadFromFile() method.
- Get a specific worksheet using Workbook.Worksheets[] property.
- Set the height of a specific row using Worksheet.SetRowHeight() method.
- Save the resulting file using Workbook.SaveToFile() method.
- Python
from spire.xls import *
from spire.xls.common import *

# Create a Workbook object
workbook = Workbook()
# Load an Excel file
workbook.LoadFromFile("Sample.xlsx")

# Get the first worksheet
worksheet = workbook.Worksheets[0]

# Set the height of the first row
worksheet.SetRowHeight(1, 25)

# Save the resulting file
workbook.SaveToFile("SetRowHeight.xlsx", ExcelVersion.Version2016)
workbook.Dispose()
Set Column Width in Excel in Python
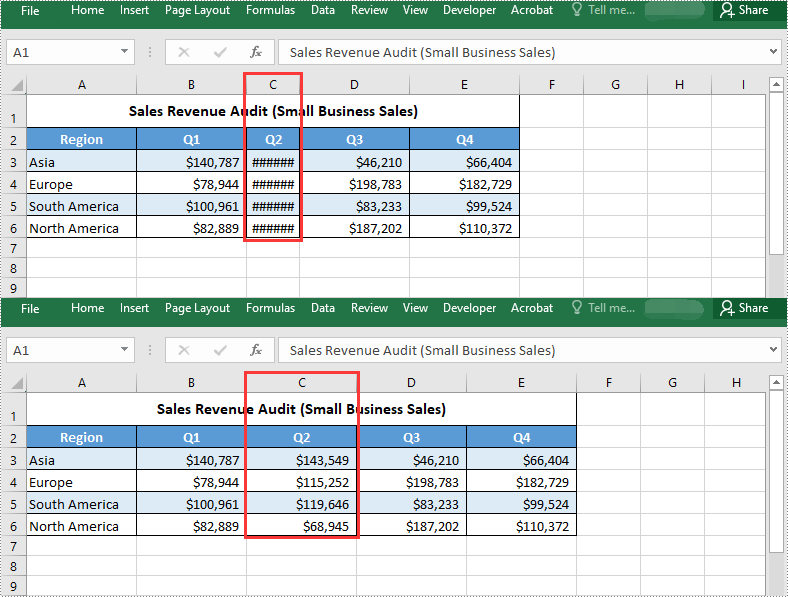
To set the width of a specific column, you can use the Worksheet.SetColumnWidth() method. The detailed steps are as follows:
- Create a Workbook object.
- Load an Excel file using Workbook.LoadFromFile() method.
- Get a specific worksheet using Workbook.Worksheets[] property.
- Set the width of a specific column using Worksheet.SetColumnWidth() method.
- Save the resulting file using Workbook.SaveToFile() method.
- Python
from spire.xls import *
from spire.xls.common import *

# Create a Workbook object
workbook = Workbook()
# Load an Excel file
workbook.LoadFromFile("Sample.xlsx")

# Get the first worksheet
worksheet = workbook.Worksheets[0]

# Set the width of the third column
worksheet.SetColumnWidth(3, 15)

# Save the resulting file
workbook.SaveToFile("SetColumnWidth.xlsx", ExcelVersion.Version2016)
workbook.Dispose()
Apply for a Temporary License
If you'd like to remove the evaluation message from the generated documents, or to get rid of the function limitations, please request a 30-day trial license for yourself.
