
Knowledgebase (2345)
Children categories
When it comes to creating professional documents, choosing the right font is crucial. Using multiple fonts in one document can help distinguish different types of content such as headings, body text or annotations, ultimately enhancing the document's readability. Moreover, different fonts have unique emotional tones and styles. For instance, handwritten fonts often convey warmth and intimacy while serif fonts are ideal for traditional and formal contexts.
In this article, you will learn how to set the font in a Word document in Java using Spire.Doc for Java.
- Apply a Font to a Paragraph in Java
- Apply Multiple Fonts to a Paragraph in Java
- Use a Private Font in a Word Document in Java
- Change the Font of the Specified Text in Java
Install Spire.Doc for Java
First of all, you're required to add the Spire.Doc.jar file as a dependency in your Java program. The JAR file can be downloaded from this link. If you use Maven, you can easily import the JAR file in your application by adding the following code to your project's pom.xml file.
<repositories>
    <repository>
        <id>com.e-iceblue</id>
        <name>e-iceblue</name>
        <url>https://repo.e-iceblue.com/nexus/content/groups/public/</url>
    </repository>
</repositories>
<dependencies>
    <dependency>
        <groupId>e-iceblue</groupId>
        <artifactId>spire.doc</artifactId>
        <version>14.6.0</version>
    </dependency>
</dependencies>
Apply a Font to a Paragraph in Java
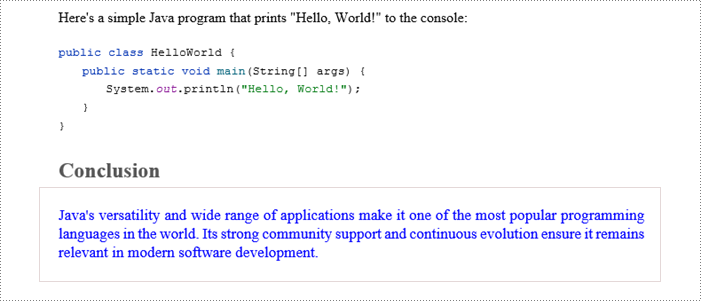
Typically, a consistent font style throughout a paragraph keeps the text looking neat. Spire.Doc for Java provides the ParagraphStyle class, allowing you to define the font name, size, style, and text color using a single object. After creating a style, you can easily apply it to format a paragraph according to your preferred settings.
The steps to set the font for a paragraph using Java are as follows:
- Create a Document object.
- Load a Word file, and add a paragraph to it.
- Append text to the paragraph.
- Create a ParagraphStyle object.
- Get the CharacterFormat object using the ParagraphStyle.getCharacterFormat() method.
- Set the font style, name, size and text color using the methods under the CharacterFormat object.
- Add the style to the document using the Document.getStyles().add() method.
- Apply the defined style to the paragraph using the Paragraph.applyStyle() method.
- Save the document to a different Word file.
- Java
import com.spire.doc.Document;
import com.spire.doc.FileFormat;
import com.spire.doc.Section;
import com.spire.doc.documents.Paragraph;
import com.spire.doc.documents.ParagraphStyle;

import java.awt.*;

public class ApplyFontToParagraph {

    public static void main(String[] args) {

        // Create a Document instance
        Document document = new Document();

        // Load a Word document
        document.loadFromFile("C:\\Users\\Administrator\\Desktop\\sample.docx");

        // Get the last section
        Section section = document.getLastSection();

        // Add a paragraph
        Paragraph paragraph = section.addParagraph();

        // Append text to the paragraph
        paragraph.appendText("Java's versatility and wide range of applications make it one of the most popular " +
                "programming languages in the world. Its strong community support and continuous evolution ensure " +
                "it remains relevant in modern software development.");

        // Create a ParagraphStyle object
        ParagraphStyle style = new ParagraphStyle(document);

        // Set the style name
        style.setName("MyStyle");

        // Set the font style, name, size and text color
        style.getCharacterFormat().setBold(false);
        style.getCharacterFormat().setTextColor(Color.blue);
        style.getCharacterFormat().setFontName("Times New Roman");
        style.getCharacterFormat().setFontSize(13f);

        // Add the style to document
        document.getStyles().add(style);

        // Apply the style to the paragraph
        paragraph.applyStyle(style.getName());

        // Apply the style to an existing paragraph
        // section.getParagraphs().get(1).applyStyle(style.getName());

        // Save the document to file
        document.saveToFile("output/ApplyFont.docx", FileFormat.Docx);

        // Dispose resources
        document.dispose();
    }
}
Apply Multiple Fonts to a Paragraph in Java
In certain situations, you might want to apply different fonts to various parts of the same paragraph to highlight important information. Spire.Doc for Java offers the TextRange class, which enables you to assign distinct styles to specific segments of text within a paragraph. To achieve this, ensure that the text requiring different styles is organized into separate text ranges.
The steps to apply multiple fonts in a paragraph using Java are as follows:
- Create a Document object.
- Load a Word file, and add a paragraph to it.
- Append text to the paragraph using the Paragraph.appendText() method, which returns a TextRange object.
- Append more text that needs to be styled differently to the paragraph and return different TextRange objects.
- Create a ParagraphStyle object with the basic font information and apply it to the paragraph.
- Change the font name, style, size and text color of the specified text range using the methods under the specific TextRange object.
- Save the document to a different Word file.
- Java
import com.spire.doc.Document;
import com.spire.doc.FileFormat;
import com.spire.doc.Section;
import com.spire.doc.documents.HorizontalAlignment;
import com.spire.doc.documents.Paragraph;
import com.spire.doc.documents.ParagraphStyle;
import com.spire.doc.fields.TextRange;

import java.awt.*;

public class ApplyMultipleFonts {

    public static void main(String[] args) {

        // Create a Document object
        Document document = new Document();

        // Load a Word document
        document.loadFromFile("C:\\Users\\Administrator\\Desktop\\sample.docx");

        // Get the last section
        Section section = document.getLastSection();

        // Add a paragraph
        Paragraph paragraph = section.addParagraph();

        // Append text to the paragraph
        TextRange textRange1 = paragraph.appendText("Java's");
        TextRange textRange2 = paragraph.appendText(" versatility and wide range of applications make it ");
        TextRange textRange3 = paragraph.appendText("one of the most popular programming languages");
        TextRange textRange4 = paragraph.appendText(" in the world. Its strong community support and continuous evolution " +
                "ensure it remains relevant in modern software development.");

        // Create a ParagraphStyle object
        ParagraphStyle style = new ParagraphStyle(document);
        style.setName("MyStyle");
        style.getCharacterFormat().setBold(false);
        style.getCharacterFormat().setTextColor(Color.black);
        style.getCharacterFormat().setFontName("Times New Roman");
        style.getCharacterFormat().setFontSize(13f);

        // Add the style the document
        document.getStyles().add(style);

        // Apply the style to the paragraph
        paragraph.applyStyle(style.getName());

        // Change the font style of the specified text ranges
        textRange1.getCharacterFormat().setTextColor(Color.blue);
        textRange3.getCharacterFormat().setItalic(true);
        textRange3.getCharacterFormat().setTextColor(Color.red);

        // Change the font name and size if you want
        // textRange1.getCharacterFormat().setFontName("Arial");
        // textRange1.getCharacterFormat().setFontSize(15f);

        // Set the horizontal alignment
        paragraph.getFormat().setHorizontalAlignment(HorizontalAlignment.Left);

        // Save the document to a docx file
        document.saveToFile("output/ApplyMultipleFonts.docx", FileFormat.Docx_2019);

        // Dispose resources
        document.dispose();
    }
}

Use a Private Font in a Word Document in Java
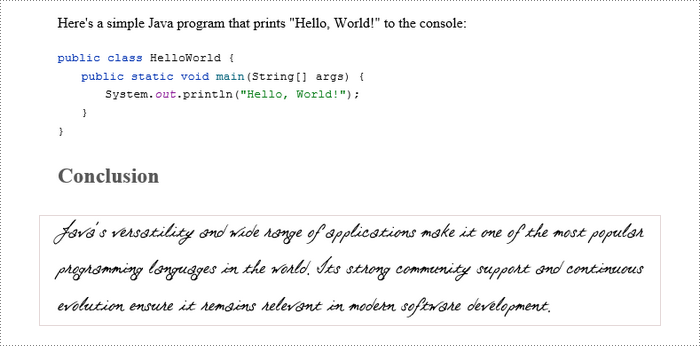
In creative fields like graphic design and marketing, incorporating private fonts in a Word document can enhance aesthetics, making it more engaging and visually unique. To add a custom font to a document, use the Document.getPrivateFontList().add() method. To ensure the document displays correctly on systems without the font installed, embed the font using the Document.setEmbedFontsInFile() method.
The steps to incorporate private fonts in a Word document are as follows:
- Create a Document object.
- Load a Word file, and add a paragraph to it.
- Create a PrivateFontPath object, specifying the name and path of a private font.
- Add the font to document using the Document.getPrivateFontList().add() method.
- Embed fonts in the generated file by passing true to the Document.setEmbedFontsInFile() method.
- Apply the font to the paragraph using the TextRange.getCharacterFormat().setFontName() method.
- Save the document to a different Word file.
- Java
import com.spire.doc.Document;
import com.spire.doc.FileFormat;
import com.spire.doc.PrivateFontPath;
import com.spire.doc.Section;
import com.spire.doc.documents.Paragraph;
import com.spire.doc.fields.TextRange;

public class ApplyPrivateFont {

    public static void main(String[] args) {

        // Create a Document instance
        Document document = new Document();

        // Load a Word document
        document.loadFromFile("C:\\Users\\Administrator\\Desktop\\sample.docx");

        // Get the last section
        Section section = document.getLastSection();

        // Add a paragraph
        Paragraph paragraph = section.addParagraph();

        // Append text to the paragraph
        TextRange textRange = paragraph.appendText("Java's versatility and wide range of applications make it one of the most popular " +
                "programming languages in the world. Its strong community support and continuous evolution ensure " +
                "it remains relevant in modern software development.");

        // Create a PrivateFontPath object, specifying font name and path
        PrivateFontPath fontPath = new PrivateFontPath();
        fontPath.setFontName("Otto");
        fontPath.setFontPath("C:\\Users\\Administrator\\Desktop\\Otto.ttf");

        // Add the private font to the document
        document.getPrivateFontList().add(fontPath);

        // Embed fonts in the generated file
        document.setEmbedFontsInFile(true);

        // Apply font to text range
        textRange.getCharacterFormat().setFontName("Otto");
        textRange.getCharacterFormat().setFontSize(28f);

        // Save the document to file
        document.saveToFile("output/ApplyPrivateFont.docx", FileFormat.Docx);

        // Dispose resources
        document.dispose();
    }
}
Change the Font of the Specified Text in Java
Changing the font of specific text can highlight key information, enhancing its visibility for readers. Spire.Doc for Java offers the Document.findAllString() method, allowing developers to search for a specified string within an existing document. Once the text is located, you can assign it to a TextRange object, which provides various APIs for formatting the text.
The steps to change the of the specified text in a Word document using Java are as follows:
- Create a Document object.
- Load a Word file.
- Find all the occurrences of the specified string using the Document.findAllString() method.
- Iterate through the occurrences.
- Get the specific occurrence (TextSection) as a TextRange object.
- Get the CharacterFormat object using the TextRange.getCharacterFormat() method.
- Change the font name, style, size and text color of the text range using the methods under the CharacterFormat object.
- Save the document to a different Word file.
- Java
import com.spire.doc.Document;
import com.spire.doc.FileFormat;
import com.spire.doc.documents.TextSelection;
import com.spire.doc.documents.UnderlineStyle;
import com.spire.doc.fields.TextRange;

import java.awt.*;

public class ChangeFontOfText {

    public static void main(String[] args) {

        // Create a Document instance
        Document document = new Document();

        // Load a Word document
        document.loadFromFile("C:\\Users\\Administrator\\Desktop\\sample.docx");

        // Find the text you wish to modify the font for
        TextSelection[] textSelections = document.findAllString("Rich Standard Library", false, true);

        // Iterate through the find results
        for (int i = 0; i < textSelections.length; i++) {

            // Get a specific text selection as a text range
            TextRange textRange = textSelections[i].getAsOneRange();

            // Change the text color and style
            textRange.getCharacterFormat().setTextColor(Color.blue);
            textRange.getCharacterFormat().setUnderlineStyle(UnderlineStyle.Dash);
            textRange.getCharacterFormat().setBold(true);

            // Change font name and size if you want
            // textRange.getCharacterFormat().setFontName("Calibri");
            // textRange.getCharacterFormat().setFontSize(18f);
        }

        // Save the result document
        document.saveToFile("output/ChangeFontOfText.docx", FileFormat.Docx_2019);

        // Dispose resources
        document.dispose();
    }
}

Apply for a Temporary License
If you'd like to remove the evaluation message from the generated documents, or to get rid of the function limitations, please request a 30-day trial license for yourself.
Adding a header to a PDF document is a useful way to display important information such as the document title, author, and page numbers. A header is a section of text or graphics that appears at the top of each page in a document and can be customized according to your needs. This feature is particularly helpful when creating reports, contracts, or other professional documents that require a consistent format. In this article, you will learn how to add a header to an existing PDF document in Java using Spire.PDF for Java.
Install Spire.PDF for Java
First of all, you're required to add the Spire.Pdf.jar file as a dependency in your Java program. The JAR file can be downloaded from this link. If you use Maven, you can easily import the JAR file in your application by adding the following code to your project's pom.xml file.
<repositories>
    <repository>
        <id>com.e-iceblue</id>
        <name>e-iceblue</name>
        <url>https://repo.e-iceblue.com/nexus/content/groups/public/</url>
    </repository>
</repositories>
<dependencies>
    <dependency>
        <groupId>e-iceblue</groupId>
        <artifactId>spire.pdf</artifactId>
        <version>12.6.4</version>
    </dependency>
</dependencies>
Background Knowledge
When an existing PDF document is manipulated by Spire.PDF for Java, the origin of the coordinate system is located at the top left corner of the page, with the x-axis extending to the right and the y-axis extending downward. Adding a header to a page means adding content, such as text, images, automatic fields and shapes, to a specified location in the upper blank area of the page.
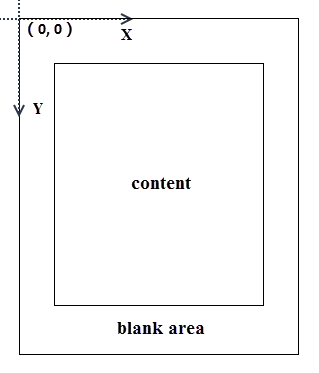
If the blank area is not large enough to accommodate the content you want to add, you can consider increasing the PDF page margins.
Add a Header to an Existing PDF Document in Java
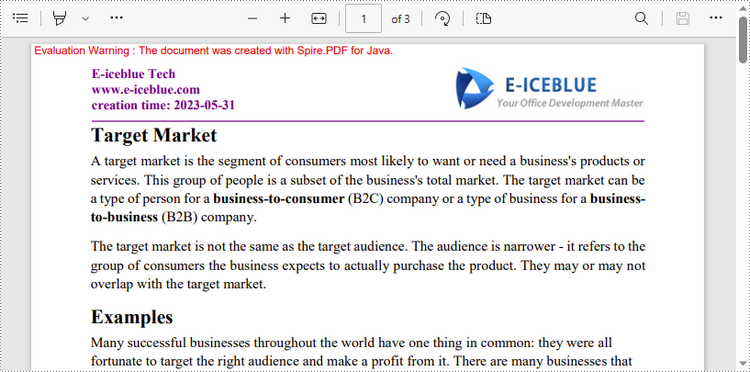
Spire.PDF for Java allows users to draw text, images and shapes on a PDF page using PdfCanvas.drawString() method, PdfCanvas.drawImage() method, PdfCanvas.drawLine() method and other similar methods. To add dynamic information to the header, such as page numbers, sections, dates, you need to resort to automatic fields. Spire.PDF for Java provides the PdfPageNumberField class, PdfSectionNumberField class, PdfCreationDateField class, etc. to achieve the dynamic addition of these data.
The following are the steps to add a header consisting of text, an image, a date, and a line to a PDF document using Spire.PDF for Java.
- Create a PdfDocument object.
- Load a PDF document using PdfDocument.loadFromFile() method.
- Create font, pen and brush objects that will be used to draw text or shapes.
- Draw text on the top blank area of a page using PdfPageBase.getCanvas().drawString() method.
- Draw a line on the top blank area of a page using PdfPageBase.getCanvas().drawLine() method.
- Load an image using PdfImage.fromFile() method.
- Draw the image on the top blank area of a page using PdfPageBase.getCanvas().drawImage() method.
- Create a PdfCreationDateField object that reflects the creation time of the document.
- Draw the creation time on the top blank area of a page using PdfCreationDateField.draw() method.
- Save the document to another PDF file using PdfDocument.saveToFile() method.
- Java
import com.spire.pdf.PdfDocument;
import com.spire.pdf.PdfPageBase;
import com.spire.pdf.automaticfields.PdfCompositeField;
import com.spire.pdf.automaticfields.PdfCreationDateField;
import com.spire.pdf.graphics.*;

import java.awt.*;

public class AddHeaderToPdf {

    public static void main(String[] args) {

        //Create a PdfDocument object
        PdfDocument doc = new PdfDocument();

        //Load a PDF file
        doc.loadFromFile("C:\\Users\\Administrator\\Desktop\\TargetMarket.pdf");

        //Load an image for the header
        PdfImage headerImage = PdfImage.fromFile("C:\\Users\\Administrator\\Desktop\\logo.png");

        //Get image width in pixel
        float width = headerImage.getWidth();

        //Convert pixel to point
        PdfUnitConvertor unitCvtr = new PdfUnitConvertor();
        float pointWidth = unitCvtr.convertUnits(width, PdfGraphicsUnit.Pixel, PdfGraphicsUnit.Point);

        //Specify text for the header
        String headerText = "E-iceblue Tech\nwww.e-iceblue.com";

        //Create a true type font
        PdfTrueTypeFont font = new PdfTrueTypeFont(new Font("Times New Roman", Font.BOLD, 12),true);

        //Create a brush
        PdfBrush brush = PdfBrushes.getPurple();

        //Create a pen
        PdfPen pen = new PdfPen(brush, 1.0f);

        //Create a creation date field
        PdfCreationDateField creationDateField = new PdfCreationDateField(font, brush);
        creationDateField.setDateFormatString("yyyy-MM-dd");

        //Create a composite field to combine static string and date field
        PdfCompositeField compositeField = new PdfCompositeField(font, brush, "creation time: {0}", creationDateField);
        compositeField.setLocation(new Point(55, 48));

        //Loop through the pages in the document
        for (int i = 0; i < doc.getPages().getCount(); i++)
        {
            //Get specific page
            PdfPageBase page = doc.getPages().get(i);

            //Draw the image on the top blank area
            page.getCanvas().drawImage(headerImage, page.getActualSize().getWidth() - pointWidth - 55, 20);

            //Draw text on the top blank area
            page.getCanvas().drawString(headerText, font, brush, 55, 20);

            //Draw a line on the top blank area
            page.getCanvas().drawLine(pen, new Point(55, 70), new Point((int)page.getActualSize().getWidth() - 55, 70));

            //Draw the composite field on the top blank area
            compositeField.draw(page.getCanvas());
        }

        //Save to file
        doc.saveToFile("output/AddHeader.pdf");
        doc.dispose();
    }
}
Apply for a Temporary License
If you'd like to remove the evaluation message from the generated documents, or to get rid of the function limitations, please request a 30-day trial license for yourself.
Variables in Word documents are a type of field that is characterized by the ability of convenient and accurate text management, such as text replacement and deletion. Compared with the find-and-replace function, replacing text by assigning values to variables is faster and less error-prone. This article is going to show how to add or change variables in Word documents programmatically using Spire.Doc for Java.
Install Spire.Doc for Java
First, you're required to add the Spire.Doc.jar file as a dependency in your Java program. The JAR file can be downloaded from this link. If you use Maven, you can easily import the JAR file in your application by adding the following code to your project's pom.xml file.
<repositories>
    <repository>
        <id>com.e-iceblue</id>
        <name>e-iceblue</name>
        <url>https://repo.e-iceblue.com/nexus/content/groups/public/</url>
    </repository>
</repositories>
<dependencies>
    <dependency>
        <groupId>e-iceblue</groupId>
        <artifactId>spire.doc</artifactId>
        <version>14.6.0</version>
    </dependency>
</dependencies>
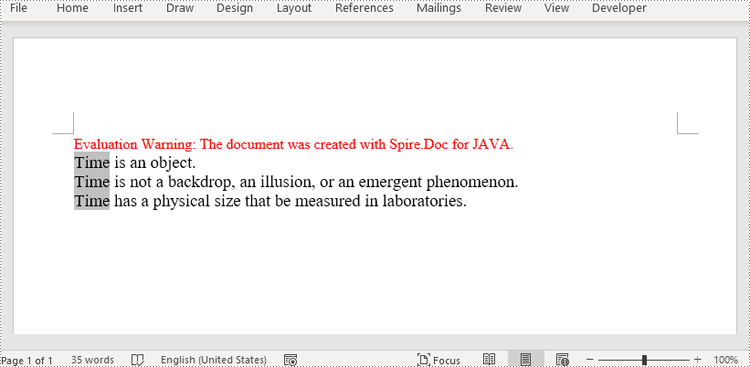
Insert Variables into Word Documents
As variables are a kind of Word fields, we can use the Paragraph.appendField(String fieldName, FieldType.Field_Doc_Variable) method to insert variables into Word documents, and then use the VariableCollection.add() method to assign values to the variables. It should be noted that after assigning values to variables, document fields need to be updated to display the assigned values. The detailed steps are as follows.
- Create an object of Document.
- Add a section to the document using Document.addSection() method.
- Add a paragraph to the section using Section.addParagraph() method.
- Add variable fields to the paragraph using Paragraph.appendField(String fieldName, FieldType.Field_Doc_Variable) method.
- Get the variable collection using Document.getVariables() method.
- Assign a value to the variable using VariableCollection.add() method.
- Update the fields in the document using Document.isUpdateFields() method.
- Save the document using Document.saveToFile() method.
- Java
import com.spire.doc.*;
import com.spire.doc.documents.Paragraph;
import com.spire.doc.formatting.CharacterFormat;

public class AddVariables {
    public static void main(String[] args) {

        //Create an object of Document
        Document document = new Document();

        //Add a section
        Section section = document.addSection();

        //Add a paragraph
        Paragraph paragraph = section.addParagraph();

        //Set text format
        CharacterFormat characterFormat = paragraph.getStyle().getCharacterFormat();
        characterFormat.setFontName("Times New Roman");
        characterFormat.setFontSize(14);

        //Set the page margin
        section.getPageSetup().getMargins().setTop(80f);

        //Add variable fields to the paragraph
        paragraph.appendField("Term", FieldType.Field_Doc_Variable);
        paragraph.appendText(" is an object.\r\n");
        paragraph.appendField("Term", FieldType.Field_Doc_Variable);
        paragraph.appendText(" is not a backdrop, an illusion, or an emergent phenomenon.\r\n");
        paragraph.appendField("Term", FieldType.Field_Doc_Variable);
        paragraph.appendText(" has a physical size that be measured in laboratories.");

        //Get the variable collection
        VariableCollection variableCollection = document.getVariables();

        //Assign a value to the variable
        variableCollection.add("Term", "Time");

        //Update the fields in the document
        document.isUpdateFields(true);

        //Save the document
        document.saveToFile("AddVariables.docx", FileFormat.Auto);
        document.dispose();
    }
}
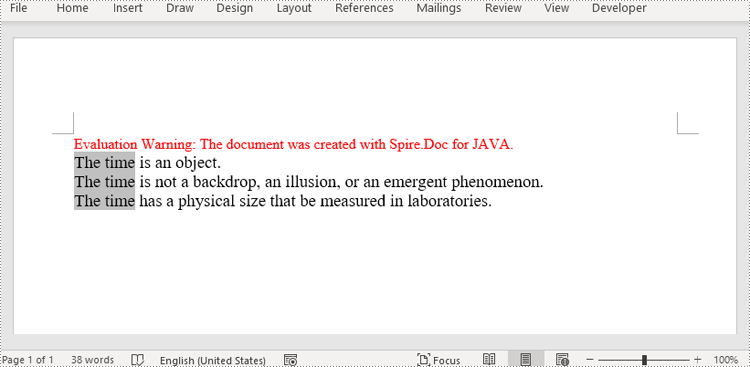
Change the Value of Variables in Word Documents
Spire.Doc for Java provides the VariableCollection.set() method to change the values of variables. And after updating fields in the document, all the occurrences of the variables will display the newly assigned value, thus achieving fast and accurate text replacement. The detailed steps are as follows.
- Create an object of Document.
- Load a Word document using Document.loaFromFile() method.
- Get the variable collection using Document.getVariables() method.
- Assign a new value to a specific variable through its name using VariableCollection.set() method.
- Update the fields in the document using Document.isUpdateFields() method.
- Save the document using Document.saveToFile() method.
- Java
import com.spire.doc.Document;
import com.spire.doc.FileFormat;
import com.spire.doc.VariableCollection;

public class ChangeVariableValue {
    public static void main(String[] args) {

        //Create an object of Document
        Document document = new Document();

        //Load a Word document
        document.loadFromFile("AddVariables.docx");

        //Get the variable collection
        VariableCollection variableCollection = document.getVariables();

        //Assign a new value to a variable
        variableCollection.set("Term", "The time");

        //Update the fields in the document
        document.isUpdateFields(true);

        //Save the document
        document.saveToFile("ChangeVariable.docx", FileFormat.Auto);
        document.dispose();
    }
}
Apply for a Temporary License
If you'd like to remove the evaluation message from the generated documents, or to get rid of the function limitations, please request a 30-day trial license for yourself.
