Массовая замена текста в PDF: 3 практических метода
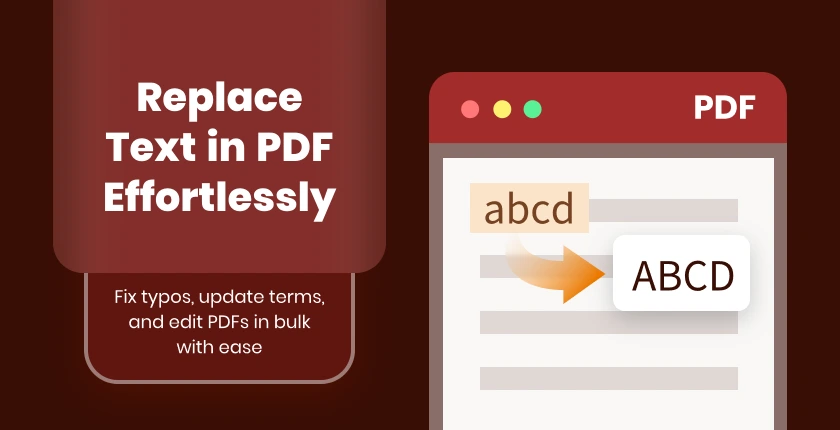
PDF-файлы широко используются для отчетов, руководств и документации. Редактирование текста в PDF не так просто, как в Word, и ручная замена каждого вхождения слова может быть утомительной. Это руководство покажет вам три практических способа эффективно заменить текст в одном PDF-файле, чтобы вы могли исправлять опечатки, обновлять термины или исправлять ошибки во всем документе без ручного редактирования каждого экземпляра.
Быстрая навигация:
- Способ 1: Использование Adobe Acrobat Pro
- Способ 2: Использование онлайн-инструмента (PDF4me)
- Способ 3: Использование .NET API (программный подход)
Зачем заменять текст в PDF?
Замена текста в PDF часто необходима, поскольку PDF-файлы предназначены для сохранения содержимого и макета, что затрудняет ручное редактирование. Распространенные сценарии включают:
- Исправление опечаток или ошибок – Даже профессионально подготовленные PDF-файлы могут содержать ошибки, которые необходимо исправить.
- Обновление устаревшей информации – Имена, даты, сведения о компании или ссылки на продукты могут потребовать пересмотра без пересоздания всего документа.
- Стандартизация терминологии – Для единообразия в отчетах или руководствах определенные термины могут потребовать обновления во всем документе.
- Юридические или нормативные обновления – Некоторые документы могут потребовать внесения текстовых изменений для соответствия нормативным или договорным требованиям.
- Улучшение читаемости – Замена неуклюжих формулировок, сокращений или технических терминов может сделать документы более понятными для читателей.
Эффективно заменяя текст, вы экономите время, сохраняете профессиональное форматирование и избегаете хлопот с пересозданием PDF-файлов с нуля.
Способ 1: Использование Adobe Acrobat Pro
Adobe Acrobat Pro — один из самых надежных и профессиональных инструментов для редактирования PDF. Он позволяет заменять текст во всем документе, сохраняя исходное форматирование, макет и шрифты. Это особенно полезно при работе со сложными PDF-файлами, содержащими таблицы, изображения, колонтитулы или верхние/нижние колонтитулы.
Программное обеспечение гарантирует, что замена не исказит выравнивание текста или структуру страницы, что является распространенной проблемой с более простыми инструментами. Adobe Acrobat Pro идеально подходит для офисных пользователей или профессионалов, которым требуется надежное настольное решение для точного редактирования текста.

Пошаговая инструкция
-
Откройте ваш PDF-файл в Adobe Acrobat Pro.
-
Перейдите в Редактировать → Найти / Заменить → Заменить текст .
-
Введите текст, который вы хотите заменить, в поле Найти.
-
Введите новый текст в поле Заменить на.
-
Настройте параметр С учетом регистра в соответствии с вашими потребностями.
- Включите его, если вы хотите заменять текст только с точным совпадением регистра.
- Отключите его, если вы хотите, чтобы Acrobat автоматически заменял все варианты регистра.
-
Нажмите Заменить, пока не будут заменены все вхождения в документе.
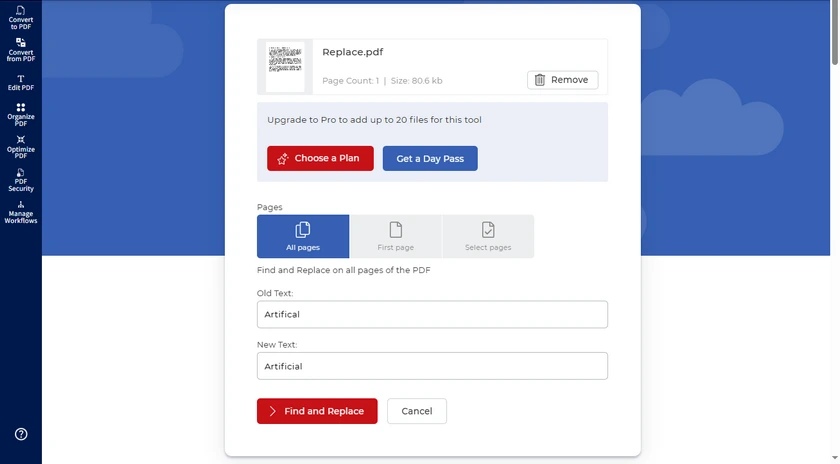
Примечание: Обращайте особое внимание на регистр при замене текста. Например, «Artifical» и «artifical» могут обрабатываться по-разному в зависимости от того, включено ли сопоставление С учетом регистра. Неправильные настройки могут привести к пропуску некоторых вхождений или их непреднамеренной замене.
Преимущества
- Сохраняет форматирование, шрифты и макет.
- Простое и надежное решение для отдельных документов.
Недостатки
- Платное программное обеспечение.
- Менее подходит для полностью автоматизированных рабочих процессов.
Способ 2: Использование онлайн-инструмента (PDF4me)
Онлайн-инструменты, такие как PDF4me, удобны для пользователей, которым требуется быстрое решение без установки какого-либо программного обеспечения. Они позволяют заменить все вхождения слова или фразы в одном PDF-файле непосредственно в вашем браузере. Этот метод особенно полезен, когда вы работаете на компьютере, где вы не можете установить программное обеспечение, или когда вам требуется быстрое исправление для небольших и средних документов.
Хотя онлайн-инструменты, как правило, просты в использовании, они могут иметь ограничения по размеру файла или количеству замен за сеанс, и вам следует проявлять осторожность при загрузке конфиденциальных документов.
Пошаговая инструкция
- Откройте инструмент поиска и замены PDF4me в вашем браузере.
- Загрузите PDF-файл, который вы хотите отредактировать.
- Введите текст для поиска и текст для замены.
- Нажмите Найти и заменить и скачайте обновленный PDF-файл.
Преимущества
- Не требуется установка; работает в любом браузере.
- Быстрое и удобное решение для периодического редактирования.
Недостатки
- Могут быть ограничения по размеру файла или количеству сеансов.
- Менее подходит для конфиденциальных документов.
Способ 3: Использование .NET API (программный подход)
Для разработчиков или опытных пользователей Spire.PDF for .NET предоставляет программное решение для замены текста во всем PDF-файле. В отличие от ручных или онлайн-методов, этот подход обеспечивает точный контроль над каждой заменой и гарантирует сохранение всех страниц, шрифтов и макетов. Это особенно полезно, если вам нужно заменить несколько терминов одновременно или интегрировать замену текста в автоматизированный рабочий процесс.
Пошаговая инструкция
- Откройте вашу среду разработки (Visual Studio и т. д.).
- Установите и добавьте ссылку на Spire.PDF for .NET в ваш проект.
- Используйте следующий код C#, чтобы заменить все вхождения слова:
PM> Install-Package Spire.PDF
using Spire.Pdf;
using Spire.Pdf.Texts;

namespace ReplaceInEntireDocument
{
    class Program
    {
        static void Main(string[] args)
        {
            // Загрузить PDF-файл
            PdfDocument doc = new PdfDocument();
            doc.LoadFromFile("Input.pdf");

            // Создать объект PdfTextReplaceOptions
            PdfTextReplaceOptions textReplaceOptions = new PdfTextReplaceOptions();

            // Указать параметры замены текста
            textReplaceOptions.ReplaceType = PdfTextReplaceOptions.ReplaceActionType.WholeWord | PdfTextReplaceOptions.ReplaceActionType.AutofitWidth;

            for (int i = 0; i < doc.Pages.Count; i++) {

                // Получить конкретную страницу
                PdfPageBase page = doc.Pages[i];

                // Создать объект PdfTextReplacer на основе страницы
                PdfTextReplacer textReplacer = new PdfTextReplacer(page);

                // Установить параметры замены
                textReplacer.Options = textReplaceOptions;

                // Заменить все вхождения целевого текста новым текстом
                textReplacer.ReplaceAllText("artifical", "artificial");
                textReplacer.ReplaceAllText("Artifical", "Artificial");
            }

            // Сохранить документ в другой PDF-файл
            doc.SaveToFile("Replaced.pdf");

            // Освободить ресурсы
            doc.Dispose();
        }
    }
}
Вывод:

Примечание: В Spire.PDF замена текста по умолчанию чувствительна к регистру. Это означает, что «artifical» и «Artifical» считаются разными строками.
Вот почему пример включает два оператора замены:
textReplacer.ReplaceAllText("artifical", "artificial");
textReplacer.ReplaceAllText("Artifical", "Artificial");
Если ваш документ содержит несколько стилей регистра, убедитесь, что вы заменяете каждый вариант отдельно.
Расширенные функции для опытных пользователей
Spire.PDF предлагает несколько расширенных возможностей поиска и замены, выходящих за рамки простой замены «всех»:
- Заменить текст на конкретной странице – Вы можете нацелиться только на одну страницу вместо всех страниц.
- Заменить первое вхождение – Полезно, когда нужно обновить только первое вхождение слова.
- Найти и заменить с использованием регулярных выражений – Позволяет выполнять сложное сопоставление с образцом и замену (например, даты, адреса электронной почты или переменные форматы).
Вы можете реализовать эти функции, настроив методы PdfTextReplacer или ReplaceAllText в вашем коде. Например, вы можете перебрать только нужную страницу или использовать регулярные выражения в строке поиска для сопоставления шаблонов, а не точных слов. Для получения дополнительных сценариев использования обратитесь к Замена текста в документе PDF с использованием C#.
Преимущества
- Полностью автоматизированный; гибкие параметры замены текста.
- Сохраняет шрифт, макет и форматирование.
- Может быть интегрирован в настольные или серверные рабочие процессы для повторяющихся задач.
Недостатки
- Требует знаний программирования.
- Для полных функций может потребоваться коммерческая лицензия.
Помимо замены текста, вы также можете заменять изображения, шрифты и другие элементы документа программно с помощью Spire.PDF for .NET. Это делает его более комплексным решением для модификации PDF, выходящим за рамки простых текстовых обновлений.
Заключение
Замена текста в PDF не обязательно должна быть сложной. Для большинства пользователей замена всех вхождений в одном PDF-файле достаточна и практична. В зависимости от ваших потребностей:
- Adobe Acrobat Pro – Лучше всего подходит для профессионального настольного редактирования с идеальным форматированием.
- PDF4me – Быстрое и простое онлайн-решение для периодического использования.
- Spire.PDF for .NET – Идеально подходит для разработчиков, которым нужны автоматизированные, точные замены.
Выбрав метод, соответствующий вашему рабочему процессу, вы сможете эффективно исправлять опечатки, обновлять термины или исправлять ошибки без ручного редактирования каждого экземпляра.
Часто задаваемые вопросы
В1: Могу ли я заменить текст в отсканированном PDF?
Нет. Отсканированные PDF-файлы по сути являются изображениями. Чтобы заменить текст, вам сначала необходимо выполнить OCR (оптическое распознавание символов), чтобы преобразовать изображения в редактируемый текст.
В2: Форматирование сломается после замены текста?
Это зависит от метода. Adobe Acrobat Pro и Spire.PDF сохраняют шрифты, макет и выравнивание. Онлайн-инструменты могут незначительно повлиять на форматирование, особенно в сложных PDF-файлах.
В3: Могу ли я заменить несколько разных слов одновременно?
Да. В Spire.PDF вы можете добавить несколько команд ReplaceAllText для разных терминов. В Adobe Acrobat вам нужно повторить поиск и замену для каждого термина.
В4: Нужна ли мне платная лицензия для замены текста?
Adobe Acrobat Pro является платным, а для полных функций Spire.PDF может потребоваться коммерческая лицензия. PDF4me предлагает бесплатные пробные версии или ограниченные замены, но большие правки могут потребовать подписки.
В5: Могу ли я отменить замены, если что-то пойдет не так?
Всегда сохраняйте резервную копию исходного PDF-файла перед заменой текста. Adobe Acrobat Pro имеет функцию Отменить, но онлайн-инструменты и программные методы требуют резервной копии для восстановления исходного содержимого.
См. также
- Как печатать PDF в Windows: 5 простых и эффективных способов
- Копирование текста из защищенных PDF: 5 бесплатных и простых способов
- 5 эффективных способов преобразования PDF в черно-белый формат
- Как выделять текст в PDF: 5 простых методов
- Бесплатное преобразование PDF в Excel – текст и отсканированные PDF
Como alterar as permissões de PDF? 4 métodos seguros
Sumário
- Quais permissões de PDF você pode alterar?
- Método 1: Editar permissões de PDF com Adobe Acrobat Pro
- Método 2: Alterar permissões de PDF usando LibreOffice Draw
- Método 3: Modificadores de permissão de PDF online
- Método 4: Alterar permissões programaticamente em C#
- Lista de verificação final antes de alterar as permissões
- Perguntas frequentes (FAQs)
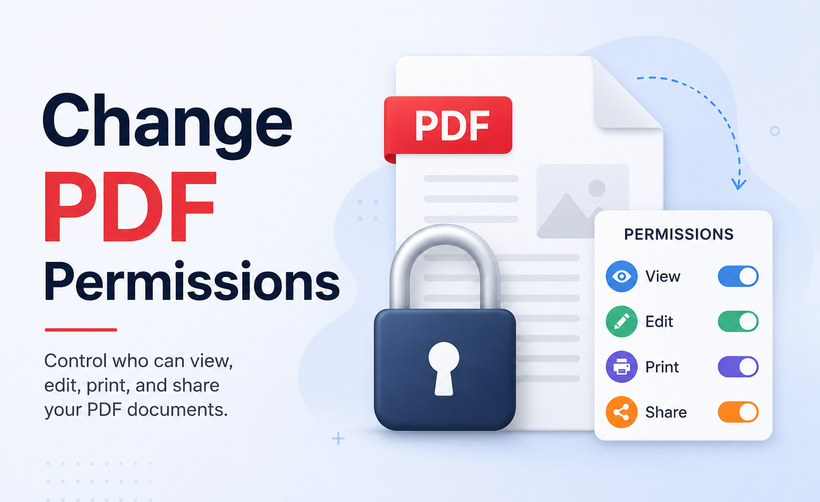
Você está se perguntando como alterar permissões de PDF para restringir a edição, desabilitar a cópia, bloquear a impressão ou desbloquear arquivos PDF restritos? PDFs são universalmente usados para documentos profissionais, contratos, currículos e arquivos oficiais devido à sua formatação fixa e recursos de compartilhamento seguro. No entanto, as configurações de permissão de PDF padrão geralmente não atendem às suas necessidades exclusivas de compartilhamento e segurança.
Neste guia, cobriremos métodos fáceis e acionáveis para editar permissões de PDF usando software profissional, ferramentas de desktop gratuitas, plataformas online confiáveis e até mesmo abordagens programáticas para desenvolvedores.
- Quais permissões de PDF você pode alterar?
- Método 1: Editar permissões de PDF com Adobe Acrobat Pro
- Método 2: Alterar permissões de PDF usando LibreOffice Draw
- Método 3: Modificadores de permissão de PDF online
- Método 4: Alterar permissões programaticamente em C#
- Lista de verificação final antes de alterar as permissões
- Perguntas frequentes (FAQs)
Quais permissões de PDF você pode alterar?
As permissões de PDF (também chamadas de "configurações de restrição" ou "flags de segurança") controlam as ações principais do usuário. Você pode alternar essas configurações conforme necessário:
| Permissão | O que controla |
|---|---|
| Impressão | Se os usuários podem imprimir – Baixa resolução ou Alta resolução |
| Cópia de conteúdo | Capacidade de copiar texto ou imagens para a área de transferência |
| Montagem de documentos | Inserir, excluir ou girar páginas |
| Comentários | Adicionar notas, destaques ou comentários adesivos |
| Preenchimento de formulários | Trabalhar com campos de formulário preenchíveis |
| Extração de conteúdo | Ferramentas de acessibilidade e leitores de tela |
| Modificação | Editar texto, imagens ou objetos |
Ao alterar permissões, você está atualizando essas flags – por exemplo, mudando de "impressão não permitida" para "impressão em alta resolução permitida", ou habilitando comentários que foram anteriormente desabilitados.
Nota Crítica: Não existe "porta dos fundos" de segurança. Você não pode alterar legalmente as permissões sem a senha do proprietário ou o consentimento do autor.
Método 1: Editar permissões de PDF com Adobe Acrobat Pro
O Adobe Acrobat é a ferramenta oficial para modificar configurações de segurança de PDF, oferecendo controle total sobre todas as opções de permissão de PDF. É ideal para usuários profissionais que precisam de personalização precisa de segurança.
Etapas para alterar as permissões de arquivo PDF:
- Abra o arquivo PDF alvo no Adobe Acrobat Pro.
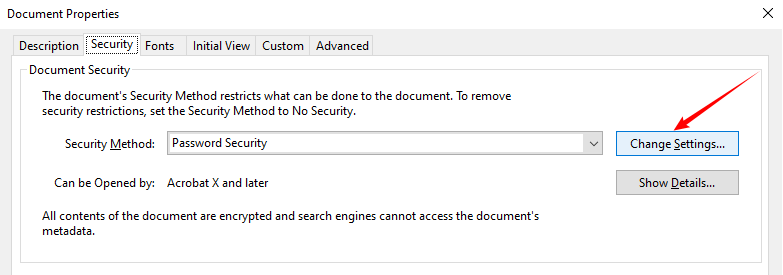
- Vá para Arquivo > Propriedades (atalho: Ctrl+D).
- Navegue até a guia Segurança – é aqui que todas as configurações de permissão são exibidas.
- Clique em Alterar Configurações para modificar as configurações de permissão existentes. Se o arquivo estiver bloqueado, insira a senha de permissão para desbloquear as configurações editáveis.
- Na janela "Segurança por senha – Configurações", personalize as permissões marcando ou desmarcando ações como:
- Definir impressão permitida (Nenhuma/Baixa/Alta Resolução)
- Definir alterações permitidas (Comentários/Preenchimento de formulários/Nenhuma)
- Alternar cópia de conteúdo e acesso de acessibilidade
- Defina uma nova senha de permissão, confirme as configurações e salve o arquivo PDF modificado para aplicar todas as alterações.
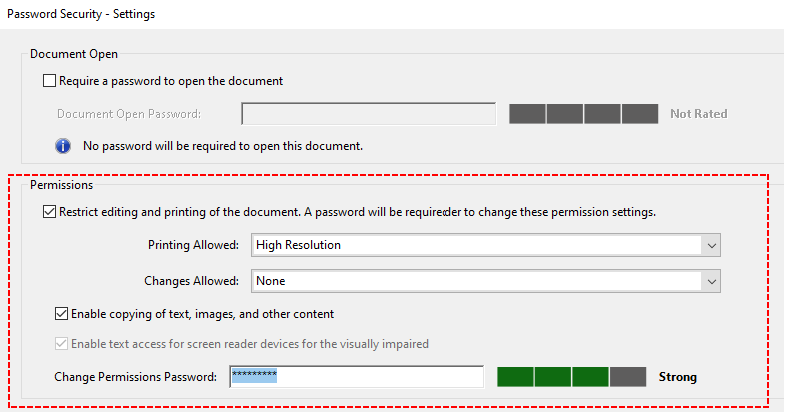
Nota: O Adobe Acrobat requer uma assinatura paga.
✅ Exemplos Práticos:
- Use "Alterações Permitidas: Nenhuma" para contratos finais somente leitura.
- Use "Alterações Permitidas: Comentários" para revisões em equipe.
Além de ajustar configurações específicas de permissão de PDF, as mesmas ferramentas também permitem remover permissões de PDF inteiramente para remover todas as restrições de uma vez.
Método 2: Alterar permissões de PDF usando LibreOffice Draw
Não tem Adobe? Sem problemas. Você pode usar o LibreOffice Draw para modificar permissões de PDF. Esta ferramenta pode abrir e editar PDFs, e depois reexportá-los com novas configurações de permissão. Funciona offline, respeita sua privacidade e não custa nada.
Etapas para usar o LibreOffice Draw:
- Baixe e instale em libreoffice.org. Escolha a versão para o seu sistema operacional (Windows, Mac, Linux).
- Inicie o LibreOffice Draw e abra seu PDF nele.
- Vá para Arquivo > Exportar Como > Exportar como PDF.
- Navegue até a guia Segurança na caixa de diálogo Opções de PDF.
- Defina uma nova senha de proprietário (necessária para alterar permissões).
- Ajuste as caixas de seleção de permissão conforme desejar. Por exemplo:
- Habilitar impressão em alta resolução
- Habilitar preenchimento de formulários (crie campos de formulário interativos em PDF primeiro)
- Habilitar cópia de conteúdo
- Habilitar texto/acesso para leitores de tela
- Clique em Exportar e salve o novo PDF.
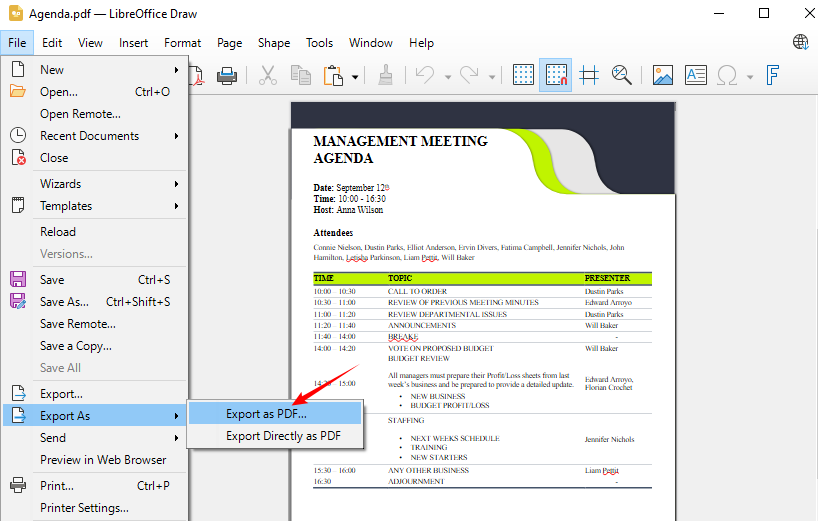
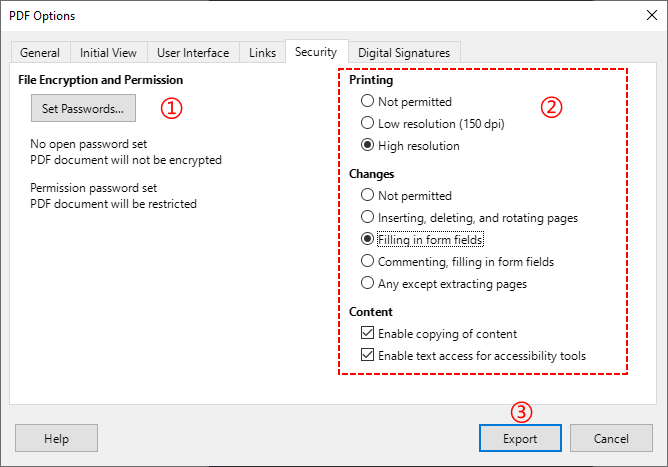
⚠️ Aviso: Este método reescreve o PDF. Algumas formatações complexas (fontes, camadas) podem mudar. Teste com uma cópia primeiro.
Método 3: Modificadores de permissão de PDF online
Se você raramente ajusta permissões de PDF e se recusa a instalar software de desktop, ferramentas de PDF online seguras oferecem uma solução rápida e temporária. Ferramentas como SwiftPDFLab e pdfup.org suportam edição de permissão de PDF baseada em navegador.
Fluxo de trabalho geral para alterar permissões de PDF online:
- Abra um editor de permissão de PDF online confiável em seu navegador (por exemplo, Ferramenta de Alteração de Permissões do SwiftPDFLab).
- Faça o upload do seu arquivo PDF para a plataforma online.
- Personalize as restrições de impressão, edição e cópia de acordo com seus requisitos.
- Defina uma nova senha de proprietário e clique em Alterar Permissões para aplicar as novas configurações.
- O arquivo PDF modificado será baixado automaticamente.
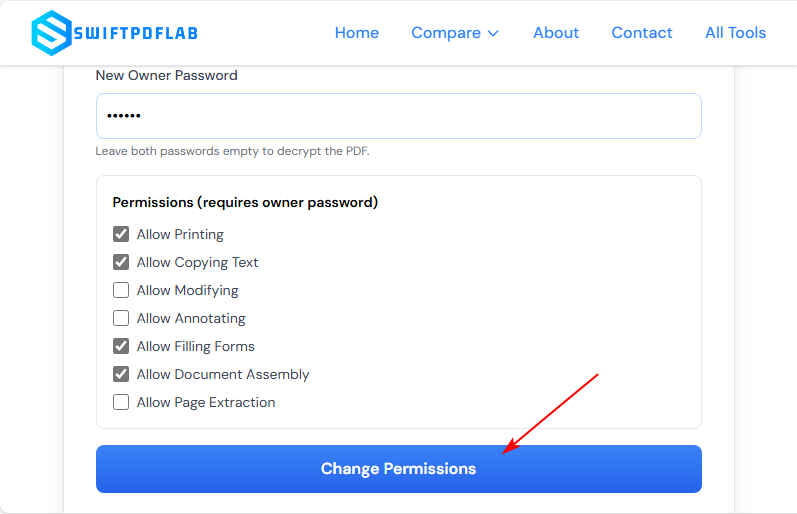
Melhor prática de segurança: Use uma ferramenta que exclua uploads automaticamente. Nunca faça upload de PDFs altamente confidenciais, privados ou sensíveis para negócios. Ferramentas online são recomendadas apenas para documentos públicos não sensíveis.
Método 4: Alterar permissões programaticamente em C#
Para desenvolvedores, equipes de TI ou usuários que precisam de automação de PDF em lote, você pode alterar permissões de PDF programaticamente com C# usando o Free Spire.PDF for .NET — uma biblioteca .NET gratuita e offline que lida com senhas de permissão e senhas de abertura, dando a você controle total do ciclo de vida da segurança de PDF.
Exemplo de Código C# (Habilitar Cópia e Impressão)
O seguinte código C# carrega um PDF, cria uma nova política de segurança, define várias permissões e salva o PDF com as novas permissões.
using Spire.Pdf;

namespace ChangeSecurityPermission
{
    class Program
    {
        static void Main(string[] args)
        {
            // 1. Criar um objeto PdfDocument
            PdfDocument pdf = new PdfDocument();

            // 2. Carregar o arquivo PDF restrito com senha do proprietário (se houver)
            pdf.LoadFromFile("Agenda.pdf", "12345");

            // 3. Especificar senha de abertura (deixe em branco se não for necessária)
            string openPsd = string.Empty;

            // 4. Especificar uma nova senha de proprietário
            string permissionPsd = "abc123";

            // 5. Criar uma política de segurança usando novas senhas de abertura e proprietário
            PdfSecurityPolicy securityPolicy = new PdfPasswordSecurityPolicy(openPsd, permissionPsd);

            // 6. Definir algoritmo de criptografia (AES 128 bits é moderno e seguro)
            securityPolicy.EncryptionAlgorithm = PdfEncryptionAlgorithm.AES_128;

            // 7. Definir as novas permissões que você deseja permitir
            securityPolicy.DocumentPrivilege.AllowContentCopying = true; // Permitir cópia de conteúdo
            securityPolicy.DocumentPrivilege.AllowPrint = true; // Permitir impressão

            // 8. Aplicar a nova política de segurança ao documento
            pdf.Encrypt(securityPolicy);

            // 9. Salvar o PDF atualizado em um novo arquivo
            pdf.SaveToFile("ChangePermissions.pdf");
            pdf.Close();
        }
    }
}
O objeto PdfDocumentPrivilege, recuperado via PdfSecurityPolicy.DocumentPrivilege, é uma classe granular de controle de permissão que define exatamente o que os usuários podem e não podem fazer com o PDF (as "regras de restrição"). É aqui que você alterna permissões como impressão, cópia, edição e preenchimento de formulários.
Resultado:
Quando usar este método:
- Você se sente confortável com C# e .NET.
- Você precisa processar muitos PDFs automaticamente (por exemplo, relatórios diários).
- Você deseja integrar alterações de permissão em seu próprio software.
Lista de verificação final antes de alterar as permissões
Antes de começar, verifique estes pontos:
- Você tem a senha do proprietário? (Não a senha do usuário/abertura)
- Você tem direitos legais para modificar este documento?
- Quais permissões você realmente precisa? (por exemplo, apenas impressão, ou cópia completa também)
- Você está usando uma ferramenta confiável (software local > plataformas online)?
Depois de confirmar isso, siga o método acima que corresponde ao seu orçamento e nível de habilidade.
Resumo
Aprender como alterar permissões de PDF permite que você controle totalmente seus arquivos PDF, equilibrando a segurança do documento e a flexibilidade. Para usuários profissionais, o Adobe Acrobat é a escolha mais confiável. O LibreOffice Draw serve como uma alternativa offline gratuita, mas pode alterar a formatação. Ferramentas online são para edições rápidas e não sensíveis, e C# com Free Spire.PDF é a melhor escolha para processamento em lote seguro e automatizado.
Priorize sempre métodos offline (software de desktop/código) para arquivos confidenciais de negócios e pessoais para evitar riscos de vazamento de dados. Ao dominar esses métodos, você pode facilmente bloquear, restringir ou desbloquear arquivos PDF para atender a todas as suas necessidades de compartilhamento e segurança de documentos.
Perguntas frequentes (FAQs)
Q1. Alterar permissões de PDF afetará o conteúdo existente do PDF?
Não. Alterar permissões apenas modifica o envelope de segurança ao redor do PDF. Os bytes de conteúdo permanecem idênticos. No entanto, o Método 2 (LibreOffice Draw) é uma exceção – como ele reexibe o PDF, a formatação pode mudar. Sempre use uma cópia com o Método 2.
Q2. Posso alterar permissões em um PDF assinado digitalmente?
Não. Assinaturas digitais bloqueiam o PDF para evitar adulteração. Você deve remover a assinatura (requer ação do signatário) antes de modificar as permissões.
Q3. Qual é a maneira mais segura de alterar permissões de PDF?
A maneira mais segura é offline com Adobe Acrobat Pro ou Free Spire.PDF porque:
- O arquivo nunca sai do seu computador.
- Criptografia forte (AES‑128) pode ser aplicada.
- Nenhum servidor de terceiros pode interceptar os dados.
Q4. O método Free Spire.PDF é seguro para produção?
Para ferramentas internas e automação em pequena escala, sim. Mas observe o limite de 10 páginas na versão gratuita. Para páginas ilimitadas, considere a versão comercial.
Veja também
- Como comprimir um PDF: Melhores ferramentas para tornar PDFs menores
- Como excluir páginas em branco em PDF (Manual e Automação)
- 3 maneiras de reordenar páginas de PDF: Online, Desktop e Python
- Como assinar digitalmente PDFs com C# (Tutorial de Código Prático)
- Java: Adicionar permissões de segurança a um documento PDF
PDF 권한을 변경하는 방법은 무엇입니까? 4가지 안전한 방법
편집 제한, 복사 비활성화, 인쇄 잠금 또는 제한된 PDF 파일 잠금 해제를 위해 PDF 권한을 변경하는 방법이 궁금하신가요? PDF는 고정된 형식과 안전한 공유 기능 덕분에 전문 문서, 계약서, 이력서 및 공식 파일에 보편적으로 사용됩니다. 그러나 기본 PDF 권한 설정은 종종 고유한 공유 및 보안 요구 사항과 일치하지 않습니다.
이 가이드에서는 전문 소프트웨어, 무료 데스크톱 도구, 신뢰할 수 있는 온라인 플랫폼 및 개발자를 위한 프로그래밍 방식 접근 방식을 사용하여 PDF 권한을 편집하는 쉽고 실행 가능한 방법을 다룹니다.
- 변경할 수 있는 PDF 권한은 무엇인가요?
- 방법 1: Adobe Acrobat Pro로 PDF 권한 편집하기
- 방법 2: LibreOffice Draw를 사용하여 PDF 권한 변경하기
- 방법 3: 온라인 PDF 권한 변경 도구
- 방법 4: C#에서 프로그래밍 방식으로 권한 변경하기
- 권한 변경 전 최종 점검 목록
- 자주 묻는 질문 (FAQ)
변경할 수 있는 PDF 권한은 무엇인가요?
PDF 권한( "제한 설정" 또는 "보안 플래그"라고도 함)은 핵심 사용자 작업을 제어합니다. 필요에 따라 이러한 설정을 전환할 수 있습니다.
| 권한 | 제어 내용 |
|---|---|
| 인쇄 | 사용자가 인쇄할 수 있는지 여부 – 저해상도 또는 고해상도 |
| 콘텐츠 복사 | 텍스트 또는 이미지를 클립보드로 복사하는 기능 |
| 문서 조립 | 페이지 삽입, 삭제 또는 회전 |
| 주석 | 메모, 강조 표시 또는 스티커 메모 추가 |
| 양식 채우기 | 채울 수 있는 양식 필드 작업 |
| 콘텐츠 추출 | 접근성 도구 및 화면 판독기 |
| 수정 | 텍스트, 이미지 또는 개체 편집 |
권한을 변경할 때 이러한 플래그를 업데이트하는 것입니다. 예를 들어 "인쇄 불가"에서 "고해상도 인쇄 가능"으로 전환하거나 이전에 비활성화되었던 주석을 활성화하는 것입니다.
중요 참고 사항: 보안 "백도어"는 없습니다. 소유자 암호 또는 작성자의 동의 없이는 합법적으로 권한을 변경할 수 없습니다.
방법 1: Adobe Acrobat Pro로 PDF 권한 편집하기
Adobe Acrobat은 PDF 보안 설정을 수정하는 공식 도구로, 모든 PDF 권한 옵션을 완벽하게 제어할 수 있습니다. 정밀한 보안 사용자 정의가 필요한 전문 사용자에게 이상적입니다.
PDF 파일 권한을 변경하는 단계:
- Adobe Acrobat Pro에서 대상 PDF 파일을 엽니다.
- 파일 > 속성 (단축키: Ctrl+D)으로 이동합니다.
- 보안 탭으로 이동합니다. 모든 권한 설정이 표시되는 곳입니다.
- 기존 권한 구성을 수정하려면 설정 변경을 클릭합니다. 파일이 잠겨 있으면 권한 암호를 입력하여 편집 가능한 설정을 잠금 해제합니다.
- "암호 보안 – 설정" 창에서 다음과 같은 작업을 선택하거나 선택 취소하여 권한을 사용자 정의합니다.
- 인쇄 허용 설정 (없음/저해상도/고해상도)
- 허용된 변경 사항 정의 (주석/양식 채우기/없음)
- 콘텐츠 복사 및 접근성 액세스 전환
- 새 권한 암호를 설정하고 설정을 확인한 다음 수정된 PDF 파일을 저장하여 모든 변경 사항을 적용합니다.
참고: Adobe Acrobat은 유료 구독이 필요합니다.
✅ 실용적인 예시:
- 최종 읽기 전용 계약서의 경우 "변경 허용: 없음"을 사용합니다.
- 팀 검토의 경우 "변경 허용: 주석"을 사용합니다.
특정 PDF 권한 설정을 조정하는 것 외에도 동일한 도구를 사용하여 PDF 권한을 완전히 제거하여 모든 제한을 한 번에 해제할 수 있습니다.
방법 2: LibreOffice Draw를 사용하여 PDF 권한 변경하기
Adobe가 없으신가요? 문제없습니다. LibreOffice Draw를 사용하여 PDF 권한을 수정할 수 있습니다. 이 도구는 PDF를 열고 편집한 다음 새 권한 설정으로 다시 내보낼 수 있습니다. 오프라인으로 작동하고 개인 정보를 존중하며 비용이 들지 않습니다.
LibreOffice Draw 사용 단계:
- libreoffice.org에서 다운로드하여 설치합니다. 운영 체제(Windows, Mac, Linux)에 맞는 버전을 선택합니다.
- LibreOffice Draw를 실행하고 PDF를 엽니다.
- 파일 > 다른 이름으로 내보내기 > PDF로 내보내기로 이동합니다.
- PDF 옵션 대화 상자에서 보안 탭으로 이동합니다.
- 새 소유자 암호를 설정합니다 (권한을 변경하려면 필요).
- 원하는 대로 권한 확인란을 조정합니다. 예를 들면 다음과 같습니다.
- 고해상도 인쇄 활성화
- 양식 채우기 활성화 (먼저 PDF에서 대화형 양식 필드 만들기 )
- 콘텐츠 복사 활성화
- 화면 판독기를 위한 텍스트/액세스 활성화
- 내보내기를 클릭하고 새 PDF를 저장합니다.
⚠️ 경고: 이 방법은 PDF를 다시 작성합니다. 일부 복잡한 서식(글꼴, 레이어)이 변경될 수 있습니다. 먼저 복사본으로 테스트하십시오.
방법 3: 온라인 PDF 권한 변경 도구
PDF 권한을 자주 조정하지 않고 데스크톱 소프트웨어를 설치하고 싶지 않다면, 안전한 온라인 PDF 도구가 빠르고 임시적인 솔루션을 제공합니다. SwiftPDFLab 및 pdfup.org와 같은 도구는 브라우저 기반 PDF 권한 편집을 지원합니다.
온라인으로 PDF 권한을 변경하는 일반적인 워크플로:
- 브라우저에서 신뢰할 수 있는 온라인 PDF 권한 편집기를 엽니다 (예: SwiftPDFLab 권한 변경 도구).
- 온라인 플랫폼에 PDF 파일을 업로드합니다.
- 요구 사항에 따라 인쇄, 편집 및 복사 제한을 사용자 정의합니다.
- 새 소유자 암호를 설정하고 권한 변경을 클릭하여 새 설정을 적용합니다.
- 수정된 PDF 파일이 자동으로 다운로드됩니다.
보안 모범 사례: 자동 삭제 기능을 제공하는 도구를 사용하십시오. 기밀, 개인 또는 비즈니스 관련 PDF는 절대 업로드하지 마십시오. 온라인 도구는 민감하지 않은 공개 문서에만 권장됩니다.
방법 4: C#에서 프로그래밍 방식으로 권한 변경하기
개발자, IT 팀 또는 일괄 PDF 자동화가 필요한 사용자를 위해, Free Spire.PDF for .NET을 사용하여 프로그래밍 방식으로 PDF 권한을 변경할 수 있습니다. 이 무료 오프라인 .NET 라이브러리는 권한 암호와 열기 암호를 모두 처리하여 PDF 보안에 대한 전체 수명 주기 제어를 제공합니다.
C# 코드 예제 (복사 및 인쇄 활성화)
다음 C# 코드는 PDF를 로드하고, 새 보안 정책을 생성하고, 다양한 권한을 설정하고, 새 권한으로 PDF를 저장합니다.
using Spire.Pdf;

namespace ChangeSecurityPermission
{
    class Program
    {
        static void Main(string[] args)
        {
            // 1. PdfDocument 객체 생성
            PdfDocument pdf = new PdfDocument();

            // 2. 소유자 암호(있는 경우)로 제한된 PDF 파일 로드
            pdf.LoadFromFile("Agenda.pdf", "12345");

            // 3. 열기 암호 지정 (필요하지 않은 경우 비워 둡니다)
            string openPsd = string.Empty;

            // 4. 새 소유자 암호 지정
            string permissionPsd = "abc123";

            // 5. 새 열기 및 소유자 암호를 사용하여 보안 정책 생성
            PdfSecurityPolicy securityPolicy = new PdfPasswordSecurityPolicy(openPsd, permissionPsd);

            // 6. 암호화 알고리즘 설정 (AES 128비트는 현대적이고 안전합니다)
            securityPolicy.EncryptionAlgorithm = PdfEncryptionAlgorithm.AES_128;

            // 7. 허용하려는 새 권한 정의
            securityPolicy.DocumentPrivilege.AllowContentCopying = true; // 콘텐츠 복사 허용
            securityPolicy.DocumentPrivilege.AllowPrint = true; // 인쇄 허용

            // 8. 새 보안 정책을 문서에 적용
            pdf.Encrypt(securityPolicy);

            // 9. 업데이트된 PDF를 새 파일에 저장
            pdf.SaveToFile("ChangePermissions.pdf");
            pdf.Close();
        }
    }
}
PdfSecurityPolicy.DocumentPrivilege를 통해 검색되는 PdfDocumentPrivilege 객체는 사용자가 PDF로 할 수 있는 것과 할 수 없는 것("제한 규칙")을 정확하게 정의하는 세분화된 권한 제어 클래스입니다. 여기서 인쇄, 복사, 편집, 양식 채우기와 같은 권한을 전환합니다.
결과:
이 방법을 사용해야 하는 경우:
- C# 및 .NET에 익숙합니다.
- 많은 PDF를 자동으로 처리해야 합니다 (예: 일일 보고서).
- 자체 소프트웨어에 권한 변경을 통합하고 싶습니다.
권한 변경 전 최종 점검 목록
시작하기 전에 다음 사항을 확인하십시오.
- 소유자 암호가 있습니까? (사용자/열기 암호가 아님)
- 이 문서를 수정할 법적 권리가 있습니까?
- 실제로 필요한 권한은 무엇입니까? (예: 인쇄만, 아니면 전체 복사도)
- 신뢰할 수 있는 도구를 사용하고 있습니까? (로컬 소프트웨어 > 온라인 플랫폼)
이러한 사항을 확인한 후 예산 및 기술 수준에 맞는 방법을 따르십시오.
요약
PDF 권한을 변경하는 방법을 배우면 PDF 파일을 완벽하게 제어하여 문서 보안과 유연성의 균형을 맞출 수 있습니다. 전문 사용자의 경우 Adobe Acrobat이 가장 신뢰할 수 있는 선택입니다. LibreOffice Draw는 무료 오프라인 대안 역할을 하지만 서식이 변경될 수 있습니다. 온라인 도구는 빠르고 민감하지 않은 편집을 위한 것이며, C#과 Free Spire.PDF는 안전하고 자동화된 일괄 처리에 가장 적합한 선택입니다.
데이터 유출 위험을 피하기 위해 기밀 비즈니스 및 개인 파일의 경우 항상 오프라인 방법(데스크톱 소프트웨어/코드)을 우선적으로 고려하십시오. 이러한 방법을 숙달하면 모든 문서 공유 및 보안 요구 사항을 충족하기 위해 PDF 파일을 쉽게 잠그거나, 제한하거나, 잠금 해제할 수 있습니다.
자주 묻는 질문 (FAQ)
Q1. PDF 권한을 변경하면 기존 PDF 콘텐츠에 영향을 미칩니까?
아니요. 권한을 변경하면 PDF 주변의 보안 봉투만 수정됩니다. 콘텐츠 바이트는 동일하게 유지됩니다. 그러나 방법 2 (LibreOffice Draw)는 예외입니다. PDF를 다시 렌더링하기 때문에 서식이 변경될 수 있습니다. 방법 2에서는 항상 복사본을 사용하십시오.
Q2. 디지털 서명된 PDF의 권한을 변경할 수 있습니까?
아니요. 디지털 서명은 PDF를 잠가 무단 수정을 방지합니다. 권한을 수정하기 전에 서명을 제거해야 합니다(서명자의 조치가 필요함).
Q3. PDF 권한을 변경하는 가장 안전한 방법은 무엇입니까?
가장 안전한 방법은 Adobe Acrobat Pro 또는 Free Spire.PDF를 사용하여 오프라인으로 변경하는 것입니다. 그 이유는 다음과 같습니다.
- 파일이 컴퓨터를 벗어나지 않습니다.
- 강력한 암호화(AES-128)를 적용할 수 있습니다.
- 제3자 서버가 데이터를 가로챌 수 없습니다.
Q4. Free Spire.PDF 방법은 프로덕션에 안전합니까?
내부 도구 및 소규모 자동화의 경우 예. 그러나 무료 버전에는 10페이지 제한이 있습니다. 무제한 페이지의 경우 상용 버전을 고려하십시오.
참고 자료
Come modificare le autorizzazioni dei PDF? 4 metodi sicuri
Indice dei contenuti
- Quali autorizzazioni PDF è possibile modificare?
- Metodo 1: Modifica delle autorizzazioni PDF con Adobe Acrobat Pro
- Metodo 2: Modifica delle autorizzazioni PDF utilizzando LibreOffice Draw
- Metodo 3: Modificatori di autorizzazioni PDF online
- Metodo 4: Modifica delle autorizzazioni programmaticamente in C#
- Checklist finale prima di modificare le autorizzazioni
- Domande frequenti (FAQ)
Ti stai chiedendo come modificare le autorizzazioni PDF per limitare la modifica, disabilitare la copia, bloccare la stampa o sbloccare file PDF protetti? I PDF sono universalmente utilizzati per documenti professionali, contratti, curriculum e file ufficiali grazie alla loro formattazione fissa e alle funzionalità di condivisione sicura. Tuttavia, le impostazioni predefinite delle autorizzazioni PDF spesso non soddisfano le tue esigenze uniche di condivisione e sicurezza.
In questa guida, copriremo metodi semplici e attuabili per modificare le autorizzazioni PDF utilizzando software professionali, strumenti desktop gratuiti, piattaforme online affidabili e persino approcci programmatici per gli sviluppatori.
- Quali autorizzazioni PDF è possibile modificare?
- Metodo 1: Modifica delle autorizzazioni PDF con Adobe Acrobat Pro
- Metodo 2: Modifica delle autorizzazioni PDF utilizzando LibreOffice Draw
- Metodo 3: Modificatori di autorizzazioni PDF online
- Metodo 4: Modifica delle autorizzazioni programmaticamente in C#
- Checklist finale prima di modificare le autorizzazioni
- Domande frequenti (FAQ)
Quali autorizzazioni PDF è possibile modificare?
Le autorizzazioni PDF (chiamate anche "impostazioni di restrizione" o "flag di sicurezza") controllano le azioni principali dell'utente. Puoi attivare o disattivare queste impostazioni secondo necessità:
| Autorizzazione | Cosa controlla |
|---|---|
| Stampa | Se gli utenti possono stampare – Bassa risoluzione o Alta risoluzione |
| Copia del contenuto | Possibilità di copiare testo o immagini negli appunti |
| Assemblaggio del documento | Inserimento, eliminazione o rotazione di pagine |
| Commenti | Aggiunta di note, evidenziazioni o commenti adesivi |
| Compilazione moduli | Lavorare con campi modulo compilabili |
| Estrazione del contenuto | Strumenti di accessibilità e screen reader |
| Modifica | Modifica di testo, immagini o oggetti |
Quando modifichi le autorizzazioni, stai aggiornando questi flag – ad esempio, passando da "stampa non consentita" a "stampa ad alta risoluzione consentita", o abilitando i commenti che erano precedentemente disabilitati.
Nota importante: Non esiste una "backdoor" di sicurezza. Non è possibile modificare legalmente le autorizzazioni senza la password del proprietario o il consenso dell'autore.
Metodo 1: Modifica delle autorizzazioni PDF con Adobe Acrobat Pro
Adobe Acrobat è lo strumento ufficiale per modificare le impostazioni di sicurezza dei PDF, offrendo il controllo completo su tutte le opzioni di autorizzazione PDF. È ideale per utenti professionali che necessitano di una personalizzazione precisa della sicurezza.
Passaggi per modificare le autorizzazioni dei file PDF:
- Apri il file PDF di destinazione in Adobe Acrobat Pro.
- Vai su File > Proprietà (scorciatoia: Ctrl+D).
- Naviga alla scheda Sicurezza – qui vengono visualizzate tutte le impostazioni di autorizzazione.
- Fai clic su Cambia impostazioni per modificare le configurazioni di autorizzazione esistenti. Se il file è bloccato, inserisci la password delle autorizzazioni per sbloccare le impostazioni modificabili.
- Nella finestra "Sicurezza con password – Impostazioni", personalizza le autorizzazioni selezionando o deselezionando azioni come:
- Imposta stampa consentita (Nessuna/Bassa/Alta risoluzione)
- Definisci modifiche consentite (Commenti/Compilazione moduli/Nessuna)
- Attiva/disattiva copia del contenuto e accesso all'accessibilità
- Imposta una nuova password delle autorizzazioni, conferma le impostazioni e salva il file PDF modificato per applicare tutte le modifiche.
Nota: Adobe Acrobat richiede un abbonamento a pagamento.
✅ Esempi pratici:
- Utilizza "Modifiche consentite: Nessuna" per contratti finali di sola lettura.
- Utilizza "Modifiche consentite: Commenti" per revisioni di gruppo.
Oltre a regolare le impostazioni specifiche delle autorizzazioni PDF, gli stessi strumenti ti consentono anche di rimuovere completamente le autorizzazioni PDF per rimuovere tutte le restrizioni contemporaneamente.
Metodo 2: Modifica delle autorizzazioni PDF utilizzando LibreOffice Draw
Non hai Adobe? Nessun problema. Puoi usare LibreOffice Draw per modificare le autorizzazioni PDF. Questo strumento può aprire e modificare PDF, quindi riesportarli con nuove impostazioni di autorizzazione. Funziona offline, rispetta la tua privacy e non costa nulla.
Passaggi per utilizzare LibreOffice Draw:
- Scarica e installa da libreoffice.org. Scegli la versione per il tuo sistema operativo (Windows, Mac, Linux).
- Avvia LibreOffice Draw e aprilo con il tuo PDF.
- Vai su File > Esporta come > Esporta come PDF.
- Naviga alla scheda Sicurezza nella finestra di dialogo Opzioni PDF.
- Imposta una nuova password del proprietario (necessaria per modificare le autorizzazioni).
- Regola le caselle di controllo delle autorizzazioni come desideri. Ad esempio:
- Abilita stampa ad alta risoluzione
- Abilita compilazione moduli (prima crea campi modulo interattivi in PDF)
- Abilita copia del contenuto
- Abilita testo/accesso per screen reader
- Fai clic su Esporta e salva il nuovo PDF.
⚠️ Attenzione: Questo metodo riscrive il PDF. Alcune formattazioni complesse (font, livelli) potrebbero spostarsi. Prova prima con una copia.
Metodo 3: Modificatori di autorizzazioni PDF online
Se raramente modifichi le autorizzazioni PDF e rifiuti di installare software desktop, gli strumenti PDF online sicuri offrono una soluzione rapida e temporanea. Strumenti come SwiftPDFLab e pdfup.org supportano la modifica delle autorizzazioni PDF basata su browser.
Flusso di lavoro generale per modificare le autorizzazioni PDF online:
- Apri un editor di autorizzazioni PDF online affidabile sul tuo browser (ad es. Strumento Cambia Autorizzazioni di SwiftPDFLab).
- Carica il tuo file PDF sulla piattaforma online.
- Personalizza le restrizioni di stampa, modifica e copia in base alle tue esigenze.
- Imposta una nuova password del proprietario e fai clic su Cambia autorizzazioni per applicare le nuove impostazioni.
- Il file PDF modificato verrà scaricato automaticamente.
Migliore pratica di sicurezza: Utilizza uno strumento che elimina automaticamente i caricamenti. Non caricare mai PDF altamente confidenziali, privati o sensibili per le aziende. Gli strumenti online sono raccomandati solo per documenti pubblici non sensibili.
Metodo 4: Modifica delle autorizzazioni programmaticamente in C#
Per sviluppatori, team IT o utenti che necessitano di automazione batch di PDF, è possibile modificare programmaticamente le autorizzazioni PDF con C# utilizzando Free Spire.PDF for .NET, una libreria .NET gratuita e offline che gestisce sia le password delle autorizzazioni che le password di apertura, offrendoti il controllo completo del ciclo di vita della sicurezza dei PDF.
Esempio di codice C# (Abilita copia e stampa)
Il seguente codice C# carica un PDF, crea una nuova policy di sicurezza, imposta varie autorizzazioni e salva il PDF con le nuove autorizzazioni.
using Spire.Pdf;

namespace ChangeSecurityPermission
{
    class Program
    {
        static void Main(string[] args)
        {
            // 1. Crea un oggetto PdfDocument
            PdfDocument pdf = new PdfDocument();

            // 2. Carica il file PDF protetto con password del proprietario (se presente)
            pdf.LoadFromFile("Agenda.pdf", "12345");

            // 3. Specifica la password di apertura (lascia vuota se non necessaria)
            string openPsd = string.Empty;

            // 4. Specifica una nuova password del proprietario
            string permissionPsd = "abc123";

            // 5. Crea una policy di sicurezza utilizzando le nuove password di apertura e proprietario
            PdfSecurityPolicy securityPolicy = new PdfPasswordSecurityPolicy(openPsd, permissionPsd);

            // 6. Imposta l'algoritmo di crittografia (AES a 128 bit è moderno e sicuro)
            securityPolicy.EncryptionAlgorithm = PdfEncryptionAlgorithm.AES_128;

            // 7. Definisci le nuove autorizzazioni che desideri consentire
            securityPolicy.DocumentPrivilege.AllowContentCopying = true; // Consenti copia del contenuto
            securityPolicy.DocumentPrivilege.AllowPrint = true; // Consenti stampa

            // 8. Applica la nuova policy di sicurezza al documento
            pdf.Encrypt(securityPolicy);

            // 9. Salva il PDF aggiornato in un nuovo file
            pdf.SaveToFile("ChangePermissions.pdf");
            pdf.Close();
        }
    }
}
L'oggetto PdfDocumentPrivilege, recuperato tramite PdfSecurityPolicy.DocumentPrivilege, è una classe di controllo delle autorizzazioni granulare che definisce esattamente cosa gli utenti possono e non possono fare con il PDF (le "regole di restrizione"). È qui che attivi/disattivi autorizzazioni come stampa, copia, modifica e compilazione moduli.
Risultato:
Quando usare questo metodo:
- Hai familiarità con C# e .NET.
- Devi elaborare molti PDF automaticamente (ad es. report giornalieri).
- Vuoi integrare le modifiche alle autorizzazioni nel tuo software.
Checklist finale prima di modificare le autorizzazioni
Prima di iniziare, verifica questi punti:
- Hai la password del proprietario? (Non la password utente/apertura)
- Hai i diritti legali per modificare questo documento?
- Quali autorizzazioni ti servono realmente? (ad es. solo la stampa, o anche la copia completa)
- Stai usando uno strumento affidabile (software locale > piattaforme online)?
Una volta confermati questi punti, segui il metodo sopra che corrisponde al tuo budget e al tuo livello di competenza.
Riepilogo
Imparare come modificare le autorizzazioni PDF ti consente di controllare completamente i tuoi file PDF, bilanciando la sicurezza del documento e la flessibilità. Per gli utenti professionali, Adobe Acrobat è la scelta più affidabile. LibreOffice Draw funge da alternativa offline gratuita ma potrebbe alterare la formattazione. Gli strumenti online sono per modifiche rapide e non sensibili, e C# con Free Spire.PDF è la scelta migliore per l'elaborazione batch sicura e automatizzata.
Dai sempre priorità ai metodi offline (software desktop/codice) per file aziendali e personali riservati per evitare rischi di fuga di dati. Padroneggiando questi metodi, puoi facilmente bloccare, limitare o sbloccare file PDF per soddisfare tutte le tue esigenze di condivisione di documenti e sicurezza.
Domande frequenti (FAQ)
D1. La modifica delle autorizzazioni PDF influenzerà il contenuto PDF esistente?
No. La modifica delle autorizzazioni modifica solo la "busta di sicurezza" attorno al PDF. I byte del contenuto rimangono identici. Tuttavia, il Metodo 2 (LibreOffice Draw) fa eccezione, poiché re-renderizza il PDF, la formattazione potrebbe cambiare. Usa sempre una copia con il Metodo 2.
D2. Posso modificare le autorizzazioni su un PDF firmato digitalmente?
No. Le firme digitali bloccano il PDF per impedirne la manomissione. Devi rimuovere la firma (richiede l'azione del firmatario) prima di modificare le autorizzazioni.
D3. Qual è il modo più sicuro per modificare le autorizzazioni PDF?
Il modo più sicuro è offline con Adobe Acrobat Pro o Free Spire.PDF perché:
- Il file non lascia mai il tuo computer.
- Può essere applicata una crittografia forte (AES-128).
- Nessun server di terze parti può intercettare i dati.
D4. Il metodo Free Spire.PDF è sicuro per la produzione?
Per strumenti interni e automazione su piccola scala, sì. Ma nota il limite di 10 pagine nella versione gratuita. Per pagine illimitate, considera la versione commerciale.
Vedi anche
- Come comprimere un PDF: i migliori strumenti per ridurre le dimensioni dei PDF
- Come eliminare pagine vuote in PDF (Manuale e Automazione)
- 3 modi per riordinare le pagine PDF: online, desktop e Python
- Come firmare digitalmente i PDF con C# (Tutorial pratico con codice)
- Java: Aggiungere autorizzazioni di sicurezza a un documento PDF
Comment modifier les autorisations d'un PDF ? 4 méthodes sécurisées
Table des matières
- Quelles autorisations PDF pouvez-vous modifier ?
- Méthode 1 : Modifier les autorisations PDF avec Adobe Acrobat Pro
- Méthode 2 : Modifier les autorisations PDF à l'aide de LibreOffice Draw
- Méthode 3 : Modificateurs d'autorisations PDF en ligne
- Méthode 4 : Modifier les autorisations par programmation en C#
- Liste de contrôle finale avant de modifier les autorisations
- Foire aux questions (FAQ)
Vous vous demandez comment modifier les autorisations PDF pour restreindre la modification, désactiver la copie, verrouiller l'impression ou déverrouiller des fichiers PDF restreints ? Les PDF sont universellement utilisés pour les documents professionnels, les contrats, les CV et les fichiers officiels en raison de leur mise en page fixe et de leurs fonctionnalités de partage sécurisé. Cependant, les paramètres d'autorisation PDF par défaut ne correspondent souvent pas à vos besoins uniques en matière de partage et de sécurité.
Dans ce guide, nous allons couvrir des méthodes simples et actionnables pour modifier les autorisations PDF à l'aide de logiciels professionnels, d'outils de bureau gratuits, de plateformes en ligne fiables et même d'approches programmatiques pour les développeurs.
- Quelles autorisations PDF pouvez-vous modifier ?
- Méthode 1 : Modifier les autorisations PDF avec Adobe Acrobat Pro
- Méthode 2 : Modifier les autorisations PDF à l'aide de LibreOffice Draw
- Méthode 3 : Modificateurs d'autorisations PDF en ligne
- Méthode 4 : Modifier les autorisations par programmation en C#
- Liste de contrôle finale avant de modifier les autorisations
- Foire aux questions (FAQ)
Quelles autorisations PDF pouvez-vous modifier ?
Les autorisations PDF (également appelées « paramètres de restriction » ou « indicateurs de sécurité ») contrôlent les actions principales des utilisateurs. Vous pouvez activer ou désactiver ces paramètres selon vos besoins :
| Autorisation | Ce qu'elle contrôle |
|---|---|
| Impression | Si les utilisateurs peuvent imprimer – Basse résolution ou Haute résolution |
| Copie de contenu | Possibilité de copier du texte ou des images dans le presse-papiers |
| Assemblage de documents | Insertion, suppression ou rotation de pages |
| Commentaires | Ajout de notes, de surlignages ou de commentaires autocollants |
| Remplissage de formulaires | Travail avec des champs de formulaire à remplir |
| Extraction de contenu | Outils d'accessibilité et lecteurs d'écran |
| Modification | Modification de texte, d'images ou d'objets |
Lorsque vous modifiez les autorisations, vous mettez à jour ces indicateurs – par exemple, en passant de « impression non autorisée » à « impression haute résolution autorisée », ou en activant les commentaires qui étaient précédemment désactivés.
Note critique : Il n'y a pas de « porte dérobée » de sécurité. Vous ne pouvez pas légalement modifier les autorisations sans le mot de passe du propriétaire ou le consentement de l'auteur.
Méthode 1 : Modifier les autorisations PDF avec Adobe Acrobat Pro
Adobe Acrobat est l'outil officiel pour modifier les paramètres de sécurité des PDF, offrant un contrôle total sur toutes les options d'autorisation PDF. Il est idéal pour les utilisateurs professionnels qui ont besoin d'une personnalisation précise de la sécurité.
Étapes pour modifier les autorisations de fichier PDF :
- Ouvrez le fichier PDF cible dans Adobe Acrobat Pro.
- Allez dans Fichier > Propriétés (raccourci : Ctrl+D).
- Accédez à l'onglet Sécurité – c'est là que tous les paramètres d'autorisation sont affichés.
- Cliquez sur Modifier les paramètres pour modifier les configurations d'autorisation existantes. Si le fichier est verrouillé, entrez le mot de passe d'autorisation pour déverrouiller les paramètres modifiables.
- Dans la fenêtre « Sécurité par mot de passe – Paramètres », personnalisez les autorisations en cochant ou décochant des actions telles que :
- Définir l'impression autorisée (Aucune/Basse/Haute résolution)
- Définir les modifications autorisées (Commentaires/Remplissage de formulaires/Aucune)
- Activer la copie de contenu et l'accès à l'accessibilité
- Définissez un nouveau mot de passe d'autorisation, confirmez les paramètres et enregistrez le fichier PDF modifié pour appliquer toutes les modifications.
Remarque : Adobe Acrobat nécessite un abonnement payant.
✅ Exemples pratiques :
- Utilisez « Modifications autorisées : Aucune » pour les contrats finaux, en lecture seule.
- Utilisez « Modifications autorisées : Commentaires » pour les revues d'équipe.
Au-delà de l'ajustement des paramètres d'autorisation PDF spécifiques, les mêmes outils vous permettent également de supprimer les autorisations PDF entièrement pour lever toutes les restrictions en une seule fois.
Méthode 2 : Modifier les autorisations PDF à l'aide de LibreOffice Draw
Vous n'avez pas Adobe ? Pas de problème. Vous pouvez utiliser LibreOffice Draw pour modifier les autorisations PDF. Cet outil peut ouvrir et modifier des PDF, puis les réexporter avec de nouveaux paramètres d'autorisation. Il fonctionne hors ligne, respecte votre vie privée et ne coûte rien.
Étapes pour utiliser LibreOffice Draw :
- Téléchargez et installez depuis libreoffice.org. Choisissez la version pour votre système d'exploitation (Windows, Mac, Linux).
- Lancez LibreOffice Draw et ouvrez votre PDF dedans.
- Allez dans Fichier > Exporter sous > Exporter au format PDF.
- Accédez à l'onglet Sécurité dans la boîte de dialogue Options PDF.
- Définissez un nouveau mot de passe propriétaire (requis pour modifier les autorisations).
- Ajustez les cases à cocher d'autorisation selon vos désirs. Par exemple :
- Activer l'impression haute résolution
- Activer le remplissage de formulaires (créez d'abord des champs de formulaire interactifs dans le PDF)
- Activer la copie de contenu
- Activer le texte/l'accès pour les lecteurs d'écran
- Cliquez sur Exporter et enregistrez le nouveau PDF.
⚠️ Attention : Cette méthode réécrit le PDF. Certains formats complexes (polices, calques) peuvent être modifiés. Testez d'abord avec une copie.
Méthode 3 : Modificateurs d'autorisations PDF en ligne
Si vous ajustez rarement les autorisations PDF et refusez d'installer un logiciel de bureau, les outils PDF en ligne sécurisés offrent une solution rapide et temporaire. Des outils comme SwiftPDFLab et pdfup.org prennent en charge la modification des autorisations PDF basée sur le navigateur.
Flux de travail général pour modifier les autorisations PDF en ligne :
- Ouvrez un éditeur d'autorisations PDF en ligne de confiance dans votre navigateur (par exemple, outil de modification des autorisations SwiftPDFLab).
- Téléchargez votre fichier PDF sur la plateforme en ligne.
- Personnalisez les restrictions d'impression, de modification et de copie selon vos besoins.
- Définissez un nouveau mot de passe propriétaire et cliquez sur Modifier les autorisations pour appliquer les nouveaux paramètres.
- Le fichier PDF modifié sera téléchargé automatiquement.
Bonne pratique de sécurité : Utilisez un outil qui supprime automatiquement les téléchargements. Ne téléchargez jamais de PDF hautement confidentiels, privés ou sensibles pour les entreprises. Les outils en ligne ne sont recommandés que pour les documents publics non sensibles.
Méthode 4 : Modifier les autorisations par programmation en C#
Pour les développeurs, les équipes informatiques ou les utilisateurs ayant besoin d'automatisation PDF par lots, vous pouvez modifier les autorisations PDF par programmation avec C# en utilisant Free Spire.PDF for .NET – une bibliothèque .NET gratuite et hors ligne qui gère à la fois les mots de passe d'autorisation et les mots de passe d'ouverture, vous donnant un contrôle complet du cycle de vie sur la sécurité PDF.
Exemple de code C# (Activer la copie et l'impression)
Le code C# suivant charge un PDF, crée une nouvelle politique de sécurité, définit diverses autorisations et enregistre le PDF avec les nouvelles autorisations.
using Spire.Pdf;

namespace ChangeSecurityPermission
{
    class Program
    {
        static void Main(string[] args)
        {
            // 1. Créez un objet PdfDocument
            PdfDocument pdf = new PdfDocument();

            // 2. Chargez le fichier PDF restreint avec le mot de passe du propriétaire (si applicable)
            pdf.LoadFromFile("Agenda.pdf", "12345");

            // 3. Spécifiez le mot de passe d'ouverture (laissez vide si non nécessaire)
            string openPsd = string.Empty;

            // 4. Spécifiez un nouveau mot de passe propriétaire
            string permissionPsd = "abc123";

            // 5. Créez une politique de sécurité à l'aide des nouveaux mots de passe d'ouverture et propriétaire
            PdfSecurityPolicy securityPolicy = new PdfPasswordSecurityPolicy(openPsd, permissionPsd);

            // 6. Définissez l'algorithme de chiffrement (AES 128 bits est moderne et sécurisé)
            securityPolicy.EncryptionAlgorithm = PdfEncryptionAlgorithm.AES_128;

            // 7. Définissez les nouvelles autorisations que vous souhaitez autoriser
            securityPolicy.DocumentPrivilege.AllowContentCopying = true; // Autoriser la copie de contenu
            securityPolicy.DocumentPrivilege.AllowPrint = true; // Autoriser l'impression

            // 8. Appliquez la nouvelle politique de sécurité au document
            pdf.Encrypt(securityPolicy);

            // 9. Enregistrez le PDF mis à jour dans un nouveau fichier
            pdf.SaveToFile("ChangePermissions.pdf");
            pdf.Close();
        }
    }
}
L'objet PdfDocumentPrivilege, récupéré via PdfSecurityPolicy.DocumentPrivilege, est une classe de contrôle d'autorisation granulaire qui définit exactement ce que les utilisateurs peuvent et ne peuvent pas faire avec le PDF (les « règles de restriction »). C'est ici que vous activez ou désactivez des autorisations telles que l'impression, la copie, la modification et le remplissage de formulaires.
Résultat :
Quand utiliser cette méthode :
- Vous êtes à l'aise avec C# et .NET.
- Vous devez traiter de nombreux PDF automatiquement (par exemple, des rapports quotidiens).
- Vous souhaitez intégrer la modification des autorisations dans votre propre logiciel.
Liste de contrôle finale avant de modifier les autorisations
Avant de commencer, vérifiez ces points :
- Avez-vous le mot de passe propriétaire ? (Pas le mot de passe utilisateur/d'ouverture)
- Avez-vous les droits légaux pour modifier ce document ?
- Quelles autorisations avez-vous réellement besoin ? (par exemple, juste l'impression, ou la copie complète aussi)
- Utilisez-vous un outil de confiance (logiciel local > plateformes en ligne) ?
Une fois que vous avez confirmé ces points, suivez la méthode ci-dessus qui correspond à votre budget et à votre niveau de compétence.
Résumé
Apprendre comment modifier les autorisations PDF vous permet de contrôler entièrement vos fichiers PDF, en équilibrant la sécurité des documents et la flexibilité. Pour les utilisateurs professionnels, Adobe Acrobat est le choix le plus fiable. LibreOffice Draw sert d'alternative gratuite hors ligne mais peut modifier le formatage. Les outils en ligne sont destinés aux modifications rapides et non sensibles, et C# avec Free Spire.PDF est le meilleur choix pour un traitement par lots sécurisé et automatisé.
Privilégiez toujours les méthodes hors ligne (logiciel de bureau/code) pour les fichiers professionnels et personnels confidentiels afin d'éviter les risques de fuite de données. En maîtrisant ces méthodes, vous pouvez facilement verrouiller, restreindre ou déverrouiller des fichiers PDF pour répondre à tous vos besoins de partage et de sécurité de documents.
Foire aux questions (FAQ)
Q1. La modification des autorisations PDF affectera-t-elle le contenu PDF existant ?
Non. La modification des autorisations ne modifie que l'enveloppe de sécurité du PDF. Les octets de contenu restent identiques. Cependant, la méthode 2 (LibreOffice Draw) fait exception – car elle ré-rend le PDF, le formatage peut changer. Utilisez toujours une copie avec la méthode 2.
Q2. Puis-je modifier les autorisations d'un PDF signé numériquement ?
Non. Les signatures numériques verrouillent le PDF pour empêcher toute falsification. Vous devez supprimer la signature (nécessite l'action du signataire) avant de modifier les autorisations.
Q3. Quelle est la méthode la plus sûre pour modifier les autorisations PDF ?
La méthode la plus sûre est hors ligne avec Adobe Acrobat Pro ou Free Spire.PDF car :
- Le fichier ne quitte jamais votre ordinateur.
- Un chiffrement fort (AES‑128) peut être appliqué.
- Aucun serveur tiers ne peut intercepter les données.
Q4. La méthode Free Spire.PDF est-elle sûre pour la production ?
Pour les outils internes et l'automatisation à petite échelle, oui. Mais notez la limite de 10 pages dans la version gratuite. Pour un nombre illimité de pages, envisagez la version commerciale.
Voir également
- Comment compresser un PDF : les meilleurs outils pour réduire la taille des PDF
- Comment supprimer les pages vierges dans un PDF (manuel et automatisation)
- 3 façons de réorganiser les pages PDF : en ligne, bureau et Python
- Comment signer numériquement des PDF avec C# (Tutoriel de code pratique)
- Java : Ajouter des autorisations de sécurité à un document PDF
¿Cómo cambiar los permisos de un PDF? 4 métodos seguros
Tabla de Contenidos
- ¿Qué permisos de PDF se pueden cambiar?
- Método 1: Editar permisos de PDF con Adobe Acrobat Pro
- Método 2: Cambiar permisos de PDF usando LibreOffice Draw
- Método 3: Cambiadores de permisos de PDF en línea
- Método 4: Cambiar permisos mediante programación en C#
- Lista de verificación final antes de cambiar los permisos
- Preguntas frecuentes (FAQ)
¿Te preguntas cómo cambiar los permisos de PDF para restringir la edición, deshabilitar la copia, bloquear la impresión o desbloquear archivos PDF restringidos? Los PDF se utilizan universalmente para documentos profesionales, contratos, currículums y archivos oficiales debido a su formato fijo y sus funciones de intercambio seguro. Sin embargo, la configuración de permisos de PDF predeterminada a menudo no coincide con tus necesidades únicas de intercambio y seguridad.
En esta guía, cubriremos métodos fáciles y prácticos para editar permisos de PDF utilizando software profesional, herramientas de escritorio gratuitas, plataformas en línea confiables e incluso enfoques programáticos para desarrolladores.
- ¿Qué permisos de PDF se pueden cambiar?
- Método 1: Editar permisos de PDF con Adobe Acrobat Pro
- Método 2: Cambiar permisos de PDF usando LibreOffice Draw
- Método 3: Cambiadores de permisos de PDF en línea
- Método 4: Cambiar permisos mediante programación en C#
- Lista de verificación final antes de cambiar los permisos
- Preguntas frecuentes (FAQ)
¿Qué permisos de PDF se pueden cambiar?
Los permisos de PDF (también llamados "configuración de restricción" o "banderas de seguridad") controlan las acciones principales del usuario. Puedes activar o desactivar estas configuraciones según sea necesario:
| Permiso | Qué controla |
|---|---|
| Impresión | Si los usuarios pueden imprimir – Baja resolución o Alta resolución |
| Copia de contenido | Capacidad de copiar texto o imágenes al portapapeles |
| Ensamblaje de documentos | Insertar, eliminar o rotar páginas |
| Comentarios | Agregar notas, resaltados o comentarios adhesivos |
| Relleno de formularios | Trabajar con campos de formulario rellenables |
| Extracción de contenido | Herramientas de accesibilidad y lectores de pantalla |
| Modificación | Editar texto, imágenes u objetos |
Cuando cambias los permisos, estás actualizando estas banderas – por ejemplo, cambiando de "impresión no permitida" a "impresión de alta resolución permitida", o habilitando comentarios que previamente estaban deshabilitados.
Nota importante: No hay una "puerta trasera" de seguridad. No puedes cambiar legalmente los permisos sin la contraseña del propietario o el consentimiento del autor.
Método 1: Editar permisos de PDF con Adobe Acrobat Pro
Adobe Acrobat es la herramienta oficial para modificar la configuración de seguridad de PDF, ofreciendo control total sobre todas las opciones de permisos de PDF. Es ideal para usuarios profesionales que necesitan una personalización de seguridad precisa.
Pasos para cambiar los permisos de archivos PDF:
- Abre el archivo PDF de destino en Adobe Acrobat Pro.
- Ve a Archivo > Propiedades (atajo: Ctrl+D).
- Navega a la pestaña Seguridad – aquí es donde se muestran todas las configuraciones de permisos.
- Haz clic en Cambiar configuración para modificar las configuraciones de permisos existentes. Si el archivo está bloqueado, ingresa la contraseña de permisos para desbloquear la configuración editable.
- En la ventana "Seguridad con contraseña – Configuración", personaliza los permisos marcando o desmarcando acciones como:
- Establecer impresión permitida (Ninguna/Baja/Alta Resolución)
- Definir cambios permitidos (Comentarios/Relleno de formularios/Ninguno)
- Activar o desactivar la copia de contenido y el acceso de accesibilidad
- Establece una nueva contraseña de permisos, confirma la configuración y guarda el archivo PDF modificado para aplicar todos los cambios.
Nota: Adobe Acrobat requiere una suscripción de pago.
✅ Ejemplos prácticos:
- Usa "Cambios permitidos: Ninguno" para contratos finales de solo lectura.
- Usa "Cambios permitidos: Comentarios" para revisiones de equipo.
Más allá de ajustar configuraciones específicas de permisos de PDF, las mismas herramientas también te permiten eliminar permisos de PDF por completo para levantar todas las restricciones a la vez.
Método 2: Cambiar permisos de PDF usando LibreOffice Draw
¿No tienes Adobe? No hay problema. Puedes usar LibreOffice Draw para modificar los permisos de PDF. Esta herramienta puede abrir y editar PDF, luego reexportarlos con nuevas configuraciones de permisos. Funciona sin conexión, respeta tu privacidad y no cuesta nada.
Pasos para usar LibreOffice Draw:
- Descarga e instala desde libreoffice.org. Elige la versión para tu sistema operativo (Windows, Mac, Linux).
- Inicia LibreOffice Draw y abre tu PDF en él.
- Ve a Archivo > Exportar como > Exportar como PDF.
- Navega a la pestaña Seguridad en el cuadro de diálogo Opciones de PDF.
- Establece una nueva contraseña de propietario (requerida para cambiar permisos).
- Ajusta las casillas de verificación de permisos según tu deseo. Por ejemplo:
- Habilitar impresión de alta resolución
- Habilitar relleno de formularios (primero crea campos de formulario interactivos en PDF)
- Habilitar copia de contenido
- Habilitar texto/acceso para lectores de pantalla
- Haz clic en Exportar y guarda el nuevo PDF.
⚠️ Advertencia: Este método reescribe el PDF. Algunos formatos complejos (fuentes, capas) pueden cambiar. Prueba primero con una copia.
Método 3: Cambiadores de permisos de PDF en línea
Si rara vez ajustas los permisos de PDF y te niegas a instalar software de escritorio, las herramientas seguras de PDF en línea proporcionan una solución rápida y temporal. Herramientas como SwiftPDFLab y pdfup.org admiten la edición de permisos de PDF basada en navegador.
Flujo de trabajo general para cambiar permisos de PDF en línea:
- Abre un editor de permisos de PDF en línea de confianza en tu navegador (por ejemplo, Herramienta de Cambio de Permisos de SwiftPDFLab).
- Sube tu archivo PDF a la plataforma en línea.
- Personaliza las restricciones de impresión, edición y copia según tus requisitos.
- Establece una nueva contraseña de propietario y haz clic en Cambiar permisos para aplicar la nueva configuración.
- El archivo PDF modificado se descargará automáticamente.
Mejor práctica de seguridad: Usa una herramienta que elimine las cargas automáticamente. Nunca subas PDF altamente confidenciales, privados o sensibles para negocios. Las herramientas en línea solo se recomiendan para documentos públicos no sensibles.
Método 4: Cambiar permisos mediante programación en C#
Para desarrolladores, equipos de TI o usuarios que necesitan automatización de PDF por lotes, puedes cambiar los permisos de PDF mediante programación con C# utilizando Free Spire.PDF for .NET, una biblioteca .NET gratuita y sin conexión que maneja tanto contraseñas de permisos como contraseñas de apertura, brindándote control total del ciclo de vida de la seguridad de PDF.
Ejemplo de código C# (Habilitar copia e impresión)
El siguiente código C# carga un PDF, crea una nueva política de seguridad, establece varios permisos y guarda el PDF con los nuevos permisos.
using Spire.Pdf;

namespace ChangeSecurityPermission
{
    class Program
    {
        static void Main(string[] args)
        {
            // 1. Crear un objeto PdfDocument
            PdfDocument pdf = new PdfDocument();

            // 2. Cargar el archivo PDF restringido con contraseña de propietario (si existe)
            pdf.LoadFromFile("Agenda.pdf", "12345");

            // 3. Especificar contraseña de apertura (dejar vacía si no es necesaria)
            string openPsd = string.Empty;

            // 4. Especificar una nueva contraseña de propietario
            string permissionPsd = "abc123";

            // 5. Crear una política de seguridad usando nuevas contraseñas de apertura y propietario
            PdfSecurityPolicy securityPolicy = new PdfPasswordSecurityPolicy(openPsd, permissionPsd);

            // 6. Establecer el algoritmo de cifrado (AES de 128 bits es moderno y seguro)
            securityPolicy.EncryptionAlgorithm = PdfEncryptionAlgorithm.AES_128;

            // 7. Definir los nuevos permisos que deseas permitir
            securityPolicy.DocumentPrivilege.AllowContentCopying = true; // Permitir copia de contenido
            securityPolicy.DocumentPrivilege.AllowPrint = true; // Permitir impresión

            // 8. Aplicar la nueva política de seguridad al documento
            pdf.Encrypt(securityPolicy);

            // 9. Guardar el PDF actualizado en un nuevo archivo
            pdf.SaveToFile("ChangePermissions.pdf");
            pdf.Close();
        }
    }
}
El objeto PdfDocumentPrivilege, recuperado a través de PdfSecurityPolicy.DocumentPrivilege, es una clase de control de permisos granular que define exactamente lo que los usuarios pueden y no pueden hacer con el PDF (las "reglas de restricción"). Aquí es donde activas o desactivas permisos como impresión, copia, edición y relleno de formularios.
Resultado:
Cuándo usar este método:
- Te sientes cómodo con C# y .NET.
- Necesitas procesar muchos PDF automáticamente (por ejemplo, informes diarios).
- Quieres integrar cambios de permisos en tu propio software.
Lista de verificación final antes de cambiar los permisos
Antes de empezar, verifica estos puntos:
- ¿Tienes la contraseña del propietario? (No la contraseña de usuario/apertura)
- ¿Tienes derechos legales para modificar este documento?
- ¿Qué permisos necesitas realmente? (por ejemplo, solo impresión, o copia completa también)
- ¿Estás utilizando una herramienta de confianza (software local > plataformas en línea)?
Una vez que confirmes estos puntos, sigue el método anterior que coincida con tu presupuesto y nivel de habilidad.
Resumen
Aprender cómo cambiar los permisos de PDF te permite controlar completamente tus archivos PDF, equilibrando la seguridad del documento y la flexibilidad. Para usuarios profesionales, Adobe Acrobat es la opción más confiable. LibreOffice Draw sirve como una alternativa gratuita sin conexión, pero puede alterar el formato. Las herramientas en línea son para ediciones rápidas y no sensibles, y C# con Free Spire.PDF es la mejor opción para procesamiento por lotes seguro y automatizado.
Prioriza siempre los métodos sin conexión (software de escritorio/código) para archivos comerciales y personales confidenciales para evitar riesgos de fuga de datos. Al dominar estos métodos, puedes bloquear, restringir o desbloquear fácilmente archivos PDF para satisfacer todas tus necesidades de intercambio de documentos y seguridad.
Preguntas frecuentes (FAQ)
P1. ¿Cambiar los permisos de PDF afectará el contenido existente del PDF?
No. Cambiar los permisos solo modifica el envoltorio de seguridad alrededor del PDF. Los bytes del contenido permanecen idénticos. Sin embargo, el Método 2 (LibreOffice Draw) es una excepción – dado que vuelve a renderizar el PDF, el formato puede cambiar. Usa siempre una copia con el Método 2.
P2. ¿Puedo cambiar los permisos en un PDF firmado digitalmente?
No. Las firmas digitales bloquean el PDF para evitar manipulaciones. Debes eliminar la firma (requiere la acción del firmante) antes de modificar los permisos.
P3. ¿Cuál es la forma más segura de cambiar los permisos de PDF?
La forma más segura es sin conexión con Adobe Acrobat Pro o Free Spire.PDF porque:
- El archivo nunca sale de tu computadora.
- Se puede aplicar cifrado fuerte (AES‑128).
- Ningún servidor de terceros puede interceptar los datos.
P4. ¿Es el método Free Spire.PDF seguro para producción?
Para herramientas internas y automatización a pequeña escala, sí. Pero ten en cuenta el límite de 10 páginas en la versión gratuita. Para páginas ilimitadas, considera la versión comercial.
Ver también
- Cómo comprimir un PDF: Las mejores herramientas para hacer PDF más pequeños
- Cómo eliminar páginas en blanco en PDF (Manual y Automatización)
- 3 formas de reordenar páginas de PDF: En línea, de escritorio y Python
- Cómo firmar digitalmente PDF con C# (Tutorial de código práctico)
- Java: Agregar permisos de seguridad a un documento PDF
Wie kann man PDF-Berechtigungen ändern? 4 sichere Methoden
Inhaltsverzeichnis
- Welche PDF-Berechtigungen können Sie ändern?
- Methode 1: PDF-Berechtigungen mit Adobe Acrobat Pro bearbeiten
- Methode 2: PDF-Berechtigungen mit LibreOffice Draw ändern
- Methode 3: Online-Tools zum Ändern von PDF-Berechtigungen
- Methode 4: Berechtigungen programmgesteuert in C# ändern
- Checkliste vor dem Ändern von Berechtigungen
- Häufig gestellte Fragen (FAQs)
Fragen Sie sich, wie Sie PDF-Berechtigungen ändern können, um Bearbeitungen einzuschränken, Kopieren zu deaktivieren, Drucken zu sperren oder eingeschränkte PDF-Dateien zu entsperren? PDFs werden aufgrund ihres festen Formats und ihrer sicheren Freigabefunktionen universell für professionelle Dokumente, Verträge, Lebensläufe und offizielle Dateien verwendet. Standardmäßige PDF-Berechtigungseinstellungen entsprechen jedoch oft nicht Ihren spezifischen Freigabe- und Sicherheitsanforderungen.
In diesem Leitfaden behandeln wir einfache, umsetzbare Methoden, um PDF-Berechtigungen zu bearbeiten, indem wir professionelle Software, kostenlose Desktop-Tools, zuverlässige Online-Plattformen und sogar programmatische Ansätze für Entwickler verwenden.
- Welche PDF-Berechtigungen können Sie ändern?
- Methode 1: PDF-Berechtigungen mit Adobe Acrobat Pro bearbeiten
- Methode 2: PDF-Berechtigungen mit LibreOffice Draw ändern
- Methode 3: Online-Tools zum Ändern von PDF-Berechtigungen
- Methode 4: Berechtigungen programmgesteuert in C# ändern
- Checkliste vor dem Ändern von Berechtigungen
- Häufig gestellte Fragen (FAQs)
Welche PDF-Berechtigungen können Sie ändern?
PDF-Berechtigungen (auch „Einschränkungseinstellungen“ oder „Sicherheitsflags“ genannt) steuern Kernaktionen von Benutzern. Sie können diese Einstellungen nach Bedarf umschalten:
| Berechtigung | Was sie steuert |
|---|---|
| Ob Benutzer drucken können – Niedrige Auflösung oder Hohe Auflösung | |
| Kopieren von Inhalten | Möglichkeit, Text oder Bilder in die Zwischenablage zu kopieren |
| Dokumentenmontage | Einfügen, Löschen oder Drehen von Seiten |
| Kommentieren | Hinzufügen von Notizen, Hervorhebungen oder Haftnotizen |
| Formularausfüllung | Arbeiten mit ausfüllbaren Formularfeldern |
| Extrahieren von Inhalten | Barrierefreiheitswerkzeuge und Screenreader |
| Änderung | Bearbeiten von Text, Bildern oder Objekten |
Wenn Sie Berechtigungen ändern, aktualisieren Sie diese Flags – zum Beispiel, indem Sie von „Drucken nicht erlaubt“ zu „Drucken in hoher Auflösung erlaubt“ wechseln oder das Kommentieren aktivieren, das zuvor deaktiviert war.
Wichtiger Hinweis: Es gibt keine Sicherheits-„Hintertür“. Sie können Berechtigungen nicht legal ändern, ohne das Eigentümerpasswort oder die Zustimmung des Autors.
Methode 1: PDF-Berechtigungen mit Adobe Acrobat Pro bearbeiten
Adobe Acrobat ist das offizielle Werkzeug zur Änderung von PDF-Sicherheitseinstellungen und bietet vollständige Kontrolle über alle PDF-Berechtigungsoptionen. Es ist ideal für professionelle Anwender, die eine präzise Sicherheitsanpassung benötigen.
Schritte zum Ändern von PDF-Dateiberechtigungen:
- Öffnen Sie die Ziel-PDF-Datei in Adobe Acrobat Pro.
- Gehen Sie zu Datei > Eigenschaften (Tastenkombination: Strg+D).
- Navigieren Sie zur Registerkarte Sicherheit – hier werden alle Berechtigungseinstellungen angezeigt.
- Klicken Sie auf Einstellungen ändern, um vorhandene Berechtigungskonfigurationen zu ändern. Wenn die Datei gesperrt ist, geben Sie das Berechtigungspasswort ein, um bearbeitbare Einstellungen zu entsperren.
- Im Fenster „Passwortsicherheit – Einstellungen“ passen Sie die Berechtigungen an, indem Sie Aktionen aktivieren oder deaktivieren, wie z. B.:
- Drucken zulassen (Keine/Niedrige/Hohe Auflösung)
- Zulässige Änderungen definieren (Kommentieren/Formularausfüllung/Keine)
- Kopieren von Inhalten und Zugriff auf Barrierefreiheit umschalten
- Legen Sie ein neues Berechtigungspasswort fest, bestätigen Sie die Einstellungen und speichern Sie die geänderte PDF-Datei, um alle Änderungen anzuwenden.
Hinweis: Adobe Acrobat erfordert ein kostenpflichtiges Abonnement.
✅ Praktische Beispiele:
- Verwenden Sie „Änderungen zulässig: Keine“ für endgültige, schreibgeschützte Verträge.
- Verwenden Sie „Änderungen zulässig: Kommentieren“ für Team-Reviews.
Neben der Anpassung spezifischer PDF-Berechtigungseinstellungen können Sie mit denselben Werkzeugen auch PDF-Berechtigungen entfernen, um alle Einschränkungen auf einmal aufzuheben.
Methode 2: PDF-Berechtigungen mit LibreOffice Draw ändern
Haben Sie kein Adobe? Kein Problem. Sie können LibreOffice Draw verwenden, um PDF-Berechtigungen zu ändern. Dieses Tool kann PDFs öffnen und bearbeiten und sie dann mit neuen Berechtigungseinstellungen erneut exportieren. Es funktioniert offline, schützt Ihre Privatsphäre und kostet nichts.
Schritte zur Verwendung von LibreOffice Draw:
- Laden Sie es von libreoffice.org herunter und installieren Sie es. Wählen Sie die Version für Ihr Betriebssystem (Windows, Mac, Linux).
- Starten Sie LibreOffice Draw und öffnen Sie Ihre PDF-Datei darin.
- Gehen Sie zu Datei > Exportieren als > Als PDF exportieren.
- Navigieren Sie im Dialogfeld „PDF-Optionen“ zur Registerkarte „Sicherheit“.
- Legen Sie ein neues Eigentümerpasswort fest (erforderlich, um Berechtigungen zu ändern).
- Passen Sie die Berechtigungs-Kontrollkästchen nach Ihren Wünschen an. Zum Beispiel:
- Drucken in hoher Auflösung aktivieren
- Formularausfüllung aktivieren (zuerst interaktive Formularfelder in PDF erstellen)
- Kopieren von Inhalten aktivieren
- Text-/Zugriff für Screenreader aktivieren
- Klicken Sie auf Exportieren und speichern Sie die neue PDF-Datei.
⚠️ Warnung: Diese Methode schreibt die PDF neu. Einige komplexe Formatierungen (Schriftarten, Ebenen) können sich verschieben. Testen Sie zuerst mit einer Kopie.
Methode 3: Online-Tools zum Ändern von PDF-Berechtigungen
Wenn Sie PDF-Berechtigungen nur selten ändern und keine Desktop-Software installieren möchten, bieten sichere Online-PDF-Tools eine schnelle, temporäre Lösung. Tools wie SwiftPDFLab und pdfup.org unterstützen die browserbasierte Bearbeitung von PDF-Berechtigungen.
Allgemeiner Workflow zum Ändern von PDF-Berechtigungen online:
- Öffnen Sie einen vertrauenswürdigen Online-PDF-Berechtigungseditor in Ihrem Browser (z. B. das SwiftPDFLab Tool zum Ändern von Berechtigungen).
- Laden Sie Ihre PDF-Datei auf die Online-Plattform hoch.
- Passen Sie die Druck-, Bearbeitungs- und Kopierbeschränkungen entsprechend Ihren Anforderungen an.
- Legen Sie ein neues Eigentümerpasswort fest und klicken Sie auf Berechtigungen ändern, um die neuen Einstellungen anzuwenden.
- Die geänderte PDF-Datei wird automatisch heruntergeladen.
Best Practice für Sicherheit: Verwenden Sie ein Tool, das Uploads automatisch löscht. Laden Sie niemals hochvertrauliche, private oder geschäftskritische PDFs hoch. Online-Tools werden nur für nicht sensible öffentliche Dokumente empfohlen.
Methode 4: Berechtigungen programmgesteuert in C# ändern
Für Entwickler, IT-Teams oder Benutzer, die eine Stapelverarbeitung von PDFs benötigen, können Sie PDF-Berechtigungen mit C# programmgesteuert ändern, indem Sie Free Spire.PDF for .NET verwenden – eine kostenlose, Offline-.NET-Bibliothek, die sowohl Berechtigungs- als auch Öffnungspasswörter verarbeitet und Ihnen die vollständige Kontrolle über die PDF-Sicherheit über den gesamten Lebenszyklus ermöglicht.
C#-Codebeispiel (Kopieren und Drucken zulassen)
Der folgende C#-Code lädt eine PDF-Datei, erstellt eine neue Sicherheitrichtlinie, legt verschiedene Berechtigungen fest und speichert die PDF-Datei mit den neuen Berechtigungen.
using Spire.Pdf;

namespace ChangeSecurityPermission
{
    class Program
    {
        static void Main(string[] args)
        {
            // 1. Erstellen Sie ein PdfDocument-Objekt
            PdfDocument pdf = new PdfDocument();

            // 2. Laden Sie die eingeschränkte PDF-Datei mit dem Eigentümerpasswort (falls vorhanden)
            pdf.LoadFromFile("Agenda.pdf", "12345");

            // 3. Geben Sie das Öffnungspasswort an (leer lassen, falls nicht benötigt)
            string openPsd = string.Empty;

            // 4. Geben Sie ein neues Eigentümerpasswort an
            string permissionPsd = "abc123";

            // 5. Erstellen Sie eine Sicherheitrichtlinie mit neuen Öffnungs- & Eigentümerpasswörtern
            PdfSecurityPolicy securityPolicy = new PdfPasswordSecurityPolicy(openPsd, permissionPsd);

            // 6. Legen Sie den Verschlüsselungsalgorithmus fest (AES 128-Bit ist modern und sicher)
            securityPolicy.EncryptionAlgorithm = PdfEncryptionAlgorithm.AES_128;

            // 7. Definieren Sie die neuen Berechtigungen, die Sie zulassen möchten
            securityPolicy.DocumentPrivilege.AllowContentCopying = true; // Kopieren von Inhalten zulassen
            securityPolicy.DocumentPrivilege.AllowPrint = true; // Drucken zulassen

            // 8. Wenden Sie die neue Sicherheitrichtlinie auf das Dokument an
            pdf.Encrypt(securityPolicy);

            // 9. Speichern Sie die aktualisierte PDF-Datei in einer neuen Datei
            pdf.SaveToFile("ChangePermissions.pdf");
            pdf.Close();
        }
    }
}
Das PdfDocumentPrivilege-Objekt, das über PdfSecurityPolicy.DocumentPrivilege abgerufen wird, ist eine granulare Berechtigungsklasse, die genau definiert, was Benutzer mit der PDF tun können und was nicht (die „Einschränkungsregeln“). Hier schalten Sie Berechtigungen wie Drucken, Kopieren, Bearbeiten und Formularausfüllung um.
Ergebnis:
Wann diese Methode verwendet werden sollte:
- Sie sind mit C# und .NET vertraut.
- Sie müssen viele PDFs automatisch verarbeiten (z. B. tägliche Berichte).
- Sie möchten Berechtigungsänderungen in Ihre eigene Software integrieren.
Checkliste vor dem Ändern von Berechtigungen
Verifizieren Sie vor dem Start diese Punkte:
- Haben Sie das Eigentümerpasswort? (Nicht das Benutzer-/Öffnungspasswort)
- Haben Sie die rechtlichen Befugnisse, dieses Dokument zu ändern?
- Welche Berechtigungen benötigen Sie tatsächlich? (z. B. nur Drucken oder auch vollständiges Kopieren)
- Verwenden Sie ein vertrauenswürdiges Werkzeug (lokale Software > Online-Plattformen)?
Sobald Sie diese bestätigt haben, folgen Sie der obigen Methode, die Ihrem Budget und Ihrem Kenntnisstand entspricht.
Zusammenfassung
Das Erlernen, wie man PDF-Berechtigungen ändert, ermöglicht Ihnen die vollständige Kontrolle über Ihre PDF-Dateien und gleicht die Sicherheit von Dokumenten mit Flexibilität aus. Für professionelle Anwender ist Adobe Acrobat die zuverlässigste Wahl. LibreOffice Draw dient als kostenlose Offline-Alternative, kann aber die Formatierung ändern. Online-Tools sind für schnelle, nicht sensible Bearbeitungen gedacht, und C# mit Free Spire.PDF ist die beste Wahl für sichere, automatisierte Stapelverarbeitung.
Priorisieren Sie immer Offline-Methoden (Desktop-Software/Code) für vertrauliche Geschäfts- und persönliche Dateien, um Risiken von Datenlecks zu vermeiden. Durch die Beherrschung dieser Methoden können Sie PDF-Dateien einfach sperren, einschränken oder entsperren, um alle Ihre Anforderungen an die Dokumentenfreigabe und -sicherheit zu erfüllen.
Häufig gestellte Fragen (FAQs)
F1. Beeinflusst das Ändern von PDF-Berechtigungen vorhandene PDF-Inhalte?
Nein. Das Ändern von Berechtigungen modifiziert nur die Sicherheitsumgebung um die PDF. Die Inhaltsbytes bleiben identisch. Methode 2 (LibreOffice Draw) ist jedoch eine Ausnahme – da sie die PDF neu rendert, kann sich die Formatierung ändern. Verwenden Sie bei Methode 2 immer eine Kopie.
F2. Kann ich Berechtigungen für eine digital signierte PDF-Datei ändern?
Nein. Digitale Signaturen sperren die PDF, um Manipulationen zu verhindern. Sie müssen die Signatur entfernen (erfordert die Aktion des Unterzeichners), bevor Sie Berechtigungen ändern können.
F3. Was ist der sicherste Weg, PDF-Berechtigungen zu ändern?
Der sicherste Weg ist offline mit Adobe Acrobat Pro oder Free Spire.PDF, weil:
- Die Datei verlässt niemals Ihren Computer.
- Eine starke Verschlüsselung (AES‑128) kann angewendet werden.
- Kein Drittanbieter-Server kann die Daten abfangen.
F4. Ist die Free Spire.PDF-Methode sicher für die Produktion?
Für interne Tools und Kleinserienautomatisierung ja. Beachten Sie jedoch das 10-Seiten-Limit in der kostenlosen Version. Für unbegrenzte Seiten sollten Sie die kommerzielle Version in Betracht ziehen.
Siehe auch
- So komprimieren Sie eine PDF-Datei: Die besten Tools, um PDFs kleiner zu machen
- So löschen Sie leere Seiten in PDF (manuell & Automatisierung)
- 3 Wege, PDF-Seiten neu anzuordnen: Online, Desktop & Python
- So signieren Sie PDFs digital mit C# (Praktisches Code-Tutorial)
- Java: Sicherheitsberechtigungen zu einem PDF-Dokument hinzufügen
Как изменить разрешения PDF? 4 безопасных способа
Содержание
- Какие разрешения PDF можно изменить?
- Способ 1: Изменение разрешений PDF с помощью Adobe Acrobat Pro
- Способ 2: Изменение разрешений PDF с помощью LibreOffice Draw
- Способ 3: Онлайн-инструменты для изменения разрешений PDF
- Способ 4: Программное изменение разрешений в C#
- Финальный чек-лист перед изменением разрешений
- Часто задаваемые вопросы (FAQ)
Вы задаетесь вопросом, как изменить разрешения PDF, чтобы ограничить редактирование, запретить копирование, заблокировать печать или разблокировать защищенные файлы PDF? PDF-файлы повсеместно используются для профессиональных документов, контрактов, резюме и официальных файлов благодаря их фиксированному форматированию и функциям безопасного обмена. Однако стандартные настройки разрешений PDF часто не соответствуют вашим уникальным потребностям в обмене и безопасности.
В этом руководстве мы рассмотрим простые и действенные методы редактирования разрешений PDF с использованием профессионального программного обеспечения, бесплатных настольных инструментов, надежных онлайн-платформ и даже программных подходов для разработчиков.
- Какие разрешения PDF можно изменить?
- Способ 1: Изменение разрешений PDF с помощью Adobe Acrobat Pro
- Способ 2: Изменение разрешений PDF с помощью LibreOffice Draw
- Способ 3: Онлайн-инструменты для изменения разрешений PDF
- Способ 4: Программное изменение разрешений в C#
- Финальный чек-лист перед изменением разрешений
- Часто задаваемые вопросы (FAQ)
Какие разрешения PDF можно изменить?
Разрешения PDF (также называемые «настройки ограничений» или «флаги безопасности») контролируют основные действия пользователя. Вы можете переключать эти настройки по мере необходимости:
| Разрешение | Что контролирует |
|---|---|
| Печать | Разрешена ли печать – Низкое разрешение или Высокое разрешение |
| Копирование содержимого | Возможность копировать текст или изображения в буфер обмена |
| Сборка документа | Вставка, удаление или поворот страниц |
| Комментирование | Добавление заметок, выделений или стикеров |
| Заполнение форм | Работа с заполняемыми полями формы |
| Извлечение содержимого | Инструменты доступности и программы чтения с экрана |
| Модификация | Редактирование текста, изображений или объектов |
Когда вы изменяете разрешения, вы обновляете эти флаги – например, переключаясь с «печать не разрешена» на «печать в высоком разрешении разрешена» или включая комментирование, которое ранее было отключено.
Важное примечание: Не существует «бэкдора» для безопасности. Вы не можете законно изменить разрешения без пароля владельца или согласия автора.
Способ 1: Изменение разрешений PDF с помощью Adobe Acrobat Pro
Adobe Acrobat — это официальный инструмент для изменения настроек безопасности PDF, предоставляющий полный контроль над всеми параметрами разрешений PDF. Он идеально подходит для профессиональных пользователей, которым требуется точная настройка безопасности.
Шаги по изменению разрешений файла PDF:
- Откройте целевой PDF-файл в Adobe Acrobat Pro.
- Перейдите в раздел Файл > Свойства (сочетание клавиш: Ctrl+D).
- Перейдите на вкладку Безопасность – здесь отображаются все настройки разрешений.
- Нажмите Изменить настройки, чтобы изменить существующие конфигурации разрешений. Если файл заблокирован, введите пароль разрешений, чтобы разблокировать настраиваемые параметры.
- В окне «Безопасность паролем – Настройки» настройте разрешения, устанавливая или снимая флажки для таких действий, как:
- Установить разрешение на печать (Нет/Низкое/Высокое разрешение)
- Определить разрешенные изменения (Комментирование/Заполнение форм/Нет)
- Включить копирование содержимого и доступ для программ чтения с экрана
- Установите новый пароль разрешений, подтвердите настройки и сохраните измененный PDF-файл, чтобы применить все изменения.
Примечание: Adobe Acrobat требует платной подписки.
✅ Практические примеры:
- Используйте «Разрешенные изменения: Нет» для окончательных контрактов только для чтения.
- Используйте «Разрешенные изменения: Комментирование» для командных обзоров.
Помимо настройки конкретных параметров разрешений PDF, те же инструменты позволяют полностью удалить разрешения PDF, чтобы снять все ограничения одновременно.
Способ 2: Изменение разрешений PDF с помощью LibreOffice Draw
Нет Adobe? Не проблема. Вы можете использовать LibreOffice Draw для изменения разрешений PDF. Этот инструмент может открывать и редактировать PDF-файлы, а затем повторно экспортировать их с новыми настройками разрешений. Он работает в автономном режиме, уважает вашу конфиденциальность и ничего не стоит.
Шаги по использованию LibreOffice Draw:
- Загрузите и установите с сайта libreoffice.org. Выберите версию для вашей операционной системы (Windows, Mac, Linux).
- Запустите LibreOffice Draw и откройте в нем свой PDF-файл.
- Перейдите в раздел Файл > Экспортировать как > Экспортировать как PDF.
- Перейдите на вкладку Безопасность в диалоговом окне Параметры PDF.
- Установите новый пароль владельца (требуется для изменения разрешений).
- Настройте флажки разрешений по своему желанию. Например:
- Включить печать в высоком разрешении
- Включить заполнение форм (сначала создайте интерактивные поля формы в PDF)
- Включить копирование содержимого
- Включить текст/доступ для программ чтения с экрана
- Нажмите Экспортировать и сохраните новый PDF-файл.
⚠️ Предупреждение: Этот метод перезаписывает PDF. Некоторые сложные элементы форматирования (шрифты, слои) могут сместиться. Сначала протестируйте на копии.
Способ 3: Онлайн-инструменты для изменения разрешений PDF
Если вы редко изменяете разрешения PDF и отказываетесь устанавливать настольное программное обеспечение, безопасные онлайн-инструменты для работы с PDF предоставляют быстрое временное решение. Такие инструменты, как SwiftPDFLab и pdfup.org, поддерживают редактирование разрешений PDF через браузер.
Общий рабочий процесс для изменения разрешений PDF онлайн:
- Откройте надежный онлайн-редактор разрешений PDF в своем браузере (например, инструмент SwiftPDFLab для изменения разрешений).
- Загрузите свой PDF-файл на онлайн-платформу.
- Настройте ограничения на печать, редактирование и копирование в соответствии с вашими требованиями.
- Установите новый пароль владельца и нажмите Изменить разрешения, чтобы применить новые настройки.
- Измененный PDF-файл будет загружен автоматически.
Лучшая практика безопасности: Используйте инструмент, который автоматически удаляет загруженные файлы. Никогда не загружайте крайне конфиденциальные, личные или коммерчески важные PDF-файлы. Онлайн-инструменты рекомендуются только для нечувствительных общедоступных документов.
Способ 4: Программное изменение разрешений в C#
Для разработчиков, ИТ-отделов или пользователей, которым требуется пакетная автоматизация PDF, вы можете программно изменять разрешения PDF с помощью C#, используя Free Spire.PDF for .NET — бесплатную автономную библиотеку .NET, которая обрабатывает как пароли разрешений, так и открывающие пароли, предоставляя вам полный контроль над безопасностью PDF на протяжении всего жизненного цикла.
Пример кода на C# (Включение копирования и печати)
Следующий код на C# загружает PDF-файл, создает новую политику безопасности, устанавливает различные разрешения и сохраняет PDF с новыми разрешениями.
using Spire.Pdf;

namespace ChangeSecurityPermission
{
    class Program
    {
        static void Main(string[] args)
        {
            // 1. Создать объект PdfDocument
            PdfDocument pdf = new PdfDocument();

            // 2. Загрузить защищенный PDF-файл с паролем владельца (если есть)
            pdf.LoadFromFile("Agenda.pdf", "12345");

            // 3. Указать открывающий пароль (оставить пустым, если не требуется)
            string openPsd = string.Empty;

            // 4. Указать новый пароль владельца
            string permissionPsd = "abc123";

            // 5. Создать политику безопасности, используя новые открывающий и пароль владельца
            PdfSecurityPolicy securityPolicy = new PdfPasswordSecurityPolicy(openPsd, permissionPsd);

            // 6. Установить алгоритм шифрования (AES 128-бит является современным и безопасным)
            securityPolicy.EncryptionAlgorithm = PdfEncryptionAlgorithm.AES_128;

            // 7. Определить новые разрешения, которые вы хотите разрешить
            securityPolicy.DocumentPrivilege.AllowContentCopying = true; // Разрешить копирование содержимого
            securityPolicy.DocumentPrivilege.AllowPrint = true; // Разрешить печать

            // 8. Применить новую политику безопасности к документу
            pdf.Encrypt(securityPolicy);

            // 9. Сохранить обновленный PDF в новый файл
            pdf.SaveToFile("ChangePermissions.pdf");
            pdf.Close();
        }
    }
}
Объект PdfDocumentPrivilege, получаемый через PdfSecurityPolicy.DocumentPrivilege, представляет собой класс детального контроля разрешений, который определяет, что именно пользователи могут и не могут делать с PDF (т.е. «правила ограничений»). Именно здесь вы переключаете такие разрешения, как печать, копирование, редактирование и заполнение форм.
Результат:
Когда использовать этот метод:
- Вы уверенно владеете C# и .NET.
- Вам нужно автоматически обрабатывать большое количество PDF-файлов (например, ежедневные отчеты).
- Вы хотите интегрировать изменения разрешений в собственное программное обеспечение.
Финальный чек-лист перед изменением разрешений
Перед началом проверьте следующие пункты:
- У вас есть пароль владельца? (Не пользовательский/открывающий пароль)
- У вас есть юридические права на изменение этого документа?
- Какие разрешения вам действительно нужны? (например, только печать или полное копирование тоже)
- Вы используете надежный инструмент (настольное ПО > онлайн-платформы)?
После подтверждения этих пунктов следуйте приведенному выше методу, который соответствует вашему бюджету и уровню навыков.
Резюме
Изучение того, как изменить разрешения PDF, дает вам возможность полностью контролировать ваши PDF-файлы, балансируя безопасность документов и гибкость. Для профессиональных пользователей Adobe Acrobat является наиболее надежным выбором. LibreOffice Draw служит бесплатной автономной альтернативой, но может изменять форматирование. Онлайн-инструменты предназначены для быстрых, нечувствительных правок, а C# с Free Spire.PDF — лучший выбор для безопасной автоматизированной пакетной обработки.
Всегда отдавайте предпочтение автономным методам (настольное ПО/код) для конфиденциальных деловых и личных файлов, чтобы избежать рисков утечки данных. Освоив эти методы, вы сможете легко блокировать, ограничивать или разблокировать PDF-файлы для удовлетворения всех ваших потребностей в обмене документами и обеспечении безопасности.
Часто задаваемые вопросы (FAQ)
В1. Повлияет ли изменение разрешений PDF на существующее содержимое PDF?
Нет. Изменение разрешений только изменяет контейнер безопасности вокруг PDF. Байты содержимого остаются идентичными. Однако Способ 2 (LibreOffice Draw) является исключением – поскольку он перерисовывает PDF, форматирование может измениться. Всегда используйте копию со Способом 2.
В2. Могу ли я изменить разрешения в PDF с цифровой подписью?
Нет. Цифровые подписи блокируют PDF для предотвращения подделки. Перед изменением разрешений необходимо удалить подпись (требуется действие подписанта).
В3. Какой самый безопасный способ изменить разрешения PDF?
Самый безопасный способ — автономно с помощью Adobe Acrobat Pro или Free Spire.PDF, потому что:
- Файл никогда не покидает ваш компьютер.
- Может применяться сильное шифрование (AES‑128).
- Ни один сторонний сервер не может перехватить данные.
В4. Безопасен ли метод Free Spire.PDF для продакшена?
Для внутренних инструментов и маломасштабной автоматизации — да. Но обратите внимание на ограничение в 10 страниц в бесплатной версии. Для неограниченного количества страниц рассмотрите коммерческую версию.
См. также
- Как сжать PDF: лучшие инструменты для уменьшения размера PDF
- Как удалить пустые страницы в PDF (вручную и автоматизация)
- 3 способа изменить порядок страниц PDF: онлайн, настольные ПК и Python
- Как ставить цифровую подпись на PDF с помощью C# (практическое руководство по коду)
- Java: Добавление разрешений безопасности к документу PDF
5 maneiras simples de dividir um documento do Word em vários arquivos (manual e automatizado)
Sumário
Lidar com documentos Word grandes pode ser desafiador. Arquivos com centenas de páginas frequentemente deixam o Word lento, complicam a colaboração e tornam o compartilhamento por e-mail incômodo. Saber como dividir um documento Word eficientemente pode economizar tempo, reduzir o tamanho do arquivo e melhorar o fluxo de trabalho.
Neste guia, apresentaremos 5 maneiras práticas de dividir documentos Word, desde métodos manuais simples como Copiar e Colar até soluções automatizadas usando Python. Seja você um iniciante gerenciando um único arquivo ou um usuário avançado processando centenas de documentos, este artigo o ajudará a escolher o método que melhor se adapta às suas necessidades.
Visão Geral dos Métodos
- Método 1 - Dividir um Documento Word via Copiar e Colar
- Método 2 - Dividir Documento Word por Títulos
- Método 3 - Dividir Documentos Word via Conversão para PDF
- Método 4 - Dividir Páginas no Word Online Gratuitamente
- Método 5 - Automatizar a Divisão de Documentos Word com Python
Por Que Você Pode Precisar Dividir um Documento Word?
Dividir um documento Word não é apenas uma tarefa técnica - pode tornar seu trabalho mais organizado e fácil de gerenciar. Aqui estão algumas razões comuns para dividir documentos Word:
- Colaboração Aprimorada: Envie facilmente capítulos ou seções específicas para diferentes editores ou partes interessadas sem compartilhar o documento inteiro.
- Tamanho de Arquivo Otimizado: Reduza o volume de documentos massivos e ricos em imagens para e-mails mais rápidos e uploads mais suaves na nuvem.
- Melhor Organização: Divida um relatório complexo de múltiplos projetos em arquivos individuais e pesquisáveis.
- Conversão Perfeita: Prepare segmentos específicos para conversão para PDF, Markdown ou HTML.
Método 1 - Dividir um Documento Word via Copiar e Colar
Ideal para: Extrair seções específicas, edições únicas ou iniciantes.
O método de Copiar e Colar é a maneira mais intuitiva de dividir um documento Word manualmente. Ele não requer software adicional ou conhecimento técnico e funciona perfeitamente em todas as versões do Microsoft Word, incluindo Word para Microsoft 365, Word 2024, 2021, 2019 e 2016. Essa abordagem é ideal para usuários que precisam de controle granular total sobre o conteúdo específico que desejam isolar.
Instruções Passo a Passo:
-
Abra Seu Documento
Abra o Word e o arquivo que você deseja dividir. -
Selecione o Conteúdo Desejado
Destaque a seção ou capítulo a ser extraído.- ⚡ Dica: Use Ctrl + Shift + End (Windows) ou Cmd + Shift + End (Mac) para selecionar rapidamente tudo do seu cursor até o final do documento.
-
Copie o Conteúdo
Pressione Ctrl + C (Windows) ou Cmd + C (Mac) no seu teclado, ou clique com o botão direito na área destacada e selecione Copiar.
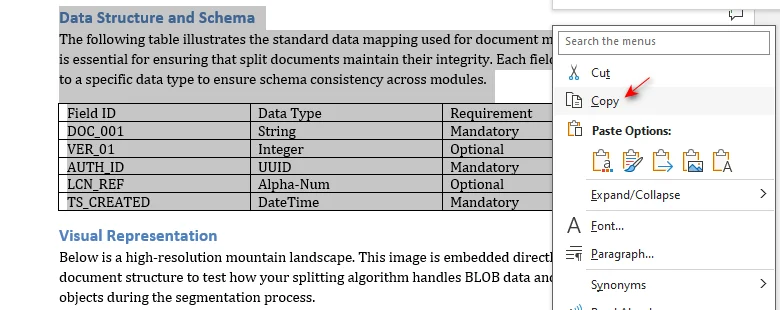
-
Crie um Novo Arquivo
Pressione Ctrl + N para abrir instantaneamente um novo documento em branco. -
Cole o Conteúdo
Pressione Ctrl + V (Windows) ou Cmd + V (Mac) para colar. Para preservar a formatação original, clique no ícone Opções de Colagem no final do texto colado (ou pressione Ctrl) e selecione Manter Formatação Original (K).
-
Salve o Novo Arquivo
Pressione F12 para abrir a caixa de diálogo Salvar Como. Insira um nome de arquivo descritivo, escolha sua pasta de destino e clique em Salvar.
Pontos Fortes e Limitações:
| ✅ Pontos Fortes | ❌ Limitações |
|---|---|
| Curva de aprendizado zero | Ineficiente para tarefas em massa |
| Controle preciso sobre a seleção de conteúdo | Formatação complexa pode exigir ajuste manual |
Dicas Extras: Evitando Mudanças de Formatação
Copiar manualmente é rápido, mas pode quebrar layouts complexos. Siga estas dicas:
- Páginas Paisagem: Se a origem tiver páginas em paisagem, insira uma Quebra de Seção (Layout > Quebras > Próxima Página) no novo arquivo antes de colar para garantir que o layout horizontal seja preservado.
- Cabeçalhos e Rodapés: Esses elementos de fundo (incluindo números de página e marcas d'água) não são transferidos. Você precisará reaplicá-los manualmente no novo arquivo.
- Consistência de Estilo: Para evitar alterações de fonte ou espaçamento, sempre use Manter Formatação Original ao colar.
- Links Quebrados: Esteja ciente de que hiperlinks internos (Sumário) geralmente quebram; pressione F9 no novo arquivo para atualizar todos os campos.
Precisa converter esses arquivos divididos? Confira nosso guia sobre Converter Word para Markdown para documentação de alta velocidade.
Método 2 - Dividir Documento Word por Títulos
Ideal para: Dividir documentos longos e com múltiplos capítulos (por exemplo, 50+ páginas) que já utilizam os Estilos de Título do Word.
Se o seu documento está bem organizado com Estilos de Título (Título 1, 2, etc.), o recurso integrado Modo de Exibição de Tópicos do Microsoft Word é mais eficiente. Este método automatiza o processo de segmentação, garantindo que cada seção seja exportada como um arquivo vinculado individual, eliminando os erros de destaque manual e a 'formatação quebrada' comum com copiar e colar.
Instruções Passo a Passo:
-
Entrar no Modo de Exibição de Tópicos
Navegue até a guia Exibir e clique em Tópicos.
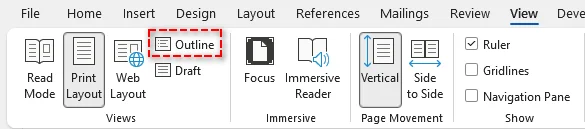
-
Mostrar Títulos
Na guia Tópicos, defina Mostrar Nível para o nível de título pelo qual você deseja dividir (por exemplo, Nível 2). Isso recolhe todo o texto do corpo, mostrando apenas seus títulos principais.
-
Selecionar Títulos
Destaque todos os títulos pelos quais você deseja dividir. -
Criar Subdocumentos
Clique no botão Mostrar Documento e, em seguida, clique em Criar. Você verá caixas cinzas finas (Subdocumentos) aparecerem ao redor dos seus títulos selecionados.
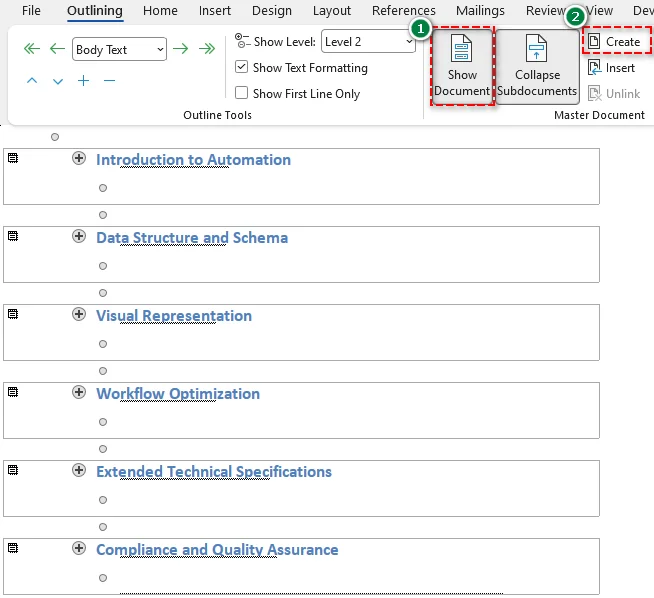
-
Salvar os Subdocumentos
Pressione F12, escolha uma pasta de destino e clique em Salvar para salvar os subdocumentos.
Resultado: O Word gerará instantaneamente arquivos separados para cada título que você selecionou dentro dessa pasta.
Pontos Fortes e Limitações:
| ✅ Pontos Fortes | ❌ Limitações |
|---|---|
| Sem arrastar manualmente | Só funciona se o documento usar Estilos de Título consistentes |
| Nomes de arquivo são atribuídos automaticamente | Cria links de subdocumentos complexos que podem ser frágeis se os arquivos forem movidos individualmente |
Dicas Extras:
- Regra da Nova Pasta: Sempre crie uma nova pasta antes de salvar os subdocumentos. O Word usará o texto do seu título como nomes de arquivo; sem uma pasta, ele poluirá seu diretório instantaneamente.
- Teste de Navegação Primeiro: Antes de dividir, vá para o Painel de Navegação (Ctrl + F > Títulos). Se estiver vazio, o Word não reconhece sua estrutura. Você precisará aplicar Estilos de Título aos seus títulos primeiro.
Método 3 - Dividir Documentos Word via Conversão para PDF
Ideal para: Compartilhar capítulos específicos que não exigem edição adicional e devem ter a mesma aparência em qualquer dispositivo.
Se o seu objetivo é distribuir um segmento polido do seu trabalho, dividir via conversão para PDF é a maneira mais confiável de garantir a compatibilidade entre plataformas. O PDF bloqueia seu layout, fontes e imagens, impedindo que as configurações do Word do destinatário baguncem seu trabalho árduo.
Instruções Passo a Passo:
-
Converter para PDF
Abra seu arquivo no Word, vá para Arquivo > Salvar Como e selecione PDF (*.pdf). -
Definir Intervalo
Na caixa de diálogo, clique no botão Opções.... Na seção Intervalo de páginas, selecione Página(s), insira seu intervalo desejado (por exemplo, 5-10) e clique em OK.
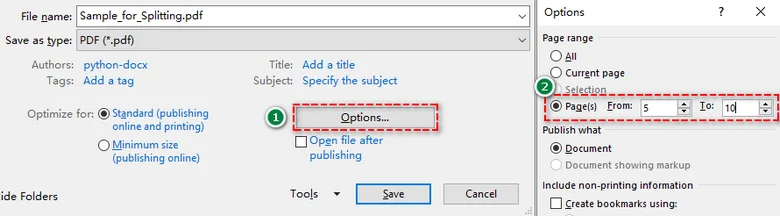
-
Salvar o arquivo
Clique em Salvar e repita para outros intervalos de páginas.
Pontos Fortes e Limitações:
| ✅ Pontos Fortes | ❌ Limitações |
|---|---|
| Layout e formatação permanecem 100% estáticos | Mais difícil de editar após a divisão |
Dica Extra:
- Reedição: Precisa mudar algo? Clique com o botão direito no PDF dividido e selecione Abrir com > Word. O Word tentará reconstruir o texto para você, embora layouts complexos possam mudar ligeiramente.
Método 4 - Dividir Páginas no Word Online Gratuitamente
Ideal para: Usuários sem o Microsoft Word instalado no desktop ou qualquer pessoa que trabalhe em dispositivos móveis.
Se você não tem acesso ao aplicativo desktop do Microsoft Word, ou se precisa de uma solução de "um clique" em movimento, um divisor de documentos Word online como o Zamzar é a escolha mais conveniente. Esta ferramenta baseada em nuvem cuida do trabalho pesado em seus servidores, permitindo que você divida documentos Word a cada X páginas sem nenhuma formatação manual.
Como Dividir Páginas no Word Online:
-
Carregar Seu Arquivo
Acesse o site do divisor de documentos Word Zamzar e clique em Escolher Arquivos (ou arraste e solte seu documento).
-
Definir sua Lógica de Divisão
Especifique o intervalo para a divisão (por exemplo, dividir a cada 1 página).
-
Dividir e Baixar
Clique em Dividir Agora. Assim que o processo for concluído, baixe seus documentos divididos diretamente para o seu dispositivo.
Pontos Fortes e Limitações:
| ✅ Pontos Fortes | ❌ Limitações |
|---|---|
| Rápido e simples | Requer o upload do seu documento para um servidor de terceiros |
| Funciona em qualquer dispositivo (celulares, tablets e mais) | Versões gratuitas geralmente limitam o tamanho total do arquivo (por exemplo, 50 MB) |
Aviso de Segurança:
Embora os divisores online sejam incrivelmente convenientes, nunca os use para documentos confidenciais (como contratos legais, extratos bancários ou registros médicos). Para dados privados, sempre opte pelos métodos offline (Método 1, 2, 3 ou 5).
Método 5 - Automatizar a Divisão de Documentos Word com Python
Ideal para: Desenvolvedores e usuários avançados que precisam processar grandes volumes de documentos ou automatizar relatórios mensais recorrentes.
Se você está enfrentando uma "montanha" de arquivos - como dividir 500 contratos individuais em arquivos separados - clicar manualmente não é mais uma opção. A automação com Python permite criar um único script que lida com todo o processo em segundos, garantindo 100% de precisão sem intervenção humana.
Instruções Passo a Passo:
-
Configuração do Ambiente
Para automatizar a divisão de documentos Word, usaremos a biblioteca Spire.Doc para Python. Ao contrário de algumas bibliotecas de código aberto como python-docx, que lutam com layouts complexos do Word, Spire.Doc mantém alta fidelidade durante o processo de extração de páginas.Antes de prosseguir, instale-a executando o seguinte comando no seu terminal:
pip install Spire.Doc
-
Escrever o Script de Automação
Este script escaneia uma pasta de Entrada, encontra todos os arquivos .docx e extrai cada página em um documento separado automaticamente:import os from spire.doc import * # Definir caminhos das pastas input_folder = "Source_Documents/" output_folder = "Split_Results/" # Criar pasta de saída se ela não existir if not os.path.exists(output_folder): os.makedirs(output_folder) # Iterar por todos os arquivos na pasta de entrada for filename in os.listdir(input_folder): if filename.endswith(".docx"): file_path = os.path.join(input_folder, filename) # Carregar o documento doc = Document() doc.LoadFromFile(file_path) # Dividir o documento atual por página for i in range(doc.PageCount): single_page_doc = doc.ExtractPages(i, 1) # Salvar com um nome como "ContratoA_Pagina_1.docx" base_name = os.path.splitext(filename)[0] save_path = f"{output_folder}{base_name}_Page_{i + 1}.docx" single_page_doc.SaveToFile(save_path, FileFormat.Docx) single_page_doc.Dispose() doc.Dispose() print(f"Processado: {filename}") print("Todos os documentos foram divididos com sucesso!")
| ✅ Pontos Fortes | ❌ Limitações |
|---|---|
| Dividir em lote milhares de documentos com alta eficiência | Requer um ambiente Python e instalação de biblioteca |
| Lógica totalmente personalizável (dividir por página, intervalo de páginas ou seção) | Requer conhecimento básico de Python |
Dica Profissional:
- Além das Páginas: Se o seu documento usa Quebras de Seção, Spire.Doc pode dividir por seções automaticamente, o que é perfeito para documentos com comprimentos de capítulo variados.
Precisa combinar vários arquivos Word novamente? Confira nosso guia sobre Como Combinar Documentos Word em Python.
Comparação Rápida de Todos os Métodos de Divisão de Documentos Word
| Método | Melhor Caso de Uso | Nível de Habilidade | Preservação de Formatação |
|---|---|---|---|
| Copiar e Colar | Edições pequenas e únicas (1-5 páginas) | Iniciante | Parcial |
| Estilos de Título | Relatórios longos e estruturados | Intermediário | Alta |
| Conversão para PDF | Versões finais para compartilhamento | Iniciante | Muito Alta |
| Divisores Online | Usuários móveis ou não usuários do Word | Iniciante | Média |
| Script Python | Processamento em lote (100+ arquivos) | Avançado | Alta |
Dicas para Dividir Documentos Word Eficientemente
- Faça Backup Primeiro: Sempre crie uma cópia de backup do seu documento mestre antes de dividir. Isso o protege contra exclusões acidentais ou erros de formatação.
- Preservar Formatação: Use Manter Formatação Original ou modelos consistentes para garantir que títulos e layouts permaneçam idênticos em todos os arquivos divididos.
- Nomenclatura Inteligente de Arquivos: Use uma convenção de nomenclatura clara como NomeProjeto_Parte01.docx. Para usuários de Python, você pode automatizar isso extraindo IDs ou títulos exclusivos do texto.
- Revisão Final: Sempre verifique cabeçalhos, rodapés e números de página após a divisão. O Word frequentemente redefine esses elementos quando o conteúdo é movido para um novo arquivo.
Conclusão
Existem várias maneiras de dividir um documento Word, o melhor método depende do tamanho do seu arquivo, estrutura e fluxo de trabalho:
- Arquivos pequenos ou edições ocasionais: Copiar e Colar manual ou divisores online funcionam perfeitamente.
- Compartilhamento de segmentos com formatação fixa: A conversão para PDF garante um layout consistente em todos os dispositivos.
- Documentos de larga escala: A automação com Python oferece a máxima velocidade e precisão para processamento em lote.
Pronto para começar? Escolha o método que se adapta às suas necessidades e assuma o controle do seu gerenciamento de documentos hoje mesmo!
Perguntas Frequentes
P1: Posso dividir um documento Word sem instalar nenhum software?
R1: Sim. Você pode usar divisores online confiáveis como o Zamzar para dividir documentos Word sem precisar de uma instalação desktop.
P2: Por que minha formatação muda após dividir manualmente?
R2: Isso geralmente acontece quando o novo documento tem configurações de estilo diferentes. Para corrigir isso, sempre selecione Manter Formatação Original ao colar conteúdo em um novo arquivo.
P3: Como divido um documento por intervalos de páginas específicos?
R3: A maneira mais fácil é usar a Conversão para PDF. Nas opções Salvar Como, você pode especificar um intervalo personalizado (por exemplo, páginas 5-10) para extrair apenas essas páginas.
P4: É seguro dividir documentos confidenciais online?
R4: Para dados sensíveis, recomendamos métodos offline como Copiar e Colar ou automação com Python. Isso garante que seus dados nunca saiam do seu computador local.
P5: Como os desenvolvedores podem automatizar a divisão do Word em Python?
R5: Desenvolvedores podem usar bibliotecas como Spire.Doc para Python. Ela permite detectar programaticamente páginas e extrair intervalos ou seções específicas em novos arquivos com apenas algumas linhas de código.
Explore Mais Tutoriais de Processamento de Texto
Word 문서를 여러 파일로 분할하는 5가지 간단한 방법 (수동 및 자동)
대용량 워드 문서를 다루는 것은 어려울 수 있습니다. 수백 페이지에 달하는 파일은 종종 Word를 느리게 하고, 협업을 복잡하게 하며, 이메일 공유를 번거롭게 만듭니다. 워드 문서를 분할하는 방법을 효율적으로 알면 시간을 절약하고 파일 크기를 줄이며 워크플로우를 개선할 수 있습니다.
이 가이드에서는 복사 및 붙여넣기와 같은 간단한 수동 방법부터 Python을 사용한 자동화된 솔루션까지, 워드 문서를 분할하는 5가지 실용적인 방법을 안내합니다. 단일 파일을 관리하는 초보자이든 수백 개의 문서를 처리하는 파워 유저이든, 이 기사는 귀하의 요구에 가장 적합한 방법을 선택하는 데 도움이 될 것입니다.
방법 개요
- 방법 1 - 복사 및 붙여넣기를 통한 워드 문서 분할
- 방법 2 - 머리글을 통한 워드 문서 분할
- 방법 3 - PDF 변환을 통한 워드 문서 분할
- 방법 4 - Word Online에서 무료로 페이지 분할
- 방법 5 - Python을 사용하여 워드 문서 분할 자동화
워드 문서를 분할해야 하는 이유
워드 문서를 분할하는 것은 단순한 기술 작업이 아니라 작업을 더 체계적이고 쉽게 만들 수 있습니다. 워드 문서를 분할하는 몇 가지 일반적인 이유는 다음과 같습니다.
- 향상된 협업: 전체 문서를 공유하지 않고 특정 장이나 섹션을 다른 편집자 또는 이해 관계자에게 쉽게 보낼 수 있습니다.
- 최적화된 파일 크기: 이메일 전송 속도를 높이고 클라우드 업로드를 원활하게 하기 위해 대용량, 이미지 중심 문서의 크기를 줄입니다.
- 더 나은 구성: 복잡한 다중 프로젝트 보고서를 개별적이고 검색 가능한 파일로 나눕니다.
- 원활한 변환: PDF, Markdown 또는 HTML로 변환할 특정 세그먼트를 준비합니다.
방법 1 - 복사 및 붙여넣기를 통한 워드 문서 분할
적합 대상: 특정 섹션 추출, 일회성 편집 또는 초보자.
복사 및 붙여넣기 방법은 수동으로 워드 문서를 분할하는 가장 직관적인 방법입니다. 추가 소프트웨어나 기술 전문 지식이 필요하지 않으며 Microsoft 365용 Word, Word 2024, 2021, 2019 및 2016을 포함한 모든 버전의 Microsoft Word에서 원활하게 작동합니다. 이 접근 방식은 분리하려는 특정 콘텐츠에 대한 완전한 세부 제어가 필요한 사용자에게 이상적입니다.
단계별 지침:
-
문서 열기
Word를 실행하고 분할하려는 파일을 엽니다. -
대상 콘텐츠 선택
추출하려는 섹션 또는 장을 강조 표시합니다.- ⚡ 팁: Ctrl + Shift + End (Windows) 또는 Cmd + Shift + End (Mac)를 사용하여 커서부터 문서 끝까지 빠르게 선택합니다.
-
콘텐츠 복사
키보드에서 Ctrl + C (Windows) 또는 Cmd + C (Mac)를 누르거나 강조 표시된 영역을 마우스 오른쪽 버튼으로 클릭하고 복사를 선택합니다.
-
새 파일 만들기
Ctrl + N을 눌러 새 빈 문서를 즉시 엽니다. -
콘텐츠 붙여넣기
Ctrl + V (Windows) 또는 Cmd + V (Mac)를 눌러 붙여넣습니다. 원본 서식을 유지하려면 붙여넣은 텍스트 끝에 있는 붙여넣기 옵션 아이콘을 클릭하거나 (Ctrl 키를 누름) 원본 서식 유지 (K)를 선택합니다.
-
새 파일 저장
F12를 눌러 다른 이름으로 저장 대화 상자를 엽니다. 설명적인 파일 이름을 입력하고 대상 폴더를 선택한 다음 저장을 클릭합니다.
장점 및 단점:
| ✅ 장점 | ❌ 단점 |
|---|---|
| 학습 곡선 없음 | 대량 작업에 비효율적 |
| 콘텐츠 선택에 대한 정확한 제어 | 복잡한 서식은 수동 조정이 필요할 수 있음 |
추가 팁: 서식 변경 방지
수동 복사는 빠르지만 복잡한 레이아웃을 깨뜨릴 수 있습니다. 다음 팁을 따르세요.
- 가로 페이지: 원본에 가로 페이지가 있는 경우 새 파일에 구역 나누기 (레이아웃 > 나누기 > 다음 페이지)를 붙여넣기 전에 삽입하여 가로 레이아웃이 유지되도록 합니다.
- 머리글 및 바닥글: 이러한 배경 요소(페이지 번호 및 워터마크 포함)는 전송되지 않습니다. 새 파일에서 수동으로 다시 적용해야 합니다.
- 스타일 일관성: 글꼴 또는 간격 변경을 방지하려면 붙여넣을 때 항상 원본 서식 유지를 사용합니다.
- 깨진 링크: 내부 하이퍼링크(목차)는 종종 깨집니다. 새 파일에서 F9를 눌러 모든 필드를 새로 고칩니다.
분할된 파일을 변환해야 합니까? 빠른 문서화를 위해 Word를 Markdown으로 변환에 대한 가이드를 확인하세요.
방법 2 - 머리글을 통한 워드 문서 분할
적합 대상: Word의 머리글 스타일을 이미 사용하는 긴 다중 장 문서(예: 50페이지 이상) 분할.
문서가 머리글 스타일(머리글 1, 2 등)로 잘 구성되어 있다면 Microsoft Word의 기본 개요 보기 기능이 더 효율적입니다. 이 방법은 세그먼트화 프로세스를 자동화하여 각 섹션이 개별 연결 파일로 내보내지도록 하면서 복사 및 붙여넣기에서 흔히 발생하는 수동 강조 오류 및 '서식 깨짐'을 제거합니다.
단계별 지침:
-
개요 보기 진입
보기 탭으로 이동하여 개요를 클릭합니다.
-
머리글 표시
개요 탭에서 수준 표시를 분할하려는 머리글 수준(예: 수준 2)으로 설정합니다. 이렇게 하면 본문 텍스트가 모두 축소되고 주요 머리글만 표시됩니다.
-
머리글 선택
분할하려는 모든 머리글을 강조 표시합니다. -
하위 문서 만들기
문서 표시 버튼을 클릭한 다음 만들기를 클릭합니다. 선택한 머리글 주위에 얇은 회색 상자(하위 문서)가 나타납니다.
-
하위 문서 저장
F12를 누르고 대상 폴더를 선택한 다음 저장을 클릭하여 하위 문서를 저장합니다.
결과: Word는 해당 폴더에서 선택한 각 머리글에 대해 별도의 파일을 즉시 생성합니다.
장점 및 단점:
| ✅ 장점 | ❌ 단점 |
|---|---|
| 수동 드래그 없음 | 문서가 일관된 머리글 스타일을 사용하는 경우에만 작동 |
| 자동으로 할당되는 파일 이름 | 파일이 개별적으로 이동될 경우 불안정할 수 있는 복잡한 하위 문서 링크 생성 |
추가 팁:
- 새 폴더 규칙: 하위 문서를 저장하기 전에 항상 새 폴더를 만듭니다. Word는 머리글 텍스트를 파일 이름으로 사용합니다. 폴더가 없으면 디렉토리가 즉시 지저분해집니다.
- 탐색 먼저 테스트: 분할하기 전에 탐색 창 (Ctrl + F > 머리글)으로 이동합니다. 비어 있다면 Word가 구조를 인식하지 못하는 것입니다. 먼저 제목에 머리글 스타일을 적용해야 합니다.
방법 3 - PDF 변환을 통한 워드 문서 분할
적합 대상: 추가 편집이 필요하지 않고 모든 장치에서 동일하게 보여야 하는 특정 장을 공유하는 경우.
작업의 일부를 다듬어 배포하는 것이 목표라면 PDF 변환을 통한 분할이 플랫폼 간 호환성을 보장하는 가장 안정적인 방법입니다. PDF는 레이아웃, 글꼴 및 이미지를 잠가 수신자의 Word 설정이 열심히 작업한 내용을 망치는 것을 방지합니다.
단계별 지침:
-
PDF로 변환
Word에서 파일을 연 다음 파일 > 다른 이름으로 저장으로 이동하여 PDF (*.pdf)를 선택합니다. -
범위 정의
대화 상자에서 옵션... 버튼을 클릭합니다. 페이지 범위 섹션에서 페이지를 선택하고 대상 범위(예: 5-10)를 입력한 다음 확인을 클릭합니다.
-
파일 저장
저장을 클릭하고 다른 페이지 범위에 대해 반복합니다.
장점 및 단점:
| ✅ 장점 | ❌ 단점 |
|---|---|
| 레이아웃과 서식이 100% 고정됨 | 분할 후 편집하기 어려움 |
추가 팁:
- 재편집: 변경해야 할 사항이 있습니까? 분할된 PDF를 마우스 오른쪽 버튼으로 클릭하고 다음으로 열기 > Word를 선택합니다. Word가 텍스트를 다시 빌드하려고 시도하지만 복잡한 레이아웃은 약간 변경될 수 있습니다.
방법 4 - Word Online에서 무료로 페이지 분할
적합 대상: 데스크톱 Microsoft Word가 설치되지 않은 사용자 또는 모바일 장치에서 작업하는 모든 사용자.
Microsoft Word 데스크톱 앱에 액세스할 수 없거나 이동 중에 "원클릭" 솔루션이 필요한 경우 Zamzar와 같은 온라인 워드 문서 분할기가 가장 편리한 선택입니다. 이 클라우드 기반 도구는 서버에서 작업을 처리하여 수동 서식 없이도 모든 X 페이지마다 워드 문서를 분할할 수 있습니다.
Word Online에서 페이지 분할 방법:
-
파일 업로드
Zamzar 워드 문서 분할기 웹사이트로 이동하여 파일 선택을 클릭하거나 문서를 드래그 앤 드롭합니다.
-
분할 논리 설정
분할 간격을 지정합니다(예: 1페이지마다 분할).
-
분할 및 다운로드
지금 분할을 클릭합니다. 프로세스가 완료되면 분할된 문서를 장치로 직접 다운로드합니다.
장점 및 단점:
| ✅ 장점 | ❌ 단점 |
|---|---|
| 빠르고 간단함 | 문서를 타사 서버에 업로드해야 함 |
| 모든 장치(모바일, 태블릿 등)에서 작동 | 무료 버전은 총 파일 크기를 제한하는 경우가 많음(예: 50MB) |
보안 경고:
온라인 분할기는 매우 편리하지만 민감한 문서(법률 계약, 은행 명세서 또는 의료 기록 등)에는 절대 사용하지 마십시오. 개인 데이터의 경우 항상 오프라인 방법(방법 1, 2, 3 또는 5)을 사용하십시오.
방법 5 - Python을 사용하여 워드 문서 분할 자동화
적합 대상: 대량의 문서를 처리하거나 반복되는 월별 보고서를 자동화해야 하는 개발자 및 파워 유저.
수백 개의 개별 계약을 별도의 파일로 분할하는 것과 같은 "산더미"의 파일에 직면해 있다면 수동 클릭은 더 이상 옵션이 아닙니다. Python 자동화를 사용하면 전체 프로세스를 몇 초 안에 처리하는 단일 스크립트를 만들어 인간의 개입 없이 100% 정확도를 보장할 수 있습니다.
단계별 지침:
-
환경 설정
워드 문서 분할을 자동화하기 위해 Spire.Doc for Python 라이브러리를 사용합니다. 복잡한 Word 레이아웃으로 어려움을 겪는 python-docx와 같은 일부 오픈 소스 라이브러리와 달리 Spire.Doc은 페이지 추출 프로세스 중에 높은 충실도를 유지합니다.계속하기 전에 터미널에서 다음 명령을 실행하여 설치하십시오.
pip install Spire.Doc -
자동화 스크립트 작성
이 스크립트는 입력 폴더를 스캔하고 모든 .docx 파일을 찾아 각 페이지를 별도의 문서로 자동 추출합니다.import os from spire.doc import * # 폴더 경로 정의 input_folder = "Source_Documents/" output_folder = "Split_Results/" # 출력 폴더가 없으면 생성 if not os.path.exists(output_folder): os.makedirs(output_folder) # 입력 폴더의 모든 파일을 반복 for filename in os.listdir(input_folder): if filename.endswith(".docx"): file_path = os.path.join(input_folder, filename) # 문서 로드 doc = Document() doc.LoadFromFile(file_path) # 현재 문서를 페이지별로 분할 for i in range(doc.PageCount): single_page_doc = doc.ExtractPages(i, 1) # "ContractA_Page_1.docx"와 같은 이름으로 저장 base_name = os.path.splitext(filename)[0] save_path = f"{output_folder}{base_name}_Page_{i + 1}.docx" single_page_doc.SaveToFile(save_path, FileFormat.Docx) single_page_doc.Dispose() doc.Dispose() print(f"처리됨: {filename}") print("모든 문서가 성공적으로 분할되었습니다!")
| ✅ 장점 | ❌ 단점 |
|---|---|
| 수천 개의 문서를 높은 효율성으로 일괄 분할 | Python 환경 및 라이브러리 설치 필요 |
| 완전히 사용자 정의 가능한 논리(페이지, 페이지 범위 또는 섹션별 분할) | 기본적인 Python 지식 필요 |
프로 팁:
- 페이지 이상: 문서에 구역 나누기가 사용된 경우 Spire.Doc은 자동으로 섹션별로 분할할 수 있으며, 이는 다양한 장 길이의 문서에 적합합니다.
여러 Word 파일을 다시 결합해야 합니까? Python에서 Word 문서 병합 방법에 대한 가이드를 확인하세요.
모든 Word 문서 분할 방법의 빠른 비교
| 방법 | 최적의 사용 사례 | 기술 수준 | 서식 유지 |
|---|---|---|---|
| 복사 및 붙여넣기 | 일회성 소규모 편집(1-5페이지) | 초보자 | 부분적 |
| 머리글 스타일 | 긴 구조화 보고서 | 중급 | 높음 |
| PDF 변환 | 공유용 최종 버전 | 초보자 | 매우 높음 |
| 온라인 분할기 | 모바일 사용자 또는 Word 미사용자 | 초보자 | 중간 |
| Python 스크립트 | 일괄 처리(100개 이상 파일) | 고급 | 높음 |
워드 문서 효율적으로 분할하는 팁
- 먼저 백업: 분할하기 전에 항상 마스터 문서의 백업 복사본을 만드십시오. 이렇게 하면 실수로 삭제하거나 서식 오류가 발생하는 것을 방지할 수 있습니다.
- 서식 유지: 원본 서식 유지 또는 일관된 템플릿을 사용하여 모든 분할 파일에서 머리글과 레이아웃이 동일하게 유지되도록 합니다.
- 스마트 파일 이름 지정: ProjectName_Part01.docx와 같은 명확한 이름 지정 규칙을 사용합니다. Python 사용자의 경우 텍스트에서 고유 ID 또는 제목을 가져와 이를 자동화할 수 있습니다.
- 최종 검토: 분할 후 항상 머리글, 바닥글 및 페이지 번호를 확인하십시오. Word는 콘텐츠가 새 파일로 이동될 때 종종 이러한 요소를 재설정합니다.
결론
워드 문서를 분할하는 방법에는 여러 가지가 있으며, 최적의 방법은 파일 크기, 구조 및 워크플로우에 따라 달라집니다.
- 소규모 파일 또는 간헐적인 편집: 수동 복사 및 붙여넣기 또는 온라인 분할기가 완벽하게 작동합니다.
- 고정된 서식으로 세그먼트 공유: PDF 변환은 모든 장치에서 일관된 레이아웃을 보장합니다.
- 대규모 문서: Python 자동화는 일괄 처리를 위한 최고의 속도와 정밀도를 제공합니다.
시작할 준비가 되셨습니까? 귀하의 요구에 맞는 방법을 선택하고 오늘 문서 관리를 제어하십시오!
자주 묻는 질문
Q1: 소프트웨어를 설치하지 않고 워드 문서를 분할할 수 있습니까?
A1: 예. Zamzar와 같은 안정적인 온라인 분할기를 사용하여 데스크톱 설치 없이 워드 문서를 분할할 수 있습니다.
Q2: 수동으로 분할한 후 서식이 변경되는 이유는 무엇입니까?
A2: 일반적으로 새 문서에 다른 스타일 설정이 있을 때 발생합니다. 이를 수정하려면 새 파일에 콘텐츠를 붙여넣을 때 항상 원본 서식 유지를 선택하십시오.
Q3: 특정 페이지 범위별로 문서를 분할하려면 어떻게 해야 합니까?
A3: 가장 쉬운 방법은 PDF 변환을 사용하는 것입니다. 다른 이름으로 저장 옵션에서 사용자 지정 범위(예: 5-10페이지)를 지정하여 해당 페이지만 추출할 수 있습니다.
Q4: 온라인으로 기밀 문서를 분할해도 안전합니까?
A4: 민감한 데이터의 경우 복사 및 붙여넣기 또는 Python 자동화와 같은 오프라인 방법을 사용하는 것이 좋습니다. 이렇게 하면 데이터가 로컬 컴퓨터를 벗어나지 않습니다.
Q5: 개발자는 Python에서 Word 분할을 어떻게 자동화할 수 있습니까?
A5: 개발자는 Spire.Doc for Python과 같은 라이브러리를 사용할 수 있습니다. 몇 줄의 코드로 페이지를 프로그래밍 방식으로 감지하고 특정 범위 또는 섹션을 새 파일로 추출할 수 있습니다.