Pandas DataFrame to Excel in Python: Step-by-Step Guide
Table of Contents
- Why Use Spire.XLS for Pandas DataFrame to Excel
- Prerequisites for Pandas DataFrame to Excel
- Export a Single Pandas DataFrame to Excel with Formatting
- Convert Multiple Pandas DataFrames to One Excel File
- Write Pandas DataFrames to Existing Excel File
- Advanced Customization for Exporting Pandas DataFrames to Excel
- Conclusion
- FAQs
Install with Pypi
pip install pandas spire.xls
Related Links
Working with tabular data is a common task for Python developers, and Pandas is the go-to library for data manipulation and analysis. Often, developers need to export Pandas DataFrames to Excel for reporting, team collaboration, or further data analysis. While Pandas provides the to_excel function for basic exports, creating professional Excel reports with formatted headers, styled cells, multiple sheets, and charts can be challenging.
This tutorial demonstrates how to write a single DataFrame or multiple DataFrames to Excel using Spire.XLS for Python, a multi-functional Excel library that enables full customization of Excel files directly from Python-without needing Microsoft Excel to be installed.
Table of Contents
- Why Use Spire.XLS for Pandas DataFrame to Excel
- Prerequisites for Pandas DataFrame to Excel
- Export a Single Pandas DataFrame to Excel with Formatting
- Convert Multiple Pandas DataFrames to One Excel File
- Write Pandas DataFrames to Existing Excel File
- Advanced Customization for Exporting Pandas DataFrames to Excel
- Conclusion
- FAQs
Why Use Spire.XLS for Pandas DataFrame to Excel
While Pandas provides basic Excel export functionality, Spire.XLS extends this by giving full control over Excel file creation. Instead of just writing raw data, developers can:
- Organize multiple DataFrames into separate sheets within a single workbook.
- Customize headers, fonts, colors, and cell formatting to produce professional layouts.
- Auto-fit columns and adjust row heights for improved readability.
- Add charts, formulas, and other Excel features directly from Python
Prerequisites for Pandas DataFrame to Excel
Before exporting a Pandas DataFrame to Excel, ensure you have the following required libraries installed. You can do this by running the following command in your project's terminal:
pip install pandas spire.xls
These libraries allow you to write DataFrames to Excel with multiple sheets, custom formatting, attractive charts, and structured layouts.
Export a Single Pandas DataFrame to Excel with Formatting
Exporting a single DataFrame to an Excel file is the most common scenario. Using Spire.XLS, you can not only export your DataFrame but also format headers, style cells, and add charts to make your report look professional.
Let's go through this process step by step.
Step 1: Create a Sample DataFrame
First, we need to create a DataFrame. Here, we have employee names, departments, and salaries. You can, of course, replace this with your own dataset.
import pandas as pd
from spire.xls import *

# Create a simple DataFrame
df = pd.DataFrame({
    'Employee': ['Alice', 'Bob', 'Charlie'],
    'Department': ['HR', 'Finance', 'IT'],
    'Salary': [5000, 6000, 7000]
})
Step 2: Create a Workbook and Access the First Sheet
Now we'll create a new Excel workbook and get the first worksheet ready. Let's give it a meaningful name so it's easy to understand.
# Create a new workbook
workbook = Workbook()
sheet = workbook.Worksheets[0]
sheet.Name = "Employee Data"
Step 3: Write Column Headers
We'll write the headers to the first row, make them bold and add a light gray background, so everything looks neat.
# Write column headers
for colIndex, colName in enumerate(df.columns, start=1):
    cell = sheet.Range[1, colIndex]
    cell.Text = colName
    cell.Style.Font.IsBold = True                # Make headers bold
    cell.Style.Color = Color.get_LightGray()     # Light gray background
Step 4: Write the Data Rows
Next, we write each row from the DataFrame. For numbers, we use the NumberValue property so Excel can recognize them for calculations and charts.
# Write data rows
for rowIndex, row in enumerate(df.values, start=2):
    for colIndex, value in enumerate(row, start=1):
        cell = sheet.Range[rowIndex, colIndex]
        if isinstance(value, (int, float)):
            cell.NumberValue = value
        else:
            cell.Text = str(value)
Step 5: Apply Borders and Auto-Fit Columns
To give your Excel sheet a polished, table-like appearance, let's add borders and automatically adjust the column widths.
# Apply borders and auto-fit columns
usedRange = sheet.AllocatedRange
usedRange.BorderAround(LineStyleType.Thin, Color.get_Black()) # Outside borders
usedRange.BorderInside(LineStyleType.Thin, Color.get_Black()) # Inside borders
usedRange.AutoFitColumns()
Step 6: Add a Chart to Visualize Data
Charts help you quickly understand trends. Here, we'll create a column chart comparing salaries.
# Add a chart
chart = sheet.Charts.Add()
chart.ChartType = ExcelChartType.ColumnClustered
chart.DataRange = sheet.Range["A1:C4"]        # Data range for chart
chart.SeriesDataFromRange = False
chart.LeftColumn = 5                          # Chart position
chart.TopRow = 1
chart.RightColumn = 10
chart.BottomRow = 16
chart.ChartTitle = "Employee Salary Comparison"
chart.ChartTitleArea.Font.Size = 12
chart.ChartTitleArea.Font.IsBold = True
Step 7: Save the Workbook
Finally, save the workbook to your desired location.
# Save the Excel file
workbook.SaveToFile("DataFrameWithChart.xlsx", ExcelVersion.Version2016)
workbook.Dispose()
Result:
The Excel XLSX File generated from Pandas DataFrame looks like this:
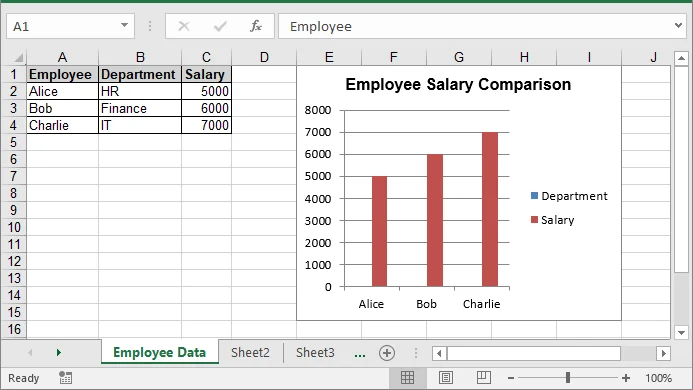
Once the Excel file is generated, it can be further processed, such as being converted to PDF for easy sharing:
workbook.SaveToFile("ToPdf.pdf", FileFormat.PDF)
For more details, see the guide on converting Excel to PDF in Python.
Convert Multiple Pandas DataFrames to One Excel File
When creating Excel reports, multiple datasets often need to be placed on separate sheets. Using Spire.XLS, each Pandas DataFrame can be written to its own worksheet, ensuring related data is organized clearly and easy to analyze. The following steps demonstrate this workflow.
Step 1: Create Multiple Sample DataFrames
Before exporting, we create two separate DataFrames - one for employee information and another for products. Each DataFrame will go into its own Excel sheet.
import pandas as pd
from spire.xls import *

# Sample DataFrames
df1 = pd.DataFrame({'Name': ['Alice', 'Bob'], 'Age': [25, 30]})
df2 = pd.DataFrame({'Product': ['Laptop', 'Phone'], 'Price': [1000, 500]})

# List of DataFrames with corresponding sheet names
dataframes = [
    (df1, "Employees"),
    (df2, "Products")
]
Here, dataframes is a list of tuples that pairs each DataFrame with the name of the sheet it should appear in.
Step 2: Create a New Workbook
Next, we create a new Excel workbook to store all the DataFrames.
# Create a new workbook
workbook = Workbook()
This initializes a blank workbook with three default sheets. We'll rename and populate them in the next step.
Step 3: Loop Through Each DataFrame and Write to Its Own Sheet
Instead of writing each DataFrame individually, we can loop through our list and process them in the same way. This reduces duplicate code and makes it easier to handle more datasets.
for i, (df, sheet_name) in enumerate(dataframes):
    # Get or create a sheet
    if i < workbook.Worksheets.Count:
        sheet = workbook.Worksheets[i]
    else:
        sheet = workbook.Worksheets.Add()

    sheet.Name = sheet_name

    # Write headers with bold font and background color
    for colIndex, colName in enumerate(df.columns, start=1):
        cell = sheet.Range[1, colIndex]
        cell.Text = colName
        cell.Style.Font.IsBold = True
        cell.Style.Color = Color.get_LightGray()
        sheet.Columns[colIndex - 1].ColumnWidth = 15  # Set fixed column width

    # Write rows of data
    for rowIndex, row in enumerate(df.values, start=2):
        for colIndex, value in enumerate(row, start=1):
            cell = sheet.Range[rowIndex, colIndex]
            if isinstance(value, (int, float)):
                cell.NumberValue = value
            else:
                cell.Text = str(value)

    # Apply thin borders around the used range
    usedRange = sheet.AllocatedRange
    usedRange.BorderAround(LineStyleType.Thin, Color.get_Black()) # Outside borders
    usedRange.BorderInside(LineStyleType.Thin, Color.get_Black()) # Inside borders
Using this loop, we can easily add more DataFrames in the future without rewriting the same code.
Step 4: Save the Workbook
Finally, we save the Excel file. Both datasets are now neatly organized in one file with separate sheets, formatted headers, and proper borders.
# Save the workbook
workbook.SaveToFile("MultipleDataFrames.xlsx", ExcelVersion.Version2016)
workbook.Dispose()
Now your Excel file is ready to be shared or analyzed further.
Result:

The file MultipleDataFrames.xlsx contains two sheets:
- Employees (with names and ages)
- Products (with product details and prices)
This organization makes multi-report Excel files clean and easy to navigate.
Write Pandas DataFrames to Existing Excel File
In some cases, instead of creating a new Excel file, you may need to write DataFrames to an existing workbook. This can be easily achieved by loading the existing workbook, adding a new sheet or accessing the desired sheet, and writing the DataFrame data using the same logic.
The following code shows how to write a Pandas DataFrame to an Existing Excel file:
import pandas as pd
from spire.xls import *

# Load an existing Excel file
workbook = Workbook()
workbook.LoadFromFile("MultipleDataFrames.xlsx")

# Create a new DataFrame to add
new_df = pd.DataFrame({
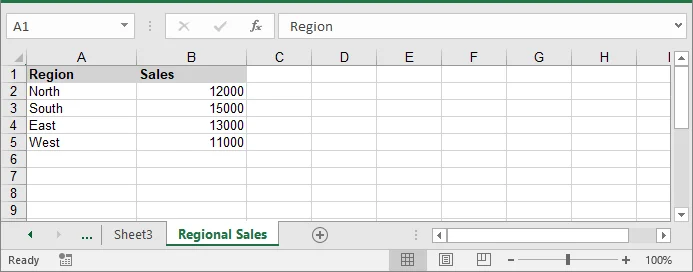
    'Region': ['North', 'South', 'East', 'West'],
    'Sales': [12000, 15000, 13000, 11000]
})

# Add a new worksheet for the new DataFrame
new_sheet = workbook.Worksheets.Add("Regional Sales")

# Write headers
for colIndex, colName in enumerate(new_df.columns, start=1):
    cell = new_sheet.Range[1, colIndex]
    cell.Text = colName
    cell.Style.Font.IsBold = True
    cell.Style.Color = Color.get_LightGray()
    new_sheet.Columns[colIndex - 1].ColumnWidth = 15

# Write data rows
for rowIndex, row in enumerate(new_df.values, start=2):
    for colIndex, value in enumerate(row, start=1):
        cell = new_sheet.Range[rowIndex, colIndex]
        if isinstance(value, (int, float)):
            cell.NumberValue = value
        else:
            cell.Text = str(value)

# Save the changes
workbook.SaveToFile("DataFrameToExistingWorkbook.xlsx", ExcelVersion.Version2016)
workbook.Dispose()
Advanced Customization for Exporting Pandas DataFrames to Excel
Beyond basic exports, Pandas DataFrames can be customized in Excel to meet specific reporting requirements. Advanced options-such as selecting specific columns, and including or excluding the index-allow you to create cleaner, more readable, and professional Excel files. The following examples demonstrate how to apply these customizations.
1. Select Specific Columns
Sometimes you may not need to export all columns from a DataFrame. By selecting only the relevant columns, you can keep your Excel reports concise and focused. The following code demonstrates how to loop through chosen columns when writing headers and rows:
import pandas as pd
from spire.xls import *

# Create a DataFrame
df = pd.DataFrame({
    'Employee': ['Alice', 'Bob', 'Charlie'],
    'Department': ['HR', 'Finance', 'IT'],
    'Salary': [5000, 6000, 7000]
})

# Set the columns to export
columns_to_export = ['Employee', 'Department']

# Create a new workbook and access the first sheet
workbook = Workbook()
sheet = workbook.Worksheets[0]

# Write headers
for colIndex, colName in enumerate(columns_to_export, start=1):
    sheet.Range[1, colIndex].Text = colName

# Write rows
for rowIndex, row in enumerate(df[columns_to_export].values, start=2):
    for colIndex, value in enumerate(row, start=1):
        sheet.Range[rowIndex, colIndex].Text = value

# Save the Excel file
workbook.SaveToFile("select_columns.xlsx")
workbook.Dispose()
2. Include or Exclude Index
By default, the DataFrame index is not included in the export. If your report requires row identifiers or numeric indices, you can add them manually. This code snippet shows how to include the index alongside selected columns:
# Write header for index
sheet.Range[1, 1].Text = "Index"

# Write index values (numeric)
for rowIndex, idx in enumerate(df.index, start=2):
    sheet.Range[rowIndex, 1].NumberValue = idx  # Use NumberValue for numeric

# Write headers for other columns
for colIndex, colName in enumerate(columns_to_export, start=2):
    sheet.Range[1, colIndex].Text = colName

# Write the data rows
for rowIndex, row in enumerate(df[columns_to_export].values, start=2):
    for colIndex, value in enumerate(row, start=2):
        if isinstance(value, (int, float)):
            sheet.Range[rowIndex, colIndex].NumberValue = value
        else:
            sheet.Range[rowIndex, colIndex].Text = str(value)

# Save the workbook
workbook.SaveToFile("include_index.xlsx", ExcelVersion.Version2016)
workbook.Dispose()
Conclusion
Exporting a Pandas DataFrame to Excel is simple, but producing professional, well-formatted reports requires additional control. By using Pandas for data preparation and Spire.XLS for Python to create and format Excel files, you can generate structured, readable, and visually organized workbooks. This approach works for both single DataFrames and multiple datasets, making it easy to create Excel reports that are ready for analysis, sharing, or further manipulation.
FAQs
Q1: How can I export a Pandas DataFrame to Excel in Python?
A1: You can use libraries like Spire.XLS to write a DataFrame to an Excel file. This allows you to transfer tabular data from Python into Excel while keeping control over formatting and layout.
Q2: Can I export more than one DataFrame to a single Excel file?
A2: Yes. Multiple DataFrames can be written to separate sheets within the same workbook. This helps keep related datasets organized in one file.
Q3: How do I add headers and format cells in Excel from a DataFrame?
A3: Headers can be made bold, colored, or have fixed widths. Numeric values can be stored as numbers and text as strings. Formatting improves readability for reports.
Q4: Is it possible to include charts in the exported Excel file?
A4: Yes. Charts such as column or line charts can be added based on your DataFrame data to help visualize trends or comparisons.
Q5: Do I need Microsoft Excel installed to export DataFrames?
A5: Not necessarily. Some libraries, including Spire.XLS, can create and format Excel files entirely within Python without relying on Excel being installed.
See Also
How to Create a Pie Chart in PowerPoint Step by Step
Table of Contents
Install with Pypi
pip install spire.presentation
Related Links

Making your data easy to understand can be tricky, especially if you’re not sure how to turn numbers into visuals. If you’ve ever opened PowerPoint and wondered how to make a chart quickly, you’re in the right place. In this guide, you’ll learn how to create a pie chart in PowerPoint, step by step. We’ll cover everything from adding a chart to customizing colors and labels, so your slides look clear and professional. By the end, you’ll be able to show your data in a way that’s simple, attractive, and easy for anyone to understand.
How to Create a Pie Chart in PowerPoint Manually
Making a pie chart in PowerPoint is easier than you might think. In this chapter, we’ll guide you step by step through the process. First, make sure you have your data ready along with a PowerPoint presentation. Most importantly, you’ll need Microsoft PowerPoint or another presentation editing app installed on your device. In this tutorial, we’ll use Microsoft PowerPoint as our example. Once you’re ready, let’s dive into today’s guide.
Step 1: Open Your Presentation
Start by locating and opening the PowerPoint file where you want to add your chart.
Step 2: Choose the Slide
Select the slide where the pie chart should appear. Make sure it’s ready for the data you want to show.
Step 3: Insert the Chart
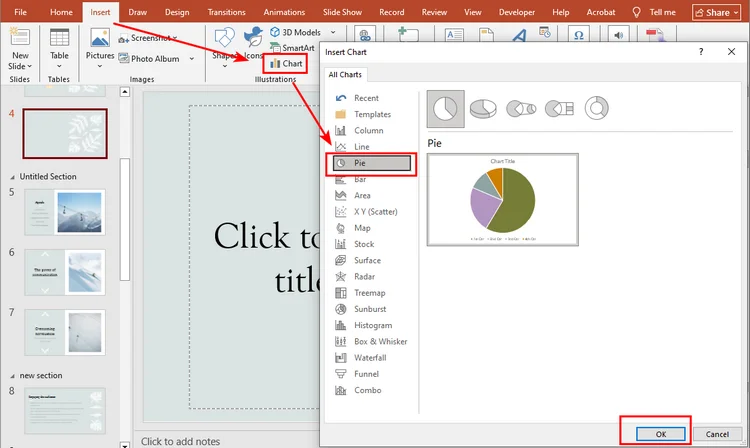
Go to the Insert tab on the Ribbon at the top and click Chart.
Step 4: Pick Your Pie Chart
In the Insert Chart dialog box, select Pie from the left panel. You’ll see several types of pie charts—if you want to create a 3D Pie chart on the slide, choose the second option. Click OK to insert the chart.
Step 5: Enter Your Data
PowerPoint will show default data in an Excel-like sheet. Replace it with your own numbers to match your presentation needs.

Step 6: Customize the Chart
Click the chart and go to the Chart Design tab on the Ribbon. Here, you can change the style, colors, labels, or even switch to another chart type. Play around until it looks just right for your slide.
Here is the final look of the pie chart: 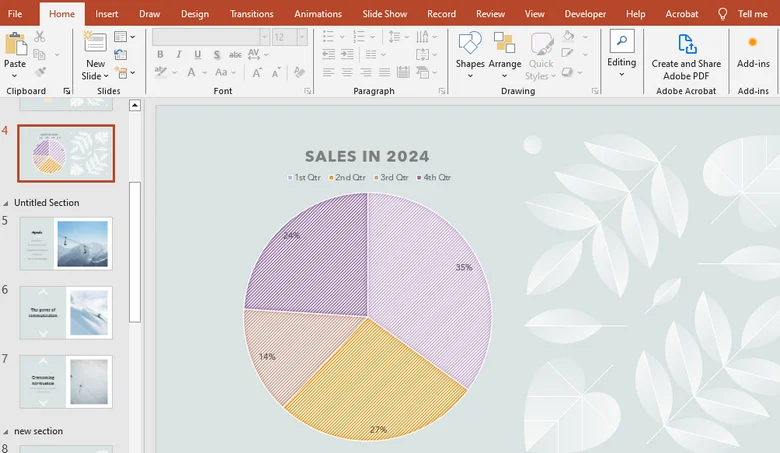
How to Create a Pie Chart in PowerPoint Presentation Automatically
After learning how to add a pie chart manually in PowerPoint, you’ve probably noticed that the steps can be a bit tedious, especially when updating data or customizing the chart. So, is there a faster way?
Using code to generate charts is a great solution. With Spire.Presentation, a professional PowerPoint library, you can easily create charts automatically, handling everything from file setup to data input and chart customization in one go.
Here’s a detailed guide on how to create a chart in PowerPoint using Spire.Presentation:
Step 1: Install Spire.Presentation
In this tutorial, we’ll use Spire.Presentation for Python. You can install it via pip by opening your Python environment (for example, the VSCode terminal) and running:
pip install spire.presentation
Press Enter, and the library will be installed.
Step 2: Write the Code
Here’s the overall logic for creating a pie chart with Spire.Presentation:
- Import the file – Load the PowerPoint presentation you want to work with or create a new presentation.
- Access the target slide – Select the slide where the pie chart will be inserted.
- Insert the pie chart – Add a pie chart object to the slide.
- Set the chart title – Give your pie chart a title.
- Add data to the chart – Fill the pie chart with your dataset.
- Customize chart colors – Adjust colors to make the chart visually appealing.
Below is the complete Python code showing how to create a pie chart while making a new PowerPoint presentation:
from spire.presentation.common import *
from spire.presentation import *

# Create a Presentation instance
presentation = Presentation()

# Add a pie chart at a specified location on the first slide
rect = RectangleF.FromLTRB (40, 100, 590, 420)
chart = presentation.Slides[0].Shapes.AppendChartInit (ChartType.Pie, rect, False)

# Set and format chart title
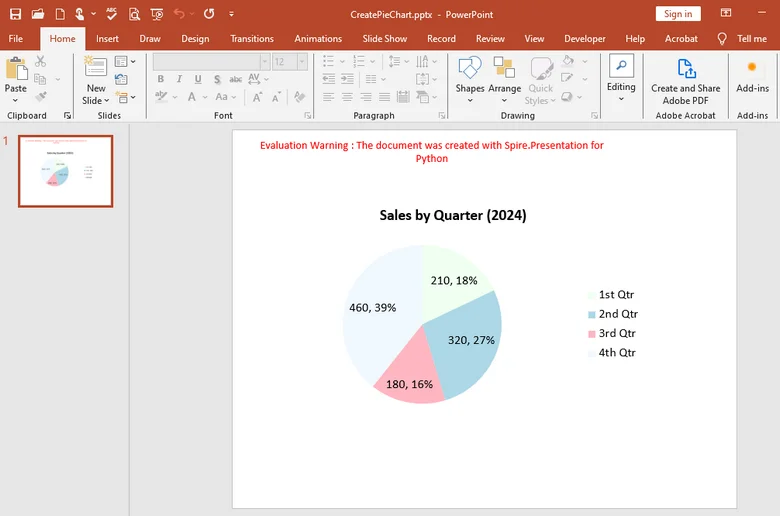
chart.ChartTitle.TextProperties.Text = "Sales by Quarter (2024)"
chart.ChartTitle.TextProperties.IsCentered = True
chart.ChartTitle.Height = 30
chart.HasTitle = True

# Define some data
quarters = ["1st Qtr", "2nd Qtr", "3rd Qtr", "4th Qtr"]
sales = [210, 320, 180, 460]

# Append data to ChartData, which represents a data table where the chart data is stored
chart.ChartData[0,0].Text = "Quarters"
chart.ChartData[0,1].Text = "Sales"
i = 0
while i < len(quarters):
    chart.ChartData[i + 1,0].Text = quarters[i]
    chart.ChartData[i + 1,1].NumberValue = sales[i]
    i += 1

# Set series labels and category labels
chart.Series.SeriesLabel = chart.ChartData["B1","B1"]
chart.Categories.CategoryLabels = chart.ChartData["A2","A5"]

# Set values for series
chart.Series[0].Values = chart.ChartData["B2","B5"]

# Add data points to series
for i, unusedItem in enumerate(chart.Series[0].Values):
    cdp = ChartDataPoint(chart.Series[0])
    cdp.Index = i
    chart.Series[0].DataPoints.Add(cdp)

# Fill each data point with a different color
chart.Series[0].DataPoints[0].Fill.FillType = FillFormatType.Solid
chart.Series[0].DataPoints[0].Fill.SolidColor.Color = Color.get_Honeydew()
chart.Series[0].DataPoints[1].Fill.FillType = FillFormatType.Solid
chart.Series[0].DataPoints[1].Fill.SolidColor.Color = Color.get_LightBlue()
chart.Series[0].DataPoints[2].Fill.FillType = FillFormatType.Solid
chart.Series[0].DataPoints[2].Fill.SolidColor.Color = Color.get_LightPink()
chart.Series[0].DataPoints[3].Fill.FillType = FillFormatType.Solid
chart.Series[0].DataPoints[3].Fill.SolidColor.Color = Color.get_AliceBlue()

# Set the data labels to display label value and percentage value
chart.Series[0].DataLabels.LabelValueVisible = True
chart.Series[0].DataLabels.PercentValueVisible = True

# Save the result file
presentation.SaveToFile("E:/Administrator/Python1/output/CreatePieChart.pptx", FileFormat.Pptx2016)
presentation.Dispose()
Here's the pie chart made by Spire.Presentation:
With Spire.Presentation, you can do much more than just create pie charts. It also lets you generate column charts, line charts, bar charts, and many other types of visuals directly in your slides. Plus, the library supports multiple programming languages — whether you prefer C#, Java, Python or JavaScript, you can easily create and customize charts with just a few lines of code.
The Conclusion
In this guide, we’ve walked through how to create a pie chart in PowerPoint step by step, from inserting the chart manually to customizing its style and colors. While the manual method works well for simple tasks, Spire.Presentation works better under complecated situations. With this professional library, you can automate the entire process—from adding charts and inputting data to customizing their appearance. Try it out immediately by obtaining a temporary license for 30 days , making chart creation faster and more efficient than ever.
FAQs about Creating a Pie Chart in PowerPoint
1. How do I create a pie chart step by step in PowerPoint?
Go to Insert → Chart → Pie, then replace the sample data with your own and adjust the chart style under Chart Design.
2. How can I show percentages in a pie chart?
Click the chart, select Data Labels → More Options, and check Percentage to display values as percentages.
3. How do I make a progress pie chart in PowerPoint?
Use a Pie or Doughnut chart with two values—progress and remaining—and format the slices with different colors.
4. Can I automate pie chart creation?
Yes. You can use Spire.Presentation to generate and edit charts automatically after obtaining a temporary license.
ALSO READ
Come esportare le diapositive di PowerPoint come immagini di alta qualità
Indice dei contenuti
- 1. Esportare le diapositive usando "Salva con nome" di PowerPoint (il più veloce)
- 2. Esportare le diapositive di PowerPoint a una risoluzione più alta (risolvere le immagini sfocate)
- 3. Convertire le diapositive di PowerPoint in immagini online (senza PowerPoint)
- 4. Automatizzare l'esportazione delle immagini di PowerPoint (VBA e API)
- 5. Acquisire una diapositiva come immagine (screenshot)
- Supporto decisionale
- FAQ
- Correlato: esportare diapositive PowerPoint tramite codice (sviluppatori)
- Vedi anche
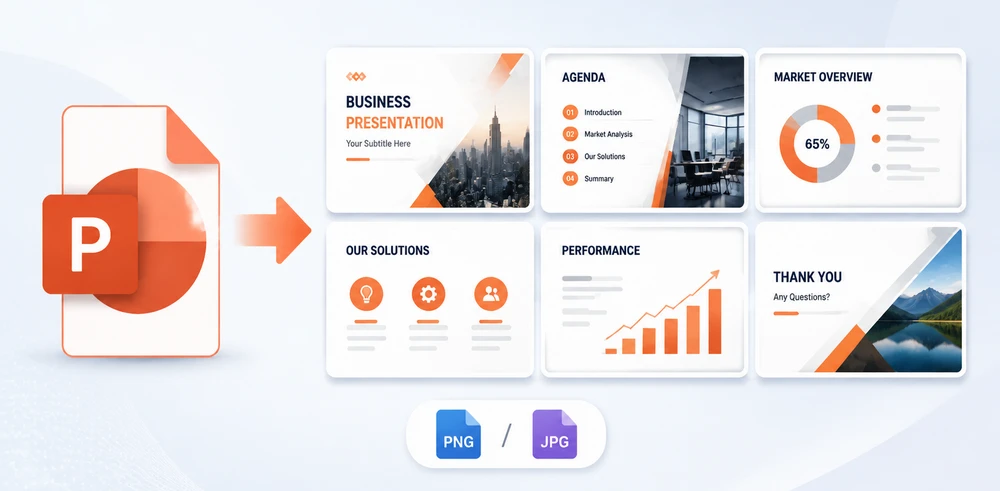
Hai finito la presentazione. Ora qualcuno ne ha bisogno sotto forma di immagini per un sito web, una dispensa o una diapositiva all'interno di un altro documento. Clicchi su Salva con nome, invii i file PNG e ti rispondono: "Sono sfocati."
È questo il problema. L'esportazione predefinita delle diapositive di PowerPoint è di circa 96 pixel per pollice (PPI), quindi le diapositive che appaiono nitide sullo schermo diventano sgranate nel momento in cui vengono ingrandite o stampate. Questa guida copre ogni metodo pratico per trasformare le diapositive di PowerPoint in file PNG o JPG e, cosa altrettanto importante, come rendere quelle immagini effettivamente nitide.
Risposta rapida: Per un'operazione veloce, usa Salva con nome di PowerPoint (PNG/JPG, pochi clic). Se il risultato appare sfocato, aumenta la risoluzione di esportazione — non sono necessarie modifiche al registro. Non hai PowerPoint installato? Usa il convertitore online gratuito CloudXDocs. Devi elaborare molte presentazioni o integrare l'esportazione nel tuo software? Automatizza con VBA o l'API Spire.Presentation. Il confronto completo è qui sotto.
1. Esportare le diapositive usando "Salva con nome" di PowerPoint (il più veloce)
La funzione integrata Salva con nome di PowerPoint è il modo meno impegnativo per trasformare una presentazione in immagini ed è la scelta giusta quando PowerPoint è già aperto e ti serve un'esportazione rapida. Il PNG è il formato predefinito più sicuro per diapositive con testo, diagrammi o grafici — vedi PNG vs JPG per capire quando è meglio il JPG.
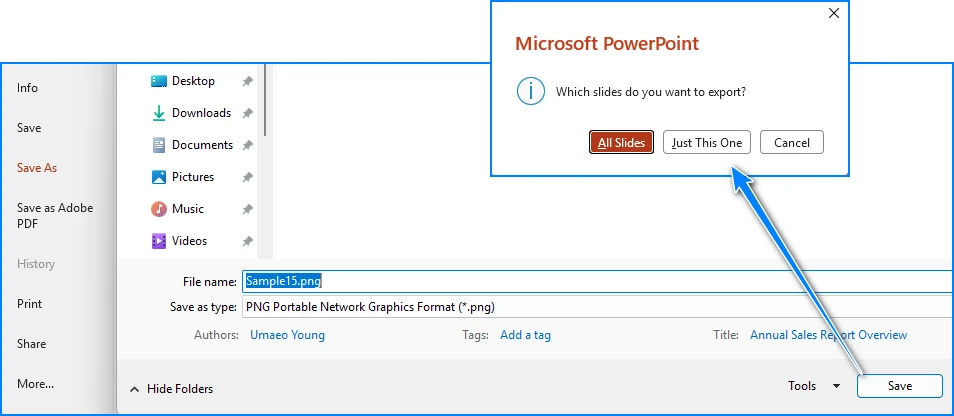
- Apri la presentazione e vai su File → Salva con nome (o Salva una copia su OneDrive/SharePoint).
- Scegli una cartella e un nome file.
- Apri il menu a tendina Salva come e scegli PNG o JPEG.
- Clicca su Salva, quindi scegli Tutte le diapositive (ogni diapositiva come file separato) o Solo questa.
Perché i risultati possono apparire sgranati: questo metodo esporta a circa 96 PPI (1280×720 su una diapositiva widescreen). Va bene per il web, troppo poco per la stampa o schermi grandi — vedi Metodo 2.
Pro: Nessun software aggiuntivo, nessun account, metodo ufficiale, il più veloce per lavori singoli.
Contro: Fisso a circa 96 PPI per impostazione predefinita, quindi le immagini possono apparire sfocate se ingrandite o stampate; un file alla volta.
2. Esportare le diapositive di PowerPoint a una risoluzione più alta (risolvere le immagini sfocate)
Ideale per: stampa, poster o qualsiasi utilizzo in cui 96 PPI risultano sfocati. Questa è la soluzione principale per le esportazioni di bassa qualità.
La risoluzione di esportazione predefinita di PowerPoint è 96 PPI. La soluzione ufficiale di Microsoft consiste nel modificare il registro di Windows (ExportBitmapResolution) — rischioso e facile da sbagliare. Non è necessario. Ecco le alternative — tutte evitano il registro: un'opzione predefinita senza Office, un'opzione ad alta risoluzione senza Office e un percorso completamente basato su script:
| Risoluzione target | Dimensioni pixel (16:9 widescreen) | Ideale per |
|---|---|---|
| 96 PPI | 1280 × 720 | Web, email, uso interno alle slide |
| 150 PPI | 2000 × 1125 | Proiettori, monitor grandi |
| 200 PPI | 2667 × 1500 | Dispense A4 |
| 300 PPI | 4000 × 2250 | Poster, stampa professionale |
PPI (pixel per pollice) è la misura a schermo; per la stampa, punta a 200–300 PPI. Il valore predefinito di PowerPoint è 96 PPI.
- Senza Office, qualità predefinita: CloudXDocs converte nel browser alla stessa qualità predefinita (~96 PPI) — vedi Metodo 3.
- Senza Office, risoluzione più alta: CloudConvert (anche nel Metodo 3) esegue il rendering online a circa 1920×1080 e ti permette di aumentare i DPI — ben oltre i 96 PPI.
- Dimensioni personalizzate (massimo controllo): automatizza l'esportazione a qualsiasi dimensione in pixel con VBA o un'API — Metodo 4.
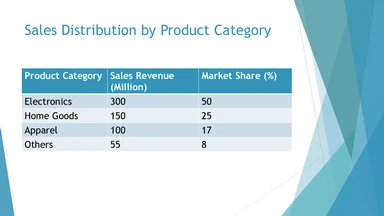
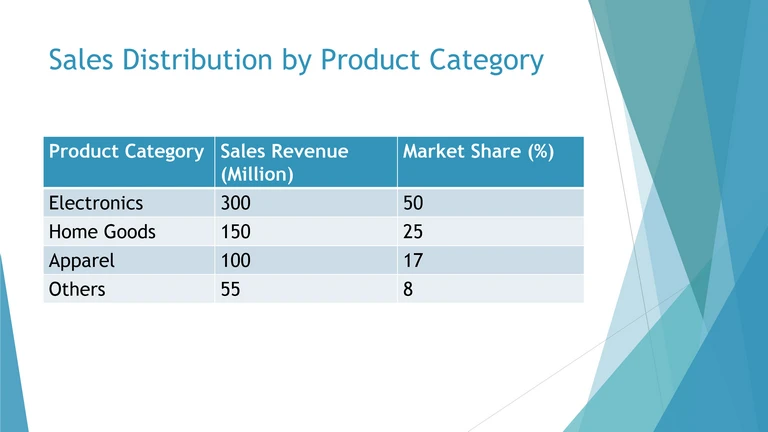
Entrambe le immagini sono la stessa diapositiva 16:9, ciascuna ridimensionata al 30% della sua dimensione originale in pixel, così la differenza è facile da confrontare alla stessa larghezza sulla pagina. A 96 PPI (in alto) il testo e le linee sottili appaiono più morbidi; a 192 PPI (in basso) rimangono sensibilmente più nitidi.
Se usi il metodo del registro: vai su
HKEY_CURRENT_USER\Software\Microsoft\Office\<ver>\PowerPoint\Options, aggiungi unDWORDchiamatoExportBitmapResolution, imposta il suo valore decimale (es.300). Fai prima un backup del registro; procedi a tuo rischio.
Ideale per: chiunque raggiunga il limite di qualità di 96 PPI e necessiti di un output più nitido per la stampa o schermi grandi.
Da tenere a mente: il "Salva con nome" integrato non può superare il valore predefinito senza la modifica del registro o uno strumento diverso. Il percorso VBA/API e CloudConvert superano entrambi quel limite; CloudXDocs rimane sul valore predefinito ma non richiede Office.
3. Convertire le diapositive di PowerPoint in immagini online (senza PowerPoint)
Ideale per: utenti senza PowerPoint installato, o chiunque desideri un convertitore basato su browser quando Office non è disponibile o è necessario elaborare rapidamente più file.
CloudXDocs è un convertitore basato su browser dello stesso team dietro Spire. Non richiede Microsoft Office né installazione.
- Apri il Convertitore da PPT a Immagine di CloudXDocs in qualsiasi browser.
- Clicca o trascina il tuo file
.pptx/.pptnell'area di caricamento. - Attendi che CloudXDocs esegua il rendering e la conversione automatica (solitamente pochi secondi).
- Scarica il file
.ziprisultante ed estrailo per ottenere ogni diapositiva come immagine separata.
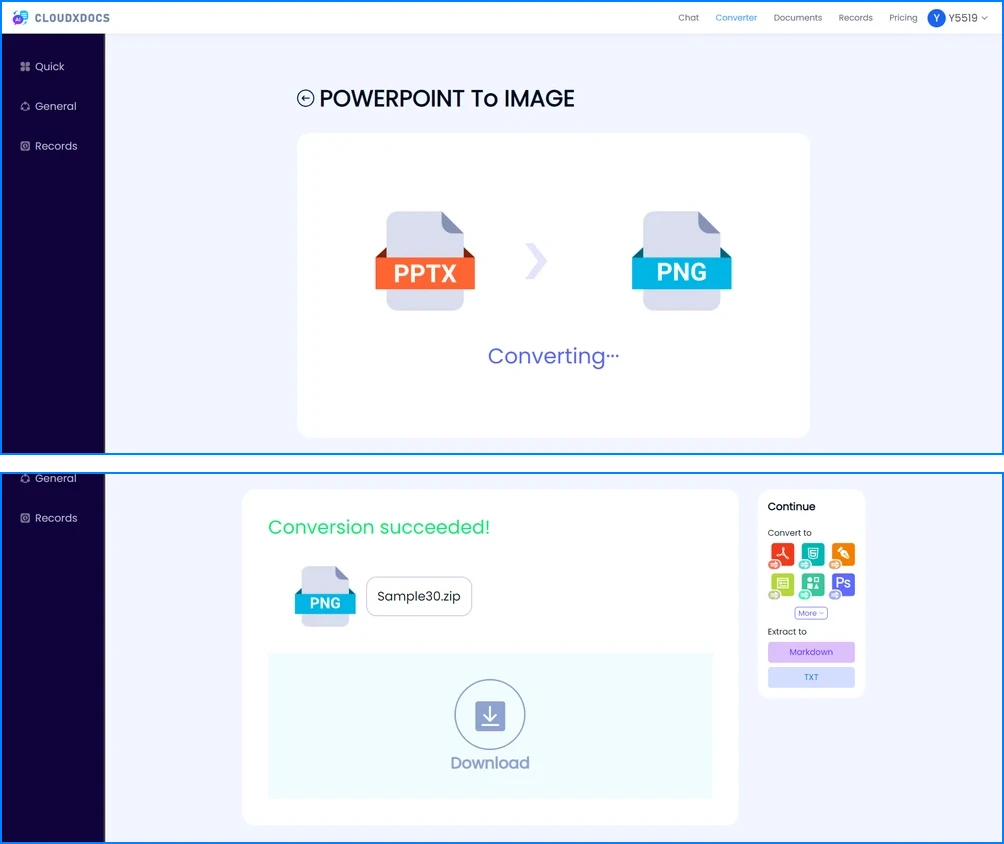
Perché è utile: CloudXDocs fornisce un modo comodo basato su browser per convertire presentazioni quando PowerPoint non è disponibile o quando è necessario elaborare più file rapidamente. I file caricati vengono eliminati automaticamente dopo 24 ore secondo la politica del servizio.
Pro: Niente Office, niente installazione, niente software desktop; gestisce un'intera presentazione come zip; funziona su qualsiasi dispositivo.
Contro: Richiede una connessione internet; la qualità dell'output segue il rendering del convertitore piuttosto che un'impostazione che puoi controllare.
Se hai bisogno di un output più nitido ma non puoi installare Office, alcuni convertitori online ti permettono di scegliere la risoluzione di esportazione. CloudConvert, ad esempio, ha un valore predefinito di circa 1920×1080 e ti permette di aumentare ulteriormente i DPI — ben oltre i 96 PPI predefiniti di PowerPoint.
I passaggi sono essenzialmente gli stessi di cui sopra: carica il tuo .pptx → scegli JPG o PNG → aumenta i DPI nelle opzioni → converti → scarica lo zip.
Questo rende un convertitore online una soluzione valida per le esportazioni sfocate quando non è disponibile alcuno strumento desktop, sebbene i file passino attraverso un server di terze parti, quindi evita presentazioni riservate.
4. Automatizzare l'esportazione delle immagini di PowerPoint (VBA & API)
Ideale per: molte presentazioni, lavori pianificati o per integrare l'esportazione in uno strumento interno. Due percorsi a seconda del tuo profilo.
Opzione A — Macro VBA (per utenti esperti di Office su Windows)
Se lavori in PowerPoint su Windows e hai bisogno di una dimensione di esportazione personalizzata, una breve macro automatizza l'intera presentazione. Premi Alt + F11, Inserisci → Modulo, incolla, quindi Macro → Esegui ExportSlidesHighRes (crea prima la cartella C:\Exports\):
Sub ExportSlidesHighRes()
    Dim sld As Slide, i As Integer
    i = 1
    For Each sld In ActivePresentation.Slides
        sld.Export "C:\Exports\Slide_" & i & ".png", "PNG", 3000, 1688  ' ~200 PPI
        i = i + 1
    Next sld
End Sub
Regola 3000, 1688 per raggiungere il tuo obiettivo (vedi la tabella del Metodo 2).
Opzione B — API Spire.Presentation (per sviluppatori .NET)
Hai bisogno di un'esportazione lato server o completamente programmabile? Spire.Presentation per .NET esegue il rendering di ogni diapositiva in un'immagine con poche righe di codice — nessun Microsoft PowerPoint, nessuna modifica al registro, dimensioni di output impostate nel codice. Per una guida completa, consulta il nostro tutorial di Spire.Presentation per convertire diapositive in immagini.
using Spire.Presentation;
using System.Drawing;
using System.Drawing.Imaging;

class Program
{
    static void Main(string[] args)
    {
        using (Presentation ppt = new Presentation())
        {
            ppt.LoadFromFile("Sample.pptx");
            for (int i = 0; i < ppt.Slides.Count; i++)
            {
                Image img = ppt.Slides[i].SaveAsImage(1280 * 2, 720 * 2);
                img.Save(string.Format("Slide_{0}.png", i), ImageFormat.Png);
            }
        }
    }
}
SaveAsImage(larghezza, altezza) imposta l'esatta dimensione in pixel, quindi l'API esegue il rendering alla risoluzione specificata — niente registro, niente Office. Qui 1280 * 2, 720 * 2 produce 2560×1440 (circa 192 PPI); cambia i due numeri con qualsiasi dimensione presente nella tabella del Metodo 2.
Suggerimento Enterprise: esegui in modalità headless su Linux, imposta le dimensioni di output esatte e convoglia le esportazioni in un flusso di lavoro documentale più ampio — niente Office, niente modifiche al registro. Scarica il progetto di esempio completo →
Pro: Controllo completo sulla dimensione in pixel, elaborazione batch/headless reale, nessun passaggio manuale; Spire funziona senza Office installato.
Contro: VBA solo su Windows con PowerPoint; l'API è una libreria a pagamento per uso professionale.
5. Acquisire una diapositiva come immagine (screenshot)
Ideale per: catturare una diapositiva esattamente come appare sullo schermo, o quando non puoi aprire il file in un editor.
- Windows: Strumento di cattura (
Win + Shift + S) → seleziona la diapositiva → salva come PNG. - macOS:
Cmd + Shift + 4poi barra spaziatrice per catturare una finestra. - Terze parti: ShareX, Lightshot o Snagit per catture annotate.
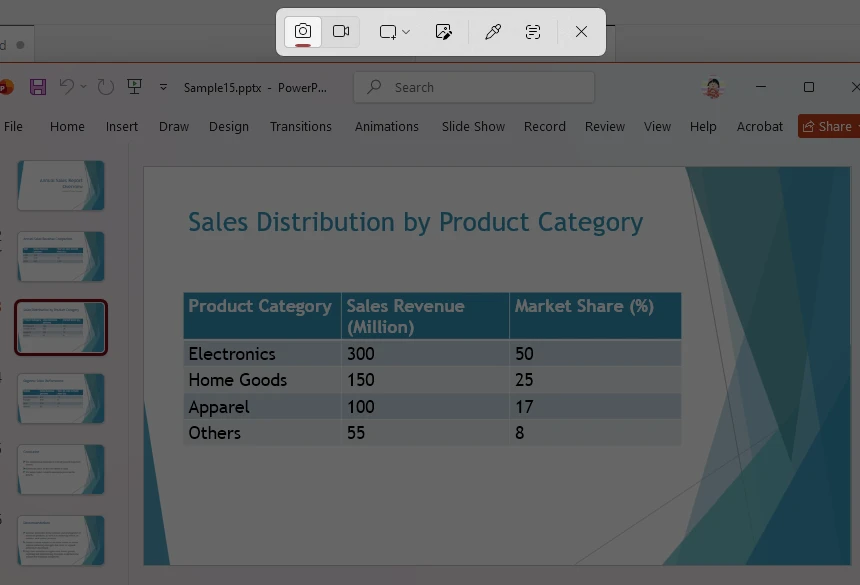
Avvertenza: gli screenshot ereditano la risoluzione dello schermo e possono includere elementi dell'interfaccia. Per immagini pulite dell'intera diapositiva a una dimensione controllabile, preferisci i Metodi 1–4.
Pro: Configurazione zero, funziona su qualsiasi macchina, perfetto per "catturare esattamente ciò che è sullo schermo".
Contro: Risoluzione limitata dal tuo display; non è una vera esportazione; non può gestire batch.
Supporto decisionale
Le sezioni seguenti ti aiutano a confrontare i metodi, scegliere un formato e risolvere i problemi di qualità. Lavori da un PDF invece che da PowerPoint? Vedi come convertire pagine PDF in immagini.
Confronto e come scegliere
| # | Metodo | Ideale per | Risoluzione | Installazione necessaria | Batch? |
|---|---|---|---|---|---|
| 1 | Salva con nome di PowerPoint | Lavoro singolo rapido | 96 PPI | PowerPoint | Per file |
| 2 | Risoluzione più alta | Risolvere sfocatura / stampa | Fino a 300 PPI* | — | Per file |
| 3 | CloudXDocs online | No Office / rapido | Come predefinito (~96 PPI) | No (browser) | Sì (zip) |
| 4 | VBA / Spire API | Dev / batch / server | Pixel personalizzati | VBA: PowerPoint; Spire: NuGet | Sì |
| 5 | Screenshot | Singola diapositiva a schermo | Limitato dallo schermo | No | No |
| — | Google Slides / LibreOffice | No PowerPoint | App nativa | App | Per file |
*Raggiunto tramite VBA o l'API Spire; gli strumenti online eseguono il rendering alle dimensioni native della diapositiva.
Scegli in base alla situazione:
- Hai bisogno di una o due immagini rapidamente → Salva con nome di PowerPoint
- Il risultato appare sfocato → Esportazione ad alta risoluzione
- Non hai PowerPoint installato → CloudXDocs online
- Centinaia di diapositive / lato server → VBA o API Spire
- Cattura esatta a schermo → Screenshot
Come esportare diapositive come immagini senza PowerPoint
Se Microsoft PowerPoint non è installato, hai comunque delle opzioni — il convertitore CloudXDocs sopra, più due suite per ufficio gratuite:
- Google Slides: apri la presentazione, quindi File → Scarica → Immagine PNG (.png) o Immagine JPEG (.jpg). Ogni download esporta la diapositiva corrente; ripeti per diapositiva, o usa CloudXDocs per un'intera presentazione in una volta sola.
- LibreOffice Impress: apri il file, quindi File → Esporta, scegli PNG o JPG e seleziona le diapositive da esportare.
Questi sono utili quando PowerPoint non è disponibile, sebbene offrano meno controllo sulla risoluzione rispetto al Metodo 2 o al Metodo 4.
PNG vs JPG: quale formato esportare?
| Formato | Ideale per | Vantaggi |
|---|---|---|
| PNG | Testo, diagrammi, grafici, screenshot UI | Qualità lossless, bordi più nitidi |
| JPG | Foto, diapositive ricche di immagini | Dimensioni file minori |
Per la maggior parte delle presentazioni aziendali, il PNG è solitamente la scelta migliore perché le diapositive contengono spesso testo e diagrammi che necessitano di bordi nitidi. Usa il JPG solo quando una diapositiva è dominata da fotografie e la dimensione del file conta più di un testo perfetto al pixel.
Perché le immagini esportate appaiono sfocate? (e come risolvere)
L'esportazione predefinita di PowerPoint è di circa 96 PPI, quindi le immagini appaiono morbide una volta ingrandite o stampate. Se le tue immagini non sono ancora abbastanza nitide:
- Usa i percorsi ad alta risoluzione nel Metodo 2 — non sono necessarie modifiche al registro.
- Evita gli screenshot per la stampa o schermi grandi; la loro risoluzione è limitata dallo schermo (Metodo 5).
- Preferisci il PNG per diapositive con testo o diagrammi (PNG vs JPG).
- Per il controllo completo sulla dimensione in pixel o l'esportazione lato server, automatizza con VBA o l'API Spire (Metodo 4).
Per la stampa, punta a 200–300 PPI. La tabella di risoluzione completa mostra la dimensione in pixel per ogni obiettivo.
FAQ
Come posso salvare tutte le diapositive di PowerPoint come immagini separate in una volta sola?
File → Salva con nome → PNG/JPEG, quindi scegli "Tutte le diapositive" quando richiesto. Per un batch senza installazione, usa il convertitore CloudXDocs; per un batch tramite script, la macro VBA o l'API Spire.
Quale formato immagine è migliore — PNG o JPG?
PNG per diapositive con testo, grafici o linee nitide (lossless). JPG per diapositive ricche di foto dove contano dimensioni file minori.
Posso esportare diapositive senza Microsoft PowerPoint installato?
Sì. Il Convertitore da PPT a Immagine di CloudXDocs funziona in qualsiasi browser senza installazione, e Spire.Presentation (Metodo 4) converte lato server senza Office. Google Slides e LibreOffice Impress possono anche esportare diapositive — vedi senza PowerPoint.
Come esporto solo una diapositiva invece dell'intera presentazione?
Nel prompt Salva con nome, seleziona "Solo questa". Con uno strumento di screenshot, cattura solo la diapositiva visibile.
Perché le mie diapositive esportate appaiono sfocate e come ottengo immagini di alta qualità?
PowerPoint salva a ~96 PPI per impostazione predefinita, quindi le immagini appaiono morbide quando ingrandite o stampate. Per migliorare la qualità, esporta a una risoluzione più alta (vedi la tabella di risoluzione) — con uno strumento che esegue il rendering delle diapositive a dimensioni maggiori, o automatizzando l'esportazione con VBA o un'API di presentazione (Metodo 4) per il controllo completo sulla dimensione in pixel.
È sicuro caricare la mia presentazione su un convertitore online?
Con CloudXDocs, i file caricati vengono automaticamente eliminati dal server 24 ore dopo la conversione e non vengono conservati o riutilizzati. Evita i convertitori che non dichiarano una politica di eliminazione.
Posso esportare diapositive PowerPoint come immagini senza perdere qualità?
Sì. Usa il formato PNG ed esporta a una dimensione in pixel maggiore quando possibile. Evita gli screenshot per output professionali, perché la risoluzione dello schermo limita la qualità dell'immagine — usa invece il Metodo 2 (risoluzione più alta) o il Metodo 4 (dimensione pixel personalizzata).
Qual è la dimensione immagine migliore per le diapositive PowerPoint?
Per una presentazione 16:9, 1920 × 1080 pixel è solitamente adatto per gli schermi. Risoluzioni più alte come 2560 × 1440 o 3840 × 2160 sono migliori per schermi grandi o per la stampa.
Correlato: esportare diapositive PowerPoint tramite codice (sviluppatori)
Se stai costruendo un flusso di lavoro documentale, l'elaborazione lato server è solitamente più affidabile degli strumenti online per lavori ripetitivi o ad alto volume. Casi comuni in cui una libreria batte uno strumento web:
- Elaborazione batch — converti migliaia di presentazioni secondo una pianificazione.
- Report automatizzati — esporta presentazioni generate in immagini pulite.
- Pipeline documentali — esegui il rendering delle diapositive come un passaggio in un flusso più ampio di conversione/unione/creazione.
- Applicazioni enterprise — incorpora l'esportazione di diapositive nel tuo prodotto o servizio.
Per fonti PDF nello stesso flusso di lavoro, puoi anche ritagliare un PDF o unire file PDF.
Spire.Presentation per .NET esegue il rendering di ogni diapositiva in PNG/JPG con le dimensioni esatte che imposti, su Windows o Linux, senza Microsoft Office. Consulta il progetto di esempio Spire.Presentation per codice eseguibile.
Dopo l'esportazione, apri le immagini (o il .pptx originale) in CloudXDocs AI Chat per generare automaticamente note del relatore, un glossario bilingue o una lista di cose da fare per i verbali di riunione — un modo veloce per riutilizzare i contenuti esportati, senza bisogno di design o programmazione. L'IA lavora con il contenuto; non crea le immagini.
Vedi anche
Como exportar slides do PowerPoint como imagens de alta qualidade
Índice
- 1. Exportar slides usando "Salvar Como" do PowerPoint (mais rápido)
- 2. Exportar slides do PowerPoint em alta resolução (corrigir imagens desfocadas)
- 3. Converter slides do PowerPoint para imagens online (sem necessidade de PowerPoint)
- 4. Automatizar a exportação de imagens do PowerPoint (VBA e APIs)
- 5. Capturar um slide como imagem (captura de tela)
- Suporte à decisão
- Perguntas Frequentes (FAQ)
- Relacionado: exportar slides do PowerPoint via código (desenvolvedores)
- Veja também
Você terminou a apresentação. Agora, alguém precisa dela como imagens para um site, um folheto ou um slide dentro de outro documento. Você clica em Salvar Como, envia os PNGs e eles retornam: "Estão desfocados."
Esse é o problema. A exportação padrão de slides do PowerPoint é de cerca de 96 pixels por polegada (PPI), então slides que parecem nítidos na tela ficam suaves no momento em que são ampliados ou impressos. Este guia cobre todas as formas práticas de transformar slides do PowerPoint em arquivos PNG ou JPG — e, tão importante quanto, como tornar essas imagens realmente nítidas.
Resposta rápida: Para uma tarefa rápida única, use o Salvar Como do PowerPoint (PNG/JPG, poucos cliques). Se o resultado parecer desfocado, aumente a resolução de exportação — sem necessidade de edições no registro. Não tem o PowerPoint instalado? Use o conversor online gratuito CloudXDocs. Precisa processar muitas apresentações ou integrar a exportação ao seu próprio software? Automatize com VBA ou a API Spire.Presentation. A comparação completa está abaixo.
1. Exportar slides usando "Salvar Como" do PowerPoint (mais rápido)
O recurso integrado Salvar Como do PowerPoint é a maneira que exige menos esforço para transformar uma apresentação em imagens, e é a escolha certa quando o PowerPoint já está aberto e você só precisa de uma exportação rápida. PNG é o padrão mais seguro para slides com texto, diagramas ou gráficos — veja PNG vs JPG para saber quando o JPG é mais adequado.
- Abra a apresentação e vá em Arquivo → Salvar Como (ou Salvar uma Cópia no OneDrive/SharePoint).
- Escolha uma pasta e o nome do arquivo.
- Abra o menu suspenso Tipo de arquivo e escolha PNG ou JPEG.
- Clique em Salvar e, em seguida, escolha Todos os Slides (cada slide como seu próprio arquivo) ou Apenas este.
Por que os resultados podem parecer suaves: este método exporta a aproximadamente 96 PPI (1280×720 em um slide widescreen). Bom para a web, muito baixo para impressão ou telas grandes — veja o Método 2.
Prós: Sem software extra, sem conta, o método oficial, mais rápido para tarefas únicas.
Contras: Fixo em ~96 PPI por padrão, então as imagens podem parecer desfocadas quando ampliadas ou impressas; um arquivo por vez.
2. Exportar slides do PowerPoint em alta resolução (corrigir imagens desfocadas)
Ideal para: impressão, pôsteres ou qualquer uso onde 96 PPI pareça desfocado. Esta é a correção principal para exportações de baixa qualidade.
A resolução de exportação padrão do PowerPoint é 96 PPI. A correção oficial da Microsoft é editar o registro do Windows (ExportBitmapResolution) — arriscado e fácil de errar. Você não precisa fazer isso. Aqui estão as alternativas — todas evitam o registro: um padrão sem Office, uma opção de alta resolução sem Office e uma rota totalmente via script:
| Resolução alvo | Tamanho em pixels (16:9 widescreen) | Bom para |
|---|---|---|
| 96 PPI | 1280 × 720 | Web, e-mail, uso em slides |
| 150 PPI | 2000 × 1125 | Projetores, monitores grandes |
| 200 PPI | 2667 × 1500 | Folhetos A4 |
| 300 PPI | 4000 × 2250 | Pôsteres, impressão profissional |
PPI (pixels por polegada) é a medida na tela; para impressão, mire em 200–300 PPI. O padrão do PowerPoint é 96 PPI.
- Sem Office, qualidade padrão: O CloudXDocs converte no navegador no mesmo padrão (~96 PPI) — veja o Método 3.
- Sem Office, resolução mais alta: O CloudConvert (também no Método 3) renderiza online a ~1920×1080 e permite aumentar o DPI — confortavelmente acima de 96 PPI.
- Tamanho personalizado (mais controle): crie um script para a exportação em qualquer tamanho de pixel com VBA ou uma API — Método 4.
Ambas as imagens são o mesmo slide 16:9, cada uma dimensionada para 30% do seu tamanho original em pixels para que a diferença seja fácil de comparar na mesma largura de página. A 96 PPI (topo), o texto e as linhas finas parecem mais suaves; a 192 PPI (base), eles permanecem visivelmente mais nítidos.
Se você usar o método do registro: vá para
HKEY_CURRENT_USER\Software\Microsoft\Office\<ver>\PowerPoint\Options, adicione umDWORDchamadoExportBitmapResolution, defina seu valor decimal (ex:300). Faça backup do registro primeiro; prossiga por sua conta e risco.
Ideal para: qualquer pessoa que atinja o limite de qualidade de 96 PPI e precise de uma saída mais nítida para impressão ou telas grandes.
Tenha em mente: o Salvar Como integrado não pode exceder seu padrão sem o ajuste no registro ou uma ferramenta diferente. A rota VBA/API e o CloudConvert superam esse limite; o CloudXDocs permanece no padrão, mas não precisa do Office.
3. Converter slides do PowerPoint para imagens online (sem necessidade de PowerPoint)
Ideal para: usuários sem o PowerPoint instalado ou qualquer pessoa que deseje um conversor baseado em navegador quando o Office não estiver disponível ou quando vários arquivos precisarem de processamento rápido.
CloudXDocs é um conversor baseado em navegador da mesma equipe por trás do Spire. Ele não precisa do Microsoft Office e não requer instalação.
- Abra o Conversor de PPT para Imagem do CloudXDocs em qualquer navegador.
- Clique ou arraste seu arquivo
.pptx/.pptpara a área de upload. - Aguarde o CloudXDocs renderizar e converter automaticamente (geralmente segundos).
- Baixe o
.zipresultante e descompacte para obter cada slide como uma imagem separada.
Por que é útil: O CloudXDocs oferece uma maneira conveniente baseada em navegador para converter apresentações quando o PowerPoint não está disponível ou quando você precisa processar vários arquivos rapidamente. Os arquivos enviados são excluídos automaticamente após 24 horas, de acordo com a política do serviço.
Prós: Sem Office, sem instalação, sem software de desktop; lida com toda uma apresentação como um zip; funciona em qualquer dispositivo.
Contras: Requer conexão com a internet; a qualidade da saída segue a renderização do conversor em vez de uma configuração que você controla.
Se você precisa de uma saída mais nítida, mas não pode instalar o Office, alguns conversores online permitem escolher a resolução de exportação. O CloudConvert, por exemplo, usa ~1920×1080 como padrão e permite aumentar o DPI — confortavelmente acima do padrão de 96 PPI do PowerPoint.
Os passos são essencialmente os mesmos acima: envie seu .pptx → escolha JPG ou PNG → aumente o DPI nas opções → converta → baixe o zip.
Isso torna um conversor online uma solução real para exportações desfocadas quando nenhuma ferramenta de desktop está disponível, embora os arquivos passem por um servidor de terceiros, portanto, evite apresentações confidenciais.
4. Automatizar a exportação de imagens do PowerPoint (VBA e APIs)
Ideal para: muitas apresentações, tarefas agendadas ou integrar a exportação em uma ferramenta interna. Duas rotas, dependendo de quem você é.
Opção A — Macro VBA (para usuários avançados do Office no Windows)
Se você trabalha no PowerPoint no Windows e precisa de um tamanho de exportação personalizado, uma macro curta automatiza toda a apresentação. Pressione Alt + F11, Inserir → Módulo, cole o código e, em seguida, Macros → Executar ExportSlidesHighRes (crie a pasta C:\Exports\ primeiro):
Sub ExportSlidesHighRes()
    Dim sld As Slide, i As Integer
    i = 1
    For Each sld In ActivePresentation.Slides
        sld.Export "C:\Exports\Slide_" & i & ".png", "PNG", 3000, 1688  ' ~200 PPI
        i = i + 1
    Next sld
End Sub
Ajuste 3000, 1688 para atingir seu alvo (veja a tabela do Método 2).
Opção B — API Spire.Presentation (para desenvolvedores .NET)
Precisa de exportação no lado do servidor ou totalmente programável? O Spire.Presentation for .NET renderiza cada slide para uma imagem com algumas linhas de código — sem Microsoft PowerPoint, sem edições no registro, tamanho de saída definido no código. Para um passo a passo completo, veja nosso tutorial do Spire.Presentation para converter slides em imagens.
using Spire.Presentation;
using System.Drawing;
using System.Drawing.Imaging;

class Program
{
    static void Main(string[] args)
    {
        using (Presentation ppt = new Presentation())
        {
            ppt.LoadFromFile("Sample.pptx");
            for (int i = 0; i < ppt.Slides.Count; i++)
            {
                Image img = ppt.Slides[i].SaveAsImage(1280 * 2, 720 * 2);
                img.Save(string.Format("Slide_{0}.png", i), ImageFormat.Png);
            }
        }
    }
}
SaveAsImage(largura, altura) define o tamanho exato em pixels, então a API renderiza na resolução que você especificar — sem registro, sem Office. Aqui, 1280 * 2, 720 * 2 produz 2560×1440 (cerca de 192 PPI); altere os dois números para qualquer tamanho na tabela do Método 2.
Dica Corporativa: execute sem interface (headless) no Linux, defina dimensões de saída exatas e direcione as exportações para um fluxo de trabalho de documento maior — sem Office, sem ajustes no registro. Baixe o projeto de exemplo completo →
Prós: Controle total sobre o tamanho em pixels, processamento em lote/headless real, sem etapas manuais; o Spire roda sem o Office instalado.
Contras: VBA apenas no Windows com PowerPoint; a API é uma biblioteca paga para uso em produção.
5. Capturar um slide como imagem (captura de tela)
Ideal para: capturar um slide exatamente como mostrado na tela ou quando você não pode abrir o arquivo em um editor.
- Windows: Ferramenta de Captura (
Win + Shift + S) → selecione o slide → salve como PNG. - macOS:
Cmd + Shift + 4e depois a barra de espaço para capturar uma janela. - Terceiros: ShareX, Lightshot ou Snagit para capturas anotadas.
Aviso: capturas de tela herdam a resolução da sua tela e podem incluir elementos da interface. Para imagens limpas de slides completos em um tamanho controlável, prefira os Métodos 1–4.
Prós: Configuração zero, funciona em qualquer máquina, perfeito para "capturar exatamente o que está na tela".
Contras: Resolução limitada pela sua tela; não é uma exportação real; não pode processar em lote.
Suporte à decisão
As seções abaixo ajudam você a comparar métodos, escolher um formato e corrigir problemas de qualidade. Trabalhando a partir de um PDF em vez do PowerPoint? Veja como converter páginas de PDF em imagens.
Comparação e como escolher
| # | Método | Ideal para | Resolução | Instalação necessária | Em lote? |
|---|---|---|---|---|---|
| 1 | Salvar Como do PowerPoint | Tarefa rápida única | 96 PPI | PowerPoint | Por arquivo |
| 2 | Resolução mais alta | Corrigir desfoque / impressão | Até 300 PPI* | — | Por arquivo |
| 3 | CloudXDocs online | Sem Office / rápido | Igual ao padrão (~96 PPI) | Não (navegador) | Sim (zip) |
| 4 | VBA / API Spire | Dev / lote / servidor | Px personalizado | VBA: PowerPoint; Spire: NuGet | Sim |
| 5 | Captura de tela | Slide único na tela | Limitado pela tela | Não | Não |
| — | Google Slides / LibreOffice | Sem PowerPoint | App nativo | App | Por arquivo |
*Alcançado via VBA ou API Spire; ferramentas online renderizam nas dimensões nativas do slide.
Escolha pela situação:
- Precisa de uma ou duas imagens rapidamente → Salvar Como do PowerPoint
- O resultado parece desfocado → Exportação em alta resolução
- Não tem o PowerPoint instalado → CloudXDocs online
- Centenas de slides / lado do servidor → VBA ou API Spire
- Captura exata na tela → Captura de tela
Como exportar slides como imagens sem o PowerPoint
Se o Microsoft PowerPoint não estiver instalado, você ainda tem opções — o conversor CloudXDocs acima, além de duas suítes de escritório gratuitas:
- Google Slides: abra a apresentação, então Arquivo → Fazer download → Imagem PNG (.png) ou Imagem JPEG (.jpg). Cada download exporta o slide atual; repita por slide ou use o CloudXDocs para uma apresentação inteira de uma vez.
- LibreOffice Impress: abra o arquivo, então Arquivo → Exportar, escolha PNG ou JPG e selecione os slides para exportar.
Eles são úteis quando o PowerPoint não está disponível, embora ofereçam menos controle sobre a resolução do que o Método 2 ou o Método 4.
PNG vs JPG: qual formato você deve exportar?
| Formato | Ideal para | Vantagens |
|---|---|---|
| PNG | Texto, diagramas, gráficos, capturas de tela | Qualidade sem perdas, bordas mais nítidas |
| JPG | Fotos, slides com muitas imagens | Tamanho de arquivo menor |
Para a maioria das apresentações de negócios, o PNG é geralmente a melhor escolha porque os slides frequentemente contêm texto e diagramas que precisam de bordas nítidas. Use JPG apenas quando um slide for dominado por fotografias e o tamanho do arquivo for mais importante do que um texto perfeito em pixels.
Por que as imagens exportadas parecem desfocadas? (e como corrigir)
A exportação padrão do PowerPoint é de cerca de 96 PPI, então os slides parecem suaves quando ampliados ou impressos. Se suas imagens ainda não estiverem nítidas o suficiente:
- Use as rotas de alta resolução no Método 2 — sem necessidade de edições no registro.
- Evite capturas de tela para impressão ou telas grandes; sua resolução é limitada pela sua tela (Método 5).
- Prefira PNG para slides com texto ou diagramas (PNG vs JPG).
- Para controle total sobre o tamanho em pixels ou exportação no lado do servidor, automatize com VBA ou a API Spire (Método 4).
Para impressão, mire em 200–300 PPI. A tabela de resolução completa mostra o tamanho em pixels para cada alvo.
Perguntas Frequentes (FAQ)
Como salvo todos os slides do PowerPoint como imagens separadas de uma vez?
Arquivo → Salvar Como → PNG/JPEG, então escolha "Todos os Slides" quando solicitado. Para um lote sem instalação, use o conversor CloudXDocs; para lote via script, a macro VBA ou API Spire.
Qual formato de imagem é melhor — PNG ou JPG?
PNG para slides com texto, gráficos ou linhas nítidas (sem perdas). JPG para slides com muitas fotos onde o tamanho menor do arquivo importa.
Posso exportar slides sem o Microsoft PowerPoint instalado?
Sim. O Conversor de PPT para Imagem do CloudXDocs roda em qualquer navegador sem instalação, e o Spire.Presentation (Método 4) converte no lado do servidor sem o Office. Google Slides e LibreOffice Impress também podem exportar slides — veja sem PowerPoint.
Como exporto apenas um slide em vez de toda a apresentação?
No prompt Salvar Como, selecione "Apenas este". Com uma ferramenta de captura de tela, capture apenas o slide visível.
Por que meus slides exportados parecem desfocados e como obtenho imagens de alta qualidade?
O PowerPoint salva a ~96 PPI por padrão, então as imagens parecem suaves quando ampliadas ou impressas. Para melhorar a qualidade, exporte em uma resolução mais alta (veja a tabela de resolução) — seja com uma ferramenta que renderiza slides em dimensões maiores ou automatizando a exportação com VBA ou uma API de apresentação (Método 4) para controle total sobre o tamanho em pixels.
É seguro enviar minha apresentação para um conversor online?
Com o CloudXDocs, os arquivos enviados são excluídos automaticamente do servidor 24 horas após a conversão e não são retidos ou reutilizados. Evite conversores que não declaram uma política de exclusão.
Posso exportar slides do PowerPoint como imagens sem perder qualidade?
Sim. Use o formato PNG e exporte em um tamanho de pixel maior quando possível. Evite capturas de tela para saída profissional, pois a resolução da tela limita a qualidade da imagem — use o Método 2 (resolução mais alta) ou o Método 4 (tamanho de pixel personalizado) em vez disso.
Qual é o melhor tamanho de imagem para slides do PowerPoint?
Para uma apresentação 16:9, 1920 × 1080 pixels geralmente é adequado para telas. Resoluções mais altas, como 2560 × 1440 ou 3840 × 2160, são melhores para telas grandes ou impressão.
Relacionado: exportar slides do PowerPoint via código (desenvolvedores)
Se você está construindo um fluxo de trabalho de documentos, o processamento no lado do servidor geralmente é mais confiável do que ferramentas online para tarefas repetitivas ou de alto volume. Casos comuns onde uma biblioteca supera uma ferramenta web:
- Processamento em lote — converta milhares de apresentações em uma agenda.
- Relatórios automatizados — exporte apresentações geradas para imagens limpas.
- Pipelines de documentos — renderize slides como uma etapa em um fluxo maior de conversão/mesclagem/construção.
- Aplicações corporativas — incorpore a exportação de slides em seu próprio produto ou serviço.
Para fontes PDF no mesmo fluxo de trabalho, você também pode cortar um PDF ou mesclar arquivos PDF.
Spire.Presentation for .NET renderiza cada slide para PNG/JPG com as dimensões exatas que você definir, no Windows ou Linux, sem Microsoft Office. Veja o projeto de exemplo do Spire.Presentation para código executável.
Após a exportação, abra as imagens (ou o .pptx original) no CloudXDocs AI Chat para gerar automaticamente notas do orador, um glossário bilíngue ou uma lista de tarefas de atas de reunião — uma maneira rápida de reaproveitar conteúdo exportado, sem necessidade de design ou codificação. A IA trabalha com o conteúdo; ela não cria as imagens.
Veja também
PowerPoint 슬라이드를 고품질 이미지로 내보내는 방법
목차
프레젠테이션을 완성했습니다. 이제 누군가 웹사이트, 유인물 또는 다른 문서에 삽입할 이미지로 슬라이드가 필요하다고 합니다. 다른 이름으로 저장을 클릭하여 PNG 파일을 보냈더니 돌아오는 답변은 "이미지가 흐릿해요."입니다.
이것이 바로 함정입니다. PowerPoint의 기본 슬라이드 내보내기 해상도는 약 96 PPI(인치당 픽셀)입니다. 따라서 화면에서는 선명해 보이던 슬라이드가 확대하거나 인쇄하는 순간 흐릿해집니다. 이 가이드에서는 PowerPoint 슬라이드를 PNG 또는 JPG 파일로 변환하는 모든 실용적인 방법과, 무엇보다 중요한 '이미지를 선명하게 만드는 방법'을 다룹니다.
빠른 답변: 일회성 작업이라면 PowerPoint의 다른 이름으로 저장(PNG/JPG, 몇 번의 클릭)을 사용하세요. 결과물이 흐릿하다면 내보내기 해상도를 높이세요(레지스트리 편집 불필요). PowerPoint가 설치되어 있지 않다면 무료 CloudXDocs 온라인 변환기를 사용하세요. 많은 프레젠테이션을 처리하거나 자체 소프트웨어에 내보내기 기능을 구축해야 한다면 VBA 또는 Spire.Presentation API를 사용하여 자동화하세요. 전체 비교는 아래에 있습니다.
1. PowerPoint의 "다른 이름으로 저장"을 사용하여 슬라이드 내보내기 (가장 빠름)
PowerPoint에 내장된 다른 이름으로 저장 기능은 프레젠테이션을 이미지로 변환하는 가장 쉬운 방법이며, PowerPoint가 이미 열려 있고 빠른 내보내기가 필요할 때 적합합니다. 텍스트, 다이어그램 또는 차트가 포함된 슬라이드에는 PNG가 더 안전한 기본값입니다. JPG가 적합한 경우는 PNG vs JPG를 참조하세요.
- 프레젠테이션을 열고 파일 → 다른 이름으로 저장(OneDrive/SharePoint의 경우 복사본 저장)으로 이동합니다.
- 폴더와 파일 이름을 선택합니다.
- 파일 형식 드롭다운을 열고 PNG 또는 JPEG를 선택합니다.
- 저장을 클릭한 다음 모든 슬라이드(각 슬라이드를 개별 파일로 저장) 또는 현재 슬라이드만을 선택합니다.
결과물이 흐릿하게 보이는 이유: 이 방법은 약 96 PPI(와이드스크린 슬라이드 기준 1280×720)로 내보냅니다. 웹용으로는 괜찮지만 인쇄나 대형 디스플레이용으로는 해상도가 너무 낮습니다. 방법 2를 참조하세요.
장점: 추가 소프트웨어 불필요, 계정 불필요, 공식적인 방법, 일회성 작업에 가장 빠름.
단점: 기본적으로 약 96 PPI로 고정되어 있어 확대 또는 인쇄 시 이미지가 흐릿해 보일 수 있음; 한 번에 하나의 파일만 처리 가능.
2. 더 높은 해상도로 PowerPoint 슬라이드 내보내기 (흐릿한 이미지 수정)
용도: 인쇄, 포스터 또는 96 PPI가 흐릿하게 보이는 모든 경우. 이것이 저품질 내보내기에 대한 핵심 해결책입니다.
PowerPoint의 기본 내보내기 해상도는 96 PPI입니다. Microsoft의 공식 해결책은 Windows 레지스트리(ExportBitmapResolution)를 편집하는 것인데, 이는 위험하고 실수하기 쉽습니다. 하지만 그럴 필요가 없습니다. 레지스트리를 건드리지 않는 대안들이 있습니다: Office가 필요 없는 기본 방식, Office가 필요 없는 고해상도 옵션, 그리고 완전히 스크립트로 처리하는 방식입니다:
| 목표 해상도 | 픽셀 크기 (16:9 와이드스크린) | 용도 |
|---|---|---|
| 96 PPI | 1280 × 720 | 웹, 이메일, 슬라이드 내 사용 |
| 150 PPI | 2000 × 1125 | 프로젝터, 대형 모니터 |
| 200 PPI | 2667 × 1500 | A4 유인물 |
| 300 PPI | 4000 × 2250 | 포스터, 전문 인쇄 |
PPI(인치당 픽셀)는 화면상의 측정 단위이며, 인쇄 시에는 200~300 PPI를 목표로 하세요. PowerPoint의 기본값은 96 PPI입니다.
- Office 없음, 기본 품질: CloudXDocs는 브라우저에서 동일한 기본값(~96 PPI)으로 변환합니다. 방법 3을 참조하세요.
- Office 없음, 고해상도: CloudConvert(방법 3에도 포함)는 온라인에서 약 1920×1080으로 렌더링하며 DPI를 높일 수 있어 96 PPI보다 훨씬 선명합니다.
- 사용자 지정 크기 (가장 강력한 제어): VBA 또는 API를 사용하여 원하는 픽셀 크기로 내보내기를 스크립트화합니다. 방법 4를 참조하세요.
두 이미지 모두 동일한 16:9 슬라이드이며, 페이지 내에서 동일한 너비로 비교하기 쉽도록 원래 픽셀 크기의 30%로 축소되었습니다. 96 PPI(위)에서는 텍스트와 가는 선이 부드럽게 보이지만, 192 PPI(아래)에서는 훨씬 더 선명하게 유지됩니다.
레지스트리 방법을 사용하는 경우:
HKEY_CURRENT_USER\Software\Microsoft\Office\<버전>\PowerPoint\Options로 이동하여ExportBitmapResolution이라는DWORD를 추가하고 십진수 값(예:300)을 설정하세요. 먼저 레지스트리를 백업하고, 위험을 감수하고 진행하십시오.
용도: 96 PPI 품질 한계에 도달하여 인쇄나 대형 디스플레이를 위해 더 선명한 결과물이 필요한 모든 사용자.
참고: 내장된 '다른 이름으로 저장' 기능은 레지스트리 수정이나 다른 도구 없이는 기본값을 초과할 수 없습니다. VBA/API 방식과 CloudConvert는 모두 이 한계를 극복합니다. CloudXDocs는 기본값을 유지하지만 Office가 필요 없습니다.
3. 온라인에서 PowerPoint 슬라이드를 이미지로 변환 (PowerPoint 불필요)
용도: PowerPoint가 설치되어 있지 않은 사용자, 또는 Office를 사용할 수 없거나 여러 파일을 빠르게 처리해야 할 때 브라우저 기반 변환기를 원하는 사용자.
CloudXDocs는 Spire 팀이 제공하는 브라우저 기반 변환기입니다. Microsoft Office가 필요 없으며 설치도 필요 없습니다.
- 브라우저에서 CloudXDocs PPT to Image 변환기를 엽니다.
.pptx/.ppt파일을 업로드 영역으로 드래그하거나 클릭하여 업로드합니다.- CloudXDocs가 자동으로 렌더링하고 변환할 때까지 기다립니다(보통 몇 초 소요).
- 결과물인
.zip파일을 다운로드하고 압축을 풀면 각 슬라이드가 별도의 이미지로 저장되어 있습니다.
유용한 이유: CloudXDocs는 PowerPoint를 사용할 수 없거나 여러 파일을 빠르게 처리해야 할 때 편리한 브라우저 기반 변환 방법을 제공합니다. 서비스 정책에 따라 업로드된 파일은 24시간 후 자동으로 삭제됩니다.
장점: Office 불필요, 설치 불필요, 데스크톱 소프트웨어 불필요; 전체 프레젠테이션을 zip으로 처리; 모든 기기에서 작동.
단점: 인터넷 연결 필요; 출력 품질은 사용자가 제어하는 설정이 아니라 변환기의 렌더링 방식을 따름.
더 선명한 결과물이 필요하지만 Office를 설치할 수 없는 경우, 일부 온라인 변환기에서는 내보내기 해상도를 선택할 수 있습니다. 예를 들어 CloudConvert는 기본적으로 약 1920×1080으로 설정되며 DPI를 더 높여 PowerPoint의 기본값인 96 PPI보다 훨씬 선명하게 만들 수 있습니다.
단계는 기본적으로 위와 동일합니다: .pptx 업로드 → JPG 또는 PNG 선택 → 옵션에서 DPI 높이기 → 변환 → zip 다운로드.
따라서 데스크톱 도구를 사용할 수 없을 때 온라인 변환기는 흐릿한 내보내기에 대한 확실한 해결책이 될 수 있습니다. 단, 파일이 타사 서버를 거치므로 기밀 문서는 피하십시오.
4. PowerPoint 이미지 내보내기 자동화 (VBA & API)
용도: 많은 프레젠테이션, 예약된 작업, 또는 내부 도구에 내보내기 기능을 구축할 때. 사용자에 따라 두 가지 경로가 있습니다.
옵션 A — VBA 매크로 (Windows의 Office 파워 유저용)
Windows에서 PowerPoint를 사용하고 사용자 지정 내보내기 크기가 필요한 경우, 간단한 매크로로 전체 프레젠테이션을 자동화할 수 있습니다. Alt + F11을 누르고 삽입 → 모듈을 선택한 후 코드를 붙여넣고, 매크로 → ExportSlidesHighRes 실행을 클릭하세요 (먼저 C:\Exports\ 폴더를 생성하세요):
Sub ExportSlidesHighRes()
    Dim sld As Slide, i As Integer
    i = 1
    For Each sld In ActivePresentation.Slides
        sld.Export "C:\Exports\Slide_" & i & ".png", "PNG", 3000, 1688  ' ~200 PPI
        i = i + 1
    Next sld
End Sub
3000, 1688 값을 조정하여 목표 해상도를 맞추세요 (방법 2 표 참조).
옵션 B — Spire.Presentation API (.NET 개발자용)
서버 측 또는 완전히 프로그래밍 가능한 내보내기가 필요하십니까? Spire.Presentation for .NET은 몇 줄의 코드로 모든 슬라이드를 이미지로 렌더링합니다. Microsoft PowerPoint가 필요 없고 레지스트리 편집도 필요 없으며, 코드에서 출력 크기를 설정할 수 있습니다. 전체 가이드는 슬라이드를 이미지로 변환하는 Spire.Presentation 튜토리얼을 참조하세요.
using Spire.Presentation;
using System.Drawing;
using System.Drawing.Imaging;

class Program
{
    static void Main(string[] args)
    {
        using (Presentation ppt = new Presentation())
        {
            ppt.LoadFromFile("Sample.pptx");
            for (int i = 0; i < ppt.Slides.Count; i++)
            {
                Image img = ppt.Slides[i].SaveAsImage(1280 * 2, 720 * 2);
                img.Save(string.Format("Slide_{0}.png", i), ImageFormat.Png);
            }
        }
    }
}
SaveAsImage(width, height)는 정확한 픽셀 크기를 설정하므로 API가 지정한 해상도로 렌더링합니다. 여기에서 1280 * 2, 720 * 2는 2560×1440(약 192 PPI)을 생성합니다. 두 숫자를 방법 2 표의 원하는 크기로 변경하세요.
엔터프라이즈 팁: Linux에서 헤드리스(headless)로 실행하고, 정확한 출력 치수를 설정하며, 내보내기를 더 큰 문서 워크플로우로 파이프하세요. Office나 레지스트리 수정이 필요 없습니다. 전체 샘플 프로젝트 다운로드 →
장점: 픽셀 크기에 대한 완전한 제어, 진정한 일괄/헤드리스 처리, 수동 단계 없음; Spire는 Office 설치 없이 실행됨.
단점: VBA는 PowerPoint가 설치된 Windows에서만 가능; API는 프로덕션용 유료 라이브러리임.
5. 슬라이드를 이미지로 캡처 (스크린샷)
용도: 화면에 보이는 그대로 슬라이드 하나를 가져오거나, 편집기에서 파일을 열 수 없을 때.
- Windows: 캡처 도구(
Win + Shift + S) → 슬라이드 선택 → PNG로 저장. - macOS:
Cmd + Shift + 4를 누른 후 스페이스바를 눌러 창을 캡처. - 타사 도구: 주석 캡처를 위해 ShareX, Lightshot 또는 Snagit 사용.
주의: 스크린샷은 화면 해상도를 상속받으며 UI 요소가 포함될 수 있습니다. 제어 가능한 크기의 깔끔한 전체 슬라이드 이미지를 원한다면 방법 1~4를 선호합니다.
장점: 설정 불필요, 모든 기기에서 작동, "화면에 보이는 그대로" 가져오기에 완벽함.
단점: 해상도가 디스플레이로 제한됨; 실제 내보내기가 아님; 일괄 처리 불가.
의사결정 지원
아래 섹션은 방법을 비교하고, 형식을 선택하며, 품질 문제를 해결하는 데 도움이 됩니다. PowerPoint 대신 PDF로 작업 중이신가요? PDF 페이지를 이미지로 변환하는 방법을 확인하세요.
비교 및 선택 방법
| # | 방법 | 용도 | 해상도 | 설치 필요 | 일괄 처리 |
|---|---|---|---|---|---|
| 1 | PowerPoint 다른 이름으로 저장 | 빠른 일회성 작업 | 96 PPI | PowerPoint | 파일별 |
| 2 | 고해상도 | 흐릿함 수정 / 인쇄 | 최대 300 PPI* | — | 파일별 |
| 3 | CloudXDocs 온라인 | Office 없음 / 빠름 | 기본값과 동일(~96 PPI) | 아니요 (브라우저) | 예 (zip) |
| 4 | VBA / Spire API | 개발 / 일괄 / 서버 | 사용자 지정 px | VBA: PowerPoint; Spire: NuGet | 예 |
| 5 | 스크린샷 | 화면의 단일 슬라이드 | 화면 제한 | 아니요 | 아니요 |
| — | Google Slides / LibreOffice | PowerPoint 없음 | 네이티브 앱 | 앱 | 파일별 |
*VBA 또는 Spire API를 통해 달성; 온라인 도구는 슬라이드의 기본 치수로 렌더링함.
상황별 선택:
- 이미지 한두 개가 빠르게 필요함 → PowerPoint 다른 이름으로 저장
- 결과물이 흐릿하게 보임 → 고해상도 내보내기
- PowerPoint가 설치되어 있지 않음 → CloudXDocs 온라인
- 수백 개의 슬라이드 / 서버 측 작업 → VBA 또는 Spire API
- 정확한 화면 캡처 → 스크린샷
PowerPoint 없이 슬라이드를 이미지로 내보내는 방법
Microsoft PowerPoint가 설치되어 있지 않아도 선택지는 있습니다. 위의 CloudXDocs 변환기와 두 가지 무료 오피스 제품군이 있습니다:
- Google Slides: 프레젠테이션을 열고 파일 → 다운로드 → PNG 이미지(.png) 또는 JPEG 이미지(.jpg)를 선택합니다. 각 다운로드는 현재 슬라이드를 내보냅니다. 슬라이드별로 반복하거나, 전체 프레젠테이션을 한 번에 처리하려면 CloudXDocs를 사용하세요.
- LibreOffice Impress: 파일을 열고 파일 → 내보내기를 선택한 다음 PNG 또는 JPG를 선택하고 내보낼 슬라이드를 선택합니다.
이 방법들은 PowerPoint를 사용할 수 없을 때 유용하지만, 방법 2나 방법 4보다 해상도 제어 기능이 떨어집니다.
PNG vs JPG: 어떤 형식으로 내보내야 할까요?
| 형식 | 용도 | 장점 |
|---|---|---|
| PNG | 텍스트, 다이어그램, 차트, UI 스크린샷 | 무손실 품질, 더 선명한 가장자리 |
| JPG | 사진, 이미지가 많은 슬라이드 | 더 작은 파일 크기 |
대부분의 비즈니스 프레젠테이션에서는 PNG가 더 나은 선택입니다. 슬라이드에는 선명한 가장자리가 필요한 텍스트와 다이어그램이 포함되는 경우가 많기 때문입니다. 사진이 주를 이루고 픽셀 단위의 텍스트보다 파일 크기가 더 중요한 경우에만 JPG를 사용하세요.
내보낸 이미지가 흐릿하게 보이는 이유는 무엇인가요? (그리고 해결 방법)
PowerPoint의 기본 내보내기는 약 96 PPI이므로 확대하거나 인쇄하면 이미지가 부드럽게(흐릿하게) 보입니다. 이미지가 여전히 충분히 선명하지 않다면:
- 방법 2의 고해상도 경로를 사용하세요(레지스트리 편집 불필요).
- 인쇄나 대형 디스플레이용으로 스크린샷을 사용하지 마세요. 해상도가 화면에 의해 제한됩니다(방법 5).
- 텍스트나 다이어그램이 있는 슬라이드에는 PNG를 선호하세요(PNG vs JPG).
- 픽셀 크기나 서버 측 내보내기를 완전히 제어하려면 VBA 또는 Spire API를 사용하여 자동화하세요(방법 4).
인쇄의 경우 200~300 PPI를 목표로 하세요. 전체 해상도 표에서 각 목표에 대한 픽셀 크기를 확인할 수 있습니다.
자주 묻는 질문 (FAQ)
모든 PowerPoint 슬라이드를 한 번에 별도의 이미지로 저장하려면 어떻게 하나요?
파일 → 다른 이름으로 저장 → PNG/JPEG를 선택한 다음 프롬프트가 표시되면 "모든 슬라이드"를 선택하세요. 설치 없이 일괄 처리하려면 CloudXDocs 변환기를 사용하고, 스크립트 기반 일괄 처리를 원하면 VBA 매크로 또는 Spire API를 사용하세요.
어떤 이미지 형식이 가장 좋나요 — PNG인가요, JPG인가요?
텍스트, 차트 또는 선명한 선이 있는 슬라이드에는 PNG(무손실)를 사용하세요. 파일 크기가 중요한 사진 위주의 슬라이드에는 JPG를 사용하세요.
Microsoft PowerPoint가 설치되어 있지 않아도 슬라이드를 내보낼 수 있나요?
네. CloudXDocs PPT to Image 변환기는 설치 없이 브라우저에서 실행되며, Spire.Presentation(방법 4)은 Office 없이 서버 측에서 변환합니다. Google Slides와 LibreOffice Impress도 슬라이드를 내보낼 수 있습니다(PowerPoint 없이 참조).
전체 프레젠테이션 대신 슬라이드 하나만 내보내려면 어떻게 하나요?
'다른 이름으로 저장' 프롬프트에서 "현재 슬라이드만"을 선택하세요. 캡처 도구를 사용하여 화면에 보이는 슬라이드만 캡처할 수도 있습니다.
내보낸 슬라이드가 흐릿하게 보이는데, 고품질 이미지를 얻으려면 어떻게 하나요?
PowerPoint는 기본적으로 약 96 PPI로 저장하므로 확대하거나 인쇄하면 이미지가 흐릿해집니다. 품질을 향상하려면 더 높은 해상도로 내보내거나(해상도 표 참조), 슬라이드를 더 큰 치수로 렌더링하는 도구를 사용하거나, VBA 또는 프레젠테이션 API(방법 4)를 사용하여 내보내기를 자동화하여 픽셀 크기를 완전히 제어하세요.
프레젠테이션을 온라인 변환기에 업로드해도 안전한가요?
CloudXDocs의 경우, 업로드된 파일은 변환 후 24시간이 지나면 서버에서 자동으로 삭제되며 보관되거나 재사용되지 않습니다. 삭제 정책을 명시하지 않은 변환기는 피하십시오.
품질 저하 없이 PowerPoint 슬라이드를 이미지로 내보낼 수 있나요?
네. PNG 형식을 사용하고 가능하면 더 큰 픽셀 크기로 내보내세요. 전문적인 결과물을 위해서는 스크린샷을 피하십시오. 화면 해상도가 이미지 품질을 제한하기 때문입니다. 대신 방법 2(고해상도) 또는 방법 4(사용자 지정 픽셀 크기)를 사용하세요.
PowerPoint 슬라이드에 가장 적합한 이미지 크기는 무엇인가요?
16:9 프레젠테이션의 경우, 화면용으로는 1920 × 1080 픽셀이 일반적으로 적합합니다. 대형 디스플레이나 인쇄용으로는 2560 × 1440 또는 3840 × 2160과 같은 더 높은 해상도가 더 좋습니다.
관련 항목: 코드로 PowerPoint 슬라이드 내보내기 (개발자용)
문서 워크플로우를 구축하는 경우, 반복적이거나 대량 작업에는 온라인 도구보다 서버 측 처리가 일반적으로 더 안정적입니다. 라이브러리가 웹 도구보다 나은 일반적인 사례:
- 일괄 처리 — 일정에 따라 수천 개의 프레젠테이션 변환.
- 자동화된 보고서 — 생성된 프레젠테이션을 깔끔한 이미지로 내보내기.
- 문서 파이프라인 — 더 큰 변환/병합/빌드 흐름의 한 단계로 슬라이드 렌더링.
- 엔터프라이즈 애플리케이션 — 자체 제품이나 서비스에 슬라이드 내보내기 기능 내장.
같은 워크플로우에서 PDF 소스를 사용하는 경우, PDF 자르기나 PDF 파일 병합도 가능합니다.
Spire.Presentation for .NET은 Windows 또는 Linux에서 Microsoft Office 없이 설정한 정확한 치수로 모든 슬라이드를 PNG/JPG로 렌더링합니다. 실행 가능한 코드는 Spire.Presentation 샘플 프로젝트를 참조하세요.
내보낸 후, 이미지를 CloudXDocs AI Chat에서 열어 발표자 노트, 이중 언어 용어집 또는 회의록 할 일 목록을 자동 생성하세요. 디자인이나 코딩 없이 내보낸 콘텐츠를 재활용하는 빠른 방법입니다. AI는 콘텐츠로 작업하며 이미지를 생성하지는 않습니다.
참고 항목
Comment exporter des diapositives PowerPoint sous forme d'images de haute qualité
Table des matières
- 1. Exporter les diapositives avec « Enregistrer sous » de PowerPoint (le plus rapide)
- 2. Exporter les diapositives PowerPoint en haute résolution (corriger les images floues)
- 3. Convertir les diapositives PowerPoint en images en ligne (sans PowerPoint)
- 4. Automatiser l'exportation d'images PowerPoint (VBA et API)
- 5. Capturer une diapositive sous forme d'image (capture d'écran)
- Aide à la décision
- FAQ
- Connexe : exporter des diapositives PowerPoint par code (développeurs)
- Voir aussi
Vous avez terminé votre présentation. Maintenant, quelqu'un en a besoin sous forme d'images pour un site web, un document à distribuer ou une diapositive dans un autre document. Vous cliquez sur Enregistrer sous, envoyez les fichiers PNG, et on vous répond : « Ils sont flous. »
C'est là tout le problème. L'exportation par défaut de PowerPoint est d'environ 96 pixels par pouce (PPP). Ainsi, les diapositives qui semblent nettes à l'écran deviennent floues dès qu'elles sont agrandies ou imprimées. Ce guide couvre toutes les méthodes pratiques pour transformer des diapositives PowerPoint en fichiers PNG ou JPG — et, tout aussi important, comment rendre ces images réellement nettes.
Réponse rapide : Pour une opération ponctuelle rapide, utilisez « Enregistrer sous » de PowerPoint (PNG/JPG, quelques clics). Si le résultat est flou, augmentez la résolution d'exportation — aucune modification du registre n'est nécessaire. Vous n'avez pas PowerPoint ? Utilisez le convertisseur en ligne gratuit CloudXDocs. Besoin de traiter de nombreuses présentations ou d'intégrer l'exportation dans votre propre logiciel ? Automatisez avec VBA ou l'API Spire.Presentation. La comparaison complète se trouve ci-dessous.
1. Exporter les diapositives avec « Enregistrer sous » de PowerPoint (le plus rapide)
La fonction Enregistrer sous intégrée de PowerPoint est le moyen le plus simple de transformer une présentation en images, et c'est le bon choix lorsque PowerPoint est déjà ouvert et que vous avez besoin d'une exportation rapide. Le PNG est le format par défaut le plus sûr pour les diapositives contenant du texte, des diagrammes ou des graphiques — voir PNG vs JPG pour savoir quand utiliser le format JPG.
- Ouvrez la présentation et allez dans Fichier → Enregistrer sous (ou Enregistrer une copie sur OneDrive/SharePoint).
- Choisissez un dossier et un nom de fichier.
- Ouvrez le menu déroulant Type et choisissez PNG ou JPEG.
- Cliquez sur Enregistrer, puis choisissez Toutes les diapositives (chaque diapositive devient un fichier) ou Juste celle-ci.
Pourquoi les résultats peuvent paraître flous : cette méthode exporte à environ 96 PPP (1280×720 sur une diapositive panoramique). C'est suffisant pour le web, mais trop faible pour l'impression ou les grands écrans — voir Méthode 2.
Avantages : Aucun logiciel supplémentaire, pas de compte, méthode officielle, la plus rapide pour les tâches ponctuelles.
Inconvénients : Fixé à ~96 PPP par défaut, donc les images peuvent paraître floues une fois agrandies ou imprimées ; un seul fichier à la fois.
2. Exporter les diapositives PowerPoint en haute résolution (corriger les images floues)
Idéal pour : l'impression, les affiches ou toute utilisation où 96 PPP semble flou. C'est la solution principale pour les exportations de basse qualité.
La résolution d'exportation par défaut de PowerPoint est de 96 PPP. La solution officielle de Microsoft consiste à modifier le registre Windows (ExportBitmapResolution) — c'est risqué et facile à rater. Vous n'êtes pas obligé de le faire. Voici les alternatives — toutes évitent le registre : une option par défaut sans Office, une option haute résolution sans Office, et une méthode entièrement scriptée :
| Résolution cible | Taille en pixels (16:9 panoramique) | Idéal pour |
|---|---|---|
| 96 PPP | 1280 × 720 | Web, e-mail, usage interne |
| 150 PPP | 2000 × 1125 | Projecteurs, grands moniteurs |
| 200 PPP | 2667 × 1500 | Documents A4 |
| 300 PPP | 4000 × 2250 | Affiches, impression professionnelle |
Le PPP (pixels par pouce) est la mesure à l'écran ; pour l'impression, visez 200–300 PPP. La valeur par défaut de PowerPoint est 96 PPP.
- Sans Office, qualité par défaut : CloudXDocs convertit dans le navigateur à la même valeur par défaut (~96 PPP) — voir Méthode 3.
- Sans Office, résolution supérieure : CloudConvert (également dans la Méthode 3) effectue le rendu en ligne à environ 1920×1080 et vous permet d'augmenter le DPI — confortablement au-dessus de 96 PPP.
- Taille personnalisée (contrôle total) : automatisez l'exportation à n'importe quelle taille de pixel avec VBA ou une API — Méthode 4.
Les deux images sont la même diapositive 16:9, chacune mise à l'échelle à 30 % de sa taille en pixels originale afin que la différence soit facile à comparer à la même largeur sur la page. À 96 PPP (en haut), le texte et les lignes fines semblent plus doux ; à 192 PPP (en bas), ils restent nettement plus nets.
Si vous utilisez la méthode du registre : allez dans
HKEY_CURRENT_USER\Software\Microsoft\Office\<ver>\PowerPoint\Options, ajoutez une valeurDWORDnomméeExportBitmapResolution, et définissez sa valeur décimale (par ex.300). Sauvegardez le registre au préalable ; procédez à vos propres risques.
Idéal pour : quiconque atteint la limite de qualité de 96 PPP et a besoin d'une sortie plus nette pour l'impression ou les grands écrans.
À garder à l'esprit : la fonction Enregistrer sous intégrée ne peut pas dépasser sa valeur par défaut sans modification du registre ou un outil différent. La méthode VBA/API et CloudConvert dépassent cette limite ; CloudXDocs reste à la valeur par défaut mais ne nécessite pas Office.
3. Convertir les diapositives PowerPoint en images en ligne (sans PowerPoint)
Idéal pour : les utilisateurs sans PowerPoint installé, ou quiconque souhaite un convertisseur basé sur navigateur lorsqu'Office n'est pas disponible ou que plusieurs fichiers doivent être traités rapidement.
CloudXDocs est un convertisseur basé sur navigateur par la même équipe derrière Spire. Il ne nécessite ni Microsoft Office ni installation.
- Ouvrez le convertisseur PPT vers image de CloudXDocs dans n'importe quel navigateur.
- Cliquez ou faites glisser votre fichier
.pptx/.pptdans la zone de téléchargement. - Attendez que CloudXDocs effectue le rendu et la conversion automatiquement (généralement quelques secondes).
- Téléchargez le fichier
.ziprésultant et décompressez-le pour obtenir chaque diapositive sous forme d'image distincte.
Pourquoi c'est utile : CloudXDocs offre un moyen pratique de convertir des présentations lorsque PowerPoint n'est pas disponible ou que vous devez traiter plusieurs fichiers rapidement. Les fichiers téléchargés sont automatiquement supprimés après 24 heures conformément à la politique du service.
Avantages : Pas d'Office, pas d'installation, pas de logiciel de bureau ; traite une présentation entière sous forme de zip ; fonctionne sur n'importe quel appareil.
Inconvénients : Nécessite une connexion internet ; la qualité de sortie dépend du rendu du convertisseur plutôt que d'un réglage que vous contrôlez.
Si vous avez besoin d'une sortie plus nette mais ne pouvez pas installer Office, certains convertisseurs en ligne vous permettent de choisir la résolution d'exportation. CloudConvert, par exemple, utilise par défaut environ 1920×1080 et vous permet d'augmenter le DPI — confortablement au-dessus de la valeur par défaut de 96 PPP de PowerPoint.
Les étapes sont essentiellement les mêmes que ci-dessus : téléchargez votre .pptx → choisissez JPG ou PNG → augmentez le DPI dans les options → convertissez → téléchargez le zip.
Cela fait d'un convertisseur en ligne une solution réelle pour les exportations floues lorsqu'aucun outil de bureau n'est disponible, bien que les fichiers transitent par un serveur tiers ; évitez donc les présentations confidentielles.
4. Automatiser l'exportation d'images PowerPoint (VBA et API)
Idéal pour : de nombreuses présentations, des tâches planifiées ou l'intégration de l'exportation dans un outil interne. Deux voies selon votre profil.
Option A — Macro VBA (pour les utilisateurs avancés d'Office sous Windows)
Si vous travaillez sur PowerPoint sous Windows et avez besoin d'une taille d'exportation personnalisée, une courte macro automatise toute la présentation. Appuyez sur Alt + F11, Insertion → Module, collez le code, puis Macros → Exécuter ExportSlidesHighRes (créez d'abord C:\Exports\) :
Sub ExportSlidesHighRes()
    Dim sld As Slide, i As Integer
    i = 1
    For Each sld In ActivePresentation.Slides
        sld.Export "C:\Exports\Slide_" & i & ".png", "PNG", 3000, 1688  ' ~200 PPP
        i = i + 1
    Next sld
End Sub
Ajustez 3000, 1688 pour atteindre votre cible (voir le tableau de la Méthode 2).
Option B — API Spire.Presentation (pour les développeurs .NET)
Besoin d'une exportation côté serveur ou entièrement programmable ? Spire.Presentation pour .NET rend chaque diapositive en image avec quelques lignes de code — pas de Microsoft PowerPoint, pas de modification du registre, taille de sortie définie dans le code. Pour une procédure complète, consultez notre tutoriel Spire.Presentation pour convertir des diapositives en images.
using Spire.Presentation;
using System.Drawing;
using System.Drawing.Imaging;

class Program
{
    static void Main(string[] args)
    {
        using (Presentation ppt = new Presentation())
        {
            ppt.LoadFromFile("Sample.pptx");
            for (int i = 0; i < ppt.Slides.Count; i++)
            {
                Image img = ppt.Slides[i].SaveAsImage(1280 * 2, 720 * 2);
                img.Save(string.Format("Slide_{0}.png", i), ImageFormat.Png);
            }
        }
    }
}
SaveAsImage(largeur, hauteur) définit la taille exacte en pixels, de sorte que l'API effectue le rendu à la résolution que vous spécifiez — pas de registre, pas d'Office. Ici, 1280 * 2, 720 * 2 produit du 2560×1440 (environ 192 PPP) ; changez les deux nombres pour n'importe quelle taille du tableau de la Méthode 2.
Conseil entreprise : exécutez en mode sans tête (headless) sur Linux, définissez les dimensions de sortie exactes et intégrez les exportations dans un flux de travail documentaire plus large — pas d'Office, pas de modifications du registre. Téléchargez le projet d'exemple complet →
Avantages : Contrôle total sur la taille en pixels, traitement par lots/sans tête réel, pas d'étapes manuelles ; Spire fonctionne sans Office installé.
Inconvénients : VBA uniquement sur Windows avec PowerPoint ; l'API est une bibliothèque payante pour une utilisation en production.
5. Capturer une diapositive sous forme d'image (capture d'écran)
Idéal pour : capturer une diapositive exactement telle qu'elle apparaît à l'écran, ou lorsque vous ne pouvez pas ouvrir le fichier dans un éditeur.
- Windows : Outil Capture d'écran (
Win + Maj + S) → sélectionnez la diapositive → enregistrez en PNG. - macOS :
Cmd + Maj + 4puis barre d'espace pour capturer une fenêtre. - Tiers : ShareX, Lightshot ou Snagit pour des captures annotées.
Mise en garde : les captures d'écran héritent de la résolution de votre écran et peuvent inclure des éléments de l'interface. Pour des images nettes et complètes à une taille contrôlable, préférez les Méthodes 1 à 4.
Avantages : Aucune configuration, fonctionne sur n'importe quelle machine, parfait pour « capturer exactement ce qui est à l'écran ».
Inconvénients : Résolution limitée par votre écran ; pas une véritable exportation ; pas de traitement par lots.
Aide à la décision
Les sections ci-dessous vous aident à comparer les méthodes, choisir un format et corriger les problèmes de qualité. Vous travaillez à partir d'un PDF au lieu de PowerPoint ? Découvrez comment convertir des pages PDF en images.
Comparaison et comment choisir
| # | Méthode | Idéal pour | Résolution | Installation nécessaire | Par lots ? |
|---|---|---|---|---|---|
| 1 | Enregistrer sous PowerPoint | Ponctuel rapide | 96 PPP | PowerPoint | Par fichier |
| 2 | Haute résolution | Corriger flou / impression | Jusqu'à 300 PPP* | — | Par fichier |
| 3 | CloudXDocs en ligne | Sans Office / rapide | Identique par défaut (~96 PPP) | Non (navigateur) | Oui (zip) |
| 4 | VBA / API Spire | Dev / lots / serveur | Pixels personnalisés | VBA : PowerPoint ; Spire : NuGet | Oui |
| 5 | Capture d'écran | Diapositive unique à l'écran | Limitée par l'écran | Non | Non |
| — | Google Slides / LibreOffice | Sans PowerPoint | App native | App | Par fichier |
*Atteint via VBA ou l'API Spire ; les outils en ligne effectuent le rendu aux dimensions natives de la diapositive.
Choisir selon la situation :
- Besoin d'une ou deux images rapidement → Enregistrer sous PowerPoint
- Le résultat est flou → Exportation haute résolution
- Pas de PowerPoint installé → CloudXDocs en ligne
- Des centaines de diapositives / côté serveur → VBA ou API Spire
- Capture exacte à l'écran → Capture d'écran
Comment exporter des diapositives en images sans PowerPoint
Si Microsoft PowerPoint n'est pas installé, vous avez toujours des options — le convertisseur CloudXDocs ci-dessus, plus deux suites bureautiques gratuites :
- Google Slides : ouvrez la présentation, puis Fichier → Télécharger → Image PNG (.png) ou Image JPEG (.jpg). Chaque téléchargement exporte la diapositive actuelle ; répétez pour chaque diapositive, ou utilisez CloudXDocs pour une présentation entière d'un coup.
- LibreOffice Impress : ouvrez le fichier, puis Fichier → Exporter, choisissez PNG ou JPG, et sélectionnez les diapositives à exporter.
Celles-ci sont pratiques lorsque PowerPoint n'est pas disponible, bien qu'elles offrent moins de contrôle sur la résolution que la Méthode 2 ou la Méthode 4.
PNG vs JPG : quel format exporter ?
| Format | Idéal pour | Avantages |
|---|---|---|
| PNG | Texte, diagrammes, graphiques, captures UI | Qualité sans perte, bords nets |
| JPG | Photos, diapositives riches en images | Taille de fichier réduite |
Pour la plupart des présentations professionnelles, le PNG est généralement le meilleur choix car les diapositives contiennent souvent du texte et des diagrammes qui nécessitent des bords nets. Utilisez le JPG uniquement lorsqu'une diapositive est dominée par des photographies et que la taille du fichier importe plus qu'un texte parfait au pixel près.
Pourquoi les images exportées paraissent-elles floues ? (et comment y remédier)
L'exportation par défaut de PowerPoint est d'environ 96 PPP, donc les diapositives paraissent douces une fois agrandies ou imprimées. Si vos images ne sont toujours pas assez nettes :
- Utilisez les méthodes haute résolution de la Méthode 2 — aucune modification du registre nécessaire.
- Évitez les captures d'écran pour l'impression ou les grands écrans ; leur résolution est limitée par votre écran (Méthode 5).
- Préférez le PNG pour les diapositives avec du texte ou des diagrammes (PNG vs JPG).
- Pour un contrôle total sur la taille en pixels ou l'exportation côté serveur, automatisez avec VBA ou l'API Spire (Méthode 4).
Pour l'impression, visez 200–300 PPP. Le tableau de résolution complet montre la taille en pixels pour chaque cible.
FAQ
Comment enregistrer toutes les diapositives PowerPoint en images distinctes en une fois ?
Fichier → Enregistrer sous → PNG/JPEG, puis choisissez « Toutes les diapositives » lorsque vous y êtes invité. Pour un traitement par lots sans installation, utilisez le convertisseur CloudXDocs ; pour un traitement par lots scripté, la macro VBA ou l'API Spire.
Quel format d'image est le meilleur — PNG ou JPG ?
PNG pour les diapositives avec du texte, des graphiques ou des lignes nettes (sans perte). JPG pour les diapositives riches en photos où une taille de fichier plus petite est importante.
Puis-je exporter des diapositives sans Microsoft PowerPoint installé ?
Oui. Le convertisseur PPT vers image de CloudXDocs fonctionne dans n'importe quel navigateur sans installation, et Spire.Presentation (Méthode 4) convertit côté serveur sans Office. Google Slides et LibreOffice Impress peuvent également exporter des diapositives — voir sans PowerPoint.
Comment exporter une seule diapositive au lieu de toute la présentation ?
Dans l'invite Enregistrer sous, sélectionnez « Juste celle-ci ». Avec un outil de capture d'écran, capturez uniquement la diapositive visible.
Pourquoi mes diapositives exportées paraissent-elles floues, et comment obtenir des images de haute qualité ?
PowerPoint enregistre à ~96 PPP par défaut, donc les images paraissent douces lorsqu'elles sont agrandies ou imprimées. Pour améliorer la qualité, exportez à une résolution plus élevée (voir le tableau de résolution) — soit avec un outil qui effectue le rendu des diapositives à des dimensions plus grandes, soit en automatisant l'exportation avec VBA ou une API de présentation (Méthode 4) pour un contrôle total sur la taille en pixels.
Est-il sûr de télécharger ma présentation vers un convertisseur en ligne ?
Avec CloudXDocs, les fichiers téléchargés sont automatiquement supprimés du serveur 24 heures après la conversion et ne sont ni conservés ni réutilisés. Évitez les convertisseurs qui n'indiquent pas de politique de suppression.
Puis-je exporter des diapositives PowerPoint en images sans perte de qualité ?
Oui. Utilisez le format PNG et exportez à une taille en pixels plus grande si possible. Évitez les captures d'écran pour une sortie professionnelle, car la résolution de l'écran limite la qualité de l'image — utilisez plutôt la Méthode 2 (haute résolution) ou la Méthode 4 (taille en pixels personnalisée).
Quelle est la meilleure taille d'image pour les diapositives PowerPoint ?
Pour une présentation 16:9, 1920 × 1080 pixels est généralement adapté aux écrans. Des résolutions plus élevées telles que 2560 × 1440 ou 3840 × 2160 sont meilleures pour les grands écrans ou l'impression.
Connexe : exporter des diapositives PowerPoint par code (développeurs)
Si vous construisez un flux de travail documentaire, le traitement côté serveur est généralement plus fiable que les outils en ligne pour les tâches répétitives ou à haut volume. Cas courants où une bibliothèque surpasse un outil web :
- Traitement par lots — convertir des milliers de présentations selon un calendrier.
- Rapports automatisés — exporter des présentations générées en images propres.
- Pipelines documentaires — rendre les diapositives comme une étape d'un flux plus large de conversion/fusion/construction.
- Applications d'entreprise — intégrer l'exportation de diapositives dans votre propre produit ou service.
Pour les sources PDF dans le même flux, vous pouvez également rogner un PDF ou fusionner des fichiers PDF.
Spire.Presentation pour .NET rend chaque diapositive en PNG/JPG avec les dimensions exactes que vous définissez, sous Windows ou Linux, sans Microsoft Office. Consultez le projet d'exemple Spire.Presentation pour du code exécutable.
Après l'exportation, ouvrez les images (ou le .pptx original) dans CloudXDocs AI Chat pour générer automatiquement des notes de présentation, un glossaire bilingue ou une liste de tâches de compte-rendu de réunion — un moyen rapide de réutiliser le contenu exporté, sans conception ni codage requis. L'IA travaille avec le contenu ; elle ne crée pas les images.
Voir aussi
Cómo exportar diapositivas de PowerPoint como imágenes de alta calidad
Tabla de contenidos
- 1. Exportar diapositivas usando "Guardar como" de PowerPoint (más rápido)
- 2. Exportar diapositivas de PowerPoint a mayor resolución (corregir imágenes borrosas)
- 3. Convertir diapositivas de PowerPoint a imágenes en línea (sin necesidad de PowerPoint)
- 4. Automatizar la exportación de imágenes de PowerPoint (VBA y APIs)
- 5. Capturar una diapositiva como imagen (captura de pantalla)
- Soporte para la toma de decisiones
- Preguntas frecuentes (FAQ)
- Relacionado: exportar diapositivas de PowerPoint mediante código (desarrolladores)
- Ver también
Terminaste la presentación. Ahora alguien la necesita como imágenes para un sitio web, un folleto o una diapositiva dentro de otro documento. Haces clic en Guardar como, envías los archivos PNG y te responden: "Se ven borrosos".
Ese es el problema. La exportación predeterminada de diapositivas de PowerPoint es de aproximadamente 96 píxeles por pulgada (PPI), por lo que las diapositivas que se ven nítidas en la pantalla se ven suaves en cuanto se amplían o se imprimen. Esta guía cubre todas las formas prácticas de convertir diapositivas de PowerPoint en archivos PNG o JPG y, lo que es igual de importante, cómo hacer que esas imágenes sean realmente nítidas.
Respuesta rápida: Para una tarea rápida, usa "Guardar como" de PowerPoint (PNG/JPG, unos pocos clics). Si el resultado se ve borroso, aumenta la resolución de exportación; no se requieren ediciones del registro. ¿No tienes PowerPoint instalado? Usa el convertidor en línea gratuito CloudXDocs. ¿Necesitas procesar muchas presentaciones o integrar la exportación en tu propio software? Automatiza con VBA o la API de Spire.Presentation. La comparativa completa está a continuación.
1. Exportar diapositivas usando "Guardar como" de PowerPoint (más rápido)
La función integrada Guardar como de PowerPoint es la forma más sencilla de convertir una presentación en imágenes, y es la opción correcta cuando PowerPoint ya está abierto y solo necesitas una exportación rápida. PNG es la opción predeterminada más segura para diapositivas con texto, diagramas o gráficos; consulta PNG vs JPG para saber cuándo es mejor usar JPG.
- Abre la presentación y ve a Archivo → Guardar como (o Guardar una copia en OneDrive/SharePoint).
- Elige una carpeta y un nombre de archivo.
- Abre el menú desplegable Tipo y selecciona PNG o JPEG.
- Haz clic en Guardar y luego elige Todas las diapositivas (cada diapositiva como su propio archivo) o Solo esta.
Por qué los resultados pueden verse suaves: este método exporta a ~96 PPI (1280×720 en una diapositiva panorámica). Está bien para la web, pero es demasiado bajo para impresión o pantallas grandes; consulta el Método 2.
Pros: Sin software adicional, sin cuentas, es el método oficial, el más rápido para trabajos puntuales.
Contras: Fijado a ~96 PPI por defecto, por lo que las imágenes pueden verse borrosas al ampliarlas o imprimirlas; un archivo a la vez.
2. Exportar diapositivas de PowerPoint a mayor resolución (corregir imágenes borrosas)
Ideal para: impresión, carteles o cualquier uso donde 96 PPI se vea borroso. Esta es la solución principal para exportaciones de baja calidad.
La resolución de exportación predeterminada de PowerPoint es 96 PPI. La solución oficial de Microsoft consiste en editar el registro de Windows (ExportBitmapResolution), lo cual es arriesgado y fácil de hacer mal. No tienes por qué hacerlo. Aquí tienes las alternativas, todas evitan el registro: una opción predeterminada sin Office, una opción de alta resolución sin Office y una ruta totalmente programada:
| Resolución objetivo | Tamaño en píxeles (16:9 panorámico) | Ideal para |
|---|---|---|
| 96 PPI | 1280 × 720 | Web, correo electrónico, uso dentro de diapositivas |
| 150 PPI | 2000 × 1125 | Proyectores, monitores grandes |
| 200 PPI | 2667 × 1500 | Folleto A4 |
| 300 PPI | 4000 × 2250 | Carteles, impresión profesional |
PPI (píxeles por pulgada) es la medida en pantalla; para impresión, apunta a 200–300 PPI. El valor predeterminado de PowerPoint es 96 PPI.
- Sin Office, calidad predeterminada: CloudXDocs convierte en el navegador a la misma calidad predeterminada (~96 PPI); consulta el Método 3.
- Sin Office, mayor resolución: CloudConvert (también en el Método 3) renderiza en línea a ~1920×1080 y te permite aumentar los DPI, superando cómodamente los 96 PPI.
- Tamaño personalizado (mayor control): programa la exportación a cualquier tamaño de píxel con VBA o una API; Método 4.
Ambas imágenes son la misma diapositiva 16:9, cada una escalada al 30% de su tamaño original en píxeles para que la diferencia sea fácil de comparar al mismo ancho en la página. A 96 PPI (arriba) el texto y las líneas finas se ven más suaves; a 192 PPI (abajo) se mantienen notablemente más nítidos.
Si utilizas el método del registro: ve a
HKEY_CURRENT_USER\Software\Microsoft\Office\<ver>\PowerPoint\Options, añade un valorDWORDllamadoExportBitmapResolutiony establece su valor decimal (por ejemplo,300). Haz una copia de seguridad del registro primero; procede bajo tu propia responsabilidad.
Ideal para: cualquier persona que alcance el límite de calidad de 96 PPI y necesite una salida más nítida para impresión o pantallas grandes.
Ten en cuenta: la función integrada "Guardar como" no puede superar su valor predeterminado sin el ajuste del registro o una herramienta diferente. La ruta VBA/API y CloudConvert superan ese límite; CloudXDocs se mantiene en el valor predeterminado pero no necesita Office.
3. Convertir diapositivas de PowerPoint a imágenes en línea (sin necesidad de PowerPoint)
Ideal para: usuarios sin PowerPoint instalado o cualquier persona que desee un convertidor basado en navegador cuando Office no está disponible o se necesiten procesar varios archivos rápidamente.
CloudXDocs es un convertidor basado en navegador del mismo equipo detrás de Spire. No necesita Microsoft Office ni instalación.
- Abre el Convertidor de PPT a imagen de CloudXDocs en cualquier navegador.
- Haz clic o arrastra tu archivo
.pptx/.pptal área de carga. - Espera a que CloudXDocs renderice y convierta automáticamente (generalmente toma segundos).
- Descarga el archivo
.zipresultante y descomprímelo para obtener cada diapositiva como una imagen separada.
Por qué es útil: CloudXDocs proporciona una forma cómoda basada en navegador para convertir presentaciones cuando PowerPoint no está disponible o cuando necesitas procesar varios archivos rápidamente. Los archivos cargados se eliminan automáticamente después de 24 horas según la política del servicio.
Pros: Sin Office, sin instalación, sin software de escritorio; maneja toda una presentación como un zip; funciona en cualquier dispositivo.
Contras: Requiere conexión a internet; la calidad de salida sigue el renderizado del convertidor en lugar de una configuración que tú controles.
Si necesitas una salida más nítida pero no puedes instalar Office, algunos convertidores en línea te permiten elegir la resolución de exportación. CloudConvert, por ejemplo, tiene un valor predeterminado de aproximadamente 1920×1080 y te permite aumentar los DPI, superando cómodamente el valor predeterminado de 96 PPI de PowerPoint.
Los pasos son esencialmente los mismos que los anteriores: sube tu .pptx → elige JPG o PNG → aumenta los DPI en las opciones → convierte → descarga el zip.
Esto convierte a un convertidor en línea en una solución real para exportaciones borrosas cuando no hay una herramienta de escritorio disponible, aunque los archivos pasan por un servidor de terceros, así que evita presentaciones confidenciales.
4. Automatizar la exportación de imágenes de PowerPoint (VBA y APIs)
Ideal para: muchas presentaciones, trabajos programados o integrar la exportación en una herramienta interna. Dos rutas dependiendo de quién seas.
Opción A — Macro VBA (para usuarios avanzados de Office en Windows)
Si trabajas en PowerPoint en Windows y necesitas un tamaño de exportación personalizado, una macro corta automatiza toda la presentación. Presiona Alt + F11, Insertar → Módulo, pega el código y luego Macros → Ejecutar ExportSlidesHighRes (crea primero la carpeta C:\Exports\):
Sub ExportSlidesHighRes()
    Dim sld As Slide, i As Integer
    i = 1
    For Each sld In ActivePresentation.Slides
        sld.Export "C:\Exports\Slide_" & i & ".png", "PNG", 3000, 1688  ' ~200 PPI
        i = i + 1
    Next sld
End Sub
Ajusta 3000, 1688 para alcanzar tu objetivo (consulta la tabla del Método 2).
Opción B — API Spire.Presentation (para desarrolladores .NET)
¿Necesitas una exportación del lado del servidor o totalmente programable? Spire.Presentation for .NET renderiza cada diapositiva a una imagen con unas pocas líneas de código: sin Microsoft PowerPoint, sin ediciones del registro, con el tamaño de salida establecido en el código. Para un tutorial completo, consulta nuestra guía de Spire.Presentation para convertir diapositivas a imágenes.
using Spire.Presentation;
using System.Drawing;
using System.Drawing.Imaging;

class Program
{
    static void Main(string[] args)
    {
        using (Presentation ppt = new Presentation())
        {
            ppt.LoadFromFile("Sample.pptx");
            for (int i = 0; i < ppt.Slides.Count; i++)
            {
                Image img = ppt.Slides[i].SaveAsImage(1280 * 2, 720 * 2);
                img.Save(string.Format("Slide_{0}.png", i), ImageFormat.Png);
            }
        }
    }
}
SaveAsImage(ancho, alto) establece el tamaño exacto en píxeles, por lo que la API renderiza a la resolución que especifiques: sin registro, sin Office. Aquí 1280 * 2, 720 * 2 produce 2560×1440 (aproximadamente 192 PPI); cambia los dos números a cualquier tamaño de la tabla del Método 2.
Consejo empresarial: ejecuta sin interfaz gráfica en Linux, establece dimensiones de salida exactas y canaliza las exportaciones hacia un flujo de trabajo documental más amplio: sin Office, sin ajustes de registro. Descarga el proyecto de ejemplo completo →
Pros: Control total sobre el tamaño en píxeles, procesamiento por lotes/sin interfaz, sin pasos manuales; Spire se ejecuta sin Office instalado.
Contras: VBA solo en Windows con PowerPoint; la API es una biblioteca de pago para uso en producción.
5. Capturar una diapositiva como imagen (captura de pantalla)
Ideal para: capturar una diapositiva exactamente como se muestra en pantalla, o cuando no puedes abrir el archivo en un editor.
- Windows: Recortes y anotación (
Win + Shift + S) → selecciona la diapositiva → guarda como PNG. - macOS:
Cmd + Shift + 4y luego la barra espaciadora para capturar una ventana. - Terceros: ShareX, Lightshot o Snagit para capturas anotadas.
Advertencia: las capturas de pantalla heredan la resolución de tu pantalla y pueden incluir elementos de la interfaz. Para imágenes limpias de diapositivas completas a un tamaño controlable, prefiere los Métodos 1–4.
Pros: Configuración cero, funciona en cualquier máquina, perfecto para "capturar exactamente lo que hay en pantalla".
Contras: Resolución limitada por tu pantalla; no es una exportación real; no se puede procesar por lotes.
Soporte para la toma de decisiones
Las secciones a continuación te ayudan a comparar métodos, elegir un formato y solucionar problemas de calidad. ¿Trabajas desde un PDF en lugar de PowerPoint? Mira cómo convertir páginas PDF a imágenes.
Comparativa y cómo elegir
| # | Método | Ideal para | Resolución | Instalación necesaria | ¿Lotes? |
|---|---|---|---|---|---|
| 1 | Guardar como de PowerPoint | Trabajo rápido | 96 PPI | PowerPoint | Por archivo |
| 2 | Mayor resolución | Corregir borrosidad / impresión | Hasta 300 PPI* | — | Por archivo |
| 3 | CloudXDocs en línea | Sin Office / rápido | Igual al predeterminado (~96 PPI) | No (navegador) | Sí (zip) |
| 4 | VBA / API Spire | Desarrolladores / lotes / servidor | Píxeles personalizados | VBA: PowerPoint; Spire: NuGet | Sí |
| 5 | Captura de pantalla | Diapositiva única en pantalla | Limitado por pantalla | No | No |
| — | Google Slides / LibreOffice | Sin PowerPoint | App nativa | App | Por archivo |
*Logrado mediante VBA o la API de Spire; las herramientas en línea renderizan a las dimensiones nativas de la diapositiva.
Elige según la situación:
- Necesitas una o dos imágenes rápidamente → Guardar como de PowerPoint
- El resultado se ve borroso → Exportación de mayor resolución
- No tienes PowerPoint instalado → CloudXDocs en línea
- Cientos de diapositivas / lado del servidor → VBA o API de Spire
- Captura exacta en pantalla → Captura de pantalla
Cómo exportar diapositivas como imágenes sin PowerPoint
Si Microsoft PowerPoint no está instalado, todavía tienes opciones: el convertidor CloudXDocs anterior, además de dos suites de oficina gratuitas:
- Google Slides: abre la presentación, luego Archivo → Descargar → Imagen PNG (.png) o Imagen JPEG (.jpg). Cada descarga exporta la diapositiva actual; repite por diapositiva, o usa CloudXDocs para toda la presentación a la vez.
- LibreOffice Impress: abre el archivo, luego Archivo → Exportar, elige PNG o JPG y selecciona las diapositivas a exportar.
Son útiles cuando PowerPoint no está disponible, aunque ofrecen menos control sobre la resolución que el Método 2 o el Método 4.
PNG vs JPG: ¿qué formato deberías exportar?
| Formato | Ideal para | Ventajas |
|---|---|---|
| PNG | Texto, diagramas, gráficos, capturas de UI | Calidad sin pérdida, bordes más nítidos |
| JPG | Fotos, diapositivas con muchas imágenes | Menor tamaño de archivo |
Para la mayoría de las presentaciones de negocios, PNG suele ser la mejor opción porque las diapositivas a menudo contienen texto y diagramas que necesitan bordes nítidos. Usa JPG solo cuando una diapositiva esté dominada por fotografías y el tamaño del archivo importe más que un texto perfecto a nivel de píxel.
¿Por qué las imágenes exportadas se ven borrosas? (y cómo corregirlo)
La exportación predeterminada de PowerPoint es de aproximadamente 96 PPI, por lo que las diapositivas se ven suaves una vez que se amplían o se imprimen. Si tus imágenes aún no son lo suficientemente nítidas:
- Usa las rutas de mayor resolución en el Método 2; no se necesitan ediciones del registro.
- Evita las capturas de pantalla para impresión o pantallas grandes; su resolución está limitada por tu pantalla (Método 5).
- Prefiere PNG para diapositivas con texto o diagramas (PNG vs JPG).
- Para un control total sobre el tamaño en píxeles o la exportación del lado del servidor, automatiza con VBA o la API de Spire (Método 4).
Para impresión, apunta a 200–300 PPI. La tabla de resolución completa muestra el tamaño en píxeles para cada objetivo.
Preguntas frecuentes (FAQ)
¿Cómo guardo todas las diapositivas de PowerPoint como imágenes separadas a la vez?
Archivo → Guardar como → PNG/JPEG, luego elige "Todas las diapositivas" cuando se te solicite. Para un lote sin instalación, usa el convertidor CloudXDocs; para un lote programado, la macro VBA o la API de Spire.
¿Qué formato de imagen es mejor: PNG o JPG?
PNG para diapositivas con texto, gráficos o líneas nítidas (sin pérdida). JPG para diapositivas con muchas fotos donde el tamaño de archivo más pequeño es importante.
¿Puedo exportar diapositivas sin tener Microsoft PowerPoint instalado?
Sí. El Convertidor de PPT a imagen de CloudXDocs se ejecuta en cualquier navegador sin instalación, y Spire.Presentation (Método 4) convierte del lado del servidor sin Office. Google Slides y LibreOffice Impress también pueden exportar diapositivas; consulta sin PowerPoint.
¿Cómo exporto solo una diapositiva en lugar de toda la presentación?
En el aviso de Guardar como, selecciona "Solo esta". Con una herramienta de captura de pantalla, captura solo la diapositiva visible.
¿Por qué mis diapositivas exportadas se ven borrosas y cómo obtengo imágenes de alta calidad?
PowerPoint guarda a ~96 PPI por defecto, por lo que las imágenes se ven suaves al ampliarlas o imprimirlas. Para mejorar la calidad, exporta a una resolución más alta (consulta la tabla de resolución), ya sea con una herramienta que renderice diapositivas a dimensiones mayores o automatizando la exportación con VBA o una API de presentación (Método 4) para un control total sobre el tamaño en píxeles.
¿Es seguro subir mi presentación a un convertidor en línea?
Con CloudXDocs, los archivos cargados se eliminan automáticamente del servidor 24 horas después de la conversión y no se conservan ni reutilizan. Evita los convertidores que no indiquen una política de eliminación.
¿Puedo exportar diapositivas de PowerPoint como imágenes sin perder calidad?
Sí. Usa el formato PNG y exporta a un tamaño de píxel mayor cuando sea posible. Evita las capturas de pantalla para una salida profesional, porque la resolución de pantalla limita la calidad de la imagen; usa en su lugar el Método 2 (mayor resolución) o el Método 4 (tamaño de píxel personalizado).
¿Cuál es el mejor tamaño de imagen para las diapositivas de PowerPoint?
Para una presentación 16:9, 1920 × 1080 píxeles suele ser adecuado para pantallas. Resoluciones más altas como 2560 × 1440 o 3840 × 2160 son mejores para pantallas grandes o impresión.
Relacionado: exportar diapositivas de PowerPoint mediante código (desarrolladores)
Si estás creando un flujo de trabajo documental, el procesamiento del lado del servidor suele ser más fiable que las herramientas en línea para trabajos repetitivos o de gran volumen. Casos comunes donde una biblioteca supera a una herramienta web:
- Procesamiento por lotes: convierte miles de presentaciones según un horario.
- Informes automatizados: exporta presentaciones generadas a imágenes limpias.
- Canalizaciones de documentos: renderiza diapositivas como un paso en un flujo más grande de conversión/fusión/construcción.
- Aplicaciones empresariales: integra la exportación de diapositivas en tu propio producto o servicio.
Para fuentes PDF en el mismo flujo de trabajo, también puedes recortar un PDF o fusionar archivos PDF.
Spire.Presentation for .NET renderiza cada diapositiva a PNG/JPG con las dimensiones exactas que establezcas, en Windows o Linux, sin Microsoft Office. Consulta el proyecto de ejemplo de Spire.Presentation para obtener código ejecutable.
Después de la exportación, abre las imágenes (o el .pptx original) en CloudXDocs AI Chat para generar automáticamente notas del orador, un glosario bilingüe o una lista de tareas pendientes de las minutas de la reunión: una forma rápida de reutilizar el contenido exportado, sin necesidad de diseño o programación. La IA trabaja con el contenido; no crea las imágenes.
Ver también
So exportieren Sie PowerPoint-Folien als hochwertige Bilder
Inhaltsverzeichnis
- 1. Folien exportieren mit PowerPoint „Speichern unter“ (am schnellsten)
- 2. PowerPoint-Folien mit höherer Auflösung exportieren (unscharfe Bilder korrigieren)
- 3. PowerPoint-Folien online in Bilder konvertieren (kein PowerPoint erforderlich)
- 4. PowerPoint-Bildexport automatisieren (VBA & APIs)
- 5. Eine Folie als Bild aufnehmen (Screenshot)
- Entscheidungshilfe
- FAQ
- Verwandt: PowerPoint-Folien per Code exportieren (für Entwickler)
- Siehe auch
Sie haben die Präsentation fertiggestellt. Nun benötigt jemand die Folien als Bilder für eine Website, ein Handout oder zur Einbettung in ein anderes Dokument. Sie klicken auf Speichern unter, senden die PNGs, und erhalten die Rückmeldung: „Diese sehen unscharf aus.“
Das ist der Haken. Der Standard-Folienexport von PowerPoint liegt bei etwa 96 Pixel pro Zoll (PPI). Folien, die auf dem Bildschirm scharf aussehen, wirken daher verwaschen, sobald sie vergrößert oder gedruckt werden. Dieser Leitfaden behandelt alle praktischen Wege, um PowerPoint-Folien in PNG- oder JPG-Dateien umzuwandeln – und, was ebenso wichtig ist, wie Sie diese Bilder tatsächlich scharf bekommen.
Kurze Antwort: Für einen schnellen Einzelexport verwenden Sie PowerPoints „Speichern unter“ (PNG/JPG, wenige Klicks). Wenn das Ergebnis unscharf aussieht, erhöhen Sie die Exportauflösung – ohne Registry-Änderungen. Kein PowerPoint installiert? Nutzen Sie den kostenlosen CloudXDocs Online-Konverter. Müssen Sie viele Präsentationen verarbeiten oder den Export in Ihre eigene Software integrieren? Automatisieren Sie mit VBA oder der Spire.Presentation API. Den vollständigen Vergleich finden Sie unten.
1. Folien exportieren mit PowerPoint „Speichern unter“ (am schnellsten)
Die integrierte Funktion Speichern unter in PowerPoint ist der einfachste Weg, eine Präsentation in Bilder umzuwandeln. Sie ist die richtige Wahl, wenn PowerPoint bereits geöffnet ist und Sie nur einen schnellen Export benötigen. PNG ist das sicherere Standardformat für Folien mit Text, Diagrammen oder Grafiken – siehe PNG vs. JPG, um zu erfahren, wann JPG besser geeignet ist.
- Öffnen Sie die Präsentation und gehen Sie auf Datei → Speichern unter (oder Kopie speichern bei OneDrive/SharePoint).
- Wählen Sie einen Ordner und einen Dateinamen.
- Öffnen Sie das Dropdown-Menü Dateityp und wählen Sie PNG oder JPEG.
- Klicken Sie auf Speichern und wählen Sie dann Alle Folien (jede Folie als eigene Datei) oder Nur diese.
Warum die Ergebnisse unscharf wirken können: Diese Methode exportiert mit ca. 96 PPI (1280×720 bei einer Breitbild-Folie). Gut für das Web, zu niedrig für Druck oder große Displays – siehe Methode 2.
Vorteile: Keine zusätzliche Software, kein Konto erforderlich, offizielle Methode, am schnellsten für Einzelaufträge.
Nachteile: Standardmäßig auf ~96 PPI festgelegt, daher können Bilder bei Vergrößerung oder Druck unscharf wirken; nur eine Datei nach der anderen.
2. PowerPoint-Folien mit höherer Auflösung exportieren (unscharfe Bilder korrigieren)
Am besten geeignet für: Druck, Poster oder jede Verwendung, bei der 96 PPI unscharf wirken. Dies ist die Hauptlösung für qualitativ minderwertige Exporte.
Die Standard-Exportauflösung von PowerPoint beträgt 96 PPI. Die offizielle Lösung von Microsoft besteht in der Bearbeitung der Windows-Registry (ExportBitmapResolution) – riskant und fehleranfällig. Das müssen Sie nicht tun. Hier sind die Alternativen – alle vermeiden die Registry: eine Standardoption ohne Office, eine hochauflösende Option ohne Office und ein vollständig skriptbasierter Weg:
| Zielauflösung | Pixelgröße (16:9 Breitbild) | Geeignet für |
|---|---|---|
| 96 PPI | 1280 × 720 | Web, E-Mail, Verwendung in Folien |
| 150 PPI | 2000 × 1125 | Projektoren, große Monitore |
| 200 PPI | 2667 × 1500 | A4-Handouts |
| 300 PPI | 4000 × 2250 | Poster, professioneller Druck |
PPI (Pixel pro Zoll) ist das Maß für den Bildschirm; für den Druck sollten Sie 200–300 PPI anstreben. Der Standard von PowerPoint liegt bei 96 PPI.
- Kein Office, Standardqualität: CloudXDocs konvertiert im Browser mit der gleichen Standardauflösung (~96 PPI) – siehe Methode 3.
- Kein Office, höhere Auflösung: CloudConvert (ebenfalls in Methode 3) rendert online mit ca. 1920×1080 und erlaubt es Ihnen, die DPI zu erhöhen – deutlich über 96 PPI.
- Benutzerdefinierte Größe (maximale Kontrolle): Skripten Sie den Export mit einer beliebigen Pixelgröße per VBA oder API – Methode 4.
Beide Bilder zeigen dieselbe 16:9-Folie, jeweils auf 30% ihrer ursprünglichen Pixelgröße skaliert, damit der Unterschied bei gleicher Breite auf der Seite leicht zu vergleichen ist. Bei 96 PPI (oben) wirken Text und dünne Linien weicher; bei 192 PPI (unten) bleiben sie deutlich schärfer.
Falls Sie die Registry-Methode verwenden: Gehen Sie zu
HKEY_CURRENT_USER\Software\Microsoft\Office\<Version>\PowerPoint\Options, fügen Sie einenDWORD-Wert namensExportBitmapResolutionhinzu und setzen Sie den Dezimalwert (z.B.300). Sichern Sie vorher die Registry; die Durchführung erfolgt auf eigene Gefahr.
Am besten geeignet für: jeden, der an die Qualitätsgrenze von 96 PPI stößt und schärfere Ausgaben für Druck oder große Displays benötigt.
Beachten Sie: Die integrierte „Speichern unter“-Funktion kann den Standard ohne Registry-Änderung oder ein anderes Tool nicht überschreiten. Der VBA/API-Weg und CloudConvert umgehen diese Grenze; CloudXDocs bleibt beim Standard, benötigt aber kein Office.
3. PowerPoint-Folien online in Bilder konvertieren (kein PowerPoint erforderlich)
Am besten geeignet für: Benutzer ohne installiertes PowerPoint oder jeden, der einen browserbasierten Konverter wünscht, wenn Office nicht verfügbar ist oder mehrere Dateien schnell verarbeitet werden müssen.
CloudXDocs ist ein browserbasierter Konverter des Teams hinter Spire. Er benötigt kein Microsoft Office und keine Installation.
- Öffnen Sie den CloudXDocs PPT-zu-Bild-Konverter in einem beliebigen Browser.
- Klicken Sie in den Upload-Bereich oder ziehen Sie Ihre
.pptx/.ppt-Datei hinein. - Warten Sie, bis CloudXDocs die Datei automatisch rendert und konvertiert (meist nur Sekunden).
- Laden Sie die resultierende
.zip-Datei herunter und entpacken Sie diese, um jede Folie als separates Bild zu erhalten.
Warum es nützlich ist: CloudXDocs bietet eine bequeme browserbasierte Möglichkeit, Präsentationen zu konvertieren, wenn PowerPoint nicht verfügbar ist oder Sie mehrere Dateien schnell verarbeiten müssen. Hochgeladene Dateien werden gemäß der Servicerichtlinie nach 24 Stunden automatisch gelöscht.
Vorteile: Kein Office, keine Installation, keine Desktop-Software; verarbeitet eine ganze Präsentation als Zip; funktioniert auf jedem Gerät.
Nachteile: Erfordert eine Internetverbindung; die Ausgabequalität folgt dem Rendering des Konverters und nicht einer Einstellung, die Sie steuern können.
Wenn Sie eine schärfere Ausgabe benötigen, aber kein Office installieren können, erlauben einige Online-Konverter die Wahl der Exportauflösung. CloudConvert beispielsweise verwendet standardmäßig ca. 1920×1080 und lässt Sie die DPI weiter erhöhen – deutlich über den 96-PPI-Standard von PowerPoint.
Die Schritte sind im Wesentlichen dieselben wie oben: .pptx hochladen → JPG oder PNG wählen → DPI in den Optionen erhöhen → konvertieren → Zip herunterladen.
Damit ist ein Online-Konverter eine echte Lösung für unscharfe Exporte, wenn kein Desktop-Tool verfügbar ist. Da die Dateien jedoch über einen Drittanbieterserver laufen, sollten Sie vertrauliche Präsentationen vermeiden.
4. PowerPoint-Bildexport automatisieren (VBA & APIs)
Am besten geeignet für: viele Präsentationen, geplante Aufgaben oder die Integration des Exports in ein internes Tool. Zwei Wege, je nachdem, wer Sie sind.
Option A — VBA-Makro (für Office-Power-User unter Windows)
Wenn Sie unter Windows mit PowerPoint arbeiten und eine benutzerdefinierte Exportgröße benötigen, automatisiert ein kurzes Makro die gesamte Präsentation. Drücken Sie Alt + F11, Einfügen → Modul, fügen Sie den Code ein und wählen Sie dann Makros → ExportSlidesHighRes ausführen (erstellen Sie vorher den Ordner C:\Exports\):
Sub ExportSlidesHighRes()
    Dim sld As Slide, i As Integer
    i = 1
    For Each sld In ActivePresentation.Slides
        sld.Export "C:\Exports\Slide_" & i & ".png", "PNG", 3000, 1688  ' ~200 PPI
        i = i + 1
    Next sld
End Sub
Passen Sie 3000, 1688 an Ihr Ziel an (siehe Tabelle in Methode 2).
Option B — Spire.Presentation API (für .NET-Entwickler)
Benötigen Sie einen serverseitigen oder vollständig programmierbaren Export? Spire.Presentation für .NET rendert jede Folie mit wenigen Zeilen Code in ein Bild – kein Microsoft PowerPoint, keine Registry-Änderungen, Ausgabegröße per Code einstellbar. Eine vollständige Anleitung finden Sie in unserem Spire.Presentation-Tutorial zur Konvertierung von Folien in Bilder.
using Spire.Presentation;
using System.Drawing;
using System.Drawing.Imaging;

class Program
{
    static void Main(string[] args)
    {
        using (Presentation ppt = new Presentation())
        {
            ppt.LoadFromFile("Sample.pptx");
            for (int i = 0; i < ppt.Slides.Count; i++)
            {
                Image img = ppt.Slides[i].SaveAsImage(1280 * 2, 720 * 2);
                img.Save(string.Format("Slide_{0}.png", i), ImageFormat.Png);
            }
        }
    }
}
SaveAsImage(width, height) legt die exakte Pixelgröße fest, sodass die API mit der von Ihnen angegebenen Auflösung rendert – ohne Registry, ohne Office. Hier erzeugt 1280 * 2, 720 * 2 eine Auflösung von 2560×1440 (ca. 192 PPI); ändern Sie die beiden Zahlen in eine beliebige Größe aus der Tabelle in Methode 2.
Enterprise-Tipp: Führen Sie den Prozess „headless“ auf Linux aus, legen Sie exakte Ausgabedimensionen fest und leiten Sie Exporte in einen größeren Dokument-Workflow – kein Office, keine Registry-Änderungen. Vollständiges Beispielprojekt herunterladen →
Vorteile: Volle Kontrolle über Pixelgröße, echte Stapelverarbeitung/Headless-Betrieb, keine manuellen Schritte; Spire läuft ohne installiertes Office.
Nachteile: VBA nur unter Windows mit PowerPoint; die API ist eine kostenpflichtige Bibliothek für den produktiven Einsatz.
5. Eine Folie als Bild aufnehmen (Screenshot)
Am besten geeignet für: das schnelle Erfassen einer einzelnen Folie genau so, wie sie auf dem Bildschirm angezeigt wird, oder wenn Sie die Datei nicht in einem Editor öffnen können.
- Windows: Ausschneiden und Skizzieren (
Win + Umschalt + S) → Folie auswählen → als PNG speichern. - macOS:
Cmd + Umschalt + 4, dann Leertaste, um ein Fenster aufzunehmen. - Drittanbieter: ShareX, Lightshot oder Snagit für annotierte Aufnahmen.
Hinweis: Screenshots übernehmen die Auflösung Ihres Bildschirms und können UI-Elemente enthalten. Für saubere, bildschirmfüllende Folien in steuerbarer Größe bevorzugen Sie die Methoden 1–4.
Vorteile: Keine Einrichtung, funktioniert auf jedem Gerät, perfekt für „genau das aufnehmen, was auf dem Bildschirm ist“.
Nachteile: Auflösung durch Ihr Display begrenzt; kein echter Export; keine Stapelverarbeitung möglich.
Entscheidungshilfe
Die folgenden Abschnitte helfen Ihnen beim Vergleich der Methoden, der Wahl eines Formats und der Behebung von Qualitätsproblemen. Arbeiten Sie mit einem PDF statt mit PowerPoint? Sehen Sie hier, wie man PDF-Seiten in Bilder konvertiert.
Vergleich & Auswahlhilfe
| # | Methode | Am besten für | Auflösung | Installation nötig | Stapelverarbeitung? |
|---|---|---|---|---|---|
| 1 | PowerPoint Speichern unter | Schnelle Einzelexporte | 96 PPI | PowerPoint | Pro Datei |
| 2 | Höhere Auflösung | Unscharfe Korrektur / Druck | Bis zu 300 PPI* | — | Pro Datei |
| 3 | CloudXDocs online | Kein Office / schnell | Wie Standard (~96 PPI) | Nein (Browser) | Ja (Zip) |
| 4 | VBA / Spire API | Dev / Batch / Server | Benutzerdef. px | VBA: PowerPoint; Spire: NuGet | Ja |
| 5 | Screenshot | Einzelne Folie auf Bildschirm | Bildschirmbegrenzt | Nein | Nein |
| — | Google Slides / LibreOffice | Kein PowerPoint | Native App | App | Pro Datei |
*Erreicht via VBA oder Spire API; Online-Tools rendern in den nativen Dimensionen der Folie.
Wahl nach Situation:
- Ein oder zwei Bilder schnell benötigt → PowerPoint Speichern unter
- Ergebnis wirkt unscharf → Hochauflösender Export
- Kein PowerPoint installiert → CloudXDocs online
- Hunderte von Folien / serverseitig → VBA oder Spire API
- Exakte Aufnahme vom Bildschirm → Screenshot
Wie man Folien ohne PowerPoint als Bilder exportiert
Wenn Microsoft PowerPoint nicht installiert ist, haben Sie dennoch Optionen – den oben genannten CloudXDocs-Konverter sowie zwei kostenlose Office-Suiten:
- Google Slides: Öffnen Sie die Präsentation, dann Datei → Herunterladen → PNG-Bild (.png) oder JPEG-Bild (.jpg). Jeder Download exportiert die aktuelle Folie; wiederholen Sie dies pro Folie oder nutzen Sie CloudXDocs für eine ganze Präsentation auf einmal.
- LibreOffice Impress: Öffnen Sie die Datei, dann Datei → Exportieren, wählen Sie PNG oder JPG und wählen Sie die zu exportierenden Folien aus.
Diese sind praktisch, wenn PowerPoint nicht verfügbar ist, bieten jedoch weniger Kontrolle über die Auflösung als Methode 2 oder Methode 4.
PNG vs. JPG: Welches Format sollten Sie exportieren?
| Format | Am besten für | Vorteile |
|---|---|---|
| PNG | Text, Diagramme, Grafiken, UI-Screenshots | Verlustfreie Qualität, schärfere Kanten |
| JPG | Fotos, bildlastige Folien | Kleinere Dateigröße |
Für die meisten Geschäftspräsentationen ist PNG meist die bessere Wahl, da Folien oft Text und Diagramme enthalten, die scharfe Kanten benötigen. Verwenden Sie JPG nur, wenn eine Folie von Fotos dominiert wird und die Dateigröße wichtiger ist als pixelgenauer Text.
Warum wirken exportierte Bilder unscharf? (und wie man es behebt)
Der Standard-Export von PowerPoint liegt bei ca. 96 PPI, daher wirken Folien bei Vergrößerung oder Druck weich. Wenn Ihre Bilder immer noch nicht scharf genug sind:
- Nutzen Sie die hochauflösenden Wege in Methode 2 – keine Registry-Änderungen nötig.
- Vermeiden Sie Screenshots für Druck oder große Displays; deren Auflösung ist durch Ihren Bildschirm begrenzt (Methode 5).
- Bevorzugen Sie PNG für Folien mit Text oder Diagrammen (PNG vs. JPG).
- Für volle Kontrolle über Pixelgröße oder serverseitigen Export automatisieren Sie mit VBA oder der Spire API (Methode 4).
Für den Druck sollten Sie 200–300 PPI anstreben. Die vollständige Auflösungstabelle zeigt die Pixelgröße für jedes Ziel.
FAQ
Wie speichere ich alle PowerPoint-Folien gleichzeitig als separate Bilder?
Datei → Speichern unter → PNG/JPEG, dann bei Aufforderung „Alle Folien“ wählen. Für eine Stapelverarbeitung ohne Installation nutzen Sie den CloudXDocs-Konverter; für skriptbasierte Stapelverarbeitung das VBA-Makro oder die Spire API.
Welches Bildformat ist am besten – PNG oder JPG?
PNG für Folien mit Text, Diagrammen oder scharfen Linien (verlustfrei). JPG für fotolastige Folien, bei denen eine kleinere Dateigröße wichtig ist.
Kann ich Folien ohne installiertes Microsoft PowerPoint exportieren?
Ja. Der CloudXDocs PPT-zu-Bild-Konverter läuft in jedem Browser ohne Installation, und Spire.Presentation (Methode 4) konvertiert serverseitig ohne Office. Google Slides und LibreOffice Impress können ebenfalls Folien exportieren – siehe ohne PowerPoint.
Wie exportiere ich nur eine Folie statt der ganzen Präsentation?
Wählen Sie bei der „Speichern unter“-Aufforderung „Nur diese“. Mit einem Screenshot-Tool nehmen Sie nur die sichtbare Folie auf.
Warum wirken meine exportierten Folien unscharf und wie erhalte ich hochwertige Bilder?
PowerPoint speichert standardmäßig mit ~96 PPI, daher wirken Bilder bei Vergrößerung oder Druck weich. Um die Qualität zu verbessern, exportieren Sie mit einer höheren Auflösung (siehe Auflösungstabelle) – entweder mit einem Tool, das Folien in größeren Dimensionen rendert, oder durch Automatisierung des Exports mit VBA oder einer Präsentations-API (Methode 4) für volle Kontrolle über die Pixelgröße.
Ist es sicher, meine Präsentation auf einen Online-Konverter hochzuladen?
Bei CloudXDocs werden hochgeladene Dateien 24 Stunden nach der Konvertierung automatisch vom Server gelöscht und nicht aufbewahrt oder wiederverwendet. Vermeiden Sie Konverter, die keine Löschrichtlinie angeben.
Kann ich PowerPoint-Folien als Bilder exportieren, ohne an Qualität zu verlieren?
Ja. Verwenden Sie das PNG-Format und exportieren Sie nach Möglichkeit mit einer größeren Pixelgröße. Vermeiden Sie Screenshots für professionelle Ausgaben, da die Bildschirmauflösung die Bildqualität begrenzt – verwenden Sie stattdessen Methode 2 (höhere Auflösung) oder Methode 4 (benutzerdefinierte Pixelgröße).
Was ist die beste Bildgröße für PowerPoint-Folien?
Für eine 16:9-Präsentation sind 1920 × 1080 Pixel für Bildschirme meist ausreichend. Höhere Auflösungen wie 2560 × 1440 oder 3840 × 2160 sind besser für große Displays oder den Druck.
Verwandt: PowerPoint-Folien per Code exportieren (für Entwickler)
Wenn Sie einen Dokument-Workflow aufbauen, ist serverseitige Verarbeitung meist zuverlässiger als Online-Tools für repetitive oder hochvolumige Aufgaben. Häufige Fälle, in denen eine Bibliothek einem Web-Tool überlegen ist:
- Stapelverarbeitung – Tausende von Präsentationen nach Zeitplan konvertieren.
- Automatisierte Berichte – Generierte Präsentationen in saubere Bilder exportieren.
- Dokumenten-Pipelines – Folien als einen Schritt in einem größeren Konvertierungs-/Zusammenführungs-/Build-Prozess rendern.
- Unternehmensanwendungen – Folienexport in Ihr eigenes Produkt oder Ihren Service einbetten.
Für PDF-Quellen im selben Workflow können Sie auch ein PDF zuschneiden oder PDF-Dateien zusammenführen.
Spire.Presentation für .NET rendert jede Folie in PNG/JPG mit den exakten Dimensionen, die Sie festlegen, unter Windows oder Linux, ohne Microsoft Office. Siehe das Spire.Presentation-Beispielprojekt für ausführbaren Code.
Öffnen Sie nach dem Export die Bilder (oder die ursprüngliche .pptx) im CloudXDocs AI Chat, um automatisch Sprechernotizen, ein zweisprachiges Glossar oder eine To-Do-Liste aus dem Protokoll zu generieren – ein schneller Weg, exportierte Inhalte wiederzuverwenden, ohne Design- oder Programmierkenntnisse. Die KI arbeitet mit dem Inhalt; sie erstellt keine Bilder.
Siehe auch
Как экспортировать слайды PowerPoint в изображения высокого качества
Оглавление
- 1. Экспорт слайдов через функцию «Сохранить как» в PowerPoint (самый быстрый способ)
- 2. Экспорт слайдов PowerPoint в высоком разрешении (устранение размытости)
- 3. Конвертация слайдов PowerPoint в изображения онлайн (без установки PowerPoint)
- 4. Автоматизация экспорта изображений PowerPoint (VBA и API)
- 5. Захват слайда как изображения (скриншот)
- Поддержка принятия решений
- Часто задаваемые вопросы (FAQ)
- По теме: экспорт слайдов PowerPoint программным путем (для разработчиков)
- См. также
Презентация готова. Теперь кому-то нужно получить ее в виде изображений для веб-сайта, раздаточного материала или вставки в другой документ. Вы нажимаете «Сохранить как», отправляете PNG-файлы, а в ответ получаете: «Они выглядят размытыми».
В этом и подвох. Стандартный экспорт слайдов в PowerPoint выполняется с разрешением около 96 точек на дюйм (PPI), поэтому слайды, которые четко выглядят на экране, становятся нечеткими при увеличении или печати. В этом руководстве рассматриваются все практические способы превращения слайдов PowerPoint в файлы PNG или JPG — и, что не менее важно, способы сделать эти изображения действительно четкими.
Краткий ответ: Для быстрой разовой задачи используйте «Сохранить как» в PowerPoint (PNG/JPG, несколько кликов). Если результат выглядит размытым, увеличьте разрешение экспорта — редактирование реестра не требуется. PowerPoint не установлен? Воспользуйтесь бесплатным онлайн-конвертером CloudXDocs. Нужно обработать много презентаций или встроить экспорт в собственное ПО? Автоматизируйте процесс с помощью VBA или API Spire.Presentation. Полное сравнение приведено ниже.
1. Экспорт слайдов через функцию «Сохранить как» в PowerPoint (самый быстрый способ)
Встроенная функция «Сохранить как» в PowerPoint — это самый простой способ превратить презентацию в изображения, и он лучше всего подходит, если PowerPoint уже открыт и вам нужен быстрый экспорт. PNG — более безопасный выбор по умолчанию для слайдов с текстом, диаграммами или графиками — см. раздел PNG против JPG, чтобы узнать, когда лучше использовать JPG.
- Откройте презентацию и перейдите в Файл → Сохранить как (или Сохранить копию в OneDrive/SharePoint).
- Выберите папку и имя файла.
- Откройте раскрывающийся список Тип файла и выберите PNG или JPEG.
- Нажмите Сохранить, затем выберите Все слайды (каждый слайд станет отдельным файлом) или Только текущий.
Почему результаты могут выглядеть нечеткими: этот метод экспортирует с разрешением ~96 PPI (1280×720 для широкоэкранного слайда). Это нормально для веба, но слишком мало для печати или больших дисплеев — см. Метод 2.
Плюсы: Не нужно дополнительное ПО или учетные записи, официальный метод, самый быстрый для разовых задач.
Минусы: По умолчанию фиксированное разрешение ~96 PPI, поэтому изображения могут выглядеть размытыми при увеличении или печати; экспорт по одному файлу.
2. Экспорт слайдов PowerPoint в высоком разрешении (устранение размытости)
Лучший вариант для: печати, плакатов или любого использования, где 96 PPI выглядит размыто. Это основное решение проблемы низкого качества экспорта.
Стандартное разрешение экспорта в PowerPoint — 96 PPI. Официальное решение от Microsoft заключается в редактировании реестра Windows (ExportBitmapResolution) — это рискованно и легко сделать неправильно. Вам не обязательно это делать. Вот альтернативы, которые позволяют избежать работы с реестром: вариант без Office, вариант без Office с высоким разрешением и полностью автоматизированный путь:
| Целевое разрешение | Размер в пикселях (16:9 широкоэкранный) | Подходит для |
|---|---|---|
| 96 PPI | 1280 × 720 | Веб, электронная почта, вставка в слайды |
| 150 PPI | 2000 × 1125 | Проекторы, большие мониторы |
| 200 PPI | 2667 × 1500 | Раздаточные материалы формата А4 |
| 300 PPI | 4000 × 2250 | Плакаты, профессиональная печать |
PPI (пиксели на дюйм) — это мера для экрана; для печати стремитесь к 200–300 PPI. Стандарт PowerPoint — 96 PPI.
- Без Office, стандартное качество: CloudXDocs конвертирует в браузере с тем же стандартным разрешением (~96 PPI) — см. Метод 3.
- Без Office, высокое разрешение: CloudConvert (также в Методе 3) выполняет рендеринг онлайн с разрешением ~1920×1080 и позволяет увеличить DPI — значительно выше стандартных 96 PPI.
- Пользовательский размер (максимальный контроль): настройте экспорт с любым размером в пикселях с помощью VBA или API — Метод 4.
Оба изображения — это один и тот же слайд 16:9, каждое масштабировано до 30% от своего исходного размера в пикселях, чтобы разницу было легко сравнить при одинаковой ширине на странице. При 96 PPI (сверху) текст и тонкие линии выглядят мягче; при 192 PPI (снизу) они остаются заметно более четкими.
Если вы все же используете метод с реестром: перейдите в
HKEY_CURRENT_USER\Software\Microsoft\Office\<версия>\PowerPoint\Options, добавьте параметрDWORDс именемExportBitmapResolutionи установите его десятичное значение (например,300). Сначала сделайте резервную копию реестра; действуйте на свой страх и риск.
Лучший выбор для: тех, кто уперся в ограничение качества 96 PPI и нуждается в более четком выводе для печати или больших дисплеев.
Имейте в виду: встроенная функция «Сохранить как» не может превысить значение по умолчанию без правки реестра или использования другого инструмента. Путь через VBA/API и CloudConvert позволяют преодолеть этот барьер; CloudXDocs остается на уровне стандартного разрешения, но не требует установленного Office.
3. Конвертация слайдов PowerPoint в изображения онлайн (без установки PowerPoint)
Лучший выбор для: пользователей, у которых не установлен PowerPoint, или тех, кому нужен браузерный конвертер, когда Office недоступен или нужно быстро обработать несколько файлов.
CloudXDocs — это браузерный конвертер от той же команды, что создала Spire. Он не требует Microsoft Office и установки.
- Откройте конвертер PPT в изображения CloudXDocs в любом браузере.
- Нажмите или перетащите ваш файл
.pptx/.pptв область загрузки. - Дождитесь автоматического рендеринга и конвертации (обычно занимает секунды).
- Скачайте полученный
.zip-архив и распакуйте его, чтобы получить каждый слайд в виде отдельного изображения.
Почему это полезно: CloudXDocs предоставляет удобный способ конвертации презентаций через браузер, когда PowerPoint недоступен или нужно быстро обработать несколько файлов. Загруженные файлы автоматически удаляются через 24 часа в соответствии с политикой сервиса.
Плюсы: Не нужен Office, установка или настольное ПО; обрабатывает всю презентацию как zip-архив; работает на любом устройстве.
Минусы: Требуется подключение к интернету; качество вывода зависит от настроек рендеринга конвертера, а не от ваших параметров.
Если вам нужно более четкое изображение, но вы не можете установить Office, некоторые онлайн-конвертеры позволяют выбрать разрешение экспорта. CloudConvert, например, по умолчанию использует разрешение около 1920×1080 и позволяет увеличить DPI — значительно выше стандартных 96 PPI в PowerPoint.
Шаги по сути те же: загрузите ваш .pptx → выберите JPG или PNG → увеличьте DPI в настройках → конвертируйте → скачайте zip-архив.
Это делает онлайн-конвертер реальным решением проблемы размытости при отсутствии настольных инструментов, хотя файлы проходят через сторонний сервер, поэтому избегайте загрузки конфиденциальных презентаций.
4. Автоматизация экспорта изображений PowerPoint (VBA и API)
Лучший выбор для: большого количества презентаций, запланированных задач или встраивания экспорта во внутренний инструмент. Два пути в зависимости от ваших задач.
Вариант А — Макрос VBA (для опытных пользователей Office на Windows)
Если вы работаете в PowerPoint на Windows и вам нужен нестандартный размер экспорта, небольшой макрос автоматизирует всю презентацию. Нажмите Alt + F11, Вставка → Модуль, вставьте код, затем Макросы → Запустить ExportSlidesHighRes (сначала создайте папку C:\Exports\):
Sub ExportSlidesHighRes()
    Dim sld As Slide, i As Integer
    i = 1
    For Each sld In ActivePresentation.Slides
        sld.Export "C:\Exports\Slide_" & i & ".png", "PNG", 3000, 1688  ' ~200 PPI
        i = i + 1
    Next sld
End Sub
Настройте значения 3000, 1688 для достижения нужного разрешения (см. таблицу в Методе 2).
Вариант Б — API Spire.Presentation (для .NET разработчиков)
Нужен серверный или полностью программный экспорт? Spire.Presentation для .NET преобразует каждый слайд в изображение с помощью нескольких строк кода — без Microsoft PowerPoint, без правок реестра, размер вывода задается в коде. Полное руководство см. в нашем уроке по конвертации слайдов в изображения с помощью Spire.Presentation.
using Spire.Presentation;
using System.Drawing;
using System.Drawing.Imaging;

class Program
{
    static void Main(string[] args)
    {
        using (Presentation ppt = new Presentation())
        {
            ppt.LoadFromFile("Sample.pptx");
            for (int i = 0; i < ppt.Slides.Count; i++)
            {
                Image img = ppt.Slides[i].SaveAsImage(1280 * 2, 720 * 2);
                img.Save(string.Format("Slide_{0}.png", i), ImageFormat.Png);
            }
        }
    }
}
SaveAsImage(width, height) задает точный размер в пикселях, поэтому API выполняет рендеринг с указанным вами разрешением — без реестра и Office. Здесь 1280 * 2, 720 * 2 дает 2560×1440 (около 192 PPI); измените эти два числа на любые значения из таблицы в Методе 2.
Совет для бизнеса: запускайте в headless-режиме на Linux, задавайте точные размеры вывода и встраивайте экспорт в рабочий процесс обработки документов — без Office и правок реестра. Скачайте полный пример проекта →
Плюсы: Полный контроль над размером в пикселях, пакетная/headless обработка, никаких ручных действий; Spire работает без установленного Office.
Минусы: VBA работает только на Windows с PowerPoint; API — это платная библиотека для коммерческого использования.
5. Захват слайда как изображения (скриншот)
Лучший выбор для: быстрого захвата одного слайда в том виде, в котором он отображается на экране, или когда вы не можете открыть файл в редакторе.
- Windows: «Ножницы» / «Фрагмент и набросок» (
Win + Shift + S) → выберите слайд → сохраните как PNG. - macOS:
Cmd + Shift + 4, затем пробел для захвата окна. - Сторонние инструменты: ShareX, Lightshot или Snagit для захвата с аннотациями.
Важное замечание: скриншоты наследуют разрешение вашего экрана и могут включать элементы интерфейса. Для получения чистых изображений слайдов в нужном размере лучше использовать Методы 1–4.
Плюсы: Нулевая настройка, работает на любой машине, идеально для «захвата того, что на экране».
Минусы: Разрешение ограничено вашим дисплеем; это не полноценный экспорт; нельзя выполнить пакетно.
Поддержка принятия решений
Разделы ниже помогут вам сравнить методы, выбрать формат и исправить проблемы с качеством. Работаете с PDF вместо PowerPoint? Узнайте, как конвертировать страницы PDF в изображения.
Сравнение и выбор метода
| # | Метод | Лучший выбор для | Разрешение | Нужна установка | Пакетно? |
|---|---|---|---|---|---|
| 1 | PowerPoint «Сохранить как» | Быстрая разовая задача | 96 PPI | PowerPoint | Пофайлово |
| 2 | Высокое разрешение | Исправление размытости / печать | До 300 PPI* | — | Пофайлово |
| 3 | CloudXDocs онлайн | Нет Office / быстро | Стандартное (~96 PPI) | Нет (браузер) | Да (zip) |
| 4 | VBA / Spire API | Разработка / пакетно / сервер | Пользовательское | VBA: PowerPoint; Spire: NuGet | Да |
| 5 | Скриншот | Один слайд на экране | Ограничено экраном | Нет | Нет |
| — | Google Slides / LibreOffice | Нет PowerPoint | Нативное приложение | Приложение | Пофайлово |
*Достигается через VBA или API Spire; онлайн-инструменты рендерят в нативных размерах слайда.
Выбирайте по ситуации:
- Нужно быстро получить одно-два изображения → PowerPoint «Сохранить как»
- Результат выглядит размытым → Экспорт в высоком разрешении
- PowerPoint не установлен → CloudXDocs онлайн
- Сотни слайдов / серверная обработка → VBA или Spire API
- Точный захват с экрана → Скриншот
Как экспортировать слайды без PowerPoint
Если Microsoft PowerPoint не установлен, у вас все равно есть варианты — конвертер CloudXDocs выше, а также два бесплатных офисных пакета:
- Google Slides: откройте презентацию, затем Файл → Скачать → Изображение PNG (.png) или Изображение JPEG (.jpg). Каждое скачивание экспортирует текущий слайд; повторяйте для каждого слайда или используйте CloudXDocs для всей презентации сразу.
- LibreOffice Impress: откройте файл, затем Файл → Экспорт, выберите PNG или JPG и укажите слайды для экспорта.
Это удобно, когда PowerPoint недоступен, хотя они предлагают меньше контроля над разрешением, чем Метод 2 или Метод 4.
PNG против JPG: какой формат выбрать?
| Формат | Лучший выбор для | Преимущества |
|---|---|---|
| PNG | Текст, диаграммы, графики, скриншоты интерфейса | Качество без потерь, четкие края |
| JPG | Фотографии, слайды с обилием изображений | Меньший размер файла |
Для большинства бизнес-презентаций PNG обычно является лучшим выбором, так как слайды часто содержат текст и диаграммы, требующие четких краев. Используйте JPG только тогда, когда на слайде преобладают фотографии и размер файла важнее, чем идеальная четкость текста.
Почему экспортированные изображения выглядят размытыми? (и как это исправить)
Стандартный экспорт PowerPoint выполняется с разрешением около 96 PPI, поэтому слайды выглядят нечеткими при увеличении или печати. Если изображения все еще недостаточно четкие:
- Используйте способы с высоким разрешением из Метода 2 — правка реестра не требуется.
- Избегайте скриншотов для печати или больших дисплеев; их разрешение ограничено вашим экраном (Метод 5).
- Предпочитайте PNG для слайдов с текстом или диаграммами (PNG против JPG).
- Для полного контроля над размером в пикселях или серверного экспорта автоматизируйте процесс с помощью VBA или API Spire (Метод 4).
Для печати стремитесь к 200–300 PPI. Полная таблица разрешений показывает размер в пикселях для каждой цели.
Часто задаваемые вопросы (FAQ)
Как сохранить все слайды PowerPoint как отдельные изображения сразу?
Файл → Сохранить как → PNG/JPEG, затем выберите «Все слайды» при появлении запроса. Для пакетной обработки без установки используйте конвертер CloudXDocs; для скриптовой пакетной обработки — макрос VBA или API Spire.
Какой формат изображения лучше — PNG или JPG?
PNG для слайдов с текстом, графиками или четкими линиями (без потерь). JPG для слайдов с большим количеством фотографий, где важен меньший размер файла.
Можно ли экспортировать слайды без установленного Microsoft PowerPoint?
Да. Конвертер CloudXDocs PPT в изображения работает в любом браузере без установки, а Spire.Presentation (Метод 4) конвертирует на стороне сервера без Office. Google Slides и LibreOffice Impress также могут экспортировать слайды — см. раздел без PowerPoint.
Как экспортировать только один слайд вместо всей презентации?
В окне «Сохранить как» выберите «Только текущий». С помощью инструмента для скриншотов захватите только видимый слайд.
Почему мои экспортированные слайды выглядят размытыми и как получить качественные изображения?
PowerPoint по умолчанию сохраняет с разрешением ~96 PPI, поэтому изображения выглядят нечеткими при увеличении или печати. Чтобы улучшить качество, экспортируйте с более высоким разрешением (см. таблицу разрешений) — либо с помощью инструмента, который рендерит слайды в больших размерах, либо автоматизировав экспорт с помощью VBA или API презентаций (Метод 4) для полного контроля над размером в пикселях.
Безопасно ли загружать презентацию в онлайн-конвертер?
В CloudXDocs загруженные файлы автоматически удаляются с сервера через 24 часа после конвертации и не сохраняются и не используются повторно. Избегайте конвертеров, которые не указывают политику удаления.
Можно ли экспортировать слайды PowerPoint как изображения без потери качества?
Да. Используйте формат PNG и экспортируйте с большим размером в пикселях, когда это возможно. Избегайте скриншотов для профессионального вывода, так как разрешение экрана ограничивает качество изображения — вместо этого используйте Метод 2 (высокое разрешение) или Метод 4 (пользовательский размер в пикселях).
Какой размер изображения лучше всего подходит для слайдов PowerPoint?
Для презентации 16:9 разрешение 1920 × 1080 пикселей обычно подходит для экранов. Более высокие разрешения, такие как 2560 × 1440 или 3840 × 2160, лучше подходят для больших дисплеев или печати.
По теме: экспорт слайдов PowerPoint программным путем (для разработчиков)
Если вы создаете рабочий процесс обработки документов, серверная обработка обычно надежнее онлайн-инструментов для повторяющихся или высоконагруженных задач. Типичные случаи, когда библиотека лучше веб-инструмента:
- Пакетная обработка — конвертация тысяч презентаций по расписанию.
- Автоматизированные отчеты — экспорт сгенерированных презентаций в чистые изображения.
- Конвейеры документов — рендеринг слайдов как один из этапов более крупного процесса конвертации/объединения/сборки.
- Корпоративные приложения — встраивание экспорта слайдов в ваш собственный продукт или сервис.
Для источников в формате PDF в том же рабочем процессе вы также можете обрезать PDF или объединить PDF-файлы.
Spire.Presentation для .NET преобразует каждый слайд в PNG/JPG с точными размерами, которые вы задаете, на Windows или Linux, без Microsoft Office. См. пример проекта Spire.Presentation для получения рабочего кода.
После экспорта откройте изображения (или исходный .pptx) в AI-чате CloudXDocs для автоматической генерации заметок докладчика, двуязычного глоссария или списка дел по итогам встречи — это быстрый способ перепрофилировать экспортированный контент без необходимости дизайна или кодирования. ИИ работает с контентом; он не создает изображения.
См. также
Edit PDF in C# .NET: Step-by-Step Guide with Code Examples
PDF (Portable Document Format) is widely used for sharing, distributing, and preserving documents because it maintains a consistent layout and formatting across platforms. Developers often need to edit PDF files in C#, whether it's to replace text, insert images, add watermarks, or extract pages.
In this step-by-step tutorial, you will learn how to programmatically edit PDFs in C# with the Spire.PDF for .NET library.
Table of Contents
- Why Edit PDFs Programmatically in C#
- C# Library to Edit PDFs
- Step-by-Step Guide: Editing PDF in C#
- Tips for Efficient PDF Editing in C#
- Conclusion
- FAQs
Why Edit PDFs Programmatically in C
While tools like Adobe Acrobat provide manual PDF editing, programmatically editing PDFs has significant advantages:
- Automation: Batch process hundreds of documents without human intervention.
- Integration: Edit PDFs as part of a workflow, such as generating reports, invoices, or certificates dynamically.
- Consistency: Apply uniform styling, stamps, or watermarks across multiple PDFs.
- Flexibility: Extract or replace content programmatically to integrate with databases or external data sources.
C# Library to Edit PDFs
Spire.PDF for .NET is a robust .NET PDF library that enables developers to generate, read, edit, and convert PDF files in .NET applications. It's compatible with both .NET Framework and .NET Core applications.
This library provides a rich set of features for developers working with PDFs:
- PDF Creation: Generate new PDFs from scratch or from existing documents.
- Text Editing: Add, replace, or delete text on any page.
- Image Editing: Insert images, resize, or remove them.
- Page Operations: Insert, remove, extract, or reorder pages.
- Annotations: Add stamps, comments, and shapes for marking content.
- Watermarking: Add text or image watermarks for branding or security.
- Form Handling: Create and fill PDF forms programmatically.
- Digital Signatures: Add and validate signatures for authenticity.
- Encryption: Apply password protection and user permissions.
Step-by-Step Guide: Editing PDF in C
Modifying a PDF file in C# involves several steps: setting up a C# project, installing the library, loading the PDF file, making necessary changes, and saving the document. Let's break down each step in detail.
Step 1: Set Up Your C# Project
Before you start editing PDFs, you need to create a new C# project by following the steps below:
- Open Visual Studio.
- Create a new project. You can choose a Console App or a Windows Forms App depending on your use case.
- Name your project (e.g., PdfEditorDemo) and click Create.
Step 2: Install Spire.PDF
Next, you need to install the Spire.PDF library, which provides all the functionality required to read, edit, and save PDF files programmatically.
You can simply install it via the NuGet Package Manager Console with the following command:
Install-Package Spire.PDF
Alternatively, you can use the NuGet Package Manager GUI to search for Spire.PDF and click Install.
Step 3: Load an Existing PDF
Before you can modify an existing PDF file, you need to load it into a PdfDocument object. This gives you access to its pages, text, images, and structure.
using Spire.Pdf;
PdfDocument pdf = new PdfDocument();
pdf.LoadFromFile("example.pdf");
Step 4: Edit PDF Content
Text editing, image insertion, page management, and watermarking are common operations when working with PDFs. This step covers all these editing tasks.
4.1 Edit Text
Text editing is one of the most common operations when working with PDFs. Depending on your needs, you might want to replace existing text or add new text to specific pages.
Replace existing text:
Replacing text in PDF allows you to update content across a single page or an entire PDF while maintaining formatting consistency. Using the PdfTextReplacer class, you can quickly find and replace text programmatically:
// Get the first page
PdfPageBase page = pdf.Pages[0];
// Create a PdfTextReplacer
PdfTextReplacer textReplacer = new PdfTextReplacer(page);

// Replace all occurrences of target text with new text
textReplacer.ReplaceAllText("Old text", "New text");
Add new text:
In addition to replacing existing content, you may need to insert new text into a PDF. With just one line of code, you can add text to any location on a PDF page:
page.Canvas.DrawString(
    "Hello, World!",
    new PdfTrueTypeFont(new Font("Arial Unicode MS", 15f, FontStyle.Bold), true),
    new PdfSolidBrush(Color.Black),
    90, 30
);
4.2 Insert and Update Images
PDFs often contain visual elements such as logos, charts, or illustrations. You can insert new images or update outdated graphics to enhance the document's visual appeal.
Insert an Image:
// Load an image
PdfImage image = PdfImage.FromFile("logo.png");
// Draw the image at a specific location with defined size
page.Canvas.DrawImage(image, 100, 150, 200, 100);
Update an image:
// Load the new image
PdfImage newImage = PdfImage.FromFile("image1.jpg");
// Create a PdfImageHelper instance
PdfImageHelper imageHelper = new PdfImageHelper();
// Get the image information from the page
PdfImageInfo[] imageInfo = imageHelper.GetImagesInfo(page);
// Replace the first image on the page with the new image
imageHelper.ReplaceImage(imageInfo[0], newImage);
4.3 Add, Remove, or Extract Pages
Managing page structure is another important aspect of PDF editing, such as adding new pages, removing unwanted pages, and extracting particular pages to a new document.
Add a new page:
// Add a new page
PdfPageBase newPage = pdf.Pages.Add();
Remove a page:
// Remove the last page
pdf.Pages.RemoveAt(pdf.Pages.Count - 1);
Extract a page to a new document:
// Create a new PDF document
PdfDocument newPdf = new PdfDocument();
// Extract the third page to a new PDF document
newPdf.InsertPage(pdf, pdf.Pages[2]);
// Save the new PDF document
newPdf.SaveToFile("extracted_page.pdf");
4.4 Add Watermarks
Adding Watermarks to PDFs can help indicate confidentiality, add branding, or protect intellectual property. You can easily add them programmatically to any page:
// Iterate through each page in the PDF document
foreach (PdfPageBase page in pdf.Pages)
{
    // Create a tiling brush for the watermark
    // The brush size is set to half the page width and one-third of the page height
    PdfTilingBrush brush = new PdfTilingBrush(
        new SizeF(page.Canvas.ClientSize.Width / 2, page.Canvas.ClientSize.Height / 3));

    // Set the brush transparency to 0.3 for a semi-transparent watermark
    brush.Graphics.SetTransparency(0.3f);

    // Save the current graphics state for later restoration
    brush.Graphics.Save();

    // Move the origin of the brush to its center to prepare for rotation
    brush.Graphics.TranslateTransform(brush.Size.Width / 2, brush.Size.Height / 2);

    // Rotate the coordinate system by -45 degrees to angle the watermark
    brush.Graphics.RotateTransform(-45);

    // Draw the watermark text on the brush
    // Using Helvetica font, size 24, violet color, centered alignment
    brush.Graphics.DrawString(
        "DO NOT COPY",
        new PdfFont(PdfFontFamily.Helvetica, 24),
        PdfBrushes.Violet,
        0, 0,
        new PdfStringFormat(PdfTextAlignment.Center));

    // Restore the previously saved graphics state, undoing rotation and translation
    brush.Graphics.Restore();

    // Reset the transparency to fully opaque
    brush.Graphics.SetTransparency(1);

    // Draw the brush over the entire page area to apply the watermark
    page.Canvas.DrawRectangle(brush, new RectangleF(new PointF(0, 0), page.Canvas.ClientSize));
}
Step 5: Save the Modified PDF
After making all the necessary edits, the final step is to save your changes.
// Save the Modified PDF and release resources
pdf.SaveToFile("modified.pdf");
pdf.Close();
Output PDF
The output modified.pdf looks like this:
Tips for Efficient PDF Editing in C
When editing PDFs programmatically, it's important to keep a few best practices in mind to ensure the output remains accurate, readable, and efficient.
- Batch Processing: For repetitive tasks, process multiple PDF files in a loop rather than handling them individually. This approach improves efficiency and reduces manual effort.
- Text Placement: Use coordinates carefully when inserting new text. Proper positioning prevents content from overlapping with existing elements and maintains a clean layout.
- Fonts and Encoding: Choose fonts that support the characters you need. This is especially critical for languages such as Chinese, Arabic, or other scripts that require extended font support.
- Memory Management: Always release resources by disposing of PdfDocument objects after use. Proper memory management helps avoid performance issues in larger applications.
Conclusion
This tutorial demonstrates how to edit PDF in C# using Spire.PDF. From replacing text, inserting images, and managing pages, to adding watermarks, each step includes practical code examples. Developers can now automate PDF editing, enhance document presentation, and handle PDFs efficiently within professional applications.
FAQs
Q1: How can I programmatically edit text in a PDF using C#?
A1: You can use a C# PDF library like Spire.PDF to replace existing text or add new text to a PDF. Classes such as PdfTextReplacer and page.Canvas.DrawString() provide precise control over text editing while preserving formatting.
Q2: How do I replace or add text in a PDF using C#?
A2: With C#, libraries like Spire.PDF let you search and replace existing text using PdfTextReplacer or add new text anywhere on a page using page.Canvas.DrawString().
Q3: Can I insert or update images in a PDF programmatically?
A3: Yes. You can load images into your project and use classes like PdfImage and PdfImageHelper to draw or replace images on a PDF page.
Q4: Is it possible to add watermarks to a PDF using code?
A4: Absolutely. You can add text or image watermarks programmatically, control transparency, rotation, and position, and apply them to one or all pages of a PDF.
Q5: How can I extract specific pages from a PDF?
A5: You can create a new PDF document and insert selected pages from the original PDF, enabling you to extract single pages or ranges for separate use.