Автоматизация обработки счетов с помощью ИИ-агента в .NET
Содержание
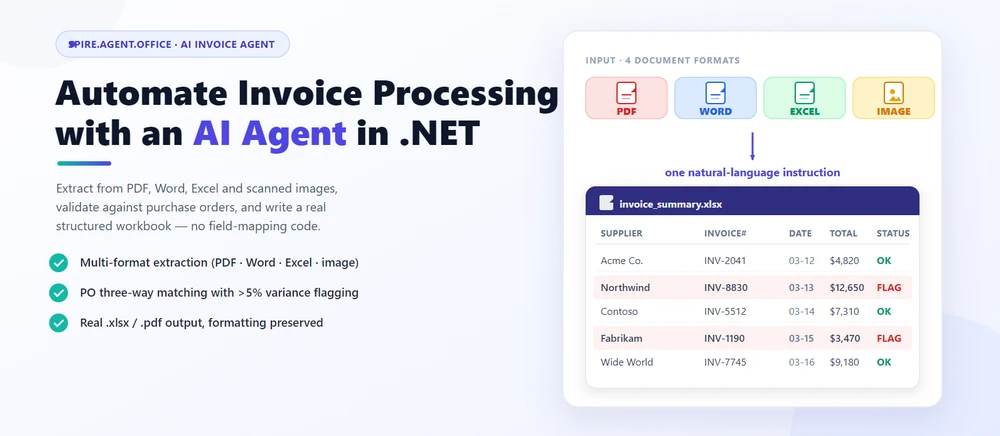
Автоматизированная обработка счетов означает чтение входящих счетов от поставщиков, извлечение позиций, их сверку с заказами на поставку и запись результатов в структурированную книгу, которую может использовать ваша финансовая система. На практике это автоматизация документов в .NET, где инструкции на естественном языке заменяют код для сопоставления полей и настройки макетов. Spire.Agent.Office — это SDK ИИ-агента для работы с документами, который берет на себя обработку языка, а детерминированный уровень работы с документами гарантирует получение корректных файлов Excel и PDF.
Быстрая навигация
- Почему обработка счетов подходит для ИИ
- Что может и чего не может ИИ-агент для счетов
- Типичные сценарии обработки счетов
- Три способа автоматизации обработки счетов в .NET
- Пример работы: извлечение, проверка и отчетность на C#
- Почему стоит использовать Spire.Agent.Office для обработки счетов с ИИ
- Часто задаваемые вопросы (FAQ)
1. Почему обработка счетов подходит для ИИ
Работа со счетами в мире разработки — это три повторяющиеся задачи: чтение (извлечение поставщика, даты, позиций и итоговых сумм из документов, поступающих в виде PDF, файлов Word, таблиц Excel или сканированных изображений), проверка (сверка счетов с заказами на поставку и выявление расхождений) и создание (запись результатов в структурированную книгу для бухгалтерской системы).
Для .NET-разработчиков проблема заключается не только в понимании содержания счета, но и в превращении неструктурированных документов в различных форматах в структурированные, воспроизводимые рабочие процессы.
Три свойства делают эти задачи идеальными для языковой модели, а не для жестко заданных правил:
- Входные данные имеют разные форматы. Входящие счета приходят как вложения PDF, сканированные изображения, документы Word или файлы Excel — каждый со своим макетом. Правила, работающие для одного формата, ломаются на другом; LLM же читает текст напрямую, независимо от типа файла.
- Выходные данные имеют форму документа. Результатом является реальный файл
.xlsxили.pdfс правильным форматированием, а не просто набор текста. Именно здесь уровень работы с документами оправдывает себя. - Объем постоянно меняется. Привлечение 50 новых поставщиков или проверка 200 счетов в месяц требует решения, управляемого конфигурацией, а не переписывания кода под каждого поставщика.
На практике извлечение и проверка идут рука об руку: командам нужно, чтобы счета были суммированы, расхождения отмечены, а новые счета создавались на основе шаблона и структурированных данных. Более подробно о том, как устроен ИИ-агент для документов и где он вписывается в конвейер обработки контента, см. в статье ИИ-агент для обработки документов: что это и как работает.
2. Что может и чего не может ИИ-агент для счетов
| Может | Не может |
|---|---|
| Извлекать поставщика, дату, позиции, итоговые суммы из PDF, Word, Excel и сканов | Заменить профессиональную проверку бухгалтером для дорогостоящих или регулируемых транзакций |
| Сверять счета с заказами на поставку и отмечать расхождения | Гарантировать точность сверки для намеренно двусмысленных или мошеннических счетов |
| Создавать структурированные книги или PDF-отчеты пакетно | Вести переговоры или принимать условия от вашего имени |
| Сохранять форматирование, стили таблиц и шрифты | Интерпретировать новые или двусмысленные условия поставщиков; перенаправлять в отдел закупок |
| Работать внутри вашего приложения (без загрузки в облако) | Гарантировать отсутствие ошибок без проверки человеком |
Разделение труда: агент автоматизирует чтение, извлечение и проверку (то, на что бухгалтер тратит часы), а человек-рецензент берет на себя финальное утверждение. Эта граница делает инструмент полезным, а процесс — обоснованным.
3. Типичные сценарии обработки счетов
Обработка счетов охватывает не только разовое извлечение данных. Один и тот же шаблон (инструкция, файлы счетов и опциональные справочные данные) покрывает большинство сценариев, которые ищут команды:
| Сценарий | Пример инструкции |
|---|---|
| Извлечение из счетов в разных форматах | "Извлеки поставщика, дату, позиции и итоговые суммы из этих счетов и объедини в один лист." |
| Трехсторонняя сверка с заказом (PO) | "Сравни каждый счет с заказами на поставку и отметь расхождения более 5%." |
| Пакетная отчетность по счетам | "Создай сводную книгу с общей суммой по поставщикам, отмеченными расхождениями и отчетом для печати." |
| Обнаружение дубликатов | "Выяви потенциальные дубликаты счетов, сравнив поставщика, дату и сумму во входящих." |
| Маршрутизация рабочих процессов утверждения | "Направляй счета свыше $10 000 в очередь на утверждение, а остальные — на автоутверждение." |
Каждый сценарий имеет одну и ту же архитектуру: инструкция на входе, реальный документ на выходе.
4. Три способа автоматизации обработки счетов в .NET
| Подход | Объем кода | Точность формата | Обслуживание | Для кого лучше |
|---|---|---|---|---|
| ИИ-агент для документов (LLM + уровень документов) | Одна инструкция + ~10 строк | Высокая (реальные файлы Excel/PDF) | Низкое (изменение поведения через правку инструкций) | Команды, автоматизирующие счета без создания конвейера LLM |
| Raw LLM API (OpenAI/Claude + ваш код) | Высокий (промпты, парсинг, ввод-вывод) | Низкая (LLM не читают/пишут файлы Office напрямую) | Высокое (вы сами отвечаете за RAG, маршрутизацию, ошибки) | Команды, у которых уже есть стек LLM |
| Традиционный SDK (Spire.Office и аналоги) | Десятки строк на каждый тип документа | Высокая (детерминированная) | Высокое (каждое сопоставление — это код) | Фиксированные счета, которые редко меняются |
Ключевой момент: LLM не может прочитать PDF-счет без уровня обработки документов, а традиционный SDK не может понять запрос на естественном языке. ИИ-агент для документов объединяет и то, и другое.
Это не значит, что традиционный путь неверен. Для фиксированных счетов, которые редко меняются, детерминированный SDK часто является правильным выбором, и Spire.Office по-прежнему закрывает эту потребность. Если это ваш случай, статья Генерация документов Word из данных Excel на C# демонстрирует классический рабочий процесс генерации документов на основе данных. Агент же выигрывает, когда макеты поставщиков, форматы ввода и правила проверки меняются настолько часто, что переписывание кода становится «бутылочным горлышком».
Почему Raw LLM API недостаточно для обработки счетов
Вызов gpt-4 или claude напрямую с командой "извлеки данные из этого счета" проваливается в трех аспектах, важных для продакшена:
- Невозможность надежно читать или писать файлы Office. LLM видят текст, а не структуру
.xlsxи.pdf. Чтение PDF-счета, сохранение таблицы позиций или создание валидной книги Excel обычно требует отдельного конвейера извлечения и реконструкции, который вам придется строить самостоятельно. - Отсутствие гарантии форматирования. Отчеты по счетам содержат заголовки столбцов, форматы чисел и условное форматирование, которые важны для бухгалтерии. Raw LLM возвращает текст, и потеря форматирования — это именно то, что критично для отделов расчетов с поставщиками.
- Необходимость реализации всей оркестрации. Дизайн промптов, сопоставление полей, обработка ошибок, ввод-вывод файлов и проверка вывода становятся вашим кодом, который нужно поддерживать.
ИИ-агент для документов сочетает языковое понимание модели с детерминированными API документов: модель решает, что извлечь или сверить, а уровень документов гарантирует, что файл будет реальным и корректно сформированным. В этом разница между демо-версией и рабочим процессом, который можно внедрить.
5. Пример работы: извлечение, проверка и отчетность на C#
Ниже приведена задача, которую бухгалтерия повторяет каждый месяц: обработка входящих счетов, извлечение данных из форматов, сверка с заказами на поставку и создание структурированной книги. Реализация использует Spire.Agent.Office для .NET — ИИ-агента, который обрабатывает документы Word, Excel, PowerPoint и PDF с помощью инструкций на естественном языке. Пример сфокусирован на этом рабочем процессе. Официальные руководства Getting Started и AI Contract Review in C# описывают настройку API пошагово, а этот раздел фокусируется на шаблонах интеграции C#.
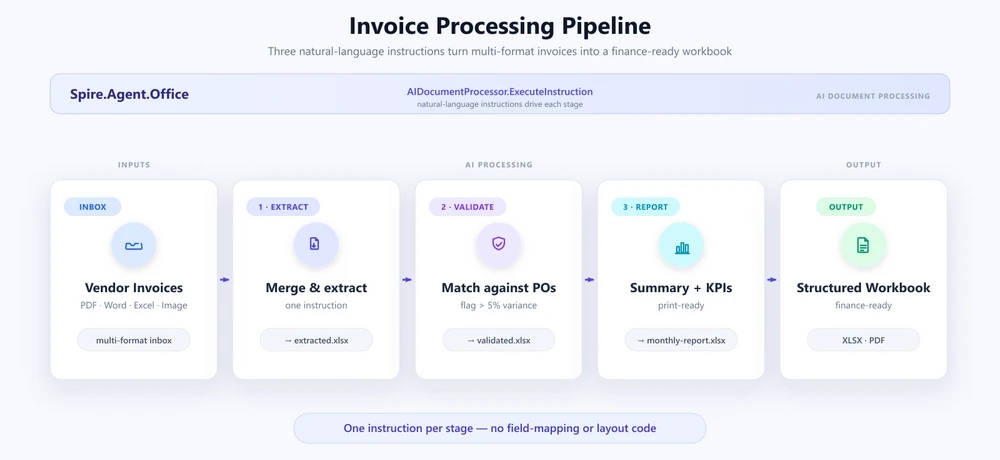
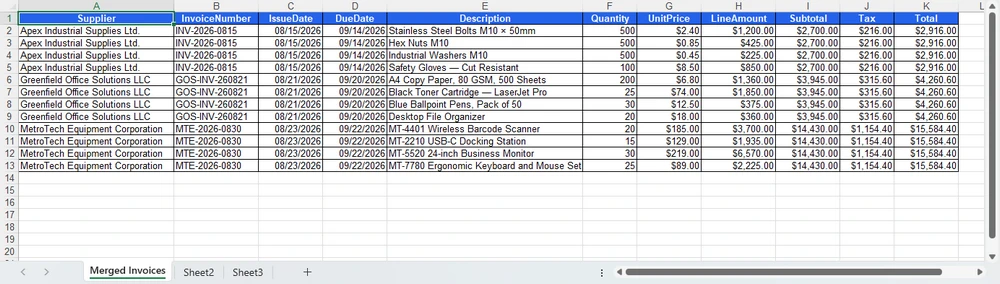
1. Извлечение данных из каждого счета во входящих. Настройте агента один раз, затем прочитайте папку входящих, чтобы каждый счет был разобран в единую объединенную таблицу:
using System.IO;
using Spire.Agent.Office.AI;
using Spire.Agent.Office.Extensions;
using Spire.Doc;
using Spire.Pdf;
using Spire.Xls;

AIOptions agentOptions = new AIOptions();
agentOptions.WorkDir = @"C:\ap-invoices\output";
agentOptions.SpireToken = spireToken;

string extractPrompt =
    "Прочитай каждый файл счета поставщика во входящих (PDF, Word, Excel или изображения) и извлеки " +
    "информацию: название компании, номер счета, дату выпуска, срок оплаты, позиции " +
    "(описание, количество, цена за единицу, сумма), промежуточный итог, налог и общую сумму. Объедини " +
    "результаты в один лист со столбцами: Supplier, InvoiceNumber, IssueDate, DueDate, " +
    "Description, Quantity, UnitPrice, LineAmount, Subtotal, Tax, Total. Пропускай дублирующиеся заголовки " +
    "и сохрани как книгу.";

Directory.CreateDirectory(@"C:\ap-invoices\output");

string[] invoiceFiles = Directory.GetFiles(@"C:\ap-invoices\inbox", "*.*");
Агент справляется с задачей работы с разными форматами — PDF, сканы, Word и Excel проходят через одну и ту же инструкцию без специфического кода для каждого формата:
using (Workbook extracted = new Workbook())
{
    AIResult result = extracted.AI(agentOptions).ExecuteInstruction(
        extracted,
        extractPrompt,
        @"C:\ap-invoices\output\extracted.xlsx",
        invoiceFiles);

    if (result == null || !result.Success)
        throw new InvalidOperationException(
            $"Ошибка извлечения: {result?.ErrorMessage}");
}
Ключевые вызовы API
Workbook.AI(agentOptions)— прикрепляет ИИ-процессор документов к объекту книгиExecuteInstruction(doc, instruction, savePath, attachments)— запускает извлечение и записывает объединенную книгуAIResult.Success/AIResult.ErrorMessage— проверяет результат и выводит ошибки
Результат
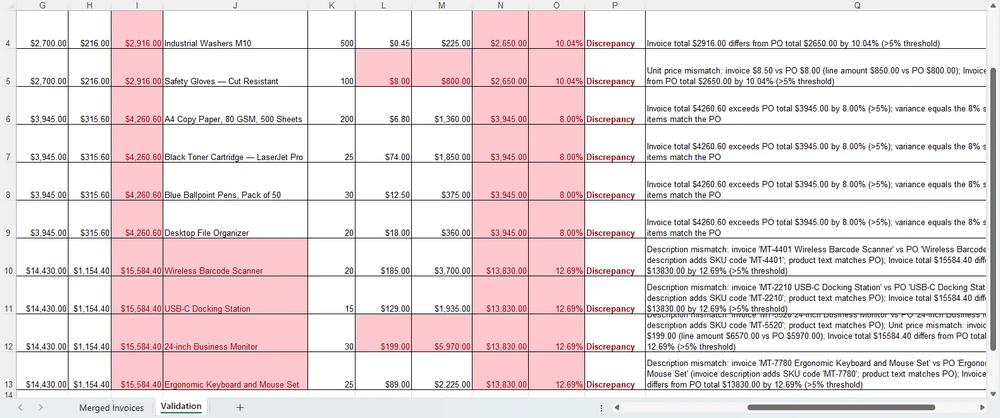
2. Проверка по заказам на поставку (PO). Загрузите извлеченный файл и укажите правило сверки на простом языке. Агент добавит лист Validation, оставив исходные данные нетронутыми:
using (Workbook validation = new Workbook())
{
    validation.LoadFromFile(@"C:\ap-invoices\output\extracted.xlsx");

    string[] poFiles = { @"C:\ap-invoices\data\purchase-orders.xlsx" };

    AIResult result = validation.AI(agentOptions).ExecuteInstruction(
        validation,
        "Добавь лист 'Validation'. Сравни каждую позицию счета с заказами на поставку " +
        "в вложениях, отметь счета, где общая сумма отличается от PO более чем на 5%, " +
        "отметь позиции, описание которых не совпадает с PO. Выдели расхождения красным " +
        "и добавь столбец 'Reason' с объяснением каждого расхождения. Оставь исходные листы данных без изменений.",
        @"C:\ap-invoices\output\validated.xlsx",
        poFiles);

    if (result == null || !result.Success)
        throw new InvalidOperationException(
            $"Ошибка проверки: {result?.ErrorMessage}");
}
Лист Validation появляется рядом с исходными данными, с отмеченными строками, красной заливкой и столбцом Reason, примененными согласно инструкции:
3. Отчетность. Составьте сводку из раздела 5 и экспортируйте её. Параметр savePath определяет формат — .xlsx для редактирования или .pdf для распространения:
using (Workbook report = new Workbook())
{
    report.LoadFromFile(@"C:\ap-invoices\output\validated.xlsx");

    AIResult result = report.AI(agentOptions).ExecuteInstruction(
        report,
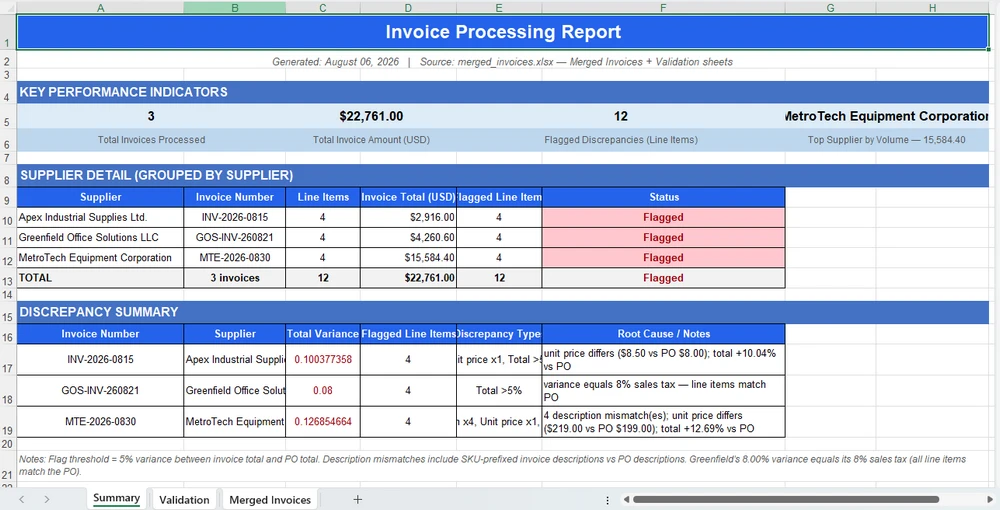
        "Создай отчет об обработке. Добавь лист 'Summary' в начало с блоком KPI " +
        "(всего обработано счетов, общая сумма, количество расхождений, топ-поставщик по " +
        "объему), детальной таблицей по поставщикам и сводкой расхождений. Отформатируй для печати " +
        "и сохрани готовую книгу.",
        @"C:\ap-invoices\output\monthly-report.xlsx");

    if (result == null || !result.Success)
        throw new InvalidOperationException(
            $"Ошибка генерации отчета: {result?.ErrorMessage}");
}
Лист Summary размещается в начале книги, готовый к печати или экспорту в PDF:
В чем разница: традиционный SDK против ИИ-агента
Ценность агента наиболее очевидна при сравнении. С традиционным SDK вы ищете каждое поле по заголовку, жестко прописываете каждый порог проверки и пишете данные ячейка за ячейкой — и перенастраиваете всё это, когда поставщик меняет макет или меняется правило. Скетч ниже (упрощенно) показывает масштаб этой работы:
// Традиционный SDK (иллюстрация): каждое поле находится и извлекается
// по строке заголовка, пороги жестко закодированы, вывод пишется по ячейкам
foreach (string file in invoiceFiles)
{
    Workbook wb = new Workbook();
    wb.LoadFromFile(file);
    Worksheet sheet = wb.Worksheets[0];

    // Ломается, как только поставщик меняет "Total Due" на "Amount Payable".
    int totalCol = FindColumnByHeader(sheet, "Total Due");
    int vendorCol = FindColumnByHeader(sheet, "Vendor Name");

    for (int r = sheet.LastRow; r >= 2; r--)
    {
        double invoiceTotal = double.Parse(sheet.Range[r, totalCol].Text);
        double poTotal = GetPoTotal(sheet.Range[r, 1].Text);
        double diff = Math.Abs(invoiceTotal - poTotal) / poTotal;

        // Один жесткий порог; поставщик стройматериалов вызывает ложные срабатывания.
        if (diff > 0.05) sheet.Range[r, totalCol].Style.Color = Color.Red;
    }
    // ... затем объединение, затем проверка, затем сводка — сотни строк на поставщика и месяц.
}
ИИ-агент заменяет эту оркестрацию одной инструкцией:
validation.AI(agentOptions).ExecuteInstruction(
    validation,
    "Добавь лист 'Validation'. Сравни каждую позицию счета с заказами на поставку " +
    "в вложениях, отметь счета, где общая сумма отличается от PO более чем на 5%, " +
    "отметь позиции, описание которых не совпадает с PO. Выдели расхождения красным " +
    "и добавь столбец 'Reason' с объяснением каждого расхождения. Оставь исходные листы данных без изменений.",
    @"C:\ap-invoices\output\validated.xlsx",
    poFiles);
Оба подхода дают одну и ту же книгу проверки. Там, где SDK требует вызова FindColumnByHeader для каждого поля, сравнения порогов для каждого правила и записи ячеек, агент поглощает эту работу в одну инструкцию. Когда поставщик меняет макет или финансовый отдел меняет порог допустимых отклонений, вы редактируете инструкцию, а не код.
6. Почему стоит использовать Spire.Agent.Office для обработки счетов
Сравнение выше нейтрально; тот же паттерн работает с любой способной LLM. Spire.Agent.Office выигрывает для .NET-команд в трех областях:
- Нативная обработка счетов в разных форматах. PDF, Word, Excel и сканированные изображения — это первоклассные граждане, а не форматы, которые нужно "прикручивать". Агент читает и извлекает данные из всех четырех форматов одной инструкцией.
- Сохранение форматирования. Отчеты по счетам содержат заголовки, форматы чисел и условное форматирование, которые должны пережить обработку. Уровень документов агента сохраняет их в целости. Добавьте "сохранить исходный макет и стиль документа" в инструкцию, и результат останется верным шаблону.
- Нативная интеграция с .NET. Это C# SDK, который встраивается в существующее приложение .NET. Никаких отдельных сервисов обработки документов, никакой сложной "сантехники" между сервисами. Пример выше — это вся поверхность интеграции.
Если вы уже используете Spire.Office для обработки документов, агент станет естественным следующим слоем: тот же объект Workbook получает процессор AI(), который превращает инструкции в исполняемые рабочие процессы.
7. Часто задаваемые вопросы (FAQ)
Может ли ИИ обрабатывать сканированные изображения?
Да. Пример извлечения выше загружает сканированные изображения вместе с PDF и Word, и агент читает и анализирует каждый файл в его нативном формате. Для сканов без текстового слоя агент работает напрямую с содержимым изображения. Если качество скана низкое, для лучших результатов рекомендуется сначала выполнить OCR.
Могут ли данные счетов оставаться внутри моего окружения?
Да, с одним важным нюансом. Spire.Agent.Office работает из вашего приложения, поэтому SDK, шаблоны и обработка документов остаются в вашем контуре. Файлы счетов не загружаются в сторонний сервис для хранения или конвертации. Для анализа содержимого ИИ нужны соответствующие текстовые данные, которые передаются модели — это неотъемлемый шаг любого ИИ-процесса. Если вы развернете свою модель в локальной сети, контент останется полностью внутри вашей инфраструктуры. Если вы подключаетесь через API (например, OpenAI или Azure OpenAI), данные передаются провайдеру согласно вашей конфигурации.
Могу ли я использовать свою модель с Spire.Agent.Office?
Да. Spire.Agent.Office поддерживает гибкую интеграцию моделей и совместим с основной ИИ-инфраструктурой, включая API и частные модели. Вы можете направить агента на свой эндпоинт. Подробности см. в руководстве по интеграции; по вопросам поддержки конкретных провайдеров обращайтесь в отдел продаж по адресу sales@e-iceblue.com.
Какую модель использует Spire.Agent.Office?
Spire.Agent.Office подключается к большой языковой модели через ключ SpireToken. Вы описываете задачу на естественном языке, а агент оркестрирует инструменты обработки документов. Модель отвечает за понимание, а уровень документов гарантирует форматирование и точность файла.
Можно ли обрабатывать счета пакетно?
Да. Одна инструкция применяется к папке с файлами, и агент создает одну консолидированную книгу со всеми данными. Поддерживается как извлечение полей, так и сверка между документами.
Изменит ли ИИ форматирование моей книги?
Не если вы этого не захотите. Добавьте фразу вроде "сохранить исходный макет, стили и шрифты" в инструкцию; официальное руководство документирует это решение.
Чем это отличается от использования Raw LLM API?
Raw LLM не может надежно читать, редактировать или писать файлы Word и Excel самостоятельно; ему нужен уровень обработки документов. ИИ-агент для документов объединяет понимание языка LLM с детерминированными API документов, поэтому на выходе вы получаете реальный, корректный файл.
Готовы автоматизировать обработку счетов?
Извлечение, проверка и составление отчетов — это самые быстрые способы получить пользу: направьте агента на папку входящих, опишите правила обработки и получите структурированную книгу или PDF. Следуйте руководству Getting Started, чтобы запустить свой первый рабочий процесс в .NET.
Дополнительное чтение
- Обзор продукта Spire.Agent.Office -- SDK ИИ-агентов для всех форматов Office
- ИИ-агент для обработки документов: что это и как работает -- концепция ИИ-агента для документов
- Генерация документов Word из данных Excel на C# -- генерация документов с помощью детерминированного SDK
- ИИ-проверка контрактов на C# -- тот же рабочий процесс агента для Word и PDF
Como remover hiperlinks no Word (desktop, online e C#)
Índice
- Remover um hiperlink no Microsoft Word
- Remover todos os hiperlinks de um documento do Word de uma só vez
- Remover hiperlinks do Word Online
- Excluir hiperlinks em lote de documentos do Word com C#
- Bônus: Impedir que o Word crie hiperlinks automaticamente
- Coisas a verificar após remover hiperlinks do Word
- Perguntas frequentes
Resumo rápido (TL;DR):
-
Um ou alguns hiperlinks: Clique com o botão direito no texto vinculado e selecione Remover Hiperlink.
-
Todos os hiperlinks em um documento:
-
Windows: Pressione Ctrl + A e, em seguida, Ctrl + Shift + F9.
-
Mac: Pressione Cmd + A e, em seguida, Cmd + Shift + F9. Se a tecla F9 estiver atribuída a uma função do sistema macOS, use Cmd + Fn + Shift + F9 ou pressione Cmd + 6.
-
-
Sem o Word instalado: Use o Word para a Web para remover hiperlinks em um navegador.
-
Vários arquivos do Word: Use processamento em lote com C# para remover hiperlinks automaticamente.
Hiperlinks são úteis para compartilhar sites, referências e outros recursos em um documento do Word. Mas, ao preparar um documento para impressão, publicação ou reutilização, esses links podem tornar-se desnecessários — ou deixar uma formatação que você não deseja mais.
Este guia mostra como remover hiperlinks no Word, desde a remoção de links individuais e de todos os links no Microsoft Word até a automação da limpeza em vários arquivos DOCX com C#.
O que você aprenderá:
- Remover um hiperlink no Microsoft Word
- Remover todos os hiperlinks de um documento do Word de uma só vez
- Remover hiperlinks do Word Online
- Excluir hiperlinks em lote de documentos do Word com C#
- Bônus: Impedir que o Word crie hiperlinks automaticamente
- Coisas a verificar após remover hiperlinks do Word
- Perguntas frequentes
Remover um hiperlink no Microsoft Word
Ideal para: Remover um ou poucos hiperlinks sem afetar o restante do conteúdo do documento.
Se apenas um pequeno número de links precisar ser removido, o comando nativo do Word Remover Hiperlink é a opção mais segura e direta. Ele remove o destino clicável, mantendo o texto exibido no local.
Este método é especialmente útil em documentos que contêm sumários, citações, referências cruzadas ou outros campos dinâmicos, pois apenas o hiperlink selecionado é afetado.
Instruções passo a passo
-
Abra o documento no Microsoft Word.
-
Localize o hiperlink que deseja remover.
-
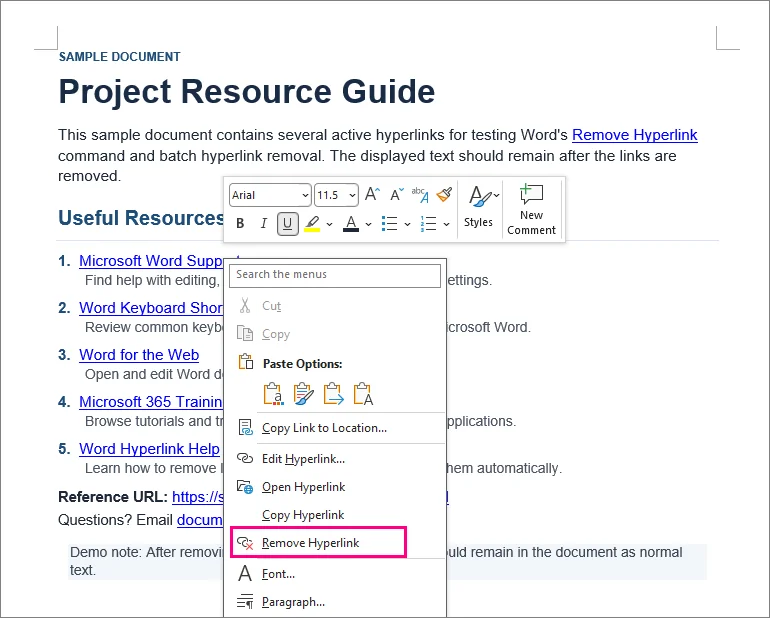
Clique com o botão direito no texto vinculado.
-
Selecione Remover Hiperlink.
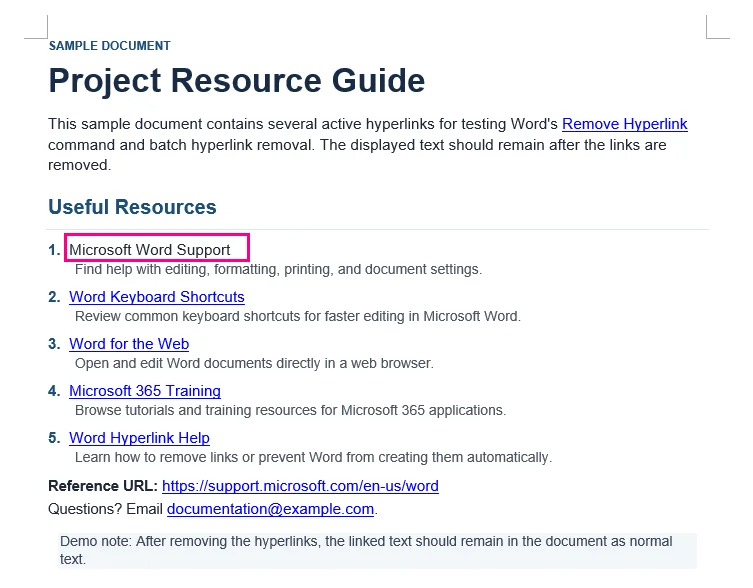
Resultado: O texto selecionado permanece no documento, mas não é mais clicável.
⚡ Dica: Se você quiser excluir tanto o hiperlink quanto o texto exibido, selecione o texto e pressione Delete ou Backspace.
Remover todos os hiperlinks de um documento do Word de uma só vez
Ideal para: Remover rapidamente muitos hiperlinks de um documento do Word relativamente simples.
Remover dezenas de links um por um é demorado. O Word oferece um atalho de teclado que pode remover hiperlinks do conteúdo selecionado em uma única operação.
Remover todos os hiperlinks no Windows
-
Pressione Ctrl + A para selecionar todo o conteúdo do documento. Você também pode selecionar manualmente apenas a seção que deseja processar.
-
Pressione Ctrl + Shift + F9.
Remover todos os hiperlinks no Mac
-
Pressione Cmd + A para selecionar o conteúdo do documento.
-
Pressione Cmd + Shift + F9.
⚡ Dica: Se o seu Mac usa F9 para uma função do sistema ou de mídia, use Cmd + Fn + Shift + F9 ou pressione Cmd + 6 para executar o comando UnlinkFields do Word sem depender da tecla F9.
Resultado: Todos os hiperlinks selecionados são convertidos em texto simples, preservando a redação original.
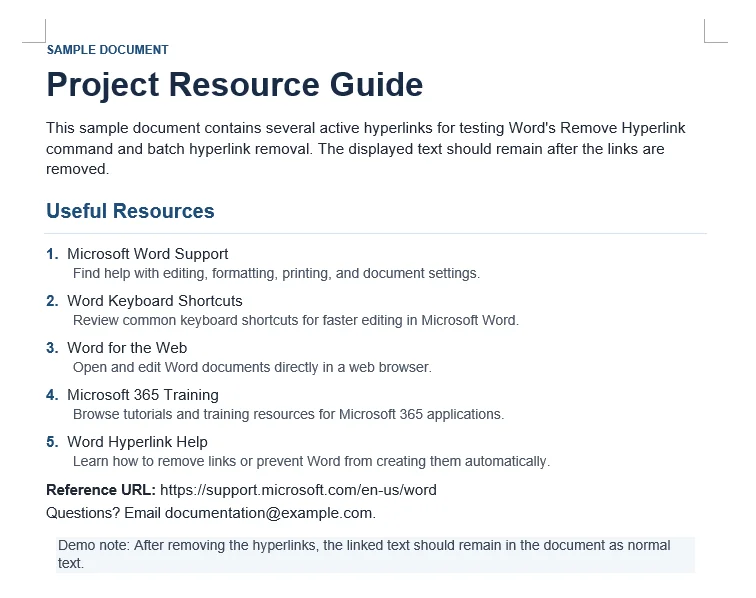
⚠️ Importante: Verifique os campos dinâmicos antes de usar este atalho
O atalho Ctrl + Shift + F9 não é um comando específico para hiperlinks. É o comando geral do Word para Desvincular Campo.
Isso significa que outros campos incluídos na seleção também podem ser convertidos em texto estático. Eles podem incluir:
-
Sumários gerados automaticamente
-
Referências cruzadas
-
Campos de citação
-
Outros campos dinâmicos do Word
Para relatórios, teses, manuais ou outros documentos que dependem de campos dinâmicos, salve um backup antes de usar o atalho. Observe também que o Ctrl + A normalmente seleciona o texto principal do documento. Hiperlinks em cabeçalhos e rodapés podem precisar ser tratados separadamente.
Remover hiperlinks do Word Online
Ideal para: Remoção ocasional de hiperlinks quando a versão desktop do Microsoft Word não está disponível.
Se você não tem o Word instalado, pode abrir seu documento no Word para a Web para editar hiperlinks diretamente em um navegador. Isso é conveniente para um pequeno número de links e não requer instalação de software.
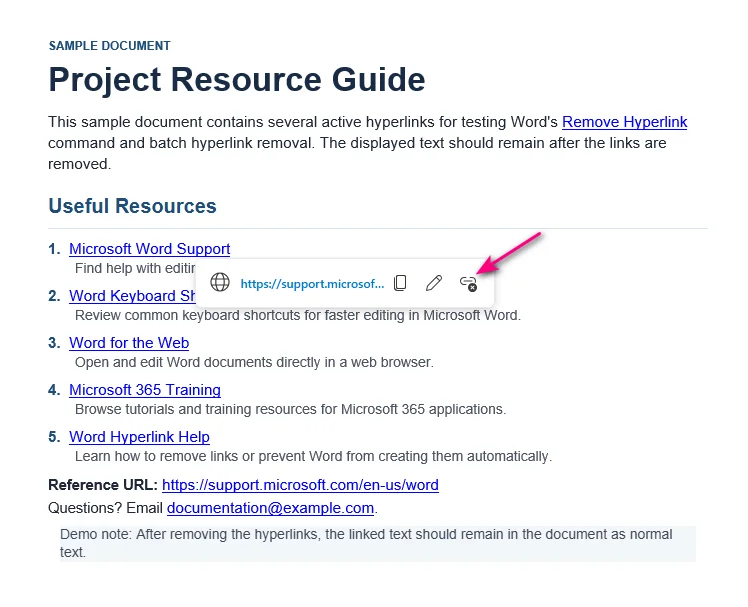
Opção A: Barra de ferramentas pop-up (Mais rápido)
-
Clique no texto com hiperlink.
-
Clique no ícone Desvincular (um elo de corrente com um pequeno "X") no lado direito da barra de ferramentas pop-up.
Opção B: Menu de clique com o botão direito
-
Clique com o botão direito no texto com hiperlink.
-
Selecione Remover Hiperlink no menu de contexto.
Não consegue remover um hiperlink no Word para a Web?
Alguns links no Word para a Web podem aparecer cinza ou não ser editáveis. Causas comuns incluem:
-
Controle de Alterações: O link foi criado ou editado enquanto o Controle de Alterações estava ativado.
-
Links de vários parágrafos: O link abrange vários parágrafos e foi criado na versão desktop do Word.
Solução: Clique em Abrir no Aplicativo da Área de Trabalho (localizado no menu suspenso Edição na faixa de opções superior) e remova os links no Word desktop.
Excluir hiperlinks em lote de documentos do Word com C#
Ideal para: Desenvolvedores que automatizam o processamento de documentos em backend, limpam arquivos importados ou processam grandes coleções de documentos do Word.
Métodos manuais tornam-se ineficientes quando a mesma limpeza precisa ser aplicada em muitos arquivos do Word. Isso é comum ao processar documentos importados, preparar relatórios para publicação ou arquivamento, ou limpar arquivos gerados por outro sistema.
Nesses casos, a remoção de hiperlinks pode ser incorporada a um fluxo de trabalho em C#. O exemplo a seguir usa o Spire.Doc for .NET para remover hiperlinks em lote de vários arquivos DOCX sem exigir que o Microsoft Word esteja instalado.
Passo 1: Instalar a biblioteca .NET Word
Instale o Spire.Doc for .NET via NuGet usando o Console do Gerenciador de Pacotes ou a CLI do .NET.
Console do Gerenciador de Pacotes NuGet:
Install-Package Spire.Doc
CLI do .NET:
dotnet add package Spire.Doc
Após a instalação, os namespaces necessários podem ser referenciados diretamente no seu projeto C#.
Passo 2: Escrever código C# para remover hiperlinks em lote de arquivos DOCX
O exemplo a seguir verifica uma pasta de entrada em busca de arquivos .docx, identifica campos de hiperlink em cada documento, remove os campos de hiperlink preservando o texto exibido e salva os arquivos processados em uma pasta de saída separada.
using Spire.Doc;
using Spire.Doc.Documents;
using Spire.Doc.Fields;
using System;
using System.Collections.Generic;
using System.Drawing;
using System.IO;

namespace Remove_Hyperlinks
{
    class Program
    {
        static void Main(string[] args)
        {
            string inputFolder = @"C:\WordFiles\Input";
            string outputFolder = @"C:\WordFiles\Output";

            // Criar a pasta de saída se ela não existir
            Directory.CreateDirectory(outputFolder);

            // Processar todos os arquivos DOCX na pasta de entrada
            foreach (string inputFile in Directory.GetFiles(inputFolder, "*.docx"))
            {
                // Ignorar arquivos temporários do Word
                if (Path.GetFileName(inputFile).StartsWith("~$"))
                    continue;

                // Criar uma instância de Document
                Document doc = new Document();

                // Carregar um documento do Word
                doc.LoadFromFile(inputFile);

                // Encontrar todos os hiperlinks
                List<Field> hyperlinks = FindAllHyperlinks(doc);

                // Achatar todos os hiperlinks
                for (int i = hyperlinks.Count - 1; i >= 0; i--)
                {
                    FlattenHyperlinks(hyperlinks[i]);
                }

                // Salvar o documento processado
                string outputFile = Path.Combine(
                    outputFolder,
                    Path.GetFileName(inputFile));

                doc.SaveToFile(outputFile, FileFormat.Docx);
                doc.Close();

                Console.WriteLine(
                    $"Processado: {Path.GetFileName(inputFile)}");
            }
        }

        // Obter todos os hiperlinks do corpo do documento
        private static List<Field> FindAllHyperlinks(Document document)
        {
            List<Field> hyperlinks = new List<Field>();

            foreach (Section section in document.Sections)
            {
                foreach (DocumentObject sec in section.Body.ChildObjects)
                {
                    if (sec.DocumentObjectType == DocumentObjectType.Paragraph)
                    {
                        foreach (DocumentObject para
                                 in (sec as Paragraph).ChildObjects)
                        {
                            if (para.DocumentObjectType ==
                                DocumentObjectType.Field)
                            {
                                Field field = para as Field;

                                if (field.Type == FieldType.FieldHyperlink)
                                {
                                    hyperlinks.Add(field);
                                }
                            }
                        }
                    }
                }
            }

            return hyperlinks;
        }

        // Achatar um campo de hiperlink mantendo seu texto exibido
        private static void FlattenHyperlinks(Field field)
        {
            int ownerParaIndex =
                field.OwnerParagraph.OwnerTextBody.ChildObjects
                    .IndexOf(field.OwnerParagraph);

            int fieldIndex =
                field.OwnerParagraph.ChildObjects.IndexOf(field);

            Paragraph sepOwnerPara =
                field.Separator.OwnerParagraph;

            int sepOwnerParaIndex =
                field.Separator.OwnerParagraph.OwnerTextBody.ChildObjects
                    .IndexOf(field.Separator.OwnerParagraph);

            int sepIndex =
                field.Separator.OwnerParagraph.ChildObjects
                    .IndexOf(field.Separator);

            int endIndex =
                field.End.OwnerParagraph.ChildObjects
                    .IndexOf(field.End);

            int endOwnerParaIndex =
                field.End.OwnerParagraph.OwnerTextBody.ChildObjects
                    .IndexOf(field.End.OwnerParagraph);

            FormatFieldResultText(
                field.Separator.OwnerParagraph.OwnerTextBody,
                sepOwnerParaIndex,
                endOwnerParaIndex,
                sepIndex,
                endIndex);

            // Remover o marcador de fim de campo
            field.End.OwnerParagraph.ChildObjects.RemoveAt(endIndex);

            // Remover o código de campo e o separador
            for (int i = sepOwnerParaIndex; i >= ownerParaIndex; i--)
            {
                if (i == sepOwnerParaIndex && i == ownerParaIndex)
                {
                    for (int j = sepIndex; j >= fieldIndex; j--)
                    {
                        field.OwnerParagraph.ChildObjects.RemoveAt(j);
                    }
                }
                else if (i == ownerParaIndex)
                {
                    for (int j =
                            field.OwnerParagraph.ChildObjects.Count - 1;
                         j >= fieldIndex;
                         j--)
                    {
                        field.OwnerParagraph.ChildObjects.RemoveAt(j);
                    }
                }
                else if (i == sepOwnerParaIndex)
                {
                    for (int j = sepIndex; j >= 0; j--)
                    {
                        sepOwnerPara.ChildObjects.RemoveAt(j);
                    }
                }
                else
                {
                    field.OwnerParagraph.OwnerTextBody.ChildObjects
                        .RemoveAt(i);
                }
            }
        }

        // Definir o texto do hiperlink retido como preto e remover o sublinhado
        private static void FormatFieldResultText(
            Body ownerBody,
            int sepOwnerParaIndex,
            int endOwnerParaIndex,
            int sepIndex,
            int endIndex)
        {
            for (int i = sepOwnerParaIndex;
                 i <= endOwnerParaIndex;
                 i++)
            {
                Paragraph para =
                    ownerBody.ChildObjects[i] as Paragraph;

                if (i == sepOwnerParaIndex &&
                    i == endOwnerParaIndex)
                {
                    for (int j = sepIndex + 1; j < endIndex; j++)
                    {
                        FormatText(para.ChildObjects[j] as TextRange);
                    }
                }
                else if (i == sepOwnerParaIndex)
                {
                    for (int j = sepIndex + 1;
                         j < para.ChildObjects.Count;
                         j++)
                    {
                        FormatText(para.ChildObjects[j] as TextRange);
                    }
                }
                else if (i == endOwnerParaIndex)
                {
                    for (int j = 0; j < endIndex; j++)
                    {
                        FormatText(para.ChildObjects[j] as TextRange);
                    }
                }
                else
                {
                    for (int j = 0;
                         j < para.ChildObjects.Count;
                         j++)
                    {
                        FormatText(para.ChildObjects[j] as TextRange);
                    }
                }
            }
        }

        // Definir o texto do hiperlink retido como preto sem sublinhado
        private static void FormatText(TextRange textRange)
        {
            if (textRange == null)
                return;

            textRange.CharacterFormat.TextColor = Color.Black;
            textRange.CharacterFormat.UnderlineStyle =
                UnderlineStyle.None;
        }
    }
}
Passo 3: Executar o programa
Atualize os caminhos das pastas de entrada e saída, coloque os arquivos DOCX na pasta de entrada e execute o aplicativo. As cópias limpas serão salvas na pasta de saída com seus nomes de arquivo originais.
Para um lote grande, teste o programa em alguns documentos representativos primeiro.
Saída:
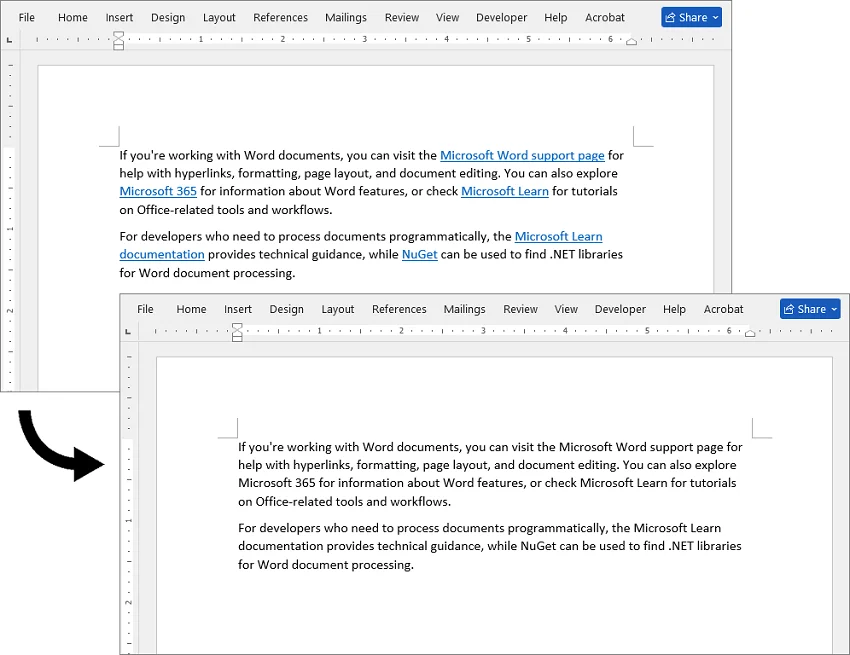
⚠️ Nota técnica: Este trecho de código C# tem como alvo parágrafos de corpo de nível superior. Se seus documentos contiverem hiperlinks aninhados em tabelas, caixas de texto ou cabeçalhos/rodapés, a lógica de travessia deve ser estendida para verificar esses elementos filhos recursivamente.
O código também redefine o texto do hiperlink retido para preto e remove seu sublinhado. Se você precisar apenas alterar a cor ou remover o sublinhado de hiperlinks sem remover os links, você pode modificar a formatação do hiperlink separadamente.
Bônus: Impedir que o Word crie hiperlinks automaticamente
Se o problema real é que o Word continua transformando URLs e endereços de e-mail em links enquanto você digita, você pode desativar a criação automática de hiperlinks em vez de removê-los repetidamente depois.
No Word para Windows
-
Clique em Arquivo no canto superior esquerdo e escolha Opções na parte inferior da barra lateral.
-
Selecione a categoria Revisão de Texto no painel esquerdo.
-
Clique no botão Opções de AutoCorreção... próximo ao topo.
-
Mude para a guia AutoFormatação ao Digitar.
-
Desmarque a caixa ao lado de Caminhos da Internet e de rede com hiperlinks.
-
Clique em OK para aplicar.
No Word para Mac
-
Clique em Word na barra de menu superior da Apple e selecione Preferências.
-
Abra a ferramenta AutoCorreção na seção Autor.
-
Mude para a guia AutoFormatação ao Digitar.
-
Desmarque Caminhos da Internet e de rede com hiperlinks.
Alterar essa configuração impede que o Word formate links futuros enquanto você digita. Isso não afetará nem limpará hiperlinks que já estão salvos dentro do seu documento atual.
Coisas a verificar após remover hiperlinks do Word
Remover hiperlinks geralmente é simples, mas vale a pena verificar alguns detalhes depois, especialmente formatação, campos dinâmicos e links em áreas separadas do documento.
-
Verifique a cor do texto e sublinhados: Se o texto permanecer azul ou sublinhado, defina a cor da fonte como Automática ou combine com o texto ao redor e, em seguida, remova o sublinhado, se necessário.
-
Verifique os campos dinâmicos: Se você usou o atalho Ctrl + Shift + F9, verifique seu Sumário, referências cruzadas e citações. Certifique-se de que não foram convertidos acidentalmente em texto simples não atualizável.
-
Verifique cabeçalhos e rodapés: O Ctrl + A não seleciona texto dentro de cabeçalhos e rodapés. Clique duas vezes dentro dessas áreas específicas manualmente para limpar os links ocultos restantes.
Perguntas frequentes
P: Remover um hiperlink exclui o texto de exibição?
R: Não. O comando Remover Hiperlink remove o link enquanto mantém o texto exibido no local.
P: Como posso remover o sublinhado azul sem quebrar o link?
R: Destaque o hiperlink, vá para a guia Página Inicial, defina a cor da fonte como Automática ou combine com o texto ao redor e, em seguida, clique no botão Sublinhado (ou pressione Ctrl + U) para desativar o sublinhado.
P: Como removo um hiperlink de uma imagem no Word?
R: Clique com o botão direito na imagem com hiperlink e selecione Remover Hiperlink. Em fluxos de trabalho de documentos automatizados, hiperlinks de imagem também podem ser gerenciados programaticamente.
P: Posso remover hiperlinks do Word sem instalar o Word?
R: Sim. Você pode abrir e editar o arquivo em um navegador usando o Word para a Web. Para vários arquivos, você também pode usar C# com uma biblioteca de software como o Spire.Doc para automatizar a remoção.
Considerações finais
Escolher a melhor maneira de remover hiperlinks depende do seu contexto de edição. Para edições manuais rápidas, os comandos nativos e atalhos de teclado do Word são ideais. Para fluxos de trabalho de documentos automatizados ou grandes coleções de arquivos DOCX, a automação via script C# oferece uma solução confiável e escalável.
Word에서 하이퍼링크 제거하는 방법 (데스크톱, 온라인 및 C#)
요약 (TL;DR):
-
하나 또는 소수의 하이퍼링크: 링크된 텍스트를 마우스 오른쪽 버튼으로 클릭하고 하이퍼링크 제거를 선택합니다.
-
문서 내 모든 하이퍼링크:
-
Windows: Ctrl + A를 누른 다음 Ctrl + Shift + F9를 누릅니다.
-
Mac: Cmd + A를 누른 다음 Cmd + Shift + F9를 누릅니다. F9가 macOS 시스템 기능으로 할당된 경우 Cmd + Fn + Shift + F9를 사용하거나 Cmd + 6을 누릅니다.
-
-
Word가 설치되지 않은 경우: 웹용 Word(Word for the web)를 사용하여 브라우저에서 하이퍼링크를 제거합니다.
-
여러 개의 Word 파일: C# 일괄 처리를 사용하여 자동으로 하이퍼링크를 제거합니다.
하이퍼링크는 Word 문서에서 웹사이트, 참조 자료 및 기타 리소스를 공유하는 데 유용합니다. 하지만 문서를 인쇄, 게시 또는 재사용하기 위해 준비할 때는 이러한 링크가 불필요해지거나 원치 않는 서식이 남을 수 있습니다.
이 가이드에서는 Microsoft Word에서 개별 및 모든 링크를 제거하는 방법부터 C#을 사용하여 여러 DOCX 파일의 정리를 자동화하는 방법까지, Word에서 하이퍼링크를 제거하는 방법을 설명합니다.
학습 내용:
- Microsoft Word에서 하이퍼링크 제거하기
- Word 문서의 모든 하이퍼링크 한 번에 제거하기
- Word Online에서 하이퍼링크 제거하기
- C#을 사용하여 Word 문서에서 하이퍼링크 일괄 삭제하기
- 보너스: Word가 자동으로 하이퍼링크를 생성하지 않도록 설정하기
- Word 하이퍼링크 제거 후 확인해야 할 사항
- 자주 묻는 질문(FAQ)
Microsoft Word에서 하이퍼링크 제거하기
용도: 다른 문서 콘텐츠에 영향을 주지 않고 하나 또는 소수의 하이퍼링크를 제거할 때 적합합니다.
제거해야 할 링크 수가 적은 경우, Word의 내장된 하이퍼링크 제거 명령이 가장 안전하고 간단한 옵션입니다. 이 명령은 표시된 텍스트는 그대로 유지하면서 클릭 가능한 대상만 제거합니다.
이 방법은 목차, 인용, 상호 참조 또는 기타 동적 필드가 포함된 문서에서 선택한 하이퍼링크에만 영향을 주므로 특히 유용합니다.
단계별 지침
-
Microsoft Word에서 문서를 엽니다.
-
제거하려는 하이퍼링크를 찾습니다.
-
링크된 텍스트를 마우스 오른쪽 버튼으로 클릭합니다.
-
하이퍼링크 제거를 선택합니다.
결과: 선택한 텍스트는 문서에 그대로 남지만 더 이상 클릭할 수 없습니다.
⚡ 팁: 하이퍼링크와 표시된 텍스트를 모두 삭제하려면 텍스트를 선택한 후 Delete 또는 Backspace 키를 누르세요.
Word 문서의 모든 하이퍼링크 한 번에 제거하기
용도: 비교적 단순한 Word 문서에서 많은 하이퍼링크를 빠르게 제거할 때 적합합니다.
수십 개의 링크를 하나씩 제거하는 것은 시간이 많이 걸립니다. Word는 선택한 콘텐츠에서 하이퍼링크를 한 번에 제거할 수 있는 키보드 단축키를 제공합니다.
Windows에서 모든 하이퍼링크 제거
-
Ctrl + A를 눌러 문서의 모든 내용을 선택합니다. 처리하려는 섹션만 수동으로 선택할 수도 있습니다.
-
Ctrl + Shift + F9를 누릅니다.
Mac에서 모든 하이퍼링크 제거
-
Cmd + A를 눌러 문서 내용을 선택합니다.
-
Cmd + Shift + F9를 누릅니다.
⚡ 팁: Mac에서 F9를 시스템 또는 미디어 기능으로 사용하는 경우 Cmd + Fn + Shift + F9를 사용하거나, Cmd + 6을 눌러 F9 키를 사용하지 않고 Word의 필드 연결 해제(UnlinkFields) 명령을 실행하세요.
결과: 선택한 모든 하이퍼링크가 원래의 문구는 유지한 채 일반 텍스트로 변환됩니다.
⚠️ 중요: 이 단축키를 사용하기 전에 동적 필드를 확인하세요
Ctrl + Shift + F9는 하이퍼링크 전용 명령이 아닙니다. 이는 Word의 일반적인 필드 연결 해제 명령입니다.
즉, 선택 영역에 포함된 다른 필드도 정적 텍스트로 변환될 수 있습니다. 여기에는 다음이 포함될 수 있습니다:
-
자동 생성된 목차
-
상호 참조
-
인용 필드
-
기타 동적 Word 필드
보고서, 논문, 매뉴얼 또는 동적 필드에 의존하는 기타 문서의 경우, 단축키를 사용하기 전에 백업을 저장하십시오. 또한 Ctrl + A는 일반적으로 기본 문서 텍스트만 선택한다는 점에 유의하십시오. 머리글과 바닥글의 하이퍼링크는 별도로 처리해야 할 수 있습니다.
Word Online에서 하이퍼링크 제거하기
용도: 데스크톱 버전의 Microsoft Word를 사용할 수 없을 때 가끔 하이퍼링크를 제거해야 하는 경우에 적합합니다.
Word가 설치되어 있지 않은 경우, 웹용 Word(Word for the Web)에서 문서를 열어 브라우저에서 직접 하이퍼링크를 편집할 수 있습니다. 이는 소수의 링크를 처리할 때 편리하며 소프트웨어 설치가 전혀 필요하지 않습니다.
옵션 A: 팝업 도구 모음 (가장 빠름)
-
하이퍼링크가 걸린 텍스트를 클릭합니다.
-
팝업 도구 모음 오른쪽에 있는 연결 해제 아이콘(작은 "X"가 있는 체인 링크)을 클릭합니다.
옵션 B: 마우스 오른쪽 버튼 메뉴
-
하이퍼링크가 걸린 텍스트를 마우스 오른쪽 버튼으로 클릭합니다.
-
컨텍스트 메뉴에서 하이퍼링크 제거를 선택합니다.
웹용 Word에서 하이퍼링크를 제거할 수 없나요?
웹용 Word의 일부 링크는 회색으로 표시되거나 편집할 수 없을 수 있습니다. 일반적인 원인은 다음과 같습니다:
-
변경 내용 추적: 변경 내용 추적 기능이 활성화된 상태에서 링크가 생성되거나 편집되었습니다.
-
여러 단락에 걸친 링크: 링크가 여러 단락에 걸쳐 있으며 Word 데스크톱 버전에서 생성되었습니다.
해결 방법: 상단 리본의 편집 드롭다운 메뉴에 있는 데스크톱 앱에서 열기를 클릭하고 데스크톱 Word에서 링크를 제거하십시오.
C#을 사용하여 Word 문서에서 하이퍼링크 일괄 삭제하기
용도: 백엔드 문서 처리를 자동화하거나, 가져온 파일을 정리하거나, 대량의 Word 문서를 처리하는 개발자에게 적합합니다.
많은 Word 파일에 동일한 정리 작업을 적용해야 할 경우 수동 방법은 비효율적입니다. 이는 가져온 문서를 처리하거나, 게시 또는 보관을 위해 보고서를 준비하거나, 다른 시스템에서 생성된 파일을 정리할 때 흔히 발생합니다.
이러한 경우 C# 워크플로에 하이퍼링크 제거 기능을 통합할 수 있습니다. 다음 예제는 Spire.Doc for .NET을 사용하여 Microsoft Word를 설치하지 않고도 여러 DOCX 파일에서 하이퍼링크를 일괄 제거하는 방법을 보여줍니다.
1단계: .NET Word 라이브러리 설치
패키지 관리자 콘솔 또는 .NET CLI를 사용하여 NuGet을 통해 Spire.Doc for .NET을 설치합니다.
NuGet 패키지 관리자 콘솔:
Install-Package Spire.Doc
.NET CLI:
dotnet add package Spire.Doc
설치 후 필요한 네임스페이스를 C# 프로젝트에서 직접 참조할 수 있습니다.
2단계: DOCX 파일에서 하이퍼링크를 일괄 제거하는 C# 코드 작성
다음 예제는 입력 폴더에서 .docx 파일을 검색하여 각 문서의 하이퍼링크 필드를 식별하고, 표시된 텍스트는 유지하면서 하이퍼링크 필드를 제거한 다음, 처리된 파일을 별도의 출력 폴더에 저장합니다.
using Spire.Doc;
using Spire.Doc.Documents;
using Spire.Doc.Fields;
using System;
using System.Collections.Generic;
using System.Drawing;
using System.IO;

namespace Remove_Hyperlinks
{
    class Program
    {
        static void Main(string[] args)
        {
            string inputFolder = @"C:\WordFiles\Input";
            string outputFolder = @"C:\WordFiles\Output";

            // 출력 폴더가 없으면 생성
            Directory.CreateDirectory(outputFolder);

            // 입력 폴더의 모든 DOCX 파일 처리
            foreach (string inputFile in Directory.GetFiles(inputFolder, "*.docx"))
            {
                // 임시 Word 파일 건너뛰기
                if (Path.GetFileName(inputFile).StartsWith("~$"))
                    continue;

                // Document 인스턴스 생성
                Document doc = new Document();

                // Word 문서 로드
                doc.LoadFromFile(inputFile);

                // 모든 하이퍼링크 찾기
                List<Field> hyperlinks = FindAllHyperlinks(doc);

                // 모든 하이퍼링크 평탄화(제거)
                for (int i = hyperlinks.Count - 1; i >= 0; i--)
                {
                    FlattenHyperlinks(hyperlinks[i]);
                }

                // 처리된 문서 저장
                string outputFile = Path.Combine(
                    outputFolder,
                    Path.GetFileName(inputFile));

                doc.SaveToFile(outputFile, FileFormat.Docx);
                doc.Close();

                Console.WriteLine(
                    $"처리 완료: {Path.GetFileName(inputFile)}");
            }
        }

        // 문서 본문에서 모든 하이퍼링크 가져오기
        private static List<Field> FindAllHyperlinks(Document document)
        {
            List<Field> hyperlinks = new List<Field>();

            foreach (Section section in document.Sections)
            {
                foreach (DocumentObject sec in section.Body.ChildObjects)
                {
                    if (sec.DocumentObjectType == DocumentObjectType.Paragraph)
                    {
                        foreach (DocumentObject para
                                 in (sec as Paragraph).ChildObjects)
                        {
                            if (para.DocumentObjectType ==
                                DocumentObjectType.Field)
                            {
                                Field field = para as Field;

                                if (field.Type == FieldType.FieldHyperlink)
                                {
                                    hyperlinks.Add(field);
                                }
                            }
                        }
                    }
                }
            }

            return hyperlinks;
        }

        // 표시된 텍스트를 유지하면서 하이퍼링크 필드 평탄화
        private static void FlattenHyperlinks(Field field)
        {
            int ownerParaIndex =
                field.OwnerParagraph.OwnerTextBody.ChildObjects
                    .IndexOf(field.OwnerParagraph);

            int fieldIndex =
                field.OwnerParagraph.ChildObjects.IndexOf(field);

            Paragraph sepOwnerPara =
                field.Separator.OwnerParagraph;

            int sepOwnerParaIndex =
                field.Separator.OwnerParagraph.OwnerTextBody.ChildObjects
                    .IndexOf(field.Separator.OwnerParagraph);

            int sepIndex =
                field.Separator.OwnerParagraph.ChildObjects
                    .IndexOf(field.Separator);

            int endIndex =
                field.End.OwnerParagraph.ChildObjects
                    .IndexOf(field.End);

            int endOwnerParaIndex =
                field.End.OwnerParagraph.OwnerTextBody.ChildObjects
                    .IndexOf(field.End.OwnerParagraph);

            FormatFieldResultText(
                field.Separator.OwnerParagraph.OwnerTextBody,
                sepOwnerParaIndex,
                endOwnerParaIndex,
                sepIndex,
                endIndex);

            // 필드 끝 마커 제거
            field.End.OwnerParagraph.ChildObjects.RemoveAt(endIndex);

            // 필드 코드 및 구분 기호 제거
            for (int i = sepOwnerParaIndex; i >= ownerParaIndex; i--)
            {
                if (i == sepOwnerParaIndex && i == ownerParaIndex)
                {
                    for (int j = sepIndex; j >= fieldIndex; j--)
                    {
                        field.OwnerParagraph.ChildObjects.RemoveAt(j);
                    }
                }
                else if (i == ownerParaIndex)
                {
                    for (int j =
                            field.OwnerParagraph.ChildObjects.Count - 1;
                         j >= fieldIndex;
                         j--)
                    {
                        field.OwnerParagraph.ChildObjects.RemoveAt(j);
                    }
                }
                else if (i == sepOwnerParaIndex)
                {
                    for (int j = sepIndex; j >= 0; j--)
                    {
                        sepOwnerPara.ChildObjects.RemoveAt(j);
                    }
                }
                else
                {
                    field.OwnerParagraph.OwnerTextBody.ChildObjects
                        .RemoveAt(i);
                }
            }
        }

        // 유지된 하이퍼링크 텍스트를 검은색으로 설정하고 밑줄 제거
        private static void FormatFieldResultText(
            Body ownerBody,
            int sepOwnerParaIndex,
            int endOwnerParaIndex,
            int sepIndex,
            int endIndex)
        {
            for (int i = sepOwnerParaIndex;
                 i <= endOwnerParaIndex;
                 i++)
            {
                Paragraph para =
                    ownerBody.ChildObjects[i] as Paragraph;

                if (i == sepOwnerParaIndex &&
                    i == endOwnerParaIndex)
                {
                    for (int j = sepIndex + 1; j < endIndex; j++)
                    {
                        FormatText(para.ChildObjects[j] as TextRange);
                    }
                }
                else if (i == sepOwnerParaIndex)
                {
                    for (int j = sepIndex + 1;
                         j < para.ChildObjects.Count;
                         j++)
                    {
                        FormatText(para.ChildObjects[j] as TextRange);
                    }
                }
                else if (i == endOwnerParaIndex)
                {
                    for (int j = 0; j < endIndex; j++)
                    {
                        FormatText(para.ChildObjects[j] as TextRange);
                    }
                }
                else
                {
                    for (int j = 0;
                         j < para.ChildObjects.Count;
                         j++)
                    {
                        FormatText(para.ChildObjects[j] as TextRange);
                    }
                }
            }
        }

        // 유지된 하이퍼링크 텍스트를 밑줄 없는 검은색으로 설정
        private static void FormatText(TextRange textRange)
        {
            if (textRange == null)
                return;

            textRange.CharacterFormat.TextColor = Color.Black;
            textRange.CharacterFormat.UnderlineStyle =
                UnderlineStyle.None;
        }
    }
}
3단계: 프로그램 실행
입력 및 출력 폴더 경로를 업데이트하고, DOCX 파일을 입력 폴더에 넣은 다음 애플리케이션을 실행합니다. 정리된 복사본이 원래 파일 이름으로 출력 폴더에 저장됩니다.
대량으로 처리하기 전에 몇 개의 대표 문서에서 프로그램을 먼저 테스트하십시오.
결과:
⚠️ 기술 참고 사항: 이 C# 코드 조각은 최상위 본문 단락을 대상으로 합니다. 문서에 표, 텍스트 상자 또는 머리글/바닥글 내에 중첩된 하이퍼링크가 포함된 경우, 해당 자식 요소를 재귀적으로 스캔하도록 탐색 로직을 확장해야 합니다.
또한 이 코드는 유지된 하이퍼링크 텍스트를 검은색으로 재설정하고 밑줄을 제거합니다. 링크를 제거하지 않고 하이퍼링크의 색상을 변경하거나 밑줄을 제거하기만 하면 되는 경우, 하이퍼링크 서식을 별도로 수정할 수 있습니다.
보너스: Word가 자동으로 하이퍼링크를 생성하지 않도록 설정하기
진정한 문제가 Word가 입력할 때마다 URL과 이메일 주소를 링크로 계속 변환하는 것이라면, 나중에 반복적으로 제거하는 대신 자동 하이퍼링크 생성을 비활성화할 수 있습니다.
Word for Windows의 경우
-
왼쪽 상단 모서리에 있는 파일을 클릭한 다음 사이드바 하단의 옵션을 선택합니다.
-
왼쪽 창에서 언어 교정 범주를 선택합니다.
-
상단 근처의 자동 고침 옵션... 버튼을 클릭합니다.
-
입력할 때 자동 서식 탭으로 전환합니다.
-
인터넷과 네트워크 경로를 하이퍼링크로 설정 옆의 확인란을 선택 해제합니다.
-
확인을 클릭하여 적용합니다.
Word for Mac의 경우
-
상단 Apple 메뉴 막대에서 Word를 클릭하고 기본 설정을 선택합니다.
-
작성 섹션 아래의 자동 고침 도구를 엽니다.
-
입력할 때 자동 서식 탭으로 전환합니다.
-
인터넷과 네트워크 경로를 하이퍼링크로 설정의 선택을 취소합니다.
이 설정을 변경하면 Word가 입력하는 향후 링크를 서식 지정하는 것을 중단합니다. 현재 문서 내에 이미 저장된 하이퍼링크는 건드리거나 정리하지 않습니다.
Word 하이퍼링크 제거 후 확인해야 할 사항
하이퍼링크 제거는 일반적으로 간단하지만, 특히 서식, 동적 필드 및 별도의 문서 영역에 있는 링크와 관련하여 나중에 확인해야 할 몇 가지 세부 사항이 있습니다.
-
텍스트 색상 및 밑줄 확인: 텍스트가 여전히 파란색이거나 밑줄이 그어져 있는 경우, 글꼴 색상을 자동으로 설정하거나 주변 텍스트와 일치시킨 다음 필요한 경우 밑줄을 제거하십시오.
-
동적 필드 확인: Ctrl + Shift + F9 단축키를 사용한 경우 목차, 상호 참조 및 인용을 확인하십시오. 실수로 업데이트할 수 없는 일반 텍스트로 변환되지 않았는지 확인하십시오.
-
머리글 및 바닥글 확인: Ctrl + A는 머리글과 바닥글 내부의 텍스트를 선택하지 않습니다. 남아 있는 숨겨진 링크를 지우려면 이러한 특정 영역 내부를 수동으로 두 번 클릭하십시오.
자주 묻는 질문(FAQ)
Q: 하이퍼링크를 제거하면 표시된 텍스트도 삭제되나요?
A: 아니요. 하이퍼링크 제거 명령은 표시된 텍스트는 그대로 유지하면서 링크만 제거합니다.
Q: 링크를 끊지 않고 파란색 밑줄만 제거하려면 어떻게 해야 하나요?
A: 하이퍼링크를 강조 표시하고 홈 탭으로 이동하여 글꼴 색상을 자동으로 설정하거나 주변 텍스트와 일치시킨 다음, 밑줄 버튼을 클릭(또는 Ctrl + U 누르기)하여 밑줄을 끕니다.
Q: Word에서 이미지의 하이퍼링크를 제거하려면 어떻게 해야 하나요?
A: 하이퍼링크가 걸린 이미지를 마우스 오른쪽 버튼으로 클릭하고 하이퍼링크 제거를 선택합니다. 자동화된 문서 워크플로에서는 이미지 하이퍼링크도 프로그래밍 방식으로 관리할 수 있습니다.
Q: Word를 설치하지 않고도 Word에서 하이퍼링크를 제거할 수 있나요?
A: 네. 웹용 Word를 사용하여 브라우저에서 파일을 열고 편집할 수 있습니다. 여러 파일의 경우 Spire.Doc과 같은 소프트웨어 라이브러리와 C#을 사용하여 제거를 자동화할 수도 있습니다.
최종 생각
하이퍼링크를 제거하는 가장 좋은 방법은 편집 상황에 따라 다릅니다. 빠른 수동 편집의 경우 Word의 내장 명령과 키보드 단축키가 이상적입니다. 자동화된 문서 워크플로나 대량의 DOCX 파일 컬렉션의 경우, C# 스크립트 자동화가 안정적이고 확장 가능한 솔루션을 제공합니다.
Come rimuovere i collegamenti ipertestuali in Word (desktop, online e C#)
Indice
- Rimuovere un collegamento ipertestuale in Microsoft Word
- Rimuovere tutti i collegamenti ipertestuali in un documento Word contemporaneamente
- Rimuovere collegamenti ipertestuali da Word Online
- Eliminazione in blocco di collegamenti ipertestuali da documenti Word con C#
- Bonus: Impedire a Word di creare collegamenti ipertestuali automaticamente
- Cose da controllare dopo aver rimosso i collegamenti ipertestuali di Word
- Domande frequenti
Sintesi rapida (TL;DR):
-
Uno o pochi collegamenti: Fai clic con il tasto destro sul testo collegato e seleziona Rimuovi collegamento ipertestuale.
-
Tutti i collegamenti in un documento:
-
Windows: Premi Ctrl + A, quindi Ctrl + Shift + F9.
-
Mac: Premi Cmd + A, quindi Cmd + Shift + F9. Se F9 è assegnato a una funzione di sistema di macOS, usa Cmd + Fn + Shift + F9 o premi Cmd + 6.
-
-
Word non installato: Usa Word per il web per rimuovere i collegamenti ipertestuali in un browser.
-
Più file Word: Usa l'elaborazione in blocco con C# per rimuovere i collegamenti ipertestuali automaticamente.
I collegamenti ipertestuali sono utili per condividere siti web, riferimenti e altre risorse in un documento Word. Tuttavia, quando prepari un documento per la stampa, la pubblicazione o il riutilizzo, tali collegamenti possono diventare superflui o lasciare una formattazione non desiderata.
Questa guida mostra come rimuovere i collegamenti ipertestuali in Word, dalla rimozione di singoli collegamenti o di tutti i collegamenti in Microsoft Word, fino all'automazione della pulizia su più file DOCX con C#.
Cosa imparerai:
- Rimuovere un collegamento ipertestuale in Microsoft Word
- Rimuovere tutti i collegamenti ipertestuali in un documento Word contemporaneamente
- Rimuovere collegamenti ipertestuali da Word Online
- Eliminazione in blocco di collegamenti ipertestuali da documenti Word con C#
- Bonus: Impedire a Word di creare collegamenti ipertestuali automaticamente
- Cose da controllare dopo aver rimosso i collegamenti ipertestuali di Word
- Domande frequenti
Rimuovere un collegamento ipertestuale in Microsoft Word
Ideale per: Rimuovere uno o pochi collegamenti ipertestuali senza influire sugli altri contenuti del documento.
Se è necessario rimuovere solo un numero limitato di collegamenti, il comando integrato di Word Rimuovi collegamento ipertestuale è l'opzione più sicura e diretta. Rimuove la destinazione cliccabile mantenendo il testo visualizzato al suo posto.
Questo metodo è particolarmente utile nei documenti contenenti indici, citazioni, riferimenti incrociati o altri campi dinamici, poiché viene influenzato solo il collegamento ipertestuale selezionato.
Istruzioni passo dopo passo
-
Apri il documento in Microsoft Word.
-
Individua il collegamento ipertestuale che desideri rimuovere.
-
Fai clic con il tasto destro sul testo collegato.
-
Seleziona Rimuovi collegamento ipertestuale.
Risultato: Il testo selezionato rimane nel documento, ma non è più cliccabile.
⚡ Suggerimento: Se desideri eliminare sia il collegamento ipertestuale che il testo visualizzato, seleziona il testo e premi Canc o Backspace.
Rimuovere tutti i collegamenti ipertestuali in un documento Word contemporaneamente
Ideale per: Rimuovere rapidamente molti collegamenti ipertestuali da un documento Word relativamente semplice.
Rimuovere decine di collegamenti uno per uno richiede tempo. Word fornisce una scorciatoia da tastiera in grado di eliminare i collegamenti ipertestuali dal contenuto selezionato in un'unica operazione.
Rimuovere tutti i collegamenti ipertestuali su Windows
-
Premi Ctrl + A per selezionare tutto il contenuto del documento. Puoi anche selezionare manualmente solo la sezione che desideri elaborare.
-
Premi Ctrl + Shift + F9.
Rimuovere tutti i collegamenti ipertestuali su Mac
-
Premi Cmd + A per selezionare il contenuto del documento.
-
Premi Cmd + Shift + F9.
⚡ Suggerimento: Se il tuo Mac usa F9 per una funzione di sistema o multimediale, usa Cmd + Fn + Shift + F9, oppure premi Cmd + 6 per eseguire il comando UnlinkFields di Word senza fare affidamento sul tasto F9.
Risultato: Tutti i collegamenti ipertestuali selezionati vengono convertiti in testo normale preservando la dicitura originale.
⚠️ Importante: Controlla i campi dinamici prima di usare questa scorciatoia
Ctrl + Shift + F9 non è un comando specifico per i collegamenti ipertestuali. È il comando generale di Word Scollega campo.
Ciò significa che anche altri campi inclusi nella selezione possono essere convertiti in testo statico. Questi possono includere:
-
Indici generati automaticamente
-
Riferimenti incrociati
-
Campi di citazione
-
Altri campi dinamici di Word
Per report, tesi, manuali o altri documenti che si basano su campi dinamici, salva una copia di backup prima di utilizzare la scorciatoia. Nota inoltre che Ctrl + A seleziona normalmente il testo principale del documento. I collegamenti ipertestuali in intestazioni e piè di pagina potrebbero dover essere gestiti separatamente.
Rimuovere collegamenti ipertestuali da Word Online
Ideale per: Rimozione occasionale di collegamenti ipertestuali quando la versione desktop di Microsoft Word non è disponibile.
Se non hai Word installato, puoi aprire il tuo documento in Word per il Web per modificare i collegamenti ipertestuali direttamente in un browser. È comodo per un piccolo numero di collegamenti e non richiede l'installazione di alcun software.
Opzione A: La barra degli strumenti pop-up (più veloce)
-
Fai clic sul testo con collegamento ipertestuale.
-
Fai clic sull'icona Scollega (un anello di catena con una piccola "X") sul lato destro della barra degli strumenti pop-up.
Opzione B: Il menu del tasto destro
-
Fai clic con il tasto destro sul testo con collegamento ipertestuale.
-
Seleziona Rimuovi collegamento ipertestuale dal menu contestuale.
Non riesci a rimuovere un collegamento ipertestuale in Word per il Web?
Alcuni collegamenti in Word per il Web potrebbero apparire grigi o non modificabili. Le cause comuni includono:
-
Revisioni: Il collegamento è stato creato o modificato mentre la funzione Revisioni era attiva.
-
Collegamenti su più paragrafi: Il collegamento si estende su più paragrafi ed è stato creato nella versione desktop di Word.
Soluzione: Fai clic su Apri nell'app desktop (situato nel menu a discesa Modifica sulla barra multifunzione in alto) e rimuovi i collegamenti in Word desktop.
Eliminazione in blocco di collegamenti ipertestuali da documenti Word con C#
Ideale per: Sviluppatori che automatizzano l'elaborazione dei documenti lato server, puliscono file importati o elaborano grandi raccolte di documenti Word.
I metodi manuali diventano inefficienti quando la stessa pulizia deve essere applicata a molti file Word. Questo è comune durante l'elaborazione di documenti importati, la preparazione di report per la pubblicazione o l'archiviazione, o la pulizia di file generati da un altro sistema.
In questi casi, la rimozione dei collegamenti ipertestuali può essere integrata in un flusso di lavoro C#. L'esempio seguente utilizza Spire.Doc for .NET per rimuovere in blocco i collegamenti ipertestuali da più file DOCX senza richiedere l'installazione di Microsoft Word.
Passaggio 1: Installare la libreria .NET Word
Installa Spire.Doc for .NET tramite NuGet usando la Console di Gestione pacchetti o la CLI .NET.
Console di Gestione pacchetti NuGet:
Install-Package Spire.Doc
CLI .NET:
dotnet add package Spire.Doc
Dopo l'installazione, i namespace richiesti possono essere referenziati direttamente nel tuo progetto C#.
Passaggio 2: Scrivere il codice C# per rimuovere in blocco i collegamenti ipertestuali dai file DOCX
L'esempio seguente scansiona una cartella di input alla ricerca di file .docx, identifica i campi dei collegamenti ipertestuali in ogni documento, rimuove i campi dei collegamenti mantenendo il testo visualizzato e salva i file elaborati in una cartella di output separata.
using Spire.Doc;
using Spire.Doc.Documents;
using Spire.Doc.Fields;
using System;
using System.Collections.Generic;
using System.Drawing;
using System.IO;

namespace Remove_Hyperlinks
{
    class Program
    {
        static void Main(string[] args)
        {
            string inputFolder = @"C:\WordFiles\Input";
            string outputFolder = @"C:\WordFiles\Output";

            // Crea la cartella di output se non esiste
            Directory.CreateDirectory(outputFolder);

            // Elabora tutti i file DOCX nella cartella di input
            foreach (string inputFile in Directory.GetFiles(inputFolder, "*.docx"))
            {
                // Salta i file Word temporanei
                if (Path.GetFileName(inputFile).StartsWith("~$"))
                    continue;

                // Crea un'istanza di Document
                Document doc = new Document();

                // Carica un documento Word
                doc.LoadFromFile(inputFile);

                // Trova tutti i collegamenti ipertestuali
                List<Field> hyperlinks = FindAllHyperlinks(doc);

                // Appiattisci tutti i collegamenti ipertestuali
                for (int i = hyperlinks.Count - 1; i >= 0; i--)
                {
                    FlattenHyperlinks(hyperlinks[i]);
                }

                // Salva il documento elaborato
                string outputFile = Path.Combine(
                    outputFolder,
                    Path.GetFileName(inputFile));

                doc.SaveToFile(outputFile, FileFormat.Docx);
                doc.Close();

                Console.WriteLine(
                    $"Elaborato: {Path.GetFileName(inputFile)}");
            }
        }

        // Ottieni tutti i collegamenti ipertestuali dal corpo del documento
        private static List<Field> FindAllHyperlinks(Document document)
        {
            List<Field> hyperlinks = new List<Field>();

            foreach (Section section in document.Sections)
            {
                foreach (DocumentObject sec in section.Body.ChildObjects)
                {
                    if (sec.DocumentObjectType == DocumentObjectType.Paragraph)
                    {
                        foreach (DocumentObject para
                                 in (sec as Paragraph).ChildObjects)
                        {
                            if (para.DocumentObjectType ==
                                DocumentObjectType.Field)
                            {
                                Field field = para as Field;

                                if (field.Type == FieldType.FieldHyperlink)
                                {
                                    hyperlinks.Add(field);
                                }
                            }
                        }
                    }
                }
            }

            return hyperlinks;
        }

        // Appiattisci un campo di collegamento ipertestuale mantenendo il testo visualizzato
        private static void FlattenHyperlinks(Field field)
        {
            int ownerParaIndex =
                field.OwnerParagraph.OwnerTextBody.ChildObjects
                    .IndexOf(field.OwnerParagraph);

            int fieldIndex =
                field.OwnerParagraph.ChildObjects.IndexOf(field);

            Paragraph sepOwnerPara =
                field.Separator.OwnerParagraph;

            int sepOwnerParaIndex =
                field.Separator.OwnerParagraph.OwnerTextBody.ChildObjects
                    .IndexOf(field.Separator.OwnerParagraph);

            int sepIndex =
                field.Separator.OwnerParagraph.ChildObjects
                    .IndexOf(field.Separator);

            int endIndex =
                field.End.OwnerParagraph.ChildObjects
                    .IndexOf(field.End);

            int endOwnerParaIndex =
                field.End.OwnerParagraph.OwnerTextBody.ChildObjects
                    .IndexOf(field.End.OwnerParagraph);

            FormatFieldResultText(
                field.Separator.OwnerParagraph.OwnerTextBody,
                sepOwnerParaIndex,
                endOwnerParaIndex,
                sepIndex,
                endIndex);

            // Rimuovi il marcatore di fine campo
            field.End.OwnerParagraph.ChildObjects.RemoveAt(endIndex);

            // Rimuovi il codice di campo e il separatore
            for (int i = sepOwnerParaIndex; i >= ownerParaIndex; i--)
            {
                if (i == sepOwnerParaIndex && i == ownerParaIndex)
                {
                    for (int j = sepIndex; j >= fieldIndex; j--)
                    {
                        field.OwnerParagraph.ChildObjects.RemoveAt(j);
                    }
                }
                else if (i == ownerParaIndex)
                {
                    for (int j =
                            field.OwnerParagraph.ChildObjects.Count - 1;
                         j >= fieldIndex;
                         j--)
                    {
                        field.OwnerParagraph.ChildObjects.RemoveAt(j);
                    }
                }
                else if (i == sepOwnerParaIndex)
                {
                    for (int j = sepIndex; j >= 0; j--)
                    {
                        sepOwnerPara.ChildObjects.RemoveAt(j);
                    }
                }
                else
                {
                    field.OwnerParagraph.OwnerTextBody.ChildObjects
                        .RemoveAt(i);
                }
            }
        }

        // Imposta il testo del collegamento ipertestuale mantenuto su nero e rimuovi la sottolineatura
        private static void FormatFieldResultText(
            Body ownerBody,
            int sepOwnerParaIndex,
            int endOwnerParaIndex,
            int sepIndex,
            int endIndex)
        {
            for (int i = sepOwnerParaIndex;
                 i <= endOwnerParaIndex;
                 i++)
            {
                Paragraph para =
                    ownerBody.ChildObjects[i] as Paragraph;

                if (i == sepOwnerParaIndex &&
                    i == endOwnerParaIndex)
                {
                    for (int j = sepIndex + 1; j < endIndex; j++)
                    {
                        FormatText(para.ChildObjects[j] as TextRange);
                    }
                }
                else if (i == sepOwnerParaIndex)
                {
                    for (int j = sepIndex + 1;
                         j < para.ChildObjects.Count;
                         j++)
                    {
                        FormatText(para.ChildObjects[j] as TextRange);
                    }
                }
                else if (i == endOwnerParaIndex)
                {
                    for (int j = 0; j < endIndex; j++)
                    {
                        FormatText(para.ChildObjects[j] as TextRange);
                    }
                }
                else
                {
                    for (int j = 0;
                         j < para.ChildObjects.Count;
                         j++)
                    {
                        FormatText(para.ChildObjects[j] as TextRange);
                    }
                }
            }
        }

        // Imposta il testo del collegamento ipertestuale mantenuto su nero senza sottolineatura
        private static void FormatText(TextRange textRange)
        {
            if (textRange == null)
                return;

            textRange.CharacterFormat.TextColor = Color.Black;
            textRange.CharacterFormat.UnderlineStyle =
                UnderlineStyle.None;
        }
    }
}
Passaggio 3: Eseguire il programma
Aggiorna i percorsi delle cartelle di input e output, inserisci i file DOCX nella cartella di input ed esegui l'applicazione. Le copie pulite verranno salvate nella cartella di output con i nomi file originali.
Per un lotto di grandi dimensioni, testa prima il programma su alcuni documenti rappresentativi.
Output:
⚠️ Nota tecnica: Questo snippet C# punta ai paragrafi del corpo di primo livello. Se i tuoi documenti contengono collegamenti ipertestuali annidati all'interno di tabelle, caselle di testo o intestazioni/piè di pagina, la logica di attraversamento dovrebbe essere estesa per scansionare tali elementi figlio in modo ricorsivo.
Il codice reimposta anche il testo del collegamento ipertestuale mantenuto su nero e rimuove la sottolineatura. Se hai solo bisogno di cambiare il colore o rimuovere la sottolineatura dai collegamenti ipertestuali senza rimuovere i collegamenti stessi, puoi modificare la formattazione del collegamento ipertestuale separatamente.
Bonus: Impedire a Word di creare collegamenti ipertestuali automaticamente
Se il vero problema è che Word continua a trasformare URL e indirizzi email in collegamenti mentre scrivi, puoi disabilitare la creazione automatica dei collegamenti ipertestuali invece di rimuoverli ripetutamente in seguito.
In Word per Windows
-
Fai clic su File nell'angolo in alto a sinistra, quindi scegli Opzioni in fondo alla barra laterale.
-
Seleziona la categoria Strumenti di correzione dal riquadro sinistro.
-
Fai clic sul pulsante Opzioni correzione automatica... vicino alla parte superiore.
-
Passa alla scheda Formattazione automatica durante la digitazione.
-
Deseleziona la casella accanto a Percorsi Internet e di rete con collegamenti ipertestuali.
-
Fai clic su OK per applicare.
In Word per Mac
-
Fai clic su Word nella barra dei menu Apple in alto e seleziona Preferenze.
-
Apri lo strumento Correzione automatica nella sezione Creazione.
-
Passa alla scheda Formattazione automatica durante la digitazione.
-
Deseleziona Percorsi Internet e di rete con collegamenti ipertestuali.
La modifica di questa impostazione impedisce a Word di formattare i collegamenti futuri mentre scrivi. Non toccherà o pulirà i collegamenti ipertestuali già salvati all'interno del documento corrente.
Cose da controllare dopo aver rimosso i collegamenti ipertestuali di Word
La rimozione dei collegamenti ipertestuali è solitamente semplice, ma vale la pena controllare alcuni dettagli in seguito, specialmente la formattazione, i campi dinamici e i collegamenti in aree separate del documento.
-
Controlla il colore del testo e le sottolineature: Se il testo rimane blu o sottolineato, imposta il colore del carattere su Automatico o abbinalo al testo circostante, quindi rimuovi la sottolineatura se necessario.
-
Verifica i campi dinamici: Se hai utilizzato la scorciatoia Ctrl + Shift + F9, controlla l'indice, i riferimenti incrociati e le citazioni. Assicurati che non siano stati accidentalmente convertiti in testo normale non aggiornabile.
-
Controlla intestazioni e piè di pagina: Ctrl + A non seleziona il testo all'interno di intestazioni e piè di pagina. Fai doppio clic manualmente all'interno di queste aree specifiche per eliminare i collegamenti nascosti rimanenti.
Domande frequenti
D: La rimozione di un collegamento ipertestuale elimina il testo visualizzato?
R: No. Il comando Rimuovi collegamento ipertestuale rimuove il collegamento mantenendo il testo visualizzato al suo posto.
D: Come posso rimuovere la sottolineatura blu senza interrompere il collegamento?
R: Evidenzia il collegamento ipertestuale, vai alla scheda Home, imposta il colore del carattere su Automatico o abbinalo al testo circostante, quindi fai clic sul pulsante Sottolineato (o premi Ctrl + U) per disattivare la sottolineatura.
D: Come rimuovo un collegamento ipertestuale da un'immagine in Word?
R: Fai clic con il tasto destro sull'immagine con collegamento ipertestuale e seleziona Rimuovi collegamento ipertestuale. Nei flussi di lavoro documentali automatizzati, i collegamenti ipertestuali delle immagini possono anche essere gestiti a livello di programmazione.
D: Posso rimuovere i collegamenti ipertestuali da Word senza installare Word?
R: Sì. Puoi aprire e modificare il file in un browser utilizzando Word per il web. Per più file, puoi anche utilizzare C# con una libreria software come Spire.Doc per automatizzare la rimozione.
Considerazioni finali
Scegliere il modo migliore per rimuovere i collegamenti ipertestuali dipende dal tuo contesto di modifica. Per modifiche manuali rapide, i comandi integrati e le scorciatoie da tastiera di Word sono ideali. Per flussi di lavoro documentali automatizzati o grandi raccolte di file DOCX, l'automazione tramite script C# fornisce una soluzione affidabile e scalabile.
Comment supprimer des hyperliens dans Word (bureau, en ligne et C#)
Table des matières
- Supprimer un lien hypertexte dans Microsoft Word
- Supprimer tous les liens hypertextes d'un document Word en une fois
- Supprimer les liens hypertextes dans Word Online
- Supprimer par lots les liens hypertextes des documents Word avec C#
- Bonus : Empêcher Word de créer des liens hypertextes automatiquement
- Points à vérifier après la suppression des liens hypertextes
- Questions fréquemment posées
Résumé rapide (TL;DR) :
-
Un ou quelques liens : Faites un clic droit sur le texte lié et sélectionnez Supprimer le lien hypertexte.
-
Tous les liens d'un document :
-
Windows : Appuyez sur Ctrl + A, puis sur Ctrl + Maj + F9.
-
Mac : Appuyez sur Cmd + A, puis sur Cmd + Maj + F9. Si F9 est assigné à une fonction système macOS, utilisez Cmd + Fn + Maj + F9 ou appuyez sur Cmd + 6.
-
-
Word non installé : Utilisez Word pour le web dans un navigateur pour supprimer les liens.
-
Plusieurs fichiers Word : Utilisez le traitement par lots en C# pour supprimer les liens automatiquement.
Les liens hypertextes sont utiles pour partager des sites web, des références et d'autres ressources dans un document Word. Mais lorsque vous préparez un document pour l'impression, la publication ou la réutilisation, ces liens peuvent devenir inutiles, ou laisser une mise en forme que vous ne souhaitez plus conserver.
Ce guide explique comment supprimer les liens hypertextes dans Word, de la suppression de liens individuels ou globaux dans Microsoft Word à l'automatisation du nettoyage sur plusieurs fichiers DOCX avec C#.
Ce que vous allez apprendre :
- Supprimer un lien hypertexte dans Microsoft Word
- Supprimer tous les liens hypertextes d'un document Word en une fois
- Supprimer les liens hypertextes dans Word Online
- Supprimer par lots les liens hypertextes des documents Word avec C#
- Bonus : Empêcher Word de créer des liens hypertextes automatiquement
- Points à vérifier après la suppression des liens hypertextes
- Questions fréquemment posées
Supprimer un lien hypertexte dans Microsoft Word
Idéal pour : Supprimer un ou quelques liens sans affecter le reste du contenu du document.
Si seul un petit nombre de liens doit être supprimé, la commande intégrée Supprimer le lien hypertexte de Word est l'option la plus sûre et la plus directe. Elle supprime la destination cliquable tout en conservant le texte affiché.
Cette méthode est particulièrement utile dans les documents contenant des tables des matières, des citations, des renvois ou d'autres champs dynamiques, car seul le lien hypertexte sélectionné est affecté.
Instructions étape par étape
-
Ouvrez le document dans Microsoft Word.
-
Localisez le lien hypertexte que vous souhaitez supprimer.
-
Faites un clic droit sur le texte lié.
-
Sélectionnez Supprimer le lien hypertexte.
Résultat : Le texte sélectionné reste dans le document, mais n'est plus cliquable.
⚡ Conseil : Si vous souhaitez supprimer à la fois le lien hypertexte et le texte affiché, sélectionnez le texte et appuyez sur Suppr ou Retour arrière.
Supprimer tous les liens hypertextes d'un document Word en une fois
Idéal pour : Supprimer rapidement de nombreux liens d'un document Word relativement simple.
Supprimer des dizaines de liens un par un prend du temps. Word propose un raccourci clavier qui permet de supprimer les liens hypertextes du contenu sélectionné en une seule opération.
Supprimer tous les liens hypertextes sous Windows
-
Appuyez sur Ctrl + A pour sélectionner tout le contenu du document. Vous pouvez également sélectionner manuellement uniquement la section que vous souhaitez traiter.
-
Appuyez sur Ctrl + Maj + F9.
Supprimer tous les liens hypertextes sur Mac
-
Appuyez sur Cmd + A pour sélectionner le contenu du document.
-
Appuyez sur Cmd + Maj + F9.
⚡ Conseil : Si votre Mac utilise F9 pour une fonction système ou multimédia, utilisez Cmd + Fn + Maj + F9, ou appuyez sur Cmd + 6 pour exécuter la commande Supprimer le lien de Word sans dépendre de la touche F9.
Résultat : Tous les liens hypertextes sélectionnés sont convertis en texte brut tout en préservant le libellé original.
⚠️ Important : Vérifiez les champs dynamiques avant d'utiliser ce raccourci
Ctrl + Maj + F9 n'est pas une commande spécifique aux liens hypertextes. Il s'agit de la commande générale Supprimer le lien de Word.
Cela signifie que d'autres champs inclus dans la sélection peuvent également être convertis en texte statique. Il peut s'agir de :
-
Tables des matières générées automatiquement
-
Renvois
-
Champs de citation
-
Autres champs dynamiques Word
Pour les rapports, thèses, manuels ou autres documents reposant sur des champs dynamiques, enregistrez une copie de sauvegarde avant d'utiliser le raccourci. Notez également que Ctrl + A sélectionne normalement le texte principal du document. Les liens hypertextes dans les en-têtes et pieds de page peuvent devoir être traités séparément.
Supprimer les liens hypertextes dans Word Online
Idéal pour : Une suppression occasionnelle de liens lorsque la version de bureau de Microsoft Word n'est pas disponible.
Si vous n'avez pas Word installé, vous pouvez ouvrir votre document dans Word pour le Web pour modifier les liens hypertextes directement dans un navigateur. C'est pratique pour un petit nombre de liens et ne nécessite aucune installation de logiciel.
Option A : La barre d'outils contextuelle (la plus rapide)
-
Cliquez sur le texte lié.
-
Cliquez sur l'icône Supprimer le lien (un maillon de chaîne avec un petit "X") sur le côté droit de la barre d'outils contextuelle.
Option B : Le menu clic droit
-
Faites un clic droit sur le texte lié.
-
Sélectionnez Supprimer le lien hypertexte dans le menu contextuel.
Impossible de supprimer un lien hypertexte dans Word pour le Web ?
Certains liens dans Word pour le Web peuvent apparaître grisés ou être non modifiables. Les causes courantes incluent :
-
Suivi des modifications : Le lien a été créé ou modifié alors que le suivi des modifications était activé.
-
Liens sur plusieurs paragraphes : Le lien s'étend sur plusieurs paragraphes et a été créé dans la version de bureau de Word.
Solution : Cliquez sur Ouvrir dans l'application de bureau (situé dans le menu déroulant Modification sur le ruban supérieur) et supprimez les liens dans la version de bureau de Word.
Supprimer par lots les liens hypertextes des documents Word avec C#
Idéal pour : Les développeurs automatisant le traitement de documents en arrière-plan, nettoyant des fichiers importés ou traitant de grandes collections de documents Word.
Les méthodes manuelles deviennent inefficaces lorsque le même nettoyage doit être appliqué à de nombreux fichiers Word. C'est le cas lors du traitement de documents importés, de la préparation de rapports pour la publication ou l'archivage, ou du nettoyage de fichiers générés par un autre système.
Dans ces cas, la suppression des liens hypertextes peut être intégrée dans un flux de travail C#. L'exemple suivant utilise Spire.Doc for .NET pour supprimer par lots les liens hypertextes de plusieurs fichiers DOCX sans nécessiter l'installation de Microsoft Word.
Étape 1 : Installer la bibliothèque .NET Word
Installez Spire.Doc for .NET via NuGet en utilisant la console du gestionnaire de paquets ou l'interface CLI .NET.
Console du gestionnaire de paquets NuGet :
Install-Package Spire.Doc
CLI .NET :
dotnet add package Spire.Doc
Après l'installation, les espaces de noms requis peuvent être référencés directement dans votre projet C#.
Étape 2 : Écrire le code C# pour supprimer par lots les liens hypertextes des fichiers DOCX
L'exemple suivant analyse un dossier d'entrée à la recherche de fichiers .docx, identifie les champs de lien hypertexte dans chaque document, supprime ces champs tout en préservant le texte affiché, et enregistre les fichiers traités dans un dossier de sortie séparé.
using Spire.Doc;
using Spire.Doc.Documents;
using Spire.Doc.Fields;
using System;
using System.Collections.Generic;
using System.Drawing;
using System.IO;

namespace Remove_Hyperlinks
{
    class Program
    {
        static void Main(string[] args)
        {
            string inputFolder = @"C:\WordFiles\Input";
            string outputFolder = @"C:\WordFiles\Output";

            // Créer le dossier de sortie s'il n'existe pas
            Directory.CreateDirectory(outputFolder);

            // Traiter tous les fichiers DOCX dans le dossier d'entrée
            foreach (string inputFile in Directory.GetFiles(inputFolder, "*.docx"))
            {
                // Ignorer les fichiers Word temporaires
                if (Path.GetFileName(inputFile).StartsWith("~$"))
                    continue;

                // Créer une instance de Document
                Document doc = new Document();

                // Charger un document Word
                doc.LoadFromFile(inputFile);

                // Trouver tous les liens hypertextes
                List<Field> hyperlinks = FindAllHyperlinks(doc);

                // Aplatir tous les liens hypertextes
                for (int i = hyperlinks.Count - 1; i >= 0; i--)
                {
                    FlattenHyperlinks(hyperlinks[i]);
                }

                // Enregistrer le document traité
                string outputFile = Path.Combine(
                    outputFolder,
                    Path.GetFileName(inputFile));

                doc.SaveToFile(outputFile, FileFormat.Docx);
                doc.Close();

                Console.WriteLine(
                    $"Traité : {Path.GetFileName(inputFile)}");
            }
        }

        // Obtenir tous les liens hypertextes du corps du document
        private static List<Field> FindAllHyperlinks(Document document)
        {
            List<Field> hyperlinks = new List<Field>();

            foreach (Section section in document.Sections)
            {
                foreach (DocumentObject sec in section.Body.ChildObjects)
                {
                    if (sec.DocumentObjectType == DocumentObjectType.Paragraph)
                    {
                        foreach (DocumentObject para
                                 in (sec as Paragraph).ChildObjects)
                        {
                            if (para.DocumentObjectType ==
                                DocumentObjectType.Field)
                            {
                                Field field = para as Field;

                                if (field.Type == FieldType.FieldHyperlink)
                                {
                                    hyperlinks.Add(field);
                                }
                            }
                        }
                    }
                }
            }

            return hyperlinks;
        }

        // Aplatir un champ de lien hypertexte tout en conservant son texte affiché
        private static void FlattenHyperlinks(Field field)
        {
            int ownerParaIndex =
                field.OwnerParagraph.OwnerTextBody.ChildObjects
                    .IndexOf(field.OwnerParagraph);

            int fieldIndex =
                field.OwnerParagraph.ChildObjects.IndexOf(field);

            Paragraph sepOwnerPara =
                field.Separator.OwnerParagraph;

            int sepOwnerParaIndex =
                field.Separator.OwnerParagraph.OwnerTextBody.ChildObjects
                    .IndexOf(field.Separator.OwnerParagraph);

            int sepIndex =
                field.Separator.OwnerParagraph.ChildObjects
                    .IndexOf(field.Separator);

            int endIndex =
                field.End.OwnerParagraph.ChildObjects
                    .IndexOf(field.End);

            int endOwnerParaIndex =
                field.End.OwnerParagraph.OwnerTextBody.ChildObjects
                    .IndexOf(field.End.OwnerParagraph);

            FormatFieldResultText(
                field.Separator.OwnerParagraph.OwnerTextBody,
                sepOwnerParaIndex,
                endOwnerParaIndex,
                sepIndex,
                endIndex);

            // Supprimer le marqueur de fin de champ
            field.End.OwnerParagraph.ChildObjects.RemoveAt(endIndex);

            // Supprimer le code de champ et le séparateur
            for (int i = sepOwnerParaIndex; i >= ownerParaIndex; i--)
            {
                if (i == sepOwnerParaIndex && i == ownerParaIndex)
                {
                    for (int j = sepIndex; j >= fieldIndex; j--)
                    {
                        field.OwnerParagraph.ChildObjects.RemoveAt(j);
                    }
                }
                else if (i == ownerParaIndex)
                {
                    for (int j =
                            field.OwnerParagraph.ChildObjects.Count - 1;
                         j >= fieldIndex;
                         j--)
                    {
                        field.OwnerParagraph.ChildObjects.RemoveAt(j);
                    }
                }
                else if (i == sepOwnerParaIndex)
                {
                    for (int j = sepIndex; j >= 0; j--)
                    {
                        sepOwnerPara.ChildObjects.RemoveAt(j);
                    }
                }
                else
                {
                    field.OwnerParagraph.OwnerTextBody.ChildObjects
                        .RemoveAt(i);
                }
            }
        }

        // Définir le texte du lien hypertexte conservé en noir et supprimer le soulignement
        private static void FormatFieldResultText(
            Body ownerBody,
            int sepOwnerParaIndex,
            int endOwnerParaIndex,
            int sepIndex,
            int endIndex)
        {
            for (int i = sepOwnerParaIndex;
                 i <= endOwnerParaIndex;
                 i++)
            {
                Paragraph para =
                    ownerBody.ChildObjects[i] as Paragraph;

                if (i == sepOwnerParaIndex &&
                    i == endOwnerParaIndex)
                {
                    for (int j = sepIndex + 1; j < endIndex; j++)
                    {
                        FormatText(para.ChildObjects[j] as TextRange);
                    }
                }
                else if (i == sepOwnerParaIndex)
                {
                    for (int j = sepIndex + 1;
                         j < para.ChildObjects.Count;
                         j++)
                    {
                        FormatText(para.ChildObjects[j] as TextRange);
                    }
                }
                else if (i == endOwnerParaIndex)
                {
                    for (int j = 0; j < endIndex; j++)
                    {
                        FormatText(para.ChildObjects[j] as TextRange);
                    }
                }
                else
                {
                    for (int j = 0;
                         j < para.ChildObjects.Count;
                         j++)
                    {
                        FormatText(para.ChildObjects[j] as TextRange);
                    }
                }
            }
        }

        // Définir le texte du lien hypertexte conservé en noir sans soulignement
        private static void FormatText(TextRange textRange)
        {
            if (textRange == null)
                return;

            textRange.CharacterFormat.TextColor = Color.Black;
            textRange.CharacterFormat.UnderlineStyle =
                UnderlineStyle.None;
        }
    }
}
Étape 3 : Exécuter le programme
Mettez à jour les chemins des dossiers d'entrée et de sortie, placez les fichiers DOCX dans le dossier d'entrée et exécutez l'application. Les copies nettoyées seront enregistrées dans le dossier de sortie avec leurs noms de fichiers d'origine.
Pour un lot important, testez d'abord le programme sur quelques documents représentatifs.
Sortie :
⚠️ Note technique : Cet extrait C# cible les paragraphes du corps de texte de niveau supérieur. Si vos documents contiennent des liens hypertextes imbriqués dans des tableaux, des zones de texte ou des en-têtes/pieds de page, la logique de parcours doit être étendue pour analyser ces éléments enfants de manière récursive.
Le code réinitialise également le texte du lien hypertexte conservé en noir et supprime son soulignement. Si vous avez seulement besoin de changer la couleur ou supprimer le soulignement des liens hypertextes sans supprimer les liens eux-mêmes, vous pouvez modifier la mise en forme du lien hypertexte séparément.
Bonus : Empêcher Word de créer des liens hypertextes automatiquement
Si le vrai problème est que Word transforme continuellement les URL et les adresses e-mail en liens au fur et à mesure que vous tapez, vous pouvez désactiver la création automatique de liens hypertextes au lieu de les supprimer à plusieurs reprises par la suite.
Dans Word pour Windows
-
Cliquez sur Fichier dans le coin supérieur gauche, puis choisissez Options en bas de la barre latérale.
-
Sélectionnez la catégorie Vérification dans le volet gauche.
-
Cliquez sur le bouton Options de correction automatique... près du haut.
-
Passez à l'onglet Lors de la frappe.
-
Décochez la case à côté de Chemins Internet et réseau par des liens hypertexte.
-
Cliquez sur OK pour appliquer.
Dans Word pour Mac
-
Cliquez sur Word dans la barre de menus Apple en haut et sélectionnez Préférences.
-
Ouvrez l'outil Correction automatique sous la section Auteur.
-
Passez à l'onglet Lors de la frappe.
-
Décochez Chemins Internet et réseau par des liens hypertexte.
La modification de ce paramètre empêche Word de mettre en forme les futurs liens au fur et à mesure que vous tapez. Cela ne touchera pas et ne nettoiera pas les liens hypertextes déjà enregistrés dans votre document actuel.
Points à vérifier après la suppression des liens hypertextes
La suppression des liens hypertextes est généralement simple, mais quelques détails méritent d'être vérifiés par la suite, notamment la mise en forme, les champs dynamiques et les liens dans les zones distinctes du document.
-
Vérifiez la couleur du texte et les soulignements : Si le texte reste bleu ou souligné, définissez la couleur de police sur Automatique ou faites-la correspondre au texte environnant, puis supprimez le soulignement si nécessaire.
-
Vérifiez les champs dynamiques : Si vous avez utilisé le raccourci Ctrl + Maj + F9, vérifiez votre table des matières, vos renvois et vos citations. Assurez-vous qu'ils n'ont pas été accidentellement convertis en texte brut non modifiable.
-
Vérifiez les en-têtes et pieds de page : Ctrl + A ne sélectionne pas le texte à l'intérieur des en-têtes et pieds de page. Double-cliquez manuellement à l'intérieur de ces zones spécifiques pour effacer les liens cachés restants.
Questions fréquemment posées
Q : La suppression d'un lien hypertexte supprime-t-elle le texte affiché ?
A : Non. La commande Supprimer le lien hypertexte supprime le lien tout en conservant le texte affiché.
Q : Comment puis-je supprimer le soulignement bleu sans rompre le lien ?
A : Mettez en surbrillance le lien hypertexte, accédez à l'onglet Accueil, définissez la couleur de police sur Automatique ou faites-la correspondre au texte environnant, puis cliquez sur le bouton Souligner (ou appuyez sur Ctrl + U) pour désactiver le soulignement.
Q : Comment supprimer un lien hypertexte d'une image dans Word ?
A : Faites un clic droit sur l'image liée et sélectionnez Supprimer le lien hypertexte. Dans les flux de travail documentaires automatisés, les liens hypertextes d'images peuvent également être gérés par programmation.
Q : Puis-je supprimer des liens hypertextes de Word sans installer Word ?
A : Oui. Vous pouvez ouvrir et modifier le fichier dans un navigateur en utilisant Word pour le web. Pour plusieurs fichiers, vous pouvez également utiliser C# avec une bibliothèque logicielle comme Spire.Doc pour automatiser la suppression.
Réflexions finales
Le choix de la meilleure méthode pour supprimer des liens hypertextes dépend de votre contexte d'édition. Pour des modifications manuelles rapides, les commandes intégrées et les raccourcis clavier de Word sont idéaux. Pour des flux de travail documentaires automatisés ou de grandes collections de fichiers DOCX, l'automatisation par script C# offre une solution fiable et évolutive.
Cómo eliminar hipervínculos en Word (escritorio, en línea y C#)
Tabla de contenidos
- Eliminar un hipervínculo en Microsoft Word
- Eliminar todos los hipervínculos de un documento de Word a la vez
- Eliminar hipervínculos de Word Online
- Eliminar hipervínculos por lotes de documentos de Word con C#
- Bonus: Evitar que Word cree hipervínculos automáticamente
- Cosas que verificar después de eliminar hipervínculos de Word
- Preguntas frecuentes
Resumen rápido (TL;DR):
-
Uno o pocos hipervínculos: Haga clic derecho en el texto vinculado y seleccione Quitar hipervínculo.
-
Todos los hipervínculos en un documento:
-
Windows: Presione Ctrl + A, luego Ctrl + Shift + F9.
-
Mac: Presione Cmd + A, luego Cmd + Shift + F9. Si F9 está asignado a una función del sistema macOS, use Cmd + Fn + Shift + F9 o presione Cmd + 6.
-
-
Sin Word instalado: Use Word para la web para eliminar hipervínculos en un navegador.
-
Múltiples archivos de Word: Use el procesamiento por lotes en C# para eliminar hipervínculos automáticamente.
Los hipervínculos son útiles para compartir sitios web, referencias y otros recursos en un documento de Word. Pero cuando prepara un documento para imprimir, publicar o reutilizar, esos enlaces pueden volverse innecesarios o dejar un formato que ya no desea.
Esta guía muestra cómo eliminar hipervínculos en Word, desde eliminar enlaces individuales y todos los enlaces en Microsoft Word hasta automatizar la limpieza en múltiples archivos DOCX con C#.
Lo que aprenderá:
- Eliminar un hipervínculo en Microsoft Word
- Eliminar todos los hipervínculos de un documento de Word a la vez
- Eliminar hipervínculos de Word Online
- Eliminar hipervínculos por lotes de documentos de Word con C#
- Bonus: Evitar que Word cree hipervínculos automáticamente
- Cosas que verificar después de eliminar hipervínculos de Word
- Preguntas frecuentes
Eliminar un hipervínculo en Microsoft Word
Ideal para: Eliminar uno o pocos hipervínculos sin afectar el resto del contenido del documento.
Si solo necesita eliminar una pequeña cantidad de enlaces, el comando integrado de Word Quitar hipervínculo es la opción más segura y directa. Elimina el destino clicable mientras mantiene el texto mostrado en su lugar.
Este método es especialmente útil en documentos que contienen tablas de contenido, citas, referencias cruzadas u otros campos dinámicos, ya que solo se ve afectado el hipervínculo seleccionado.
Instrucciones paso a paso
-
Abra el documento en Microsoft Word.
-
Localice el hipervínculo que desea eliminar.
-
Haga clic derecho sobre el texto vinculado.
-
Seleccione Quitar hipervínculo.
Resultado: El texto seleccionado permanece en el documento, pero ya no es clicable.
⚡ Consejo: Si desea eliminar tanto el hipervínculo como el texto mostrado, seleccione el texto y presione Suprimir o Retroceso en su lugar.
Eliminar todos los hipervínculos de un documento de Word a la vez
Ideal para: Eliminar rápidamente muchos hipervínculos de un documento de Word relativamente simple.
Eliminar docenas de enlaces uno por uno consume mucho tiempo. Word proporciona un atajo de teclado que puede eliminar hipervínculos del contenido seleccionado en una sola operación.
Eliminar todos los hipervínculos en Windows
-
Presione Ctrl + A para seleccionar todo el contenido del documento. También puede seleccionar manualmente solo la sección que desea procesar.
-
Presione Ctrl + Shift + F9.
Eliminar todos los hipervínculos en Mac
-
Presione Cmd + A para seleccionar el contenido del documento.
-
Presione Cmd + Shift + F9.
⚡ Consejo: Si su Mac usa F9 para una función del sistema o multimedia, use Cmd + Fn + Shift + F9 en su lugar, o presione Cmd + 6 para ejecutar el comando UnlinkFields de Word sin depender de la tecla F9.
Resultado: Todos los hipervínculos seleccionados se convierten en texto sin formato mientras se conserva la redacción original.
⚠️ Importante: Verifique los campos dinámicos antes de usar este atajo
Ctrl + Shift + F9 no es un comando específico para hipervínculos. Es el comando general de Word Desvincular campo.
Esto significa que otros campos incluidos en la selección también pueden convertirse en texto estático. Estos pueden incluir:
-
Tablas de contenido generadas automáticamente
-
Referencias cruzadas
-
Campos de citas
-
Otros campos dinámicos de Word
Para informes, tesis, manuales u otros documentos que dependen de campos dinámicos, guarde una copia de seguridad antes de usar el atajo. Tenga en cuenta también que Ctrl + A normalmente selecciona el texto principal del documento. Es posible que los hipervínculos en encabezados y pies de página deban manejarse por separado.
Eliminar hipervínculos de Word Online
Ideal para: Eliminación ocasional de hipervínculos cuando la versión de escritorio de Microsoft Word no está disponible.
Si no tiene Word instalado, puede abrir su documento en Word para la Web para editar hipervínculos directamente en un navegador. Esto es conveniente para una pequeña cantidad de enlaces y no requiere instalación de software.
Opción A: La barra de herramientas emergente (la más rápida)
-
Haga clic en el texto con hipervínculo.
-
Haga clic en el icono de desvincular (un eslabón de cadena con una pequeña "X") en el lado derecho de la barra de herramientas emergente.
Opción B: El menú de clic derecho
-
Haga clic derecho en el texto con hipervínculo.
-
Seleccione Quitar hipervínculo en el menú contextual.
¿No puede eliminar un hipervínculo en Word para la Web?
Algunos enlaces en Word para la Web pueden aparecer en gris o no ser editables. Las causas comunes incluyen:
-
Control de cambios: El enlace se creó o editó mientras el Control de cambios estaba habilitado.
-
Enlaces de varios párrafos: El enlace abarca varios párrafos y fue creado en la versión de escritorio de Word.
Solución: Haga clic en Abrir en la aplicación de escritorio (ubicado en el menú desplegable Edición en la cinta superior) y elimine los enlaces en el Word de escritorio.
Eliminar hipervínculos por lotes de documentos de Word con C#
Ideal para: Desarrolladores que automatizan el procesamiento de documentos en el backend, limpian archivos importados o procesan grandes colecciones de documentos de Word.
Los métodos manuales se vuelven ineficientes cuando se debe aplicar la misma limpieza en muchos archivos de Word. Esto es común al procesar documentos importados, preparar informes para publicar o archivar, o limpiar archivos generados por otro sistema.
En estos casos, la eliminación de hipervínculos puede incorporarse a un flujo de trabajo de C#. El siguiente ejemplo utiliza Spire.Doc for .NET para eliminar por lotes hipervínculos de múltiples archivos DOCX sin necesidad de tener instalado Microsoft Word.
Paso 1: Instalar la biblioteca de Word para .NET
Instale Spire.Doc for .NET a través de NuGet usando la Consola del Administrador de paquetes o la CLI de .NET.
Consola del Administrador de paquetes NuGet:
Install-Package Spire.Doc
CLI de .NET:
dotnet add package Spire.Doc
Después de la instalación, los espacios de nombres requeridos pueden ser referenciados directamente en su proyecto de C#.
Paso 2: Escribir código C# para eliminar hipervínculos por lotes de archivos DOCX
El siguiente ejemplo escanea una carpeta de entrada en busca de archivos .docx, identifica campos de hipervínculo en cada documento, elimina los campos de hipervínculo mientras conserva el texto mostrado y guarda los archivos procesados en una carpeta de salida separada.
using Spire.Doc;
using Spire.Doc.Documents;
using Spire.Doc.Fields;
using System;
using System.Collections.Generic;
using System.Drawing;
using System.IO;

namespace Remove_Hyperlinks
{
    class Program
    {
        static void Main(string[] args)
        {
            string inputFolder = @"C:\WordFiles\Input";
            string outputFolder = @"C:\WordFiles\Output";

            // Crear la carpeta de salida si no existe
            Directory.CreateDirectory(outputFolder);

            // Procesar todos los archivos DOCX en la carpeta de entrada
            foreach (string inputFile in Directory.GetFiles(inputFolder, "*.docx"))
            {
                // Saltar archivos temporales de Word
                if (Path.GetFileName(inputFile).StartsWith("~$"))
                    continue;

                // Crear una instancia de Document
                Document doc = new Document();

                // Cargar un documento de Word
                doc.LoadFromFile(inputFile);

                // Encontrar todos los hipervínculos
                List<Field> hyperlinks = FindAllHyperlinks(doc);

                // Aplanar todos los hipervínculos
                for (int i = hyperlinks.Count - 1; i >= 0; i--)
                {
                    FlattenHyperlinks(hyperlinks[i]);
                }

                // Guardar el documento procesado
                string outputFile = Path.Combine(
                    outputFolder,
                    Path.GetFileName(inputFile));

                doc.SaveToFile(outputFile, FileFormat.Docx);
                doc.Close();

                Console.WriteLine(
                    $"Procesado: {Path.GetFileName(inputFile)}");
            }
        }

        // Obtener todos los hipervínculos del cuerpo del documento
        private static List<Field> FindAllHyperlinks(Document document)
        {
            List<Field> hyperlinks = new List<Field>();

            foreach (Section section in document.Sections)
            {
                foreach (DocumentObject sec in section.Body.ChildObjects)
                {
                    if (sec.DocumentObjectType == DocumentObjectType.Paragraph)
                    {
                        foreach (DocumentObject para
                                 in (sec as Paragraph).ChildObjects)
                        {
                            if (para.DocumentObjectType ==
                                DocumentObjectType.Field)
                            {
                                Field field = para as Field;

                                if (field.Type == FieldType.FieldHyperlink)
                                {
                                    hyperlinks.Add(field);
                                }
                            }
                        }
                    }
                }
            }

            return hyperlinks;
        }

        // Aplanar un campo de hipervínculo mientras se conserva su texto mostrado
        private static void FlattenHyperlinks(Field field)
        {
            int ownerParaIndex =
                field.OwnerParagraph.OwnerTextBody.ChildObjects
                    .IndexOf(field.OwnerParagraph);

            int fieldIndex =
                field.OwnerParagraph.ChildObjects.IndexOf(field);

            Paragraph sepOwnerPara =
                field.Separator.OwnerParagraph;

            int sepOwnerParaIndex =
                field.Separator.OwnerParagraph.OwnerTextBody.ChildObjects
                    .IndexOf(field.Separator.OwnerParagraph);

            int sepIndex =
                field.Separator.OwnerParagraph.ChildObjects
                    .IndexOf(field.Separator);

            int endIndex =
                field.End.OwnerParagraph.ChildObjects
                    .IndexOf(field.End);

            int endOwnerParaIndex =
                field.End.OwnerParagraph.OwnerTextBody.ChildObjects
                    .IndexOf(field.End.OwnerParagraph);

            FormatFieldResultText(
                field.Separator.OwnerParagraph.OwnerTextBody,
                sepOwnerParaIndex,
                endOwnerParaIndex,
                sepIndex,
                endIndex);

            // Eliminar el marcador de fin de campo
            field.End.OwnerParagraph.ChildObjects.RemoveAt(endIndex);

            // Eliminar el código de campo y el separador
            for (int i = sepOwnerParaIndex; i >= ownerParaIndex; i--)
            {
                if (i == sepOwnerParaIndex && i == ownerParaIndex)
                {
                    for (int j = sepIndex; j >= fieldIndex; j--)
                    {
                        field.OwnerParagraph.ChildObjects.RemoveAt(j);
                    }
                }
                else if (i == ownerParaIndex)
                {
                    for (int j =
                            field.OwnerParagraph.ChildObjects.Count - 1;
                         j >= fieldIndex;
                         j--)
                    {
                        field.OwnerParagraph.ChildObjects.RemoveAt(j);
                    }
                }
                else if (i == sepOwnerParaIndex)
                {
                    for (int j = sepIndex; j >= 0; j--)
                    {
                        sepOwnerPara.ChildObjects.RemoveAt(j);
                    }
                }
                else
                {
                    field.OwnerParagraph.OwnerTextBody.ChildObjects
                        .RemoveAt(i);
                }
            }
        }

        // Establecer el texto del hipervínculo retenido en negro y eliminar el subrayado
        private static void FormatFieldResultText(
            Body ownerBody,
            int sepOwnerParaIndex,
            int endOwnerParaIndex,
            int sepIndex,
            int endIndex)
        {
            for (int i = sepOwnerParaIndex;
                 i <= endOwnerParaIndex;
                 i++)
            {
                Paragraph para =
                    ownerBody.ChildObjects[i] as Paragraph;

                if (i == sepOwnerParaIndex &&
                    i == endOwnerParaIndex)
                {
                    for (int j = sepIndex + 1; j < endIndex; j++)
                    {
                        FormatText(para.ChildObjects[j] as TextRange);
                    }
                }
                else if (i == sepOwnerParaIndex)
                {
                    for (int j = sepIndex + 1;
                         j < para.ChildObjects.Count;
                         j++)
                    {
                        FormatText(para.ChildObjects[j] as TextRange);
                    }
                }
                else if (i == endOwnerParaIndex)
                {
                    for (int j = 0; j < endIndex; j++)
                    {
                        FormatText(para.ChildObjects[j] as TextRange);
                    }
                }
                else
                {
                    for (int j = 0;
                         j < para.ChildObjects.Count;
                         j++)
                    {
                        FormatText(para.ChildObjects[j] as TextRange);
                    }
                }
            }
        }

        // Establecer el texto del hipervínculo retenido en negro sin subrayado
        private static void FormatText(TextRange textRange)
        {
            if (textRange == null)
                return;

            textRange.CharacterFormat.TextColor = Color.Black;
            textRange.CharacterFormat.UnderlineStyle =
                UnderlineStyle.None;
        }
    }
}
Paso 3: Ejecutar el programa
Actualice las rutas de las carpetas de entrada y salida, coloque los archivos DOCX en la carpeta de entrada y ejecute la aplicación. Las copias limpias se guardarán en la carpeta de salida con sus nombres de archivo originales.
Para un lote grande, pruebe primero el programa en algunos documentos representativos.
Resultado:
⚠️ Nota técnica: Este fragmento de C# se dirige a párrafos del cuerpo de nivel superior. Si sus documentos contienen hipervínculos anidados dentro de tablas, cuadros de texto o encabezados/pies de página, la lógica de recorrido debe extenderse para escanear esos elementos secundarios de forma recursiva.
El código también restablece el texto del hipervínculo retenido a negro y elimina su subrayado. Si solo necesita cambiar el color o eliminar el subrayado de los hipervínculos sin eliminar los enlaces, puede modificar el formato del hipervínculo por separado.
Bonus: Evitar que Word cree hipervínculos automáticamente
Si el problema real es que Word sigue convirtiendo URLs y direcciones de correo electrónico en enlaces mientras escribe, puede deshabilitar la creación automática de hipervínculos en lugar de eliminarlos repetidamente después.
En Word para Windows
-
Haga clic en Archivo en la esquina superior izquierda, luego elija Opciones en la parte inferior de la barra lateral.
-
Seleccione la categoría Revisión en el panel izquierdo.
-
Haga clic en el botón Opciones de autocorrección... cerca de la parte superior.
-
Cambie a la pestaña Autoformato mientras escribe.
-
Desmarque la casilla junto a Rutas de Internet y red con hipervínculos.
-
Haga clic en Aceptar para aplicar.
En Word para Mac
-
Haga clic en Word en la barra de menú superior de Apple y seleccione Preferencias.
-
Abra la herramienta Autocorrección en la sección Autoría.
-
Cambie a la pestaña Autoformato mientras escribe.
-
Desmarque Rutas de Internet y red con hipervínculos.
Cambiar esta configuración evita que Word formatee futuros enlaces mientras escribe. No tocará ni limpiará los hipervínculos que ya están guardados dentro de su documento actual.
Cosas que verificar después de eliminar hipervínculos de Word
Eliminar hipervínculos suele ser sencillo, pero vale la pena verificar algunos detalles después, especialmente el formato, los campos dinámicos y los enlaces en áreas separadas del documento.
-
Verifique el color del texto y los subrayados: Si el texto permanece azul o subrayado, establezca el color de fuente en Automático o haga que coincida con el texto circundante, luego elimine el subrayado si es necesario.
-
Verifique los campos dinámicos: Si utilizó el atajo Ctrl + Shift + F9, verifique su Tabla de contenido, referencias cruzadas y citas. Asegúrese de que no se hayan convertido accidentalmente en texto sin formato que no se puede actualizar.
-
Verifique encabezados y pies de página: Ctrl + A no selecciona texto dentro de encabezados y pies de página. Haga doble clic dentro de estas áreas específicas manualmente para borrar los enlaces ocultos restantes.
Preguntas frecuentes
P: ¿Eliminar un hipervínculo borra el texto mostrado?
R: No. El comando Quitar hipervínculo elimina el enlace mientras mantiene el texto mostrado en su lugar.
P: ¿Cómo puedo eliminar el subrayado azul sin romper el enlace?
R: Resalte el hipervínculo, vaya a la pestaña Inicio, establezca el color de fuente en Automático o haga que coincida con el texto circundante, y luego haga clic en el botón Subrayado (o presione Ctrl + U) para desactivar el subrayado.
P: ¿Cómo elimino un hipervínculo de una imagen en Word?
R: Haga clic derecho en la imagen con hipervínculo y seleccione Quitar hipervínculo. En flujos de trabajo de documentos automatizados, los hipervínculos de imágenes también se pueden gestionar mediante programación.
P: ¿Puedo eliminar hipervínculos de Word sin instalar Word?
R: Sí. Puede abrir y editar el archivo en un navegador usando Word para la web. Para múltiples archivos, también puede usar C# con una biblioteca de software como Spire.Doc para automatizar la eliminación.
Reflexiones finales
Elegir la mejor manera de eliminar hipervínculos depende de su contexto de edición. Para ediciones manuales rápidas, los comandos integrados y los atajos de teclado de Word son ideales. Para flujos de trabajo de documentos automatizados o grandes colecciones de archivos DOCX, la automatización mediante scripts de C# proporciona una solución confiable y escalable.
So entfernen Sie Hyperlinks in Word (Desktop, Online & C#)
Inhaltsverzeichnis
- Einen Hyperlink in Microsoft Word entfernen
- Alle Hyperlinks in einem Word-Dokument gleichzeitig entfernen
- Hyperlinks aus Word Online entfernen
- Stapelweises Löschen von Hyperlinks aus Word-Dokumenten mit C#
- Bonus: Automatische Erstellung von Hyperlinks in Word verhindern
- Was nach dem Entfernen von Word-Hyperlinks zu prüfen ist
- Häufig gestellte Fragen
Kurzzusammenfassung (TL;DR):
-
Ein oder wenige Hyperlinks: Rechtsklick auf den verknüpften Text und Hyperlink entfernen wählen.
-
Alle Hyperlinks in einem Dokument:
-
Windows: Strg + A drücken, dann Strg + Umschalt + F9.
-
Mac: Cmd + A drücken, dann Cmd + Umschalt + F9. Falls F9 einer macOS-Systemfunktion zugewiesen ist, verwenden Sie Cmd + Fn + Umschalt + F9 oder drücken Sie Cmd + 6.
-
-
Kein Word installiert: Verwenden Sie Word für das Web, um Hyperlinks im Browser zu entfernen.
-
Mehrere Word-Dateien: Verwenden Sie C#-Stapelverarbeitung, um Hyperlinks automatisch zu entfernen.
Hyperlinks sind nützlich, um Websites, Referenzen und andere Ressourcen in einem Word-Dokument zu teilen. Wenn Sie jedoch ein Dokument für den Druck, die Veröffentlichung oder zur Wiederverwendung vorbereiten, können diese Links unnötig werden – oder eine Formatierung hinterlassen, die Sie nicht mehr wünschen.
Dieser Leitfaden zeigt, wie Sie Hyperlinks in Word entfernen, vom Löschen einzelner oder aller Links in Microsoft Word bis hin zur Automatisierung der Bereinigung mehrerer DOCX-Dateien mit C#.
Was Sie lernen werden:
- Einen Hyperlink in Microsoft Word entfernen
- Alle Hyperlinks in einem Word-Dokument gleichzeitig entfernen
- Hyperlinks aus Word Online entfernen
- Stapelweises Löschen von Hyperlinks aus Word-Dokumenten mit C#
- Bonus: Automatische Erstellung von Hyperlinks in Word verhindern
- Was nach dem Entfernen von Word-Hyperlinks zu prüfen ist
- Häufig gestellte Fragen
Einen Hyperlink in Microsoft Word entfernen
Am besten geeignet für: Das Entfernen eines oder weniger Hyperlinks, ohne andere Dokumentinhalte zu beeinträchtigen.
Wenn nur eine kleine Anzahl von Links entfernt werden muss, ist der integrierte Befehl Hyperlink entfernen von Word die sicherste und einfachste Option. Er entfernt das klickbare Ziel, während der angezeigte Text erhalten bleibt.
Diese Methode ist besonders nützlich in Dokumenten, die Inhaltsverzeichnisse, Zitate, Querverweise oder andere dynamische Felder enthalten, da nur der ausgewählte Hyperlink betroffen ist.
Schritt-für-Schritt-Anleitung
-
Öffnen Sie das Dokument in Microsoft Word.
-
Suchen Sie den Hyperlink, den Sie entfernen möchten.
-
Klicken Sie mit der rechten Maustaste auf den verknüpften Text.
-
Wählen Sie Hyperlink entfernen.
Ergebnis: Der ausgewählte Text bleibt im Dokument, ist aber nicht mehr anklickbar.
⚡ Tipp: Wenn Sie sowohl den Hyperlink als auch den angezeigten Text löschen möchten, markieren Sie den Text und drücken Sie stattdessen Entf oder Rücktaste.
Alle Hyperlinks in einem Word-Dokument gleichzeitig entfernen
Am besten geeignet für: Das schnelle Entfernen vieler Hyperlinks aus einem relativ einfachen Word-Dokument.
Das Entfernen von Dutzenden von Links einzeln ist zeitaufwendig. Word bietet eine Tastenkombination, mit der Hyperlinks aus dem ausgewählten Inhalt in einem einzigen Vorgang entfernt werden können.
Alle Hyperlinks unter Windows entfernen
-
Drücken Sie Strg + A, um den gesamten Inhalt des Dokuments auszuwählen. Sie können auch manuell nur den Abschnitt auswählen, den Sie bearbeiten möchten.
-
Drücken Sie Strg + Umschalt + F9.
Alle Hyperlinks auf dem Mac entfernen
-
Drücken Sie Cmd + A, um den Dokumentinhalt auszuwählen.
-
Drücken Sie Cmd + Umschalt + F9.
⚡ Tipp: Wenn Ihr Mac F9 für eine System- oder Medienfunktion verwendet, verwenden Sie stattdessen Cmd + Fn + Umschalt + F9 oder drücken Sie Cmd + 6, um den Befehl Felder aufheben von Word auszuführen, ohne die F9-Taste zu verwenden.
Ergebnis: Alle ausgewählten Hyperlinks werden in normalen Text umgewandelt, wobei der ursprüngliche Wortlaut erhalten bleibt.
⚠️ Wichtig: Überprüfen Sie dynamische Felder, bevor Sie diese Tastenkombination verwenden
Strg + Umschalt + F9 ist kein spezifischer Befehl für Hyperlinks. Es ist der allgemeine Befehl von Word zum Aufheben der Verknüpfung von Feldern.
Das bedeutet, dass auch andere Felder, die in der Auswahl enthalten sind, in statischen Text umgewandelt werden können. Dazu gehören:
-
Automatisch generierte Inhaltsverzeichnisse
-
Querverweise
-
Zitierfelder
-
Andere dynamische Word-Felder
Erstellen Sie bei Berichten, Abschlussarbeiten, Handbüchern oder anderen Dokumenten, die auf dynamischen Feldern basieren, eine Sicherungskopie, bevor Sie die Tastenkombination verwenden. Beachten Sie auch, dass Strg + A normalerweise den Haupttext des Dokuments auswählt. Hyperlinks in Kopf- und Fußzeilen müssen möglicherweise separat behandelt werden.
Hyperlinks aus Word Online entfernen
Am besten geeignet für: Gelegentliches Entfernen von Hyperlinks, wenn die Desktop-Version von Microsoft Word nicht verfügbar ist.
Wenn Sie Word nicht installiert haben, können Sie Ihr Dokument in Word für das Web öffnen, um Hyperlinks direkt in einem Browser zu bearbeiten. Dies ist praktisch für eine kleine Anzahl von Links und erfordert keine Softwareinstallation.
Option A: Die Pop-up-Symbolleiste (am schnellsten)
-
Klicken Sie auf den verknüpften Text.
-
Klicken Sie auf das Symbol zum Aufheben der Verknüpfung (ein Kettenglied mit einem kleinen "X") auf der rechten Seite der Pop-up-Symbolleiste.
Option B: Das Rechtsklick-Menü
-
Klicken Sie mit der rechten Maustaste auf den verknüpften Text.
-
Wählen Sie Hyperlink entfernen aus dem Kontextmenü.
Kann ein Hyperlink in Word für das Web nicht entfernt werden?
Einige Links in Word für das Web können grau erscheinen oder nicht bearbeitbar sein. Häufige Ursachen sind:
-
Änderungen nachverfolgen: Der Link wurde erstellt oder bearbeitet, während "Änderungen nachverfolgen" aktiviert war.
-
Mehrabsatz-Links: Der Link erstreckt sich über mehrere Absätze und wurde in der Desktop-Version von Word erstellt.
Lösung: Klicken Sie auf In Desktop-App öffnen (im Dropdown-Menü Bearbeiten im oberen Menüband) und entfernen Sie die Links in der Desktop-Version von Word.
Stapelweises Löschen von Hyperlinks aus Word-Dokumenten mit C#
Am besten geeignet für: Entwickler, die die Dokumentverarbeitung im Backend automatisieren, importierte Dateien bereinigen oder große Sammlungen von Word-Dokumenten verarbeiten.
Manuelle Methoden werden ineffizient, wenn dieselbe Bereinigung auf viele Word-Dateien angewendet werden muss. Dies ist häufig der Fall bei der Verarbeitung importierter Dokumente, der Vorbereitung von Berichten für die Veröffentlichung oder Archivierung oder der Bereinigung von Dateien, die von einem anderen System generiert wurden.
In diesen Fällen kann das Entfernen von Hyperlinks in einen C#-Workflow integriert werden. Das folgende Beispiel verwendet Spire.Doc for .NET, um stapelweise Hyperlinks aus mehreren DOCX-Dateien zu entfernen, ohne dass Microsoft Word installiert sein muss.
Schritt 1: Die .NET Word-Bibliothek installieren
Installieren Sie Spire.Doc for .NET über NuGet unter Verwendung der Paket-Manager-Konsole oder der .NET CLI.
NuGet Paket-Manager-Konsole:
Install-Package Spire.Doc
.NET CLI:
dotnet add package Spire.Doc
Nach der Installation können die erforderlichen Namespaces direkt in Ihrem C#-Projekt referenziert werden.
Schritt 2: C#-Code zum stapelweisen Entfernen von Hyperlinks aus DOCX-Dateien schreiben
Das folgende Beispiel durchsucht einen Eingabeordner nach .docx-Dateien, identifiziert Hyperlink-Felder in jedem Dokument, entfernt die Hyperlink-Felder unter Beibehaltung des angezeigten Textes und speichert die verarbeiteten Dateien in einem separaten Ausgabeordner.
using Spire.Doc;
using Spire.Doc.Documents;
using Spire.Doc.Fields;
using System;
using System.Collections.Generic;
using System.Drawing;
using System.IO;

namespace Remove_Hyperlinks
{
    class Program
    {
        static void Main(string[] args)
        {
            string inputFolder = @"C:\WordFiles\Input";
            string outputFolder = @"C:\WordFiles\Output";

            // Erstellen Sie den Ausgabeordner, falls er nicht existiert
            Directory.CreateDirectory(outputFolder);

            // Verarbeiten Sie alle DOCX-Dateien im Eingabeordner
            foreach (string inputFile in Directory.GetFiles(inputFolder, "*.docx"))
            {
                // Überspringen Sie temporäre Word-Dateien
                if (Path.GetFileName(inputFile).StartsWith("~$"))
                    continue;

                // Erstellen Sie eine Document-Instanz
                Document doc = new Document();

                // Laden Sie ein Word-Dokument
                doc.LoadFromFile(inputFile);

                // Finden Sie alle Hyperlinks
                List<Field> hyperlinks = FindAllHyperlinks(doc);

                // Entfernen Sie alle Hyperlinks
                for (int i = hyperlinks.Count - 1; i >= 0; i--)
                {
                    FlattenHyperlinks(hyperlinks[i]);
                }

                // Speichern Sie das verarbeitete Dokument
                string outputFile = Path.Combine(
                    outputFolder,
                    Path.GetFileName(inputFile));

                doc.SaveToFile(outputFile, FileFormat.Docx);
                doc.Close();

                Console.WriteLine(
                    $"Verarbeitet: {Path.GetFileName(inputFile)}");
            }
        }

        // Holen Sie alle Hyperlinks aus dem Dokumentkörper
        private static List<Field> FindAllHyperlinks(Document document)
        {
            List<Field> hyperlinks = new List<Field>();

            foreach (Section section in document.Sections)
            {
                foreach (DocumentObject sec in section.Body.ChildObjects)
                {
                    if (sec.DocumentObjectType == DocumentObjectType.Paragraph)
                    {
                        foreach (DocumentObject para
                                 in (sec as Paragraph).ChildObjects)
                        {
                            if (para.DocumentObjectType ==
                                DocumentObjectType.Field)
                            {
                                Field field = para as Field;

                                if (field.Type == FieldType.FieldHyperlink)
                                {
                                    hyperlinks.Add(field);
                                }
                            }
                        }
                    }
                }
            }

            return hyperlinks;
        }

        // Ein Hyperlink-Feld entfernen, während der angezeigte Text beibehalten wird
        private static void FlattenHyperlinks(Field field)
        {
            int ownerParaIndex =
                field.OwnerParagraph.OwnerTextBody.ChildObjects
                    .IndexOf(field.OwnerParagraph);

            int fieldIndex =
                field.OwnerParagraph.ChildObjects.IndexOf(field);

            Paragraph sepOwnerPara =
                field.Separator.OwnerParagraph;

            int sepOwnerParaIndex =
                field.Separator.OwnerParagraph.OwnerTextBody.ChildObjects
                    .IndexOf(field.Separator.OwnerParagraph);

            int sepIndex =
                field.Separator.OwnerParagraph.ChildObjects
                    .IndexOf(field.Separator);

            int endIndex =
                field.End.OwnerParagraph.ChildObjects
                    .IndexOf(field.End);

            int endOwnerParaIndex =
                field.End.OwnerParagraph.OwnerTextBody.ChildObjects
                    .IndexOf(field.End.OwnerParagraph);

            FormatFieldResultText(
                field.Separator.OwnerParagraph.OwnerTextBody,
                sepOwnerParaIndex,
                endOwnerParaIndex,
                sepIndex,
                endIndex);

            // Entfernen Sie den Feldendmarker
            field.End.OwnerParagraph.ChildObjects.RemoveAt(endIndex);

            // Entfernen Sie den Feldcode und das Trennzeichen
            for (int i = sepOwnerParaIndex; i >= ownerParaIndex; i--)
            {
                if (i == sepOwnerParaIndex && i == ownerParaIndex)
                {
                    for (int j = sepIndex; j >= fieldIndex; j--)
                    {
                        field.OwnerParagraph.ChildObjects.RemoveAt(j);
                    }
                }
                else if (i == ownerParaIndex)
                {
                    for (int j =
                            field.OwnerParagraph.ChildObjects.Count - 1;
                         j >= fieldIndex;
                         j--)
                    {
                        field.OwnerParagraph.ChildObjects.RemoveAt(j);
                    }
                }
                else if (i == sepOwnerParaIndex)
                {
                    for (int j = sepIndex; j >= 0; j--)
                    {
                        sepOwnerPara.ChildObjects.RemoveAt(j);
                    }
                }
                else
                {
                    field.OwnerParagraph.OwnerTextBody.ChildObjects
                        .RemoveAt(i);
                }
            }
        }

        // Setzen Sie den beibehaltenen Hyperlink-Text auf Schwarz und entfernen Sie die Unterstreichung
        private static void FormatFieldResultText(
            Body ownerBody,
            int sepOwnerParaIndex,
            int endOwnerParaIndex,
            int sepIndex,
            int endIndex)
        {
            for (int i = sepOwnerParaIndex;
                 i <= endOwnerParaIndex;
                 i++)
            {
                Paragraph para =
                    ownerBody.ChildObjects[i] as Paragraph;

                if (i == sepOwnerParaIndex &&
                    i == endOwnerParaIndex)
                {
                    for (int j = sepIndex + 1; j < endIndex; j++)
                    {
                        FormatText(para.ChildObjects[j] as TextRange);
                    }
                }
                else if (i == sepOwnerParaIndex)
                {
                    for (int j = sepIndex + 1;
                         j < para.ChildObjects.Count;
                         j++)
                    {
                        FormatText(para.ChildObjects[j] as TextRange);
                    }
                }
                else if (i == endOwnerParaIndex)
                {
                    for (int j = 0; j < endIndex; j++)
                    {
                        FormatText(para.ChildObjects[j] as TextRange);
                    }
                }
                else
                {
                    for (int j = 0;
                         j < para.ChildObjects.Count;
                         j++)
                    {
                        FormatText(para.ChildObjects[j] as TextRange);
                    }
                }
            }
        }

        // Setzen Sie den beibehaltenen Hyperlink-Text auf Schwarz ohne Unterstreichung
        private static void FormatText(TextRange textRange)
        {
            if (textRange == null)
                return;

            textRange.CharacterFormat.TextColor = Color.Black;
            textRange.CharacterFormat.UnderlineStyle =
                UnderlineStyle.None;
        }
    }
}
Schritt 3: Das Programm ausführen
Aktualisieren Sie die Pfade für den Eingabe- und Ausgabeordner, legen Sie die DOCX-Dateien in den Eingabeordner und führen Sie die Anwendung aus. Die bereinigten Kopien werden mit ihren ursprünglichen Dateinamen im Ausgabeordner gespeichert.
Testen Sie das Programm bei einer großen Menge zuerst an einigen repräsentativen Dokumenten.
Ausgabe:
⚠️ Technischer Hinweis: Dieser C#-Schnipsel zielt auf Haupttextabsätze ab. Wenn Ihre Dokumente Hyperlinks enthalten, die in Tabellen, Textfeldern oder Kopf-/Fußzeilen verschachtelt sind, sollte die Durchlauflogik erweitert werden, um diese untergeordneten Elemente rekursiv zu scannen.
Der Code setzt auch den beibehaltenen Hyperlink-Text auf Schwarz und entfernt dessen Unterstreichung. Wenn Sie nur die Farbe ändern oder die Unterstreichung von Hyperlinks entfernen möchten, ohne die Links selbst zu entfernen, können Sie die Hyperlink-Formatierung separat ändern.
Bonus: Automatische Erstellung von Hyperlinks in Word verhindern
Wenn das eigentliche Problem darin besteht, dass Word URLs und E-Mail-Adressen während der Eingabe ständig in Links umwandelt, können Sie die automatische Hyperlink-Erstellung deaktivieren, anstatt sie danach wiederholt zu entfernen.
In Word für Windows
-
Klicken Sie oben links auf Datei und wählen Sie dann unten in der Seitenleiste Optionen.
-
Wählen Sie die Kategorie Dokumentprüfung in der linken Leiste.
-
Klicken Sie oben auf die Schaltfläche AutoKorrektur-Optionen....
-
Wechseln Sie zur Registerkarte AutoFormat während der Eingabe.
-
Deaktivieren Sie das Kontrollkästchen neben Internet- und Netzwerkpfade durch Hyperlinks.
-
Klicken Sie auf OK, um die Änderung zu übernehmen.
In Word für Mac
-
Klicken Sie in der oberen Apple-Menüleiste auf Word und wählen Sie Einstellungen.
-
Öffnen Sie das Werkzeug AutoKorrektur unter dem Abschnitt "Erstellung".
-
Wechseln Sie zur Registerkarte AutoFormat während der Eingabe.
-
Deaktivieren Sie Internet- und Netzwerkpfade durch Hyperlinks.
Durch Ändern dieser Einstellung wird verhindert, dass Word zukünftige Links während der Eingabe formatiert. Bestehende Hyperlinks, die bereits in Ihrem aktuellen Dokument gespeichert sind, werden dadurch nicht verändert oder bereinigt.
Was nach dem Entfernen von Word-Hyperlinks zu prüfen ist
Das Entfernen von Hyperlinks ist normalerweise unkompliziert, aber einige Details sollten danach überprüft werden, insbesondere Formatierung, dynamische Felder und Links in separaten Dokumentbereichen.
-
Textfarbe und Unterstreichungen prüfen: Wenn der Text blau bleibt oder unterstrichen ist, setzen Sie die Schriftfarbe auf Automatisch oder passen Sie sie an den umgebenden Text an und entfernen Sie bei Bedarf die Unterstreichung.
-
Dynamische Felder verifizieren: Wenn Sie die Tastenkombination Strg + Umschalt + F9 verwendet haben, überprüfen Sie Ihr Inhaltsverzeichnis, Ihre Querverweise und Zitate. Stellen Sie sicher, dass diese nicht versehentlich in nicht aktualisierbaren normalen Text umgewandelt wurden.
-
Kopf- und Fußzeilen prüfen: Strg + A wählt keinen Text innerhalb von Kopf- und Fußzeilen aus. Doppelklicken Sie manuell in diese spezifischen Bereiche, um verbleibende versteckte Links zu löschen.
Häufig gestellte Fragen
F: Löscht das Entfernen eines Hyperlinks den angezeigten Text?
A: Nein. Der Befehl Hyperlink entfernen löscht den Link, während der angezeigte Text erhalten bleibt.
F: Wie kann ich die blaue Unterstreichung entfernen, ohne den Link zu zerstören?
A: Markieren Sie den Hyperlink, gehen Sie zur Registerkarte Start, setzen Sie die Schriftfarbe auf Automatisch oder passen Sie sie an den umgebenden Text an und klicken Sie dann auf die Schaltfläche Unterstreichen (oder drücken Sie Strg + U), um die Unterstreichung zu deaktivieren.
F: Wie entferne ich einen Hyperlink von einem Bild in Word?
A: Klicken Sie mit der rechten Maustaste auf das verknüpfte Bild und wählen Sie Hyperlink entfernen. In automatisierten Dokument-Workflows können Bild-Hyperlinks auch programmgesteuert verwaltet werden.
F: Kann ich Hyperlinks aus Word entfernen, ohne Word zu installieren?
A: Ja. Sie können die Datei in einem Browser mit Word für das Web öffnen und bearbeiten. Für mehrere Dateien können Sie auch C# mit einer Softwarebibliothek wie Spire.Doc verwenden, um das Entfernen zu automatisieren.
Abschließende Gedanken
Die Wahl der besten Methode zum Entfernen von Hyperlinks hängt von Ihrem Bearbeitungskontext ab. Für schnelle manuelle Bearbeitungen sind die integrierten Befehle und Tastenkombinationen von Word ideal. Für automatisierte Dokument-Workflows oder große Sammlungen von DOCX-Dateien bietet die C#-Skriptautomatisierung eine zuverlässige und skalierbare Lösung.
Как удалить гиперссылки в Word (на компьютере, онлайн и с помощью C#)
Оглавление
- Удаление гиперссылки в Microsoft Word
- Удаление всех гиперссылок в документе Word одновременно
- Удаление гиперссылок в Word Online
- Пакетное удаление гиперссылок из документов Word с помощью C#
- Бонус: Как запретить Word автоматически создавать гиперссылки
- Что проверить после удаления гиперссылок
- Часто задаваемые вопросы
Краткое резюме (TL;DR):
-
Одна или несколько гиперссылок: Нажмите правой кнопкой мыши на текст ссылки и выберите Удалить гиперссылку.
-
Все гиперссылки в документе:
-
Windows: Нажмите Ctrl + A, затем Ctrl + Shift + F9.
-
Mac: Нажмите Cmd + A, затем Cmd + Shift + F9. Если клавиша F9 назначена системной функции macOS, используйте Cmd + Fn + Shift + F9 или нажмите Cmd + 6.
-
-
Word не установлен: Используйте Word для интернета, чтобы удалить гиперссылки в браузере.
-
Множество файлов Word: Используйте пакетную обработку на C# для автоматического удаления гиперссылок.
Гиперссылки полезны для обмена ссылками на веб-сайты, источники и другие ресурсы в документе Word. Однако при подготовке документа к печати, публикации или повторному использованию эти ссылки могут стать ненужными или оставить после себя нежелательное форматирование.
В этом руководстве показано, как удалять гиперссылки в Word: от удаления отдельных или всех ссылок в Microsoft Word до автоматизации очистки нескольких DOCX-файлов с помощью C#.
Что вы узнаете:
- Удаление гиперссылки в Microsoft Word
- Удаление всех гиперссылок в документе Word одновременно
- Удаление гиперссылок в Word Online
- Пакетное удаление гиперссылок из документов Word с помощью C#
- Бонус: Как запретить Word автоматически создавать гиперссылки
- Что проверить после удаления гиперссылок
- Часто задаваемые вопросы
Удаление гиперссылки в Microsoft Word
Лучший способ для: удаления одной или нескольких гиперссылок без влияния на остальное содержимое документа.
Если нужно удалить лишь небольшое количество ссылок, встроенная в Word команда Удалить гиперссылку является самым безопасным и простым вариантом. Она удаляет возможность перехода по ссылке, сохраняя при этом сам текст.
Этот метод особенно полезен в документах, содержащих оглавления, цитаты, перекрестные ссылки или другие динамические поля, так как затрагивается только выбранная гиперссылка.
Пошаговая инструкция
-
Откройте документ в Microsoft Word.
-
Найдите гиперссылку, которую хотите удалить.
-
Нажмите правой кнопкой мыши на текст ссылки.
-
Выберите Удалить гиперссылку.
Результат: Выбранный текст остается в документе, но перестает быть кликабельным.
⚡ Совет: Если вы хотите удалить и гиперссылку, и отображаемый текст, выделите текст и нажмите Delete или Backspace.
Удаление всех гиперссылок в документе Word одновременно
Лучший способ для: быстрого удаления множества гиперссылок из относительно простого документа Word.
Удаление десятков ссылок по одной отнимает много времени. В Word есть сочетание клавиш, которое позволяет убрать гиперссылки из выделенного фрагмента за одну операцию.
Удаление всех гиперссылок в Windows
-
Нажмите Ctrl + A, чтобы выделить все содержимое документа. Вы также можете вручную выделить только нужный фрагмент.
-
Нажмите Ctrl + Shift + F9.
Удаление всех гиперссылок на Mac
-
Нажмите Cmd + A, чтобы выделить содержимое документа.
-
Нажмите Cmd + Shift + F9.
⚡ Совет: Если на вашем Mac клавиша F9 используется для системных функций или медиа, используйте Cmd + Fn + Shift + F9 или нажмите Cmd + 6, чтобы запустить команду Word UnlinkFields без использования клавиши F9.
Результат: Все выбранные гиперссылки преобразуются в обычный текст с сохранением исходной формулировки.
⚠️ Важно: Проверьте динамические поля перед использованием этого сочетания клавиш
Ctrl + Shift + F9 — это не специфическая команда для гиперссылок. Это общая команда Word Разорвать связь с полем.
Это означает, что другие поля, включенные в выделение, также могут быть преобразованы в статический текст. К ним могут относиться:
-
Автоматически созданные оглавления
-
Перекрестные ссылки
-
Поля цитат
-
Другие динамические поля Word
Для отчетов, диссертаций, руководств и других документов, использующих динамические поля, сохраните резервную копию перед использованием этого сочетания клавиш. Также обратите внимание, что Ctrl + A обычно выделяет основной текст документа. Гиперссылки в колонтитулах, возможно, придется обрабатывать отдельно.
Удаление гиперссылок в Word Online
Лучший способ для: эпизодического удаления гиперссылок, когда настольная версия Microsoft Word недоступна.
Если у вас не установлен Word, вы можете открыть документ в Word для интернета, чтобы редактировать гиперссылки прямо в браузере. Это удобно для небольшого количества ссылок и не требует установки программного обеспечения.
Вариант А: Всплывающая панель инструментов (самый быстрый)
-
Нажмите на текст гиперссылки.
-
Нажмите на значок удаления ссылки (звено цепи с маленьким «X») в правой части всплывающей панели инструментов.
Вариант Б: Контекстное меню
-
Нажмите правой кнопкой мыши на текст гиперссылки.
-
Выберите Удалить гиперссылку в контекстном меню.
Не удается удалить гиперссылку в Word для интернета?
Некоторые ссылки в Word для интернета могут выглядеть серыми или быть недоступными для редактирования. Распространенные причины:
-
Исправления: Ссылка была создана или изменена при включенном режиме отслеживания исправлений.
-
Многоабзацные ссылки: Ссылка охватывает несколько абзацев и была создана в настольной версии Word.
Решение: Нажмите Открыть в классическом приложении (находится в выпадающем меню Редактирование на верхней ленте) и удалите ссылки в настольной версии Word.
Пакетное удаление гиперссылок из документов Word с помощью C#
Лучший способ для: разработчиков, автоматизирующих серверную обработку документов, очистку импортированных файлов или обработку больших коллекций документов Word.
Ручные методы становятся неэффективными, когда одну и ту же очистку нужно применить к множеству файлов Word. Это часто встречается при обработке импортированных документов, подготовке отчетов к публикации или архивированию, а также при очистке файлов, созданных другой системой.
В таких случаях удаление гиперссылок можно включить в рабочий процесс C#. В следующем примере используется Spire.Doc for .NET для пакетного удаления гиперссылок из нескольких DOCX-файлов без необходимости установки Microsoft Word.
Шаг 1: Установка библиотеки .NET Word
Установите Spire.Doc for .NET через NuGet, используя консоль диспетчера пакетов или .NET CLI.
Консоль диспетчера пакетов NuGet:
Install-Package Spire.Doc
.NET CLI:
dotnet add package Spire.Doc
После установки необходимые пространства имен можно использовать непосредственно в вашем проекте C#.
Шаг 2: Написание кода C# для пакетного удаления гиперссылок из DOCX-файлов
Следующий пример сканирует входную папку на наличие файлов .docx, идентифицирует поля гиперссылок в каждом документе, удаляет их, сохраняя отображаемый текст, и сохраняет обработанные файлы в отдельную выходную папку.
using Spire.Doc;
using Spire.Doc.Documents;
using Spire.Doc.Fields;
using System;
using System.Collections.Generic;
using System.Drawing;
using System.IO;

namespace Remove_Hyperlinks
{
    class Program
    {
        static void Main(string[] args)
        {
            string inputFolder = @"C:\WordFiles\Input";
            string outputFolder = @"C:\WordFiles\Output";

            // Создать выходную папку, если она не существует
            Directory.CreateDirectory(outputFolder);

            // Обработать все файлы DOCX во входной папке
            foreach (string inputFile in Directory.GetFiles(inputFolder, "*.docx"))
            {
                // Пропустить временные файлы Word
                if (Path.GetFileName(inputFile).StartsWith("~$"))
                    continue;

                // Создать экземпляр документа
                Document doc = new Document();

                // Загрузить документ Word
                doc.LoadFromFile(inputFile);

                // Найти все гиперссылки
                List<Field> hyperlinks = FindAllHyperlinks(doc);

                // «Сплющить» (удалить) все гиперссылки
                for (int i = hyperlinks.Count - 1; i >= 0; i--)
                {
                    FlattenHyperlinks(hyperlinks[i]);
                }

                // Сохранить обработанный документ
                string outputFile = Path.Combine(
                    outputFolder,
                    Path.GetFileName(inputFile));

                doc.SaveToFile(outputFile, FileFormat.Docx);
                doc.Close();

                Console.WriteLine(
                    $"Обработано: {Path.GetFileName(inputFile)}");
            }
        }

        // Получить все гиперссылки из тела документа
        private static List<Field> FindAllHyperlinks(Document document)
        {
            List<Field> hyperlinks = new List<Field>();

            foreach (Section section in document.Sections)
            {
                foreach (DocumentObject sec in section.Body.ChildObjects)
                {
                    if (sec.DocumentObjectType == DocumentObjectType.Paragraph)
                    {
                        foreach (DocumentObject para
                                 in (sec as Paragraph).ChildObjects)
                        {
                            if (para.DocumentObjectType ==
                                DocumentObjectType.Field)
                            {
                                Field field = para as Field;

                                if (field.Type == FieldType.FieldHyperlink)
                                {
                                    hyperlinks.Add(field);
                                }
                            }
                        }
                    }
                }
            }

            return hyperlinks;
        }

        // Удалить поле гиперссылки, сохранив отображаемый текст
        private static void FlattenHyperlinks(Field field)
        {
            int ownerParaIndex =
                field.OwnerParagraph.OwnerTextBody.ChildObjects
                    .IndexOf(field.OwnerParagraph);

            int fieldIndex =
                field.OwnerParagraph.ChildObjects.IndexOf(field);

            Paragraph sepOwnerPara =
                field.Separator.OwnerParagraph;

            int sepOwnerParaIndex =
                field.Separator.OwnerParagraph.OwnerTextBody.ChildObjects
                    .IndexOf(field.Separator.OwnerParagraph);

            int sepIndex =
                field.Separator.OwnerParagraph.ChildObjects
                    .IndexOf(field.Separator);

            int endIndex =
                field.End.OwnerParagraph.ChildObjects
                    .IndexOf(field.End);

            int endOwnerParaIndex =
                field.End.OwnerParagraph.OwnerTextBody.ChildObjects
                    .IndexOf(field.End.OwnerParagraph);

            FormatFieldResultText(
                field.Separator.OwnerParagraph.OwnerTextBody,
                sepOwnerParaIndex,
                endOwnerParaIndex,
                sepIndex,
                endIndex);

            // Удалить маркер конца поля
            field.End.OwnerParagraph.ChildObjects.RemoveAt(endIndex);

            // Удалить код поля и разделитель
            for (int i = sepOwnerParaIndex; i >= ownerParaIndex; i--)
            {
                if (i == sepOwnerParaIndex && i == ownerParaIndex)
                {
                    for (int j = sepIndex; j >= fieldIndex; j--)
                    {
                        field.OwnerParagraph.ChildObjects.RemoveAt(j);
                    }
                }
                else if (i == ownerParaIndex)
                {
                    for (int j =
                            field.OwnerParagraph.ChildObjects.Count - 1;
                         j >= fieldIndex;
                         j--)
                    {
                        field.OwnerParagraph.ChildObjects.RemoveAt(j);
                    }
                }
                else if (i == sepOwnerParaIndex)
                {
                    for (int j = sepIndex; j >= 0; j--)
                    {
                        sepOwnerPara.ChildObjects.RemoveAt(j);
                    }
                }
                else
                {
                    field.OwnerParagraph.OwnerTextBody.ChildObjects
                        .RemoveAt(i);
                }
            }
        }

        // Установить цвет текста гиперссылки в черный и удалить подчеркивание
        private static void FormatFieldResultText(
            Body ownerBody,
            int sepOwnerParaIndex,
            int endOwnerParaIndex,
            int sepIndex,
            int endIndex)
        {
            for (int i = sepOwnerParaIndex;
                 i <= endOwnerParaIndex;
                 i++)
            {
                Paragraph para =
                    ownerBody.ChildObjects[i] as Paragraph;

                if (i == sepOwnerParaIndex &&
                    i == endOwnerParaIndex)
                {
                    for (int j = sepIndex + 1; j < endIndex; j++)
                    {
                        FormatText(para.ChildObjects[j] as TextRange);
                    }
                }
                else if (i == sepOwnerParaIndex)
                {
                    for (int j = sepIndex + 1;
                         j < para.ChildObjects.Count;
                         j++)
                    {
                        FormatText(para.ChildObjects[j] as TextRange);
                    }
                }
                else if (i == endOwnerParaIndex)
                {
                    for (int j = 0; j < endIndex; j++)
                    {
                        FormatText(para.ChildObjects[j] as TextRange);
                    }
                }
                else
                {
                    for (int j = 0;
                         j < para.ChildObjects.Count;
                         j++)
                    {
                        FormatText(para.ChildObjects[j] as TextRange);
                    }
                }
            }
        }

        // Установить текст гиперссылки в черный цвет без подчеркивания
        private static void FormatText(TextRange textRange)
        {
            if (textRange == null)
                return;

            textRange.CharacterFormat.TextColor = Color.Black;
            textRange.CharacterFormat.UnderlineStyle =
                UnderlineStyle.None;
        }
    }
}
Шаг 3: Запуск программы
Обновите пути к входной и выходной папкам, поместите файлы DOCX во входную папку и запустите приложение. Очищенные копии будут сохранены в выходной папке с исходными именами файлов.
Для большой партии сначала протестируйте программу на нескольких типичных документах.
Результат:
⚠️ Техническое примечание: Этот фрагмент кода C# нацелен на абзацы верхнего уровня. Если ваши документы содержат гиперссылки, вложенные в таблицы, текстовые поля или колонтитулы, логику обхода следует расширить для рекурсивного сканирования этих дочерних элементов.
Код также сбрасывает цвет текста гиперссылки на черный и удаляет подчеркивание. Если вам нужно только изменить цвет или удалить подчеркивание гиперссылок, не удаляя сами ссылки, вы можете изменить форматирование гиперссылок отдельно.
Бонус: Как запретить Word автоматически создавать гиперссылки
Если проблема в том, что Word постоянно превращает URL-адреса и адреса электронной почты в ссылки при вводе текста, вы можете отключить автоматическое создание гиперссылок, вместо того чтобы постоянно удалять их.
В Word для Windows
-
Нажмите Файл в левом верхнем углу, затем выберите Параметры в нижней части боковой панели.
-
Выберите категорию Правописание на левой панели.
-
Нажмите кнопку Параметры автозамены... в верхней части.
-
Перейдите на вкладку Автоформат при вводе.
-
Снимите флажок рядом с пунктом адреса Интернета и сетевые пути гиперссылками.
-
Нажмите ОК, чтобы применить.
В Word для Mac
-
Нажмите Word в верхней строке меню Apple и выберите Параметры.
-
Откройте инструмент Автозамена в разделе «Авторство».
-
Перейдите на вкладку Автоформат при вводе.
-
Снимите флажок адреса Интернета и сетевые пути гиперссылками.
Изменение этого параметра предотвращает форматирование будущих ссылок при вводе. Это не затронет и не очистит гиперссылки, которые уже сохранены в вашем текущем документе.
Что проверить после удаления гиперссылок
Удаление гиперссылок обычно проходит просто, но после этого стоит проверить несколько деталей, особенно форматирование, динамические поля и ссылки в отдельных областях документа.
-
Проверьте цвет текста и подчеркивание: Если текст остается синим или подчеркнутым, установите цвет шрифта на Авто или подберите его под окружающий текст, а затем при необходимости удалите подчеркивание.
-
Проверьте динамические поля: Если вы использовали сочетание клавиш Ctrl + Shift + F9, проверьте оглавление, перекрестные ссылки и цитаты. Убедитесь, что они случайно не превратились в обычный текст, который нельзя обновить.
-
Проверьте колонтитулы: Ctrl + A не выделяет текст внутри колонтитулов. Дважды щелкните внутри этих областей вручную, чтобы очистить оставшиеся скрытые ссылки.
Часто задаваемые вопросы
В: Удаляет ли удаление гиперссылки отображаемый текст?
О: Нет. Команда Удалить гиперссылку удаляет ссылку, сохраняя отображаемый текст на месте.
В: Как удалить синее подчеркивание, не разрывая ссылку?
О: Выделите гиперссылку, перейдите на вкладку Главная, установите цвет шрифта на Авто или подберите его под окружающий текст, а затем нажмите кнопку Подчеркнутый (или нажмите Ctrl + U), чтобы отключить подчеркивание.
В: Как удалить гиперссылку с изображения в Word?
О: Нажмите правой кнопкой мыши на изображение с гиперссылкой и выберите Удалить гиперссылку. В автоматизированных рабочих процессах гиперссылками на изображениях также можно управлять программно.
В: Можно ли удалить гиперссылки из Word без установки Word?
О: Да. Вы можете открыть и отредактировать файл в браузере с помощью Word для интернета. Для нескольких файлов вы также можете использовать C# с библиотекой, такой как Spire.Doc, для автоматизации удаления.
Заключение
Выбор лучшего способа удаления гиперссылок зависит от контекста вашего редактирования. Для быстрого ручного редактирования идеально подходят встроенные команды Word и сочетания клавиш. Для автоматизированных рабочих процессов или больших коллекций файлов DOCX автоматизация скриптов на C# обеспечивает надежное и масштабируемое решение.
Como converter tabela em texto no Word: guia passo a passo
As tabelas do Word são úteis para organizar dados, mas podem se tornar inconvenientes quando você precisa editar seu conteúdo como texto comum. Se você não precisa mais da estrutura da tabela, pode converter uma tabela em texto usando a ferramenta integrada do Word ou automatizar o processo com Python. Este guia aborda etapas detalhadas para ambos os métodos; vamos conferi-los.
- Converter Tabela em Texto no Word com uma Ferramenta Integrada
- Converter Tabelas do Word em Texto com Python
- Exportar Dados de Tabela para um Arquivo TXT Externo
- Perguntas Frequentes
Converter Tabela em Texto no Word com uma Ferramenta Integrada
O Microsoft Word oferece uma ferramenta integrada para converter tabelas em texto. Se você precisa converter apenas uma ou duas tabelas, a ferramenta integrada geralmente é a opção mais rápida. Ela remove a estrutura da tabela e converte o conteúdo das células em texto comum.
Como transformar uma tabela em texto no MS Word:
- Passo 1: Clique em qualquer lugar dentro da tabela para revelar a guia contextual Layout da Tabela na faixa de opções superior.
- Passo 2: Vá para a guia Layout da Tabela no menu superior e clique no botão Converter em Texto no grupo Dados.
- Passo 3: Selecione o delimitador de sua preferência (tabulações, vírgulas, marcas de parágrafo ou um caractere personalizado) para separar os valores das colunas.
- Passo 4: Clique em OK para transformar a tabela em parágrafos de texto comum instantaneamente.
Converter em Texto vs. Ocultar Bordas
Ocultar bordas da tabela apenas altera a aparência da tabela. As células, colunas e a estrutura da tabela permanecem no lugar, portanto, o conteúdo ainda fica restrito ao layout da tabela.
Converter a tabela em texto remove a estrutura da tabela e transforma o conteúdo das células em parágrafos comuns. Você pode então editar e formatar o conteúdo sem o layout da tabela.
Converter Tabelas do Word em Texto com Python
A ferramenta integrada do Word é conveniente para converter tabelas individuais, mas torna-se menos prática quando você precisa processar muitos documentos ou tabelas. Para desenvolvedores Python, o Free Spire.Doc for Python oferece uma maneira de automatizar a conversão de tabela para texto sem a necessidade de ter o Microsoft Word instalado.
Convertendo uma Tabela em Texto
O script lê o texto de cada célula, une as células na mesma linha com caracteres de tabulação, insere os parágrafos resultantes onde a tabela estava localizada e, em seguida, remove a tabela original.
from spire.doc import *
from spire.doc.documents import *

# Inicializar instância do Documento e carregar o arquivo alvo
doc = Document()
doc.LoadFromFile("input.docx")

# Obter a primeira seção e a tabela alvo
section = doc.Sections[0]
if section.Tables.Count > 0:
    table = section.Tables[0]

    # Extrair texto das células linha por linha
    text_lines = []
    for j in range(table.Rows.Count):
        row = table.Rows.get_Item(j)
        row_cells_text = []
        for k in range(row.Cells.Count):
            cell = row.Cells.get_Item(k)

            # Extrair texto dos parágrafos da célula
            cell_text_pieces = []
            for p in range(cell.Paragraphs.Count):
                para_obj = cell.Paragraphs.get_Item(p)
                if para_obj.Text:
                    cell_text_pieces.append(para_obj.Text.strip())

            row_cells_text.append(" ".join(cell_text_pieces))

        # Unir texto da célula usando separadores de Tabulação
        text_lines.append("\t".join(row_cells_text))

    # Localizar a tabela dentro de seu bloco pai
    owner_block = table.OwnerTextBody
    table_index = owner_block.ChildObjects.IndexOf(table)

    # Inserir novos parágrafos de texto na posição exata da tabela
    for line in reversed(text_lines):
        temp_para = section.AddParagraph()
        temp_para.Text = line
        section.Paragraphs.Remove(temp_para)
        owner_block.ChildObjects.Insert(table_index, temp_para)

    # Remover completamente a estrutura da tabela da estrutura do documento
    owner_block.ChildObjects.Remove(table)

# Salvar o documento atualizado
doc.SaveToFile("1st table to text.docx", FileFormat.Docx2016)
doc.Close()
Nota: Múltiplos parágrafos dentro da mesma célula são combinados em uma única linha separada por espaços.
Processamento em Lote de Todas as Tabelas
Para converter todas as tabelas em um documento em texto, reutilize a lógica de conversão do exemplo anterior e aplique-a a cada tabela em cada seção. Como cada tabela é removida após a conversão, as tabelas devem ser processadas em ordem inversa. Caso contrário, excluir uma tabela altera os índices das tabelas restantes, o que pode fazer com que tabelas sejam ignoradas ou resultar em erros de índice.
from spire.doc import *
from spire.doc.documents import *

# Criar um objeto Document e carregar um arquivo Word
doc = Document()
doc.LoadFromFile("input.docx")

# Iterar por cada seção no documento
for s_idx in range(doc.Sections.Count):
    section = doc.Sections[s_idx]

    # Iterar de trás para frente pelas tabelas para evitar problemas de deslocamento de índice
    table_count = section.Tables.Count
    for t_idx in range(table_count - 1, -1, -1):
        table = section.Tables.get_Item(t_idx)

        # Coletar texto de todas as linhas e células
        text_lines = []
        for j in range(table.Rows.Count):
            row = table.Rows.get_Item(j)
            row_cells_text = []
            for k in range(row.Cells.Count):
                cell = row.Cells.get_Item(k)
                cell_text_pieces = []
                for p in range(cell.Paragraphs.Count):
                    para_obj = cell.Paragraphs.get_Item(p)
                    if para_obj.Text:
                        cell_text_pieces.append(para_obj.Text.strip())
                row_cells_text.append(" ".join(cell_text_pieces))
            text_lines.append("\t".join(row_cells_text))

        # Substituir o nó da tabela por parágrafos simples no local
        owner_block = table.OwnerTextBody
        table_index = owner_block.ChildObjects.IndexOf(table)

        for line in reversed(text_lines):
            temp_para = section.AddParagraph()
            temp_para.Text = line
            section.Paragraphs.Remove(temp_para)
            owner_block.ChildObjects.Insert(table_index, temp_para)

        # Remover com segurança a tabela atual
        owner_block.ChildObjects.Remove(table)

# Salvar o arquivo final
doc.SaveToFile("all tables to text.docx", FileFormat.Docx2016)
doc.Close()
Dica: Exportar Dados de Tabela para um Arquivo TXT Externo
Em muitos fluxos de trabalho de pipeline de dados, o objetivo é obter informações em vez de modificar arquivos de layout originais. Se você precisa apenas de texto tabular para ingestão em banco de dados, registro ou arquivamento de texto simples, é ainda mais fácil. Você pode extrair rapidamente conteúdos brutos das células e gravá-los diretamente em um arquivo de texto externo com o Free Spire.Doc.
Exemplo de Código
from spire.doc import *
from spire.doc.common import *

# Criar uma instância de Documento
doc = Document()

# Carregar um documento Word
doc.LoadFromFile("input.docx")

# Obter a primeira tabela
table = doc.Sections[0].Tables[0]

# Extrair texto da tabela
tableData = ''
for j in range(table.Rows.Count):
    row = table.Rows.get_Item(j)

    for k in range(row.Cells.Count):
        cell = row.Cells.get_Item(k)

        for p in range(cell.Paragraphs.Count):
            tableData += cell.Paragraphs.get_Item(p).Text + ' '

        if k < row.Cells.Count - 1:
            tableData += '\t'

    tableData += '\n'

# Salvar o texto extraído em um arquivo TXT
with open("/table_text.txt", "w", encoding="utf-8") as f:
    f.write(tableData)

doc.Close()
Dica: Para dados tabulares estruturados, você também pode converter tabelas do Word para CSV para uso em planilhas, bancos de dados e outros fluxos de trabalho de processamento de dados.
Perguntas Frequentes
Q1: O que devo fazer se o texto convertido parecer desalinhado?
O uso de tabulações (\t) preserva melhor o espaçamento estrutural. Se o alinhamento das colunas ainda parecer irregular no Word, selecione os parágrafos convertidos e ajuste as Paradas de Tabulação na régua horizontal.
Q2: Como posso converter texto de volta para uma tabela no Word?
Para reverter o processo, destaque seu texto, vá para Inserir > Tabela e clique em Converter Texto em Tabela. Selecione o delimitador correspondente (por exemplo, tabulações ou vírgulas) para reconstruir sua tabela.
Q3: Qual é a tecla de atalho para converter uma tabela em texto no Word?
O Microsoft Word não oferece um atalho de teclado dedicado para Converter em Texto. Você pode acessar o comando através da Faixa de Opções ou personalizar um atalho através das configurações de teclado do Word.
Resumo
Este artigo apresentou duas maneiras de converter tabelas em documentos Word para texto. A ferramenta integrada do Word funciona bem para tabelas individuais ou um pequeno número de documentos, enquanto o Free Spire.Doc for Python é mais adequado para o processamento automatizado de várias tabelas. Você também pode extrair conteúdos de tabelas para um arquivo TXT para armazenamento em texto simples ou processamento posterior.
Leia Também:
Word에서 표를 텍스트로 변환하는 방법: 단계별 가이드
Word 표는 데이터를 정리하는 데 유용하지만, 내용을 일반 텍스트로 편집해야 할 때는 불편할 수 있습니다. 더 이상 표 구조가 필요하지 않은 경우 Word의 내장 도구를 사용하여 표를 텍스트로 변환하거나 Python으로 프로세스를 자동화할 수 있습니다. 이 가이드에서는 두 가지 방법에 대한 자세한 단계를 설명합니다. 함께 살펴보겠습니다.
내장 도구를 사용하여 Word에서 표를 텍스트로 변환하기
Microsoft Word는 표를 텍스트로 변환하는 내장 도구를 제공합니다. 한두 개의 표만 변환해야 하는 경우 내장 도구가 가장 빠른 옵션입니다. 표 구조를 제거하고 셀 내용을 일반 텍스트로 변환합니다.
MS Word에서 표를 텍스트로 변경하는 방법:
- 1단계: 표 내부의 아무 곳이나 클릭하여 상단 리본 메뉴에 표 레이아웃 탭이 나타나게 합니다.
- 2단계: 상단 메뉴의 표 레이아웃 탭으로 이동하여 데이터 그룹에서 텍스트로 변환 버튼을 클릭합니다.
- 3단계: 열 값을 구분할 원하는 구분 기호(탭, 쉼표, 단락 기호 또는 사용자 지정 문자)를 선택합니다.
- 4단계: 확인을 클릭하면 표가 즉시 일반 텍스트 단락으로 변환됩니다.
텍스트로 변환 vs. 테두리 숨기기
표 테두리를 숨기면 표의 외관만 변경됩니다. 셀, 열 및 표 구조는 그대로 유지되므로 콘텐츠는 여전히 표 레이아웃에 의해 제한됩니다.
표를 텍스트로 변환하면 표 구조가 제거되고 셀 내용이 일반 단락으로 바뀝니다. 그런 다음 표 레이아웃 없이 콘텐츠를 편집하고 서식을 지정할 수 있습니다.
Python으로 Word 표를 텍스트로 변환하기
Word의 내장 도구는 개별 표를 변환하는 데 편리하지만, 많은 문서나 표를 처리해야 할 때는 실용성이 떨어집니다. Python 개발자의 경우 Free Spire.Doc for Python을 사용하면 Microsoft Word를 설치하지 않고도 표에서 텍스트로의 변환을 자동화할 수 있습니다.
표를 텍스트로 변환하기
스크립트는 각 셀의 텍스트를 읽고, 동일한 행의 셀을 탭 문자로 연결하고, 결과 단락을 표가 있던 위치에 삽입한 다음 원래 표를 제거합니다.
from spire.doc import *
from spire.doc.documents import *

# Initialize Document instance and load the target file
doc = Document()
doc.LoadFromFile("input.docx")

# Get the first section and target table
section = doc.Sections[0]
if section.Tables.Count > 0:
    table = section.Tables[0]

    # Extract text from cells line by line
    text_lines = []
    for j in range(table.Rows.Count):
        row = table.Rows.get_Item(j)
        row_cells_text = []
        for k in range(row.Cells.Count):
            cell = row.Cells.get_Item(k)

            # Extract text from cell paragraphs
            cell_text_pieces = []
            for p in range(cell.Paragraphs.Count):
                para_obj = cell.Paragraphs.get_Item(p)
                if para_obj.Text:
                    cell_text_pieces.append(para_obj.Text.strip())

            row_cells_text.append(" ".join(cell_text_pieces))

        # Join cell text using Tab separators
        text_lines.append("\t".join(row_cells_text))

    # Locate the table inside its parent block
    owner_block = table.OwnerTextBody
    table_index = owner_block.ChildObjects.IndexOf(table)

    # Insert new text paragraphs at the exact table position
    for line in reversed(text_lines):
        temp_para = section.AddParagraph()
        temp_para.Text = line
        section.Paragraphs.Remove(temp_para)
        owner_block.ChildObjects.Insert(table_index, temp_para)

    # Completely remove the table structure from the document structure
    owner_block.ChildObjects.Remove(table)

# Save the updated document
doc.SaveToFile("1st table to text.docx", FileFormat.Docx2016)
doc.Close()
참고: 동일한 셀 내의 여러 단락은 공백으로 구분된 단일 행으로 결합됩니다.
모든 표 일괄 처리하기
문서의 모든 표를 텍스트로 변환하려면 이전 예제의 변환 로직을 재사용하여 모든 섹션의 모든 표에 적용합니다. 변환 후 각 표가 제거되므로 표는 역순으로 처리해야 합니다. 그렇지 않으면 표를 삭제할 때 남은 표의 인덱스가 이동하여 표가 누락되거나 인덱스 오류가 발생할 수 있습니다.
from spire.doc import *
from spire.doc.documents import *

# Create a Document object and load a Word file
doc = Document()
doc.LoadFromFile("input.docx")

# Iterate through every section in the document
for s_idx in range(doc.Sections.Count):
    section = doc.Sections[s_idx]

    # Iterate backwards through tables to avoid index shifting issues
    table_count = section.Tables.Count
    for t_idx in range(table_count - 1, -1, -1):
        table = section.Tables.get_Item(t_idx)

        # Collect text from all rows and cells
        text_lines = []
        for j in range(table.Rows.Count):
            row = table.Rows.get_Item(j)
            row_cells_text = []
            for k in range(row.Cells.Count):
                cell = row.Cells.get_Item(k)
                cell_text_pieces = []
                for p in range(cell.Paragraphs.Count):
                    para_obj = cell.Paragraphs.get_Item(p)
                    if para_obj.Text:
                        cell_text_pieces.append(para_obj.Text.strip())
                row_cells_text.append(" ".join(cell_text_pieces))
            text_lines.append("\t".join(row_cells_text))

        # Replace the table node with plain paragraphs in-place
        owner_block = table.OwnerTextBody
        table_index = owner_block.ChildObjects.IndexOf(table)

        for line in reversed(text_lines):
            temp_para = section.AddParagraph()
            temp_para.Text = line
            section.Paragraphs.Remove(temp_para)
            owner_block.ChildObjects.Insert(table_index, temp_para)

        # Safely remove the current table
        owner_block.ChildObjects.Remove(table)

# Save the final file
doc.SaveToFile("all tables to text.docx", FileFormat.Docx2016)
doc.Close()
팁: 표 데이터를 외부 TXT 파일로 내보내기
많은 데이터 파이프라인 워크플로에서 목표는 원본 레이아웃 파일을 수정하는 것보다 정보를 얻는 것입니다. 데이터베이스 수집, 로깅 또는 일반 텍스트 보관을 위한 표 형식의 텍스트만 필요한 경우에는 훨씬 더 간단합니다. Free Spire.Doc을 사용하면 원본 셀 내용을 신속하게 추출하여 외부 텍스트 파일에 직접 입력할 수 있습니다.
코드 예제
from spire.doc import *
from spire.doc.common import *

# Create a Document instance
doc = Document()

# Load a Word document
doc.LoadFromFile("input.docx")

# Get the first table
table = doc.Sections[0].Tables[0]

# Extract table text
tableData = ''
for j in range(table.Rows.Count):
    row = table.Rows.get_Item(j)

    for k in range(row.Cells.Count):
        cell = row.Cells.get_Item(k)

        for p in range(cell.Paragraphs.Count):
            tableData += cell.Paragraphs.get_Item(p).Text + ' '

        if k < row.Cells.Count - 1:
            tableData += '\t'

    tableData += '\n'

# Save the extracted text to a TXT file
with open("/table_text.txt", "w", encoding="utf-8") as f:
    f.write(tableData)

doc.Close()
팁: 구조화된 표 형식 데이터의 경우, 스프레드시트, 데이터베이스 및 기타 데이터 처리 워크플로에서 사용할 수 있도록 Word 표를 CSV로 변환할 수도 있습니다.
자주 묻는 질문
Q1: 변환된 텍스트가 정렬되지 않은 것처럼 보이면 어떻게 해야 하나요?
탭(\t)을 사용하면 구조적 간격이 가장 잘 유지됩니다. Word에서 열 정렬이 여전히 고르지 않게 보이면 변환된 단락을 선택하고 가로 자에서 탭 정지 위치를 조정하세요.
Q2: Word에서 텍스트를 다시 표로 변환하려면 어떻게 해야 하나요?
프로세스를 되돌리려면 텍스트를 강조 표시하고 삽입 > 표로 이동한 다음 텍스트를 표로 변환을 클릭합니다. 일치하는 구분 기호(예: 탭 또는 쉼표)를 선택하여 표를 다시 만듭니다.
Q3: Word에서 표를 텍스트로 변환하는 단축키는 무엇인가요?
Microsoft Word는 텍스트로 변환에 대한 전용 키보드 단축키를 제공하지 않습니다. 리본 메뉴를 통해 명령에 액세스하거나 Word의 키보드 설정을 통해 단축키를 사용자 지정할 수 있습니다.
요약
이 문서에서는 Word 문서의 표를 텍스트로 변환하는 두 가지 방법을 소개했습니다. Word의 내장 도구는 개별 표나 적은 수의 문서에 적합하며, Free Spire.Doc for Python은 여러 표의 자동 처리 작업에 더 적합합니다. 표 내용을 TXT 파일로 추출하여 일반 텍스트 저장 또는 추가 처리에 활용할 수도 있습니다.